AI Summary
Have you ever wondered how to view Stripe transaction history in WordPress? Need a complete overview of your financial activities?
With the digital boom and the rise of eCommerce, tracking your Stripe transactions becomes essential for monitoring your profits.
In this guide, we’ll teach you how to stay on top of your Stripe financial activities right from the heart of your WordPress dashboard.
View Stripe Transaction History with WPForms
How to View Stripe Transaction History in WordPress
You can easily view Stripe transaction history in WordPress using WPForms’ native Stripe integration. Follow the steps below to get started:
In This Article
1. Install and Activate WPForms
WPForms simplifies the form creation process on your WordPress site. Seamlessly integrating with Stripe and numerous other payment solutions, it is an excellent choice for WordPress payment plugins.
Moreover, the free WPForms Lite plugin creates a successful connection between your purchase forms and Stripe, imposing a minimal charge of 3% per transaction, in addition to the standard Stripe fees.
To avoid those pesky extra charges, consider upgrading to WPForms Pro. This will save you money in the long term and gain access to many advanced features like conditional logic, premium templates, addons, and more.
For all license levels, though, including those using WPForms Lite, there’s the advantage of utilizing webhooks for a two-way connection to Stripe, allowing you to view a detailed transaction record for each subscription within WPForms.

After selecting your preferred WPForms subscription, download and activate the plugin on your WordPress website.
Good job! Now it’s time to connect Stripe to WPForms and turn on Stripe webhooks so that your website and Stripe actions are in sync.
2. Connect Stripe to Your WordPress Site
First, navigate to WPForms » Settings from your WordPress dashboard’s left sidebar. Next, click on the Payments section.
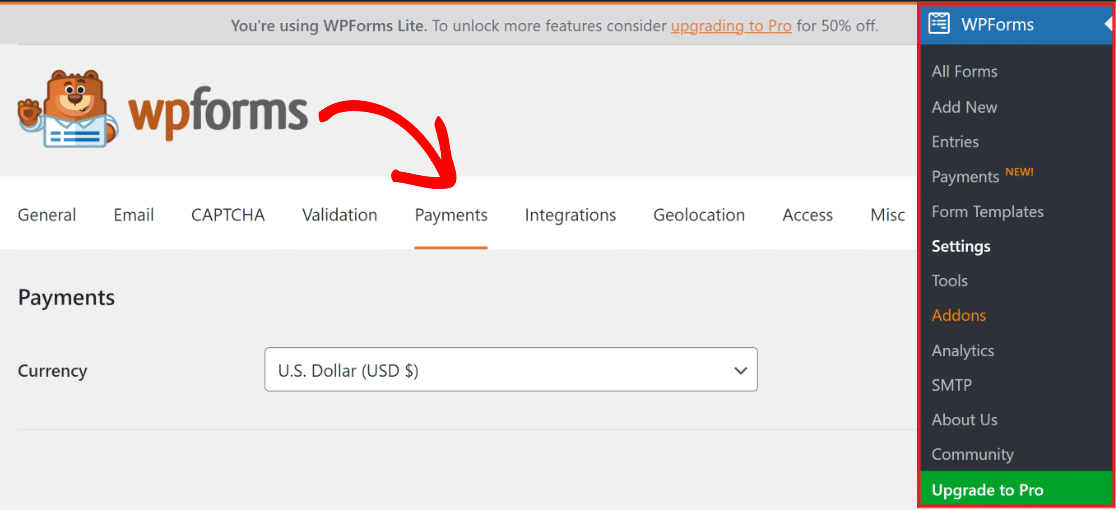
Looking to change your site’s transaction currency? Pick your preferred Currency from the dropdown list before moving forward.

Once you’re ready to integrate Stripe payment forms into your WordPress store, scroll down and click the blue Connect with Stripe button.
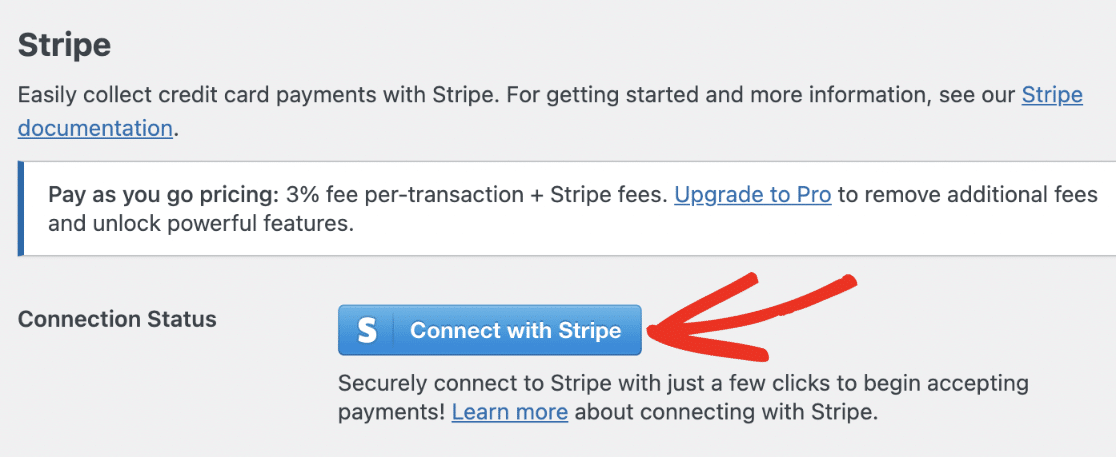
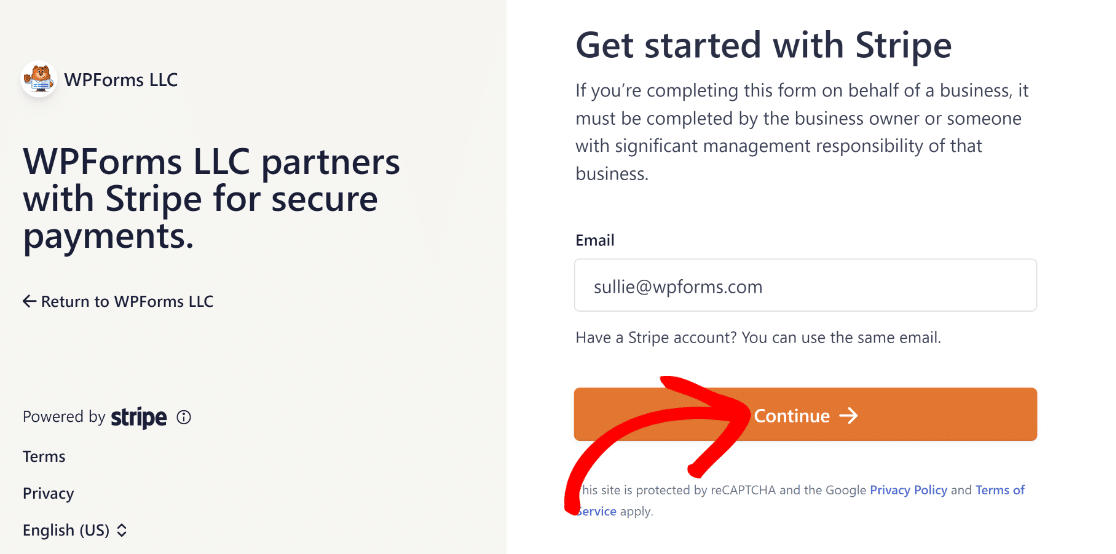
You’ll now be prompted to enter your Stripe credentials to connect WPForms with your Stripe profile. Don’t have an account? Consider creating one now.
After finishing the Stripe Connect process, go to WPForms » Settings » Payments and a green check mark should appear next to Connection Status.

Next, in order to manage your Stripe payments from a single dashboard, you will have to create a two-way connection to Stripe by enabling webhooks.
3. Enable Stripe Webhook in Payments Settings
When you connect your WPForms account to Stripe, a toggle option to Enable Webhooks will be displayed.
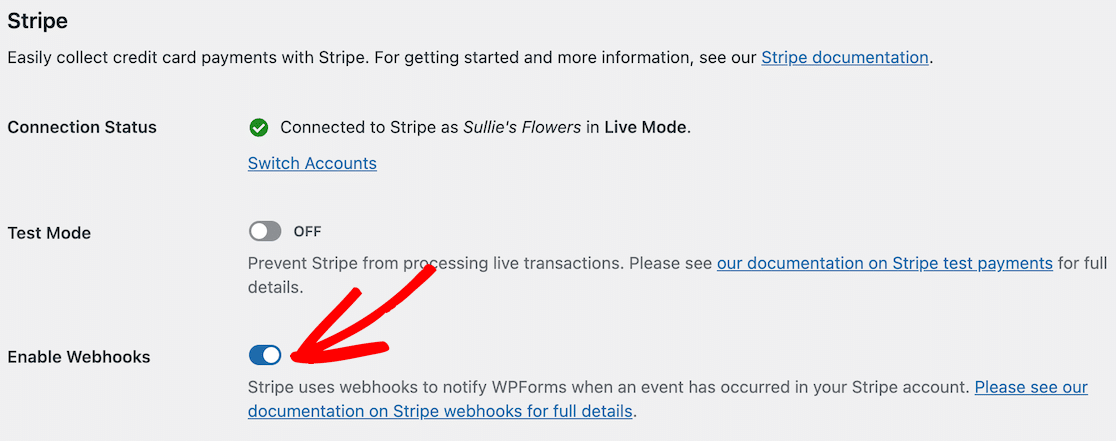
Note: Once you connect your website to Stripe, the webhook sets itself automatically. It’ll attempt this auto-setup a few times behind the scenes.
Yet, on rare occasions, the autoconfiguration may not work for your account. If that happens, WPForms will show you how to configure it manually.
You’ll need to make an endpoint from the Stripe dashboard and copy the configuration keys to WPForms to set up the Stripe webhook manually.
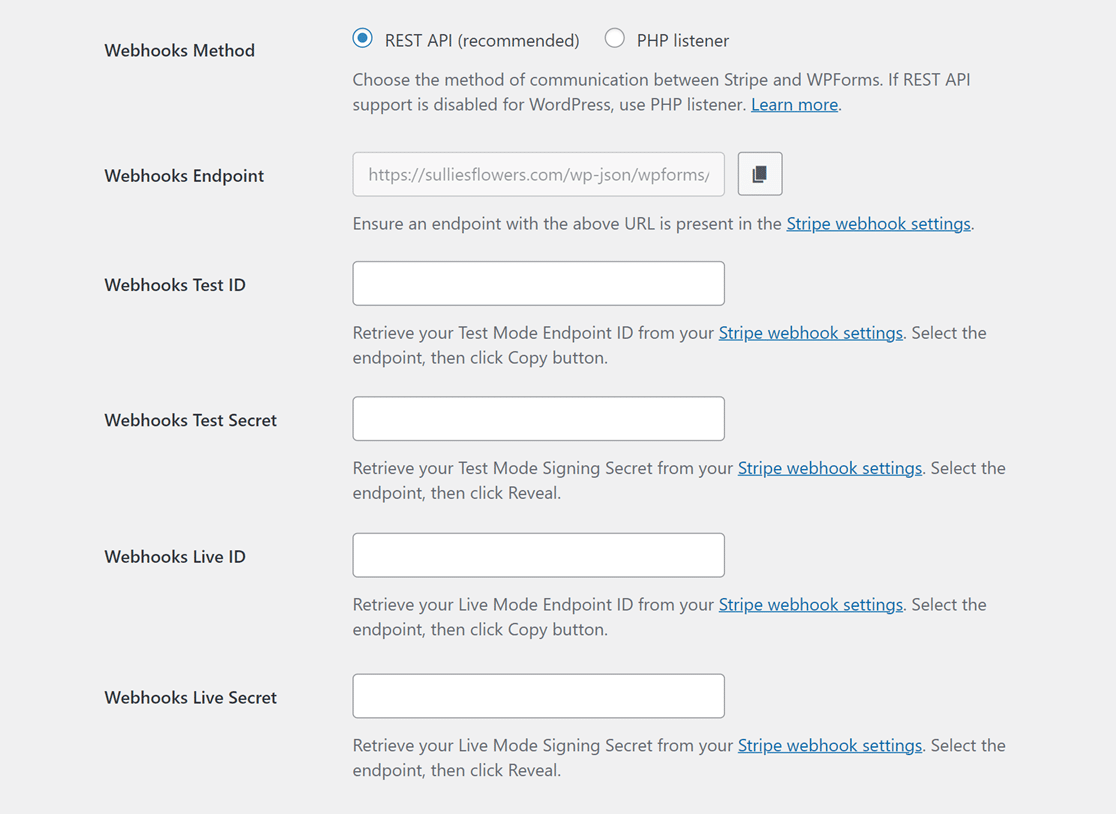
Note: You’ll need separate setups for both Live and Test modes. Use the Webhooks Test ID and Webhooks Test Secret fields for Test Mode.
Use the Webhooks Live ID and Webhooks Live Secret fields for Live Mode. Make sure your site’s mode matches Stripe’s settings.
You can then switch between Live and Test synchronization modes by visiting*domain*/wp-admin/admin.php?page=wpforms-settings&view=payments&webhooks_settings.
4. Access Detailed Stripe Payment Reports
Once you’re set to accept payments with Stripe and WPForms, you can do many tasks without often visiting the Stripe dashboard.
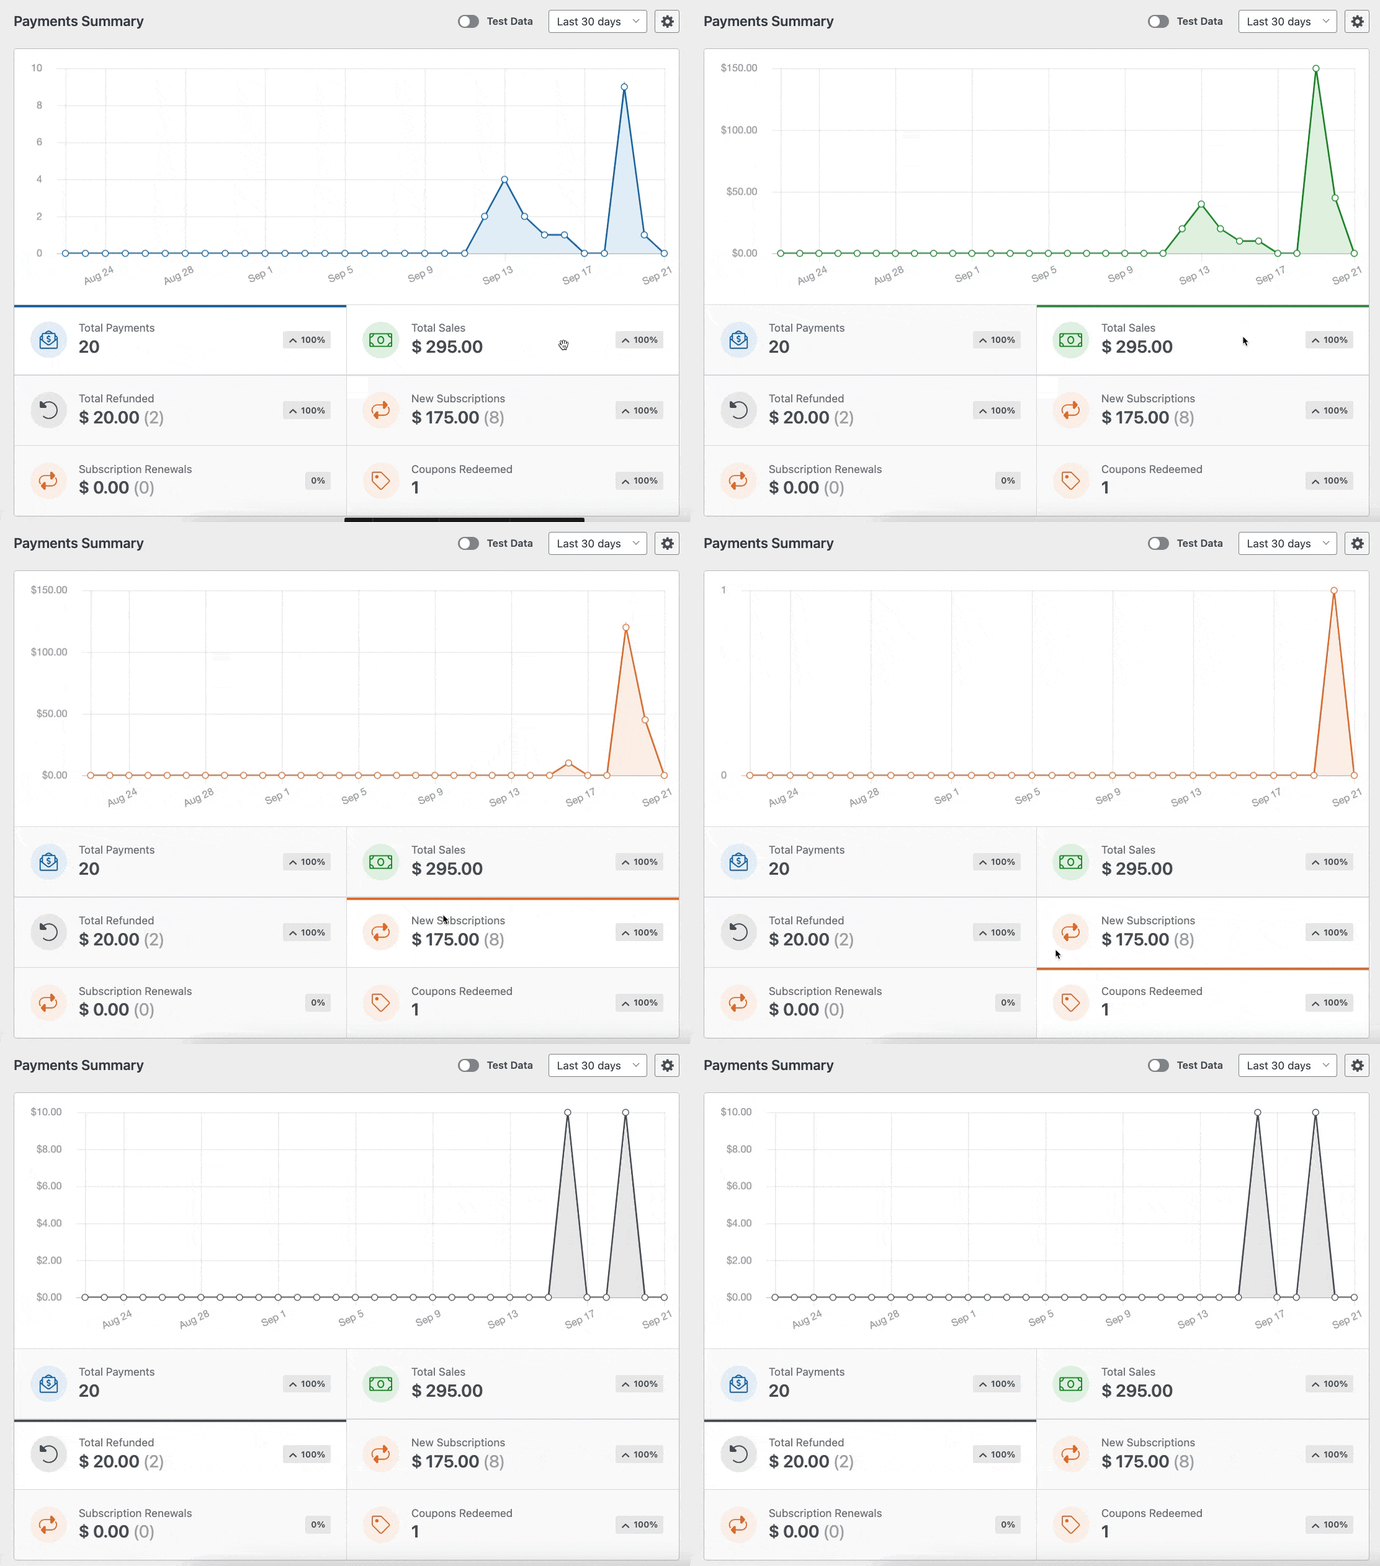
For example, to see all your WPForms payments in your WordPress dashboard, head over to WPForms » Payments and click the Overview option.
If you click on the choices below the graph, you can change what it shows and get to the data you’re most interested in quickly, such as:
- Total Payments
- Total Sales
- Total Refunded
- New Subscriptions
- Subscription Renewals
- Coupons Redeemed
Additionally, you can filter payments using the dropdowns at the top of the payments table. These options include:
- All types: This covers both single-time and recurring payments.
- All gateways: This refers to how the transaction was completed, with options being PayPal Standard, PayPal Commerce, Stripe, Square, or Authorize.net.
- All subscriptions: The current status of the payment, which may be one of the following: Active, Cancelled, or Not Synced.

Note: You can only use the All gateways filter option in WPForms if you have enabled multiple payment gateways.
Next, click on the payer’s name or email address under the Payment column for more information about a specific payment.

Now, you’ll have the convenience of accessing all the essential details or performing specific actions about that payment on its very own page.
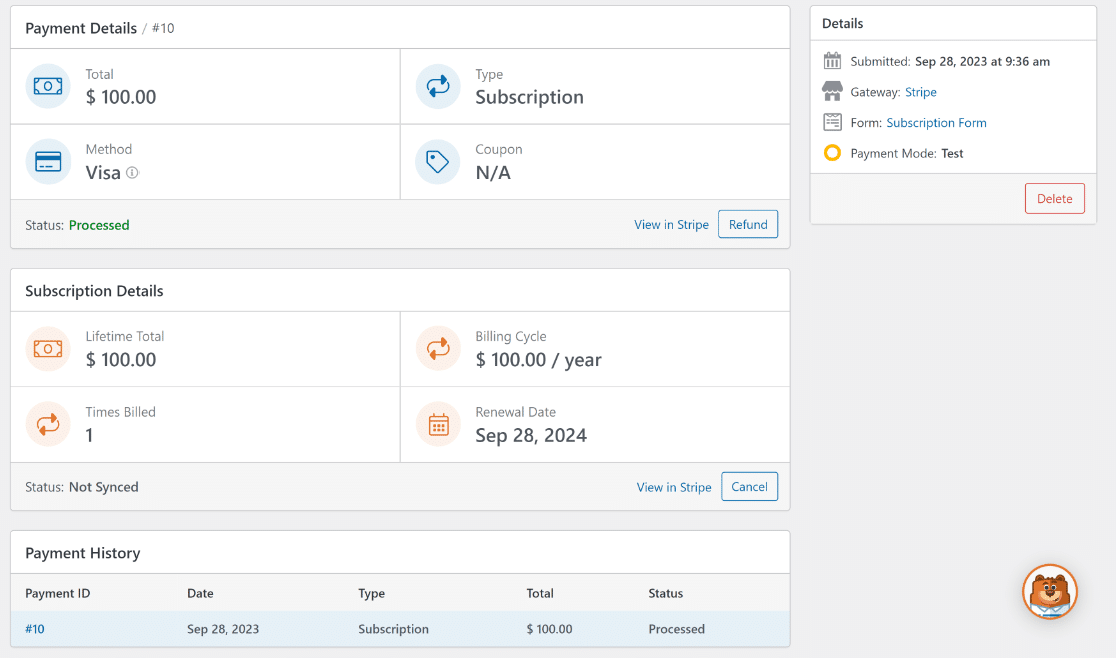
You can click on View in Stripe if you need to see the payment information from the respective payment gateway website.

Or, click on the Refund button if you want to start the refund process or check the refund status through the payment gateway for that payment.

If required, you can also terminate a subscription from the WordPress dashboard by clicking the Cancel button next to the relevant payment.

Note: In the View in Stripe option, the text “Stripe” will change to the name of the payment gateway the user has made the payment from.
5. View Transaction History Reports in WordPress
If you need to monitor recurring payments, WPForms shows a transaction history every time a recurring payment is billed with the Stripe payment gateway.
You can view this information on any subscription payment’s individual page and see the real-time status of all transactions, including its:
- Lifetime Total
- Billing Cycle
- Times Billed
- Renewal Date
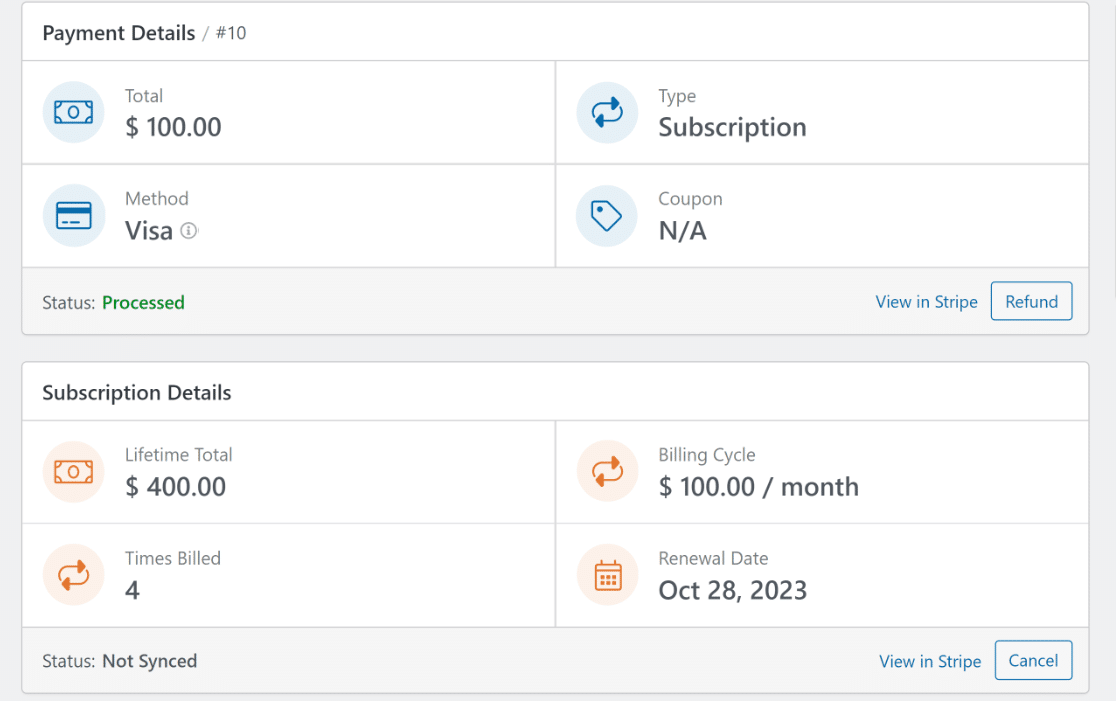
For a more detailed look, you can even scroll down to the Payment History section to see the specific dates the subscriptions were processed.

After this, you’ll find the Entry Summary section. It shows all of the checkout form’s fields and the entry information that goes with the credit card payment.
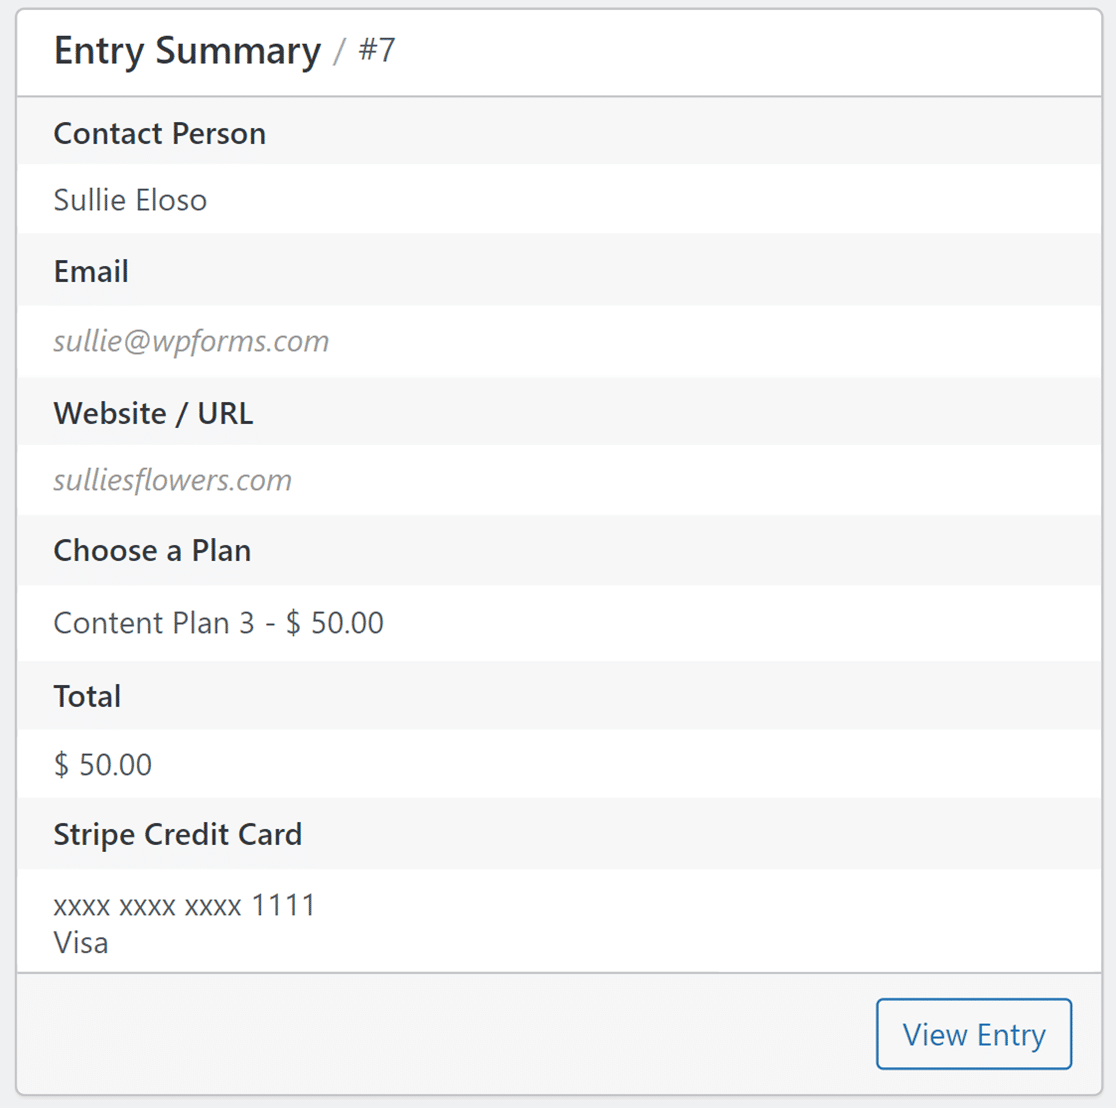
To see more about this entry, click the View Entry button in the bottom right corner to view the individual entry page for that specific form entry.
Note: Any user can access the Entry Summary. However, only those with a Basic license or higher can use the View Entry button to view the entry thoroughly.
More Questions about Stripe Transaction History in WordPress
Viewing Stripe transaction history in WordPress is a popular topic among our readers. Here are answers to some common queries about it.
How do I check my Stripe payment history?
To check your Stripe payment history, log in to your Stripe.com account. On the dashboard, navigate to Payments. Here, you’ll see a list of all transactions. For a better experience in WordPress, consider using WPForms’ native Stripe integration to view transactions directly from your WordPress dashboard.
How do I integrate Stripe payments in WordPress?
Integrating Stripe payments in WordPress is straightforward with WPForms. Install and activate the WPForms plugin. Go to the Settings option and click on Payments. Here, you’ll find an option to connect with Stripe. Once connected, you can easily accept subscriptions via Stripe on your WordPress site.
How do I get a statement from Stripe?
To get a statement from Stripe, head over to your Stripe account. From there, go to the Balance section, then Payouts. Choose the specific period you want the statement for and download it. If you’re managing Stripe transactions within WordPress, WPForms’ Stripe integration can make tracking and organizing payments even simpler.
How do I add Stripe Webhooks to WordPress?
Adding Stripe Webhooks to WordPress is easier than you might think, especially with WPForms. After setting up your Stripe integration with WPForms, it will automatically handle the webhook configuration. In rare instances where manual setup is needed, you can find the endpoint in your Stripe dashboard and copy the keys to WPForms.
Next, Choose Your Perfect Site Payment Solution
Are you confused about whether to opt for Stripe or another payment method like Square? Check out our detailed comparison of Square and Stripe to quickly determine which is right for you based on your business needs.
View Stripe Transaction History with WPForms
Ready to build your form and accept Stripe payments? Get started today with the easiest WordPress form builder plugin. WPForms Pro includes lots of free templates and offers a 14-day money-back guarantee.
If this article helped you out, please follow us on Facebook and Twitter for more free WordPress tutorials and guides.

