AI Summary
Ever wondered how to integrate a WordPress Stripe webhook for a smooth online payment process?
By harnessing the capabilities of Stripe webhooks, you can step up your payment game and ensure a seamless user experience.
This tutorial will teach you how to integrate Stripe webhooks with WPForms in a snap, keeping your site in sync with your Stripe activities.
Set Up Stripe Webhook with WPForms
How to Set Up Stripe Webhooks (Without WooCommerce)
You can easily set up Stripe webhooks using WPForms’ native Stripe integration. Follow the steps below to get started:
In This Article
1. Installing and Activating WPForms
WPForms makes it easy to create forms on your site. It works with Stripe and other payment platforms, making it one of the best WordPress payment plugins.
In addition, the free WPForms plugin makes it easy to connect your order forms with Stripe, charging a nominal 3% fee per transaction + Stripe fees.
All license levels, including WPForms Lite customers, can also use webhook for a two-way connection to Stripe, which is less complicated and time-consuming than WooCommerce.
If you want to remove the additional fees, you can upgrade to WPForms Pro to save costs in the long run and access more advanced features.
Once you’ve chosen your WPForms version and are ready to proceed, download and activate the plugin on your WordPress website!
Great! Now, it’s time to set up the Stripe connection with WPForms and enable Stripe webhooks to sync your website with your Stripe activities.
2. Connecting Stripe to Your WordPress Site
To start, you’ll need to open WPForms » Settings in the left menu of your WordPress dashboard. From there, click on the Payments tab.
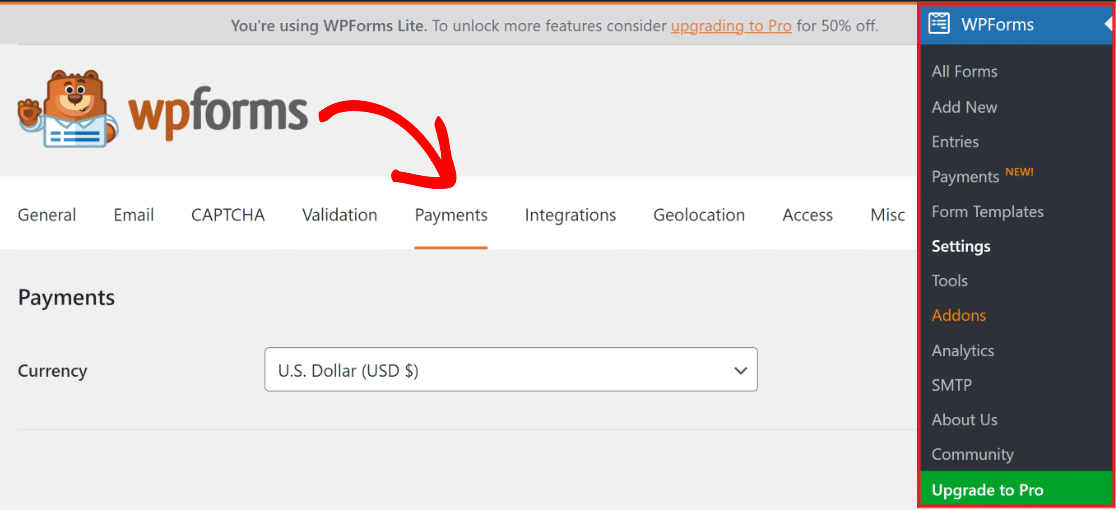
If you want to change the currency used on your site, select the desired currency from the drop-down menu before proceeding.

Once you’re ready to integrate Stripe payments into your platform, scroll down and click the blue Connect with Stripe button.
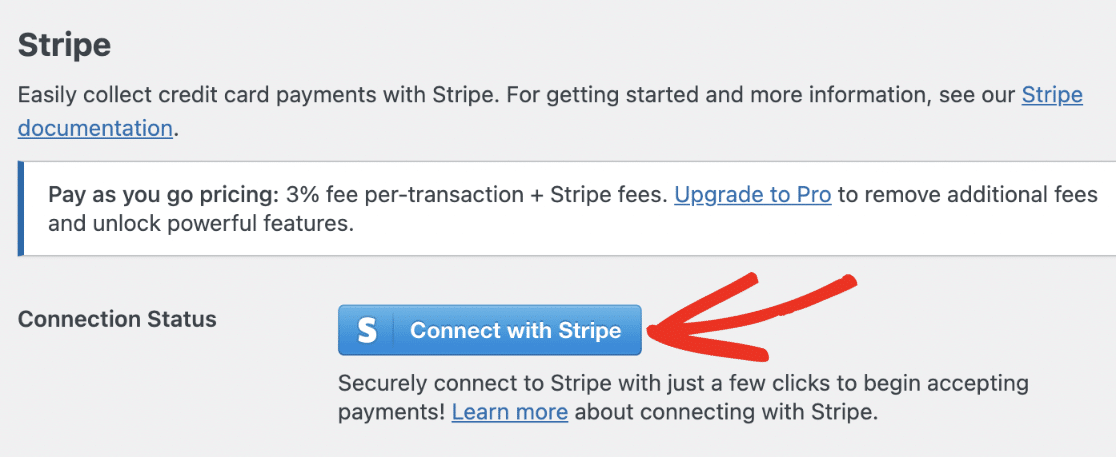
After that, you will need to enter your Stripe login details in order to connect your Stripe account with WPForms. If you don’t have a Stripe account, now might be a good time to create one.
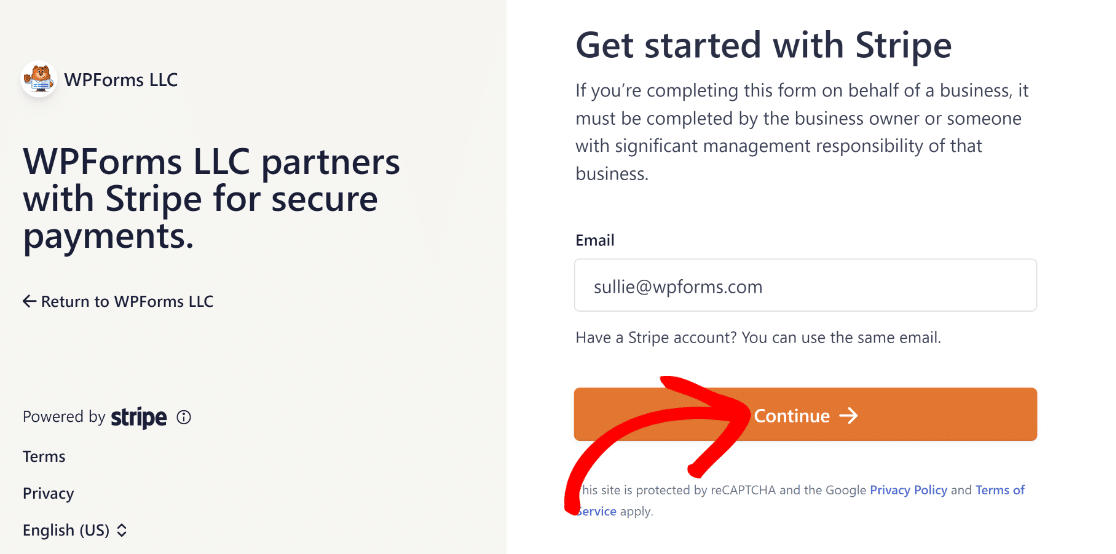
After following all the steps in the Stripe Connect wizard, you’ll be redirected back to your site’s admin area. Here, you should see a green checkmark next to Connection Status.

Note: The webhook will configure automatically when you connect your site to Stripe. It will try the autoconfiguration several times in the background.
However, in some rare cases, the autoconfiguration may not work for your account. So, WPForms will then display fields to set it up manually.
To set up the Stripe webhook manually, you’ll need to create an endpoint in the Stripe dashboard and copy the configuration keys to WPForms.
3. Setting Up Stripe Webhook Manually
To do this, navigate to WPForms » Settings in the WordPress site’s menu on the left. Click on the Payments tab.
Next, scroll down until you reach the area labeled Stripe. To begin, toggle the Enable Webhooks option from here.
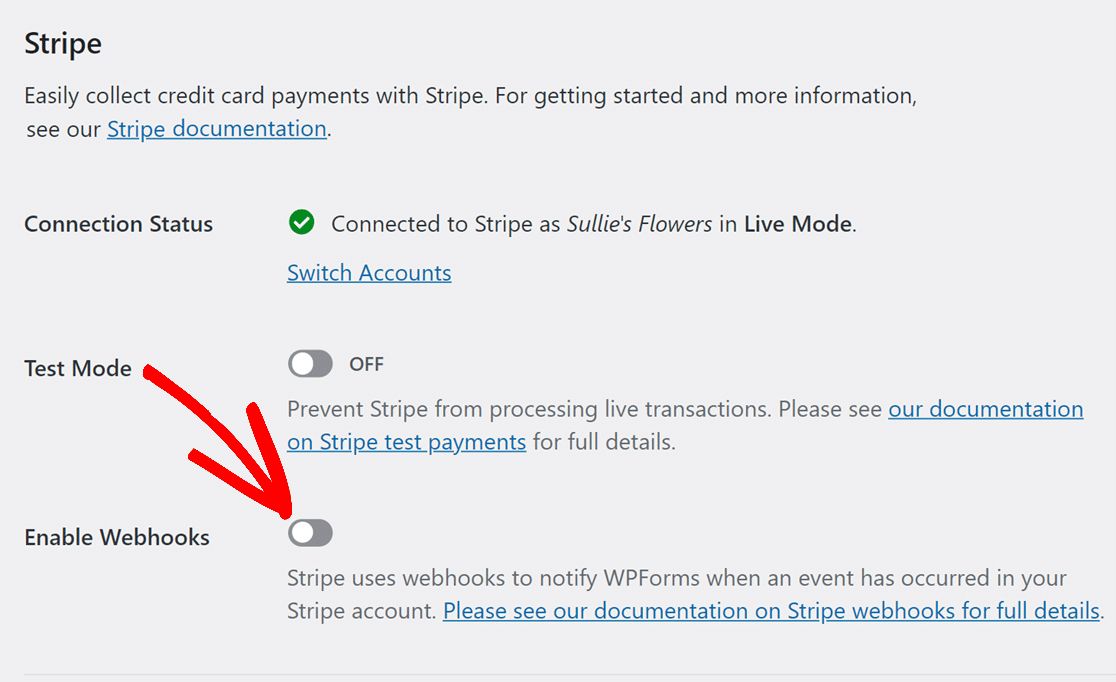
Then, at the bottom of the page, click Save Settings. The page will now refresh, and you should be able to see additional fields for further webhooks configuration.
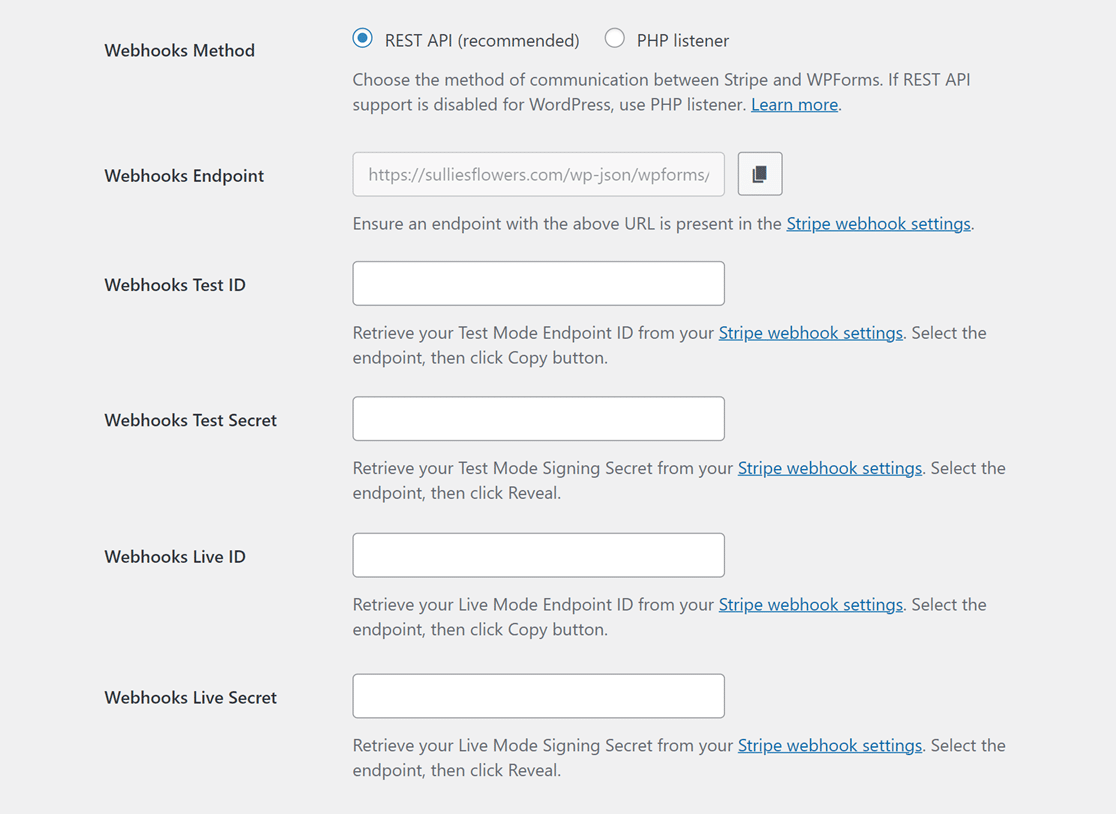
You may utilize your Stripe account to make a new endpoint, which will provide you with the data you require for these fields.
Note: Individual setups are required for the Live and Test modes. Use the Webhooks Test ID and Webhooks Test Secret fields for Test Mode.
Use the Webhooks Live ID and Webhooks Live Secret fields for Live Mode. Make sure your site’s mode matches Stripe’s settings.
You can then switch between Live and Test synchronization modes by visiting*domain*/wp-admin/admin.php?page=wpforms-settings&view=payments&webhooks_settings.
4. Creating a Webhook Endpoint in Stripe
Log in to your Stripe account and access your Stripe dashboard from a new tab so you can return to the WPForms Settings page later.
When you log in to your Stripe account, a Test mode toggle button will appear in the top-right corner of the page.
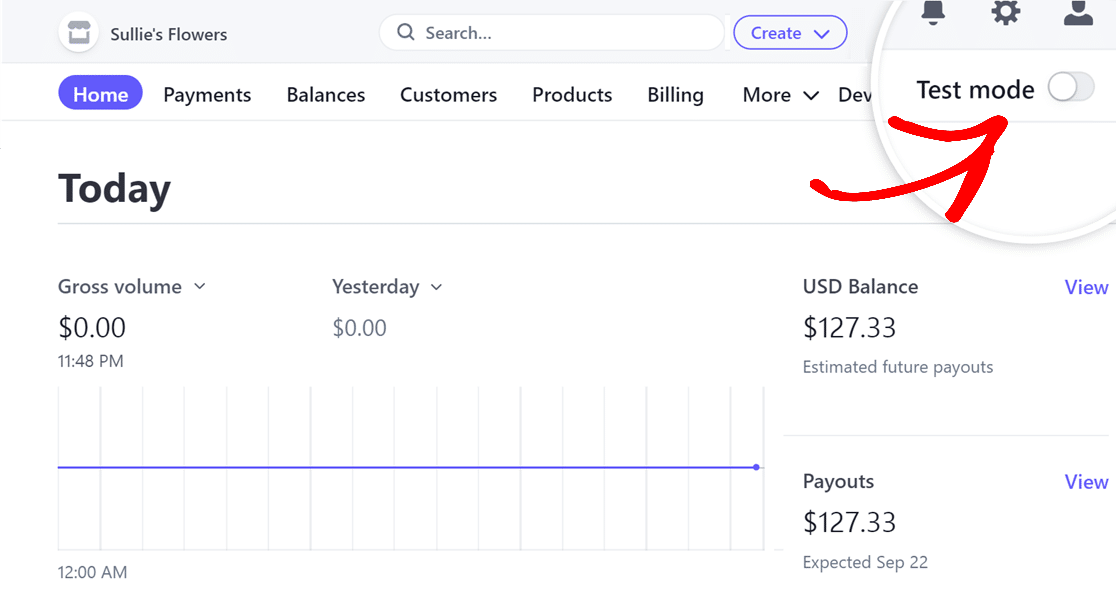
Note: If you’re in Test Mode, the toggle should be turned ON, and if you’re in Live Mode, it should be turned OFF.
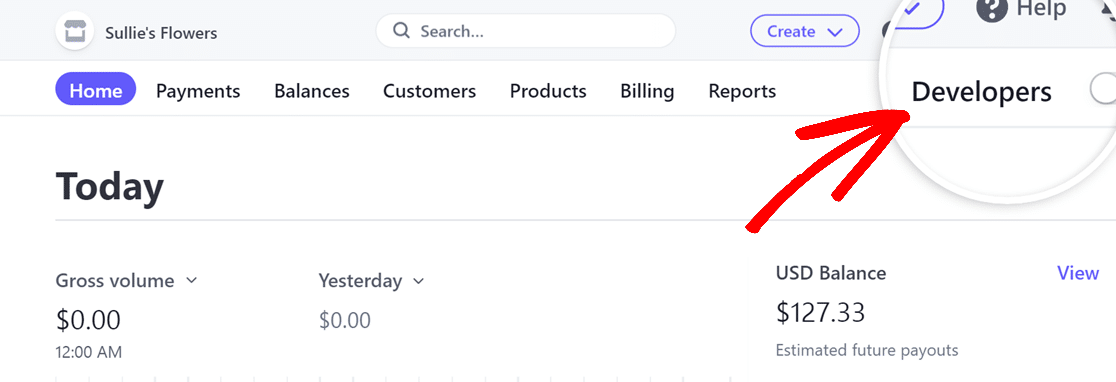
To continue, you’ll want to navigate to the Developers option, which can be found in the upper-right corner of the page.
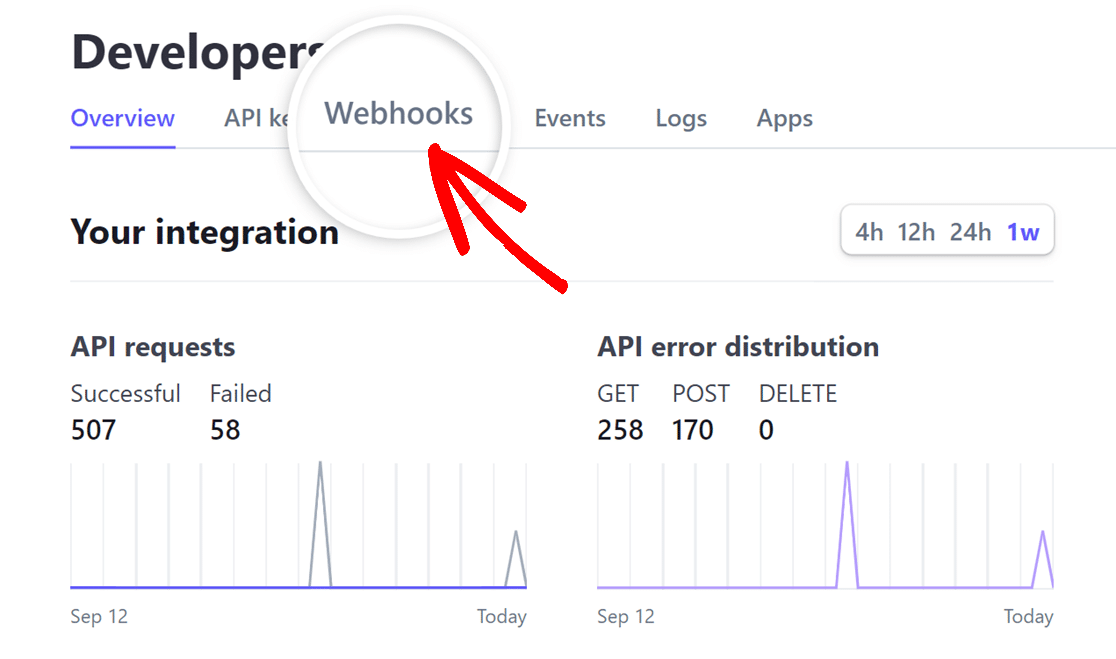
After you have opened the Developers page, simply navigate to the Webhooks tab and click on it.
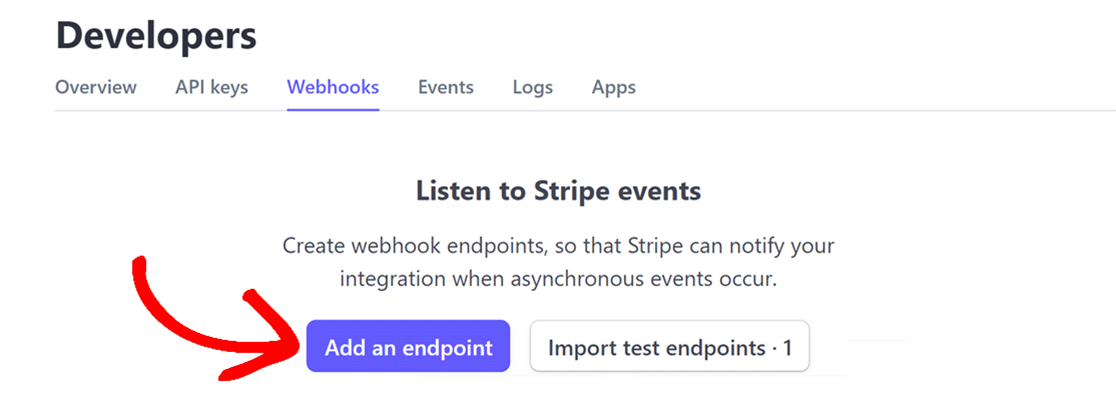
Next, click the Add an endpoint icon in the Webhooks page to create a new webhook endpoint.
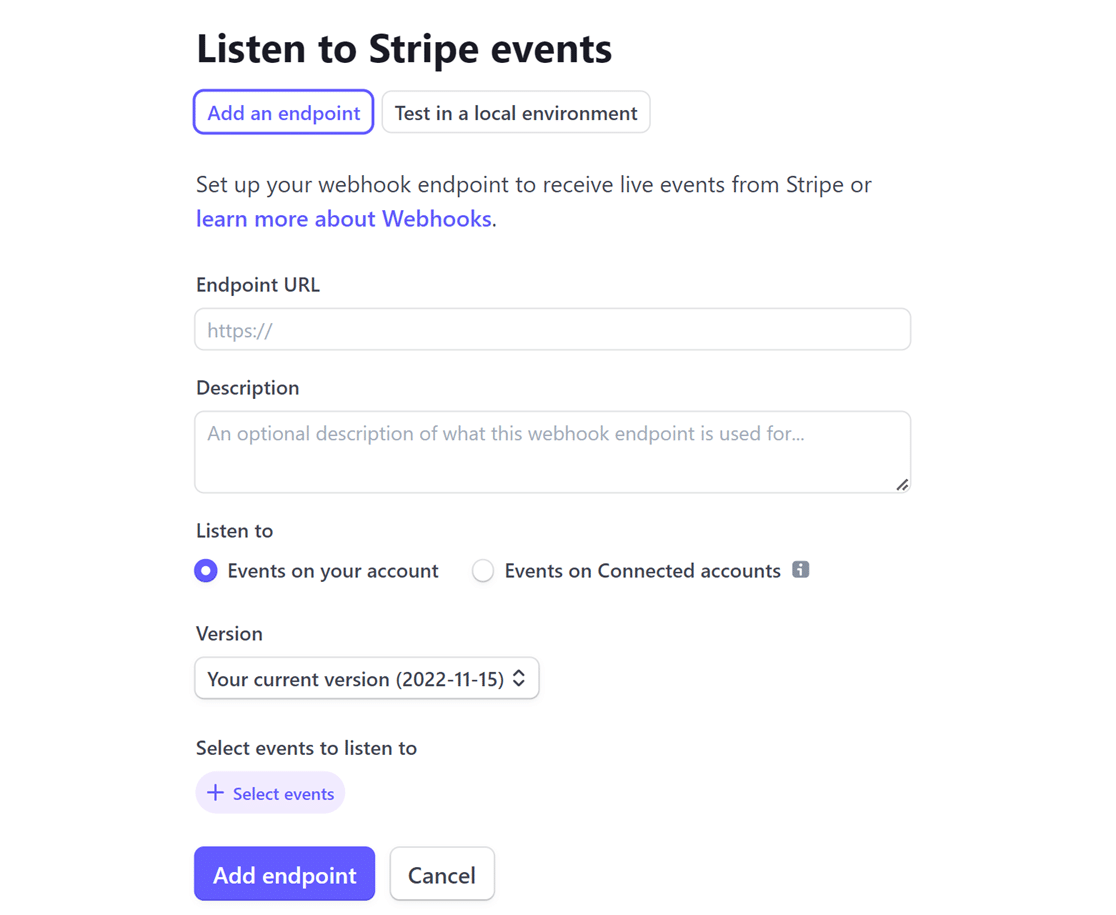
This brings up a Listen to Stripe webhook events page where you must fill in the necessary information to set up your webhook.
Now, return to WPForms » Settings » Payments. Once there, copy the Webhooks Endpoint by clicking the copy icon.
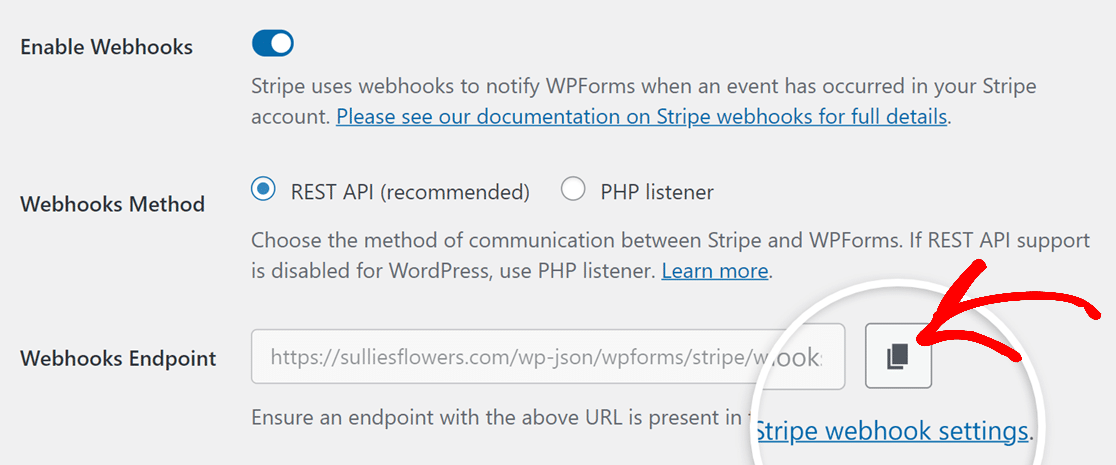
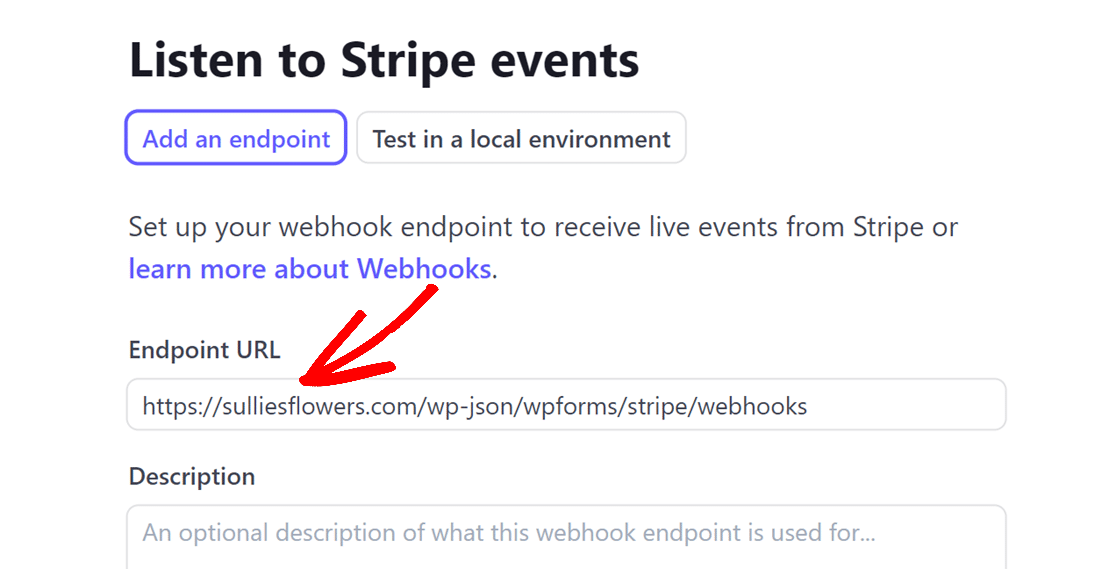
Once the Webhooks Endpoint has been copied, go to your Stripe account and enter it into the Endpoint URL field.
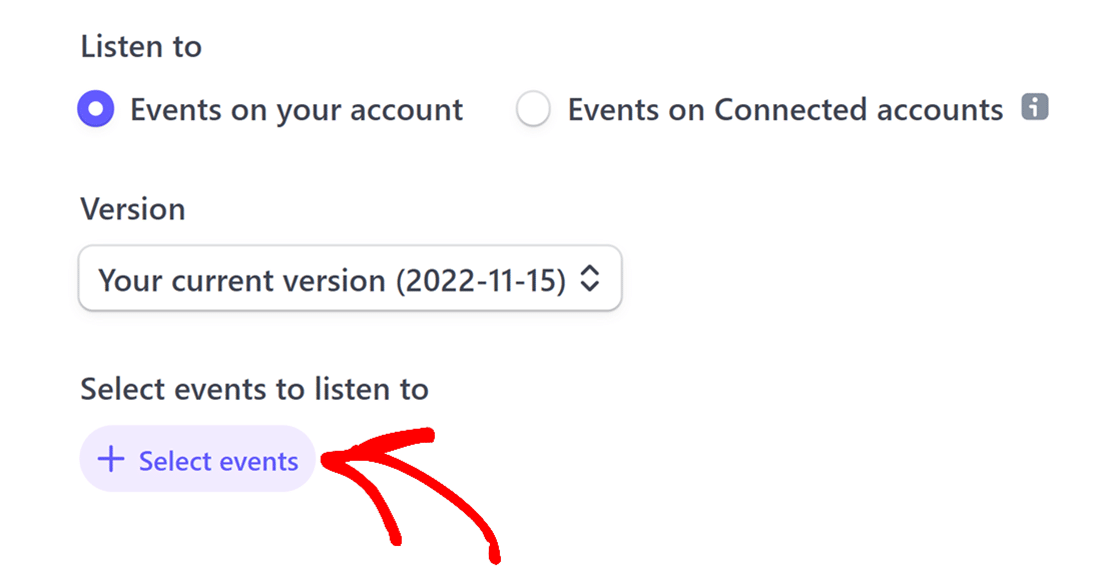
Then, the Listen to and Version options will appear. Leave them undisturbed, and then click the + Select events button.
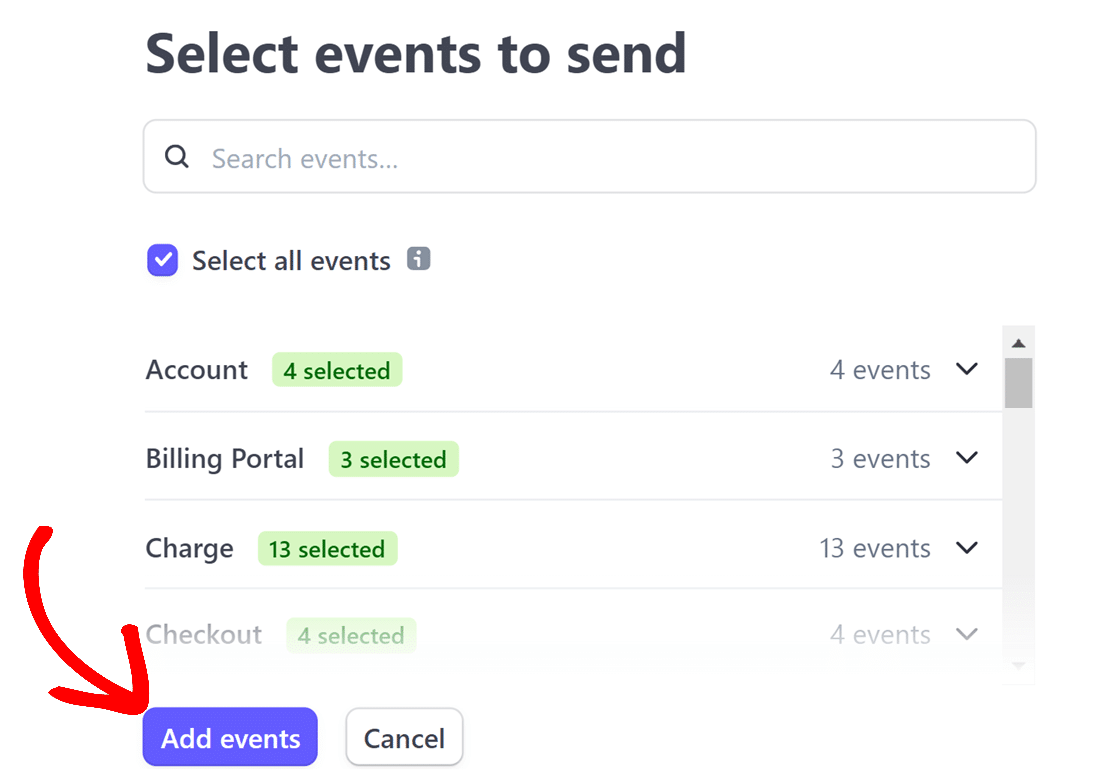
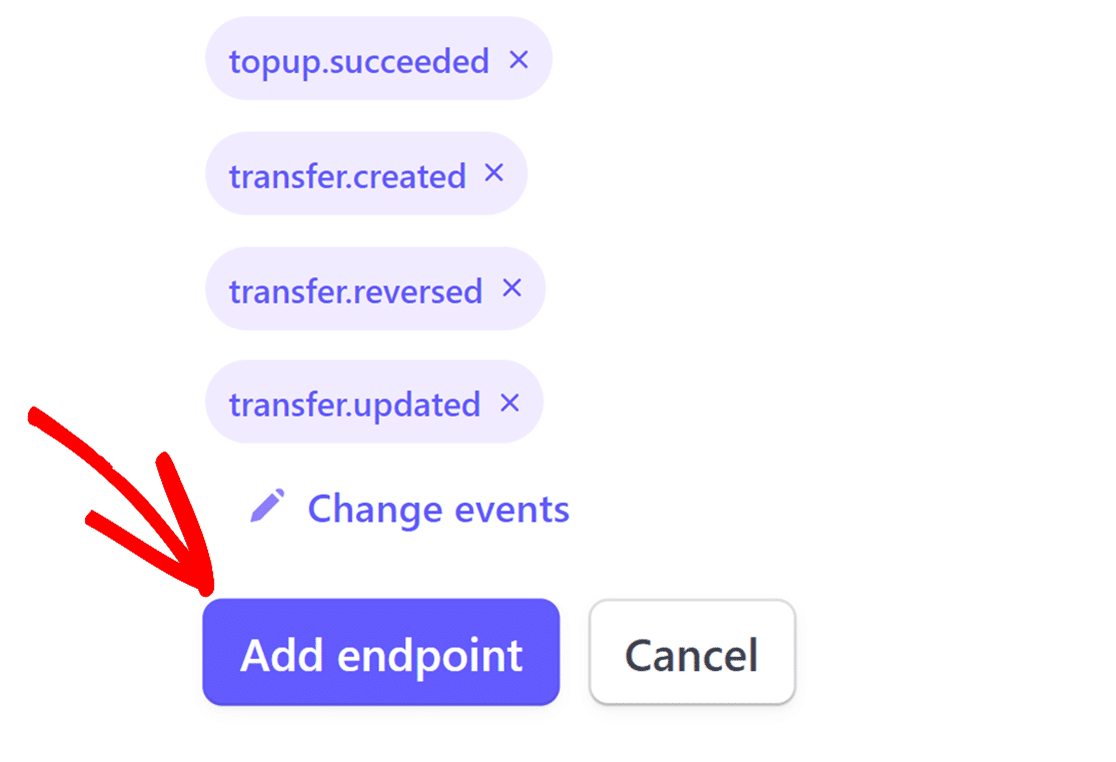
To complete your event selection, check the Select all events option and then click the Add events button.
After you have finished, please scroll down to the bottom of the page and click on the Add endpoint button.
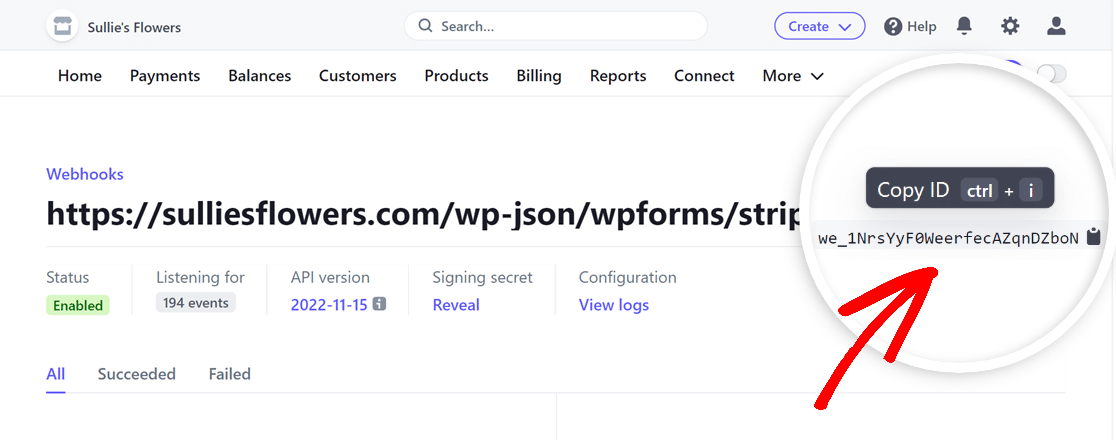
After you set up the webhook, you’ll find the webhook’s ID displayed on the top-right of the page. Simply click on it to copy.
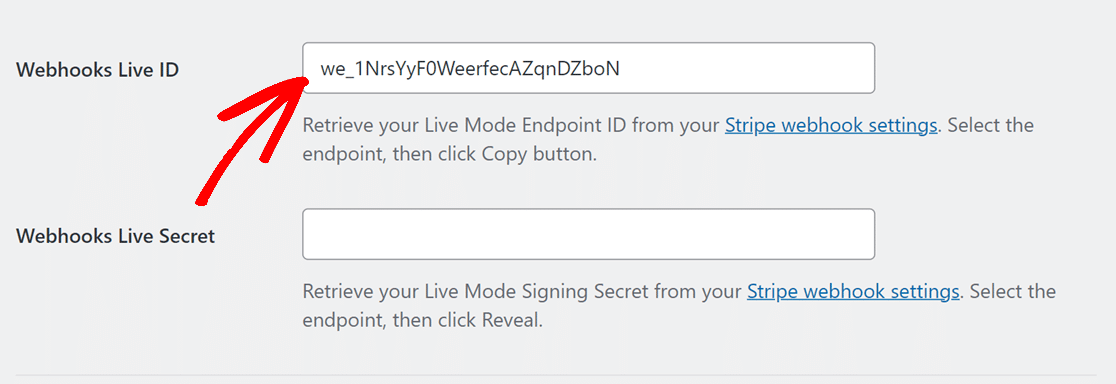
Return to WPForms » Settings » Payments and paste the webhook ID into the Webhooks Live ID area.
After that, go back to your Stripe account, locate the Signing secret key section, and then click on the Reveal option.

When the Signing secret is revealed, copy its value and paste it into the Webhooks Live Secret field in your WPForms settings.

Next, click on Save Settings, and you’ll be done with the configuration! Your payment statuses will now sync in real time between WPForms and Stripe.
5. Leveraging Enhanced Payment Features
Once you’re ready to receive payments through Stripe and WPForms, you can perform various actions without frequently accessing the Stripe dashboard.
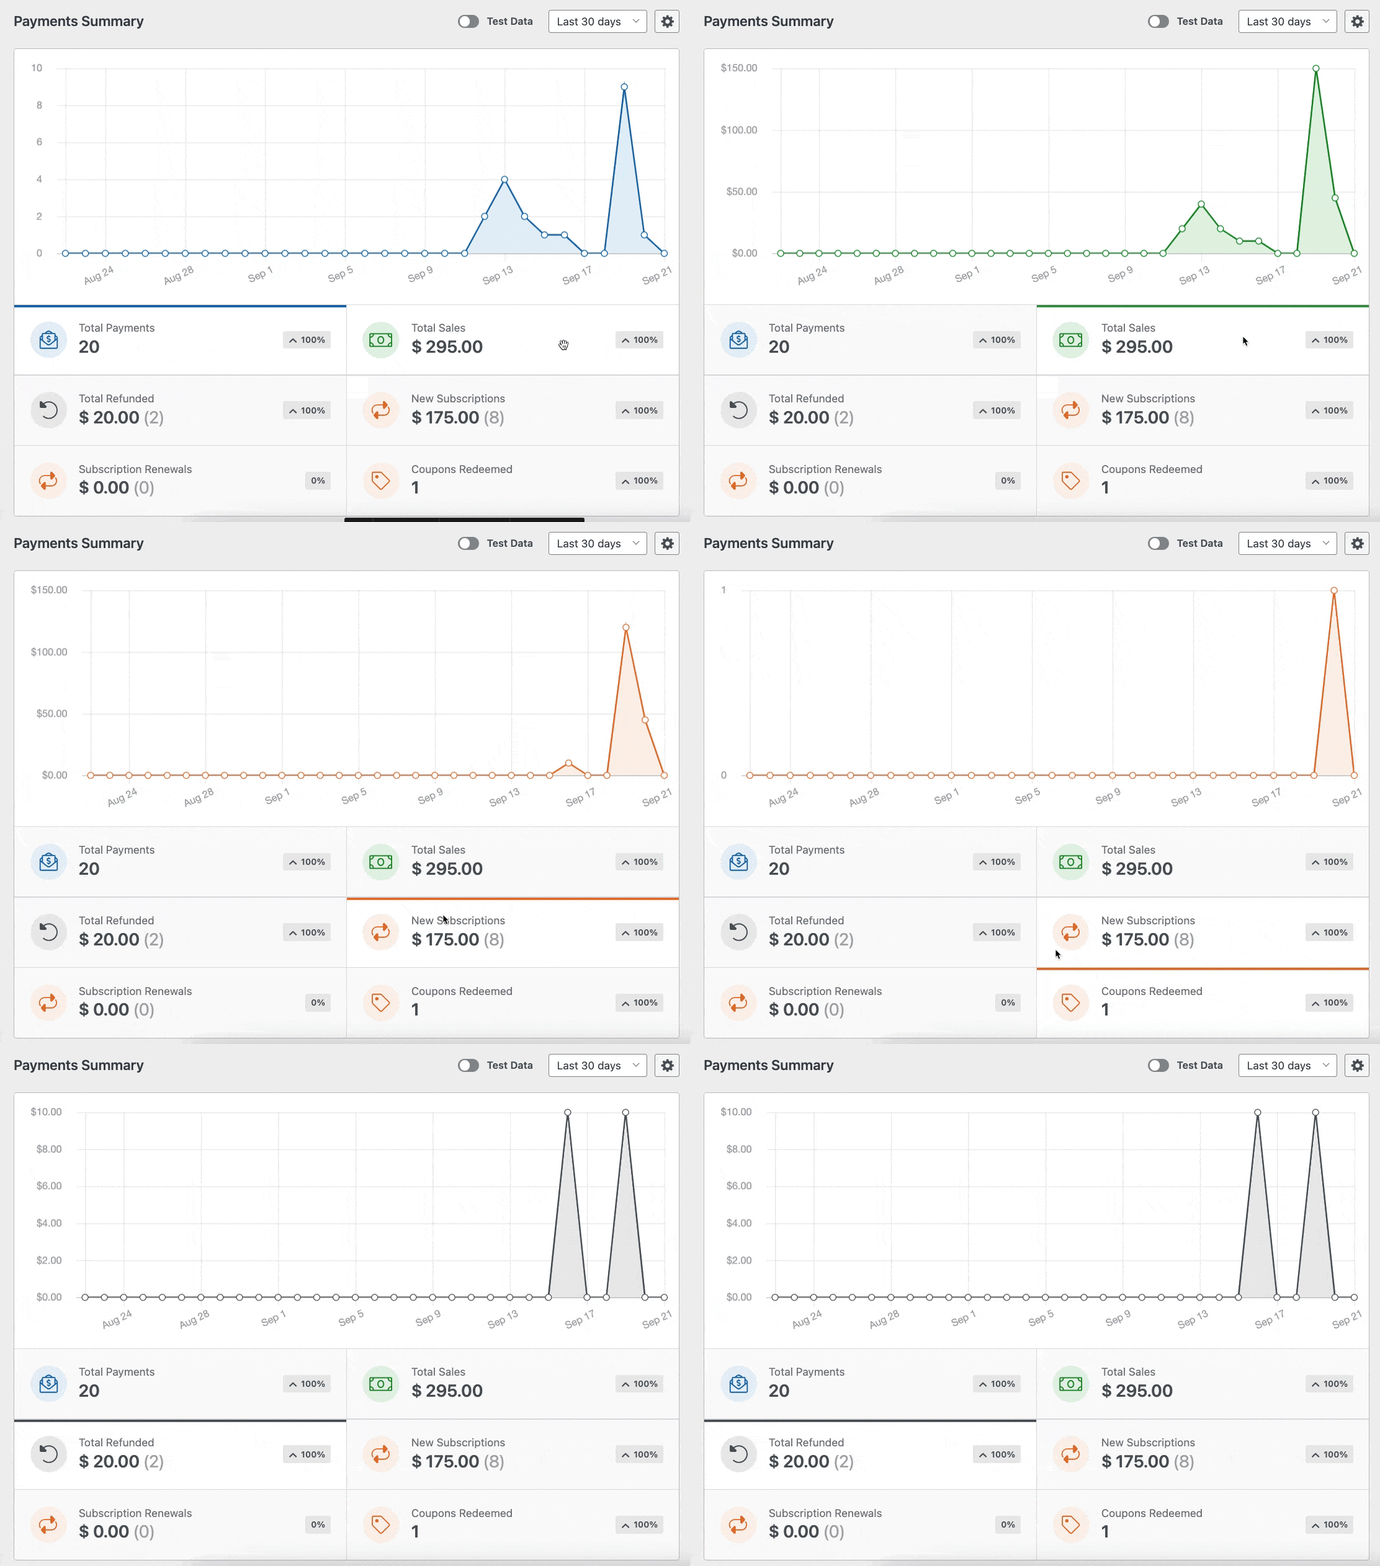
For instance, you can access all the WPForms payments in your WordPress dashboard by going to WPForms » Payments and selecting the Overview tab.
You can change what the graph shows and quickly see the data you’re most interested in by clicking on the options below the graph, such as:
- Total Payments
- Total Sales
- Total Refunded
- New Subscriptions
- Subscription Renewals
- Coupons Redeemed
In addition, you can filter payments based on various criteria by using the dropdowns at the top of the payments table, which include:
- All types: The type of payment, which includes one-time and subscription payments.
- All gateways: The payment method used to handle and approve the payment transaction, including PayPal Standard, PayPal Commerce, Stripe, Square, and Authorize.net.
- All subscriptions: The current status of the subscription-based payment, which may be one of the following: Active, Cancelled, or Not Synced.

Note: The All gateways filter option is only available if you’ve enabled multiple payment gateways in WPForms.
If you need more information about a specific payment, simply click on the payer’s email located under the Payment column.

You will now be able to view all the necessary information regarding that payment on its dedicated payment page.
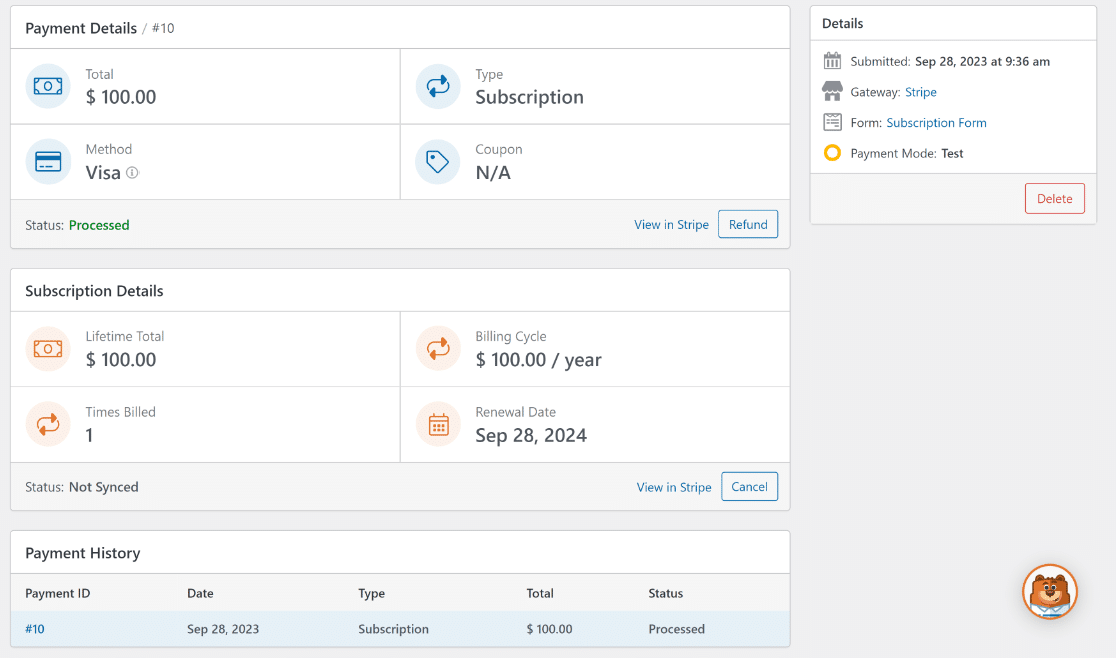
If required, you can click on View in Stripe to access the payment details directly within the payment gateway platform.

Or, if you want to initiate a refund through Stripe or the payment gateway for the respective payment, click on the Refund button.

You can also cancel a subscription directly from within the WordPress dashboard by clicking on the Cancel button for the respective payment.

For more information on navigating and viewing the details of the individual entry page, refer to our guide on Form Entries.
More Questions about WordPress Stripe Webhook
Integrating Stripe Webhook into WordPress is a popular topic among our readers. Here are answers to some common queries about it.
How to switch between live and test mode for Stripe webhook?
You can switch between Live and Test synchronization modes by visiting*domain*/wp-admin/admin.php?page=wpforms-settings&view=payments&webhooks_settings
How do I add Stripe Webhooks to WordPress?
You can utilize WPForms’ native Stripe integration for seamless webhook setup on your WordPress site, without any coding knowledge.
Does WordPress support Webhooks?
Yes, WordPress does support webhooks, and tools like WPForms make the integration even more effortless with Stripe.
Is Stripe free on WordPress?
While Stripe has processing fees, integrating it with WordPress using WPForms’ native Stripe feature doesn’t impose additional costs from the plugin side.
Next, Learn How to Create a One-Time Use Coupon in WordPress
Want to learn how to create one-time use coupons without WooCommerce? Check out the easiest way to make a form for managing and distributing single-use coupons with WPForms.
Create Your WordPress Form Now
Ready to build your form? Get started today with the easiest WordPress form builder plugin. WPForms Pro includes lots of free templates and offers a 14-day money-back guarantee.
If this article helped you out, please follow us on Facebook and Twitter for more free WordPress tutorials and guides.

