AI Summary
Are you looking for a way to make your WordPress form password-protected?
Locking your website form access with a password makes it only available for certain users, prevents unwanted form submissions, and keeps your site safe and secure.
In this article, we’ll show you 2 simple ways to password-protect your WordPress forms.
Create Your Password-Protected WordPress Form Now! 🙂
How to Make a Password-Protected Form in WordPress
There are 2 primary ways to password-protect your form in WordPress. The easiest and simplest way is to use WPForms, the most beginner-friendly form builder plugin for WordPress.
To lock your form access with a strong password, you can use the powerful Form Locker addon of WPForms, which allows you to create a password-protected form in just a few steps.
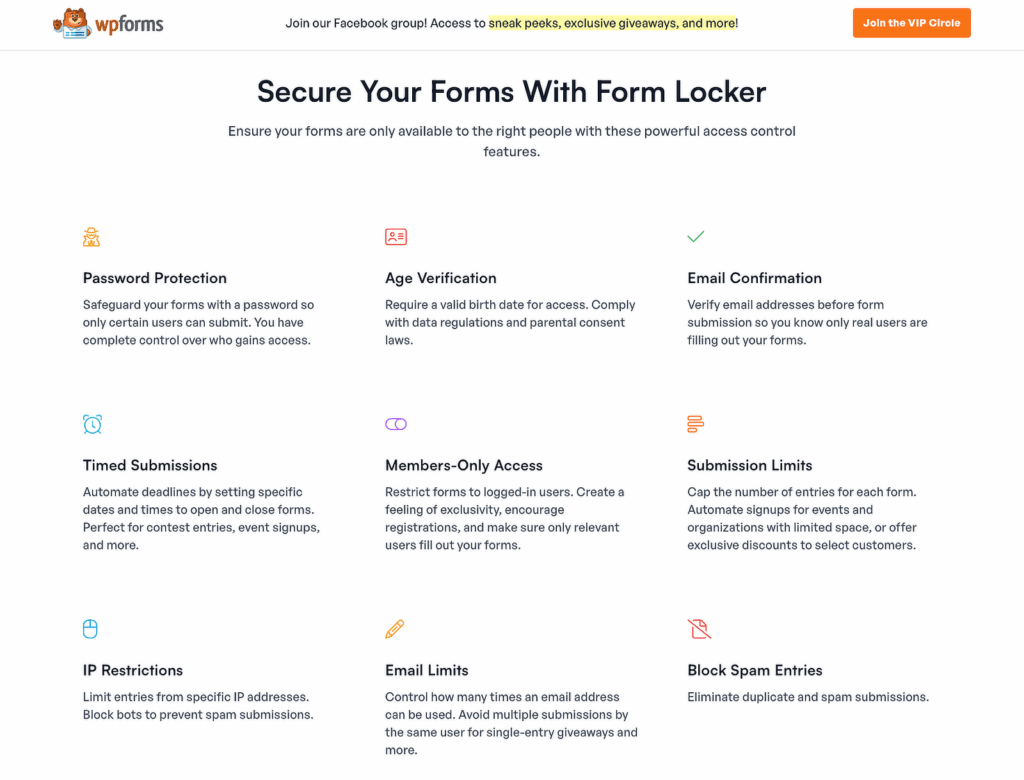
And not just password protection, but with the Form Locker addon of WPForms, you get multiple options to set access limits to your WordPress forms. You get complete flexibility to:
- Limit the number of WordPress form entries
- Close form submissions after a specific date or time.
- Display your forms to only logged-in users.
- Impose age restrictions on your forms.
The second way you can password-protect your form is by setting up a password through the WordPress Editor. But the major drawback of the process is that it’ll hide all your page content, including your contact form.
How to Password Protect Your Form Using the Form Locker Addon
Use WPForms with the Form Locker addon to add password protection directly to the form itself. Follow these steps to password-protect your WordPress forms with the Form Locker addon.
Step 1: Install the WPForms Plugin
To password-protect forms using the Form Locker method, you need WPForms Pro or higher. The Form Locker addon is not available in the free WPForms Lite version, so make sure you have an active Pro license before proceeding.
Install and activate the WPForms plugin on your site. If you need help with this step, follow our detailed guide on how to install a plugin in WordPress.
The Form Locker addon comes with the pro version of WPForms. So make sure you’ve activated WPForms Pro or a higher package on your WordPress site.
Step 2: Install and Activate the Form Locker Addon
With WPForms Pro installed, you now need to activate the specific addon that provides password protection functionality. Form Locker is included in your Pro license but needs to be enabled before you can use it.
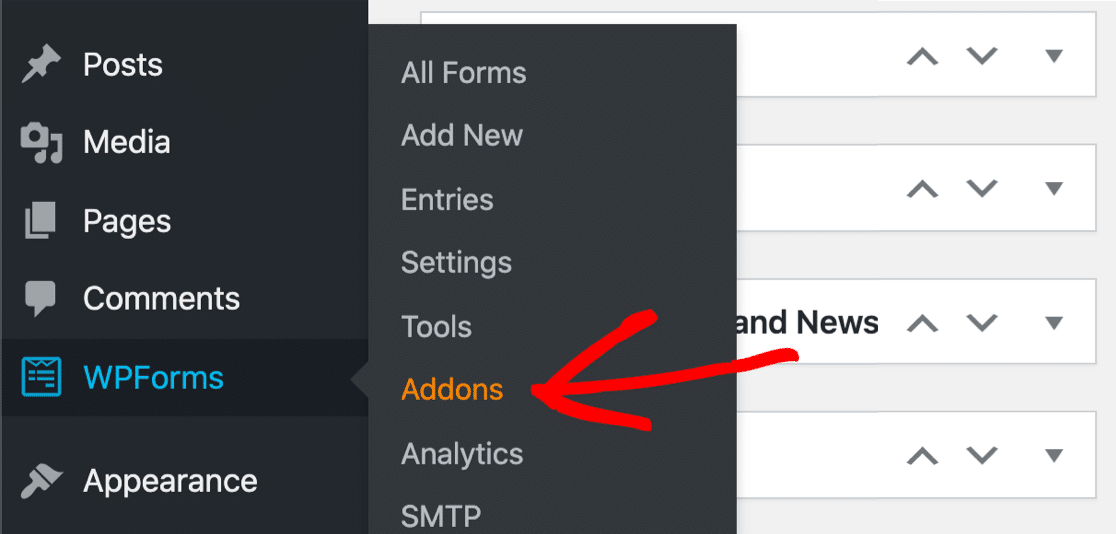
To activate the addon, go to your WordPress dashboard and click on WPForms » Addons.
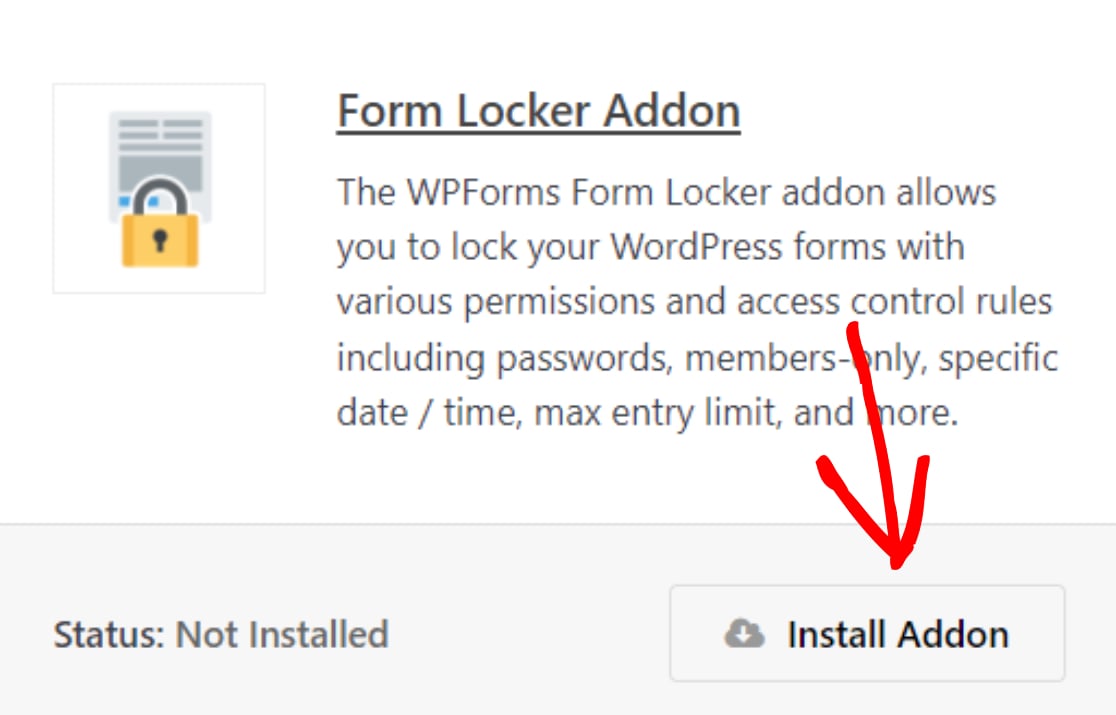
In the search bar, type Form Locker and press the Install Addon button. Once you see the green “Active” status, Form Locker is ready to use on any form you create.
Once your WPForms Form Locker addon is active, you’ll need to create a new form. I’m going to use a post submission form for our tutorial.
Step 3: Create a New Form in WordPress
With the Form Locker addon active, create the form you want to password-protect. WPForms offers 2,000+ form templates, including the post submission form template.
If you want to save time creating a form from scratch, you can simply use a pre-built form template and customize it according to your needs.
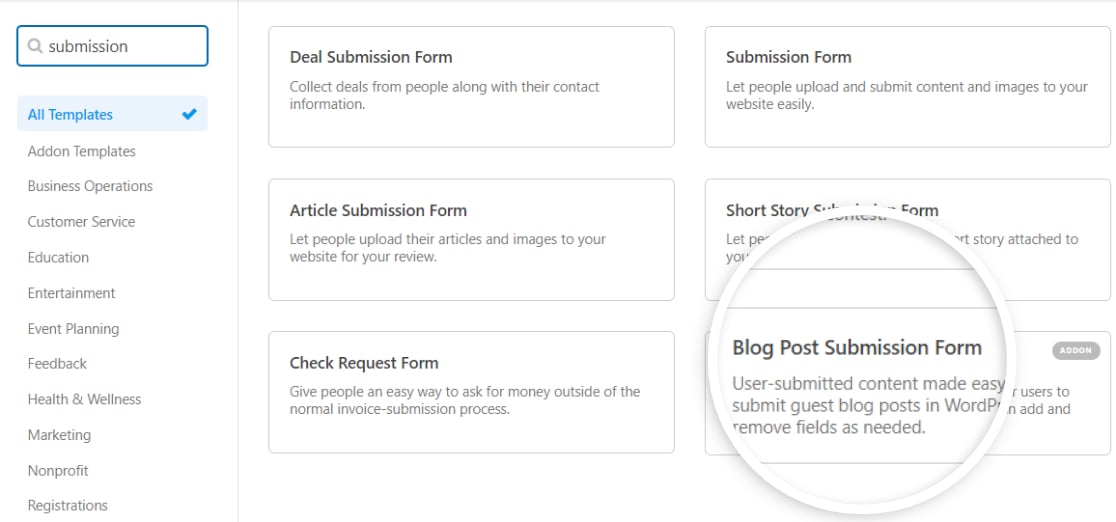
From your WordPress dashboard, go to WPForms » Add New, search for “Blog Post Submission,” and click Use Template.
The form builder will open with your template. The right panel shows a live preview of your form, while the left panel contains all available fields and settings.
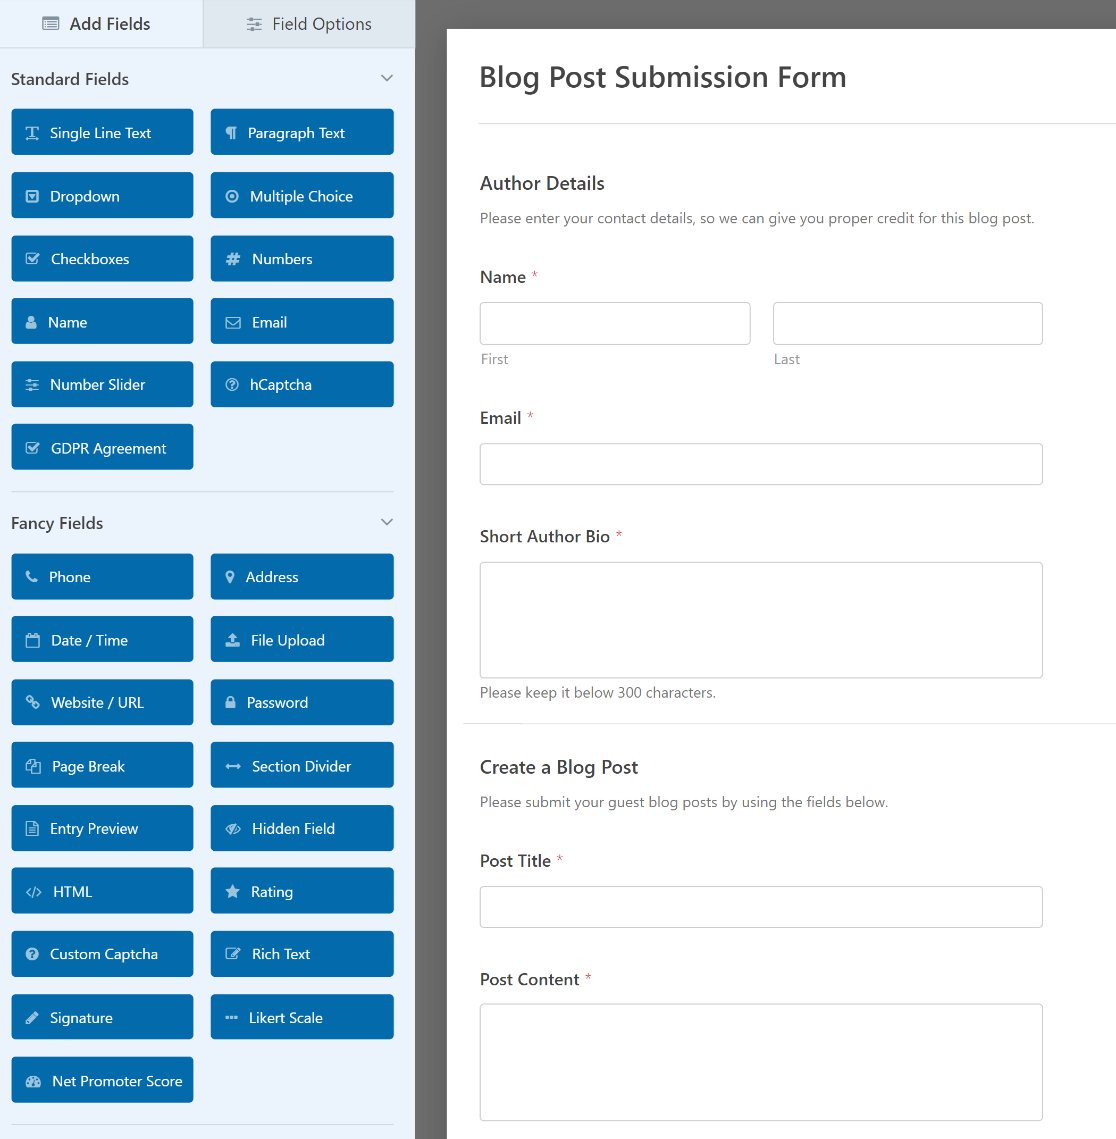
Customize the form to match your needs. You can add new fields by dragging them from the left panel onto the form preview, click any field to edit its settings, or drag fields up and down to reorder them.
Step 4: Configure Form Locker Settings
With your form created, it’s time to add the password protection. This is where Form Locker transforms your public form into a secure, access-controlled submission system.
In the form builder, go to Settings » Form Locker in the left sidebar.
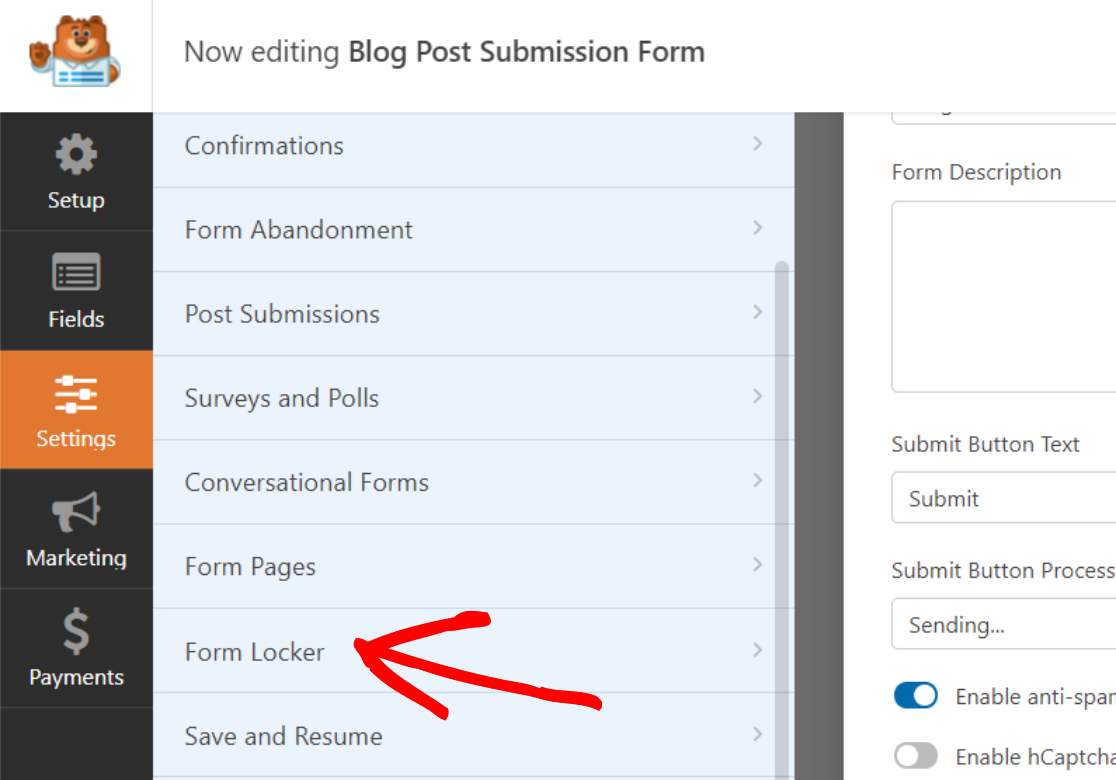
Under the Form Verification feature, toggle on the Enable verification option.

Next, select the Password type from the drop-down.
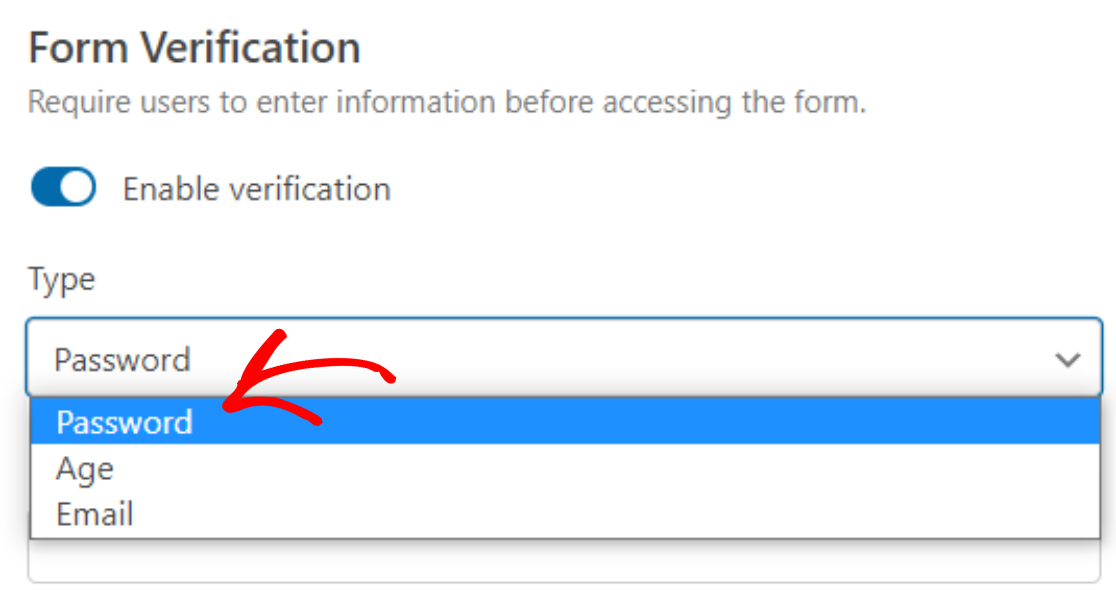
When you do this, new options will appear where you can configure the password protection settings.
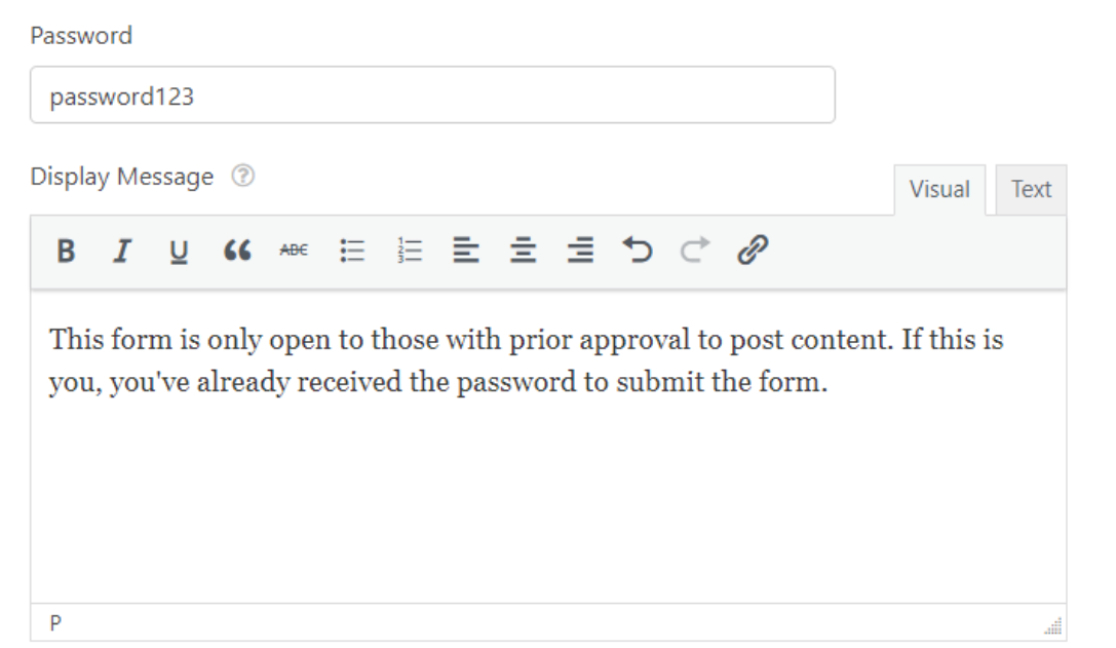
These form settings include:
- Password: this is the password people will be required to enter before accessing a form on your website.
- Display Message: this is the message that will appear above the Password field, so people know that your form is protected and requires a password to submit.
Once done, click Save. This is what your password protected WordPress form will look like on the front end of your site:
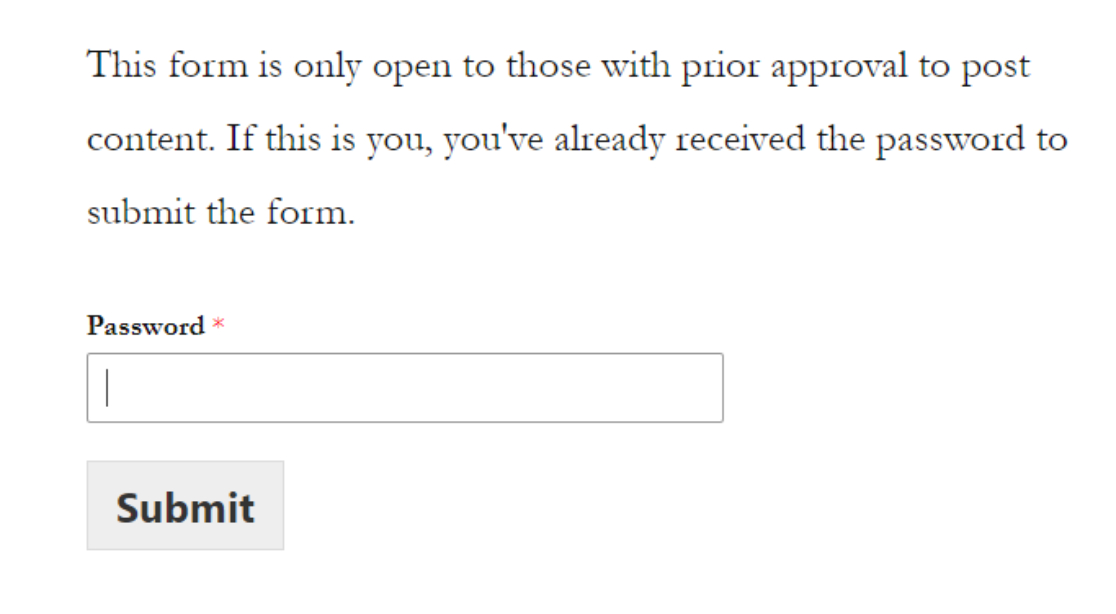
Visitors will see the password field first. After entering the correct password, the full form appears and they can submit their information.
The key advantage of this method is that your page content remains visible. Visitors can read instructions, understand what the form is for, and decide if they want to request access, all without needing the password first.
How to Password Protect Your Form in the WordPress Editor
Now let’s take a look at how to use the WordPress editor to password protect your forms. Follow these steps to password protect your forms in the WordPress editor.
Step 1: Create a New Form in WordPress
The first thing you’ll need to do is install and activate the WPForms plugin. If you need more guidance in the plugin installation process, go through this detailed article on how to install a plugin in WordPress.
Next, you’ll need to create a new form. You can choose from the tons of pre-built form templates or start from scratch. We’re going to use the same Blog Post Submission Form template we used in the first method.

Once you’ve customized your form to meet your needs, add it to a post or page on your website. To add your form to a page, check out this tutorial on how to add WPForms to a page in WordPress.
Step 2: Password Protect Your WordPress Form
Once your form is created and published on a WordPress post or page, go to the WordPress dashboard and access the place your form has been published.
In the Publish box, under the Status and visibility tab, edit the Visibility of the page by choosing the option Password Protected.
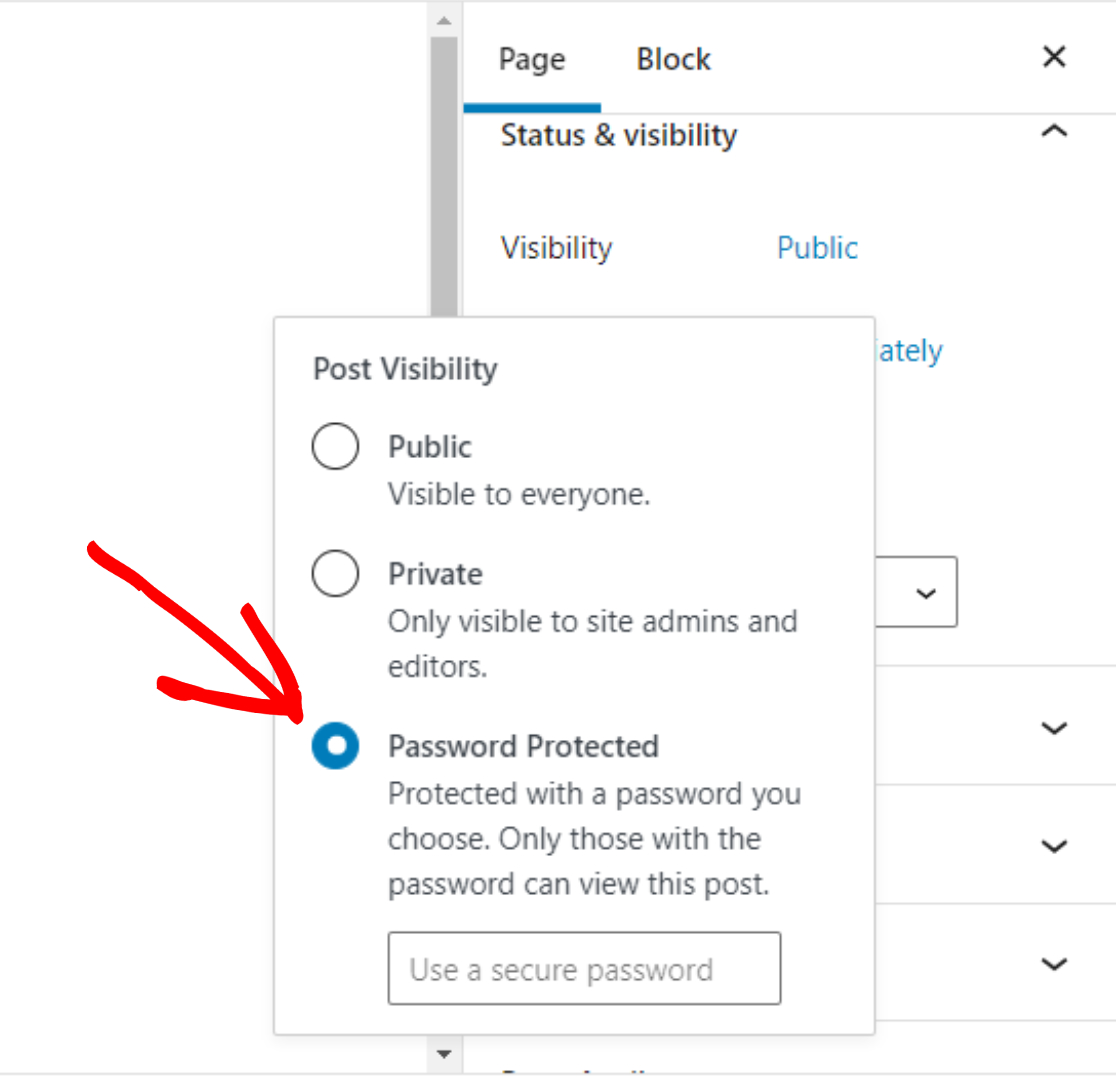
In the Password field, enter the password you want to set. Then update and publish your page.
Now you can give the people you want filling out your form on your website and posting content, the password so they can view your protected page and submit their form.
And there you have it! You now know how to password-protect WordPress forms in two very easy ways.
How to Hide the Password-Protected Page From Search Engines
If you’ve password-protected a page containing sensitive forms, you probably don’t want it appearing in Google search results either.
Even though the content is locked, the page title and URL can still show up in search engines, which might attract unwanted attention or confusion.
Method 1: Use AIOSEO
The easiest way to prevent search engines from indexing your password-protected page is using a plugin like All in One SEO (AIOSEO).
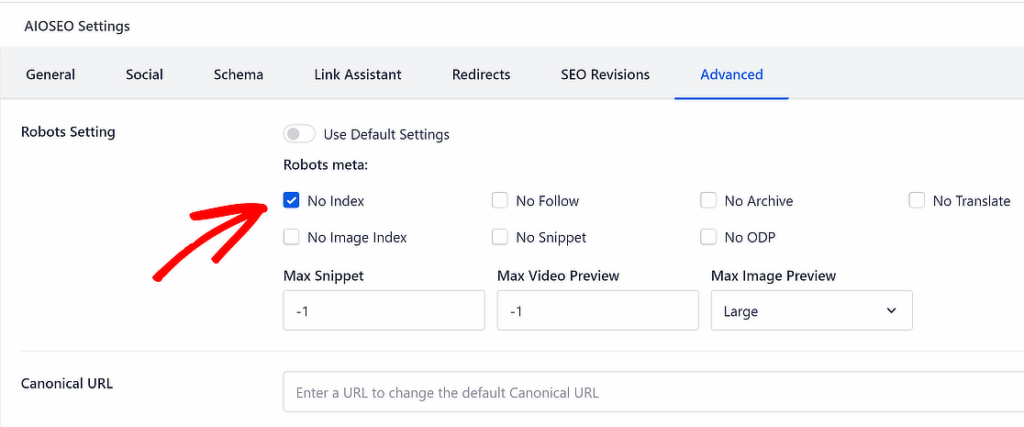
AIOSEO lets you control exactly which pages appear in search results with simple toggle switches. To hide a page using the plugin, edit the page in WordPress and scroll down to the AIOSEO Settings box.
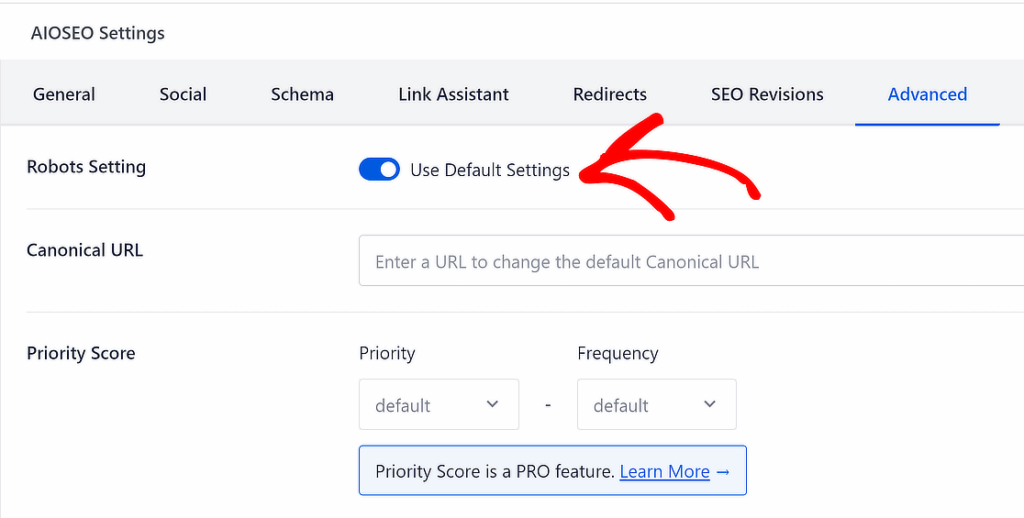
You will now see a Robots Setting option and a toggle that says se Default Settings. You need to click on the toggle to switch off the robots setting.
Once you do that, more options will appear under Robots meta. Toggle ON the option for No Index. This tells search engines not to index this page.
Method 2: Disallow in Robots.txt
Alternatively, you can manually edit your robots.txt file and add the following code to it. Make sure to replace /your-page/ with your page URL in the code.
User-agent: *
Disallow: /your-page/
For detailed instructions on both methods, read our complete guide on how to hide a page from search engines.
FAQs About Password-Protected WordPress Forms
Here are answers to the most common questions about creating and managing password-protected forms in WordPress.
Why should I password-protect WordPress forms?
Password-protecting forms prevents unauthorized submissions and ensures only approved users can access sensitive forms. This is critical for internal HR forms, client intake questionnaires, exclusive membership registrations, or guest post submissions where you want to maintain quality control.
For example, if you’re accepting guest articles, password protection filters out random, low-quality submissions and ensures only invited contributors can submit content, saving you hours of reviewing unusable submissions.
Can I password-protect a form without password-protecting the entire page?
Yes, using the WPForms Form Locker addon. This allows you to password-protect just the form while keeping your page content, instructions, and context visible to all visitors.
They only need the password to actually submit the form. WordPress’s built-in password protection locks the entire page, which hides everything including helpful information users need.
How do I password-protect WordPress without a plugin?
WordPress has a built-in password protection feature accessible in the page editor under Status and visibility » Password Protected. However, this protects the entire page, not just the form.
For form-specific password protection without hiding your page content, you need a plugin like WPForms with the Form Locker addon.
What is the WPForms Form Locker addon?
Form Locker is a WPForms addon (included in Pro and higher licenses) that adds advanced access control to your forms.
Beyond password protection, it lets you limit entry numbers, close submissions after specific dates, restrict access to logged-in users only, and impose age restrictions.
It’s a comprehensive tool for controlling who can access and submit your forms.
Can I use different passwords for different forms?
Yes, each form has its own independent Form Locker settings. You can create multiple forms with different passwords for different user groups.
For example, use one password for VIP submissions and a different password for general member submissions, allowing you to segment and track submissions by access level.
How do I hide a password-protected page from search engines?
Use a plugin like All in One SEO (AIOSEO) to toggle on No Index for the page, which tells search engines not to index it.
Alternatively, manually edit your robots.txt file to add a Disallow rule for that specific page URL. This prevents the page title and URL from appearing in Google search results.
Can I password-protect a Google Form?
No, Google Forms doesn’t have native password protection. Google Forms can be restricted to specific Google accounts (like your organization’s email domain), but it can’t require a password.
For password-protected forms, you need a WordPress form plugin like WPForms with the Form Locker addon.
What’s better: password protection or restricting to logged-in users only?
It depends on your use case. Password protection works for anyone with the password, including people without WordPress accounts.
Restricting to logged-in users only works for sites where users already have accounts (like membership sites). Form Locker supports both methods, and you can even combine them for maximum security.
Next, Save Entries From WPForms to Google Sheets
If you’re accepting guest posts on your blog, you can read these tactics to attract more guest article submissions.
Next, if you’re looking for an easy way to manage and sort your form data in Google Sheets, then check out this post on how to save entries from WPForms to Google Sheets.
Ready to build your form? Get started today with the easiest WordPress form builder plugin. WPForms Pro includes lots of free templates and offers a 14-day money-back guarantee.
If this article helped you out, please follow us on Facebook and Twitter for more free WordPress tutorials and guides.


