
AI Summary
Curious about how to track website traffic on WordPress? It’s important to know who’s coming to your website (and how).
The number of site visitors that click on your website equals the opportunities you have to increase your form conversions, build a more extensive email list, or sell more products and services.
So, in this article, we’ll show you exactly how to track website traffic on your WordPress website. We’ll be covering 2 of the easiest ways you can track your site traffic.
How to Track Website Traffic
Below are 2 easy methods you can use on their own or together to track your website visitors so you can make informed decisions about your business website.
Method 1: Use the MonsterInsights Plugin
The MonsterInsights WordPress plugin is by far the most popular way to track how many people are coming to your website (and to see where they’re coming from). We’ll show you how to set it up below.
Step 1: Set Up a Google Analytics Account
To start tracking website traffic in WordPress, the first thing you’ll need to do is sign up for a Google Analytics account and click on the Start measuring button.

Next, follow all the steps in the Google Analytics setup wizard to continue setup the tracking mechanism and data collection.

Step 2: Install and Activate MonsterInsights
So the first step is to install the MonsterInsights plugin. It’s the best Google Analytics WordPress plugin available. Plus, you’ll get detailed eCommerce reports from directly within your WordPress dashboard.
And you don’t need to be technically savvy to use MonsterInsights. That’s one of the reasons it’s so popular with small business website owners. You don’t have to edit any code or hire a developer.

To set up tracking for your WordPress site, you’ll need a MonsterInsights Pro plan. Once you’ve decided on a plan that suits your budget, check out this post on installing a WordPress plugin for step-by-step instructions.
Step 3: Connect MonsterInsights to Google Analytics
After the plugin has been activated, the Setup Wizard will appear and walk you through the procedure step by step.

The second screen will ask you to connect MonsterInsights to your WordPress site by entering your MonsterInsights license key.
Simply copy the key from the MonsterInsights account dashboard and paste it into the License Key field, then hit the Connect MonsterInsights button.

On the following screen, you will be prompted to select a Google account you’d want to link to your MonsterInsights account.
You’ll need to pick the account that you created when you initially set up your Google Analytics account for WordPress site.

Now, you must provide MonsterInsights permission to access your Google Analytics account. To proceed, click on the Allow option.

After that, select a profile to continue the connection. If your Google Analytics account is connected to multiple websites, choose the right website property.

Once the authentication is complete, you’ll be sent back to the Setup Wizard. You’ll end up on the Recommended Settings page with the following options:
- Events tracking — Enabled by default.
- Enhanced Link Attribution — Enabled by default.
- File Download Tracking — Most used file types (doc, pdf , ppt, zip, xls, docx, pptx, xlsx) are already added by default.

Upon scrolling down a bit, you’ll find more configuration settings.
- Affiliate Link Tracking — 2 affiliate link paths are added by default, and you can set up WordPress link tracking here quickly.
- Access to MonsterInsights Reports — You can choose which users can see your MonsterInsights reports.
- Automatic Plugin Updates — You can enable or disable this option to automatically install updates to your plugin.
- Show MonsterInsights Badge — Decide whether or not to include a MonsterInsights badge at the footer of your website.

Click the Save and Continue option after going over and configuring these recommended changes. On the next screen, you’ll see options for even more tracking options, addons, and helpful plugins.

Select all the options you feel are most relevant and cater to the data you want to capture from Google Analytics and hit the Save and Continue button.
After that, you’ll see a new screen with this message ‘Awesome! Tracking and Analytics are All Setup’.

This confirms that the setup process is complete and you’ve successfully installed Google Analytics on your WordPress website.
Step 4: View MonsterInsights Reports
Let’s look at the reports MonsterInsights offers to help you track your website’s traffic, among other things. To get to the reports, go to Insights » Reports.
Overview Report
Under the Overview Report tab, you can see a lot of info about the site traffic coming to your WordPress website.
You can see a visual graph of the number of sessions and pageviews your site has gotten over a certain period.
Next, you’ll see a quick view of key metrics such as the number of sessions and page views, the average session duration, and your site’s bounce rate.

This helps you determine whether the traffic coming to your website is sticking around and engaging with your content.
And if you keep scrolling, you can check out the top 10 countries where your site visitors are located, as well as your top referral sources.

Publishers Report
Under the Publishers Report tab, you’ll find other metrics that can help you learn more about the people who are coming to your website:
- Landing pages
- Exit pages
- Outbound links
- Affiliate links
- Download links
- Demographics and Interest categories
It’s an in-depth way to track website traffic to WordPress. Find out how many visitors are visiting your various web pages, track outbound and affiliate links, and how many people have clicked a download link on your website.
In addition, see the age ranges, gender, and interests of all site visitors visiting your website.

eCommerce Report
Under the eCommerce Report tab, you’ll see the number of people coming to your online shop, along with specific details related to onsite transactions:
- Conversion rate
- Number of transactions
- Revenue generated
- Average order value
- Top products

With this information, again, you can track how many people are coming to your online shop.
But you can also identify which products in your online shop are the most popular so you can continue to promote them and get more sales.
Search Console Report
Under the Search Console Report tab, you’ll see the top 50 Google search terms your site ranks for.

This is great for understanding which keywords are driving the most traffic to your website and how effective your SEO efforts are.
And helps you go even deeper into tracking website traffic to your WordPress site If you want to make improvements, ramp up your keyword research using this data.
If you are happy because the trend is moving upwards when it comes to site traffic, keep promoting your top keywords.
For help with Google Search Console, make sure to check out this helpful tutorial for configuring your website with Google Search Console.
Custom Dimensions Report
Under the Custom Dimensions Report tab, you can track custom data such as the most popular:
- Authors
- Post Types
- Categories
- Tags
- SEO Scores

Though this doesn’t track how much site traffic is coming to your website, it’s still helpful. For instance, now you can see what current site visitors find the most interesting on your site, so you can continue to develop strategies to drive more traffic to your site.
Forms Report
Under the Forms Report tab, you can see some of the most exciting information as it relates to both site traffic and your website’s forms.

In addition, get a conversion rate for each so you can see which forms are converting the highest on your site, and which ones might need adjustments.
And if you’re offering site visitors content upgrades in exchange for their email addresses, be sure to read our article on how to track file downloads using MonsterInsights.
Now, let’s take a look at how you can track website visitors using WPForms. We suggest you use both methods for an incredibly powerful visitor tracking setup.
Method 2: Use the WPForms Plugin
Want to quickly see what people do on your website before they submit a form? It’s easy.
Next, we’ll show you how you can use the WPForms plugin’s powerful User Journey addon to track website visitors on your site.
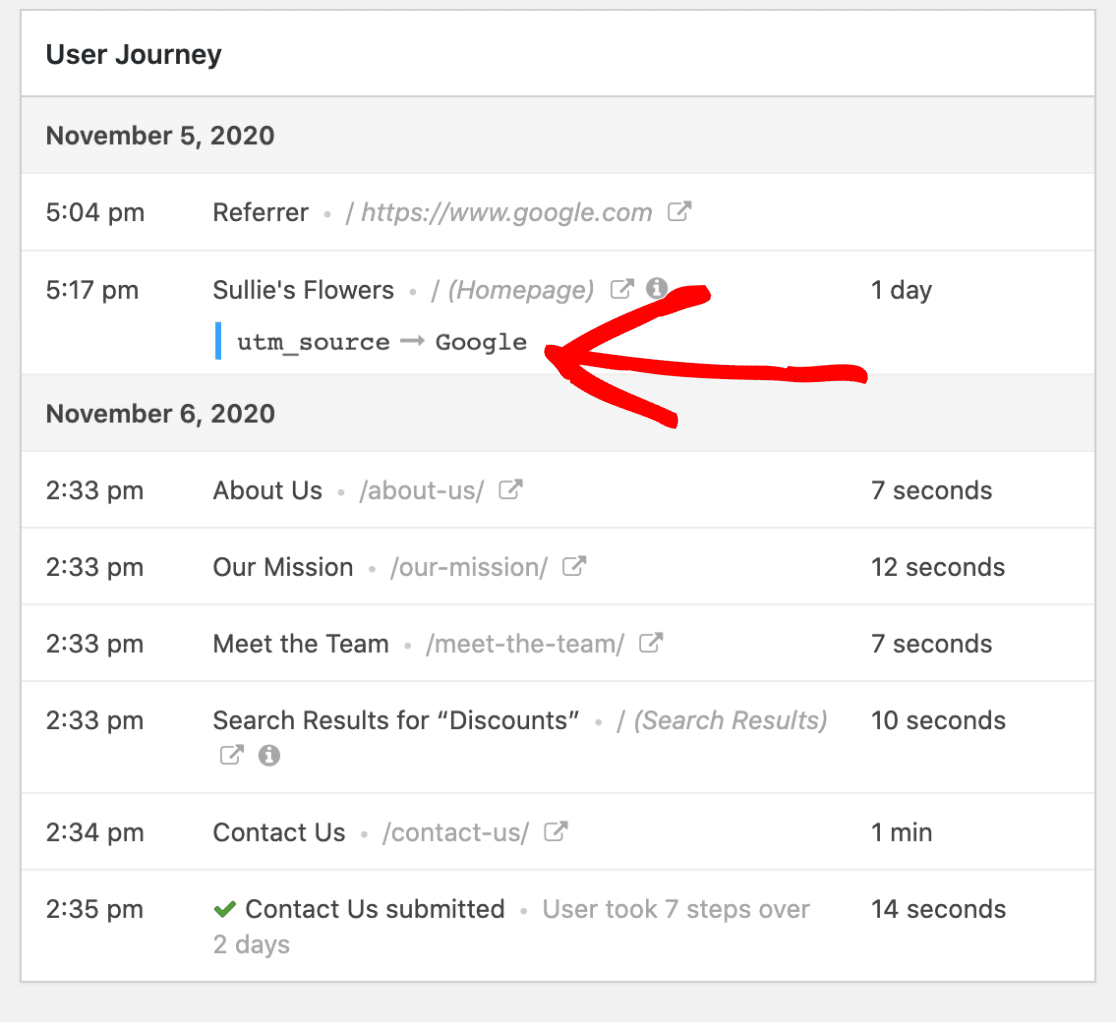
Here’s an idea of what a User Journey report looks like:

There are lots of great details that this addon shows you with just a few clicks. Let’s get started.
Step 1: Install and Activate the WPForms Plugin
Before getting started, you’ll first need to make sure that the WPForms plugin is installed and activated on your WordPress site.

If this is your first time installing a WordPress plugin, see this step-by-step guide on how to install a plugin in WordPress.
Step 2. Enable the User Journey Addon
Once you’ve got WPForms Pro installed and your license is verified, you’ll be able to install and activate the User Journey addon quickly.
So, head to your WordPress dashboard and click WPForms » Addons. Then, you can search for the User Journey addon and click on it to Activate.

For more help with this step, check out our guide on installing and activating the User Journey addon.
Step 3. View User Journey Details
Once WPForms is installed, you can use the User Journey addon easily. All of your form submissions moving forward will include these User Journey details.
So, after some time passes and people have filled out your forms, you’ll be ready to go track these visitor details.
To see this info, go to WPForms » Entries and then click on the name of your form.
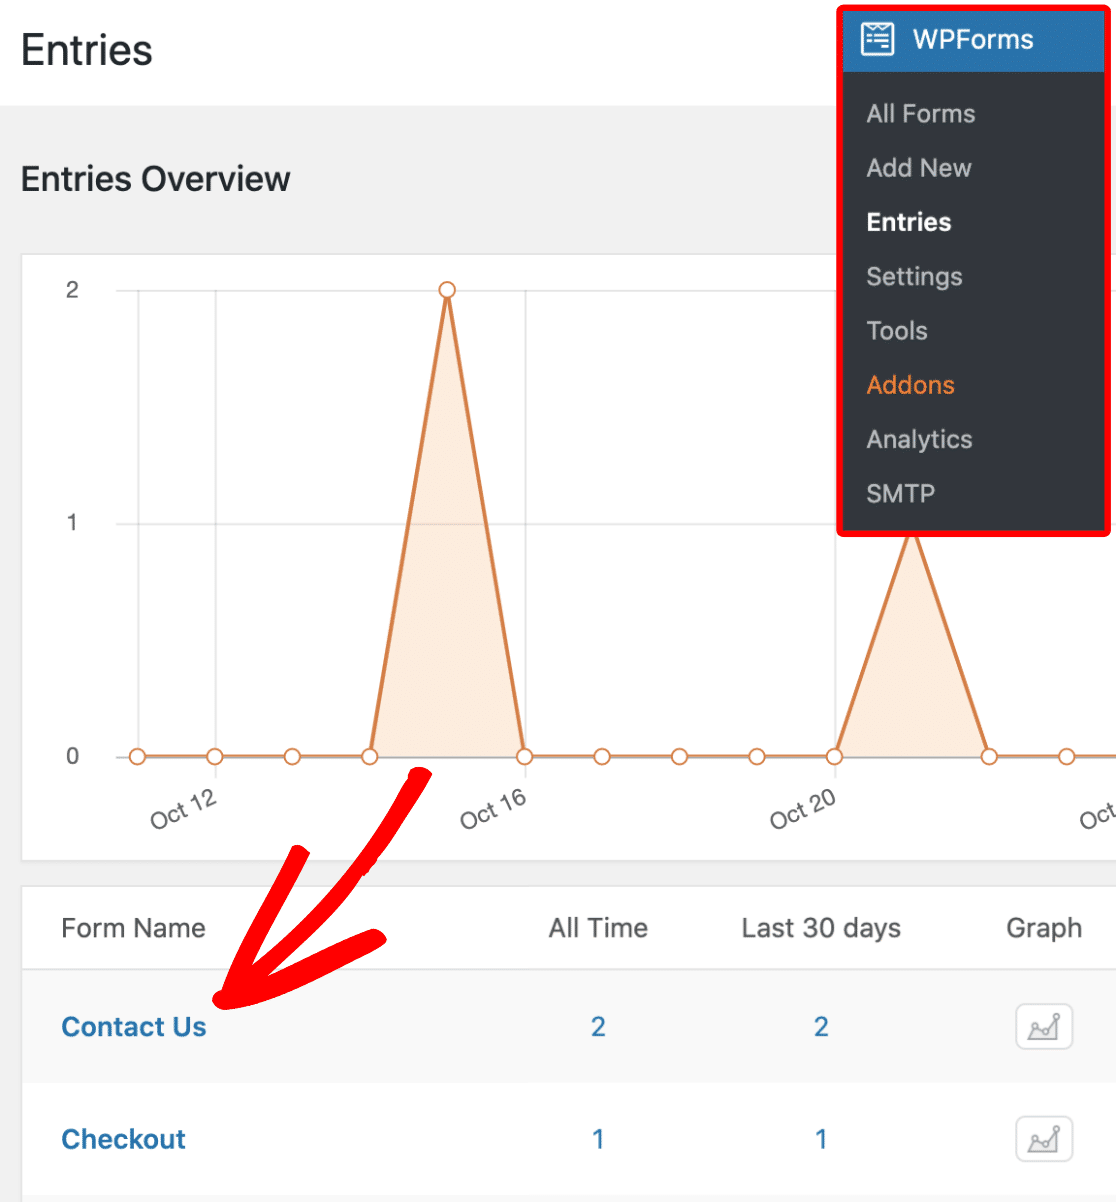
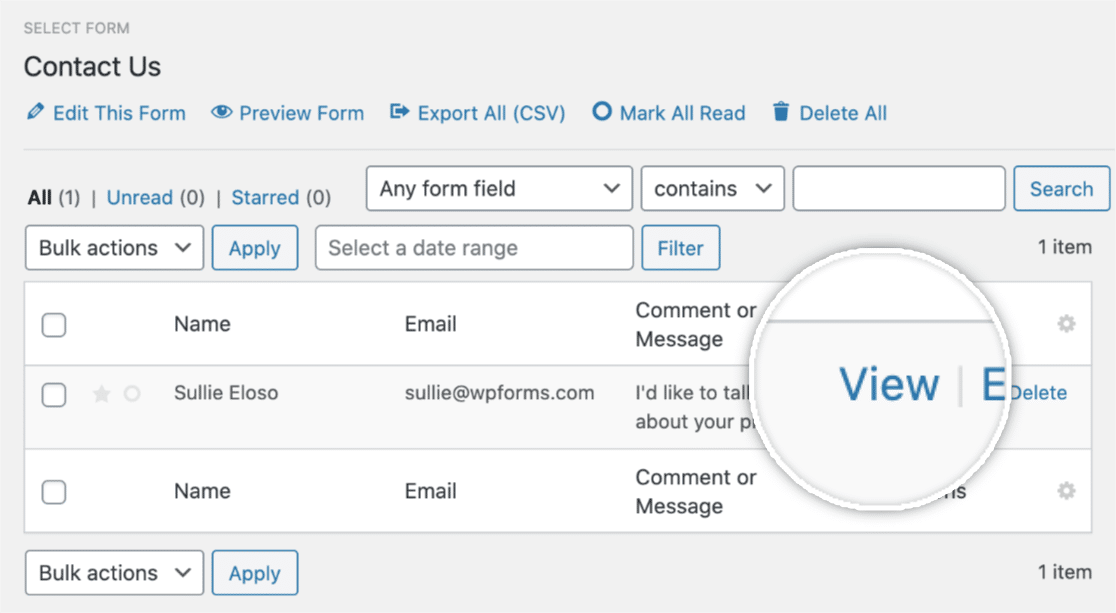
Next, you’ll see a list of all the entries for that form.So, to see an entry’s User Journey details, click the View button toward the right side.
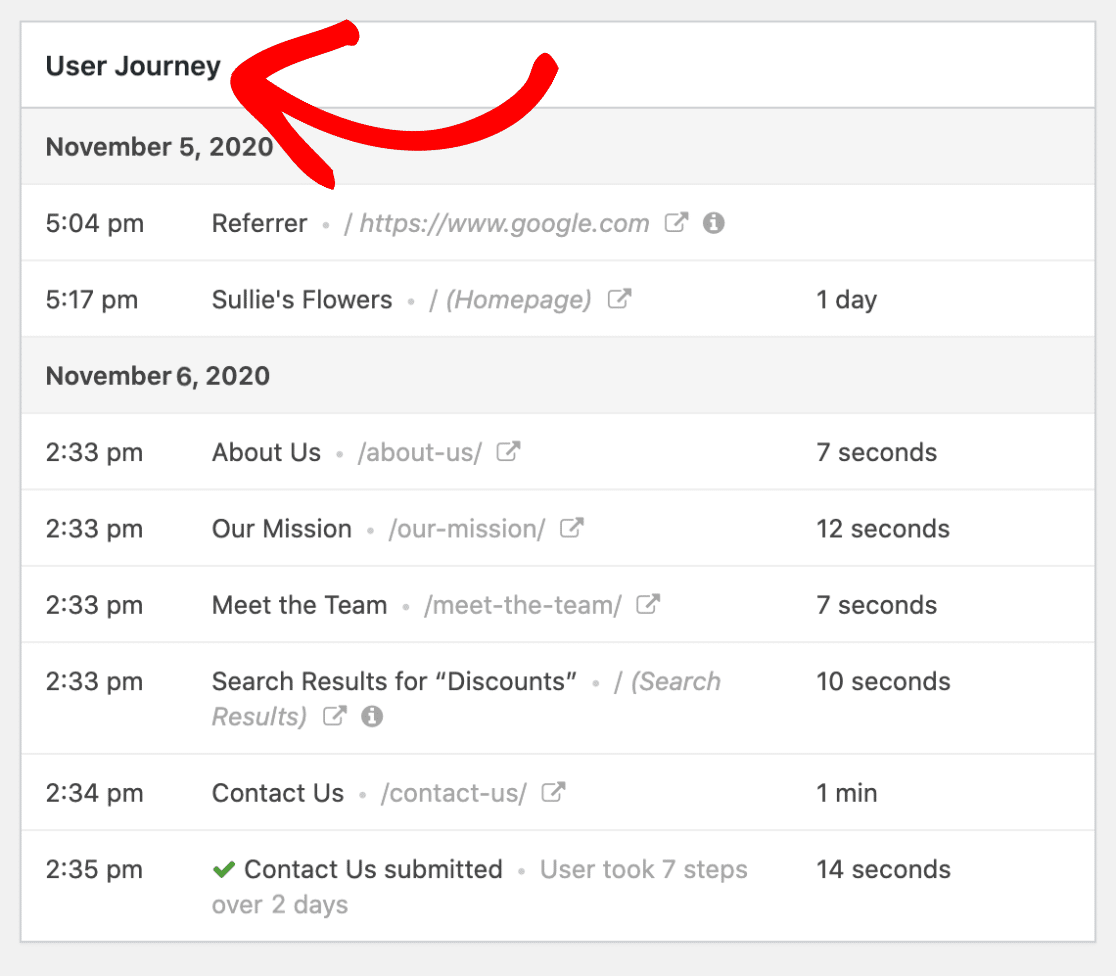
Then, once you’ve opened the details of the entry, scroll down until you see the section titled User Journey.
By the way, if you notice that some info is now available, it’s most likely because a user has come from a non-SSL site and your site runs on SSL. Or, someone might have an extension or specific privacy setting.
So, this shows each step a user took while on your site, including the page the user was referred from.
You’ll get to see the date, time, and duration of the time spent on each page of your website that they went to.
Not only that, but you’ll be able to view the URL parameters by clicking the little Info icon as shown below.
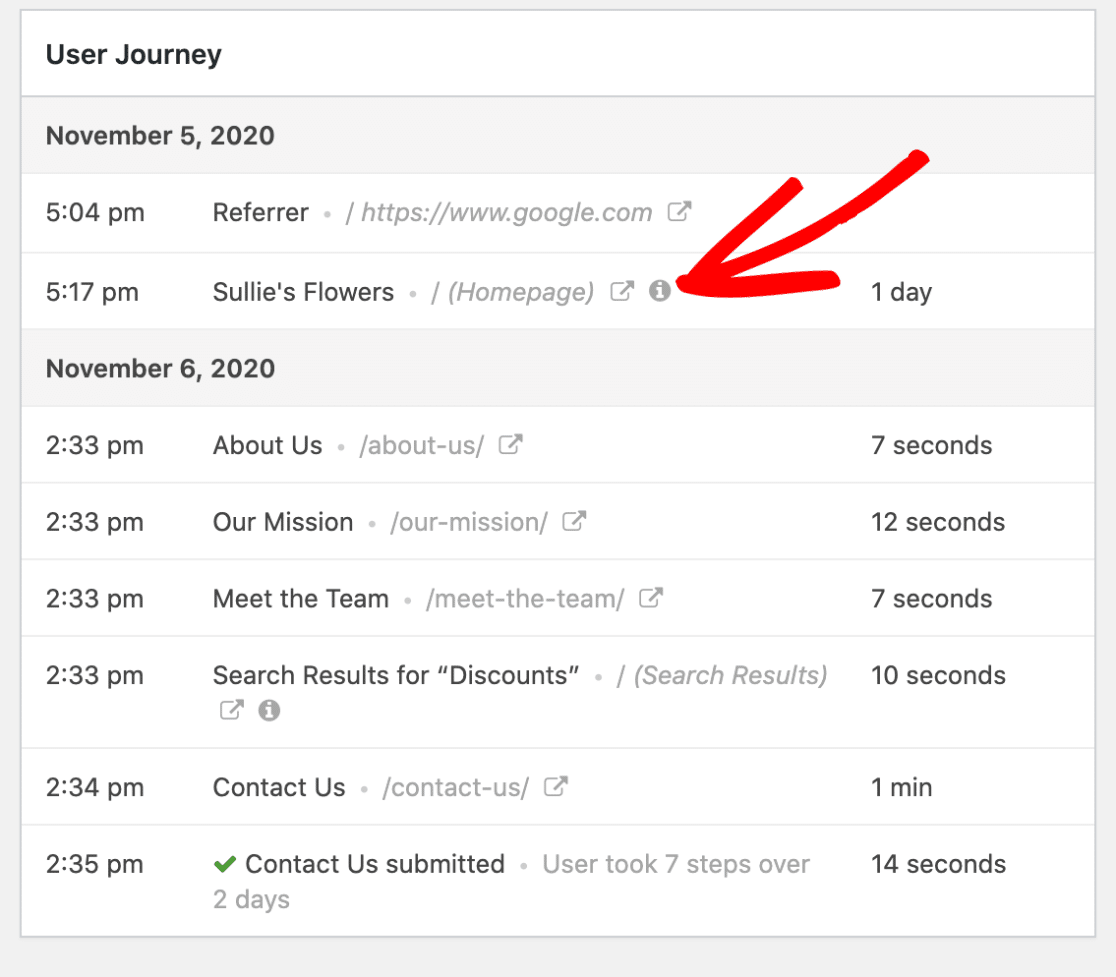
Once you click on that icon, you’ll see the specific URL parameters for that page, including search queries.
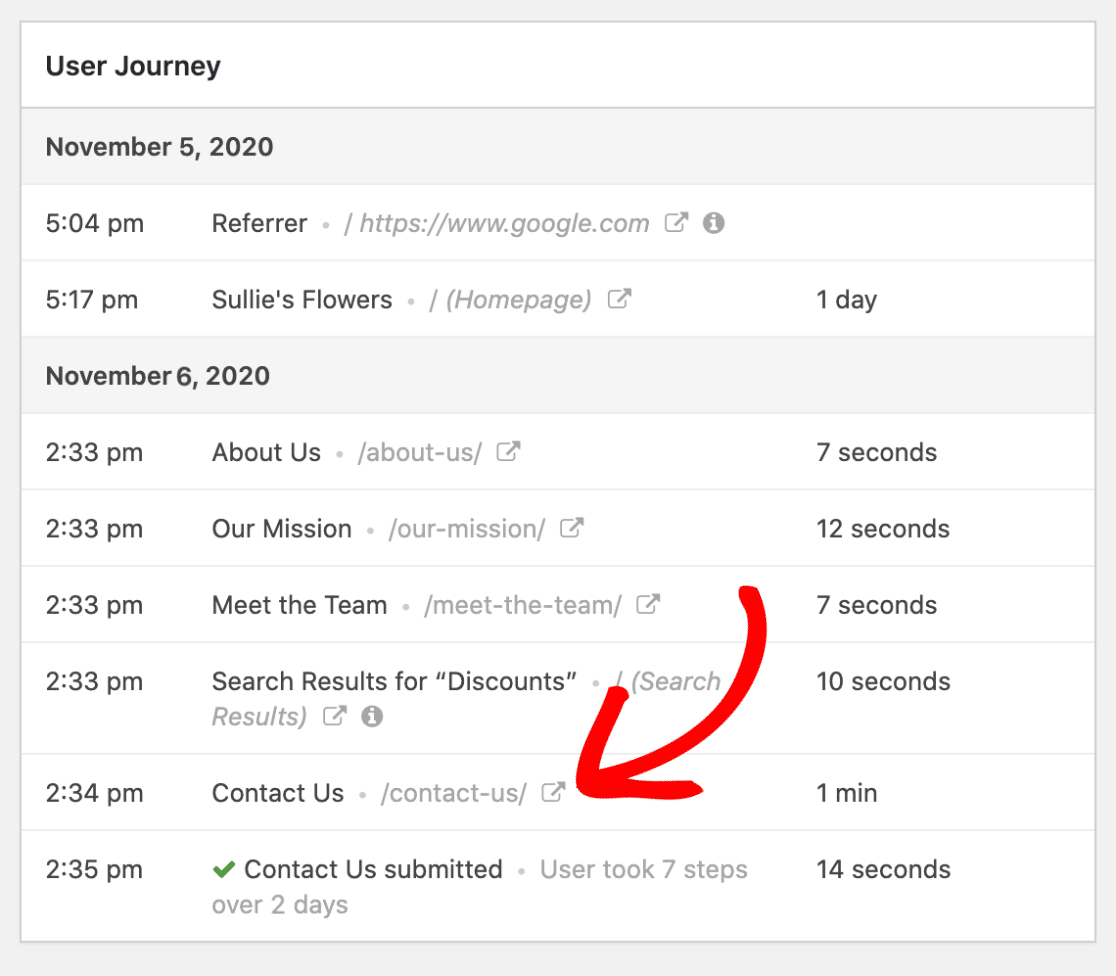
And if you’d like, you can also view a visited page in a new tab by clicking the Open Window in a New Tab icon.
And there you have it! You now know how to track website traffic to your WordPress website to improve your performance using the User Journey addon.
FAQs about Tracking Website Traffic in WordPress
Tracking website traffic in WordPress is a popular topic among our readers. Here are answers to some common queries about it.
Why is website traffic important?
Website traffic is important for establishing yourself as a trusted brand and get more customers to start buying products.
If you don’t have site visitors coming to your website, it will be super hard to have people join your email list, engage with your content, or buy your products and services.
Having more site traffic can also help you:
- Generate more high-quality leads
- Build better relationships with a broader audience
- Get your site’s content shared across more social media platforms
- Identify, nurture, and solve more pain points that’ll help you build your business
- Expand your business in terms of employees, products/services, physical locations, and revenue.
How do I track traffic on my WordPress site?
To track traffic on your WordPress site, you can use Google Analytics.
However, if you’re looking for a more user-friendly way to integrate access traffic statistics, get the MonsterInsights plugin.
This plugin provides an easy setup process and allows you to view key metrics directly from your WordPress dashboard.
Can WordPress track visitors?
Yes, WordPress can track visitors through various plugins designed for this purpose.
MonsterInsights, when connected with Google Analytics, is highly recommended for tracking visitor behavior, including page views, session duration, and more, directly within your WordPress site.
How do I see website activity on WordPress?
To see website activity on WordPress, use analytics plugins like MonsterInsights. It connects your site to Google Analytics.
This enables you to monitor real-time activity, audience behavior, and traffic sources from your WordPress dashboard, making it easy to analyze and optimize your site’s performance.
How do I see how many views my WordPress site has?
MonsterInsights is an excellent tool for determining the number of views your WordPress site receives.
After installing the plugin and setting up Google Analytics, you can easily access reports showing your site views, along with other valuable data, right in your WordPress dashboard, helping you understand your audience better.
Next, Learn How to Track Form Submission in Google Analytics
Next, make sure to check out this guide to tracking form submissions in Google Analytics and how to track form submissions with a Facebook Pixel.
And if you feel like you have a good amount of traffic coming to your website, make sure to read up on these tips for improving contact form conversions.
Create Your WordPress Form Now
Ready to build your form? Get started today with the easiest WordPress form builder plugin. WPForms Pro includes lots of free templates and offers a 14-day money-back guarantee.
If this article helped you out, please follow us on Facebook and Twitter for more free WordPress tutorials and guides.

