
AI Summary
When I need to save or share form entries, I like using PDFs. They’re easy to store, look consistent across devices, and make record-keeping simple.
And with WPForms, I don’t have to rely on third-party tools anymore. With just a few clicks, I can turn any form entry into a professional PDF — and even have it automatically emailed to myself or my users.
In this guide, I’ll show you exactly how I set up the PDF Addon, customize the look of my documents, and start sending form entries as PDFs. By the end, you’ll be able to do the same, all from inside WPForms.
Using WPForms for invoices, contracts, application receipts, event confirmations, or certificates? This is the setup you want.
How to Convert Form Entries to PDF and Email Them Automatically
1. Create a Form and Enable the PDF Addon
First, make sure you’re running WPForms Pro (or Elite, Agency) and that your plugin is updated to version 1.9.7.3 or later — that’s required for the PDF Addon.
Next, open the form you want to use, or create a new one. For example, I started with a simple contact form.
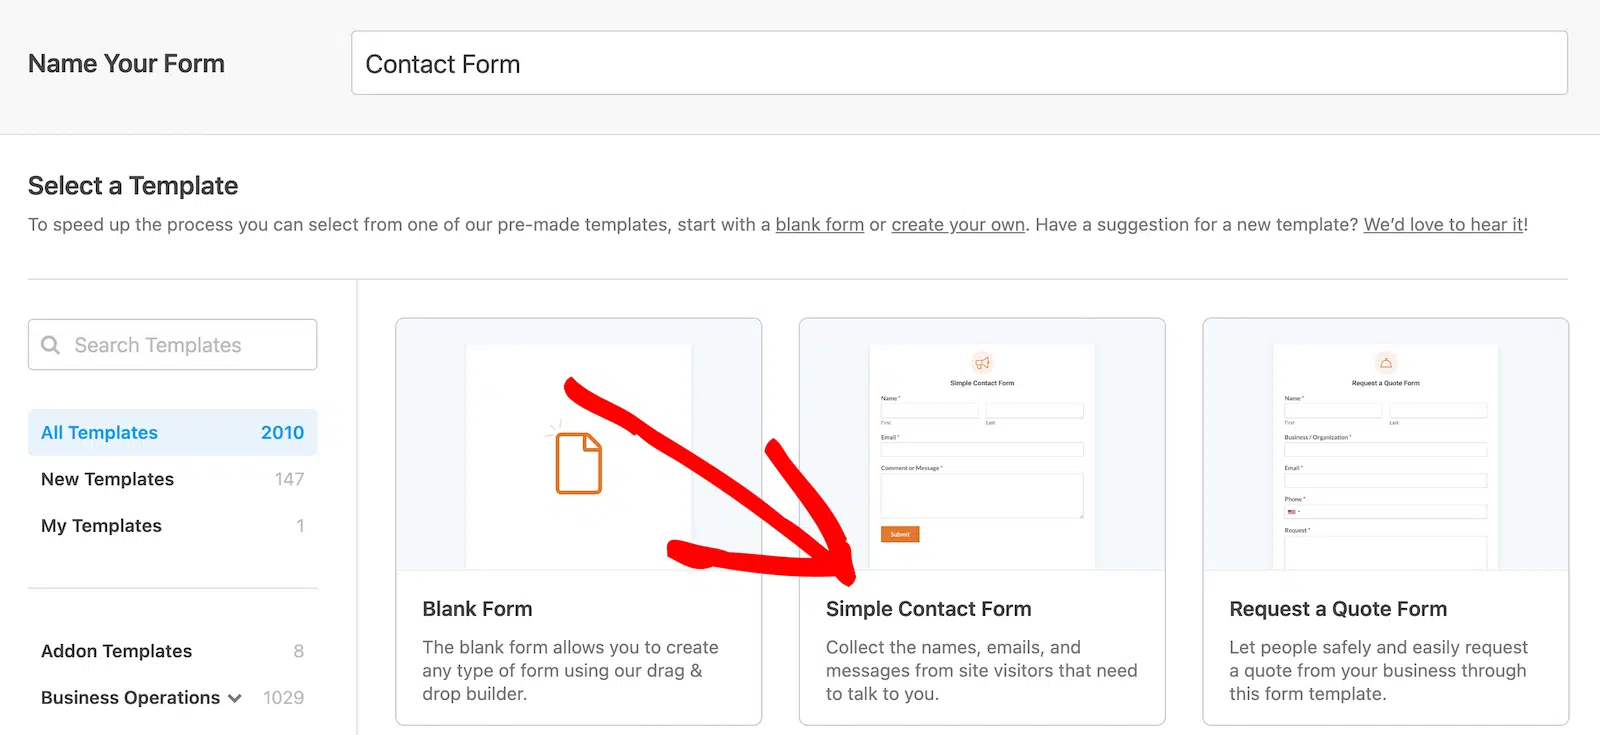
Inside the form builder, go to Settings » PDF and click Add New PDF. A popup will appear asking you to name your PDF.
You can keep it simple (like “Contact Form Entry” or “Default PDF”) or choose something more descriptive.

Once you’ve added a name, click OK to move forward.
Then, you’ll see a few important options right away:
- File name: By default, the file name uses the form name, but you can change it or use a smart tag like the Entry ID.
- Email notifications: Decide which email notifications this PDF should be attached to. This is how the PDF gets sent automatically — no extra steps needed after setup.
- Conditional logic: If you only want a PDF generated under certain conditions, you can enable this option.

2. Choose and Customize a Template
After enabling the PDF, the next step is to choose a template. WPForms includes a wide variety of pre-designed layouts grouped into categories:
- Notifications (Classic, Compact, Modern, Elegant, Tech)
- Documents (Legal, Application, Table, Sidebar, etc.)
- Financial (Invoices and related documents)
- Certificates (Awards and recognitions)

Once you pick a style, you’ll see a live preview on the left side of the screen. This makes it easy to adjust the look before saving.
To take a closer look at your design, click the Zoom button located below the preview.

3. Customize Fields and Content
Every template comes with editable fields.
You can click into any section to replace placeholder text, insert smart tags (like Name, Email, or Entry ID), or adjust colors to match your branding.

For larger content areas — like terms, conditions, or instructions — you can use the built-in text editor. This lets you:
- Apply headings, bold, and italic
- Add links or bullet lists
- Insert smart tags wherever needed
- Even add custom HTML if you want more control

4: Style the PDF Appearance
Next, you can refine the design. WPForms offers over 40 themes, plus full control over fonts, colors, and backgrounds.

Some things I like to customize are:
- Theme colors: Adjust the palette to fit my brand.
- Logo: Upload a logo and position it left, center, or right.
- Backgrounds: Choose from solid colors, gradients, or patterns like ribbons and waves.
- Borders: Add a frame around the content with rounded corners or a styled border.
This is where your PDFs really start to look polished!
5: Adjust Advanced Settings
Finally, you can set technical details like:
- Paper size (A4, Letter, Legal, etc.)
- Orientation (Portrait or Landscape)
- Access restrictions: Limit PDF access to logged-in users, certain roles, or require a password for extra security.

6: Test Your Setup
Submit a test entry to your form. Then check two things:
- Check 1 — The Entries page: Go to WPForms » Entries, open the test submission, and look for the PDF download link. Click it and confirm the PDF opens correctly with your data filled in.

- Check 2 — The email: Open the inbox for the notification email address you configured in Step 1. You should have received an email with the PDF attached. Open the attachment and confirm it looks right.
If both work, your setup is complete. Every future submission will automatically generate and send a PDF — no manual work required.
FAQs on Creating Form Entries from a PDF
We get so many ideas and use cases for converting entries to PDFs, I’ve tried to cover a few of the most common questions here.
Can I use the PDF Addon with WPForms Lite?
No. The PDF Addon requires WPForms Pro or higher.
Can I customize the look of my PDFs?
Yes! You can change colors, fonts, logos, and backgrounds. There are over 40 themes to choose from, plus full field and text editing.
Does WPForms automatically email the PDF when a form is submitted?
Yes — that’s the whole point of attaching the PDF to a notification in Step 1. Once it’s configured, every submission triggers the PDF generation and sends it as an email attachment automatically. No manual work required after setup.
What can I use WPForms PDFs for?
Common use cases include invoices, order confirmations, event tickets, application receipts, legal documents, contracts, and certificates. Any form that generates a document someone needs to save or reference is a good candidate.
Does the PDF Addon support conditional logic?
Yes. You can configure the PDF to only generate when specific form conditions are met — useful if you only want a PDF for certain submission types.
Next, Export Form Entries to CSV or Excel
WPForms gives you several ways to work with your entry data. If you need entries in a spreadsheet format, check out how to export form entries to CSV or export form entries to Excel. You can also automatically send entries to Google Sheets as they come in.
- Check out our tutorials on how to export form entries to CSV or how to export form entries to Excel.
- Learn how to automatically export form entries to Google Sheets.
Want to go deeper on PDF design? Check out How to Generate Branded PDFs with WPForms for advanced template customization tips.
Ready to do more with your forms? Get started today with the easiest WordPress form builder plugin. WPForms Pro includes powerful entry export options and offers a 14-day money-back guarantee.
If this article helped you out, please follow us on Facebook and Twitter for more free WordPress tutorials and guides.


Is it possible to have an email of the entry emailed automatically? Otherwise you have to manually create a PDF every time a new entry comes in.
Hey Andrew – I am afraid, currently there is no built-in feature to convert the entries automatically to pdf. We have a feature request opened for this. I have gone ahead and added your vote to it so that the dev team can consider this for the future.
I am sorry for the inconvenience!
Add my vote for this too!
Hi Libby – Sure, I have gone ahead and added your vote to the feature request.
Thanks 🙂
Another vote for pdf email delivery!
Hey Desiree – Thanks for the suggestion. I have gone ahead and added your vote to the feature request.
Have a good one 🙂
Hello. Where can we vote? I’d like add my vote as well. Is a must if we want to use WPforms to get donations or payments as I need to deliver a pdf as receipt.
Thanks
Hey Jorge – I have gone ahead and added your vote to the feature request. If it helps, you can modify your email notification message and add all relevant details there and the users can print that email meanwhile. I understand this might not be an ideal workaround for you. We will keep this feature on our radar for the future.
Sorry for the inconvenience.
Hi Abhishek,
You can add my vote for this too.
Hey Jérémie- I have gone ahead and added your vote to the feature request.
Have a good one 🙂
Add my Vote as well
Hey Steve- We appreciate your interest here! Yes, I have added your vote to the feature request list.
Have a good one 🙂
Can you please add me to the request list?
Hey Cody- I have added your vote for this feature request! Thanks 🙂
Is this feature coming soon? Would be a GREAT addition!
Hey Michelle – I am afraid I can’t provide any ETA on this, but I have gone ahead and added your vote to the feature request.
Thanks for your patience!
I would like to add my vote to this as well. It’s currently a function we can use in Gravity Forms and may be the one thing that is keeping me from moving all clients to WPForms. Thank you!
Hey Michelle – I totally understand how helpful it can be to email pdf of the entries automatically. I have gone ahead and added your vote to the feature request. Meanwhile, you might try creating the pdf for individual entries as mentioned in this tutorial.
Thanks for your patience.
This article doesn’t help much. I require the form submissions to arrive into my inbox as a PDF attachment. Other forms such as Ninja Forms have this feature, I would have thought this would have been standard for WP Forms?
Hey Khalid- I am sorry for the trouble you are facing here but currently, we don’t an inbuilt feature to send submissions as PDF in Email Notification. I’ve added your vote to our feature-request list.
Thank you 🙂
Add me in for this too! It’d be great to have the option for form responses to be automatically attached to the notification email as a .pdf also
Hi Tom 🙂 No problem, I’ve added your vote and details to this feature request!
Me too! Upvote.
Hey Blake! I’ve added your vote 🙂 We appreciate your feedback, thank you!
I want to VOTE for this too
Hi Sarah! Your vote has been added to this particular feature request 🙂 Thanks!
Please add my vote for this too, this needs to be built in. Performing the manual steps outlined here is simply not viable for many sites.
Hey Chris- I agree how useful the PDF addon in a Notification email can be! I have added your vote to the enhancement list.
Thanks, and sorry!
Can you add my vote for an automatic pdf created and emailed from form submission
Hi Darren! I’ve added your vote to this particular feature request! Thank you for taking the time to let us know what you’d like to be seeing included to WPForms in the future.
Your email address has been added to the list, so when there are updates regarding this feature request, you’ll be receiving those updates as well 🙂
I vote for this too. it would be such a handy feature to keep some recipients out of the admin dashboard 🙂
Hi Noel,
I have added your vote and thank you for sharing your valuable feedback on the benefits of this feature!
Have a good one 🙂
As someone who is contemplating moving an institute’s entire form system over to WPForms from Ninja Forms, I absolutely think this feature and request is essential.
I also see that the original post is almost a year old now… count this as my vote and a call for some kind of update on a timeline.
Hi Lucio! I’ve added your vote and details to this feature request, so you’ll receive news about it when there are updates. Unfortunately we do not have a timeline to provide at the moment, but it is definitely in the works.
If you have any further questions about this, please contact us 🙂
Pease add my vote too!
Hi Luca,
Your vote has been added to the feature-request list 🙂
Thanks!!
Hi, you can add my vote for this too! 🙂
Hi Jan! Thanks for reaching out to us! I’ve noted your interest in this feature and have added your vote 🙂
This feature isn’t yet implemented? Shame. Really need it.
Hi Fr! I’m sorry but our PDF addon is still not available yet as it is a work in progress. I’ve noted your interest in this feature and added your email address to our list so that when we do have news to share about it, you’ll receive updates.
I apologize that we’re not able to provide you with what you’re looking for at the moment.
If you have any further questions about this, please contact us 🙂
Please add my vote for this PDF feature as well.
Hey Liza – I have gone ahead and added your vote to the feature request.
Thanks 🙂
Please add my vote too, thanks 🙂
Hi Bek,
I have added your vote to the feature request! Thank you for your interest 🙂
Please add my vote for this feature as well. We need PDF versions of the completed forms for record keeping.
hey Ryan – I’ve added your vote into our feature request tracker.
I see this is from 2020 – it’s now 2024. Is this feature available yet?
Hey Nancy – I apologize for the frustration that we’re not able to provide the solution you need for now or an ETA if or when this feature will be available.
Due to the large number of feature suggestions we’re receiving from our users, we need to review and prioritize the features and enhancements to be included in each development cycle.
Currently, new features/enhancements get prioritized based on several factors, such as their benefit to the majority of our plugin users, the demand for the feature, as well as development resources required. I have gone ahead and added your vote to keep it on our radar as we plan out our roadmap for the future.
Thanks for your kind understanding 🙂
Hi. Any update on this function? My staff do not have access to the website but need pdf copies of submissions. Please add my vote if this is still open
Hey Willow, I am sorry but we don’t have an update. I have gone ahead and added your vote to the feature request.
Thanks and have a good one
Definitely a much needed feature! Please make the email to PDF happen! It seems there are many of us who could benefit from this.
Hey Beth, I totally agree it would be super helpful to have this feature implemented though we don’t have an update on the same. I have gone ahead and added your vote to the feature request.
Thanks
How do we see the portion of the form that was an uploaded file?
Hey Lori- I’m sorry, but I’m not sure that I understand your question – but we’d be happy to help! Could you please contact us in support with some extra details about what you’d like to be able to do?
Thanks 🙂
Hi! Can users edit their entries to the form?
Hey April – I am afraid currently only logged in users can edit the entries. If your users are registered users on your site and they can log in, I would suggest going through this article and allow required access to different user roles and then they can edit the entries.
I hope this helps!
Feature Request:
I have an existing PDF form with spaces for First Name and Last Name. I also have a WPForm that has FirstName and Last Name. I would (as would many others) like to be able for WPForm extension to be able to map WPForm First Name data to PDF First Name field, and WPForm Last Name data into the PDF Last Name field.
I would like the form to have an option like []Fill in and save PDFForm.pdf
Then when you check the box and click Submit, it will put the proper data in corresponding places in the form and save the form to a .pdf file.
Hey Christopher – I apologize! We currently don’t have a way to map WPForms fields to a PDF form. I do agree it would be super helpful and I’ve added a vote to our Feature request list.
If you need any further help on this please feel welcome to reach out to our support team.
Have a good one. 🙂
I see that there is a “Feature Request” to add a feature of sending the form as a PDF. Is there any movement on this? Was it adopted into a feature? I also DESPERATELY need this feature, as I have a few clients who need the form submission in a PDF or Jpeg, but we cannot use the internal entries feature for security reasons.
Hey Cody – I totally understand how useful it would be to have this feature. I am afraid we can’t provide any ETA on this at the moment. I have gone ahead and added your vote to keep it on our radar as we plan out our roadmap for the future.
Thanks for your patience.
Please add my vote. Than ks.
Hey Derral- Thank you for your interest here! I have gone ahead and added your vote to the feature request list.
Have a good one 🙂
Please add my vote for this too
Hey Kym- I’ve added a vote to our feature request list and we’ll keep it on our radar as we plan out our roadmap for the future.
We appreciate your interest 🙂
Hi Jon – Thanks, I’ve added your vote to the feature request.
Have a good one 🙂
I vote for PDF delivery as well. That is what I was looking for when I came to this post. Thank you.
Hi Zelda- Thanks for the suggestion. I have gone ahead and added your vote to the feature request.
Have a good one 🙂
Please add my vote as well
Hey John- Thank you for your interest here! I have added your vote to the feature request list!
Thanks, and have a good one 🙂
I have a few enquiries to make:
1. Is it possible for a user to print a summary after the form is filled from the front end?
An example is after filling school admission forms, one is able to get a printable version of the details he/she has entered. They print or save as pdf for reference.
2. I would also like to know if it possible for users to fill forms, and continue later. In that case, if a code will be generated for the user if they are exiting without completing the form, that they re-enter to continue from where they stopped.
Hey Eric! We don’t have a built in option for printing a summary for your users, but you can achieve a similar result by either including your form’s just collected data into the form’s confirmation message, or in a Notification email. You’ll need to leave some information for your users to print the data via their browsers built in print feature.
As for allowing users to partially fill forms for later completion, currently our plugin does not have this feature. I do agree it would be super helpful, though. I’ve made a note of the feature request and we’ll keep it on our radar as we plan out our roadmap for the future.
If you have a WPForms license, you have access to our email support, so please submit a support ticket.
Otherwise, we provide limited complimentary support in the WPForms Lite WordPress.org support forum.
I hope this helps!
I would like to see this feature as well.
Hey Bryan- I’ve added your vote to the list. We appreciate your interest! 🙂
Thank you!
Add my vote to this list please. Would be great if the PDF is attached automatically to the email too.
Hey John– Yes, I have added your vote to the feature request list.
Have a good one 🙂
Please add my vote to this. The text email of form entries makes it add to attach to client profile.
FYI – forminator and E2Pdf have this feature.
Thanks
Hi Tayo! I’ve added your vote and details to this feature request, so you’ll receive any updates about it when it becomes available 🙂
Thanks!
Hello there,
I’m adding my vote to this list too. Would be great if the PDF is attached automatically to the email. Please let us know !
Hello Raïssa! I’ve included your vote to this feature request, as well as your information, so when we have updates regarding this feature you’ll get notified 🙂
Thanks!
I would like to add my vote as well for the PDF automatically as an attachment. I would also like to request a feature of exporting multiple entries as PDFs.
Hi Felicia- We have added your suggestion and vote on the list of feature requests.
We appreciate your interest here 🙂
I would like to add my vote as well for the PDF automatically as an attachment. It is essential in my opinion to remove this very repetitive and restrictive manual task that can be done automatically. Let me know. Thank you
Hi Loïc! Thanks for letting us know 🙂 I’ve added your vote and information to this particular feature request, so you’ll be receiving an update when it becomes available. While we don’t have a delivery date for this feature yet, it is in progress, so please bear with us a while longer 🙂
Add my vote to send as pdf as well please, how many votes does it take for it to happen?
Hi John,
Thanks for sharing your vote here! I have added to the list. Currently there is no ETA on this feature. I agree it would be pretty useful; So I have added your vote the list. This way you’ll be notified if the feature is approved and made live.
Thanks again for the suggestion and I am sorry for the inconvenience!
Add my vote too please
Hi Mala! No problem, your vote has been added to this feature request 🙂
Hi Henry,
Is there any development on this?
Thank you,
V
Hi Vanessa!
I apologize but at this time we do not have any updates regarding the development of the PDF addon. It is something that we’re working on adding in a future update though 🙂
I’ve added your email to our list to receive updates about this particular feature request, so when there is news about it, you’ll receive updates.
Thanks!
Add my vote, as well.
Sure thing Tyler! It is done and your email has been added to the list as well, so when there is news about this feature, you’ll receive updates.
Thanks!
PLEASE for the love of god, make this a reality , it cannot be that much dev time 😉
Hi Adam! At this time we don’t have an ETA for when the PDF addon would be released, but it is definitely coming up 🙂
I’ve noted your interest in this feature and added your email to our list to receive updates about this feature.
Wow…what a bummer that this email a PDF feature has not been finished yet. I just purchased this WPForms Pro version to allow us to have clients online sign a waiver of liability, release, hold harmless, etc….forwarding a PDF copy to the person who just did all the signing is the standard practice for follow up….you guys need to knock this problem out soon…
Hi Steve! I apologize that we don’t have the PDF addon ready yet, nor do we have an ETA currently. It is something that is in the works though, so please check back in the future 🙂
I’ve also noted your interest in this feature and added your email to our list, so you’ll receive news about this particular feature as they come available.
Thanks!
In addition to voting for this to become an addon, I would also suggest that the resulting PDF has a way to have a header with the logo and the title you want to give to your form, instead of the internal display that says Contact Form – Entry #23.
Also a footer area predesigned where we can add a standard predetermined message to the client, like “Thank you for submitting your information” or “This quotation will be valid for such and such time”, etc.
Hi Monica,
Sure thing! I have added the suggested details to the existing Feature Request. We appreciate your interest and thank you for sharing your valuable idea!
Have a good one! 🙂
Any updates on the addon you guys are going to develop? Im anxiously waiting for that. Please add my vote also.
Hi Bangash.
I apologize that we don’t have the PDF addon ready yet, nor do we have an ETA currently.
I’ve noted your interest in this feature and added your email to our list to receive updates about this feature.
Thanks and have a good one!
I am interested in this feature as well please. Thank you!
Hey Ken, thanks for reaching out to us!
I’ve noted your interest in this feature and added your email to our list to receive updates about this feature.
Thanks and have a good one!
Hello, we have been waiting on the PDF addon update since 2020 its been the same response “we are working on the feature, no ETA yet”. It’s becoming quite frustrating, look at all of the votes and requests for this feature. Please give us an update on this request ASAP or should we begin to look for alternatives? Thanks
Hey Eyad,
Whereas we strive for the best to keep our customers updated once the features are released, I apologize that we don’t have the PDF addon ready yet. Giving an estimated time when the feature may be released is not possible at the moment but I will share this feedback with our team. I apologize for the same.
I’ve noted your interest in this feature and added your email to our list to receive updates about this feature.
Thanks!
Add me to the PDF addon list!
Hey Karri, I’ve noted your interest in this feature and added your email to our list to receive updates about this feature.
Thanks!
Add me to the PDF addon list!
Hey Pascal – I’ve noted your interest in this feature and added your email to our list to receive updates about this feature.
Thanks!
Like other commenters here, I found this post because I want WPForms to send a PDF along with the notification email.
I use WPForms for lengthy client onboarding questionnaires, and I want to simply download the PDF from the notification email and upload it to our client project folder where everyone on the team can easily find it.
Yes I can add everyone’s email to the notification settings, but this email will get lost in all the other emails.
Hi Clark – I apologize we can’t provide what you are looking for at the moment.
However, I’ve noted your interest in this feature and added your email to our list to receive updates about this feature.
Thanks!
Why is it taking so long for the pdf addon to arrive? Is there really no deadline?
Is this such a big problem?
Hey Pascal, I apologize for the frustration that we’re not able to provide the PDF addon update at the moment.
Due to the large number of feature suggestions we’re receiving from our users, we need to review and prioritize the features and enhancements to be included in each development cycle.
Currently, new features/enhancements (for recent updates, please check our announcement page) get prioritized based on several factors, such as their benefit to the majority of our plugin users, the demand for the feature, as well as development resources required. Unfortunately, for now, we don’t have an update regarding the PDF addon.
However, we do appreciate these feature suggestions and keep them for future review. I’ve noted your interest in this feature and added your email to our list to receive updates about this feature.
I apologize again for any trouble with this.
Thanks!
People have been asking for this feature for 2 years. Please stop lying to everyone, “we dont have an update at the moment”? Dude, it’s been 2 years of people asking and your team leading everyone on. Ridiculous
Hey there, Whereas we strive for the best to keep our customers updated once the features are released, I apologize that we don’t have the PDF addon ready yet. Giving an estimated time when the feature may be released is not possible at the moment but I will share this feedback with our team. I apologize for the same.
I’ve noted your interest in this feature and added your email to our list to receive updates about this feature.
Thanks!
May be possible to place a field mixing it with text to simulate a paper form (i.e. “I, the undersigned ___name field___ , born in ____born city field___…”) so when I prin the PDF I obtain the same paper form? Thank you.
Hi Giacomo,
Currently, we do not have a built way to achieve this form structure. By the way, great suggestion! I’ll go ahead and add your vote to consider this as a feature request for future enhancements.
Thanks 🙂
I’ve just purchased WP Forms Pro and emailing a PDF is literally the most important part of what I need to use this for. I read somewhere else that it was possible in this form but the solution available is not what I need.
Can you tell me if this feature is due to be released in the next month or if I should just request a refund now?
Hey Jon, to ensure we are as thorough as possible and to avoid any confusion, please allow us to respond via email support. Thanks!
Emailing entries in PDF should be a standard as it is available in other WordPress form plugins. I’m also voting to have this feature added to the WP Forms.
Meanwhile, is there a progress on this feature request? I can see many people already voted for this feature to be added to the plugin.
Hey Olufemi, Whereas we strive for the best to keep our customers updated once the features are released, I apologize that we don’t have the PDF addon ready yet. Giving an estimated time when the feature may be released is not possible at the moment but I will share this feedback with our team. I apologize for the same.
I’ve noted your interest in this feature and added your email to our list to receive updates about this feature.
Thanks!
Agreed that we need this! Another vote from me
Hey Luke, I have gone ahead and added your vote to the feature request.
Thanks
Another vote from me!
Vote PDF for 2023 !
Hey Max, I have gone ahead and added your vote to the feature request.
Thanks.
Please, there seems an abundance of votes for this feature and it seem unusual that this would not yet be actioned three years later. Please add my vote, and consider the amount of customers who may be exiting because this feature is not available.
Hey Rowen, Whereas we strive for the best to keep our customers updated once the features are released, I apologize that we don’t have the PDF addon ready yet. Giving an estimated time when the feature may be released is not possible at the moment but I will share this feedback with our team. I apologize for the same.
I’ve noted your interest in this feature and added your email to our list to receive updates about this feature.
Thanks!
Hi, I have one of the paid versions of WPForms, not sure which one. I am aware that I can export individual entries and I can also export all my entries, I was wondering if I could export the ones that I have selected only.
Hi Angel,
You can absolutely export the entries individually too. Please see this complete guide on Entry Export
Hope this helps 🙂
yes i really need a feature that after they fill in the form – that it puts that data into a PDF template (that has logos and other information as well) and auto sends it to a dept lead
i dont really want to have to now go buy another tool – i am happy with wpforms so far – but i need this functionality now
Hi Andy,
We apologize for the delay and frustration you are facing here! Pleas know that this feature is still in development stage. We will notify you once this is live.
Thank you for understanding!
I am actually shopping for a forms service with this solution explicitly. I am surprised you do not have this feature after 20 months of replies and “votes”. If this feature happens to complete sometime in the next 3 months, I would like to use your service exclusively.
Hey Corinthia, Whereas we strive for the best to keep our customers updated once the features are released, I apologize that we don’t have the PDF addon ready yet. Giving an estimated time when the feature may be released is not possible at the moment but I will share this feedback with our team. I apologize for the same.
I’ve noted your interest in this feature and added your email to our list to receive updates about it.
Thanks!
Hi there,
Whats the status of this?
Can you tell us how many votes this request has and where it stands in comparison to other requests as well as the estimated dev time (which your team should have if this request has been taken seriously)?
Hey Luke – Our developers are working to have this feature in the plugin, and while I’m unable to share an ETA I can assure you that it’s on the radar.
I really need Emailing entries in PDF should be a standard as it is available in other WordPress form plugins.
I’m also voting to have this feature added to the WP Forms.
Hope this addon will be lunch as soon as possible
Hey Ramesh – I do agree it would be super helpful, though. I’ve made a note of the feature request and we’ll keep it on our radar as we plan out our roadmap for the future.
In the meantime, there are a couple of options you could consider, depending on your particular goals:
1) You could set up form notification emails to send an email with the content of the submitted entry. Most browsers will then let you save an email as a PDF (here’s an example for Chrome). In case it helps, here’s our tutorial on setting up notification emails.
2) You could manually create PDFs of each entry. Here’s our tutorial with all the details.
3) You could attach a downloadable CSV file to the email notification that contains the information users submit through your form. This file can also include extra data points such as the entry ID, user’s IP address, and more. Here’s our tutorial with all the details.
I apologize that we can’t exactly provide what you’re looking for right now, but I appreciate the suggestion!
Thanks.
Hi There
I have read the post to convert your form to pdf and download it, how erver this is a lengthy method and tedious for a large quantity of form submissions.
I have also seen that an addon is on your development list as you have stated how ever since 2020 a huge amount of people have been asking for this addon to make it easier. This is almost 4 years later.
GUYS YOU NEED TO WAKE UP AND SMAIL THE COFFEE AND START LISTENING TO YOUR CLIENTS OR POTENTIAL CUSOMERS
and I am not been unreasonable here how ever the time period in really bad for so many people to ask for this pdf addon functionality.
Please I am also now asking for this addon to be done with a bit more hast and speed.
Hey Shane – The PDF addon is under active development, I’ll add your vote into our feature request tracker to expedite the process.
this guy is 100% right.
add me to the list of folks that need this feature
Hey Mike – Sure, I’ll add your vote into our feature request tracker to expedite the process.
Thanks!
Pre-purchase question :
Any news about the feature of that after they fill in the form – that it puts that data into a PDF template and auto sends it to a dept lead?
Please give me a final answer so as to know if I buy wpforms or some another plugin.
Hey Giota – This feature is already in our developer’s radar but we’re not able to provide an ETA of when this feature will be available.
Due to the large number of feature suggestions we’re receiving from our users, we need to review and prioritize the features and enhancements to be included in each development cycle.
Currently, new features/enhancements get prioritized based on several factors, such as their benefit to the majority of our plugin users, the demand for the feature, as well as development resources required. Unfortunately, for now, the feature you’ve requested is not something that many users have asked for.
However, I made sure that your email is noted in the feature request report so that you will get an update in case this feature will be available in a release.
We do appreciate these feature suggestions and keep them for future review.
Thanks 🙂
Another vote for pdf email delivery!
Hey Joardy – Thanks for the vote. I have gone ahead and added your vote to the feature request.
Have a good one 🙂
wow. Jotform has an entire business model built on multiple PDF downloads and form data emails, Something is wrong if you don’t feel this would be a popular feature.
Hey Mike – The ability to generate a PDF automatically for submitted entries is on our feature request tracker, and we hope to have this addon soon in one of our future updates.
It’s about time !
Hey Pascal- I agree how useful the PDF addon can be! I have added your vote to the enhancement list.
Thanks 🙂
Hi dear admin, maybe after three years of voting, you could really prioritize this thing, what do you think? thank you for letting us know about the delivery time.
Hey Jan – This feature is already in our developer’s radar but we’re not able to provide an ETA of when this feature will be available.
Due to the large number of feature suggestions we’re receiving from our users, we need to review and prioritize the features and enhancements to be included in each development cycle.
Currently, new features/enhancements get prioritized based on several factors, such as their benefit to the majority of our plugin users, the demand for the feature, as well as development resources required. Unfortunately, for now, the feature you’ve requested is not something that many users have asked for.
However, I made sure that your email is noted in the feature request report so that you will get an update in case this feature will be available in a release.
We do appreciate these feature suggestions and keep them for future review.
Thanks 🙂
Can you add my vote for this feature as well. It would be really helpful after an entry is submitted we can email a PDF to our customers.
Hi Elliott – Sure, I have gone ahead and added your vote to the feature request.
Thanks 🙂
I voted for this back in 2021. How many are needed for this to become reality?
Hey Noel – This feature is already in our developer’s radar but we’re not able to provide an ETA of when this feature will be available.
Due to the large number of feature suggestions we’re receiving from our users, we need to review and prioritize the features and enhancements to be included in each development cycle.
I made sure that your email is noted in the feature request report so that you will get an update in case this feature will be available in a release.
We do appreciate these feature suggestions and keep them for future review.
Thanks 🙂
Looks like the only option is to unsubscribe and no longer pay for this plugin since this company is clearly not interested in listening to it’s customers for nearly 5 years.
Hey Tariq. I understand your frustration and we definitely appreciate your patience. It would help us a great deal if you could share your ideal workflow and how the PDF addon would help? We have a number of requests for this addon with a diverse range of use cases. Knowing how it will be used helps us to understand how we might approach it. We can pass this on to our Product Lead as she plans our roadmap for the future.
If you have a WPForms license, you can send your comments to our trusted advisors in the support team and they will log a feature request. Please submit a support ticket when you have some time.
Thanks!
Hi again Tariq. Just to let you know, this tutorial has now been updated with a new workflow that will help you to achieve what you need. Hope it helps!
I too would love to have this feature, but I think you’re being unfair. This isn’t a trivial feature to add, though it would no doubt be useful to some.
The article does a pretty good job of describing how we can get this done – I learned quite a bit in the process. One thing I learned is that this isn’t magic! For a simple contact form, it’s no problem, but in cases where a form has a dozen or more fields, it becomes complicated. I don’t see any WPForms competitor providing this feature, so all we have is Zapier/PDF.co or we do this manually in the WPForm entry page.
I’ve been tasked by employer to see if it’s possible to have automated PDF generation for each form submission on a particular form, but I think we’ll have to do it manually. It’s 3 or 4 steps, depending on how you do it (printing from the emailed form, or from the form entry page).
Anyway, yes, count me in for this feature, but I get it – it’s not easy!
Thanks for your feedback, John. I’m glad the updated version of this tutorial has been helpful in explaining the process of PDF generation from form entries.
Dear Claire, I have read a number of negative comment regarding the Zapier Plugin, and how can I circumvent using it, if I only require the Form to generate a pdf?
Hi Nadja,
Using Zapier is an easy workaround for generating PDFs in WPForms. But I agree with you that it’ll be a handy feature to have in the WPForms plugin. I’ve added your suggestion to our feature requests so our Devs can consider it for future releases.
I don’t like this workaround. When you download the filled forms from the backend, there are different lay-out possible. Why is the standaard filled form always the less beautifull one. Why can’t we just use one of the lay-outs used at the back-end?
Hi Daniel,
Because this workaround uses a custom template, it doesn’t allow changing the layout from the backend at this time.
Good news is there is a feature request open for this, which is currently under discussion. But I apologize there isn’t currently a built-in solution to customize PDF layout.
Hi Claire! Thanks for your step-by-step guide making this possible. The zapier part was very tricky, reading carefully is the way to go 😉
If there would be a pro built-in option in future, to attach wpforms entries as pdf – it would be awesome!
Looking forward to your next helpful blog post.
Best regards,
Alex
Hey Alex, glad you found it helpful. I agree that a built-in solution will be beneficial.
There is an open feature requests for this functionality and I’ve added your vote to it. Our team actively review these requests for future releases.
Thanks!🙂
Are there any plans (possibly paid ones) to implement an alternative approach for the automated sending of form content via email with PDFs that also allows users in Europe to comply with the GDPR? In my opinion, this is not the case with either pdf.co or Zapier.
Hi Michael – Thanks for the suggestion! We’ve received similar feature requests and do have something in the works that we hope will help with this. While I don’t have an ETA or full details to share just yet, it’s definitely on our radar. Thanks!
It seems there have been plenty of votes since 2020 but nothing has happened on the auto pdf feature. Am I right in saying it’s not a priority or not going to happen?
Hi there,
Good news — the automatic PDF feature is now available. The PDF Addon was released with WPForms 1.9.7.3, and it does exactly what was requested in this thread: automatically generates a PDF from each form entry and attaches it to your notification emails.
This tutorial walks you through the full setup: PDF addon. If you run into any trouble getting it configured, please submit a support ticket and our Trusted Advisors will be happy to help.