AI Summary
I’ve noticed that new businesses tend to get a little hyperfocused on lead generation strategies and end up ignoring an equally important aspect of business growth – monitoring your lead sources.
Knowing which specific forms and pages on your site are attracting the majority of your leads is important. I’ve often spent days developing a new lead magnet strategy, only to discover later that a much simpler form elsewhere on my site is outperforming my clever new ideas.
I’d never be able to make discoveries like these without tracking my lead sources.
And the thing is, you absolutely don’t need to be a data wizard to set up lead source tracking or understand what’s really converting people to your website.
In this article, I’ll show you the best way to track a lead source in WordPress so you can focus on sources that are more profitable for your business.
Track Lead Sources With WPForms Now 🔍
Before we proceed, let’s first understand what lead source tracking is and why you should track the lead source.
What Is Lead Source Tracking?
Lead source tracking is a process of monitoring the sources/leads that bring traffic and convert prospects into customers on your website.
In simple terms, it’s a tracking process that helps you identify leads for your website.
So, now that you know what lead source tracking is, let’s talk about why you should do it.
Why Should You Track Lead Sources?
Tracking a lead source is important because it helps you track where exactly your buyers are coming from, how they find your site on the web, and which sources they are using to reach your website.
Based on the lead sources’ data, you can improve your brand marketing. You’ll know exactly which sources are most valuable and which area you should focus on more. In addition, it allows you to understand user behavior and gives you a clear idea of how your visitors are interacting with your website.
Lead source tracking helps you to find out:
- Which marketing campaign is performing well.
- How many lead sources are coming directly from organic searches.
- Which social media channel to focus on.
- Which referral sites are fetching more traffic.
How to Track a Lead Source in WordPress
There are many ways you can set up lead source tracking, but for this tutorial, I’ll only focus on the quick and straightforward methods you can use.
For that, I’ll be using the WPForms and MonsterInsights plugins. Using these plugins, you can easily track leads on your website without touching a single piece of code.
Method 1: Use the WPForms Plugin
In this method, we’re going to use WPForms’ powerful User Journey addon.
The User Journey addon helps you track your web form leads. It enables you to check how your visitors interact with your web forms, how many people fill out your forms, and which form they engaged with the most.
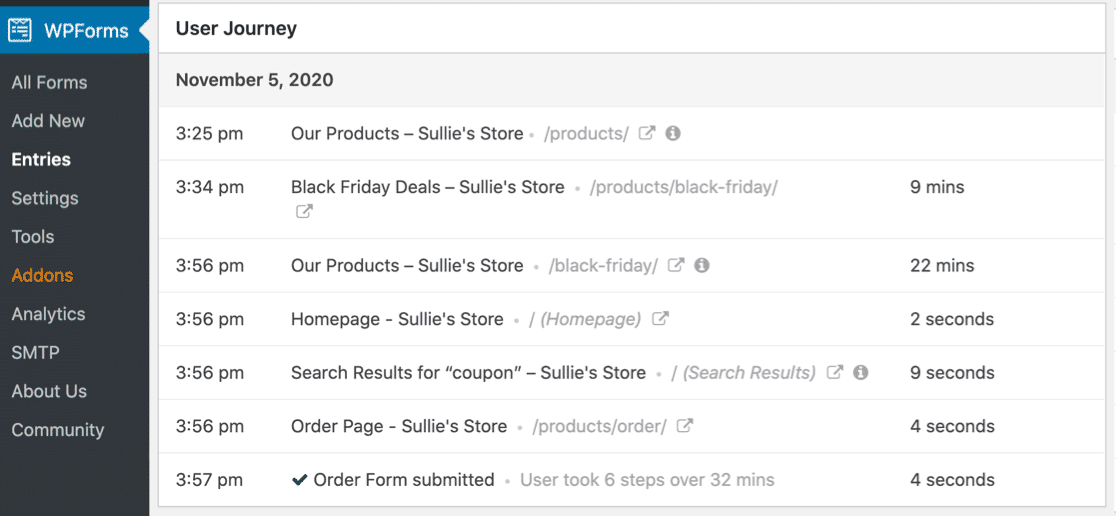
This is what a User Journey report looks like in your WordPress dashboard.
Let’s see how you can use this addon to track the lead source.
Step 1: Install and Activate WPForms
Before we start, make sure you’ve installed and activated the WPForms Pro plugin on your WordPress site. WPForms Pro comes with a host of other useful lead generation features, including highly engaging Lead Forms, the ability to capture partial entries from abandoned forms, syncing your forms with a spreadsheet with the Google Sheets integration, and more.
The installation only takes a few minutes. If you’re not sure how to install a WordPress plugin, check out this guide on installing WPForms on your site.
Step 2: Install and Activate the User Journey Addon
Once you’ve installed and activated the WPForms plugin, you’ll be able to install and activate the User Journey addon.
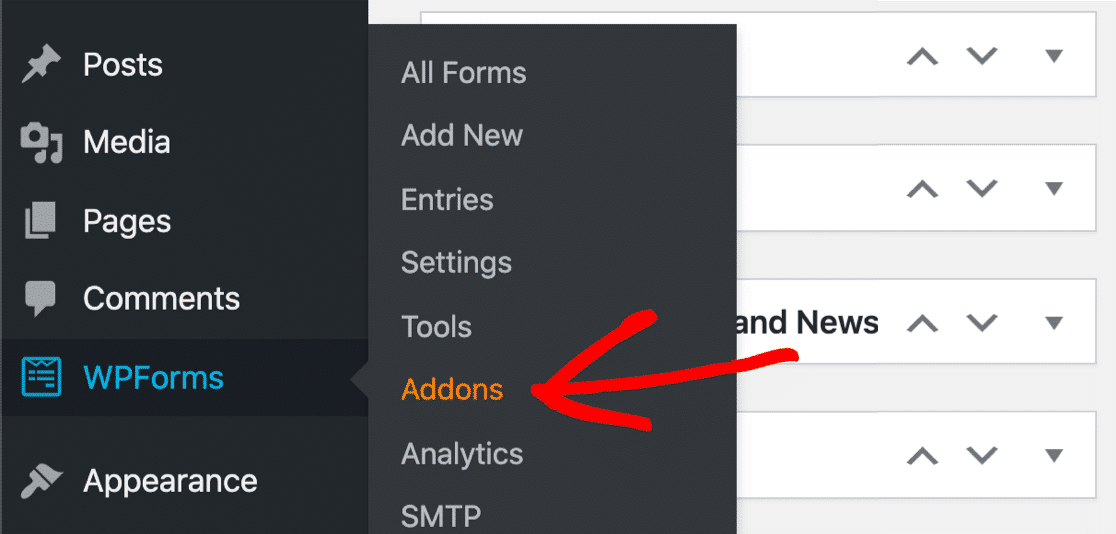
To install the addon, go to your WordPress dashboard and click on WPForms » Addons.
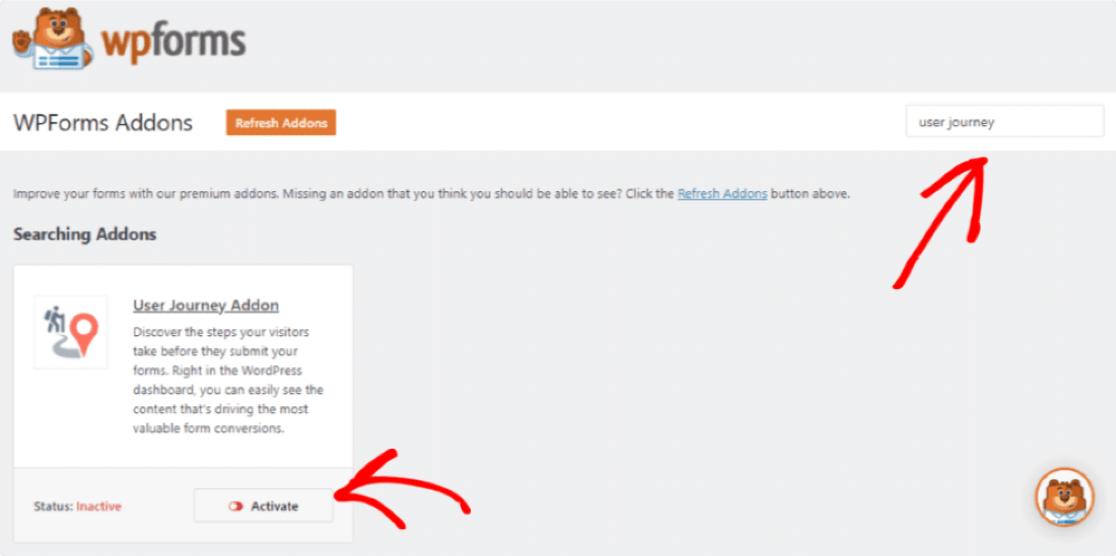
In the search bar, type User Journey addon and install the plugin.
Need more help with this step? Check out our guide on how to install and activate the User Journey addon.
Step 3: View Report to Track Lead Sources
Once you’ve activated the addon, you can check your user journey report.
To view the report on your dashboard, go to the WPForms and click Entries. Here, you can see the list of forms you’ve created with WPForms. Click on the name of the Form to see more details.
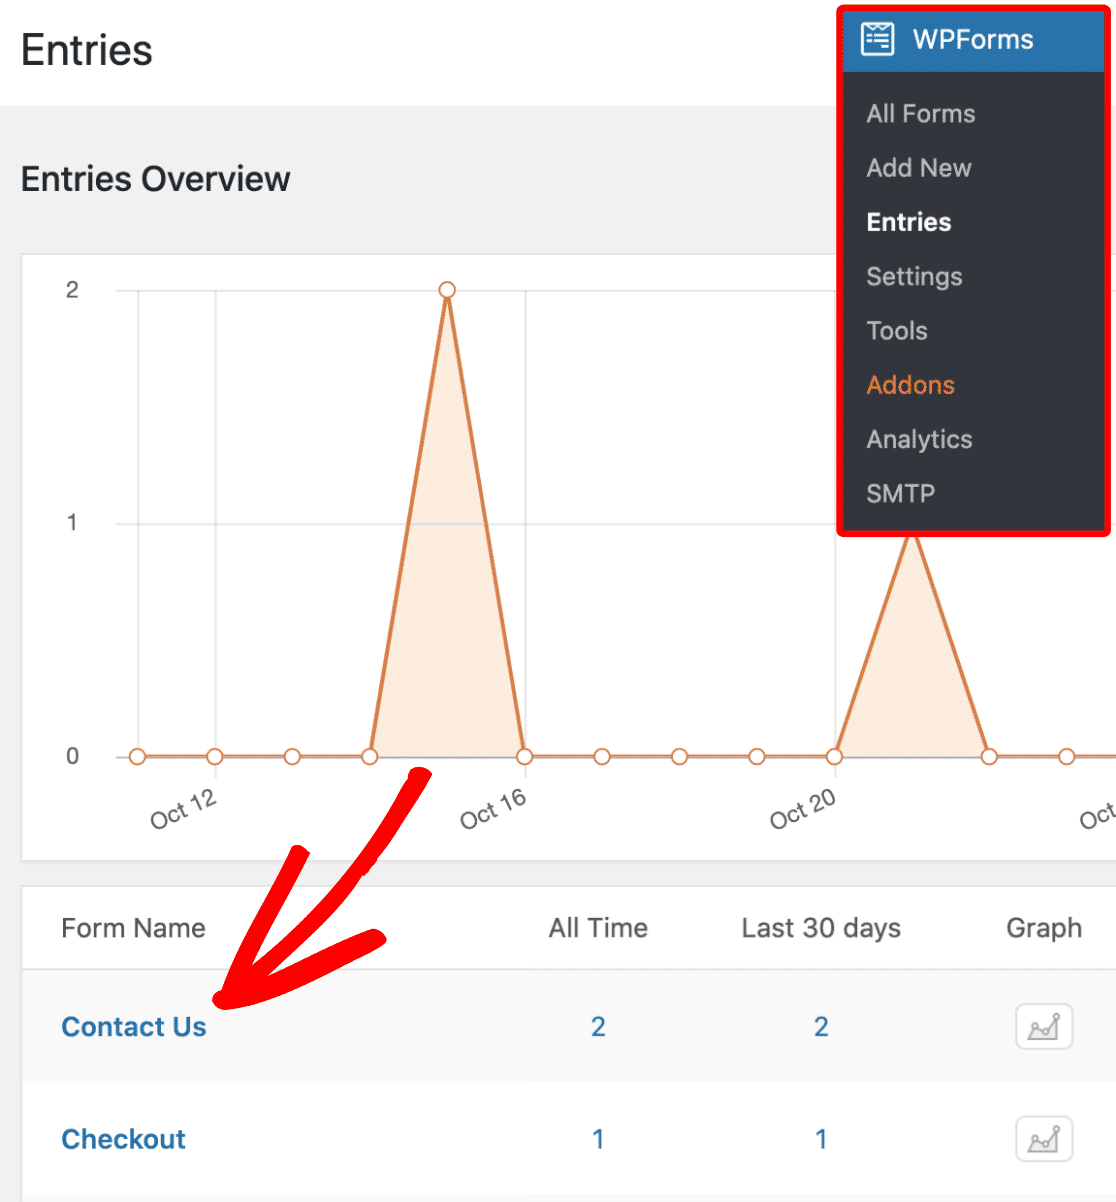
On the next page, you’ll see the list of users who submitted the form. Now, to view the user’s journey details, click the View button on the right.
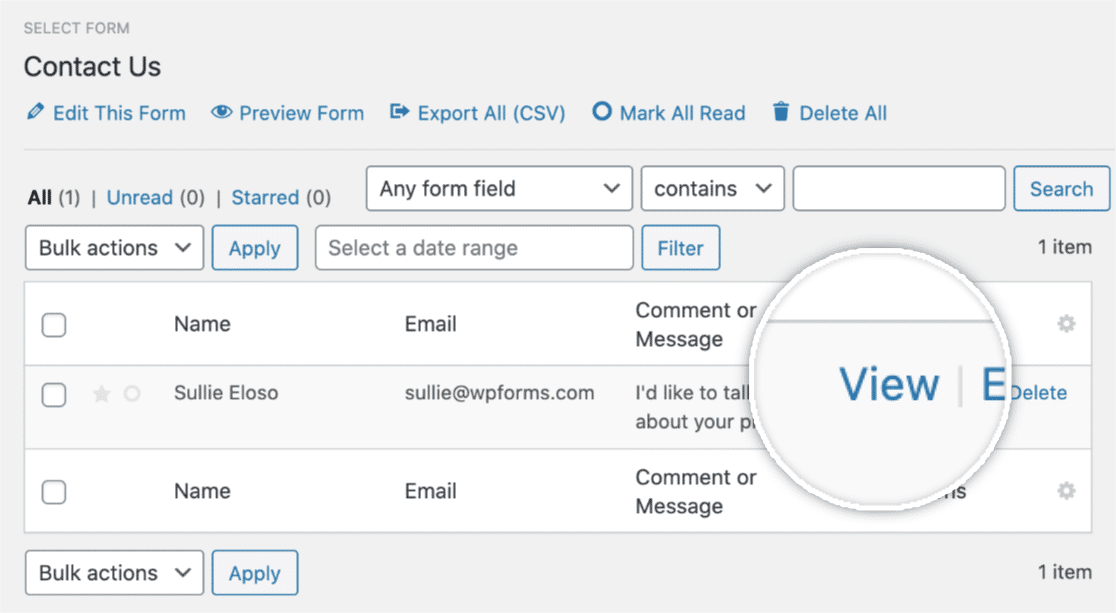
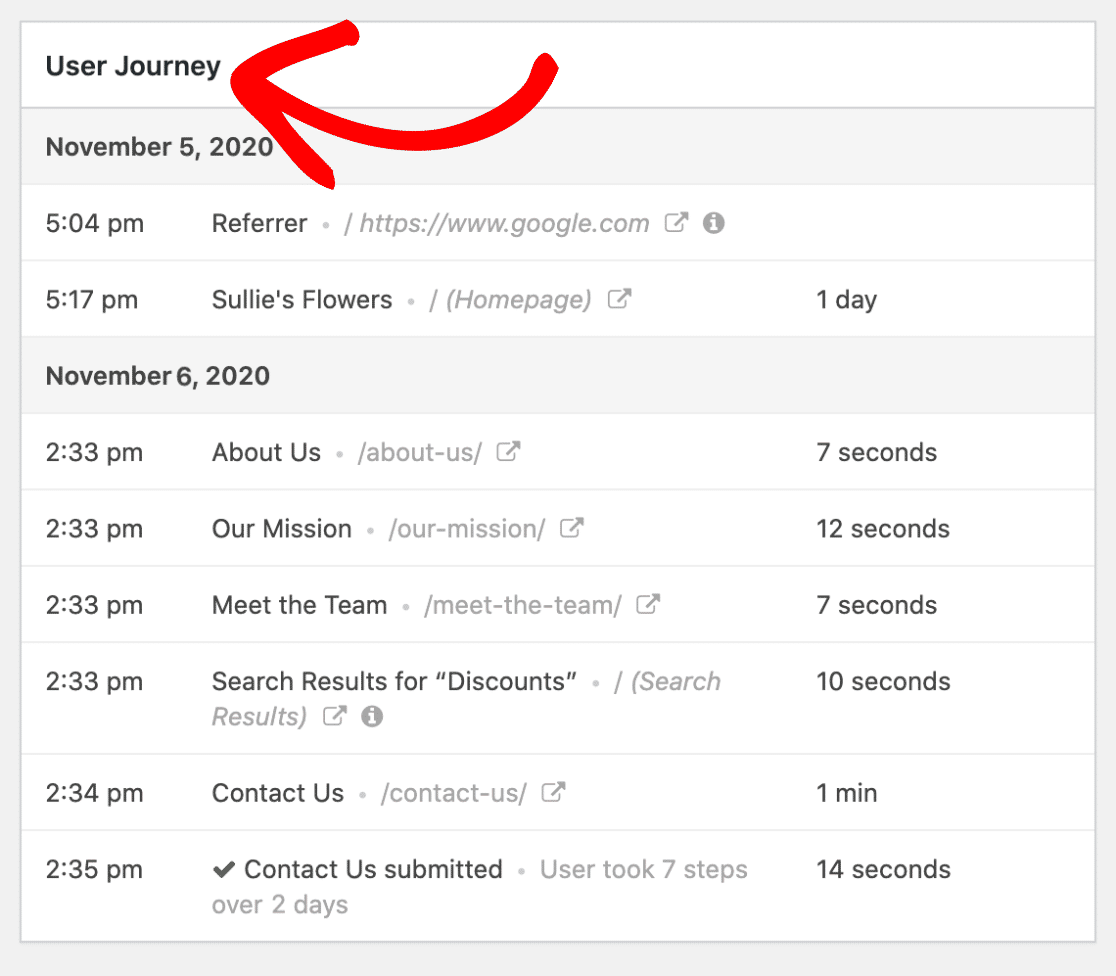
Once you’ve opened the user’s details, scroll down the page until you see the User Journey section.
In the User Journey section, you check every single step a user took before submitting the form. It shows you a referral source, which pages the user viewed, the date, time, and how much time the user spent on each page of your website.
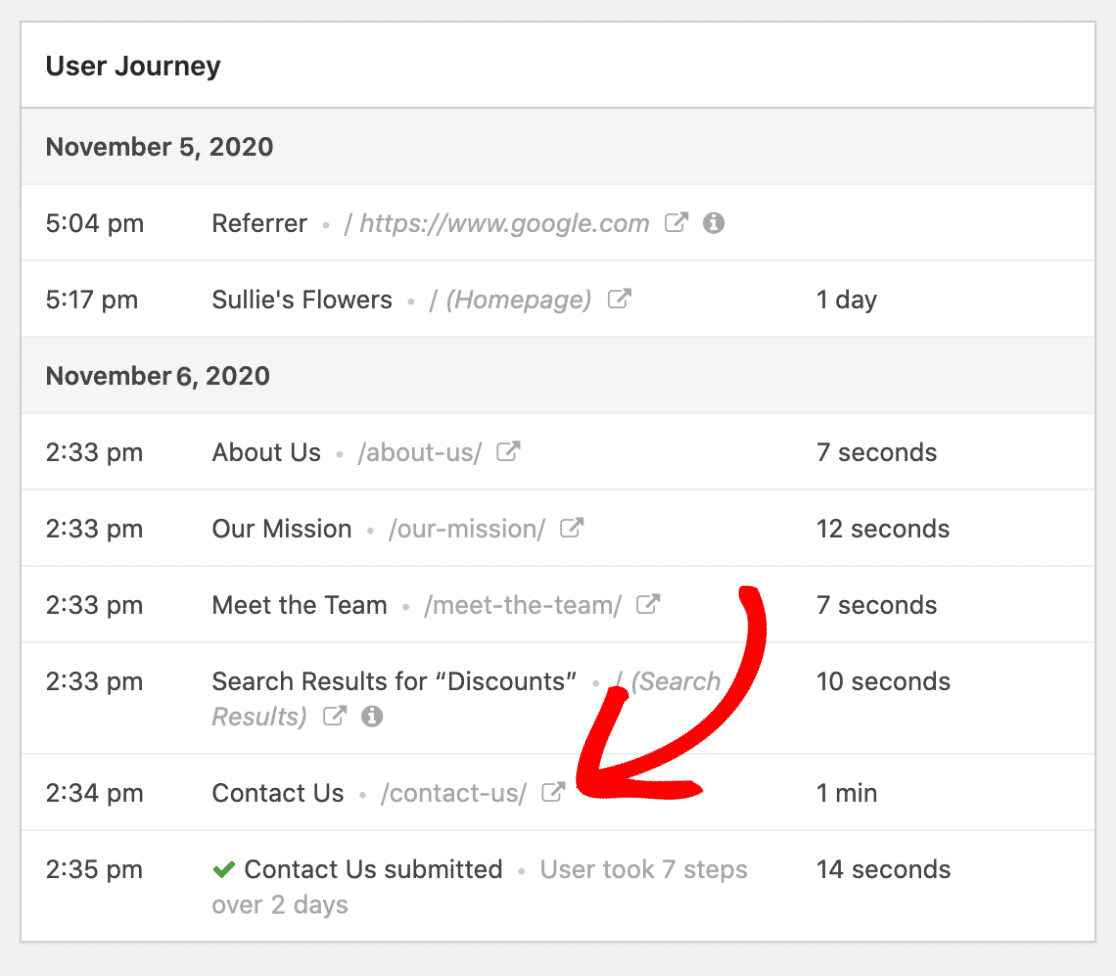
Also, you can view the visited page by clicking the Open Window in a New Tab icon.
Moreover, you can view the URL parameters by clicking the little Info icon.
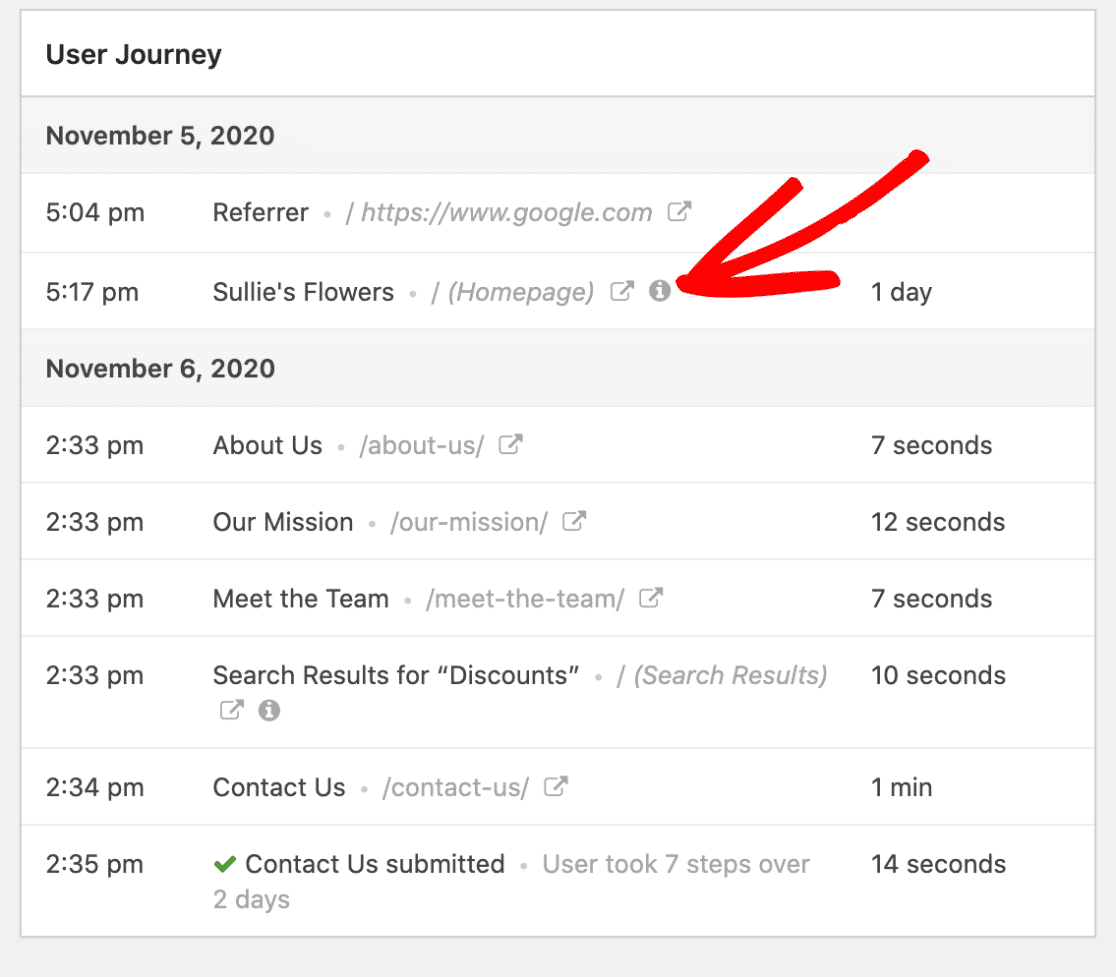
All of this is super valuable information that depicts the actual journey and steps a given user performed before filling out your form. This is how you find out which web forms are performing well and converting leads on your website.
Method 2: Use the MonsterInsights Plugin
In this method, I’ll be using MonsterInsights and its Forms addon to track lead sources.
MonsterInsights is the best web analytics plugin for WordPress. It makes it easy to embed Google Analytics on WordPress websites without editing code and asking developers for help.
One of the benefits of using MonsterInsights is that you can see all your website analytics data on your WordPress dashboard.
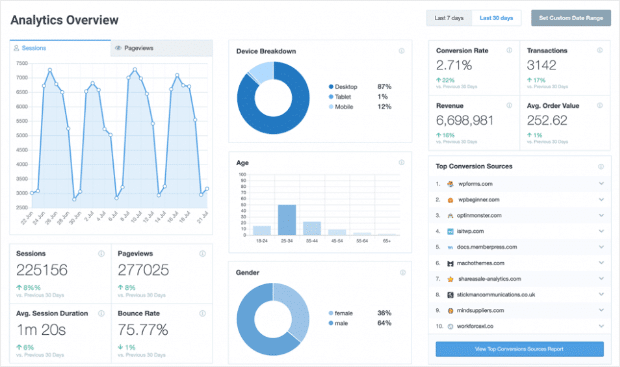
It doesn’t matter if you’re not an analytics expert; MonsterInsights breaks the Google Analytics complex data into interactive reports that are easy to understand.
Step 1: Install and Active the MonsterInsights Plugin
To get started, first, you need to install and activate the MonsterInsights plugin on your WordPress website.
You can begin by purchasing the MonsterInsights plugin. Once you complete the purchase, log into your MonsterInsights account.

Next, click on the Download MonsterInsights button to download the plugin’s zip file.
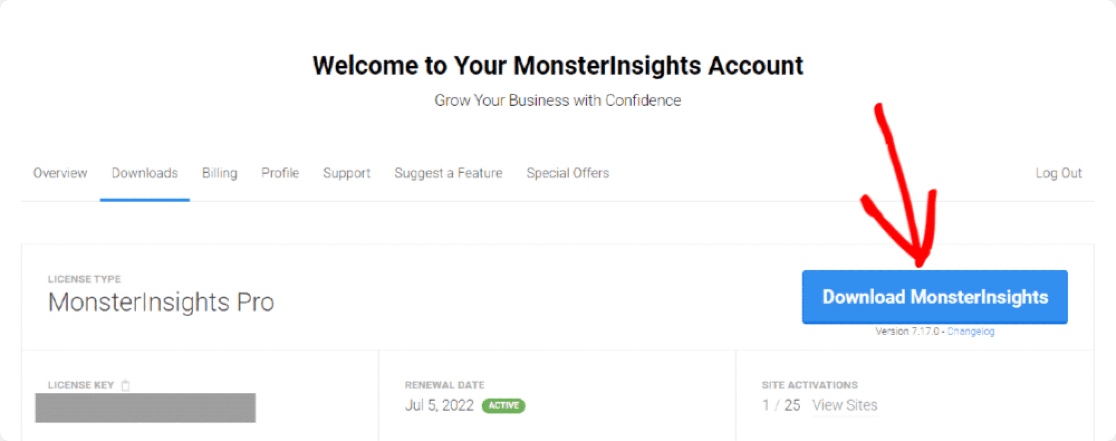
Now, head over to your WordPress website, Go to the dashboard, click Plugins » Add New.

Click on the Upload Plugin button.

Choose your zip file, click the Install Now button.

After the installation process completes, click on the Activate Plugin button.

Great job on activating the MonsterInsights plugin, let’s go ahead and set it up now.
Step 2: Set up the MonsterInsights Plugin
As soon as you click on the activate button, the MonsterInsights Setup Wizard page will open. Next, click on the Launch the Wizard button.

The wizard setup process is pretty easy, and you just need to follow the instructions.
First, you need to choose the category that best describes your website. Once done, click the Save and Continue button.

Now in the second step of wizard setup, you need to add your License Key and connect your Analytics account with your WordPress website. To get your license key, go back to your MonsterInsights account. Under the Downloads tab of your account, you’ll find your license key.
Copy the key, paste it into the License Key field, and click the Connect MonsterInsights button.
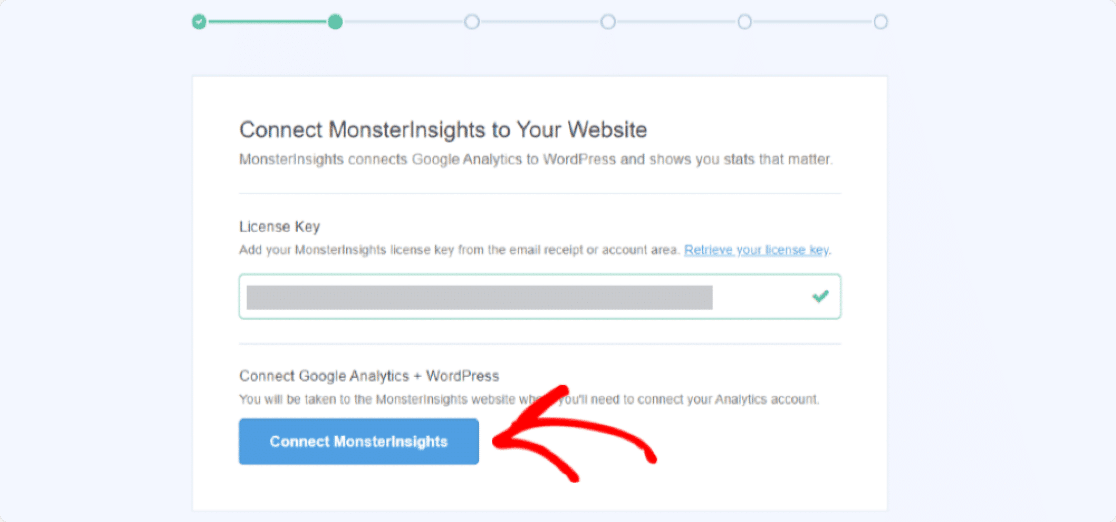
Now you need to choose a Google account to connect to your MonsterInsights account, make sure to select the account that you used to set up your Google Analytics account.
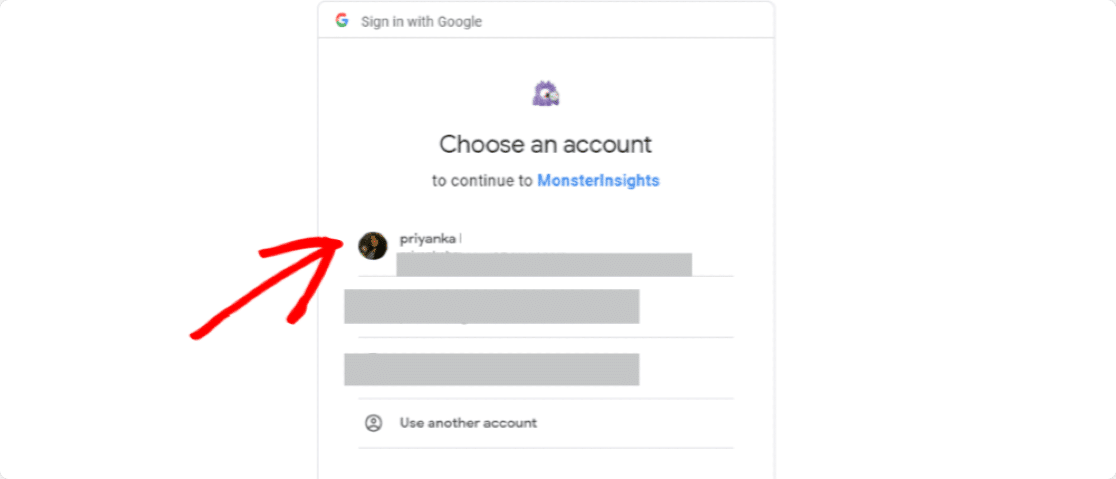
Now, you need to give access to MonsterInsights to do a few things with your Google Analytics. Click on the Allow button to continue.

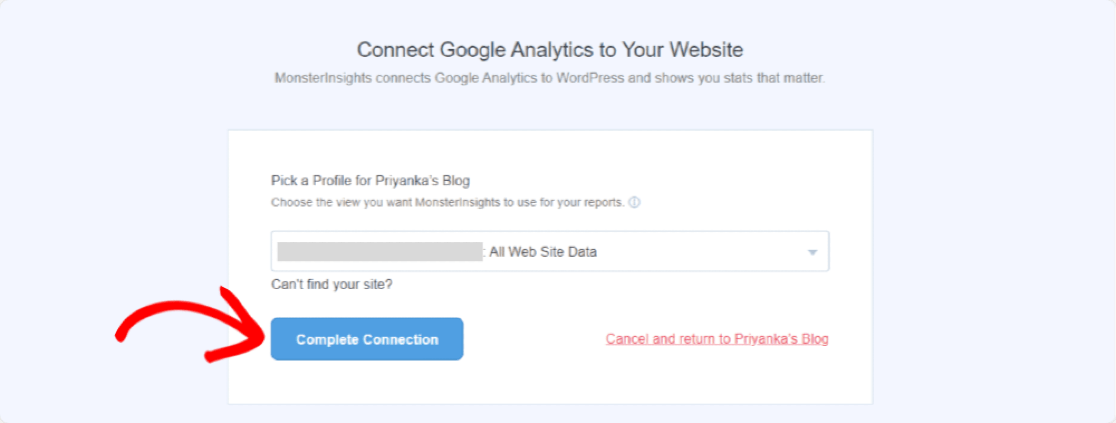
In the next step, you need to choose your profile. If you have multiple websites connected to your Google Analytics account. Make sure to select the right one and click on the Complete Connection button.
Now, the Recommended Settings page will open. Here you’ll have some settings based on your configuration. Configure these recommended settings as per your preference and click on the Save and Continue button.

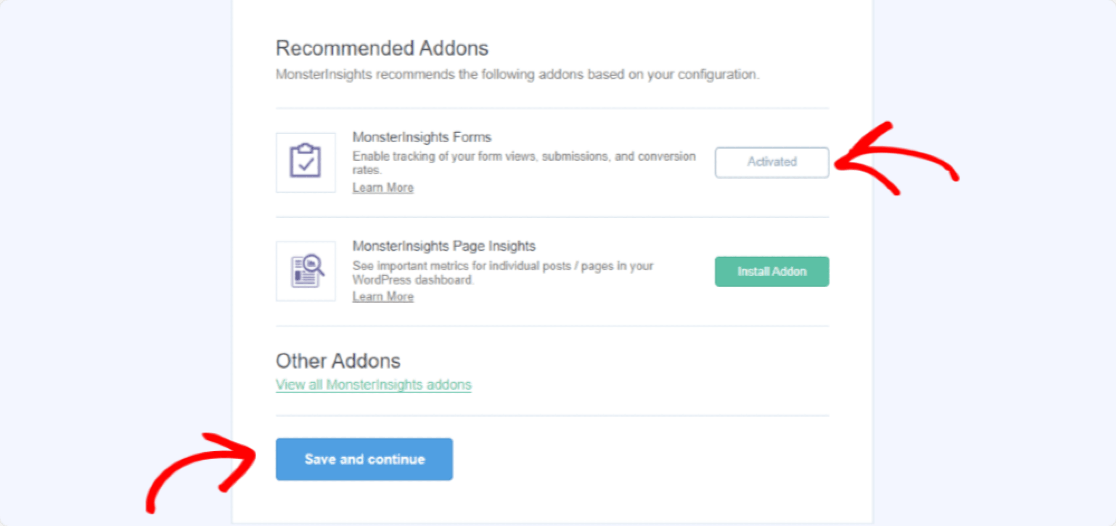
In the next step, MonsterInsights will show you Recommended Addons.
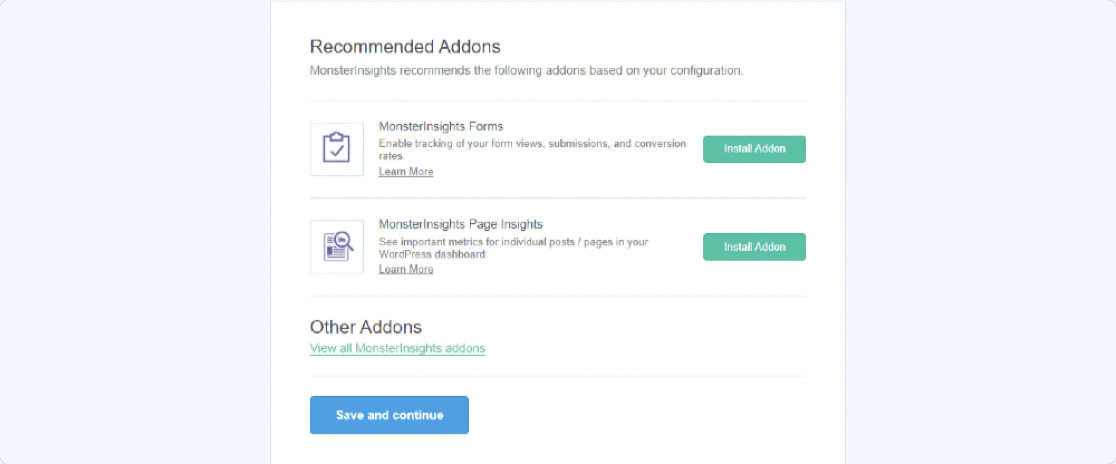
Step 3: Install and Activate the Forms Addon
MonsterInsights cuts all the tedious work by allowing you to track form conversions within your WordPress websites only. All you need to do is install and activate the Forms addons to check your form conversion data.
Click on the Install Addon button.
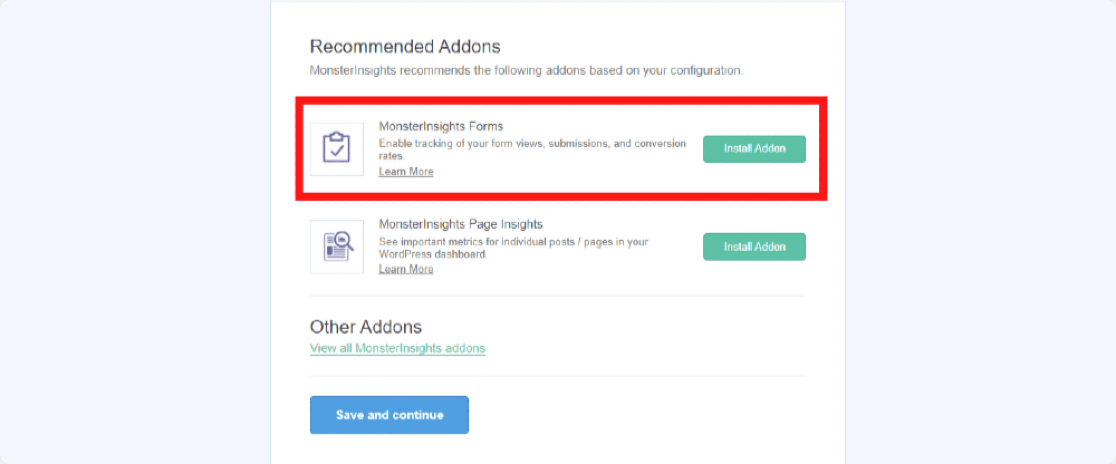
Once the Form addon is activated, click the Save and continue button.
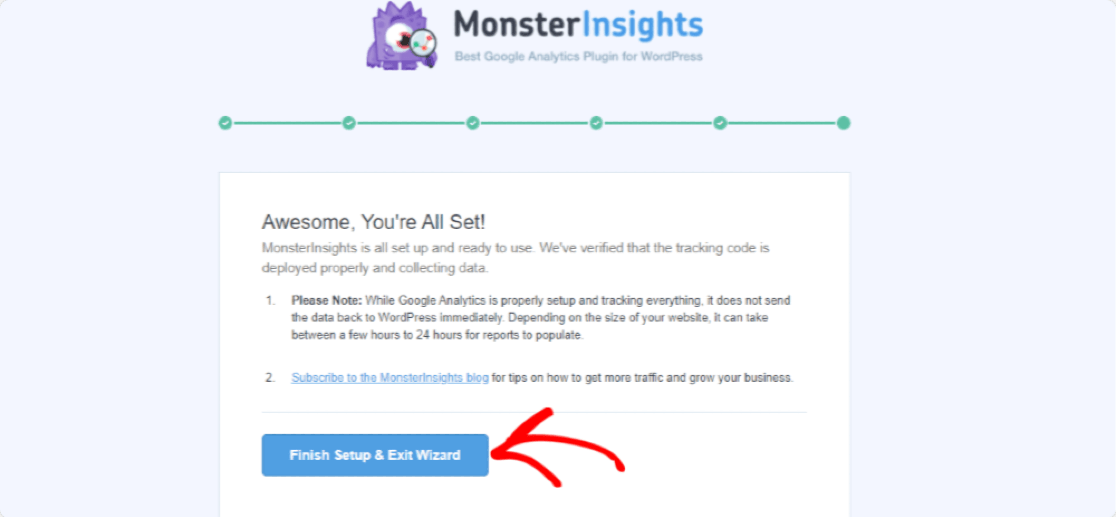
Awesome, you’re all set. Finish Setup and exit wizard.
next, we’ll show you how to view the report.
Step 4: View MonsterInsights Reports
To see your form conversions, click Insights » Reports. in your WordPress dashboard.

Click the Forms tab to see your site’s form conversion report.

Here you’ll see the complete forms report including impressions, conversions, and conversion rate for each form. If you want, you can also export all form data to PDF.
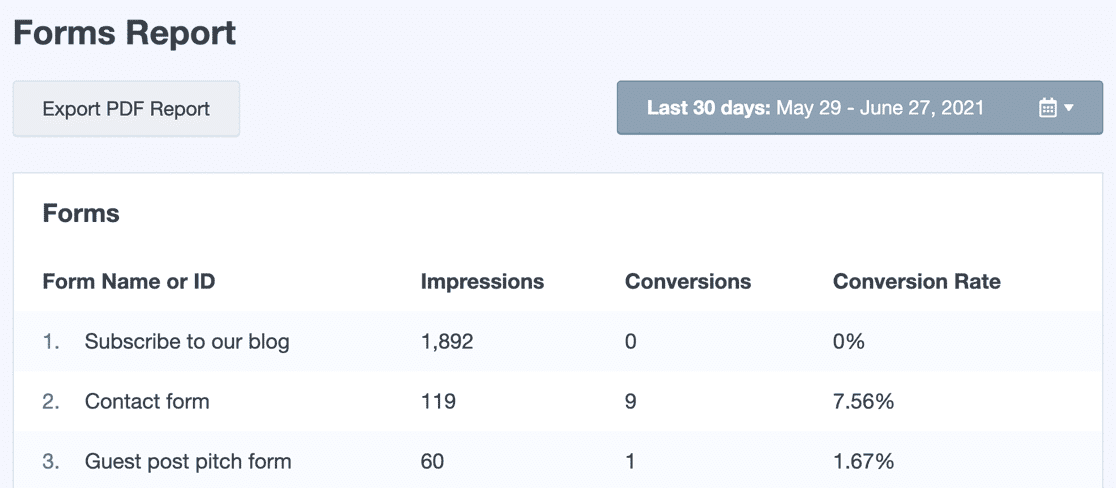
This report will tell you how many people viewed your form and how many submitted it. With this easy-to-understand report, you can make informed decisions about which forms are producing the best results for your website.
And once you know what’s working and what isn’t, you’re already halfway through to crafting effective strategies that drive conversions.
So go ahead and set up lead source tracking. It’s a set-and-forget solution, so you only have to go through this process once. After that, it’s all about monitoring the numbers and using these stats to guide your future decision-making.
Reader Questions About Lead Source Tracking
What if I’m already using a CRM? Can I still track lead sources in WordPress?
Absolutely! Most CRMs integrate seamlessly with WordPress plugins like WPForms, so you can easily sync your form with the CRM.
How can I use lead source data to improve my marketing efforts?
- Focus on High-ROI Channels: Identify your top-performing lead sources and allocate more resources to them.
- Optimize Content: Analyze which pages or forms are driving the most qualified leads and tailor your content strategy accordingly.
- Personalize User Journeys: Segment leads based on their source and create targeted follow-up campaigns for better engagement.
Are there any privacy concerns with tracking lead sources?
It’s crucial to be transparent about your data collection practices. Clearly inform users in your privacy policy about how you track lead sources. You can also use WPForms’ built-in GDPR features to disable tracking cookies and meta data related to users.
Next, Track Your Website Traffic
Analyzing your lead sources is one aspect of the broader subject of website analytics. No matter the channel you’re concentrating your marketing efforts on, I recommend tracking your WordPress site traffic, It’s the only way to learn if your strategies are working and how your website is performing overall.
Track Lead Sources With WPForms Now 🔍
If you like this article, then please follow us on Facebook and Twitter for more free WordPress tutorials.


