
AI Summary
Woke up to 300 spam form submissions overnight? Bots are flooding your contact forms with garbage entries, fake email addresses, and malicious links.
You’re wasting hours deleting spam instead of responding to real customers, and your email inbox is clogged with useless notifications.
Bot attacks can crash your server from processing thousands of fake submissions, fill your database with junk data that slows your site, and even spread malware through malicious links in form fields.
Without protection, a single bot attack can take your forms offline and damage your business reputation. This guide shows you 7 proven methods to stop bots from submitting your forms.
Create Spam-Free WordPress Forms Now! 🙂
Why Do Bots Fill Out Contact Forms?
Bots don’t spam your forms randomly. They’re programmed with specific malicious goals that profit the attackers running them. Understanding why bots target your forms helps you choose the right protection methods.
- Phishing Link Distribution: Bots fill form fields with malicious links that lead to fake websites designed to steal passwords or credit card information.
- SEO Manipulation: Spammers use bots to submit links to their websites through your forms, hoping you’ll publish user-submitted content that contains their backlinks.
- Database Overload Attacks: Aggressive bots submit thousands of fake entries in hours, filling your WordPress database with junk data. This slows your entire website.
- Email Harvesting: Bots scan websites for forms, then submit fake data while scraping your notification email addresses. These harvested emails get added to spam lists.
How To Prevent Bots From Submitting Your Forms
In this post, I’ll be using WPForms to show you different ways to stop bots from submitting your forms. For best results, use 2-3 of these methods together to create layered protection that blocks bots without frustrating real users.
- 1. Akismet Anti-Spam Protection
- 2. Modern Anti-Spam Protection
- 3. Country and Keyword Filters
- 4. Cloudflare Turnstile
- 5. Math or Q&A CAPTCHA
- 6. Google reCAPTCHA
- 7. hCaptcha
- 8. Limit Form Submissions With Form Locker
- 9. Add Multiple Steps to Your Form
- FAQs on Stopping Bots from Submitting Your Forms
- Does CAPTCHA stop bots?
- How do I stop bots from submitting my forms?
- How can I prevent bots from filling out forms without using CAPTCHA?
- Why do bots fill out contact forms?
- How do I block spam bots on my WordPress website?
- What is WPForms honeypot and how does it work?
- Why is my form still getting spam even with CAPTCHA enabled?
- Next, Best WordPress Plugins for Fighting Spam
1. Akismet Anti-Spam Protection
Akismet is the most widely-used spam-filtering tool for WordPress. It not only blocks comment spam, but it also integrates very well with the best form builder plugins.
All versions of WPForms (including Lite) come with a native Akismet integration that helps to filter bots. You can find this setting in the Spam Protection and Security settings.
Note that you will need to have Akismet already set up and connected to your site before this option will be visible to you.

Akismet uses its vast databases of known spam entries to filter spam when it’s entered into your forms. It can also analyze user behavior to distinguish between bots and real human users.
For more information, check out how to use Akismet to prevent contact form spam.
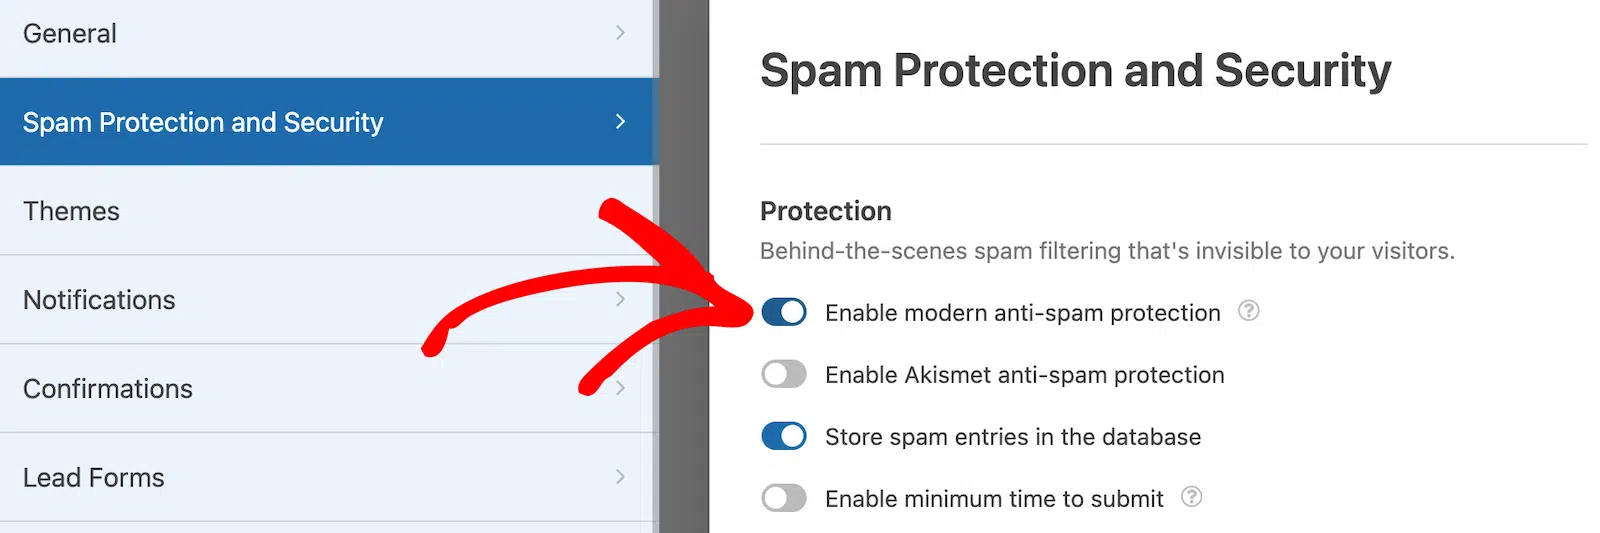
2. Modern Anti-Spam Protection
Anti-spam protection is built right into WPForms. You can toggle it on and off for specific forms in the form’s Spam Protection and Security settings.
The best part is that it runs in the background there’s nothing for you to think about. WPForms takes care of it. With this setting active, if a bot tries to get past the spam filters, the form simply won’t go through and will block them instantly.
I recommend pairing the modern anti-spam protection with another of our anti-spam measures so that you have a double layer of protection and don’t have to spend your time worrying about bots.
3. Country and Keyword Filters
Bot spam often follows certain patterns. If you’re receiving a lot of spam submissions to your forms, you might notice that they tend to come from a certain country or include specific words or phrases.
You can block form submissions that include these suspicious elements using the WPForms country and keyword filters. For keyword filters, start with obvious spam phrases like “click here,” “buy now,” or common pharmaceutical terms.

Only block countries that send 100% spam with zero legitimate submissions. Overly aggressive country blocking can prevent real international customers from contacting you.
You can also create an email allowlist or a denylist to prevent submissions getting through from fake emails or real ones. If this method is effective, you might want to block visitors from your site based on their IP address.

Check out our list of the best security plugins to find out how this works.
4. Cloudflare Turnstile
Cloudflare Turnstile is a privacy-focused, CAPTCHA-like service. You can sign up for a Cloudflare account and use it for free, so it’s a great way to stop spammers in their tracks.
To set it up, you’ll first need to log in to your Cloudflare account or sign up for a new one.
Access Cloudflare Turnstile Site and Secret Keys
Once you’ve set up your account, go to your dashboard and find the Turnstile page. Here, you’ll need to add your site.

Enter your website’s information on the next screen. Then choose your widget type. This will determine how Cloudflare processes your CAPTCHA requests.

Then click Create.

Your Cloudflare Turnstile site and secret keys will be generated.
 Enable Cloudflare Turnstile in WPForms
 Enable Cloudflare Turnstile in WPForms
In your WordPress dashboard, go to WPForms » Settings » CAPTCHA and select the Turnstile option.

Enter your site and secret keys in the fields provided.

There are a few other options here you can configure as well. See our guide to setting up Cloudflare Turnstile for more details.
Make sure to save your settings. Now you’re ready to add Turnstile to a form.
Add Cloudflare Turnstile to a Form
Open your form in the form builder and click on the Settings tab on the left side of the screen. Then select the Spam Protection and Security settings.
Under CAPTCHA, toggle on Enable Cloudflare Turnstile.

Or if you prefer, you can add a Turnstile field to your form instead.

When Turnstile is enabled, your form will have a badge showing that it’s protected.
And that’s it! Now your form data will pass through Cloudflare’s anti-spam system before the form can be submitted.
5. Math or Q&A CAPTCHA
WPForms offers a Custom Captcha option to Pro users, which allows you to set up custom math questions to filter human users from bots. You can also use this option to create a question and answer that only a human could solve.
Despite being simple, this is one of the most effective ways to stop bots from submitting your forms. It’s also ideal if you’d rather not use third-party providers.
Open up the form that bots are submitting. As long as you’re a Pro user, you’ll find the Custom Captcha field in the Fancy Fields section. Drag and drop the field onto your form.

If you’re using WPForms Lite, you can upgrade to any Pro plan to access this feature. Now we need to set up the question. To do that, click on the Custom Captcha field, and then on the Advanced tab.

Scroll down to the section labeled Type and click on the field where it says Math. You can change this to a question if you prefer.

Save the form and you’ll see that it now has a question on it. Bots won’t be able to solve this without human help!

This method doesn’t stop determined human spammers, however. For that, reCAPTCHA can help.
6. Google reCAPTCHA
Google reCAPTCHA is the go-to tool for fighting form spam for millions of websites. Here’s how to set it up:
Create a reCAPTCHA Account
To use reCAPTCHA in WordPress, we’ll need to create a reCAPTCHA account and get a Secret Key and Site Key for your website.
To get started, log on to the reCAPTCHA admin console to register a new site and get these keys. First, you’ll need to enter a Label. This is your domain name.

Then you’ll need to choose a reCAPTCHA type.
Google uses various methods to detect real people according to the way they behave:
- reCAPTCHA v3 can evaluate user behavior and filter bot activity without your visitor having to do anything.
- reCAPTCHA v2 presents a challenge to the user, like a checkbox.
Once you’ve decided which version to use, tick the checkbox next to it.
For this guide, we’ll go with invisible reCAPTCHA v2. This reCAPTCHA type provides a good balance between spam prevention and good user experience.

Next, enter the domain name where you’ll use the reCAPTCHA keys. You can enter multiple sites here. You’ll also need to accept the reCAPTCHA terms of service. Once you’ve done this, click Submit.

And you’ll have registered a new site! You’ll now see your Site Key and Secret Key. Grab these and let’s head back into the WordPress admin dashboard.

Now, we’ll head into WPForms » Settings » CAPTCHA.You’ll see that you’ll have a choice of hCaptcha, reCAPTCHA, or none. Choose reCAPTCHA to continue with the setup.

As we mentioned, there are different versions of reCAPTCHA to choose from. We’ve gotten a site key for invisible reCAPTCHA so that’s what we’ll choose in the WPForms settings.

Next, enter your Site Key and Secret Key, and remember to save these settings. That will be all for this stage. In the next step, we’ll add a reCAPTCHA field to our form.
Add reCAPTCHA to a Form
If you tried the previous method, you’ll already have a form ready for use. To find it, click through WPForms » All Forms to get to the Forms Overview page.

Click on the form name to open it up in the form builder. If the form already had a WPForms Custom Captcha field, you’ll want to remove this to make way for the reCAPTCHA field.
Click on the form to open it in the form builder. We’ll then head into the standard fields section of the form builder and click on the reCAPTCHA field to enable it.

And that’s it. In the form builder, you’ll now see that reCAPTCHA has been enabled.

Remember, we chose invisible CAPTCHA, so don’t expect to see the CAPTCHA field on the frontend, until it is triggered by suspicious behavior.

And that will be all for adding reCAPTCHA to a WordPress form. If you’d like to use a more privacy-focused anti-spam provider, we have one final option you can try.
7. hCaptcha
hCaptcha is a popular alternative to Google reCAPTCHA. Unlike reCAPTCHA, there’s only one version of hCaptcha, but you can adjust the difficulty levels of the image challenges to be displayed to users.
To use hCaptcha on your WordPress forms, first you’ll need a hCaptcha account. Here’s how to set one up:
Create a hCaptcha Account
To get started, navigate to the hCaptcha website and click Signup.

You’ll be given a range of plans to choose from. We recommend choosing the free plan for companies or websites. This plan is labeled Add hCaptcha for Publishers to my website or app.

The next step would be to get your hCaptcha Site Key and Secret Key.
Get Your hCaptcha Site Key and Secret Key
hCaptcha will generate these for you. All you have to do is grab them and enter them correctly in the WPForms settings.

But first, there are a few steps to take in configuring your site key. In the hCaptcha admin dashboard, click on Sites. You’ll see your site key on the new page.

Click on Settings. The main thing you need to do here is to add your domain name to the Site Key.
In the section labeled Hostnames, paste in your domain name (again, don’t add the https://www), then click Add new domain.

There are a few other settings to play around with, such as the difficulty level, but none of these are essential.
For more details, check out our complete guide to setting up hCaptcha in WordPress.
Now, we’ll head back into WordPress to set up WPForms with your hCaptcha Site Key and Secret Key.
Configure WPForms and hCaptcha
Back in the WordPress dashboard, click on WPForms from the left sidebar, then click Settings » CAPTCHA.

We’ve been here before, when we set up reCAPTCHA. This time we’ll choose hCaptcha.

Enter your Site Key and Secret Key and save these settings.

hCaptcha will now be ready for use with your WPForms forms. Next, we’ll show you how to add a hCaptcha field to a form.
Add a hCaptcha Field to Your Form
Back in the form builder, look for the hCaptcha field in the Standard Fields section. Just like before, we’ll first remove any other CAPTCHA type that we’ve added to our form.
To disable reCAPTCHA, simply click on the reCAPTCHA field back in the form builder, just as you did to enable it. This is also true for hCaptcha. Go ahead and enable the hCaptcha field by clicking on it.

You won’t see a hCaptcha field appear on your form but you should see a notice in the top right corner of the form builder, showing that hCaptcha has been enabled.

You can now embed your form on a page on your website following the instructions we shared previously. Here’s what your hCaptcha-enabled form looks like on the frontend:

8. Limit Form Submissions With Form Locker
Sometimes the fastest way to shut down a bot flood is to cap how many times a form can be submitted, or who’s allowed to submit it at all. The Form Locker addon gives you that control, and it’s available on any WPForms Pro plan.
To use it, install and activate Form Locker from WPForms » Addons. Then open the form you want to protect, head to Settings » Form Locker, and you’ll find a few options that work well against bots.

- Entry Limit: Set a maximum number of submissions, and the form stops accepting new entries once it hits that number. This caps the damage if a bot tries to dump thousands of entries overnight.
- Login Required: Only let logged-in users submit the form. Automated bots can’t get past a login screen, so this locks anonymous spam out entirely.
- Scheduling: Set a start and end date so the form only accepts entries during a window you choose. A form that’s closed can’t be spammed.
9. Add Multiple Steps to Your Form
Most spam bots are built to find a form, fill every field, and submit it in one quick pass. Breaking your form into multiple pages throws a wrench in that.
A bot that expects a single page often stalls when it has to click a Next button and work through a second screen to finish. WPForms makes this easy with multi-page forms.
In the form builder, drag the Page Break field onto your form wherever you want to split it. WPForms turns it into a multi-step form with a progress bar at the top, so real visitors always know how far along they are.

This won’t stop a determined bot that’s built to handle multi-step flows, so treat it as a supporting layer rather than your only defense.
I like that multi-step forms tend to feel less overwhelming for the real people filling them out, which can lift your completion rates at the same time.
FAQs on Stopping Bots from Submitting Your Forms
Form spam and bot submissions trip up a lot of WordPress site owners. Here are answers to the most common questions about how to stop bots from submitting your forms.
Does CAPTCHA stop bots?
Yes, CAPTCHAs can help to stop bots. Google reCAPTCHA is one of the most effective CAPTCHA methods. But you may have to use a CAPTCHA alternative if you find that bots are getting around your CAPTCHA rules.
How do I stop bots from submitting my forms?
Start with WPForms’ Modern Anti-Spam Protection and Akismet (both invisible to users), then add Cloudflare Turnstile or reCAPTCHA v3 if spam persists.
This combination stops 95%+ of bots without adding friction for real users. Avoid relying on a single protection method, as sophisticated bots can bypass individual defenses.
How can I prevent bots from filling out forms without using CAPTCHA?
Use WPForms’ invisible protection methods: enable Modern Anti-Spam Protection, integrate Akismet for AI-powered spam filtering, add keyword filters to block common spam phrases, enable country filtering to block known spam regions, set a minimum time to submit (bots fill forms in seconds), and use email allowlists/denylists.
Why do bots fill out contact forms?
Bots target forms to distribute phishing links, harvest email addresses for spam lists, manipulate SEO rankings through backlink spam, and overload databases with fake submissions that slow or crash websites.
Automated bots scan the internet for unprotected forms and submit spam 24/7. Without protection, a single unprotected form can receive hundreds of bot submissions daily.
How do I block spam bots on my WordPress website?
For site-wide bot protection, use a security plugin like Wordfence or Sucuri to block malicious IPs and bot traffic. For form-specific protection, use WPForms with Akismet, Modern Anti-Spam, and CAPTCHA.
Combine form protection with site-level security for comprehensive defense. Many bots probe multiple entry points, so protecting just forms isn’t enough for high-value sites.
What is WPForms honeypot and how does it work?
WPForms’ honeypot is an invisible spam trap built into the Modern Anti-Spam Protection feature. It adds hidden fields that real humans never see or fill out, but bots automatically complete.
When a submission includes data in honeypot fields, WPForms instantly blocks it as spam. Honeypot protection requires zero user interaction and stops basic bots effectively.
Why is my form still getting spam even with CAPTCHA enabled?
Some spam is from real humans (not bots) hired to bypass CAPTCHA.
For this, add keyword filtering to block common spam phrases, enable country filtering if spam comes from specific regions, set up email denylists for repeat offenders, and manually review flagged submissions in WPForms » Entries.
No single method stops 100% of spam, which is why layering 2-3 methods works best.
Next, Best WordPress Plugins for Fighting Spam
Now that we’ve shown you some ways to stop bots filling out your forms, it would be a good idea to take a look at some of the best WordPress plugins for fighting spam.
Create Spam-Free WordPress Forms Now
Ready to build your form? Get started today with the easiest WordPress form builder plugin. WPForms Pro includes lots of free templates and offers a 14-day money-back guarantee.
If this article helped you out, please follow us on Facebook and Twitter for more free WordPress tutorials and guides.


Thank you for this informative post on stopping spam entries via wpforms. I notice that you’ve not mentioned the honeypot method that works very well in stopping bots. I wondered if there is a reason for not mentioning this? I use the WP Armour plugin which seems to work very well with WPFORMS…
🙂
Richard
Hi Richard,
Thanks for sharing the great insights here. However, WPForms used honeypot spam field in the older version.It has now been replaced with Anti- Spam Protection. Please see the guide for more information.
Hope this helps 🙂
Are you going to add Cloudflare Turnstile as an option alongside ReCaptcha and hCaptcha?
Hey Andrew, Currently our forms do not have the ability to add Cloudflare Turnstile as an option alongside ReCaptcha and hCaptcha. I do agree it would be super helpful, though, and it’s certainly on our radar as we plan out our roadmap for the future. I’ve added your email to this request, as well.
Thanks.
And another item I use it to disallow URL’s in comments fields. It’s custom code but would be a great option too if built in.
Hey Tom- Yes, you got that correct! You can restrict the URL from getting entered in the form fields using the custom code. Here is a Developer guide to achieve the same.
Hope this helps 🙂