
AI Summary
Address fields are frustrating. Users misspell street names, forget zip codes, enter incomplete addresses, or abandon forms entirely because typing full addresses is tedious.
Google Maps autocomplete solves this by suggesting complete, validated addresses as users type. After typing 3-4 characters, users see a dropdown of real addresses to select from.
Want to set this up on your form to eliminate eliminates typos and speed up form completion? In this guide, I’ll provide step-by-step instructions on how to create a Google Maps autocomplete address form.
How Do I Make a Google Maps Autocomplete Address Form?
With WPForms Pro and the Geolocation addon, you can add Google address autocomplete to your WordPress forms in minutes. Follow these step-by-step instructions to get started:
Step 1: Install the WPForms Plugin
The first thing you’ll need to do is to install the WPForms plugin, which is a powerful form builder that makes it easy to create contact forms, registration forms, and more.
It has over 2,100+ WordPress form templates you can use and comes with built-in geolocation tools to really make displaying maps on your forms a lot easier.
To add maps to your contact forms, you’ll need WPForms Pro, which includes the Geolocation addon and all the map features we’ll cover in this tutorial.

If you’re new to WordPress or facing any difficulty during the plugin installation process, you can check the step-by-step guide on how to install a WordPress plugin.
Step 2: Enable the Geolocation Addon
Now that WPForms Pro is installed, you need to activate the Geolocation addon. This is what powers all the map features in your contact forms.
To activate the addon, head over to your WordPress dashboard and click on WPForms » Addons.
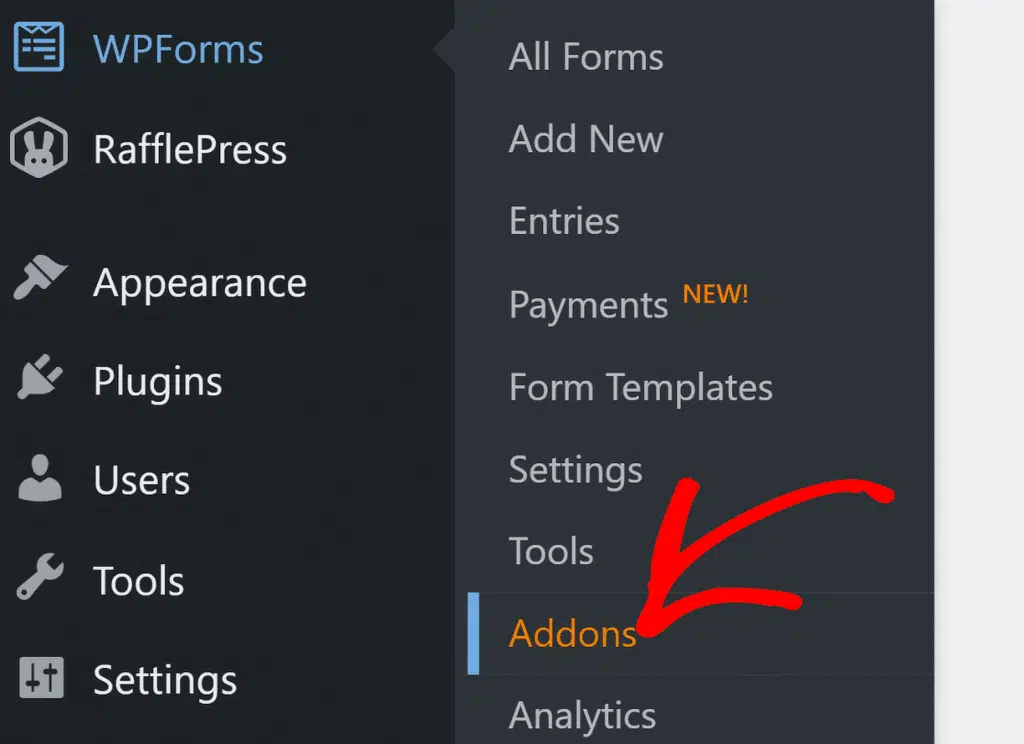
In the search bar, type Geolocation. Then click the Install Addon button to change its status to Active.

The addon installs automatically. No need to download files or configure anything yet. Next, you’ll connect it to Google Maps.
Step 3: Configure Geolocation Settings
Once you’ve enabled the Geolocation addon, you need to configure its settings. To do this, click on WPForms » Settings.

On the WPForms settings page, click Geolocation from the tabs across the top to access its settings.

Here, you’ll see different options to configure the Geolocation addon based on different needs and requirements:
- Places Provider: You get the option to choose which provider you’d like to receive your geolocation information. Here we’ll select the Google Places API as our places provider.

- Current Location: Enable this option to allow your user’s location to be pre-filled into the form.

- Google Places API: To enable autocomplete address feature and display Google Maps within your forms, you’ll need to generate an API Key and connect it with WPForms.

Let’s see the complete process of generating an API key.
Generate an API Key From Google Developer Console
Go to the Google Developer Console and select the project from the Select a Project menu at the top.
If you don’t have any previously created projects, click New Project to create a new one.

Once you’ve successfully created a new project, click Enable APIs and Services.

This will open a Google API Library.

From here, you’ll need to enable three 3 APIs:
- Geocoding API
- Maps JavaScript API
- Places API
This API library provides an easy search option; type the name of the API in the search box, go to your API and click the ENABLE button.

Once you’ve enabled all your APIs, go back to your Google Console dashboard and navigate the Credentials tab.

Click on the Create Credentials button at the top and select the API key option.

A pop-up with an API key will open. Click on the RESTRICT KEY option at the bottom right corner of the pop-up.

A new page will open, where you’ve to configure the following settings:
- Application Restrictions: From here, you can select which websites, IP addresses, or applications you can use the API key. Here you’ll need to choose the HTTP Referrers option to allow your Key to be used within your websites.

- Website Restrictions: Once you select the HTTP Referrers, a new option will be displayed, website restrictions. Here you need to add your website domain name to restrict the API Key to be used only by the specified websites.

- API Restrictions: After restricting your Key by Application and Website, you’ll need to restrict your Key by API. To do this, click the Restrict key option.
 - WPForms")
This will open a dropdown with a multiple APIs option. Select the following APIs from the dropdown:
- Places API
- Maps JavaScript API
- Geocoding AP

Once you’re done with selecting the APIs, click the Save button to save your settings, which will redirect back you to the Credentials page. Copy your Key from the page and head back over to your WPForms settings.

In your WPForms settings, paste this into the API Key field under the Google Places API and click on the Save Settings button.

Your Geolocation settings are now configured. Next, you’ll create a form with address autocomplete enabled.
Step 4: Create Your Autocomplete Address Form
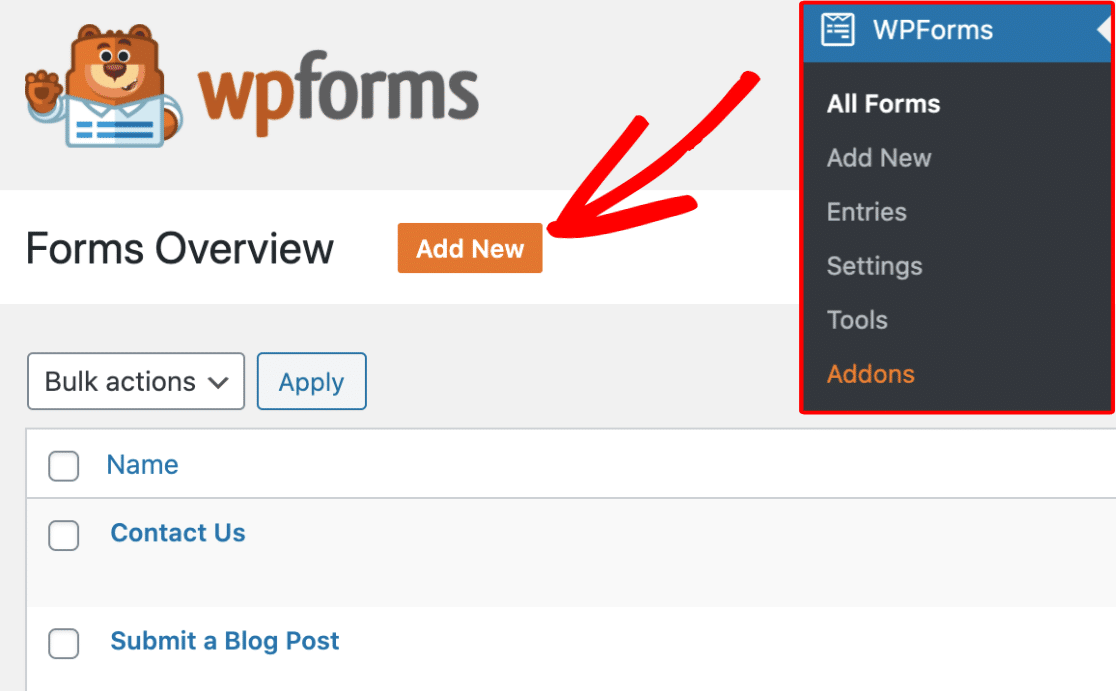
With the Geolocation addon configured, you’re ready to build your contact form. This takes about 5 minutes. Go to WPForms » Add New in your WordPress dashboard to open the form builder.
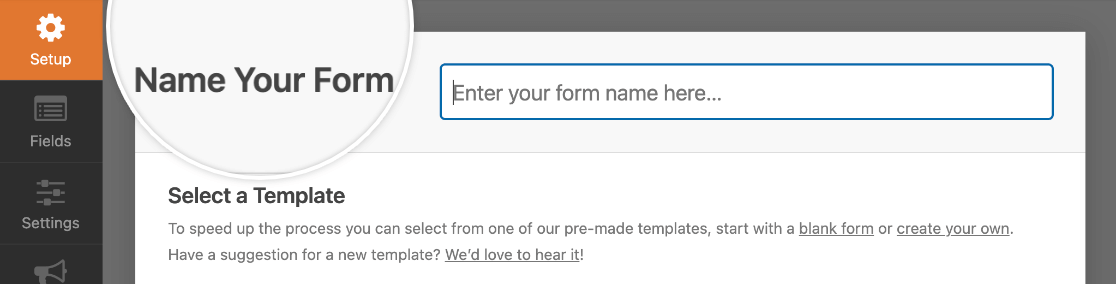
Give your form a name in the Name Your Form field. Something like “Get in Touch” works well. You’ll see a few options here. If you want to save time, you can choose from any of our 2,100+ WordPress form templates.
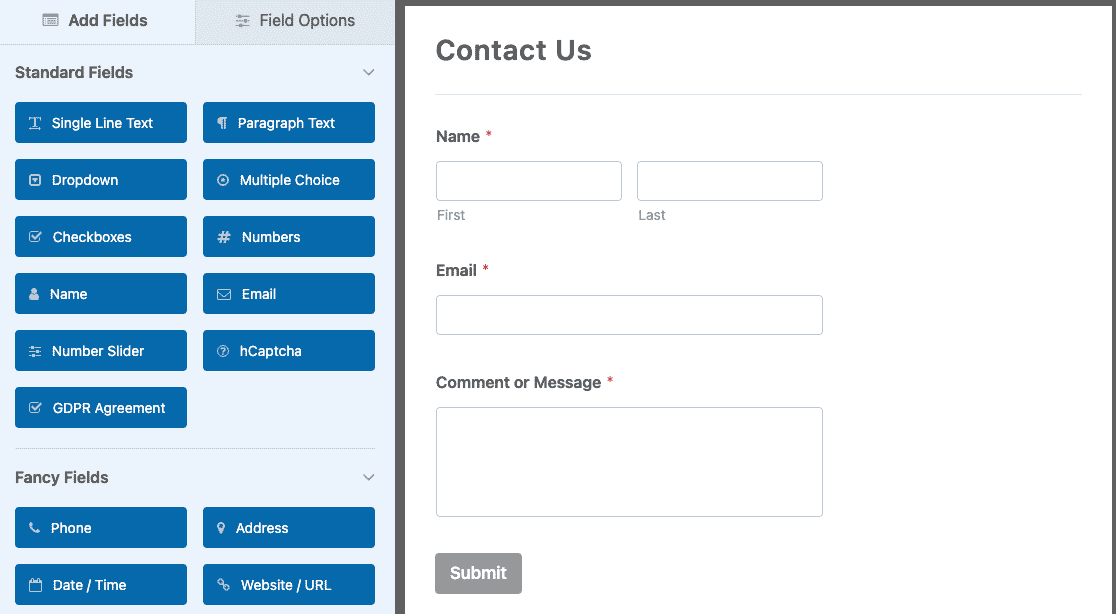
I recommend choosing the Simple Contact Form Template. This gives you a ready-made contact form with the essential fields already added.
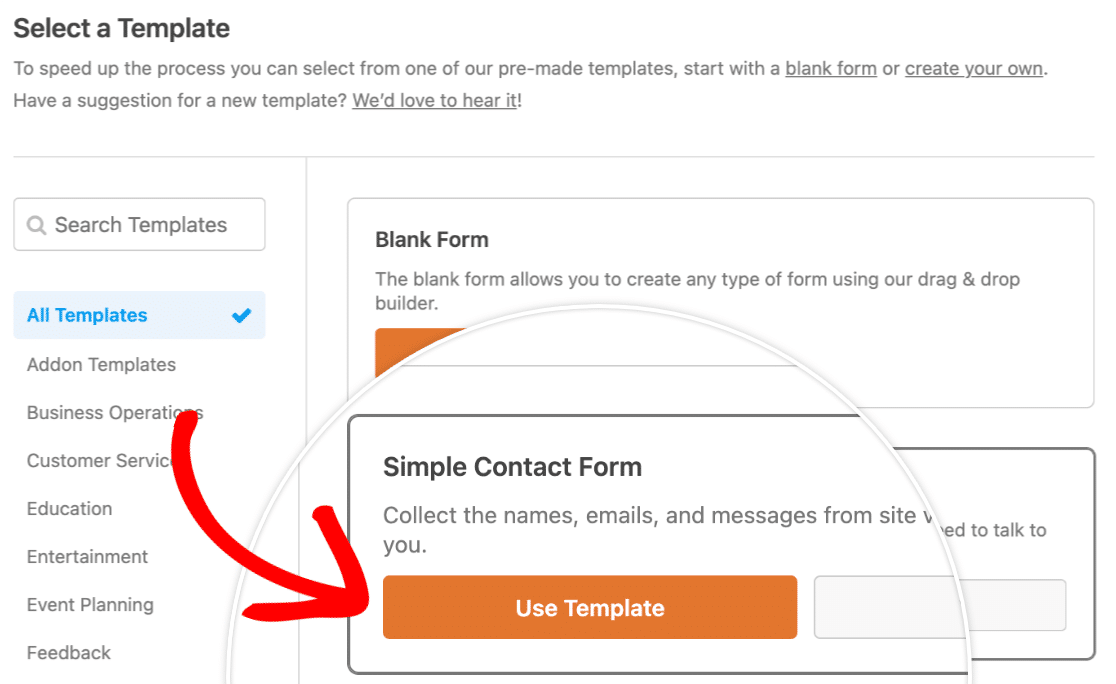
The template includes a Name field, Email field, and Comment or Message field. You can customize these fields, add new ones, or remove any you don’t need.
Now, there are probably a few more things other form settings you might want to configure, like notifications and confirmations. If so, (and I highly recommend this) check out our detailed guide on creating your first form.
Pro Tip
Another option if you don’t want to manually set up every field but have custom requirements is to let the WPForms AI Form Builder handle it for you.
Simply hover over the purple Generate With AI button and click Generate Form. You’ll land on the AI form builder screen. This is where you describe what kind of form you want.
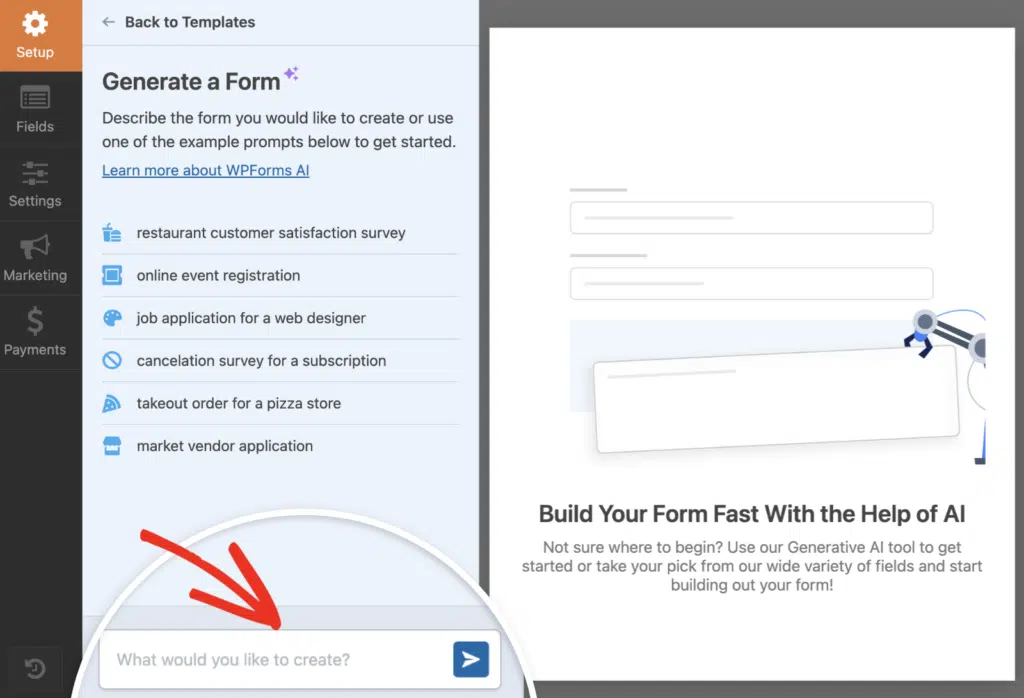
You can type your own prompt or choose from the suggestions on the left. Once you hit generate, the AI takes a few seconds to build your form.
Step 5: Add the Address Field to Your Form
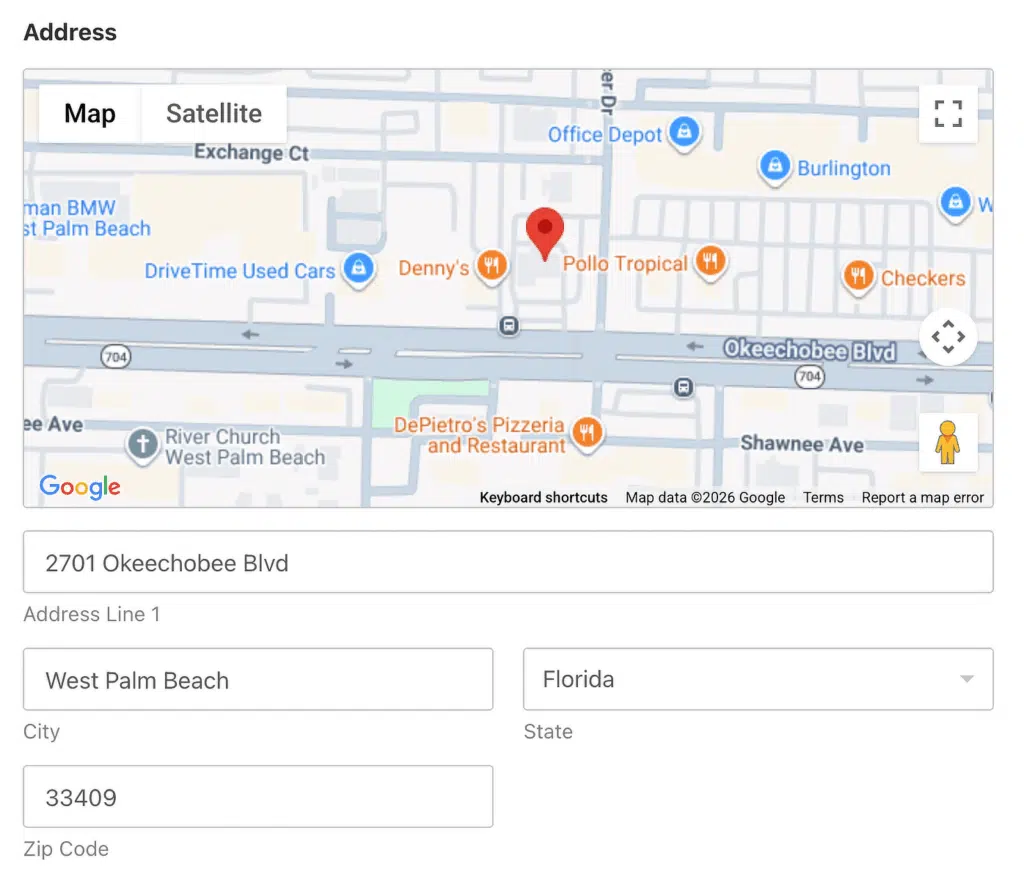
Now that we have our form ready, we just need to add the Address Field. On the left, drag the Address Field from the Fancy Fields section and place it onto your form.

The Address field already includes a label and sub-label text for your ease. You get the flexibility to customize the label text, select the address scheme, customize field size, and hide label and sub-labels.
Now you’ll activate autocomplete functionality for your Address field. This is a simple toggle that connects the field to your Google Places API.
Click on the Address field in your form, then click the Advanced tab in the field settings on the left.

Scroll down till you see the Enable Address Autocomplete option. Toggle on this setting to enable address autocomplete in your form.

Allowing this will open one more feature: Display Map. If you want to display a map in your contact form, turn on this option too.
Use the dropdown to specify if you want the map to appear above or below the Address sub-fields.

Click on the Save button at the top. Now that your autocomplete address form is ready, it’s time to add it to your website.
Step 6: Publish Your Google Maps Autocomplete Address Form
WPForms allows you to add your form in multiple locations, including pages, blog posts, and even sidebar widgets of your website.
Before embedding your form to a page, if you want, you can check how your form will look on the live page. To preview your form, click on the Preview button at the top.

If you’re happy with your Google Maps autocomplete address form, you’re ready to add it to your page. Click on the “+” icon and add the WPForms block from the block editor.

Then, select your form from the dropdown in the block. In this case, I’ll select the Address Autocomplete Form that I just created following the steps above.

After that, all you have to do is publish the page and your form will go live and be ready to accept submissions. Here’s how the Address field with the interactive map looks on a published page. Isn’t that amazing?
Awesome job! You’ve successfully created a Google Maps autocomplete address form. Check out this guide for more details on Address Lines 1 and 2.
FAQs about How to Make a Google Maps Autocomplete Address Form
Autocomplete address form is a popular topic of interest among our readers. Here are answers to some common questions about it:
What is autocomplete address in form?
Autocomplete address is a feature that suggests complete, validated addresses as users type in a form field. After entering 3-4 characters, a dropdown appears with matching addresses from Google’s database.
Users select their address instead of typing every field manually. This eliminates typos, speeds up completion (especially on mobile), and ensures addresses are accurate and deliverable.
How do I add an autocomplete address to my WordPress form?
Install WPForms Pro or higher, activate the Geolocation addon, generate a free Google Places API key from Google Cloud Console, paste the API key into WPForms » Settings » Geolocation.
After that, all you need to do is create a form, add an Address field, and toggle on “Enable Address Autocomplete” in the field’s Advanced settings.
The complete setup takes 20-30 minutes and is covered step-by-step in this guide. Once configured, autocomplete works on any form with an Address field.
Does WPForms address autocomplete work with Google Maps?
Yes, WPForms uses Google Places API for address autocomplete, which is the same technology that powers Google Maps address search.
You need to enable three Google APIs (Places API, Maps JavaScript API, and Geocoding API) for full functionality.
WPForms can also display an interactive Google Map on your form showing the selected address location, toggle this on in the Address field’s Advanced settings under “Display Map.”
Is Google Maps address autocomplete free?
Google provides 28,000 free address autocomplete requests per month. After that, you pay $2.83 per 1,000 requests. Most small to medium websites stay within the free tier.
A “request” counts each time a user types in your address field and suggestions appear (not per keystroke, but per search session). Monitor usage in your Google Cloud Console.
If you exceed limits frequently, consider upgrading your Google Cloud plan or restricting autocomplete to essential forms only.
What’s the difference between Google Places API and Mapbox for autocomplete?
Google Places API offers more comprehensive worldwide address coverage (200+ countries) and better address validation, but has a 28,000/month free tier.
Mapbox has unlimited free autocomplete requests but less detailed address data in rural areas and some international regions.
WPForms supports both. Choose Google Places for accuracy or Mapbox for unlimited usage. You can switch providers in WPForms » Settings » Geolocation without rebuilding your forms.
Can I use address autocomplete on WooCommerce checkout forms?
WPForms address autocomplete works on WPForms-built forms only, not WooCommerce’s native checkout. However, you can create a custom checkout form using WPForms with payment integration and address autocomplete.
Alternatively, install a WooCommerce-specific address autocomplete plugin that integrates directly with WooCommerce checkout fields.
If you need WooCommerce integration specifically, check WooCommerce’s plugin directory for “address autocomplete” or “Google Places” plugins designed for checkout.
What is the best Google Maps plugin for WordPress?
WPForms Pro is one of the best map plugins for WordPress. It includes a powerful Geolocation addon that comes with a pre-built address autocomplete feature that works with Google Maps or Mapbox.
This feature auto-locates and automatically suggests your users’ locations as they fill out and type in their addresses.
Furthermore, with the Geolocation addon, you can add a map to your WordPress contact form and allow your users to add a location by adjusting the pin on the map.
What happens to my form if I exceed Google’s free tier?
If you exceed 28,000 autocomplete requests per month, Google either charges your Cloud account (if billing is enabled) or stops providing autocomplete suggestions (if billing isn’t enabled).
Your form continues working and the Address field just becomes a regular text input without suggestions. Users can still type addresses manually.
Monitor your usage in Google Cloud Console and set billing alerts to avoid surprises. Most sites stay well under the free limit unless they have very high traffic.
Next, Enhance Your Forms With Interactive Maps
Awesome job! You’ve successfully created a Google Maps autocomplete address form that improves user experience and ensures accurate address data. Now that you have address autocomplete working, take your forms to the next level with WPForms’ Map Field.
This feature lets you embed interactive maps directly in your forms where users can click to select locations, view multiple business locations with custom markers, or choose their preferred service area from a visual map. The Map Field is perfect for:
- Multi-location booking forms: Let customers see all locations on one map and select their preferred branch.
- Service area selection: Display your coverage zones visually so customers know if you serve their area.
- Contact forms with office locations: Help visitors find the nearest office before they even submit.
- Event registration: Show venue locations with directions built into the form.
Check out these guides to explore what’s possible:
- How to Display a Map With Your WordPress Contact Form
- How to Create a Multi-Location WordPress Booking Form
Want to track which forms convert best? Learn how to track a lead source in WordPress to see which traffic sources bring you the most form submissions.
Ready to build your form? Get started today with the easiest WordPress form builder plugin. WPForms Pro includes lots of free templates and offers a 14-day money-back guarantee.
If this article helped you out, please follow us on Facebook and Twitter for more free WordPress tutorials and guides.


This Does NOT work return error in field!
Hi Nathan! I’m sorry to hear that your form’s Address Autocomplete is giving you errors. Could you please contact us with some more details about the issue that you’re seeing so that we can help you to troubleshoot?
Looking forward to hearing from you!
Good Afternoon,
Google Maps add-on works fine, great job!
But is there a way to save lat and long coordinate within the selected address?
Thank you in advance!
Noticed this captures address all in one field which makes it difficult to parse into standard address, city, state, zip fields. Any way to do this?
Hi Adam,
To do what you’ve described, you can create a custom address field in the form using Single Line Text fields and a Dropdown field.
You can add options quickly in a Dropdown field using our Bulk Add option in the form builder. To do this, click on the Dropdown field and in the left Field Option panel, click on Bulk Add. In the new section that appears, select Show Presets. You can then select from our list of preset choices. Here’s a short screencast of the process that adds Countries as an example.
In case it helps, we also have a detailed tutorial on that.
For the Zip Code subfield you can use the Numbers field, or require that users can only add numbers to a Single Line Text field using the input mask method. We have more details in our tutorial here.
If you’d like to, you can also format your form to have multiple columns. We have a great tutorial on how to do that here.
Hope this helps! 🙂
I’ve noticed that the notification email does not include map data – is there a way to include this when a query is submitted through the contact form?
Hi Rob,
To set this up, open the form builder and go to Settings » Notifications. Then scroll to the Email Message section and add the
{entry_geolocation}Smart Tag.In case it helps, here is a guide to include the Geo Location details on your emails.
Hope this helps! 🙂
Is there a way to restrict only a city or state/province instead of showing addresses all around the world? Thanks! The addon works great otherwise 🙂
Hey Rodney – We currently don’t have the feature in Geolocation addon to restrict address autofill based on country or location. I do agree this would be a great feature, and I’ll add it into our feature request tracker so that it’s on the radar of our developers.
Hi, I noticed this only works for addresses. I need a way to enable airports, hotels, etc. to be autofilled. Currently when user writes something like “airport vienna” there is nothing to choose. Is there any way to enable it? I though it would be great to add to my taxi website, but it just confuses people and they quit during the form submission now.
Hi Matej,
To enable autofill for locations such as airports and hotels in WPForms, you can use the Address Autocomplete feature provided by the Geolocation addon. This feature leverages services like Google Places or Mapbox, which can autocomplete a wide range of location types—including addresses, airports, hotels, and other points of interest—depending on the data available from the map provider you connect.
Hope this helps!