
AI Summary
Need to test someone’s knowledge? Graded quizzes give you a simple way to see who understands the material and who needs more help!
The problem is, building a quiz from scratch means figuring out scoring logic, setting up answer validation, and designing a results page. That’s a lot of work before you even write your first question.
With WPForms’ Quiz addon, you can skip all that. It handles the scoring, shows correct answers, and generates grade reports automatically. Let me show you exactly how to set one up.
Create Your Graded Quiz Now! 🙂
How to Create a Graded Quiz in WordPress
What You’ll Need
Before we start, make sure you have:

Not sure how to upgrade? Check out this guide on how to upgrade your WPForms license for step-by-step instructions.
Skip Everything!
If you’re short on time or just want to get a working graded quiz up fast, the WPForms AI Form Builder can handle the heavy lifting for you.
Generate Your Quiz with AI
From your WordPress dashboard, go to WPForms » Add New. Then, hover over the purple Generate With AI button and click Generate Form.
You’ll land on the AI form builder screen. This is where you describe what kind of quiz you want. You can type your own prompt or choose from the suggestions on the left.
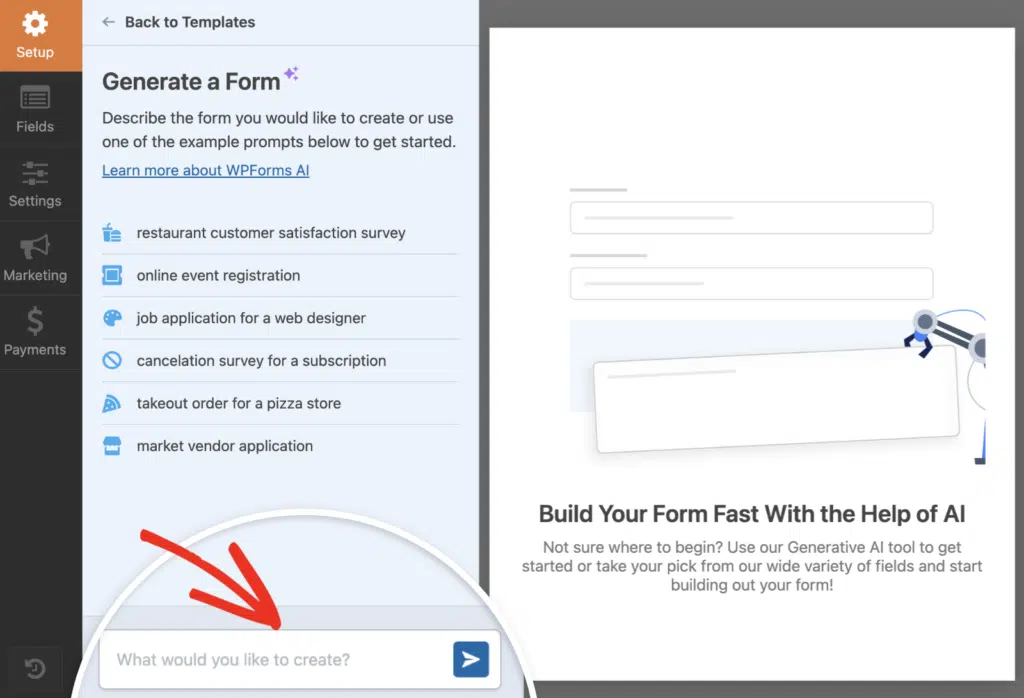
Once you hit generate, the AI takes a few seconds to build your quiz. It’ll automatically add quiz fields, set answer choices, and even configure scoring if your prompt includes grading.
From there, you can tweak questions, adjust correct answers, or change point values. The Quiz settings will already be enabled, so you’re basically starting from the finish line.
Try the WPForms AI Quiz Builder! 🙂
If you’d rather have full control over every detail, skip this step and follow the manual method instead. Follow the steps below to build your quiz from scratch!
Step 1: Create a New Form and Enable Quiz Mode
Before you can start building your graded quiz, you need to set up a new form and turn on quiz mode. From your WordPress dashboard, go to WPForms » Add New to open the form builder.
You’ll see a bunch of templates to choose from. If you want to jump right in, you can use one of the quiz templates. These give you a head start with pre-built questions you can customize.

But if you’d rather build everything from the ground up, just select Blank Form and click Use Template. Then, head over to Settings » Quiz in the left panel. You’ll see a big Enable Quiz button. Go ahead and click it.

As soon as you do that, quiz mode activates and you’ll notice new tabs appear at the top of the form builder: Questions, Outcomes, Results, and Settings.
These tabs give you everything you need to configure your graded quiz, from setting up questions to customizing what people see after they submit.
Step 2: Choose Graded Quiz Type
After you enable quiz mode, WPForms will ask you to pick the type of quiz you want to create. This is where you decide how your quiz will work and what kind of results your users will see.
You’ll see three options: Graded Quiz, Personality Quiz, and Weighted Quiz. For this guide, you’ll want to click on the Graded Quiz option.

Graded quizzes are all about right and wrong answers. When someone submits their responses, WPForms automatically scores them based on how many questions they got correct.
Once you click Graded Quiz, WPForms locks in that structure. You’ll notice the form builder adjusts to give you the tools you need to mark correct answers, set point values, and configure scoring rules.
Step 3: Set Up Your Graded Quiz
Now that your quiz questions are in place, it’s time to define how scores turn into letter grades. This is where you’ll set up ranges like A, B, C, and so on.
Configure Your Grading Scale
Head to the Quiz Settings tab in the form builder, where the Quiz Type will already be selected, and scroll down until you see the Grading Scale section.

By default, WPForms gives you a basic grading scale to start with. You’ll see fields where you can define the grade name (like “A” or “Pass”) and the score range it applies to. For a typical letter grade system, I usually set it up like this:
- A: 90-100
- B: 80-89
- C: 70-79
- D: 60-69
- F: 0-59
To add a new grade level, click the plus (+) button next to an existing grade. A new row will appear where you can type in the grade name and enter the minimum and maximum score range.
If you need to remove a grade level, just click the minus (-) button next to it. The row will disappear, and your scale will adjust accordingly. Once your grading scale is ready, click Save to lock it in.
Configure Feedback Settings
Now that your grading scale is in place, let’s set up how users will receive feedback on their quiz. This step is important because it shapes the entire quiz experience.
Scroll down to the Feedback section. You’ll see it right below the grading scale you just configured. Here’s where you decide when users see their answers.

If you toggle on Show the correct answer as soon as a choice is made, users will get instant feedback the moment they pick an option.
I’ve found this works really well for training quizzes or learning scenarios where immediate reinforcement helps people remember the material.
Once you’ve made your choice and customized the messages (if needed), you’re all set. Your quiz now knows how and when to give feedback. Next up, we’ll add your quiz questions.
Add Quiz Questions
Click on the Questions tab at the top of the form builder. You’ll see it right next to the Settings tab you were just working in.
From here, you can start adding your quiz questions. The beauty of WPForms is that you’re not limited to just one type of question format.

You’ve got several options for how you want to ask each question:
- Multiple Choice – Great for questions with one correct answer. Users see a list of options and pick one.
- Dropdown – Similar to Multiple Choice, but the options appear in a dropdown menu instead.
- Checkboxes – Perfect when there are multiple correct answers. Users can select more than one option.
- Single Line Text – Lets users type in a short answer. Good for fill-in-the-blank style questions.
- Paragraph Text – Allows longer written responses for more detailed answers from quiz takers.
To add a question, just drag the field you want from the left panel into your form preview on the right. Next to each choice, you’ll notice a small radio button or checkbox.
Simply click the one next to the correct answer, and WPForms will mark it as right.

Set Up Quiz Outcomes
After someone finishes your quiz, you want to show them a message that feels relevant and helpful. That’s where outcomes come in.
Head to the Outcomes tab in the form builder. You’ll see a Default Outcome already set up, which is what everyone sees unless you decide to customize it further.

If you want to show different messages based on how someone scored, you can create multiple outcomes using conditional logic.
For example, you could show one message to people who score above 80% and a different one to those who score lower.
To add a new outcome, click Add New Outcome. Then, set up your conditions (like “show this if quiz percentage is greater than 80”).
Now, let’s make those outcome messages more personal. WPForms gives you smart tags that pull in the user’s actual results. You can use:
- {quiz_grade}: The letter grade earned (A, B, C, D, or F)
- {quiz_percentage}: The percentage score (0-100%)
- {quiz_correct_answers}: Number of questions answered correctly
- {quiz_incorrect_answers}: Number of questions answered incorrectly
- {quiz_total_questions}: Total number of questions (10, or however many you include)
- {quiz_summary_link}: A link to a detailed breakdown showing all questions, selected answers, and correct answers

You can add as many outcomes as you want. Just repeat the process: click Add New Outcome, set your conditional logic, and write the message.
Here’s how the above outcome I set up looks on the frontend of my website. Make sure to test each outcome out to see how you can improve the messaging.

Add a Time Limit (Optional)
If you want to make your graded quiz more challenging or ensure people complete it within a specific timeframe, you can add a time limit.
Look for the Enable Time Limit option in the Settings tab and toggle it on. Once you do that, two new fields will appear: Minutes and Seconds.

Enter how long you want to give users. For example, if you want to allow 10 minutes, type 10 in the Minutes field and leave Seconds at 0.
Next, you’ll need to decide what happens when time runs out. WPForms gives you three options here, and I usually pick based on the quiz’s purpose:
- Submit the Quiz: The form automatically submits when time expires.
- Lock Remaining Questions: Any questions they haven’t answered yet become locked.
- End the Quiz: The quiz ends completely. Users can’t submit it at all once time is up.
Once you’ve set everything up, click Save. Your graded quiz will now enforce the time limit, and users will see a timer while they’re working through it.
Step 4: Publish Your Graded Quiz
You’ve built your quiz, configured the questions, set up grading, and customized the results. Now it’s time to get it live on your site.
First, make sure everything is saved. Click the Save button at the top of the form builder. I always double-check this step because it’s easy to forget, and you don’t want to lose any changes.

Next, WPForms lets you add your forms to multiple places on your website including your pages, blog posts, and sidebar widgets.
Let’s take a look at the most common placement option: page/post embedding. To begin, click the Embed button at the top of the form builder.
You can choose to publish the quiz on an existing page or create a new page, after which you’ll be redirected to the WordPress block editor.

Then, pick a name for the page where you want to embed your quiz and click on the Let’s Go button. Immediately, you’ll now see the WordPress block editor open.
Your graded quiz will already be embedded inside. Now, you can either publish this page directly to launch your form or try making some styling changes to give it extra oomph.
Simply click on the area around the embedded form in the page editor to open a new panel on the right. Here, you’ll find all the basic and advanced styling options for WPForms.
To make quick work of styling your form, you can select a ready-made theme under the Form Theme section. In this example, I’m using the Vintage theme (which is one of my favorites).

Feel free to try other themes; you’ve got lots of options. If you like experimenting directly, you can also manually customize different elements of the form more precisely.
When you’re happy with everything, click the Publish button. Your graded quiz is now out there, tracking scores, and delivering personalized results to everyone who completes it!
Step 5: View Quiz Results and Analytics
After people start taking your quiz, you’ll want to see how they’re doing. WPForms makes it easy to track everything from grade distribution to individual question performance.
To check your results, head back to the form builder and click the Results tab at the top of the screen.

You’ll immediately see a dashboard with charts showing your quiz data. The main ones include grade distribution (how many people scored in each range), overall completion rates, and breakdowns for each question.
I find the per-question breakdown especially useful. It shows you exactly which questions people are getting wrong most often, so you can spot patterns or adjust your quiz if needed.

If you want to narrow down the data, use the filters at the top. You can filter by date range, grade level (like only A’s or F’s), completion status (submitted or abandoned), or even specific questions.
Each chart also has a little settings icon in the corner. Click it to change the graph style (bar, pie, line, etc.), adjust colors, or resize the chart to fit your screen better.

This level of detail helps you understand not just who passed or failed, but why. You can see trends, identify tricky questions, and make data-driven tweaks to improve your quiz over time.
FAQs on How to Create a Graded Quiz in WordPress
Graded quizzes are popular with our readers, so we get a lot of questions about them. Here are some of the most common ones.
Can I create a graded quiz without coding?
Yes, you can create a graded quiz in WordPress without writing a single line of code. WPForms handles everything through its drag-and-drop builder and the Quiz Addon.
You just add quiz fields, set correct answers, assign point values, and you’re done. The plugin does all the scoring and result display automatically.
Which WPForms license do I need for graded quizzes?
You’ll need at least the Pro license to access the Quiz Addon. If you’re already using WPForms but don’t have the Quiz Addon yet, you can upgrade to Pro from your account dashboard. Once you do, the addon will show up under WPForms » Addons where you can install and activate it.
What field types can I use for graded quiz questions?
WPForms gives you five main field types for graded quiz questions:
- Multiple Choice – Great for questions with one correct answer. Users see a list of options and pick one.
- Dropdown – Similar to Multiple Choice, but the options appear in a dropdown menu instead.
- Checkboxes – Perfect when there are multiple correct answers. Users can select more than one option.
- Single Line Text – Lets users type in a short answer. Good for fill-in-the-blank style questions.
- Paragraph Text – Allows longer written responses for more detailed answers from quiz takers.
You can mix and match these field types in the same quiz depending on what works best for each question.
How do I show different messages based on quiz scores?
WPForms lets you customize confirmation messages using score ranges. You can show different text depending on whether someone aced the quiz or needs to study more.
To set this up, go to the Outcomes tab in the quiz builder. Then use conditional logic to create rules like “if quiz score is greater than 80%, show this message” or “if quiz score is less than 50%, show that message.”
Can I add a time limit to my graded quiz?
Yes, you can add a time limit for anyone taking the quiz. Next, you’ll need to decide what happens when time runs out. WPForms gives you three options here, and I usually pick based on the quiz’s purpose:
- Submit the Quiz: The form automatically submits when time expires.
- Lock Remaining Questions: Any questions they haven’t answered yet become locked.
- End the Quiz: The quiz ends completely. Users can’t submit it at all once time is up.
Can WPForms AI generate a graded quiz for me?
Yes, WPForms AI can create a complete graded quiz in seconds!
Just describe what you want (like “Create a 10-question quiz about WordPress security”), and the AI will generate the quiz structure with questions, answer choices, and correct answers already marked.
I’ve used this feature when I needed to build a quiz quickly, and it’s a solid starting point. You’ll still want to review the questions and adjust point values, but it beats starting from scratch.
To use it, go to WPForms » Add New and click the Generate With AI button. Then type your prompt and let the AI do its thing.
Next, Learn How to Create a Personality Quiz in WordPress
Want to create a different kind of quiz? Personality quizzes are perfect for engaging your audience in a fun, shareable way while still capturing leads.
The best part: you build them in WPForms the same way you built your graded quiz. Just switch the scoring type, and you’re good to go.
Check out our full guide on how to create a personality quiz in WordPress. It walks you through the setup, shows you how to personalize results, and gives you tips on making quizzes people actually want to share.
Ready to build your form? Get started today with the easiest WordPress form builder plugin. WPForms Pro includes lots of free templates and offers a 14-day money-back guarantee.
If this article helped you out, please follow us on Facebook and Twitter for more free WordPress tutorials and guides.

