Looking for an easy way to create a popup form in WordPress to grab visitors’ attention and collect more leads?
WordPress popup forms are known to have higher click-through-rates (CTRs) than other forms of advertising.
Create Your WordPress Form Now
In this guide, we’ll walk you through the steps on how to create a popup form through two different methods and tools.
In This Article
Getting Started: Create Your Form
Before creating a popup, you’ll want to create a form in WPForms. This tutorial will work with any version, including WPForms Lite.
Keep in mind that WPForms Lite sends entries via email, but it doesn’t store them in WordPress. We recommend WPForms Pro if you want to be able to export your form entries to other platforms later.
Check out this post to see the difference between WPForms Lite and WPForms Pro.
Once WPForms is installed and activated, go to WPForms » Add New to create a new form.

You should now see the form setup screen with various templates. For a popup form, you’ll want to avoid having a ton of fields.
Keeping the form short and compact will make it easier to display on smaller screens. We’ll use the Simple Contact Form template as a starting point.
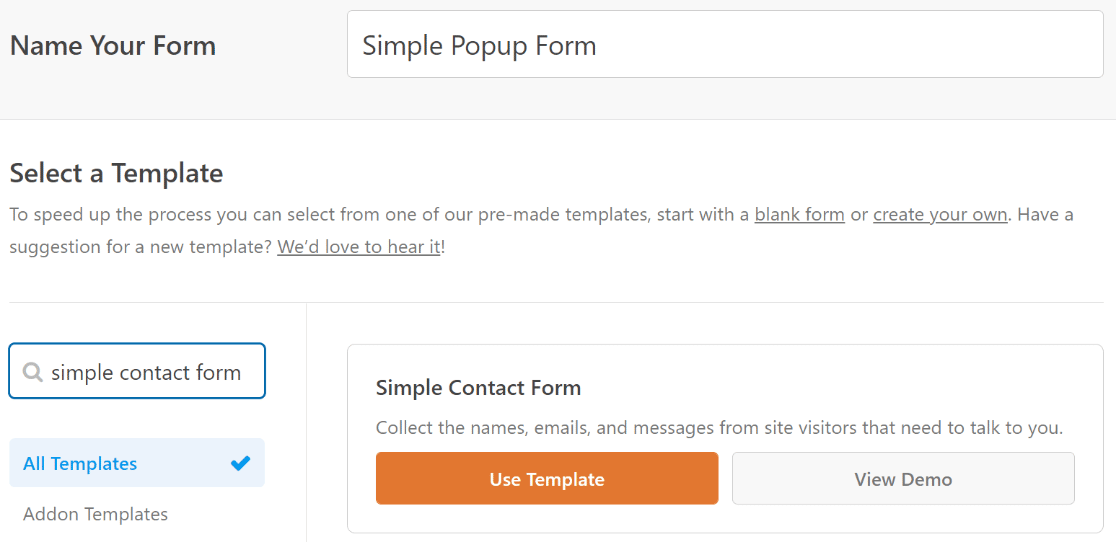
WPForms will load your template and take you to the form builder screen. The Simple Contact Form template includes the Name, Email, and Paragraph Text fields, which is all we need for now.
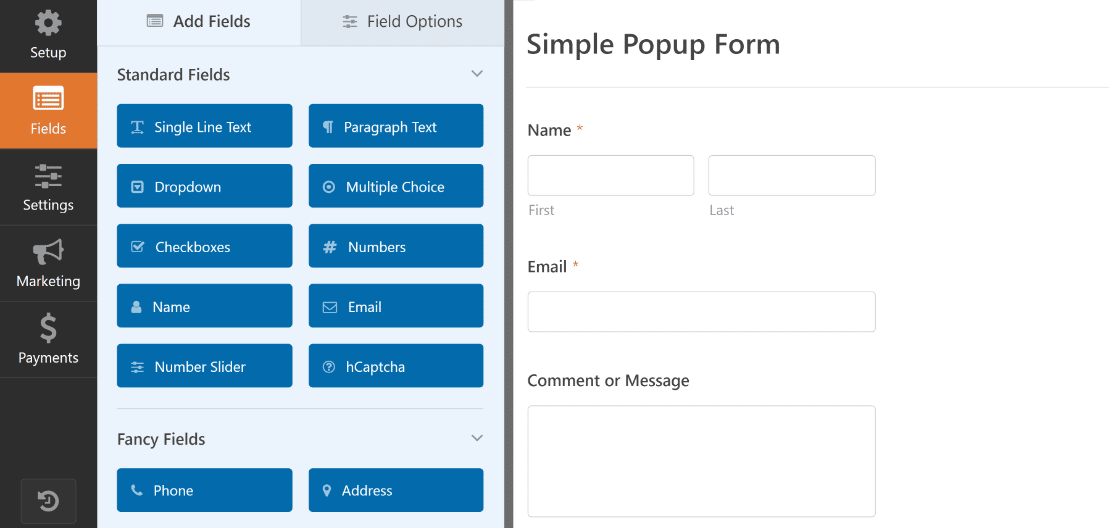
When you’re happy with how your form looks, go ahead and press Save. Now, we’re ready to move on to the popup. Let’s start with OptinMonster.
Method #1: Make a Popup With OptinMonster
OptinMonster is a SaaS service offering conversion optimization tools, which integrates smoothly with WordPress sites via its plugin. In this method, we’ll use OptinMonster to create a popup that displays a form.
1. Install OptinMonster
You can download the OptinMonster plugin for free and build up to 3 campaigns with a total limit of 300 campaign impressions per month. This is perfect for setting up your first WordPress popup form when you’re just starting out.
Later on, you’d probably like to remove the limitations of the free version from just $9/month.
If you don’t know how to install a WordPress plugin, here are the instructions for adding OptinMonster to your WordPress site.
2. Create a Popup Campaign
Next, let’s create your popup campaign. Start by clicking on OptinMonster » Campaigns from your WordPress sidebar menu.
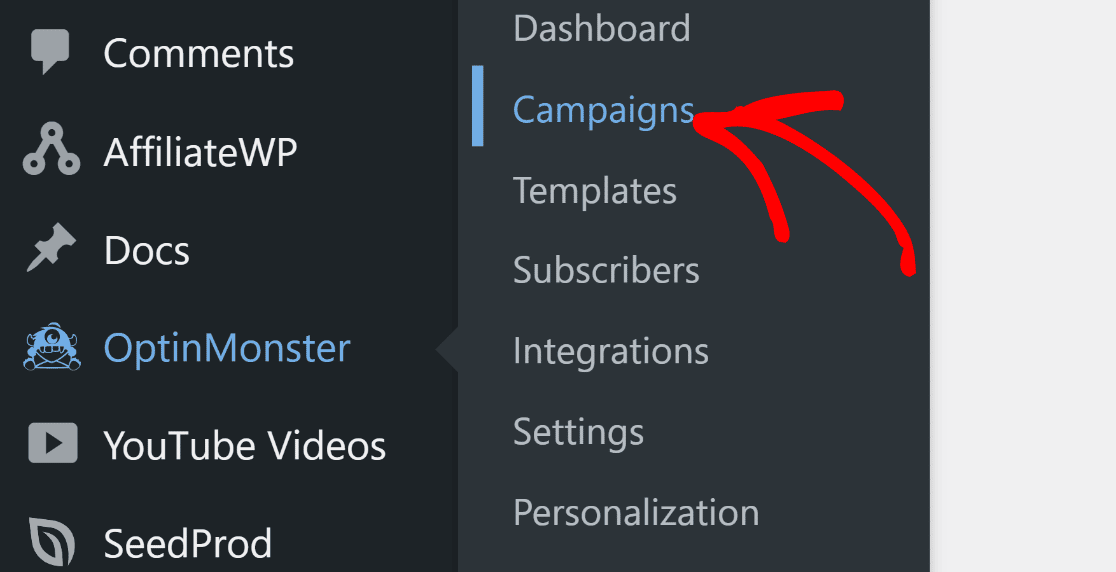
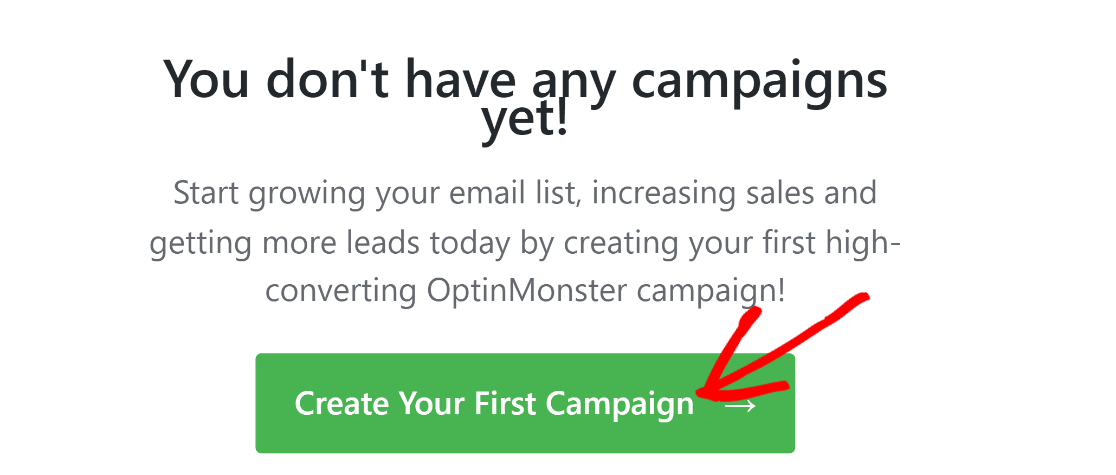
This will redirect you to the campaign creation page. Here, click on the Create Your First Campaign button.
From the list of options available, select Popup as your campaign type as that’s the main goal for now.

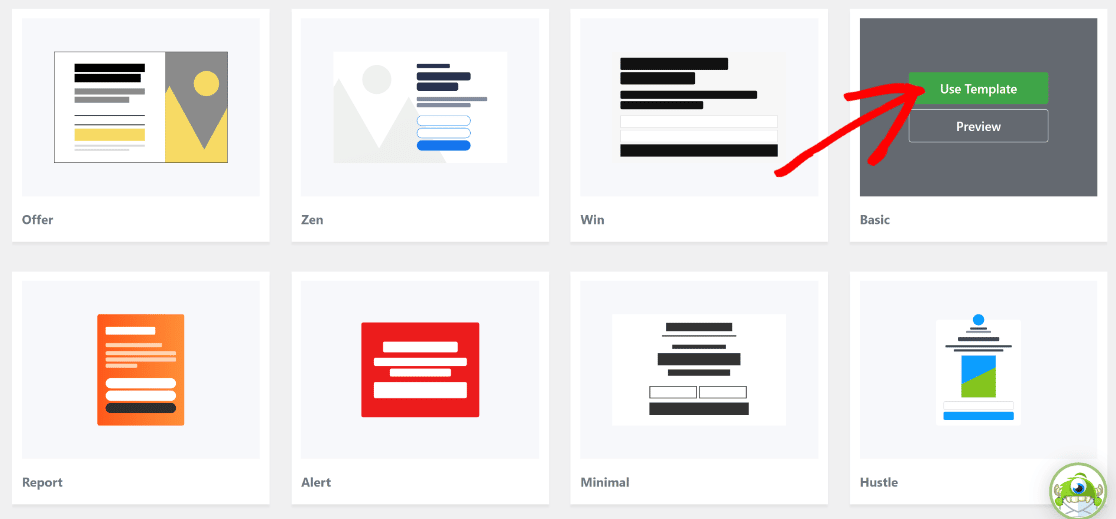
After that, scroll down and choose a template from the available options. Hover your cursor over a template and press the Use Template button.
I prefer to use the Basic campaign for popups since it’s easy to customize and doesn’t require much tweaking for a starting point. It’s also flexible enough to suit both single optin or double optin signup methods, depending on how your email marketing tool is integrated with your site.
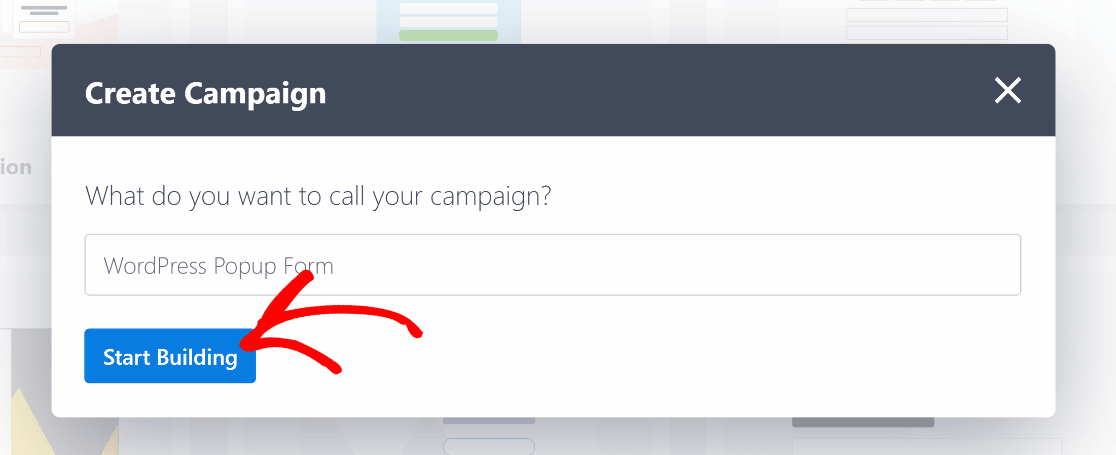
Now, OptinMonster will prompt you to give a name to your campaign. Enter a name and press the Start Building button to proceed.
After that, you’ll find yourself on the OptinMonster campaign builder screen with your selected template loaded.
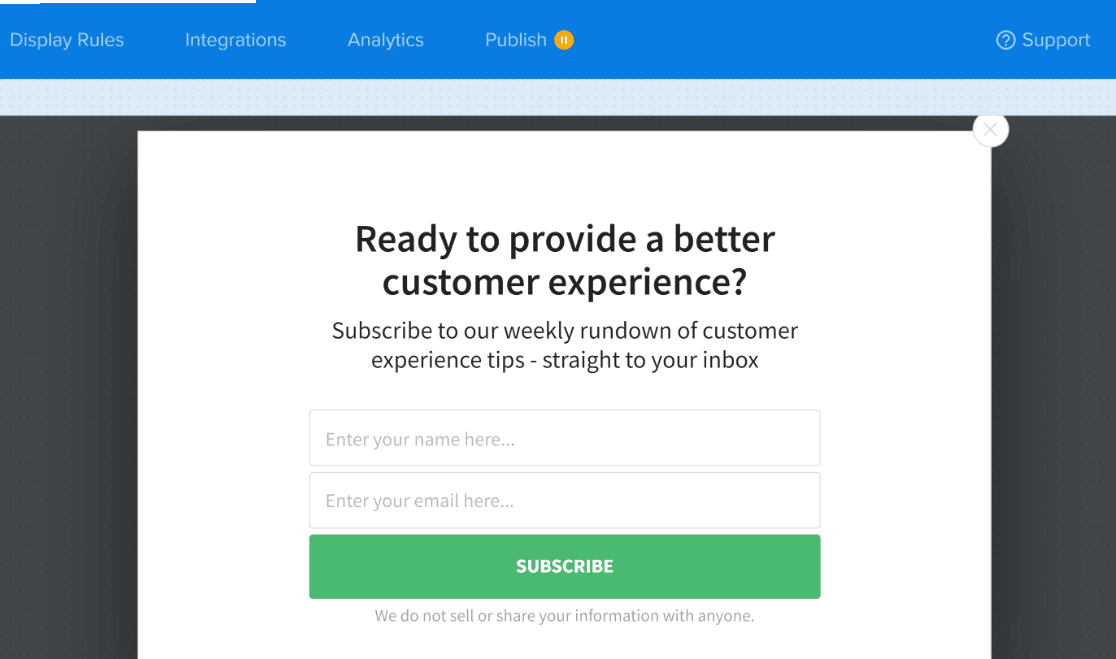
You can publish this popup campaign as is without adding the WPForms block. However, we’re going to switch to WPForms so we can use its integrations.
Let’s first edit the popup header to include useful directions for visitors seeing the popup form. Just click on the header text, and type in any message you want.
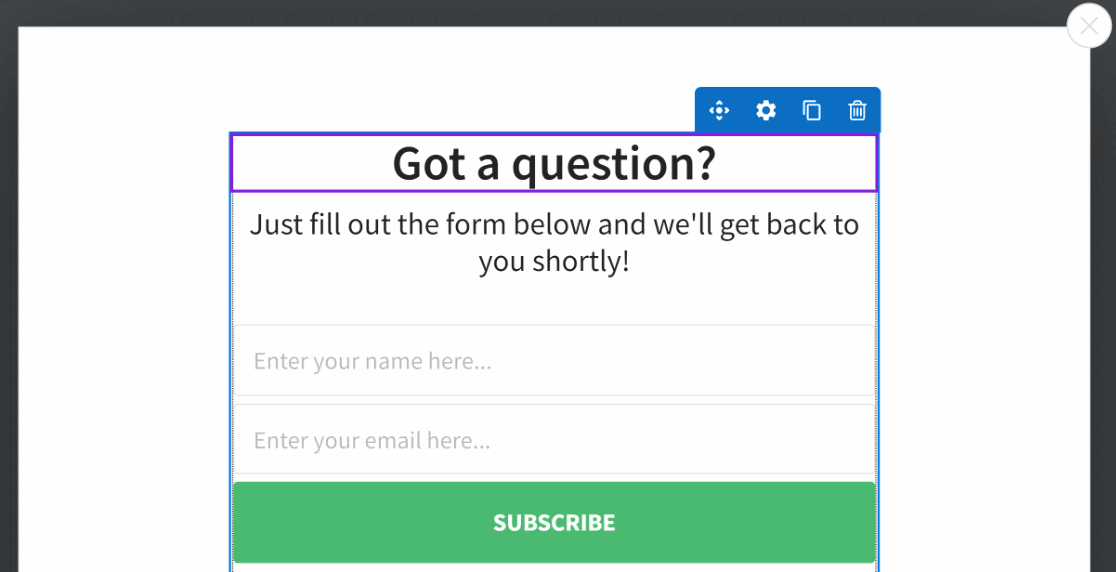
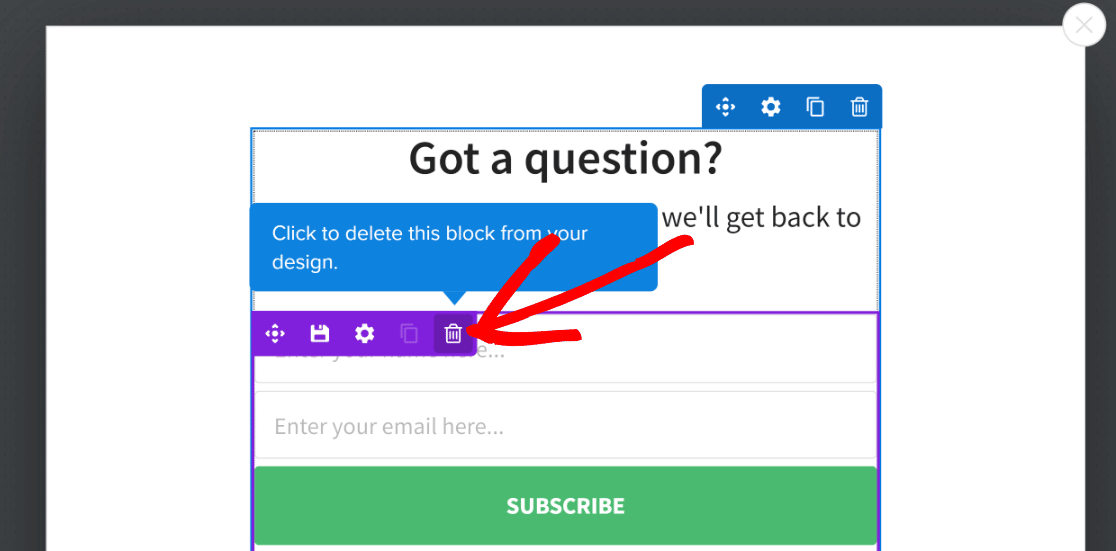
Since we want to include a form we created separately with WPForms here, we’re going to delete the pre-existing opt-in fields from this popup campaign.
You can delete any element from your campaign by hovering your cursor over it and clicking on the Trash icon.
Now, we can drag and drop the WPForms block right under the campaign header. This integration is really amazing.

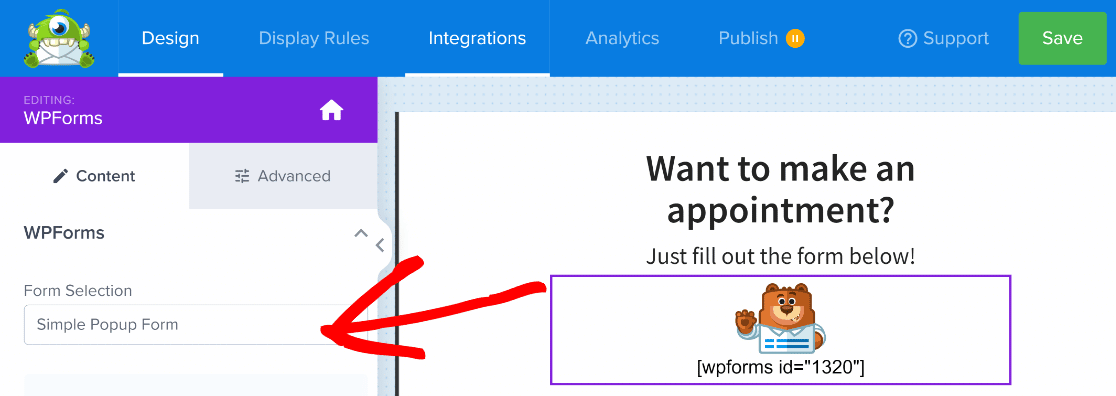
Simply, click on the WPForms block after you’ve added it to the campaign. This will open settings where you can select any form created with WPForms.
Click the Form Selection dropdown on the left-hand pane of the campaign builder and select a form that you’d like to embed in the popup campaign.
Awesome! We’re almost done creating a WordPress popup form using the first method. Now, we just need to publish it!
3. Preview and Publish Your Popup Form
Because OptinMonster uses shortcodes to embed forms made with WPForms, you can’t immediately see a live preview of your form within the popup form campaign.
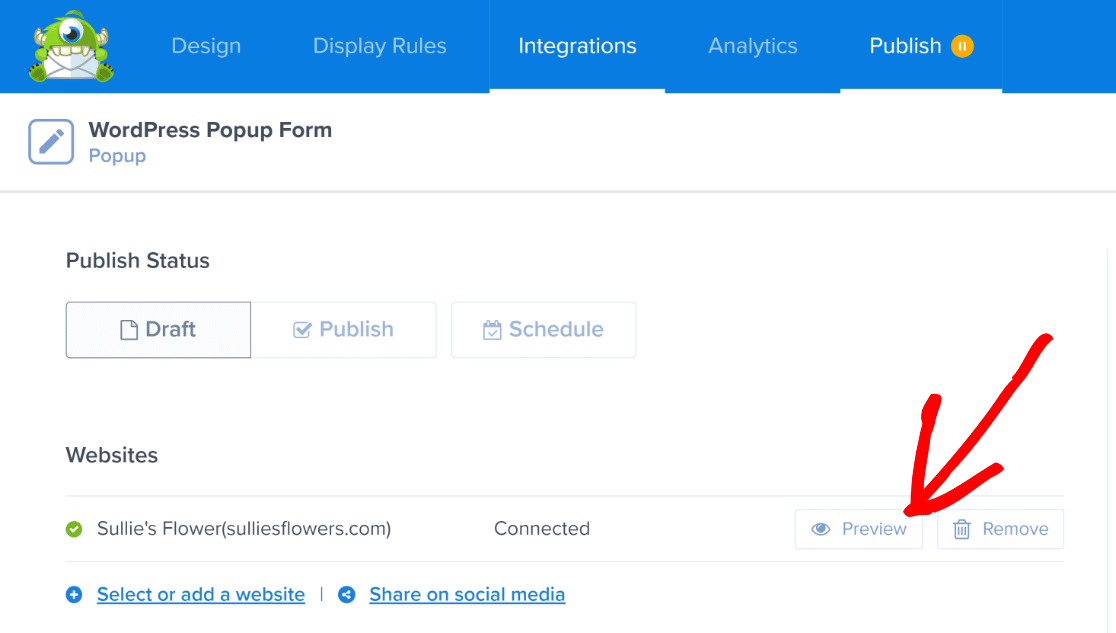
However, you can preview it right before you publish it. To do that, click on the Publish button on the navigation bar at the top.

On this screen, there’s a preview button. Clicking the Preview button will take you to your site’s frontend where the form will pop up on your screen, just like it would for your visitors.
Now, OptinMonster will trigger your WordPress popup form on page load. Here’s how it looks in our example:
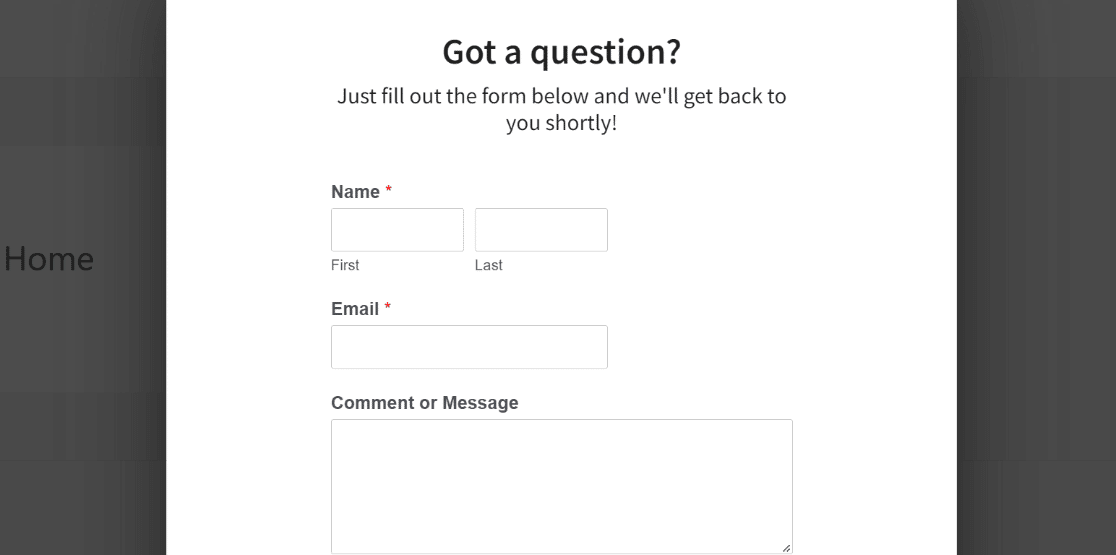
The preview allows you to double-check everything before you’re ready to publish the campaign.
Once you’re happy with how the popup form looks, go ahead and press the Publish button under Publish Status.
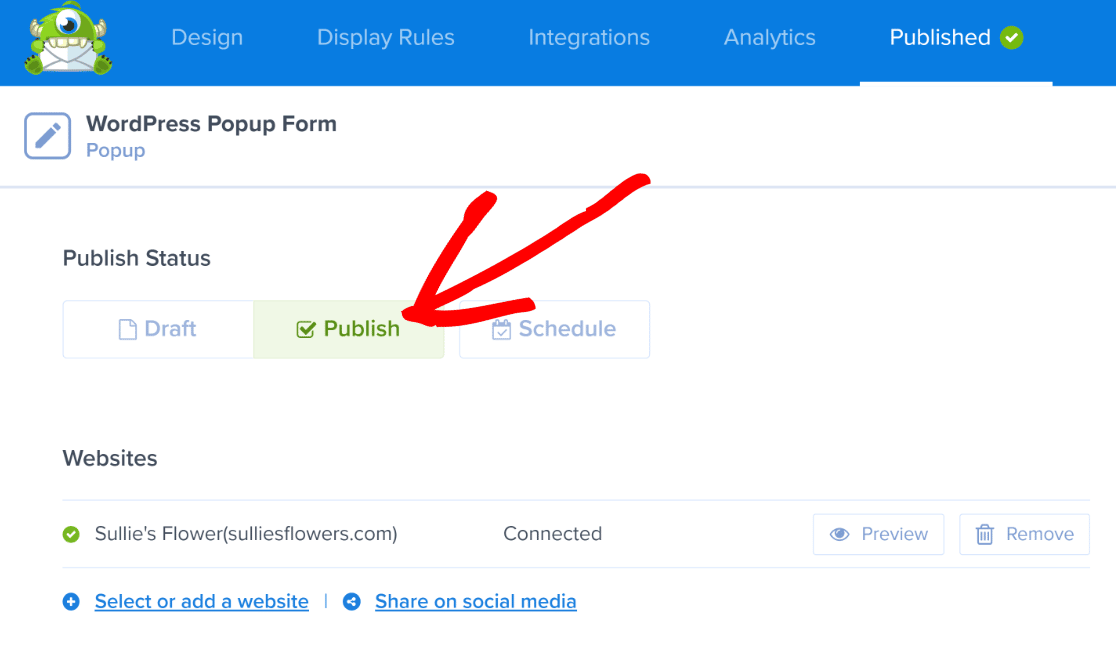
Great! Your campaign is now live. The popup form will now appear for all users visiting your site. If you want, you can also change the display rules for your WordPress popup form.
Go back to OptinMonster » Campaigns. Find the campaign you just created and hover your cursor over it. Then, click on the Output Settings option.
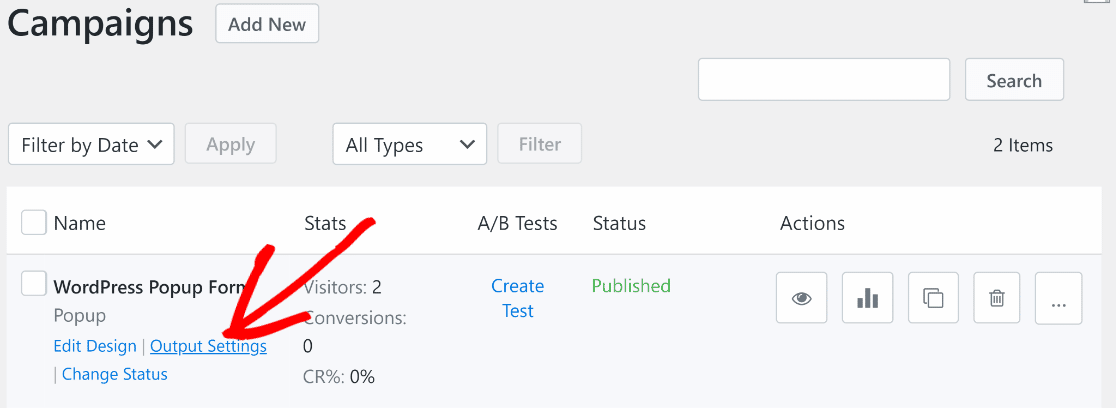
Here, you can change the visibility of the campaign and set it to be visible only to visitors, logged-in users, or both.
You can also exclude this campaign from selected pages or include it to display only on a few specific pages. It’s entirely up to you to decide which pages your popup form should display on.
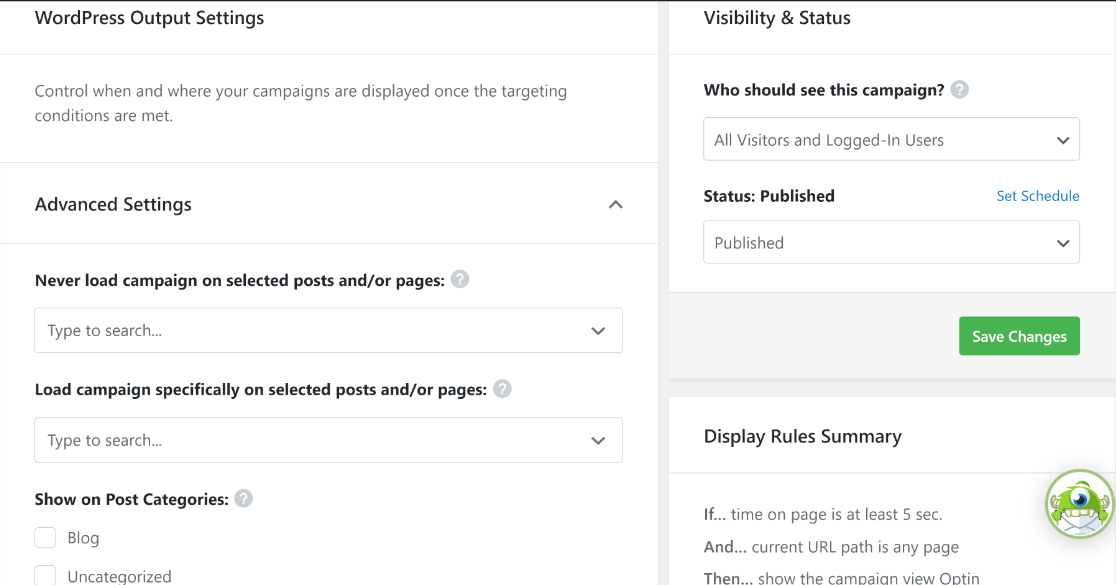
After changing display rules to your liking, make sure to press the green Save Changes button on the right.
And that’s all you need to do to create a WordPress popup form campaign using OptinMonster and WPForms!
Let’s move on to the next method for achieving the same result.
Method #2: Create a Popup Form With Popup Maker
If you’d prefer a solution where you can build a popup form completely from your WordPress dashboard, then the next method is for you.
Here’s a video guide walking you through this method:
For step-by-step written instructions, you can continue reading below:
1. Install Popup Maker
For this tutorial, the free version of Popup Maker will work just fine. It’s not as powerful as the OptinMonster plugin, but works just as well with WPForms.
Just like we did earlier, we’re going to use the form we created at the start with WPForms and embed it inside your popup.
2. Create a Popup in Popup Maker
Go into the Popup Maker plugin to create your popup. This free WordPress plugin lets you make popups from scratch, easily.
Head to your WordPress dashboard and go to Popup Maker » Add Popup, and you’ll see the popup editing screen appear.
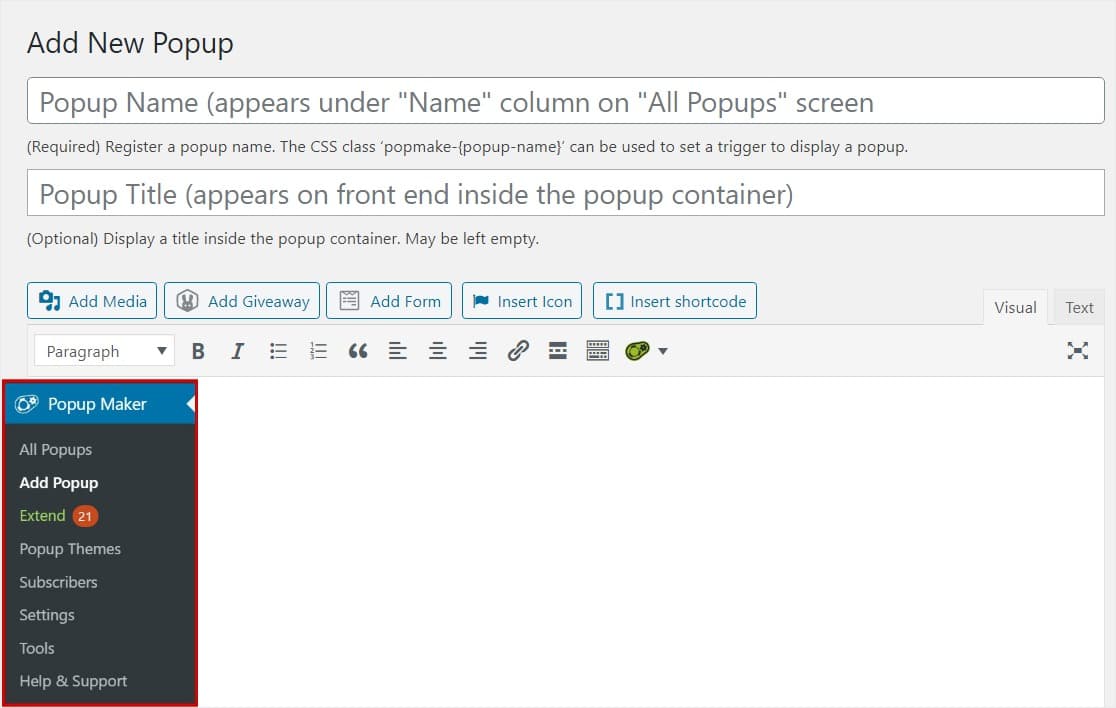
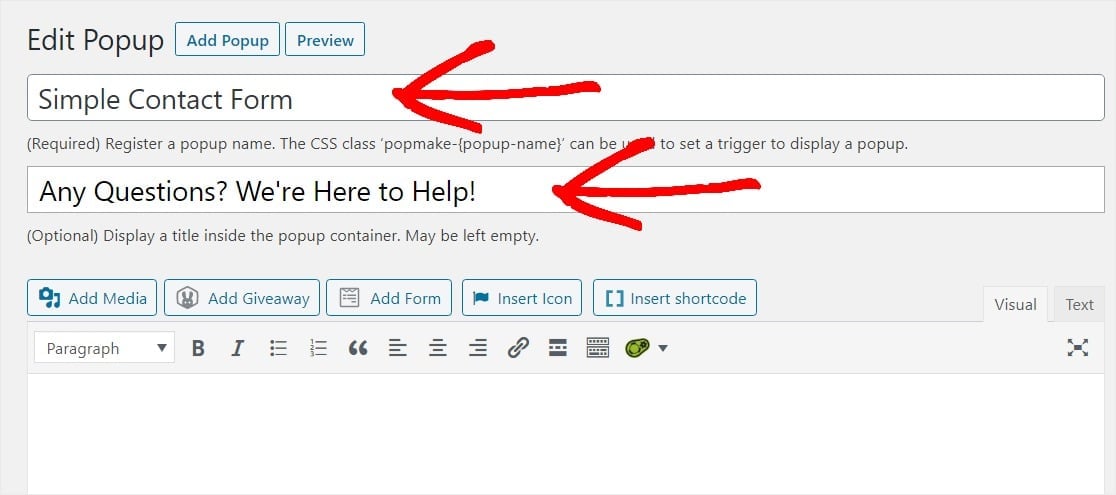
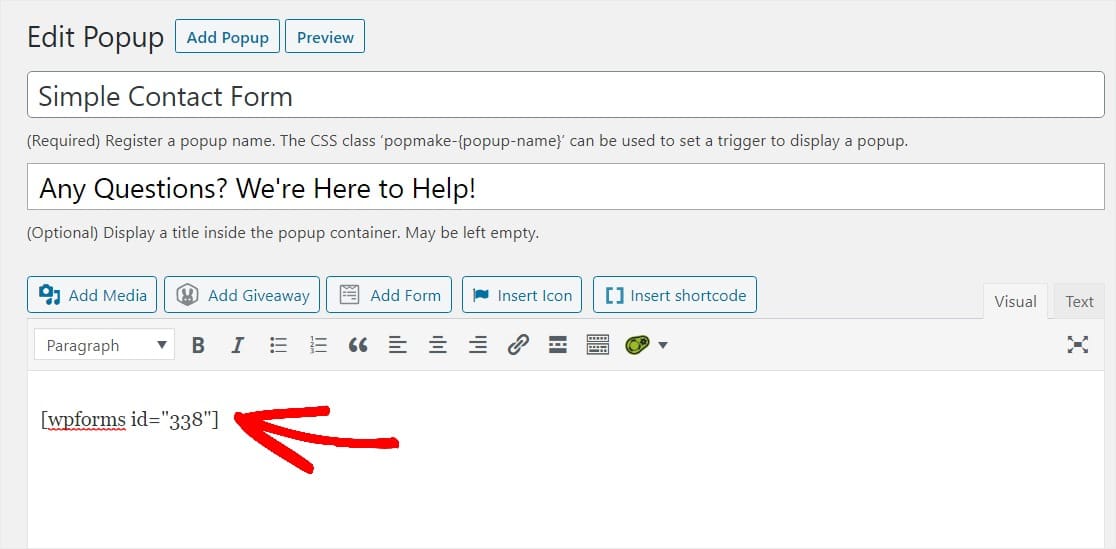
On this screen, you’ll want to enter a name for your popup. You can also enter an optional display title, as we did in this example.
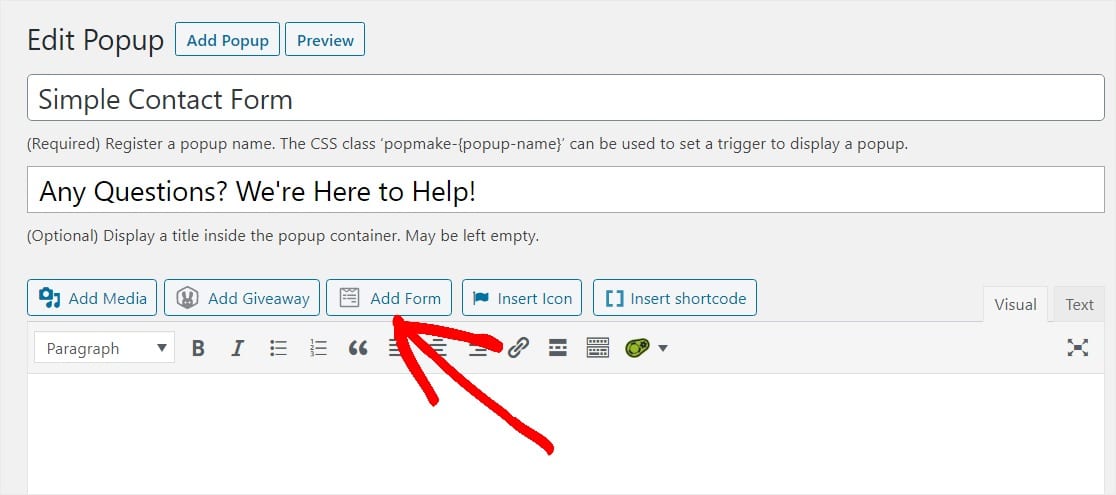
And now it’s time to insert your form into your popup. Click on the Add Form button to select your form.
An Insert Form screen will appear. Here, you can pick the form you want to insert into this popup by selecting it from the dropdown menu.
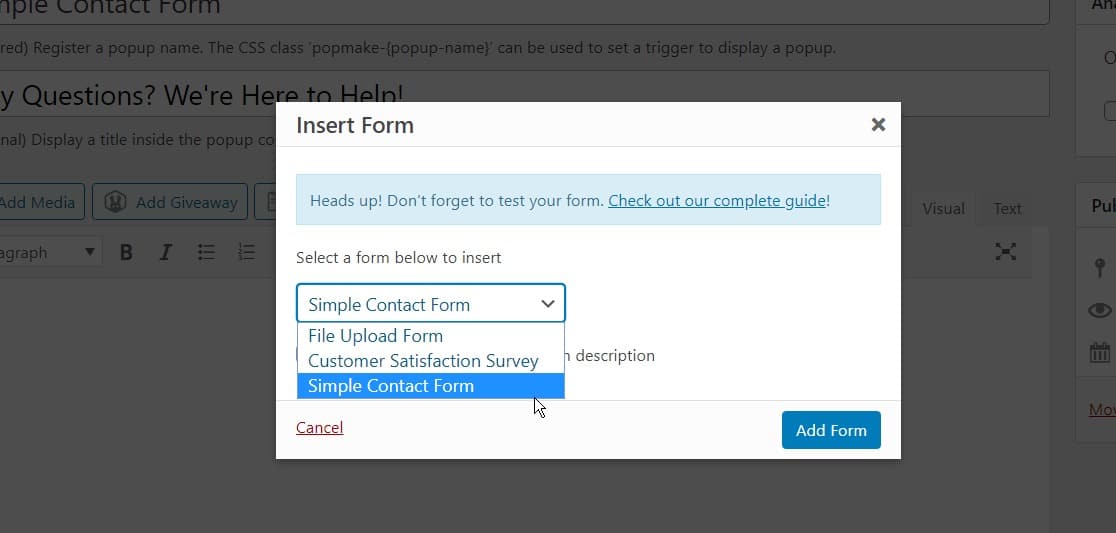
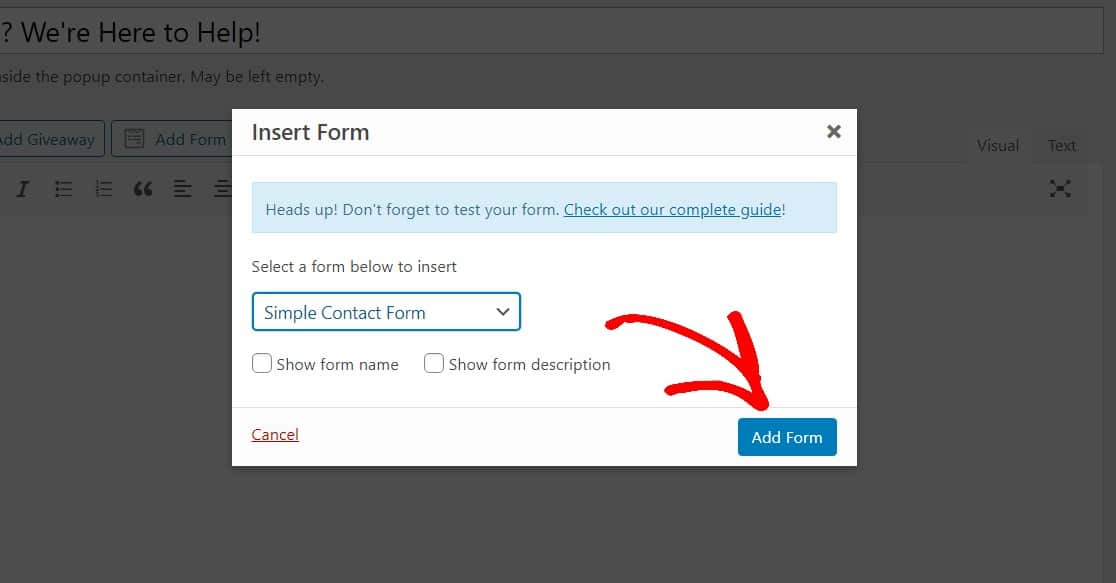
Once the form you created with WPForms is selected, click on the blue Add Form button to add it to your popup.
You’ll see a unique shortcode that tells that popup which form to use. If required, you can modify the form ID whenever required to replace the form.
Great job. Let’s customize some popup settings by scrolling down and starting with Triggers.
Triggers tell your popup when to open like when existing the page or scrolling down, etc. Click on the blue Add New Trigger button.
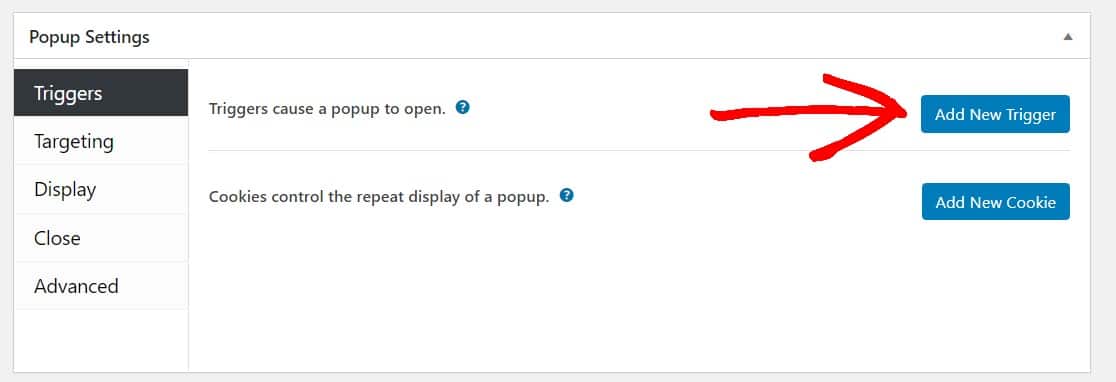
On the trigger option window, open the dropdown and select Time Delay/Auto Open. This will trigger the popup to open after your website visitors have been on the page for a certain amount of time.
I like to select 5 seconds (5,000 milliseconds). When you’re ready, click the Add button to continue.
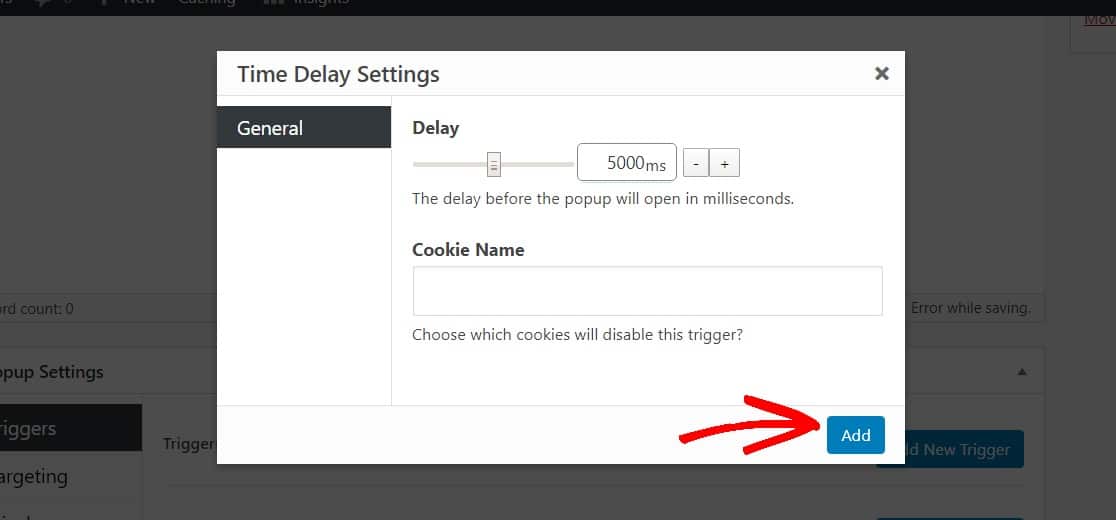
By default, this popup will show on every page of your WordPress website and to everyone on all devices.
You can adjust these settings to target specific people, devices, places (like a post or page), and more under Targeting. In fact, for more advanced settings, check out the Popup Maker documentation.
Next, let’s spruce up the look of your popup by clicking on Display under the popup settings.
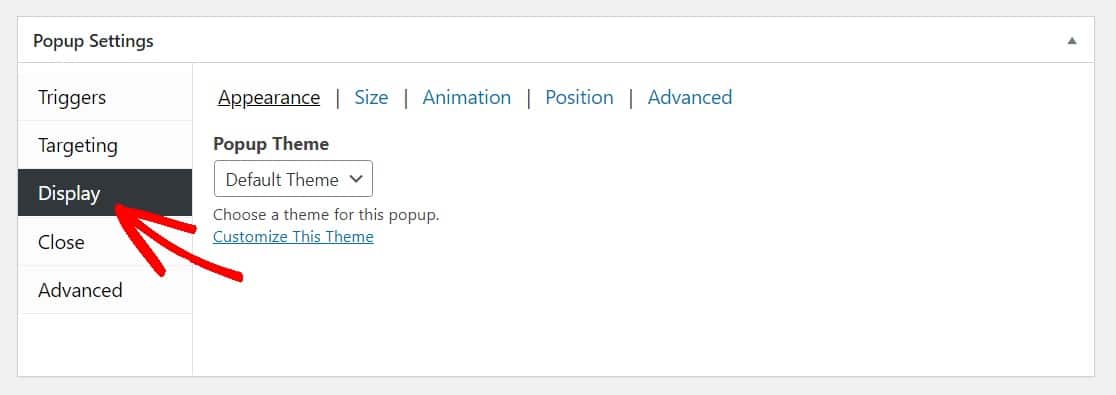
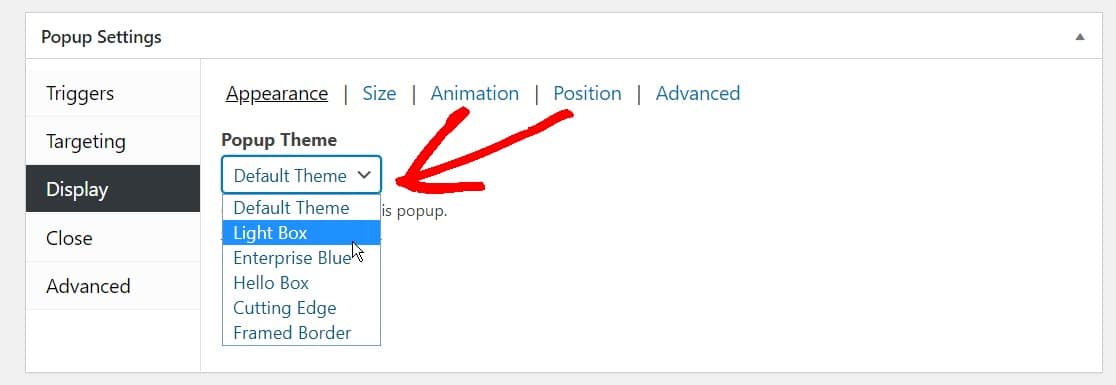
From the Popup Theme dropdown, select a theme for your popup. You can choose whichever Popup Theme you like. For this example, we’re picking the popular Light Box style.
Now, adjust any other settings you’d like, and when you’re ready, let’s go ahead and publish your form.
3. Publish the Popup Form
Scroll up on the page to the top and click on the Publish button to make your WordPress popup form live.
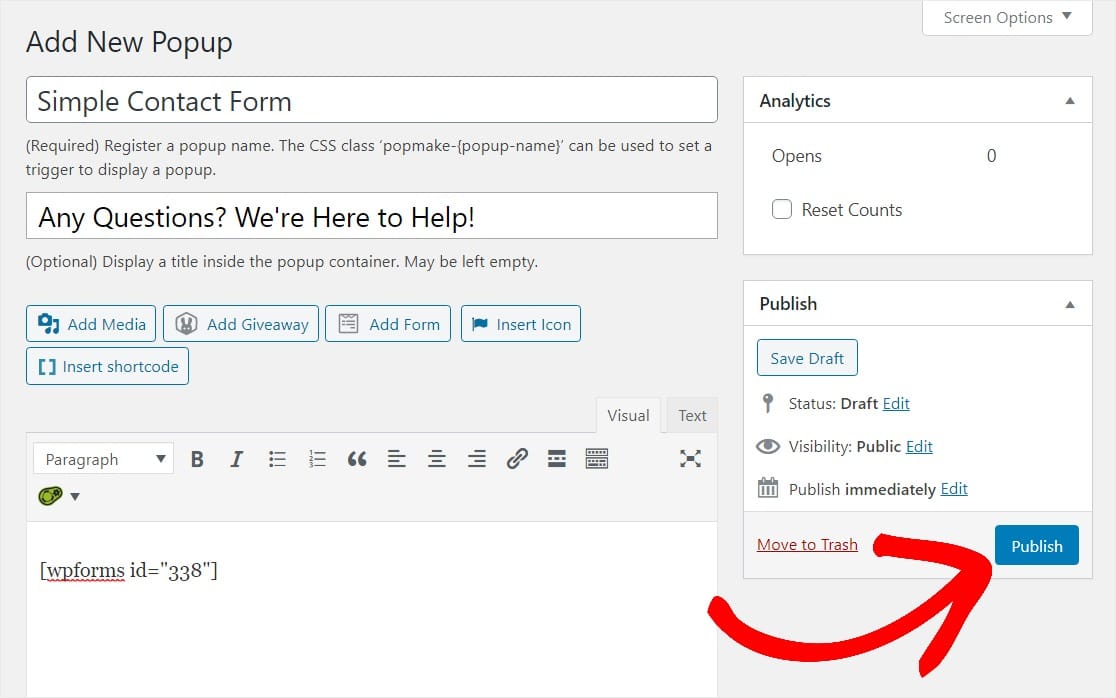
And there you have it! You can now preview your WordPress popup form to make sure it looks exactly like you want it to and adjust the settings accordingly.
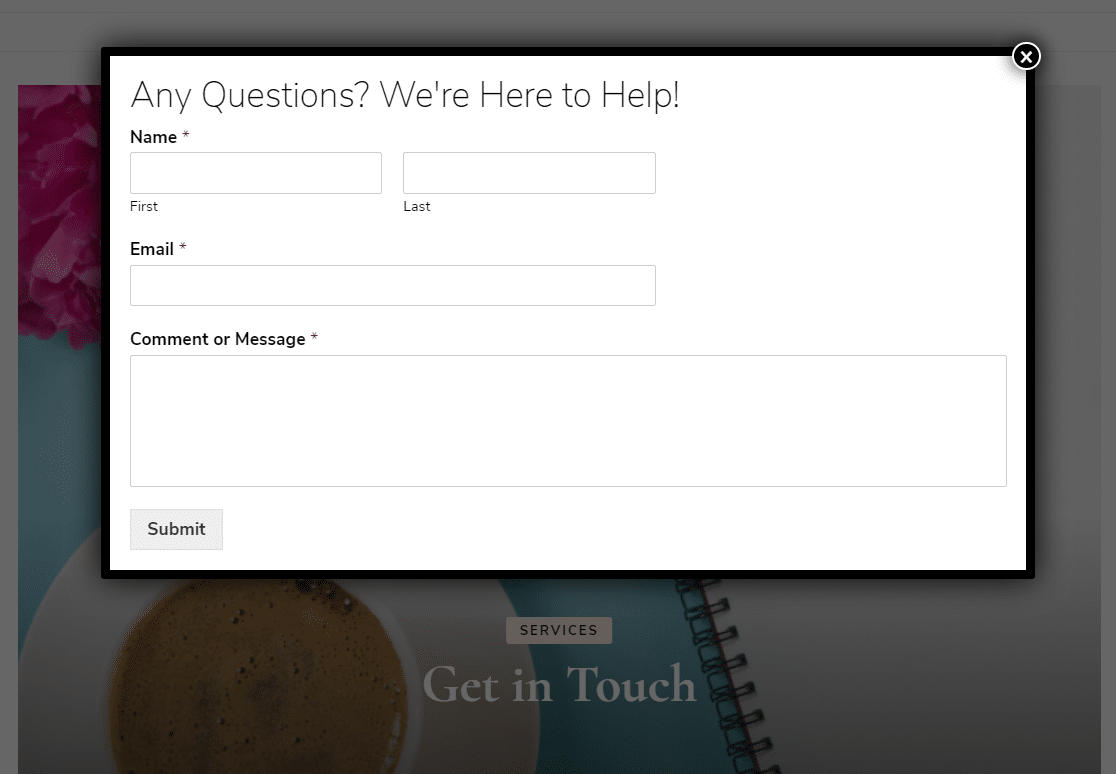
To make more contact form popups, you can repeat this process and customize the settings and display rules to appear on different posts or pages, etc. Or you can get creative and make a popup WordPress survey.
Head back to the edit page to keep an eye on the Analytics if you want to know how many people have viewed your WordPress popup form.
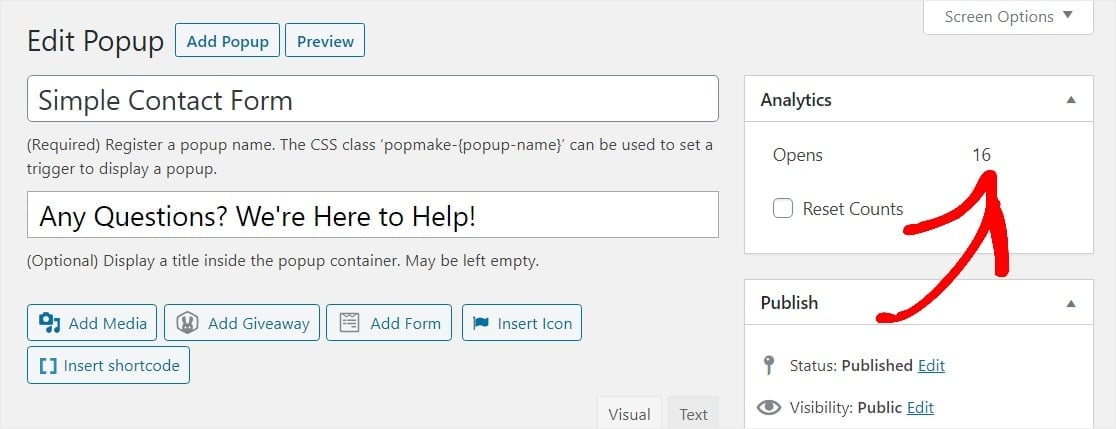
Also, if you’ve set up Google Analytics on your website, you can track Popup Maker through custom event tracking.
Alright, you’re all set. We hope this article helped you to learn how to create a WordPress contact form popup in WordPress.
FAQs about WordPress Popup Forms
Popup forms are a popular topic of interest among our readers. Here are answers to some frequently asked questions (FAQs) about them:
Why should you create a popup form in WordPress?
Popup forms give your readers a quick way to reach you without navigating away from the page that they’re on. They’re ideal for:
- Feedback — Gather feedback by asking for comments or even creating a survey
- Subscription — Build your email newsletter list by making it easy to subscribe
- Appointments — Enable users to schedule a call or appointment.
How do I add a pop up form to WordPress?
WordPress doesn’t have a built-in popup feature, so you’ll need to use a plugin like WPForms to first create your form and then OptinMonster to create your popup.
You can then use a shortcode to embed your form directly into your OptinMonster popup. This is perhaps the most convenient method available.
Not to mention, since both WPForms and OptinMonster offer free version of their plugins, you don’t have to pay a single penny to add this functionality to your website.
How do I create an automatic pop up form in HTML?
Creating an automatic popup form with HTML does require some extensive coding knowledge. Below we breakdown some of the steps that you’ll need to take for creating such a form:
- HTML Structure: Write basic HTML for your pop-up. Use <div> to create a pop-up box and another <div> for the overlay.
- Add CSS: Style your pop-up and overlay with CSS. Make the overlay cover the whole screen and the pop-up stand out.
- JavaScript for Interaction: Use JavaScript for showing and hiding the pop-up. You can set it to appear after a few seconds or when a specific action occurs.
- Include Form Elements: Inside your pop-up div, add form elements like <input> for user input.
- Test Your Code: Always test your pop-up in different browsers to make sure it works properly.
However, since working with code can quickly become complicated. We recommend that use a plugin like OptinMonster to easily create a popup form for free!
How do I create a pop up form Elementor?
In order to create a popup form in Elementor, you will require the Pro License. This will give you access to its popup builder and templates.
Choose a template or design from scratch. Drag and drop widgets to add content. Decide where and when your pop-up will appear. And that’s about it!
Next, Accept User Submitted Content
Want to let guest users submit posts on your site from the frontend? WPForms is the best plugin for that! See our guide on allowing user submitted posts on WordPress for details.
Create Your WordPress Form Now
Ready to build your form? Get started today with the easiest WordPress form builder plugin. WPForms Pro includes lots of free templates and offers a 14-day money-back guarantee.
If this article helped you out, please follow us on Facebook and Twitter for more free WordPress tutorials and guides.



Can I create the form on left side of popup and image on right side
Hey Pratham – You should be able to use our multicolumn layout fields to create form fields on left side, and display image on the right side. For more details, I’d suggest you to take a look at our blog post here.
Do I have to buy the premium versions of Popup Maker to be able to get what I want out of it to use wpforms?
Hey Robert – no, the free version of Popup Maker will also help you to create a popup with WPForms. Really, any plugin that allows you to use a shortcode should work with the WPForms shortcode.
Thanks 🙂
doesnt work if the form requires a payment
Hey Travis – We’d be happy to help! When you get a chance, please drop us a line in support so we can assist.
If you have a WPForms license, you have access to our email support, so please submit a support ticket.
Otherwise, we provide limited complimentary support in the WPForms Lite WordPress.org support forum.
Thanks 🙂
In the free version of both pop up maker and WP forms, they both look ok on their own when editing but when I include the WP form in the Popup maker it not only looks really cheap, but it garbles everything: text is all the wrong size and the text changes to different fonts and sizes than as designed.
Hey Meg – We’d be happy to help! When you get a chance, please drop us a line in support so we can assist? As you’re using the lite version, we provide limited complimentary support in the WPForms Lite WordPress.org support forum.
Thanks 🙂
Hi I want to create an announcement pop up for my wordpress site. How do I create this?
Hey SK – Sure, to create an announcement pop up, once you’ve created the form, go to the page or post where you want the announcement pop up to appear. You can either create a new page/post or edit an existing one.
Now, you can add the popup on this page/post by following any methods described in this doc! That’s it 🙂
Thanks!
Can WP Forms be to attached to a button so trigger is when button is clicked the forms displays for entry & submission. And would I use Optin Monster or Popup Maker to make this? Thanks.
Hey Phil – I apologize, currently, there’s no built-in ability to create a button to link to the form. However, you can absolutely add the form with a button by using the link of the page where the form is embedded. Please note that the form still needs to be embedded somewhere to get the form link/URL. Then you just need to use that page’s URL in the button.
Another workaround would be using a popup. You can make use of some of the multiple popup/lightbox-type plugins available on WordPress.org as well as paid plugin options. Some of the options available are OptinMonster and Popup Maker, which we’ve had customers report back success with.
Really, any plugin that allows you to use a shortcode should work with the WPForms shortcode.
Hope this helps. Thanks 🙂
How do I change the WPforms button color in Popup Maker? I don’t see an option to use the visual editor with the shortcode.
Hey AnJie, when embedding a form using a shortcode, you can’t customize the submit button directly through the editor. However, you can absolutely customize its appearance using custom CSS and the styles will reflect in Popup Maker.
Hope this helps, thanks!