
Do you know that you can create useful automations by connecting your WordPress forms with ChatGPT?
These days, all kinds of businesses are using ChatGPT to improve work efficiency.
And the good news is that WordPress site owners can now also take advantage of ChatGPT’s unique abilities to automate business processes.
In this post, we’ll show you how to integrate your WordPress forms with ChatGPT to aid your routine business tasks.
Connect Your Form With ChatGPT Now
Can You Connect ChatGPT With WordPress?
Yes, it’s fairly easy to connect ChatGPT with WordPress and add AI to your website.
You just need a third-party plugin known as Uncanny Automator to create an integration. This plugin lets you integrate AI with some other plugins on your WordPress site, such as a form builder like WPForms.
Once you’ve made the connection, there are endless ways in which you can use ChatGPT to assist you in growing your business faster and making processes easier.
How to Use WordPress Forms With ChatGPT
Use the quick links below to navigate easily through this step-by-step tutorial for WordPress ChatGPT integration.
In This Article
1. Install WPForms + Uncanny Automator
First of all, you need to install the WPForms plugin. WPForms is the most powerful yet beginner-friendly form builder plugin for WordPress. It has a rating score of 4.9 on WP.org, the highest of all form plugins.
WPForms has an extensive library of 2,000+ form templates that make the form-building process super convenient. To top it off, it integrates easily with tons of marketing services and now also with ChatGPT.
We recommend getting the WPForms Pro license to unlock the top advanced features you’ll need to grow your business.

For instructions on installing the plugin, see our WPForms installation guide.
We’ll be using WPForms to build our WordPress forms. But we need Uncanny Automator to serve as a gateway between WPForms and ChatGPT.

For the purposes of this article, we’ll use the free version of Uncanny Automator, though you may want to upgrade to Pro later. The Pro version is one of the best ChatGPT plugins for WordPress and it unlocks additional triggers and action events for your integrations.
2. Create a New WordPress Form
Now that we have the plugins we need, we’re ready to roll forward.
For this tutorial, we’ll create a New Hire form and connect it with ChatGPT. Then, we’ll have ChatGPT send a unique email to every new employee automatically upon form submission, welcoming them to the team.
Sounds interesting?
But to do that, we must start by building a form first. Open your WordPress admin panel and navigate to WPForms » Add New.

This will bring you to the form setup screen. On the top of the screen, you can enter a name for your form so you can find it easily later on by the name it is given on your dashboard.
After that, you can pick a form template. While we have a built-in New Hire template, it’s a bit more advanced than the form we need right now.
So we’ll create a simpler form from scratch in order to make the integration as straightforward as possible.
After naming your form on the form setup screen, click on Create Blank Form.

You’ll find yourself inside the form builder now, where you can start adding fields to your form.
Excellent! Let’s add some fields to this form.
3. Add Fields to Your Form
Inserting fields into your form is incredibly easy with WPForms. Just move your cursor to the left-hand pane and click on the field you need to add. You can also drag and drop the field if you want more control over where the field should appear in the form.
The two most important fields are Name and Email. So let’s start by adding those.

You can easily change the name of any field. We’ll rename the Name field to “New Hire Name”. Simply click on the field after you’ve added it to the form to open its Field Options, then type in the new name for the field under the Label option.

Next, let’s also add the following fields before renaming them like we renamed the fields above:
- Job Title (Single Line Text)
- Department (Dropdown)
- Manager (Dropdown)
- Start Date (Date/Time)

For the dropdown fields, you can add selectable options by clicking on the field to open Field Options and entering the text for each choice under the Choices section.

For the Date/Time field, we’re using the Date format because we don’t need a Time field for our purposes. You can change the format from Field Options » General.

If you want, you can also disable past dates so that the date picker field only shows present and future dates for selection.
You can find this setting in the Advanced tab of Field Options. Use the Disable Past Dates toggle button to disable all past dates.

Perfect! We’ve added all the fields we need for this form, and it’s almost ready.
Now would be a good time to Save the form, so we don’t lose any changes we made. You can find the Save button on the top of the form builder, next to the Embed button.

We’re done with building the form now. In the next step, it’s time to start the process for connecting this form with ChatGPT.
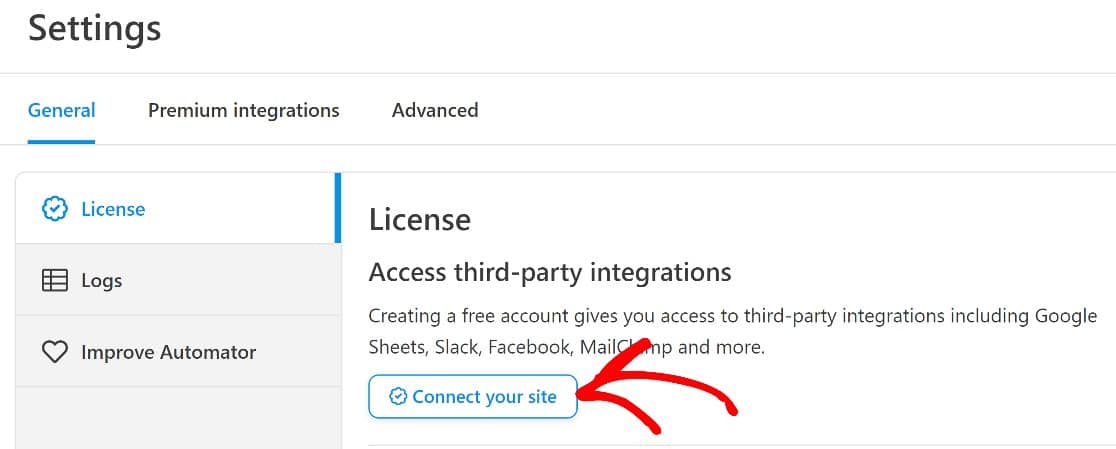
4. Create an Uncanny Automator Account
Before you can connect ChatGPT to your WordPress site, you first need to have an active Uncanny Automator account.
From your WordPress dashboard, select Automator » Settings.

This will take you to the License section of your settings. Click on the Connect Your Site button to proceed.
As soon as you press that button, a new popup window will appear. Select the Connect Your Free Account button and follow the on-screen instructions to create your free Uncanny Automator account and connect your site with it.
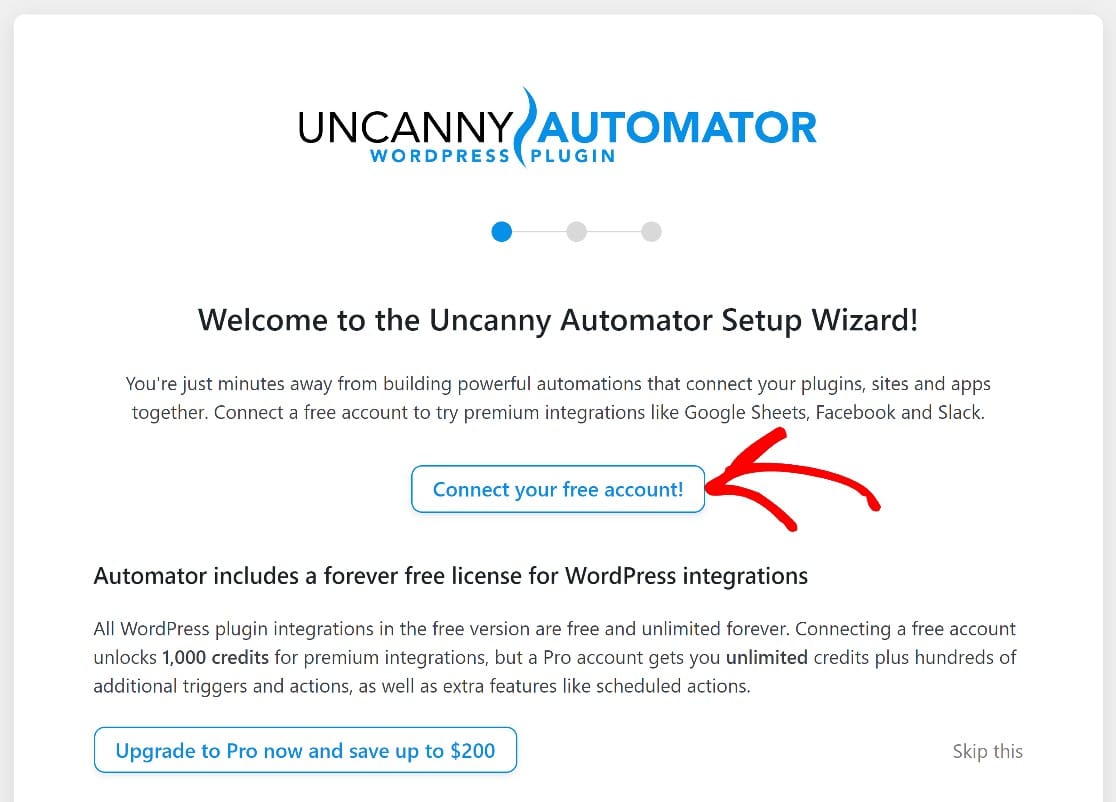
When you’ve successfully created your account, you can begin creating your automation recipe.
5. Set Up the Automation Trigger
In Uncanny Automator, every automation is called a “recipe”. Each recipe has two components: a plugin that triggers an automation and another app or plugin that completes an action based on the trigger event.
You can create Uncanny Automato recipes right from your WordPress dashboard. From the admin menu, hover your cursor over Automator and then press Add New.

You’ll be taken to the recipe editor screen now. Here, select your recipe type. Uncanny Automator lets you select a recipe by the type of user that can initiate it.
Since we’re assuming that our form will be used internally by a company to send automated emails to new employees, we’ll be choosing the Logged-in Users option. This will ensure that the automation triggers only when the authorized logged-in staff submits this form.
However, you’re free to choose either type depending on your needs. Once you’ve selected the recipe type, click on Confirm at the bottom to proceed.

Now, you can give a title to this recipe and choose your tripper plugin. Since we built our form using WPForms, we’re going to select WPForms as our trigger.

Choose a trigger event from the available options. In most cases including this one, the “A user submits a form” trigger will work just fine.

When you’re done selecting the trigger event, you’ll now have to select the specific form that should trigger this automation. This is where you’ll need to select the form that you created in the previous step.
In our case, this form is called the New Hire Form. So we’re going to use the dropdown to select this form.

Press the Save button once you’re done.
At this point, you’ve successfully set up your trigger event. Let’s move on to connecting Uncanny Automator with ChatGPT.
6. Connect Uncanny Automator With ChatGPT
Scroll down below and click on the Add Action button to begin setting up your automation action event.

Once you’ve done that, a list will open with all the available apps that you can integrate with WPForms. Look for the OpenAI icon on this list and click on it.

When you’ve clicked on that icon, a new popup window will appear on your screen, requiring you to connect your OpenAI account with Uncanny Automator. Click on the Connect Account option to move forward.

Here, you’ll need to enter your secret API key for OpenAI. To find your key, first, make sure that you have an OpenAI account. If you own an account, simply visit this link on a new browser tab to access your OpenAI key page.
Click on the Create New Secret Key button.

Click on the clipboard icon to copy your API key. Return to the previous browser tab where you’re setting up the Uncanny Automator recipe and enter your secret API key in the modal. Then, press the Connect OpenAPI Account button.

As soon as you connect, you’ll get a success message confirming that OpenAI is now ready to use with Uncanny Automator.

Now, we’re free to set up ChatGPT as our automation action.
7. Set Up Automation Action
After connecting your ChatGPT account with Uncanny Automator, return to the recipe editor screen. This time, the OpenAI icon will no longer be grayed out, suggesting it’s ready to use.
Click on the OpenAI icon.

This will pop open a dropdown with a list of available OpenAI action options. Select “Use a prompt to generate text with the GPT model” option.

Now, you’ll see several options appear that let you control the behavior of your ChatGPT model:
- Model: If you selected the action option that we recommended above, you’ll only have access to GPT-3, which is the best language model currently available in OpenAI. You can also choose between Curie, Babbage, and Ada models if you choose a different action option in the free version of Uncanny Automator. We recommend leaving this option to default for this tutorial.
- Temperature: This setting lets you control the degree of randomness of the response generated by GPT-3. You can enter values from 0 to 2. If you’re unsure, it’s better to leave this to the default value of 1.
- Maximum Length: This field accepts the maximum number of tokens. OpenAI counts length in terms of tokens, which are units of “meaning” rather than words. According to OpenAI: “You can think of tokens as pieces of words, where 1,000 tokens is about 750 words.” Once again, you can leave this field blank to use the default value.
- System message: Here, you can enter any instructions or give additional context to GPT-3 about the kind of response you’re expecting from it.
- Prompt: This is the most important part of these settings. GPT-3 will use anything you write as a prompt to generate and return a response to you.
Here’s the system message and prompt that we used:

You may notice that the prompt includes some data directly pulled from the form that we connected earlier as the trigger.
This is the coolest feature of this integration because you can personalize your email by adding actual data from each form entry.
To take data from the form and add it to your prompt, simply press the asterisk (*) icon next to the Prompt field.

When the modal opens, scroll down and select the trigger event you set up earlier.

Now, you can pull data directly from any field added to your form as long as some additional metadata like User IP.

When you’re done, press Save.
8. Use ChatGPT Generated Response
Now that you’ve set up an integration with ChatGPT, the final step is to use the generated text in some way that can be helpful to you.
In our scenario, we’re using this integration to have ChatGPT generate an email and send it to the intended recipient. However, ChatGPT can’t send an email, so we’ll need a separate action to handle the email sending process.
To do this, we’ll set up a second action in Uncanny Automator. Simply click on the Add Action button under the OpenAI action you just created.

As before, you’ll now see a list of apps available for integration. This time, click on Emails.

After you’ve done that, click on the “Send an Email” action item.

Fill in the fields to configure your email settings. Make sure to use the Email field from your form in the To field. You can do that by clicking on the asterisk (*) button on the right of the field and selecting the Email from the form trigger options, as we did in an earlier step.

Scroll down further to find the subject and body fields for your emails. First, enter a suitable text for the subject.
Because we can only obtain ChatGPT’s complete response all-in-one-piece, we can’t pull out just the subject line from its response to use it in the Subject field.
Instead, we’ll be using a fixed, manually written subject line for the purposes of this tutorial.

For the body, we need to pull the email text that ChatGPT generated for us based on the prompts we set up in the previous step.
You may have noticed that we instructed ChatGPT not to insert a subject line in its response earlier.

This way, we can ensure that the text it returns is free from any accidental mentions of a subject line within the body of the email.
Now, we just need to insert ChatGPT’s text to the email body.
Once again, go ahead and the asterisk (*) button next to the Body field to open the list of available data you can use from ChatGPT.
Because we only need ChatGPT’s prompt-based response here, we’ll select the Response output under the GPT model action dropdown.

When you’re satisfied with how everything looks, go ahead and press Save.

We’re almost done! All that remains now is to publish the form we created in the 3rd step.
9. Publish Your Form
For the final step, just return to your main WordPress dashboard and go to WPForms » All Forms.

Select the form that you created earlier from this list to access it within the builder. Once inside, click on the Preview button on the top.

This will take you to a preview of the form, where you can test it. This is a good point to fill out a dummy entry with an email address that belongs to you and press submit to initiate the automation.
If the integration was set up properly, you’ll receive a neatly written response (which, in our case, is a welcome email) from ChatGPT.
After you’re done testing and previewing your form, return to the form builder once more and press Embed.

This will bring up a modal window asking if you want to embed your form to an existing page or a new one.
We’ll be embedding the form in a new page, though the process of either option works almost the same way.

You’ll now be required to name your new page. After giving it an appropriate name, click on the Let’s Go button to continue.

As you press that button, you’ll find yourself in your WordPress editor with the form already embedded within it using a block.
This is a good place to take one last look at your form and make sure everything is to your satisfaction. You can change the colors of your form in the block editor while you’re here.
When you’re ready, press the Publish button on the top to launch your ChatGPT-integrated WordPress form.

You can now enjoy using this form to trigger an AI-generated email notification.

Here’s the AI-generated welcome email that ChatGPT sent us based on the prompts we used:

Isn’t it just perfect?
This is just one example of what you can achieve using a WPForms + ChatGPT integration. You’re free to explore, experiment, and mold this integration to align with your specific business needs.
Pro Tip
You can also integrate WPForms with HeyGen to create videos from a prompt using Zapier. The process is pretty much the same as the steps we went through here.
And that’s it! You’ve learned how to connect your WordPress forms with ChatGPT.
Next, Try More Aweomse ChatGPT Integration Ideas
There are tons of creative ways you can put a connection between WPForms and ChatGPT to great use.
One way to do that would be to use ou rcat adoption form template and have ChatGPT send a confirmation email with a random fun fact about cats. While ChatGPT runs out of unique responses after a while, you’ll still be able to increase the variety of facts being sent out with your emails, keeping things interesting for adopters!
Connect Your Form With ChatGPT Now
Ready to build your form? Get started today with the easiest WordPress form builder plugin. WPForms Pro includes lots of free templates and offers a 14-day money-back guarantee.
If this article helped you out, please follow us on Facebook and Twitter for more free WordPress tutorials and guides.


Hi, i love this integration and i use it a lot.
Do you know a way to present the OpenAI output directly to the page?
Is there any wpform, that can receive the out as a caption?
That really would be great.
Hey David – I apologize, currently we don’t have the feature to send the output back to forms from ChatGPT. I do agree this would be a great feature to have, and I’ll add this to our feature request tracker.
I am looking for a similar function as previously stated: Present the OpenAI output directly to the page. Have there been any movement on the request in the last few months? Thank you.
Hey Marc – While the developers are working to display OpenAI output on page, I apologize that I’m unable to share an ETA. That said, I’d suggest you to keep an eye on our changelog for product updates.
Thank you for sharing some insight Prashant. Would you be able to indicate whether we are weeks out or months out? Thanks again.
Hey Marc – I sincerely apologize as I’m unable to share the ETA as release of a feature depends on a lot of factors like development timeline, QA testing etc. That said, I’d encourage you to keep an eye on the changelog for latest announcement.
Do you know if part of that implementation will store the ChatGPT response in the WPForms database tables?
Hey Marc – We’d be happy to help! When you get a chance, please drop us a line in support so we can discuss further.
If you have a WPForms license, you have access to our email support, so please submit a support ticket.
Otherwise, we provide limited complimentary support in the WPForms Lite WordPress.org support forum.
Thanks 🙂
Hey Prashant – Just checking to see if the development team has made any progress with displaying the OpenAI Responses on page. Any update would be appreciated. Thank you.
Hey Jerry – Our developer’s are looking into this, and I apologize that I’m unable to share ETA.
This is such a great idea! I just went through this process but it seems like something is going wrong on my end and I’m not sure how to troubleshoot it. The email is triggering but the AI prompt won’t fire. The emails I’m receiving from the test are blank. Any ideas?
Hey Dana – We’d be happy to help! When you get a chance, please drop us a line in support so we can assist.
If you have a WPForms license, you have access to our email support, so please submit a support ticket.
Otherwise, we provide limited complimentary support in the WPForms Lite WordPress.org support forum.
Thanks 🙂
I am having the same issue. Has there been any resolution?
Hey Drako – When you get a chance, please drop us a line with more details about the issue you are facing in support so we can assist further.
If you have a WPForms license, you have access to our email support, so please submit a support ticket.
Otherwise, we provide limited complimentary support in the WPForms Lite WordPress.org support forum.
Thanks 🙂