Are you looking for a simple way to save progress on a WordPress form?
Adding the Save and Resume functionality allows your users to save their partial form submissions and resume submitting the form at a later time.
In this tutorial, we’ll show you how to let users save partially filled forms and resume filling later without losing data.
Create a Save and Resume WordPress Form Now
In This Article
- Step 1: Install the WPForms Plugin
- Step 2: Install and Activate the Save and Resume Addon
- Step 3: Create a New Form in WordPress
- Step 4: Enable the Save and Resume Feature
- Step 5: Configure Save and Resume Settings
- Step 6: Add Your Form to Your WordPress Website
- Step 7: Save Form in WordPress
- Step 8: View Saved Form Entries
- FAQs on Saving Form Progress
How to Save Progress on a WordPress Form
Let’s start our step-by-step process of adding Save and Resume functionality to WordPress forms.
Step 1: Install the WPForms Plugin
The first thing you need to do is install and activate the WPForms plugins. For this step, you can check the guide on how to install a WordPress plugin.

We took this screenshot during a sale. Click here to see if the discount is still available!
WPForms includes 4 paid packages: Basic, Plus, Pro, and Elite.
The Save and Resume addon comes with the Pro and higher plans, so make sure you’ve purchased the right version of the plugin on your site.
Step 2: Install and Activate the Save and Resume Addon
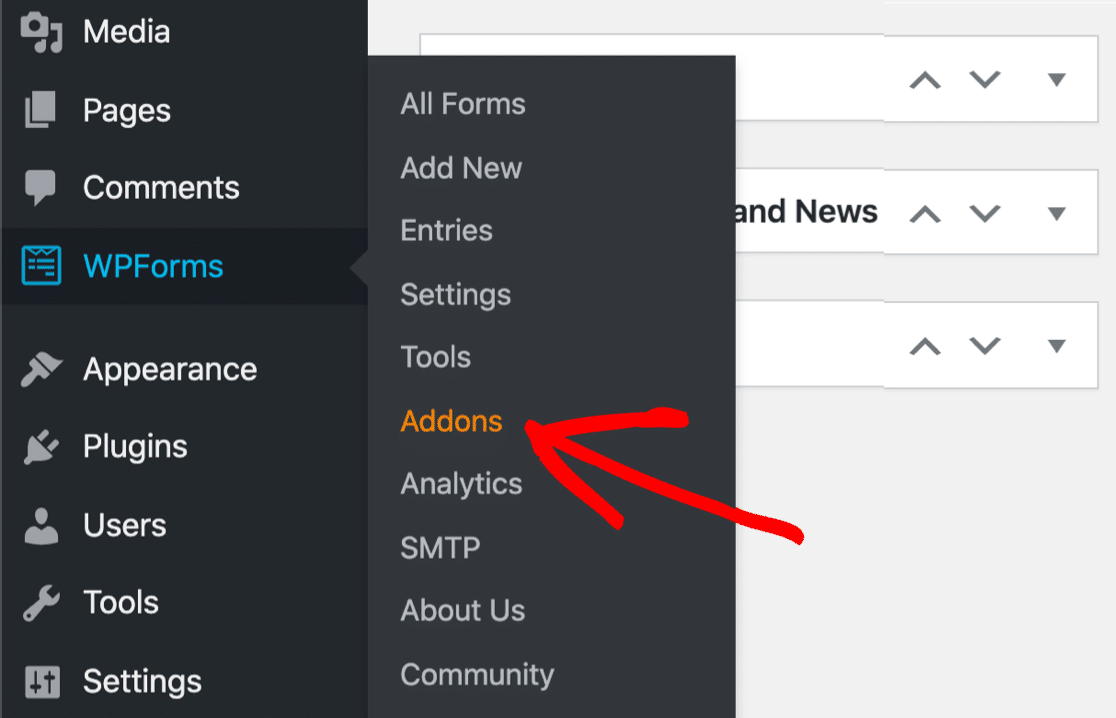
Now it’s time to activate the Save and Resume addon. To do that, go to your WordPress dashboard and click WPForms » Addons.
This will open the addons page of WPForms. In the search bar, type Save and Resume and press the Install Addon button.
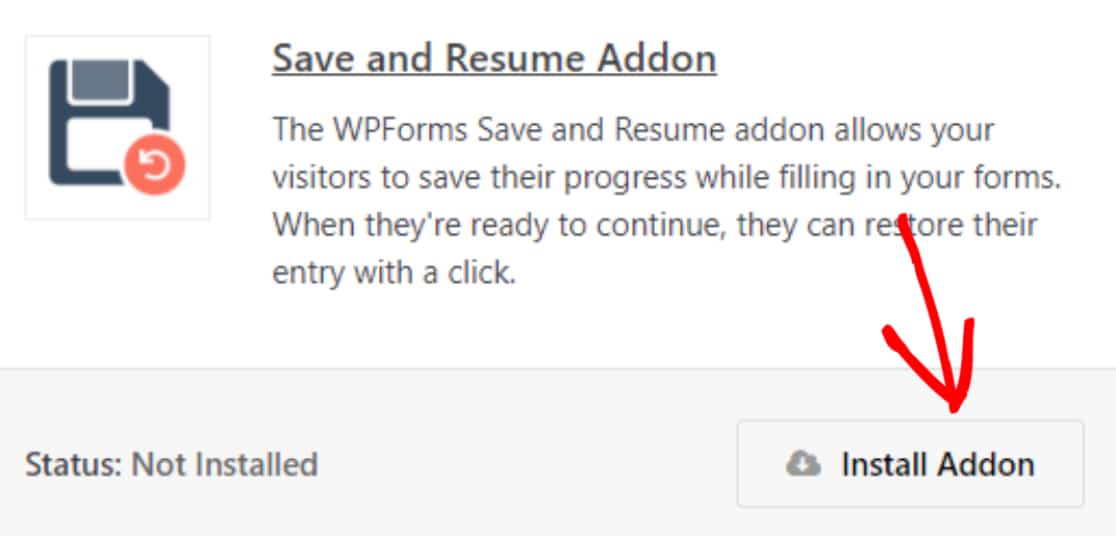
Once you install the addon successfully, you’ll be able to let users save progress when filling out a form.
Step 3: Create a New Form in WordPress
For the sake of this tutorial, we’re going to use the pre-built job application upload form template.
WPForms comes with 2,000+ form templates. All form templates are completely customizable, so you can use them as-is or tweak them any way you want.
And if you want to start building your form from scratch, you can do that too using the simple drag-and-drop builder of WPForms.
Now to start with the pre-built form template, go to WPForms » Add New.

This will take you to the WPForms form template library. Here, you’ll find a bunch of ready-made form templates.
Search for the job application upload form, add a name to your form, and click on the Use Template button.
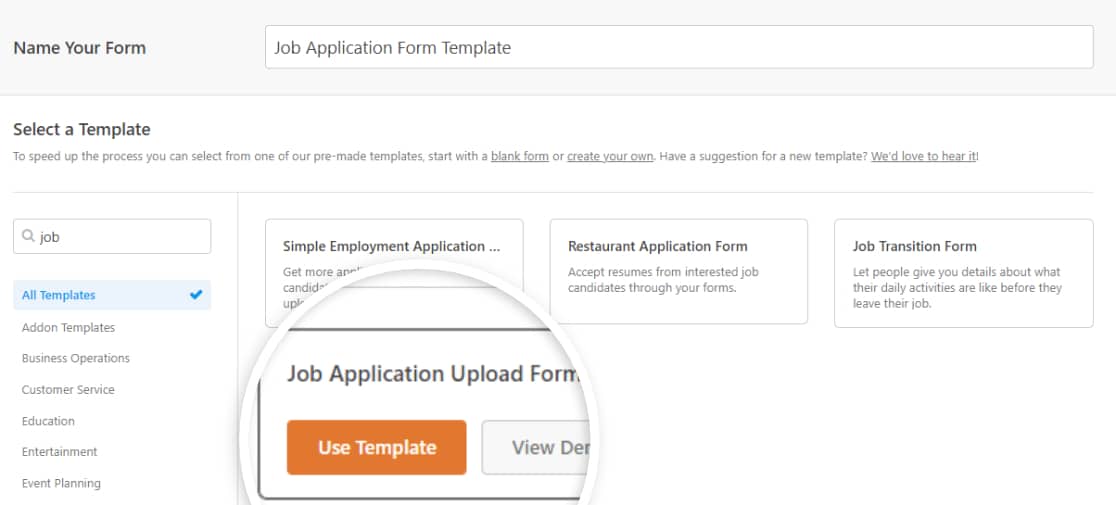
As soon as you click on the button, your form template will open in the live editor.
Below, you can check the complete form builder setup of WPForms.
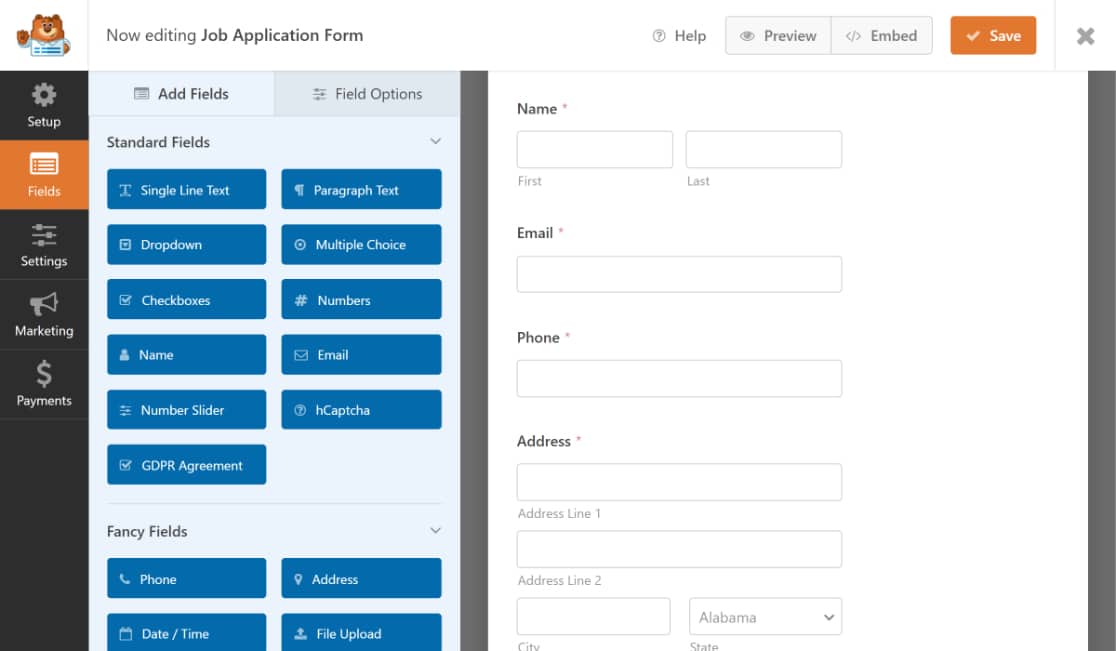
You can see your live form on the right, and the left side includes the additional form field options.
Add additional form fields by dragging them from the left-hand panel to the right-hand panel. You can delete or edit the fields by clicking on them.
Once you customize your form, you can proceed to the next step, i.e., adding the functionality to save form progress.
Step 4: Enable the Save and Resume Feature
To enable the Save and Resume feature, go to Settings » Save and Resume in the form editor.
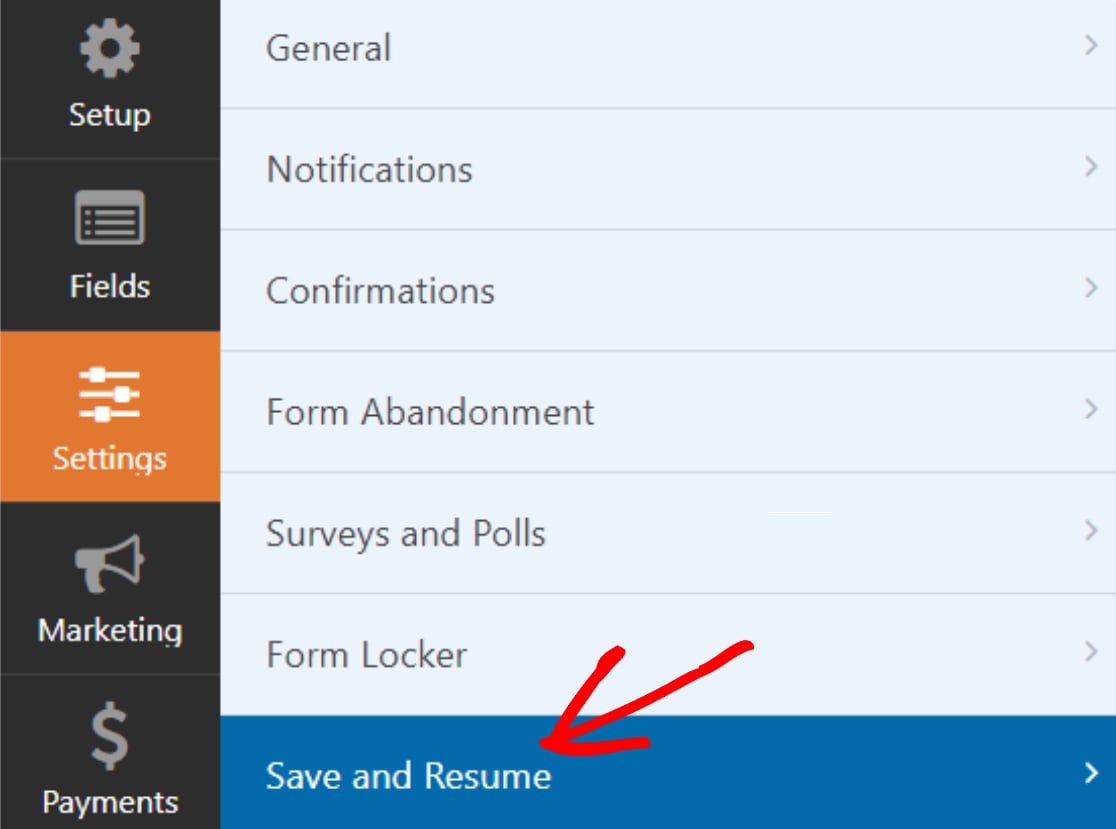
Next, toggle on the Enable Save and Resume feature.
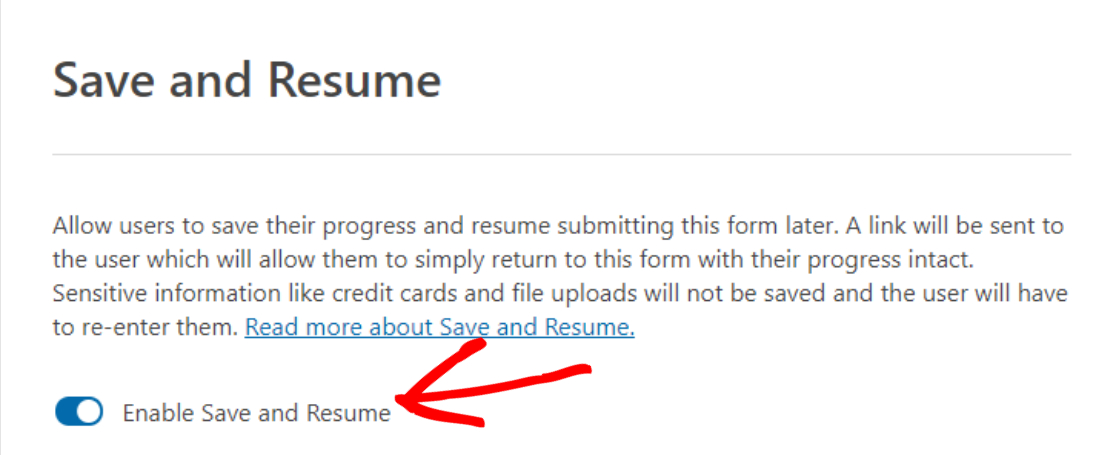
This will open the additional options that come with the Save and Resume addon. You can configure each option as per your website preference.
Step 5: Configure Save and Resume Settings
Let’s see all the save and continue options you’ll get with the addon.
Customize Save and Resume Link Text
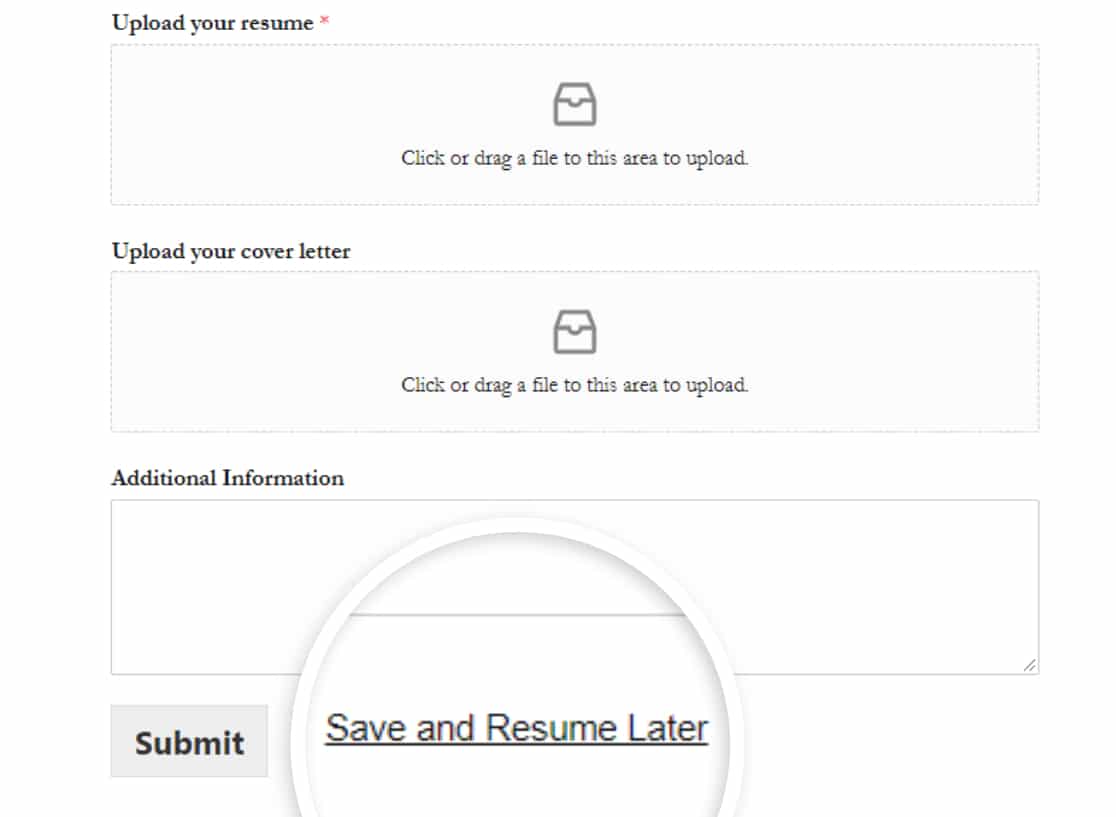
The first option here is the Link Text. This is the hyperlink text of the Save and Resume functionality. The form users need to click on this text to save their form progress mid-way.
It includes the “Save and Resume Later” pre-defined text, but you can customize the text as per your liking.

And this is how the Save and Resume hypertext link will appear on the frontend of your site.
Display Disclaimer Page
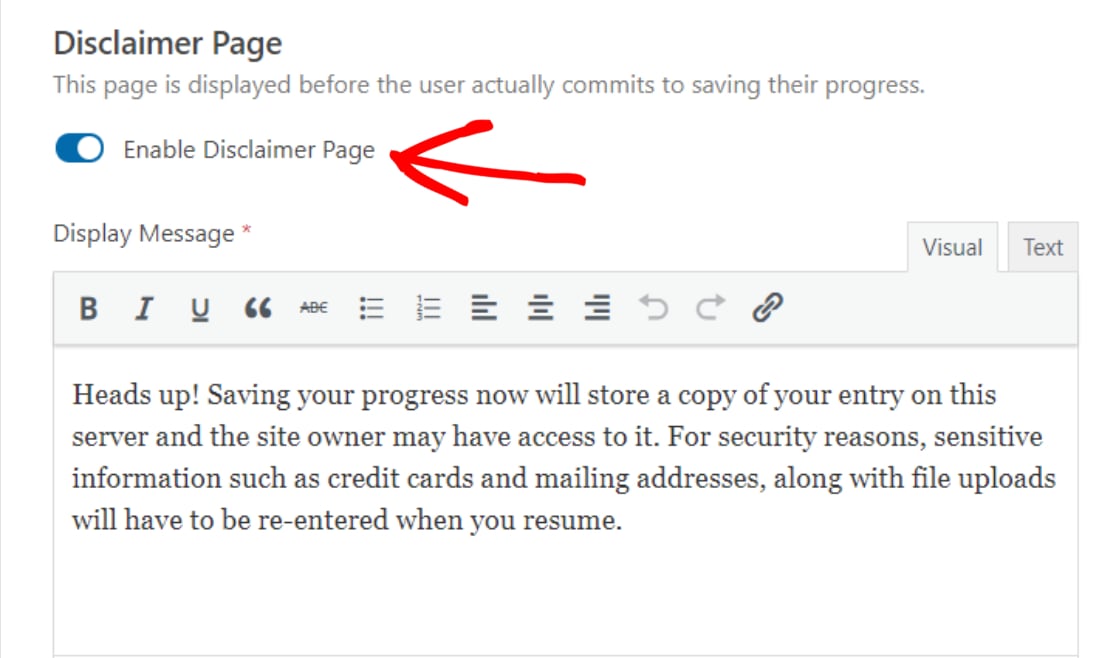
Next, you can display a customized disclaimer so your users know how their data will be stored. This disclaimer will appear before a user saves their partially filled form.
To display the disclaimer message, toggle on the Enable Disclaimer Page option.
This will open a box containing the pre-written disclaimer message. You can edit this text or leave it as it is.
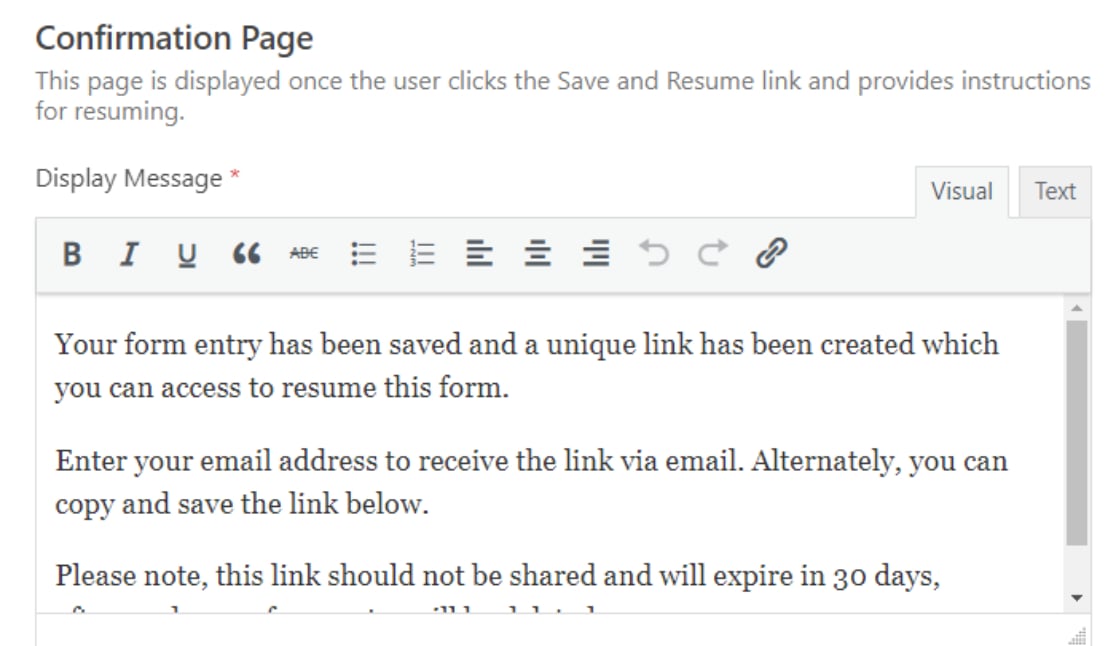
Customize Save and Resume Confirmation Message
Just like the disclaimer page, you can also display a customized confirmation message to your users.
We’ve got a pre-written copy of this confirmation message with all the details on how a user can reaccess their saved form. However, you can edit the message and add more details as per your preference.
But, make sure to include all the important instructions so your users understand how they can resume filling out the form.
The Save and Resume addon of WPForms gives 2 options to resume the WordPress form. Your form users can either:
- Use a Save and Resume link to reaccess the form later
- Resume form via email
- Or both.
Enable Resume Link

Toggling on the Enable Resume Link option will display a continuation link on the confirmation page. In order to resume the form, your users need to copy this link and use it whenever they want to complete the form later.
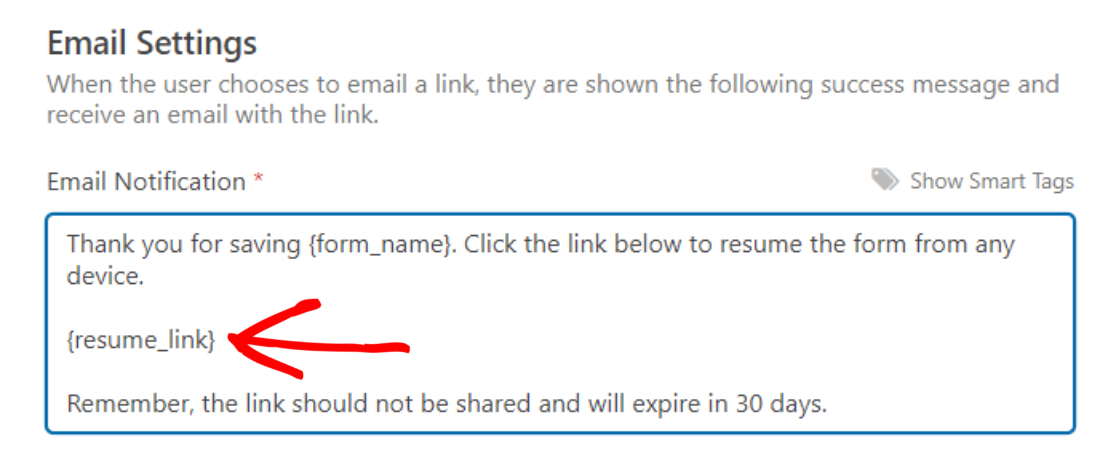
Customize Save and Resume Email Notification
Next, toggle on the Enable Email Notification feature.

This feature sends an email notification to your users containing the Save and Resume link.
You can easily customize this email notification and make your own copy of the message. Just make sure to add {resume_link} Smart Tag in the email notification.
Sometimes, email notifications are filtered as spam and may not reach the user’s inbox. If you face this issue, you can use the WP Mail SMTP plugin to fix the WordPress contact form not sending email issue.
And lastly, you can display the final confirmation message, mentioning that the resume link has been sent to the email address provided. If you want, you can customize this message as well.
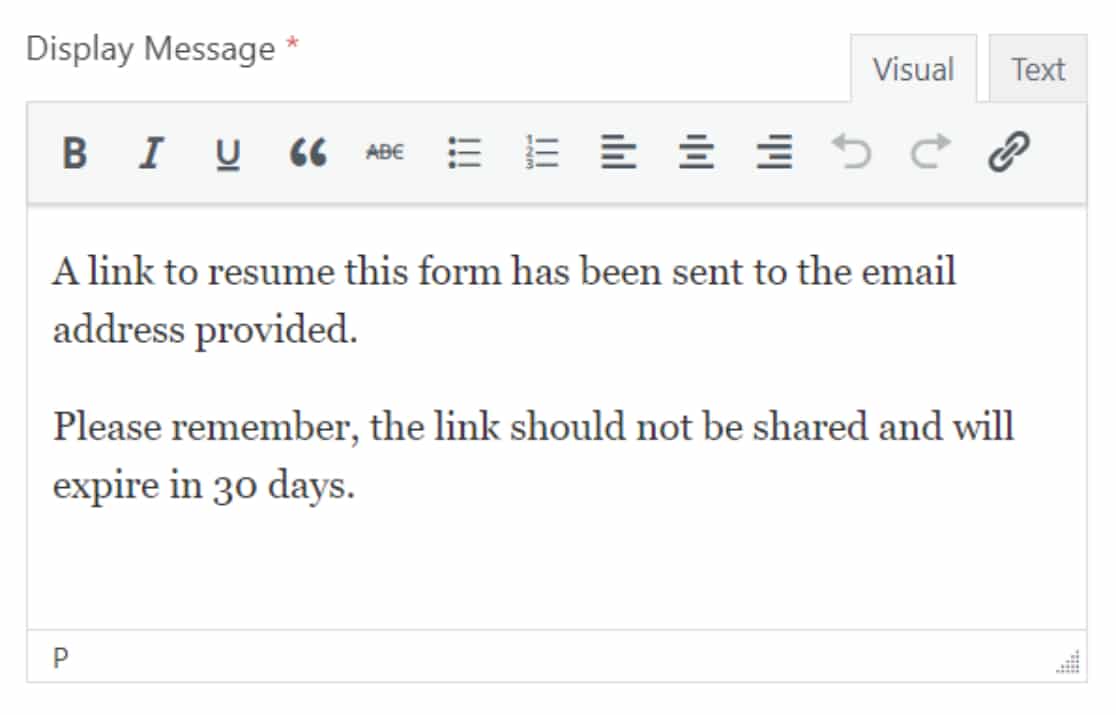
And that’s it! These are the setting options you’ll get to configure your Save and Resume addon.
Step 6: Add Your Form to Your WordPress Website
Now that your form is ready and you’ve configured the Save and Resume settings, it’s time to add it to your site.
With WPForms, you can add your form in multiple locations, including pages, posts, and the sidebar widget.
Here’s how you can add your contact form to a WordPress page.
Click on the Embed button at the top of your page.

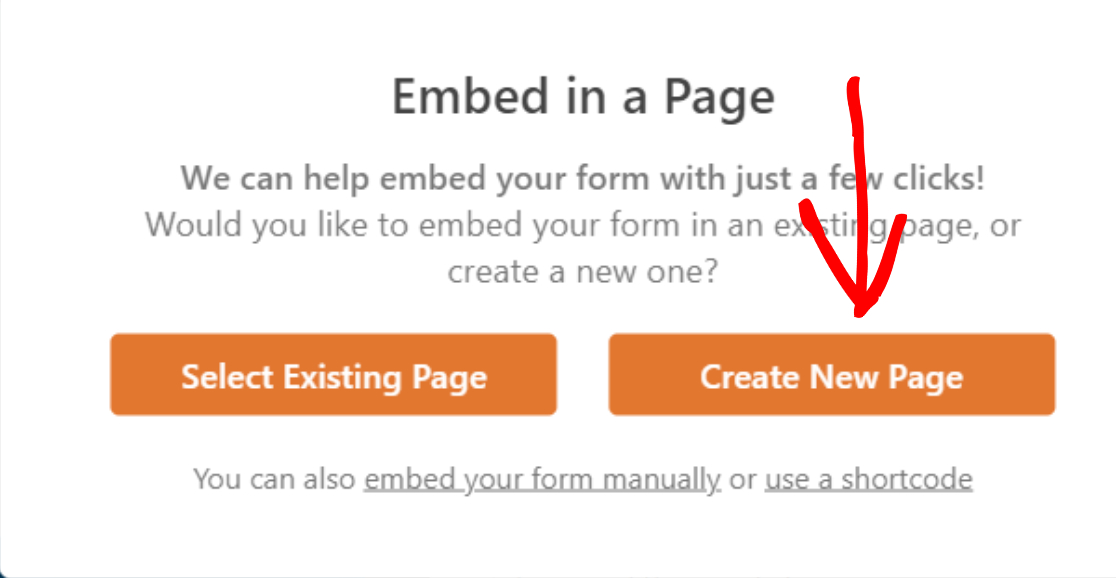
Clicking the embed button will display a popup with 2 embedding options. You can either add the form to an existing page or create a new one.
Click on the Create New Page option.
Add your page name and click the Let’s Go button.

This will create a new page and add your form to it automatically.
Click on the Publish button to publish your form on the live page.

Great! You’ve added your form to the live site. Let’s now check how the Save and Resume functionality works on the live form.
Step 7: Save Form in WordPress
Once you add your form to your site, you will find the Save and Resume link near the submit button at the bottom of your form.
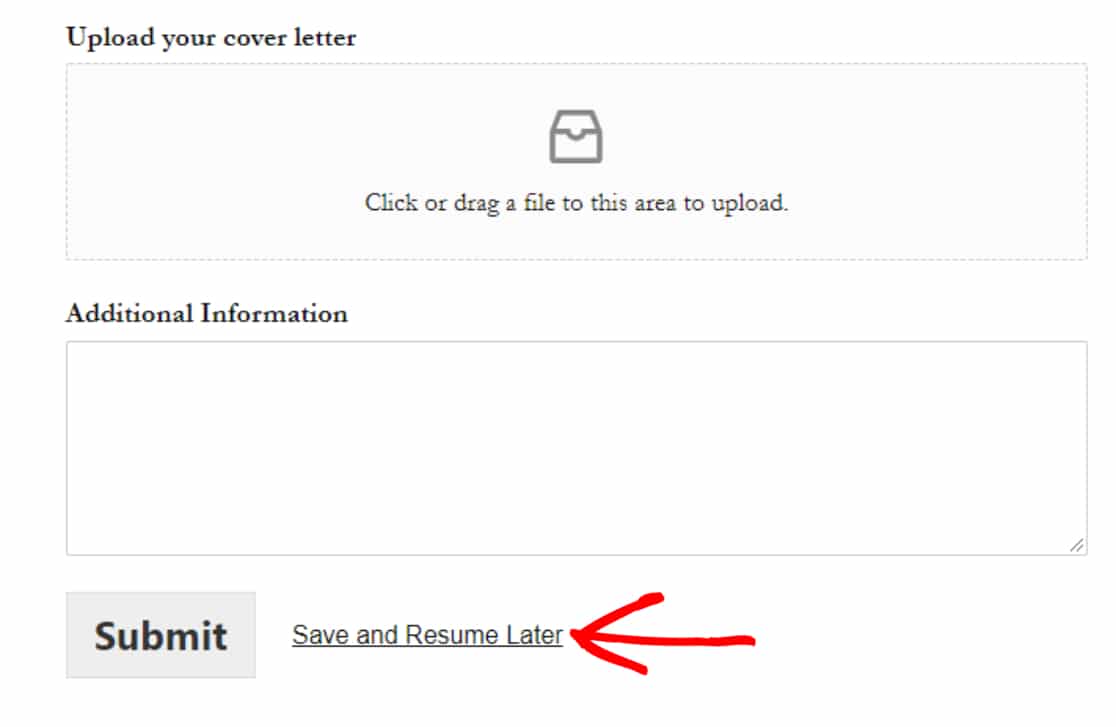
Your form users need to click on this link to save their form progress.
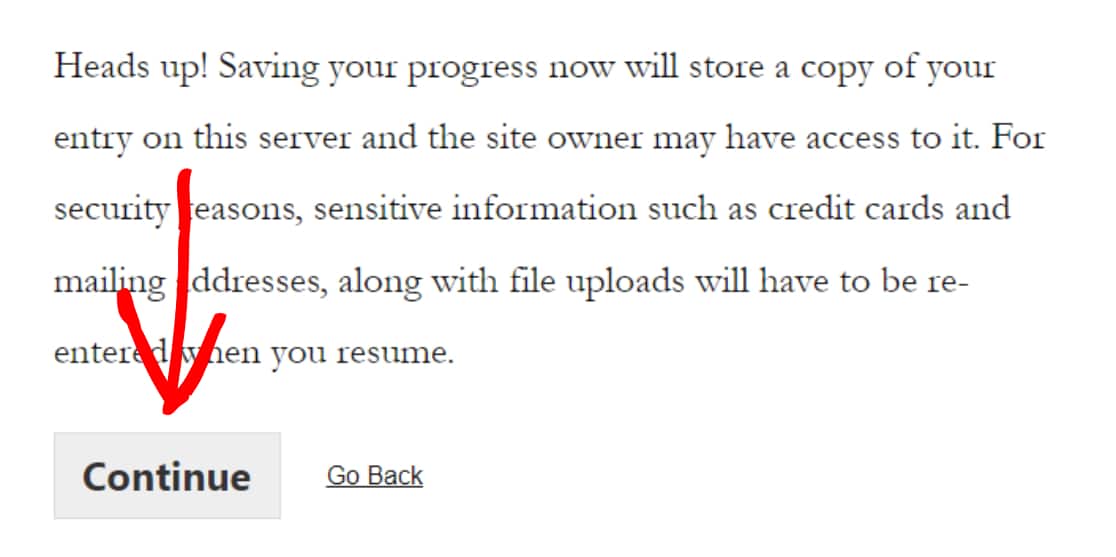
Now, if you’ve enabled the Disclaimer Page option previously, then on the next screen, your form respondents will see a disclaimer message with 2 options:
- Continue button: To save and resume the WordPress form.
- Go back: To go back and continue filling the form.
Your users need to click on the Continue button to save their partial entry.
This will display a confirmation message with a resume link and an email box.
- Copy link: This is a resume link to reaccess your WordPress form. Copy and save the link.
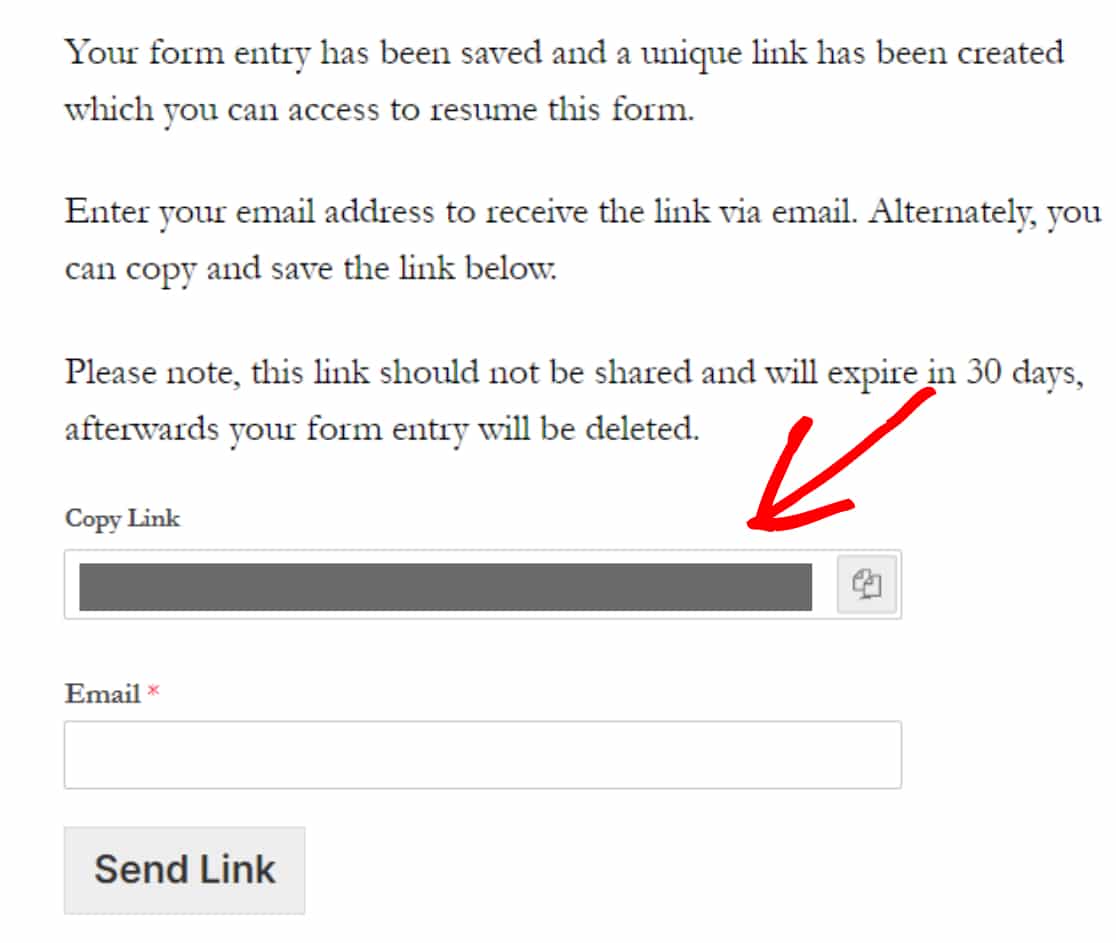
- Email: Your form users need to add the email address to receive the email notification and resume link via email.
Add the email address and click on the Send Link button.
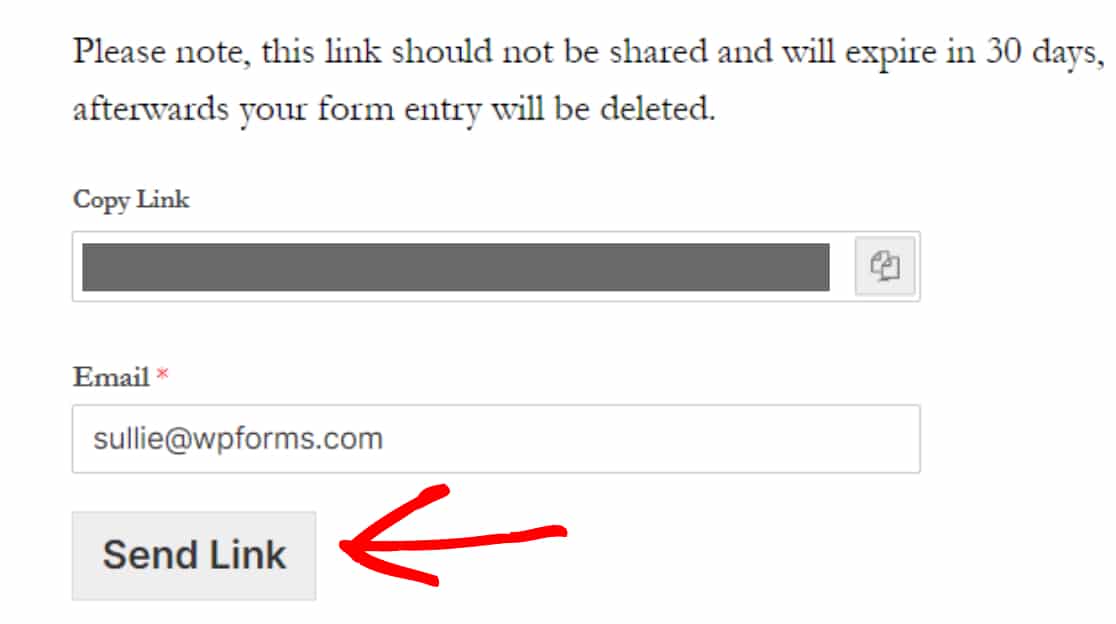
Note: Don’t share this link with anyone, and make sure to complete the form within 30 days. The resume link will automatically expire after 30 days, and all your form entries will be deleted.
Step 8: View Saved Form Entries
WPForms comes with a powerful entry management feature. It stores all your forms data in your site’s database and automatically takes care of WordPress data collection, allowing you to manage all form entries inside your WordPress dashboard.
Like other form submissions, WPForms stores partially filled form entries in the WordPress database, and you can access, view, and manage them in the same way.
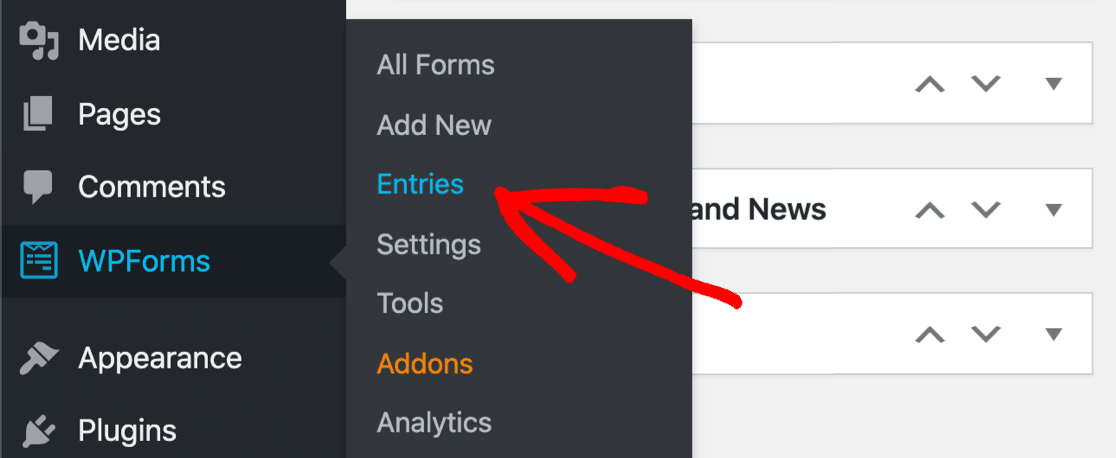
To view your users’ partial form entries, go to WPForms » Entries.
On the entries page, click on the form that has the Save and Resume feature enabled.
In our case, it’s the job application form.

This will open a page where all form submissions for a single form are stored. Under the status column, you can check that the incomplete entries are labeled as “Partial.”

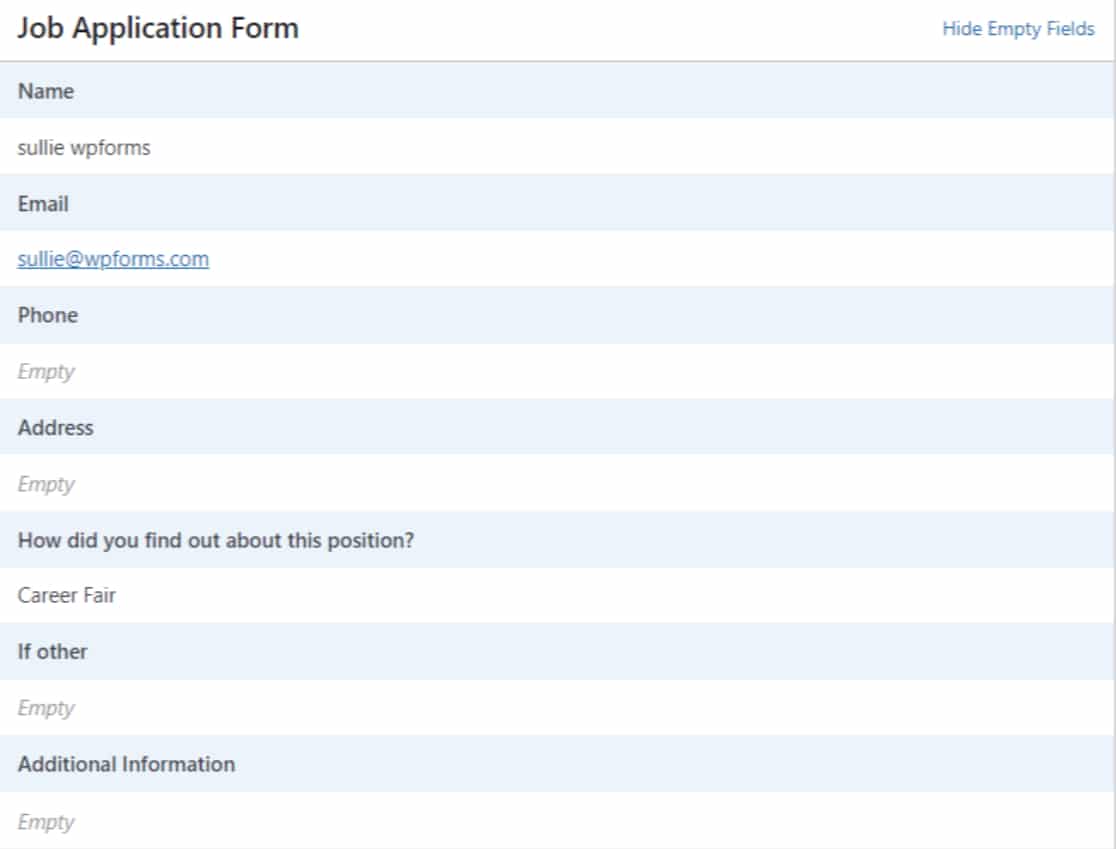
If you want to see more details, such as which form fields are filled and which are left unfilled/empty, click on the View option.

This will open a new window, including all other additional information related to the partially filled form.
And that’s it! This is how simple it is to save progress on a WordPress form.
Create Your WordPress Form Now
Note: For safety and security purposes, the Save and Resume addon doesn’t save your users’ credit card and payment details. So if you’ve enabled the Save and Resume functionality on your payment forms, your users need to add credit card details every time they resume filling out the forms on your site.
FAQs on Saving Form Progress
When considering activating the save feature on their forms, our users often reach out to us with these common questions that might help you too:
How will the user know they can save their progress?
When you enable the Save and Resume feature in WPForms, it will display a “save and resume link” right next to the Submit button. This way, your visitors will know immediately that they have the option of saving their progress at any time while filling out the form.
If you want, you can also add a bit of instructional text at the top of the form letting your visitors know about the save and resume link next to the Submit button. Using the Content field is a great way to add helpful information to any point inside your form.
When should I add save and resume functionality to my forms?
It’s a good idea to let visitors save their progress if you have a complex and lengthy form. In certain situations, such as when you have a multi-step forms that are broken up into various pages, adding the save and resume functionality can offer a lot of convenience to visitors as well. Enabling this feature also works wonders if you need a form that might require input from multiple people, each of whom can save the form and share the link with the next person so they can fill in their part, and so on.
How is the resume link shared with the visitor?
The resume link is automatically sent to the visitor’s email address (as provided inside the email field). This is to ensure the link is private so only the respondent has access to it. The WPForms Save and Resume addon handles the process of link generation and sharing via email automatically.
Does the save feature store all fields?
No, the WPForms Save and Resume addon is designed to avoid saving information from sensitive fields. These include:
- Password
- Signature
- File Upload
- Card fields (Stripe, Authorize.net, PayPal, and Square)
When the respondent wants to resume filling out the form, they’ll have to re-enter information in these fields. This is done to ensure the data security of your visitors.
Next, Limit Form Entries in WPForms
We hope this tutorial helps you add the save and continue feature to your WordPress forms.
Next, if you want to limit your form submissions and prevent multiple form entries, check out our detailed article on how to limit form entries in WPForms.
Want to put your site’s tasks on autopilot mode? Do check out our list of the best WordPress automation tools and plugins.
So what are you waiting for? Get started with the most powerful WordPress forms plugin today. WPForms Pro comes with powerful integrations and a 14-day money-back guarantee.
And don’t forget to follow us on Twitter and Facebook for more updates from our blog.


One issue that I’m seeing here is that what if the visitor lost their internet connection just before they were able to submit the form or accidentally closed the browser without clicking the SAVE button to save their form?
How are they able to recover it so they no longer need to retype everything that they’ve already filled out?
This is what I’m actually looking for because one of my visitors had this issue. He had to retype everything because he accidentally lost the page.
How can they resume with the form if they were unable to click the SAVE button?
Hey Mich – In cases where user face internet connectivity issues, you can consider using the Offline Forms Addon. Additionally, you can also checkout the Form Abandonment Addon to capture leads even when users don’t finish your forms.
This is pretty cool, but it’s cumbersome. The user has to remember to save, and fill out all his info.
Also, I use WP Forms to create website questionnaires (absolutely love WP Forms for this), and these are behind a secure Client Dashboard area on my Wordpress website. I’ve found this progress-saving method doesn’t work when the email links to a page that’s password-protected. I’ve tried it.
Here’s a much, much better user experience:
The WP Form should simply auto-save as you go, just like a Google Doc, with the little cloud icon and a “saving” animation.
I don’t know how hard this is to accomplish, but Google did it, and ConvertKit used to have a manual Save button until I bugged them long enough to auto-save and now they have this feature as well 🙂
I would love to see auto-save in WP Forms!
Hi Clark. Thanks for sharing! I can definitely see why auto saving would be helpful. Our Offline Forms addon will automatically save entries if there’s no internet connection, but it sounds like this isn’t quite what you’re looking for. We appreciate your feedback since it helps us to continually improve WPForms.
Just to note: I tested adding a Save and Resume link to a password protected page in WordPress and it worked for me. I was able to resume the entry after typing the password in, and I tried it both ways (sending the link via email and copying it to the clipboard). It’s possible that our support team may be able to help you get this working on your site. Since you have a Pro license, you have access to email support from our trusted advisors in the support team; you just need to open a support ticket and we can help look into this.
Thanks for the reply! You are correct that the password protected page loads fine when logged in as a customer. I was previously testing using my own Wordpress login and got the “Page does not exist” error. This issue is solved.
I am currently using the Save & Resume addon, and it will work for now. When the form disappears after clicking the Send Link button its a bit worrisome when you’ve spent an hour filling out information. I have to include step by step instructions within the form so my users understand how to use it.
Looking forward to the Auto-save feature! This will completely replace the Save & Resume addon and the Offline addon.
Great to hear you got the password protected page working! I can’t make any promises on auto-save, but I will pass on your suggestion!