
AI Summary
When small business owners venture into creating their own WordPress forms, the results often end up being plain and uninspiring. This is a pattern that I’ve consistently observed over the years.
Without the expertise of developers and designers, these forms may function well enough but lack the visual appeal that can engage users and drive conversions.
The good thing is that you don’t need coding knowledge or design expertise to create beautiful forms anymore. You just need the right plugin.
In this post, I’ll show you the code-free way of styling your contact forms to make a strong first impression on your visitors.
Create Your Custom Styled WordPress Form Now 🎨
How to Style Contact Forms in WordPress
Now that you know our styling tool is the best and easiest styler for WPForms, let’s break it down step by step.
1. Install & Activate WPForms
First, you’ll want to install the WPForms plugin if you don’t already have it.
Form styling is available with all versions of WPForms, including WPForms Lite (the best free form builder).
Need some help with this step? Check out this guide for beginners on how to install a WordPress plugin.
Now, let’s make sure you’re all set up with the versions you need:
- WordPress version: 6.0 or higher.
- WPForms 1.9.7.
Are you an Elementor user? WPForms supports no-code form styles for Elementor. This allows even more powerful style customizations for your form.
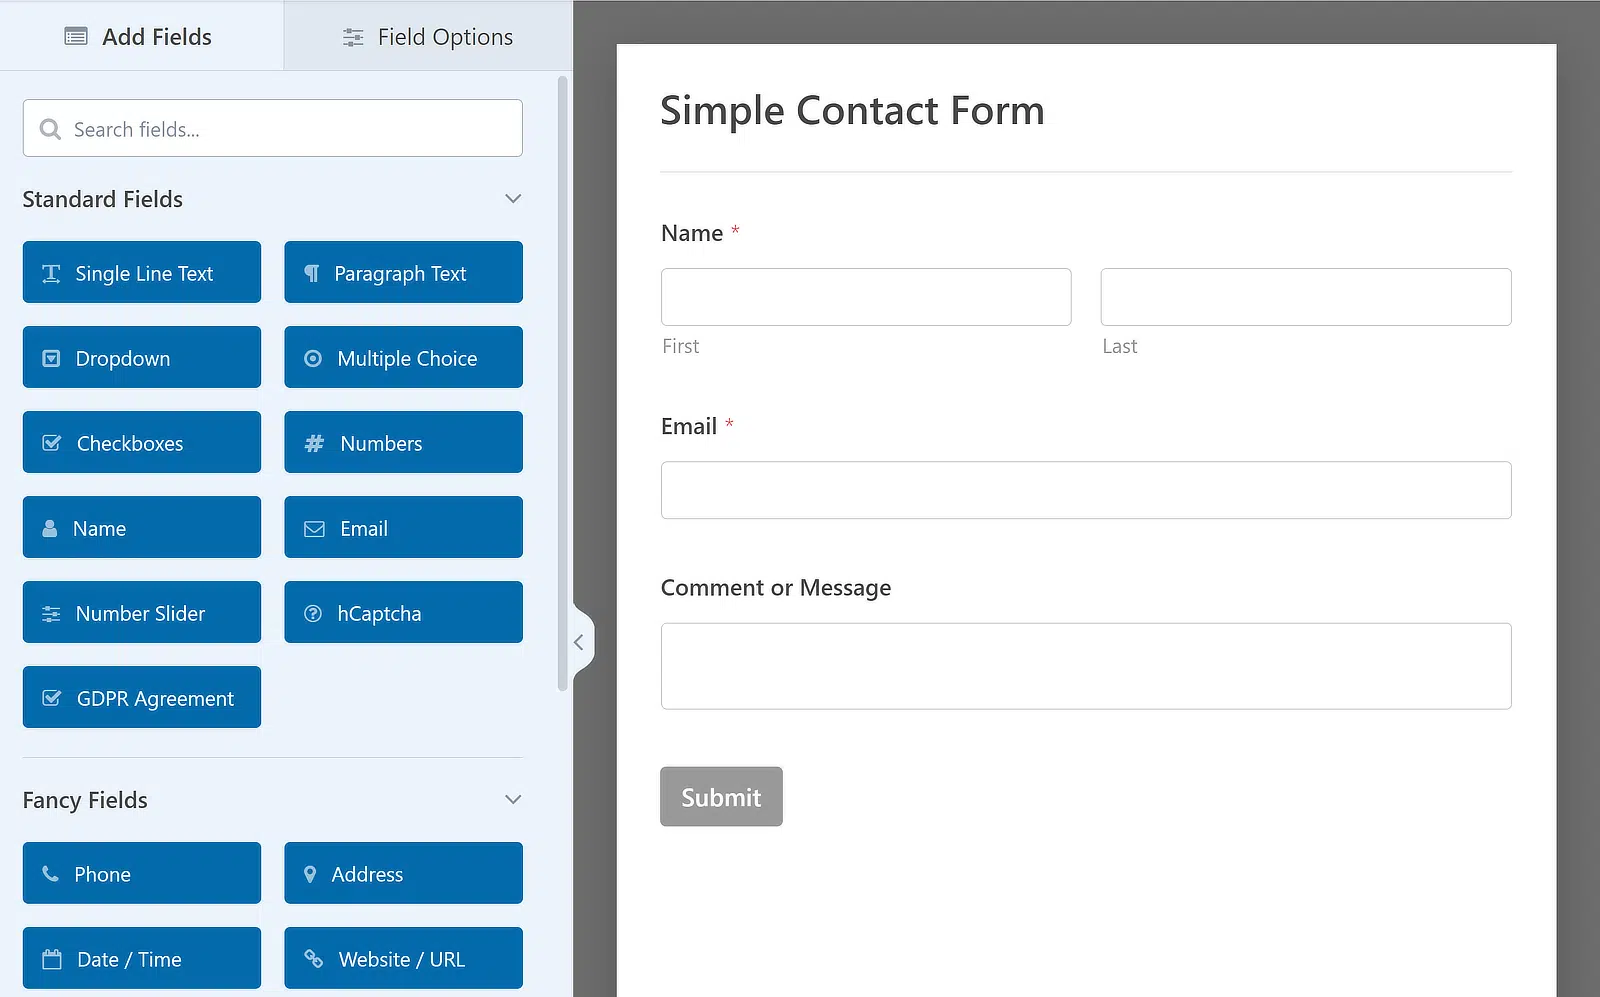
2. Open Your Form in the Builder
Now it’s time to create your form! To get started, hover your cursor over WPForms in the sidebar of your WordPress admin menu and click on Add New.

After that, it’s time to begin setting up your form, starting with the form name and template selection. There are hundreds of form templates for marketing and various other functions that you can use. You can also create your form completely from scratch if you like.
The Simple Contact Form is one of our most popular templates. It’s also pretty apt for this tutorial, so we’re going to select it by clicking the Use Template button.

Once you make your selection, you can build or customize your form using the user-friendly WPForms drag-and-drop builder.
Need a little guidance? No sweat. We have a doc to teach you how to create your first form.
3. Choose Your Theme
Now you’re ready to style your form’s theme directly within the form builder.
Go to Settings >> Themes to access styling controls.

The left panel shows all style options. The right panel displays a live preview using sample fields.
This is where you’ll choose the theme.
Themes are your shortcut to a great-looking form. They set coordinated colors and styles for fields, labels, buttons, container, and background, all in one click.
And they’re accessible to all users! For those with WPForms Lite, “Classic” and “Modern (Default)” themes are available.
Users with a WPForms license have access to the full theme library, including 15 varying themes.
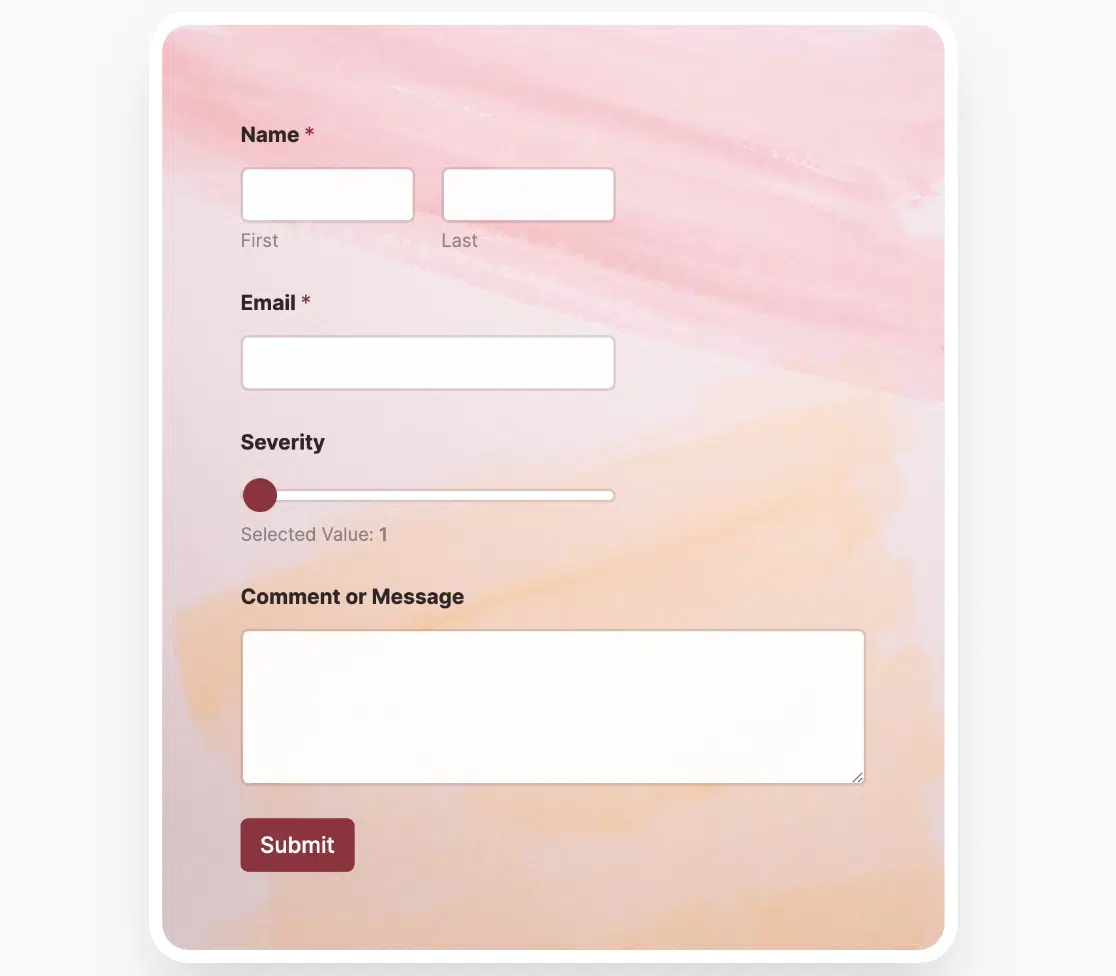
Lush is my favorite!
I checked out all the themes myself and made this descriptive overview for each one:
| Theme Name | Look & Feel | Accent Color | Background Color | Notes |
| Modern (Default) | Clean, contemporary | Blue | None | Default for all new forms |
| Classic | Minimalist | Gray | None | Very little CSS, great for a bare-bones look |
| Ocean | Similar to Modern | Dark Teal | None | Great for cool-toned Brands |
| Tangerine | Warm, energetic | Orange | None | Stands out on neutral sites |
| Aero | Light and airy | Blue | Light gray w/ box shadow | Slight “card” effect |
| Concrete | Industrial | Pink | Concrete texture | Requires downloading background images |
| Elegance | Refined | Matches image | Decorative image | Rounded corners on container |
| Fresh | Nature-inspired | Green | Leafy image | Great for eco/organic brands |
| Gloom | Dark mode | Green | Dark background | High contrast form elements |
| Hallway | Dramatic | Dark | Image | Bold, immersive container |
| Lush | Textured | Black | Brick wall image | Rounded corners and boxed shadow |
| Monstera | Playful | Green | Watercolor image | Rounded corners |
| Range | Vibrant | Green | Sunset image | Borders and box shadows |
| Spring | Soft gradient | Blue | Gradient image | Box shadow for depth |
| Vintage | Retro | Yellow | Solid color | Warm, nostalgic feel |
Take a look at our full document that covers many of these themes in detail.
4. Customize Field Styles
Once you’ve settled on a theme, head over to Field Styles to adjust:
- Size: Small, Medium, Large
- Border: Solid, Dashed, Dotted
- Border size & radius: Control thickness and corner roundness
- Colors: Set background, border, and text. Use theme palette, HEX code, or color picker

These additional touches really lend themselves to the effect and vibe you’re going for with each form. For instance, rounded corners feel friendly, square edges feel formal.
You’ll also find options here to update the Background, Border, and Text colors of your form fields.
Click on the label to open the color picker and make changes. You can either choose a color visually or enter a specific hex code for specific control.

5. Customize Label Styles
Labels are the short bits of text above your form fields that tell users what to enter—things like Name, Email Address, or Message. Done well, they make your form easy to follow, helping users avoid confusion and mistakes.
In Label Styles, you can change:
Size: Small, Medium, or Large text. For example, you might want small labels for a minimalist newsletter form, but large, bold labels for a job application form where clarity matters most.
Colors:
- Label Text: The main title above each field.
- Sublabels & Hints: Helpful instructions, like “First name only” or “We’ll never share your email.”
- Error Messages: Text that appears when the user makes a mistake, like “This field is required.” This color also controls the asterisk on required fields

For example, if your site has a dark background, you might set label text to white, sublabels to a soft gray, and error messages to a bright red so they pop immediately when something’s wrong.
6. Customize Button Styles
Your submit button is the final “call to action” for your form. It should stand out enough that visitors don’t have to hunt for it.
In Button Styles, you can adjust:
- Size: Small, Medium, or Large. Large buttons work well on mobile, while medium might suit desktop layouts better.
- Border Style: Solid, Dashed, or Dotted—though most modern designs stick with Solid or None for a cleaner look.
- Border Size & Radius: Thicker borders and sharper corners feel more formal; thinner borders and rounded corners feel friendlier and more casual.
- Background and Text Colors: These set your button’s main look.

💡 Tip: The background color here also becomes the accent color for the rest of your form, including field focus states, progress bars, and even checkboxes. So if you make your button teal, expect that teal to subtly show up throughout your form for a coordinated look.
7. Customize Container Styles
The container is like the “frame” around your form. It separates the form visually from the rest of the page and can help it feel more intentional.
In Container Styles, you can change:
- Padding: How much space is inside the container around your form fields. More padding gives a clean, spacious feel; less padding creates a compact, space-saving look.
- Border Style, Size, and Radius: Match this to your site’s visual tone—square corners and solid borders for a corporate look, rounded corners and subtle borders for a softer feel.
- Shadow: Adding a small or medium drop shadow can make your form appear “lifted” off the page. Great for making it stand out on flat backgrounds.
- Border Color: Often overlooked, but a colored border can tie your form to your brand palette.

For a photography portfolio site, for instance, you might use a container with generous padding, a thin white border, and a soft drop shadow to create an elegant “card” effect.
8. Customize Background Styles
The background is where you can get creative, but also where it’s easy to go overboard. A good background complements the form without making it hard to read. So fight the urge!
Options here include:
- Image Source: Upload from your Media Library or browse WPForms’ built-in Stock Photos (the first time you use stock photos, you’ll download the whole library).
- Position: Control where the image sits — Top Center, Center Center, Bottom Right, etc.
- Repeat: Choose No Repeat for a single image, Tile to repeat across the background, or horizontal/vertical repeats for patterns.
- Size: Cover makes the image fill the container area. Dimensions lets you set an exact width and height.
- Solid Background Color: A great option if you want something simple or if your image doesn’t load.

💡Avoid busy backgrounds that make text hard to read. If you love a busy image, tone it down with a color overlay before uploading.
10. Save, Preview, and Test
Once you’ve made your changes, all that’s left to do is save your form. Click on Save in the form builder.
Or, usse Preview (top right) to see your styles applied to a sample form layout. Then, go to your page in the WordPress editor and preview the actual form with real fields.
Don’t forget, you can also Test it:
- Fill out each field to check spacing and alignment.
- Trigger an error message to see if your colors are clear.
- View the form on mobile, tablet, and desktop to confirm it’s responsive.
And that’s it! You can now start styling your contact forms (or any other forms) you have in WordPress, right there in the form builder.
Happy styling!
Styling Contact Forms – FAQs
Here are a few common questions about styling contact forms in WordPress without code:
Will my styles apply everywhere?
Yes. When you style a form in the WPForms builder, those settings are saved with the form itself—not just the page you’re working on.
That means if you embed the same form on multiple pages or posts, it will look consistent everywhere by default. The only exception is if you intentionally override the style in the Block Editor or Elementor during embedding. Those changes apply only to that specific page.
Can I style a form template?
Absolutely. Templates in WPForms — like “Simple Contact Form” or “Newsletter Signup” — are just prebuilt sets of fields. As soon as you embed a template-based form, you can choose a theme and adjust its styling exactly the same way you would for a custom-built form
Can I delete a custom theme?
Yes, but do it carefully. When you delete a custom theme from the Themes panel in the builder, it’s gone for good.
Next, Connect Your WordPress Forms to ChatGPT
Curious about how you can automate your workflow when it comes to forms? Find out how to connect ChatGPT to your WordPress forms and streamline replies with AI.
Looking for a way to make your forms more appealing? Check out our tips on creating interactive forms that grab users’ attention.
Create Your WordPress Form Now
Ready to build your form? Get started today with the easiest WordPress form builder plugin. WPForms Pro includes lots of free templates and offers a 14-day money-back guarantee.
If this article helped you out, please follow us on Facebook and Twitter for more free WordPress tutorials and guides.


I’m trying to figure out how to style a form using the Divi module and if that is not possible, what workaround is needed.
Hey Ashley – Currently, the Form Styles can be used with the WordPress Block editor or a theme with Full Site editing. I agree that support for other builders would be great, and the option to apply the styling from the forms would be great. I’ll place this on our feature request tracker so that it’s on the radar of our developers.
Still missing Form Styles feature for Divi.
Hey Stale – I apologize, we currently don’t have the feature to edit the forms style in Divi. I do agree this would be helpful, and I’ll place this on the radar of our developers.
Is this a premium feature? I don’t see such an option in my install from the WordPress repository. It shouldn’t be this hard to specify the color we want for form inputs. It’s not right to take a basic change option and make it a “premium” feature.
Hey Boreas – This feature is available in our all paid versions including the free one (for the block editor and all Full Site Editor(FSE) themes).
In case you are missing the option to enable Modern Markup, please know that the users with at least one form on their website before updating the WPForms lite plugin to version 1.8.1.1 will see the modern markup option. Also, this option won’t be visible if you started using WPForms lite from version 1.8.1.1.
In case it helps, you can learn more about this option from the following tutorial: https://wpforms.com/docs/styling-your-forms/
If you are still facing any issues with this, please reach out to us at WPForms Lite WordPress.org support forum. Thanks.
Hi! I’ve recently upgraded the plugin to version 1.8.2. And one feature I liked is no more available. before I could write custom HTML code inside the form fields, like in checkbox choice I could add – Tomato Read more → , it didn’t let me do it now
Hi Mila — We’d be happy to help! When you get a chance, please drop us a line in support so we can assist.
If you have a WPForms license, you have access to our email support, so please submit a support ticket.
Otherwise, we provide limited complimentary support in the WPForms Lite WordPress.org support forum.
Thanks 🙂
I am using WP Forms Pro on my website. I have the form on two different pages. One on page, the text is in a serif font, on the other page, it’s in a sans serif. I have no idea why, I just built the form and placed it. Any indication as to why?
I am building with Divi builder.
Hey Lawrence – please check if the font is changed by Divi. In case it helps, Here is guide on how DiviFlash controls the fonts.
If you want us to have a closer look or need any further help with this, please contact our team by submitting a support ticket here.
Thanks.
I don’t see this option on my wpforms lite. I have 1.8.2.2, and there isn’t any option for this. I need to change the colors to the fonts for the whole form. How would I go about doing this in my form?
Hey Larry – This feature is available in our all paid versions including the free one (for the block editor and all Full Site Editor-FSE themes).
In case you are missing the option to enable Modern Markup, please know that the users with at least one form on their website before updating the WPForms lite plugin to version 1.8.1.1 will see the modern markup option. Also, this option won’t be visible if you started using WPForms lite from version 1.8.1.1.
In case it helps, you can learn more about this option from the tutorial here
If you are still facing any issues with this, please reach out to us at WPForms Lite WordPress.org support forum.
Thanks.
Hi. I’ve created my first form with wpforms. My problem is, that the fonts are different within the same form. Some labels have a sans kind of font, some like a times new roman like, but all the choices are with the sans kind of font. How to set them for the same type? I use the regular wp editor, and when I open the page in the editor, where the form is, I see all the fonts in the same style (times new roman). But on the publicated version becomes different. What could be the problem?
Hi Krisztina — We’d be happy to help! When you get a chance, please drop us a line in support so we can assist.
If you have a WPForms license, you have access to our email support, so please submit a support ticket.
Otherwise, we provide limited complimentary support in the WPForms Lite WordPress.org support forum.
Thanks 🙂
I think it should be noted that unless you add the form as a block, the above options for label, hint, etc. styling do not show. I was using the short code originally. Still this tutorial led me to try something else. Thank you.
Hey Jesse – Under “Style Your Form” and “Field Styles” we’ve mentioned that the Forms style works with WordPress block editor. While the styling feature isn’t available for shortcodes, we’re working to expand the Forms styles, and I’ll add your request to our feature request tracker.
Is it possible to edit forms styles (Fonts, Colors, Sizes) in Elementor?
Hey Rodrigo – I apologize, we currently don’t have the feature to edit the forms style in Elementor. I do agree this would be helpful, and I’ll place this on the radar of our developers.
Hi Rodrigo. Just to update you on this, you can now style WPForms in Elementor too: https://wpforms.com/announcing-elementor-form-styles-and-entry-view-settings/
My problem was different fonts in the same form. Some labels have sans font type, some labels like times new roman typeface, but all selections are in sans font type.
Hey there – We’d be happy to help! When you get a chance, please drop us a line in support so we can assist.
If you have a WPForms license, you have access to our email support, so please submit a support ticket.
Otherwise, we provide limited complimentary support in the WPForms Lite WordPress.org support forum.
Thanks 🙂
I’m trying to edit an embed located in the Footer. UI’m assuming there’s no way to do that? My footer is dark in color, so the text can’t default to black. Is there a way to edit that?
Hey Nisha – We’d be happy to help! When you get a chance, please drop us a line in support so we can assist.
If you have a WPForms license, you have access to our email support, so please submit a support ticket.
Otherwise, we provide limited complimentary support in the WPForms Lite WordPress.org support forum.
Thanks 🙂
hey can you please tell me that how can i remove border on focus input textbox text area of wpforms?
i really need the answer please.
Hello Shivam – I am sorry to hear about the trouble. When you get a chance, please drop us a line with a screenshot in support so we can assist.
If you have a WPForms license, you have access to our email support, so please submit a support ticket.
Otherwise, we provide limited complimentary support in the WPForms Lite WordPress.org support forum.
Thanks 🙂