Do you want to send emails to all users on your WordPress site?
If you have a membership site where users can register, you might want to email them announcements, promotions, or newsletters.
In this post, we’ll show you exactly how you can send emails to WordPress users.
But first, let’s have a word on what emailing your entire mailing list (also known as mass emailing) really means.
Create Your Newsletter Signup Form Now
How to Send Email to WordPress Users
Ready to send emails to WordPress users? Just follow the steps below to get started.
In This Article
Let’s dive in.
1. Install WP Mail SMTP
First of all, we need to make sure that the emails you want to send get delivered successfully to all subscribers.
And for this, we recommend installing WP Mail SMTP on your site. WP Mail SMTP enables you to connect your WordPress site with a mailer service. This way, your emails always end up in the recipients’ inboxes.
To get this plugin, see this guide on how to install WP Mail SMTP on your site.
Once the plugin is activated on your site, move to the next step.
2. Connect WP Mail SMTP With a Mailer Service
For WP Mail SMTP to work, you need to configure your site settings so that all emails are properly routed through an SMTP server.
WP Mail SMTP makes this really easy. After installing and activating it, the WP Mail SMTP setup wizard will launch to guide you through this process.
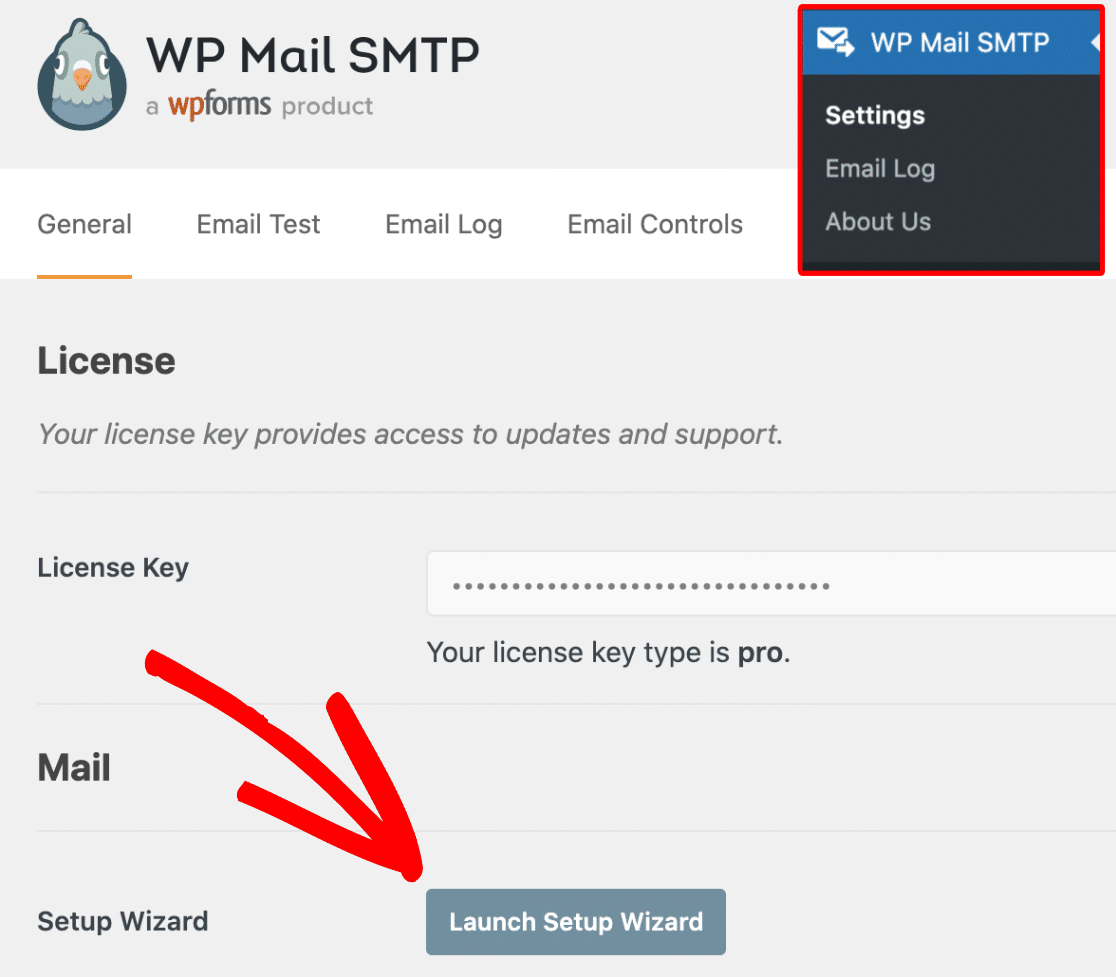
If the wizard doesn’t launch by itself, go to WP Mail SMTP » Settings. Then, click on Launch Setup Wizard under the Mail section.
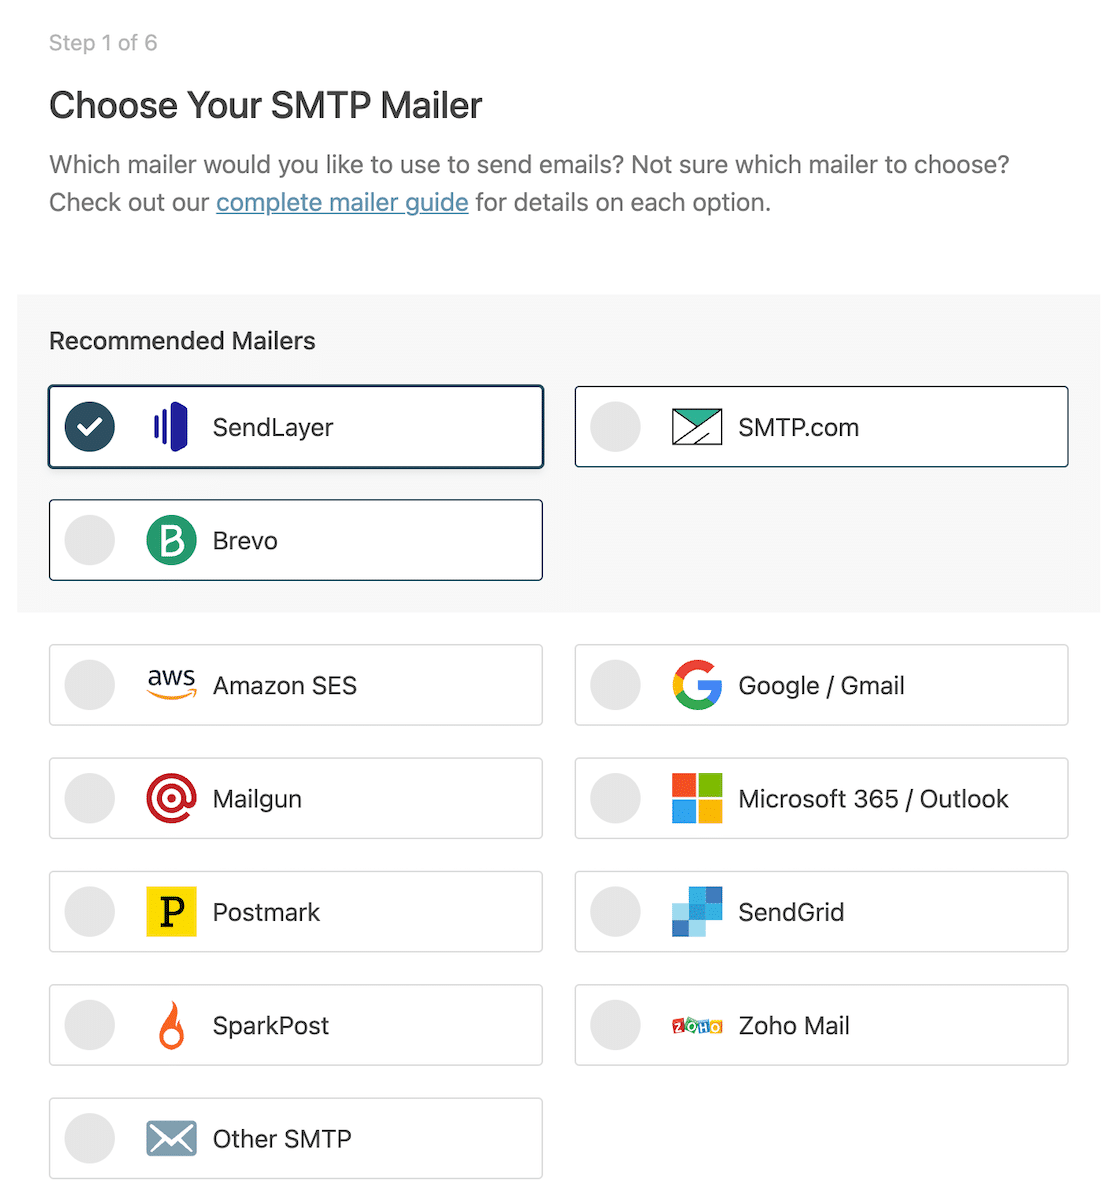
When the wizard launches, it will ask you to choose a mailer to connect your WordPress site with.
It’s best to check that your chosen mailer supports list-unsubscribe headers. This is required if you’re sending emails to Gmail or Yahoo; without those headers, your emails will be blocked. Check out this guide to adding list-unsubscribe headers in WordPress.
Our top recommended mailer service is SendLayer because of its ease of use and affordable pricing. Select SendLayer and then click on Save and Continue to proceed.
Now, you’ll need to provide your API key and other details to configure the WP Mail SMTP integration with SendLayer. For instructions, see this guide on setting up SendLayer with WP Mail SMTP.
The wizard will now send a test email to make sure your configuration is properly set up. If all is good, move to the next step.
Note: You need a SendLayer account with a verified email domain connected to it in order to add it as your mailer in WP Mail SMTP. This guide on authorizing your domain in SendLayer explains the step-by-step process in detail.
3. Install the Send Users Email Plugin
With WP Mail SMTP ready on your site, it will make sure that emails originating from all plugins across your WordPress site send reliably without issues.
But you still need a plugin to write these emails and send them to registered users of your WordPress site. The easiest WordPress plugin for this is called Send Users Email.
Install Send Users Email on your site. If you don’t know how, see this guide on installing WordPress plugins.
After installing and activating the plugin on your site, move to the next and final step.
Want to send a newsletter to subscribers instead of registered users? See our guide on how to create a newsletter in WordPress for details.
4. Send Email to All WordPress Users
From your WordPress dashboard, navigate to Email to Users » Email Roles.
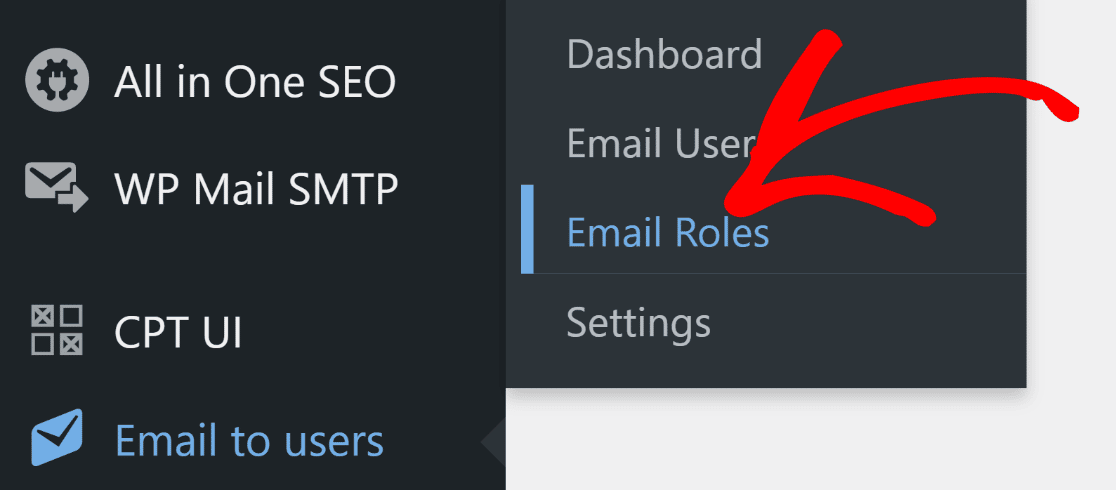
This will lead you to the email editor screen. Here, you can write the subject of your email, select your recipients by the WordPress role assigned to them, and compose the message of the email body.
To send the email to your registered subscribers, check the box next to Subscriber.
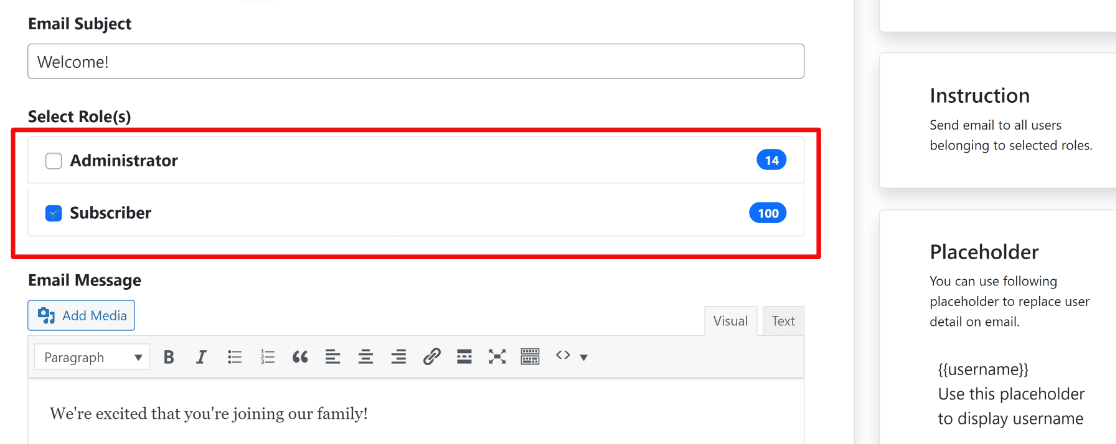
You’re free to select other groups of WordPress users by their roles (such as administrators, authors, editors, and so on) as well.
When you’re done, click on Send Message.
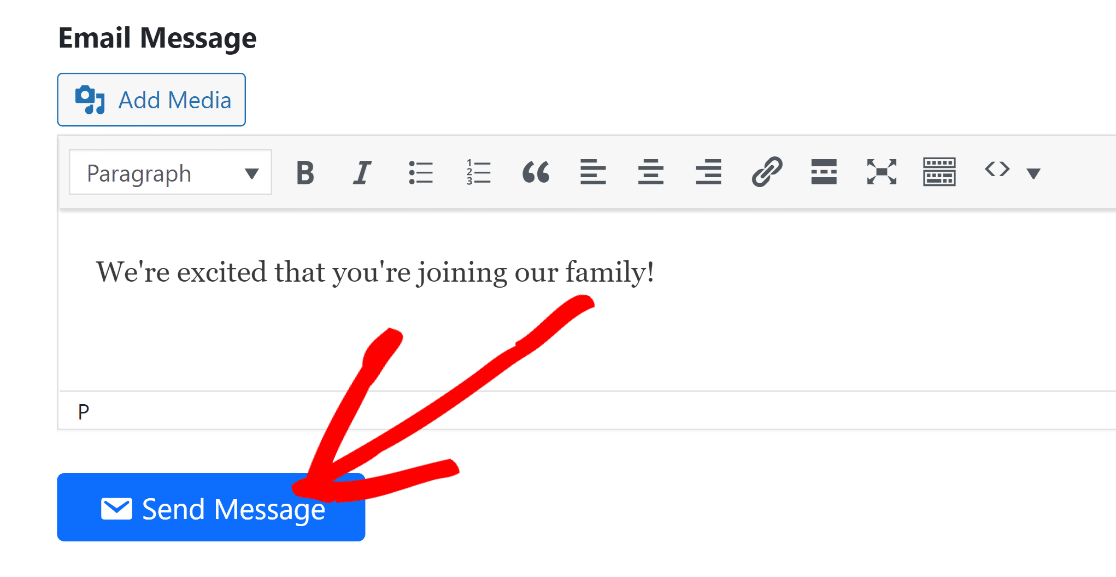
Doing so will send your email message to all of your WordPress subscribers.
It’s also possible to individually select the users that you wish to send your email to, rather than mass emailing your entire list.
To do this, go to Email to Users » Email Users. On this screen, you’ll see a list of every registered user on your WordPress site. Select your recipients by checking the boxes next to their names.
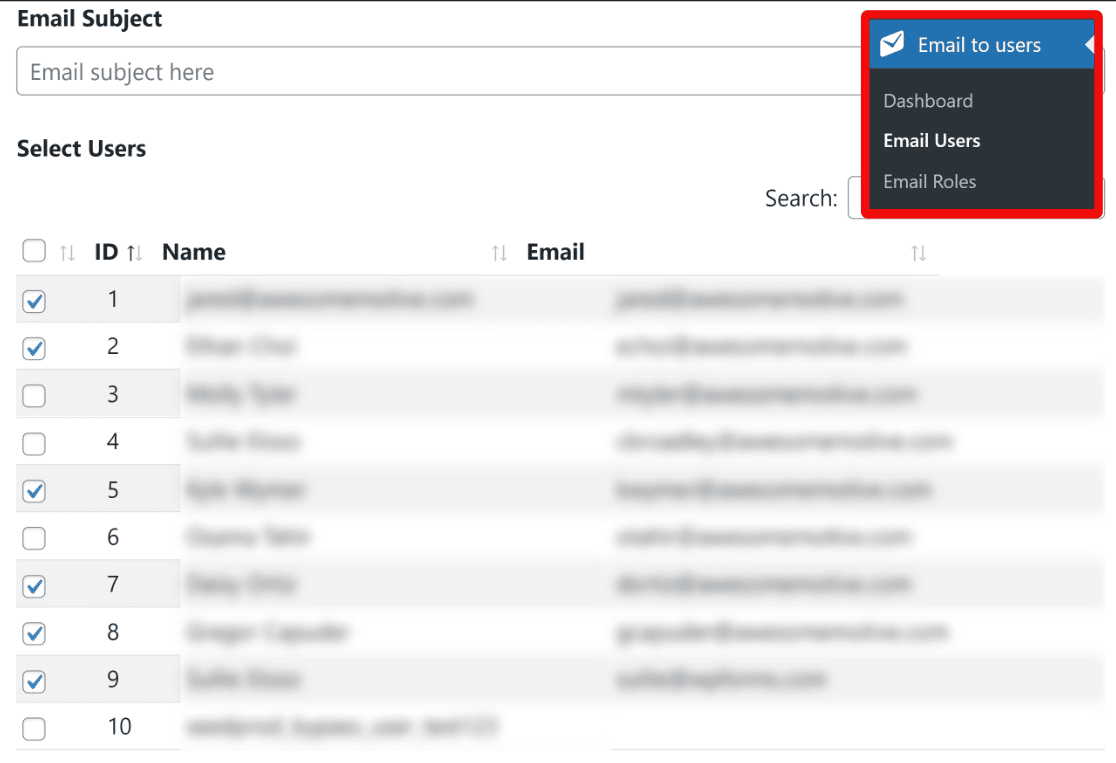
You can compose your email subject and body as before. After you’re done selecting recipients and writing the email, click on Send Message to send the email.

This will send emails to WordPress users that you individually selected as your recipients.
And that’s it! You now know how to send emails to all registered users on your WordPress site or only to those recipients individually selected by you.
But before we finish this post, we’d like to remind you that it’s not usually a good idea to rely on WordPress for your email marketing campaigns once you’re an established business.
Tips for Using WordPress for Email
Using WordPress for email is perfectly fine if you’re just starting out and have a small list of subscribers. However, WordPress is not suited for mass emailing a huge email list.
So, as your email domain matures over time, you’ll want to move to a dedicated email platform like Constant Contact, Brevo, MailerLite, Mailchimp, or others.
Then, you can take advantage of WPForms to build newsletter signup forms that allow you to gather subscribers. With lots of native integrations, WPForms will also automatically send new subscribers to your email marketing tool.
Grow Email List With WPForms 🚀
Here are a few reasons why using WordPress for mass emailing a large subscriber list isn’t ideal:
- Functional limitations: WordPress is not designed to handle mass emails efficiently. Since your email functions with WordPress are controlled by your hosting rather than a dedicated mailer service, they impose more severe limits on your email volumes. As a result, you’re likely to face considerable delays when sending mass emails, and your hosting provider might even block your emails entirely.
- Basic email design: With WordPress, it’s a lot harder to design visually appealing emails with graphic elements unless you know some advanced-level coding. On the other hand, dedicated email marketing tools make it super simple to design professional-looking emails.
- Lack of advanced features: A full-fledged email marketing service like MailerLite gives you a lot of tools for optimizing your email marketing. These include A/B tests, automated workflows, advanced audience segmentation rules, and analytics. With WordPress, you can’t experiment or analyze your emails with the same flexibility that email marketing services offer.
For these reasons, it’s a much better decision to use an email marketing service like SendLayer, Constant Contact, Brevo (formerly Sendinblue), or any other highly-rated tool.
We recommend SendLayer because it’s the most affordable and scalable transactional mailer. For more details, check out our detailed review of SendLayer.
And that’s all we have for you today! You can now send emails to WordPress users without any issues.
FAQs on Sending Emails to Registered WordPress Users
Here are some commonly asked questions about sending emails to registered WordPress users:
What Is Mass Emailing?
Mass emailing is when you send the same email to a large group of recipients. Mass emails lack personalization or audience segmentation, making it less effective as an email marketing strategy. However, it can be useful if you have a small and homogenous audience, such as your WordPress community of registered users.
Common types of mass emails include newsletters, announcements, product updates, and promotions.
Is it possible to personalize the emails sent to registered users?
Yes, the Send Users Email plugin lets you use placeholder variables in your email template. These can be used to personalize emails by including user-specific details such as their name, username, or other custom fields.
What are the best practices for email frequency to registered users?
It’s important not to overwhelm your users with too many emails. A good practice is to send updates only when there is significant news or regularly scheduled newsletters while respecting users’ preferences for communication frequency.
What should I do if my email list grows too large for my current plugin or service?
If your email list grows too large for WordPress, consider investing in a dedicated email marketing service that can handle larger volumes. Some options you can consider include Drip, Brevo, Constant Contact, ConvertKit, and Mailchimp.
Next, Create MailerLite Forms in WordPress
Want to grow your email subscribers?
WPForms lets you create MailerLite newsletter signup forms that automatically send contact details to your MailerLite account. This way, you can use WordPress to grow your email list and then run your email campaigns from MailerLite.
Integrations between WordPress and third-party tools can massively improve your business efficiency. For ideas, see our guide on the top WordPress marketing automation plugins.
Create Your WordPress Newsletter Signup Form Now
Ready to fix your emails? Get started today with the best WordPress SMTP plugin. WP Mail SMTP Elite includes full White Glove Setup and offers a 14-day money-back guarantee.
If this article helped you out, please follow us on Facebook and Twitter for more WordPress tips and tutorials.

