
AI Summary
Organizing events, workshops, or classes often requires registering multiple participants at once. A group registration form can be handy for this.
Whether managing a sign-up for a sports league or coordinating attendees for a corporate training session, a group registration form saves you time and effort.
Create a Group Registration Form Now! 🙂
In this guide, I’ll walk you through each step of creating a group registration form in WordPress. By the end, you’ll have a functional form ready to use!
How to Make a Group Registration Form in WordPress
Creating a group registration form is incredibly easy using WPForms. Follow the steps I’ve shared below to get started.
In This Article
Step 1: Install and Activate the WPForms Plugin
As the best form builder for WordPress, the WPForms plugin offers a useful Repeater field that makes creating group registration forms very straightforward. To start, you’ll need a WPForms Basic License.

Once you’ve got the WPForms Basic License, it’s time to install the plugin on your WordPress website. If this is your first time installing a plugin, check out this guide for step-by-step instructions on installing WPForms.
Upgrade to WPForms Basic Now! 🙂
Step 2: Create Your Group Registration Form
With the plugin installed, you can now easily create your group registration form. From your WordPress dashboard, simply navigate to WPForms and click on the Add New button.

Next, give your form a name. For instance, I’ll just call mine “Group Registration Form.” Then, you can choose to build your form from scratch or use a template. WPForms comes with 2,100+ WordPress form templates.
Since I want to show you all the steps involved with creating a group registration form using the Repeater field, I’m going to start with a blank form and then build it up from scratch (it’ll barely take a few seconds!).

After you click the Create Blank Form button, you will be redirected to the form builder, where you can build your form using the drag-and-drop functionality. To keep things simple, I’ll add three fields: Name, Email, and Department.
However, since I want these fields to be “Repeatable” in order to gather data from multiple registrants, I’m first going to insert the Repeater field by dragging and dropping it from the left-hand side of the screen to the right.

You’re doing a great job so far! Now, with the Repeater field added, I’m going to show you the steps to customize it by configuring the Display, Layout, and Button Styles, along with other handy options.
Step 3: Customize the Repeater Field
Once the Repeater field has been inserted, click on it to display the associated Field Options on the left. I will leave the Display setting at its default because it works perfectly for my case.
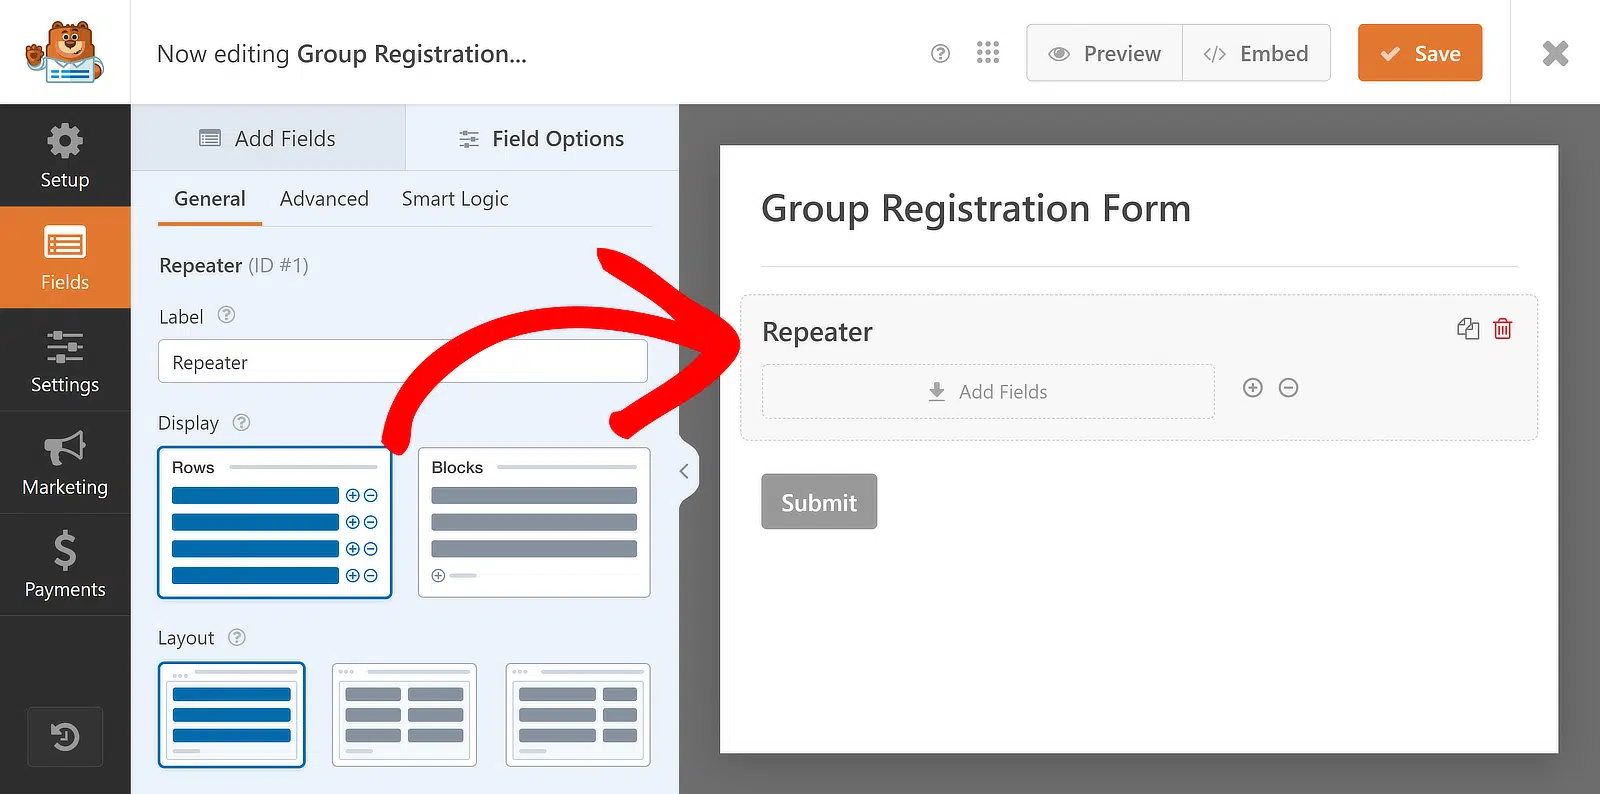
Regarding the Layout, I’ll be selecting the three-column layout, but you’re free to choose one that works best for you. There are about nine different layout presets available for the Repeater field.

As you select the layout, the preview on the right will update immediately, with drop zones appearing in columns. These sections allow you to add any fields you want to make repeatable. Let’s start with some basic customizations:
Edit the Label for the Repeater Field
Labeling your fields to help people know exactly what you’re collecting information for is always a good idea. To do this, simply click the Repeater field and navigate to its Field Options, as we did before.
Then, enter the text for the Repeater field Label. These labels are more like headings; if required, you can disable/hide them from the Advanced menu. However, I will use the functionality available and change the text for the label.

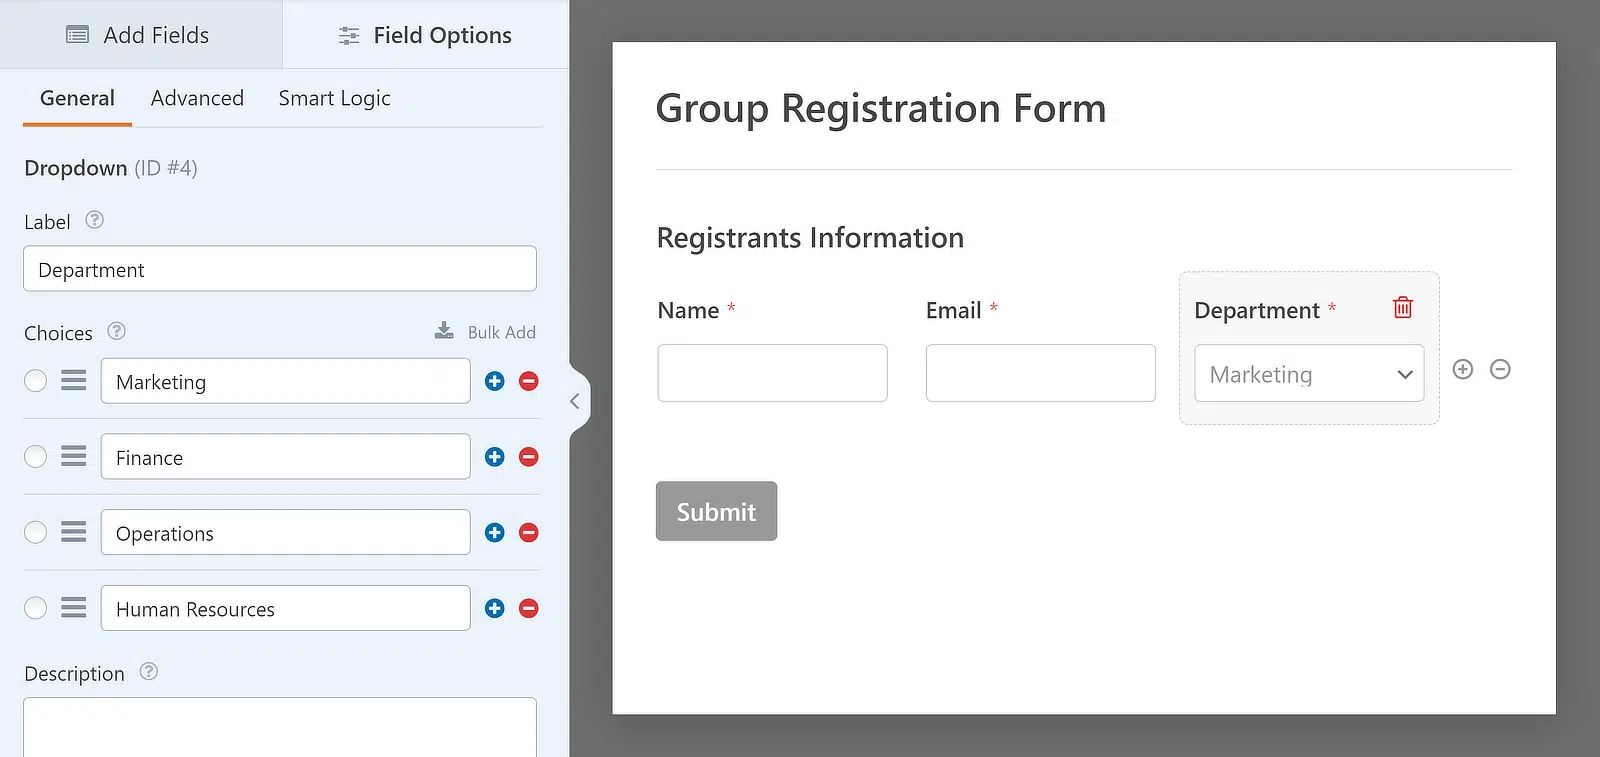
Add Fields to the Repeater Field
After choosing the Display and Layout and editing the Label, you can add fields to the columns in the Repeater field. To add a field to any column of the Repeater field, click and drag it from the sidebar to the desired column.
For the use case I’m focusing on, I will drag the Name, Email, and Dropdown fields one by one to the Repeater field drop zones and add some options in the dropdown to complete my form. Here’s what it looks like:
Set Limits to Repeater Entries
You can also control how many times a user can repeat a field in a form submission. The default minimum is 1 entry, and the maximum is 10, but you can change these numbers to suit your needs.
To adjust the limits, go to the Field Options panel for the Repeater field and find the section labeled Limit. Here, you can set the minimum and maximum number of times the field can be repeated.

Customize the Add and Remove Buttons (Optional)
For this tutorial, I used the Rows option for the Display setting of the Repeater field. However, when you use the Blocks display option, you can change how the buttons look and what they say when adding and removing sets of fields.
In the Field Options panel, there is a Button Type dropdown where you can pick different designs for the Add and Remove buttons. Choices include Buttons with icons, Buttons, Icons with text, Icons, and Plain text.

You can also edit the labels for these buttons. In the Button Labels section, just type in the text you want for the Add and Remove buttons.

Step 4: Configure the Notification & Confirmation Message
Now that you’ve customized the form, it’s important to stay informed about any new entries. To do this, you need to configure the notifications. Just click on Settings and then Notifications in the form builder.

Here, I can modify the default notification settings, such as the recipient’s email address or the subject line. For additional information, see our guide on setting up form notifications in WordPress.

Next, I set up confirmations by selecting Confirmations in the Settings menu. I chose how I wanted to respond to successful form submissions, whether it was displaying a message, showing a page, or redirecting to another URL.

For example, if you are using the group registration form to record attendees for a corporate event within your organization, you can redirect the users to the thank you page for their registration.

With that, you’re all done customizing your group registration form. However, don’t forget that you need to save all your progress. Therefore, after making your changes, click the Save button to save all of your form edits.

Step 5: Publish Your Group Registration Form
Now, all you need to do is publish your group registration form. You can do this by embedding it on an existing page on your website or creating a new page. Click the Embed option in the form builder’s top right corner.

If you’re going to add the form to an existing page, click on the Select Existing Page button. If you want to create a new page for your form, click on the Create New Page button and give it a name.

Following that, the WordPress block editor will open. The group registration form you prepared with the repeater field should already be embedded here. Simply press the Publish button at the top to take it live!

And that’s it! You now understand how to develop a group registration form in WordPress. Using the WPForms form builder, you can always go back and edit your form to improve the user experience.
Create a Group Registration Form Now! 🙂
More Questions about Group Registration Forms
Group registration forms are a popular topic of interest among our readers. Here are some quick answers to a few of the most commonly asked questions:
What is a group registration form?
A group registration form lets multiple people register for an event or activity at once. It collects all the necessary information for each participant in one form submission, making it easier to manage group sign-ups.
How can I register a group online?
To register a group online, you can use a group registration form created with WPForms Basic License. The Repeater field allows you to add multiple participants’ information within a single form submission.
How do I create a simple registration form?
Creating a simple registration form is easy with WPForms. After installing the WPForms plugin, use the Basic License to create a new form. Add the necessary fields like name, email, and any other required information. Save and publish the form on your site.
Can I create a registration form in Google?
Yes, you can create a registration form using Google Forms, but if you’re using WordPress, it’s recommended to use a plugin like WPForms to create a registration form, as you can leverage even more advanced features.
Next, Learn How to Design an Accordion Form with WPForms
Adding an accordion form to your WordPress site can enhance usability and improve the user experience. Check out our guide on the easiest way to create an accordion form using WPForms to make your website more user-friendly.
Create Your WordPress Form Now
Ready to build your form? Get started today with the easiest WordPress form builder plugin. WPForms Pro includes lots of free templates and offers a 14-day money-back guarantee.
If this article helped you out, please follow us on Facebook and Twitter for more free WordPress tutorials and guides.


This is an excellent feature, but does it work with Registration forms involving Stripe payments?
Before this update, if the same person signed up two students for subscriptions using the same email, WPForm would merge them under the same email inside Stripe without the NAMES. There is no way to distinguish between students other than by reviewing the form submission.
Also, unlike gravity form. The WP Form does not show user submission info on Stripe.
Does this new feature fix the issues?
Hello Paul – This new feature doesn’t have direct relation with what you mentioned (Stripe payments). This will make sure to register multiple user registrations at the same submission. But we’d love to help you more.
If you have a WPForms license, you have access to our email support, so please submit a support ticket with more details.
Otherwise, we provide limited complimentary support in the WPForms Lite WordPress.org support forum.
Thanks 🙂
Hi
Is there a way to ensure that there are no duplications?
Eg – if person A registers for A B and C is there a way to ensure that person C can’t register (by limiting the email or another way)
Also can the confirmation email go to all the people that have been registered?
Thank you
Amy