
AI Summary
Have you ever taken a quiz where some questions just felt more important than others? That’s the idea behind weighted quizzes, which assigns different point values based on how much each question matters.
This lets you measure things like preferences, priorities, or tendencies with way more accuracy than a standard quiz. However, most quiz plugins force you into rigid formats like personality types or pass/fail grading.
With WPForms’ Quiz addon, you don’t have to worry about this at all. You just set your point values, and the plugin does the rest automatically. Let me show you exactly how to set one up.
Create Your Weighted Quiz Now! 🙂
How to Create a Weighted Quiz in WordPress
What You’ll Need
Before we start, make sure you have:

If you’re still on WPForms Lite, you’ll need to upgrade to a paid license to access the Quiz addon.
Don’t worry, the process takes just a couple of minutes, and you can start building right after.
Skip Everything!
If you’re short on time (or just don’t want to manually set up every question and weight), you can let the WPForms AI Form Builder handle it for you.
Generate Your Quiz with AI
From your WordPress dashboard, go to WPForms » Add New. Then, hover over the purple Generate With AI button and click Generate Form.
You’ll land on the AI form builder screen. This is where you describe what kind of quiz you want. You can type your own prompt or choose from the suggestions on the left.
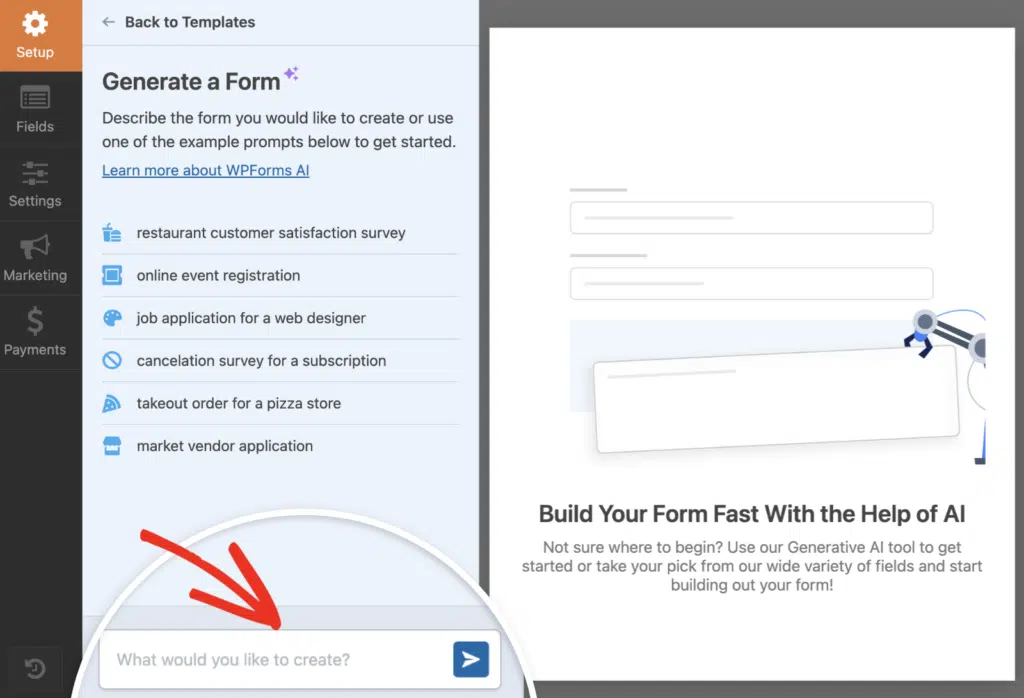
Once you hit generate, the AI takes a few seconds to build your quiz. It’ll automatically adds questions and assign weights based on the context you gave it, so you’re not starting from scratch.
From there, you can tweak questions, adjust correct answers, or change point values. The Quiz settings will already be enabled, so you’re basically starting from the finish line.
Try the WPForms AI Quiz Builder! 🙂
If you’d rather have full control over every detail, skip this step and follow the manual method instead. Follow the steps below to build your weighted quiz from scratch!
Step 1: Create a New Form and Enable Quiz Mode
To get started with your weighted quiz, head to WPForms » Add New from your WordPress dashboard. This opens the form builder where you can create your quiz from scratch.
You’ll see a bunch of templates to choose from. If you want to save time, pick one of the quiz templates. Otherwise, you can start with a Blank Form and build everything yourself.

Once the form builder loads, look at the left panel and click on Settings, then choose Quiz from the menu. You’ll see a big Enable Quiz button right there.

The moment you do that, the form builder changes a bit. You’ll notice new tabs show up at the top of the builder: Questions, Outcomes, Results, and Settings.
- Questions is where you’ll add your quiz fields.
- Outcomes lets you set up different result categories.
- Results gives you a breakdown on quiz responses.
- And Settings handles things like scoring.
Step 2: Select Weighted Quiz as Your Quiz Type
After you enable quiz mode, WPForms will ask you to pick the type of quiz you want to create. You’ll see three options: Graded Quiz, Personality Quiz, and Weighted Quiz.
Go ahead and click on Weighted Quiz. This sets up a scoring system where each answer gets a numeric weight instead of being marked right or wrong (like a graded quiz) or tied to a personality type.

Once you select it, the Settings tab will update and you’ll see a note to add Checkboxes, Multiple Choice, or Dropdown fields to your form and set the weight for each choice.
Step 3: Add Quiz Questions and Assign Weights
Now it’s time to build the actual quiz. This is where you’ll add your questions and assign weight values to each answer. In the form builder, click the Questions tab at the top.

From the left panel, drag a Multiple Choice, Checkboxes, or Dropdown field into your form preview on the right. These are the only field types that support weighted scoring, so stick with one of those three.
Once the field is in place, click on it to open the Field Options panel on the left. In the Field Label box, type your question. Scroll down to the Choices section.
This is where you’ll enter your answer options. Each choice gets its own row. Next to each answer, you’ll see a small input box. That’s where you assign the weight. Enter a number from 0 to 99.

Repeat this process for every quiz question. Add a new field, type the question, add the choices, and assign weights. Make sure every answer has a weight entered.
If you skip one, WPForms won’t be able to calculate the score correctly. Once you’ve added all your questions and set the weights, you’re done with this step. Your quiz is starting to take shape.
Step 4: Set Up Weighted Quiz Outcomes
Once you’ve assigned points to your quiz questions, the next step is to decide what your users see after they submit their answers.
This is where outcomes come in. They let you show different result messages based on how well someone scored on your weighted quiz.
To get started, click on the Outcomes tab at the top of your form builder. You’ll land on a page that looks like this:

By default, WPForms gives you a Default Outcome with a simple message editor. This is the result message every user will see unless you set up conditional logic to change it based on their score.
I usually start by adding a default message like “You scored {quiz_percentage} on this quiz. Thanks for participating!” Then I build from there.

If you want to show different messages depending on how someone scored (like a personalized “Great job!” for high scores or “Keep practicing!” for lower ones), you’ll need to add more outcomes.
Click the Add New Outcome button near the top of the page. A new outcome block will appear below your default one. Look for the Enable Conditional Logic toggle and switch it on.

Keep adding outcomes until you’ve covered all the score ranges you care about. I usually aim for three to five outcomes (low, medium, high, and maybe an “almost there” in between).
Here’s how the above outcome I set up looks on the frontend of my website. Make sure to test each outcome out to see how you can improve the messaging.

Step 5: Publish Your Weighted Quiz on WordPress
Once you’re happy with your outcomes, click Save in the top right corner of the form builder. Now, you’re ready to take your quiz live on your website!
Click the Embed button at the top of the form builder. You’ll see two options: add your quiz to an existing page or create a new page from scratch.

If you’re creating a new page, go ahead and give it a name that matches your quiz topic. Something like “Product Recommendation Quiz” works well. Then click Let’s Go.
WordPress will open the block editor with your quiz already embedded on the page. Now’s a good time to style things if you want using WPForms’ native black editor styling options.
To make quick work of styling your form, you can select a ready-made theme under the Form Theme section. In this example, I’m using the Jungle theme (which is one of my favorites).

When you’re happy with how everything looks, click the Publish button at the top right of the editor. Your weighted quiz is now live and ready for visitors to take.
Step 6: View Quiz Results and Analytics
Now that your weighted quiz is live and people are submitting responses, you’ll want to see how they’re doing. This is where the Quiz Addon really shines!
Head back to the form builder and click the Results tab at the top. You’ll see charts right away that break down weight distribution, completion rates, and how people answered each question.
I find this view super helpful when I want to see patterns at a glance, like whether most users scored high or low on a particular scale.

To dig deeper, use the Filters option. Click on it, and you can narrow results by date range, weight scale (there’s a slider you can adjust), completion status, or even specific questions and answers.
This comes in handy when you want to compare performance over time or focus on a certain group of respondents. I’ve used this feature when running seasonal quizzes to see how answers shift month to month.

You can also customize how each chart looks. Click the gear icon on any chart to change the graph style (you’ve got bar, pie, line, and column options), adjust colors, or resize the chart to fit your dashboard better.
Once you’ve set up your charts the way you like them, you’ll have a clear view of how your quiz is performing. This makes it easy to tweak questions, adjust weights, or change your scoring logic if something doesn’t look right.
FAQs on How to Create a Weighted Quiz in WordPress
I get a lot of questions about weighted quizzes, so I’ve put together answers to the most common ones below.
Which WPForms license do I need to create weighted quizzes?
You’ll need WPForms Pro or higher to access the Quiz Addon. If you’re currently on a lower-tier license, you can upgrade from your WPForms account dashboard.
Can I use any field type for weighted quiz questions?
No, only certain field types support weighted scoring. You can assign weights to Multiple Choice, Checkboxes, and Dropdown fields.
Other field types like text fields or file uploads won’t work for weighted questions since they don’t have predefined answer choices to assign points to.
How do I assign different weights to answer choices?
Click on the field you want to turn into a weighted question, then go to the Choices section in Field Options. You’ll see a Show Values toggle. Turn that on, and you’ll get a new column next to each choice.
Enter the point value you want for each answer in that column. So if one answer should be worth 10 points and another worth 5, just type those numbers in.
What is the weight range for answers in a weighted quiz?
You can assign any positive or negative number as a weight. There’s no hard limit, so you could use 1-10, 0-100, or even negative values if you want to deduct points for certain answers.
That said, I usually stick with simple ranges like 1-5 or 1-10. It makes the math easier when you’re setting up outcome messages based on score ranges.
Can I show different outcome messages based on weighted scores?
Yes, and it’s one of my favorite features. After you enable quiz mode and select Weighted as the quiz type, you can set up custom messages in the Outcomes tab.
For each outcome, you define a score range with greater than and less than operators and create a personalized message.
How do I filter weighted quiz results by score range?
Head to WPForms » Entries and select your weighted quiz form. At the top right side of the entries list, you’ll see a Filters button.
Click it and choose the score range you want to view. This is super helpful when you need to follow up with people who scored in a specific range, like low scores that might need extra attention.
Can I use WPForms AI to generate a weighted quiz?
Yes, you can ask the AI form builder to create a weighted quiz for you.
When you’re describing your form to the AI, mention that you want a weighted quiz and include details about the scoring.
For example, you could say “Create a weighted customer satisfaction quiz with 5 questions, scoring from 1-10 points per answer.”
The AI will build the basic structure, though you might still want to tweak the weights and outcomes afterward.
Next, Learn How to Create a Graded Quiz in WordPress
Once you’ve mastered weighted quizzes, you might want to explore other quiz types. A graded quiz works differently, where you mark responses as correct or incorrect and calculate a final score.
It’s perfect for testing knowledge, creating certification exams, or running training assessments. If that sounds useful, check out our guide on how to build a graded quiz for your WordPress website.
Ready to build your form? Get started today with the easiest WordPress form builder plugin. WPForms Pro includes lots of free templates and offers a 14-day money-back guarantee.
If this article helped you out, please follow us on Facebook and Twitter for more free WordPress tutorials and guides.

