
AI Summary
Managing bookings across multiple locations can be a nightmare without the right tools, especially when customers need to see where you’re located before they book.
With WPForms and the Geolocation Addon, you can create a multi location booking form WordPress that displays all your locations on an interactive map and lets visitors pick their preferred spot.
This guide walks you through building a booking form that shows multiple offices, service centers, or event venues on a single map, making it easy for customers to find and book at their nearest location.
Build Your Multi-Location WordPress Form Now! 🙂
How to Create a Multi-Location WordPress Booking Form
To build a multi-location booking form in WordPress, you’ll need a plugin that can actually do the heavy lifting, and WPForms is the one I always vouch for. Follow the steps below to get started:
Step 1: Install the WPForms Pro Plugin
WPForms is a great tool for making forms like contact forms and booking forms. It has over 2,100+ WordPress form templates you can use.
What I like most about WPForms is how it combines powerful form features with built-in geolocation tools. You’re not stuck piecing together multiple plugins or writing custom code.
To create a multi-location booking form in WordPress, you’ll need WPForms Pro, which includes the Geolocation Addon and the Map Field you’ll need for this tutorial.

To get started, buy the Pro license. Then, install WPForms on your website. If you need help, follow these instructions on how to add a plugin to WordPress.
Step 2: Activate the Geolocation Addon
Before you can add an interactive map to your booking form, you’ll need to install the Geolocation Addon. This is what powers the Map field.
To get started, head to WPForms » Addons in your WordPress dashboard. In the search bar, type “Geolocation” to find the addon quickly.

Once it appears, click Install Addon. The installation usually takes just a few seconds. After that, click Activate to enable it on your site.
Now, here’s the part that trips people up sometimes: the Geolocation Addon requires a Google Places API or Mapbox API key so that the Map field can function properly.
I know that sounds technical, but WPForms has a step-by-step guide that makes it way easier than it sounds. For complete setup instructions, check out the Geolocation Addon documentation.
It walks you through enabling the required APIs for Google Places or Mapbox, and then entering that key in WPForms » Settings » Geolocation.

Once you’ve added your API key and saved the settings, you’re all set. The Geolocation Addon is now ready to use, and you can start adding interactive maps to your forms.
Step 3: Create a New Booking Form
Now that the Geolocation addon is active, it’s time to build the actual booking form. Head to WPForms » Add New in your WordPress dashboard to open the form builder.

You’ll see a few options here. If you want to save time, you can choose from any of our 2,100+ WordPress form templates like the Appointment Booking Form Template and click Use Template.
These templates already include common booking fields, so you’re not starting from scratch. However, if you’d rather build from the ground up, choose Blank Form instead.

Another option if you don’t want to manually set up every field but have custom requirements is to let the WPForms AI Form Builder handle it for you.
Simply hover over the purple Generate With AI button and click Generate Form. You’ll land on the AI form builder screen. This is where you describe what kind of form you want.
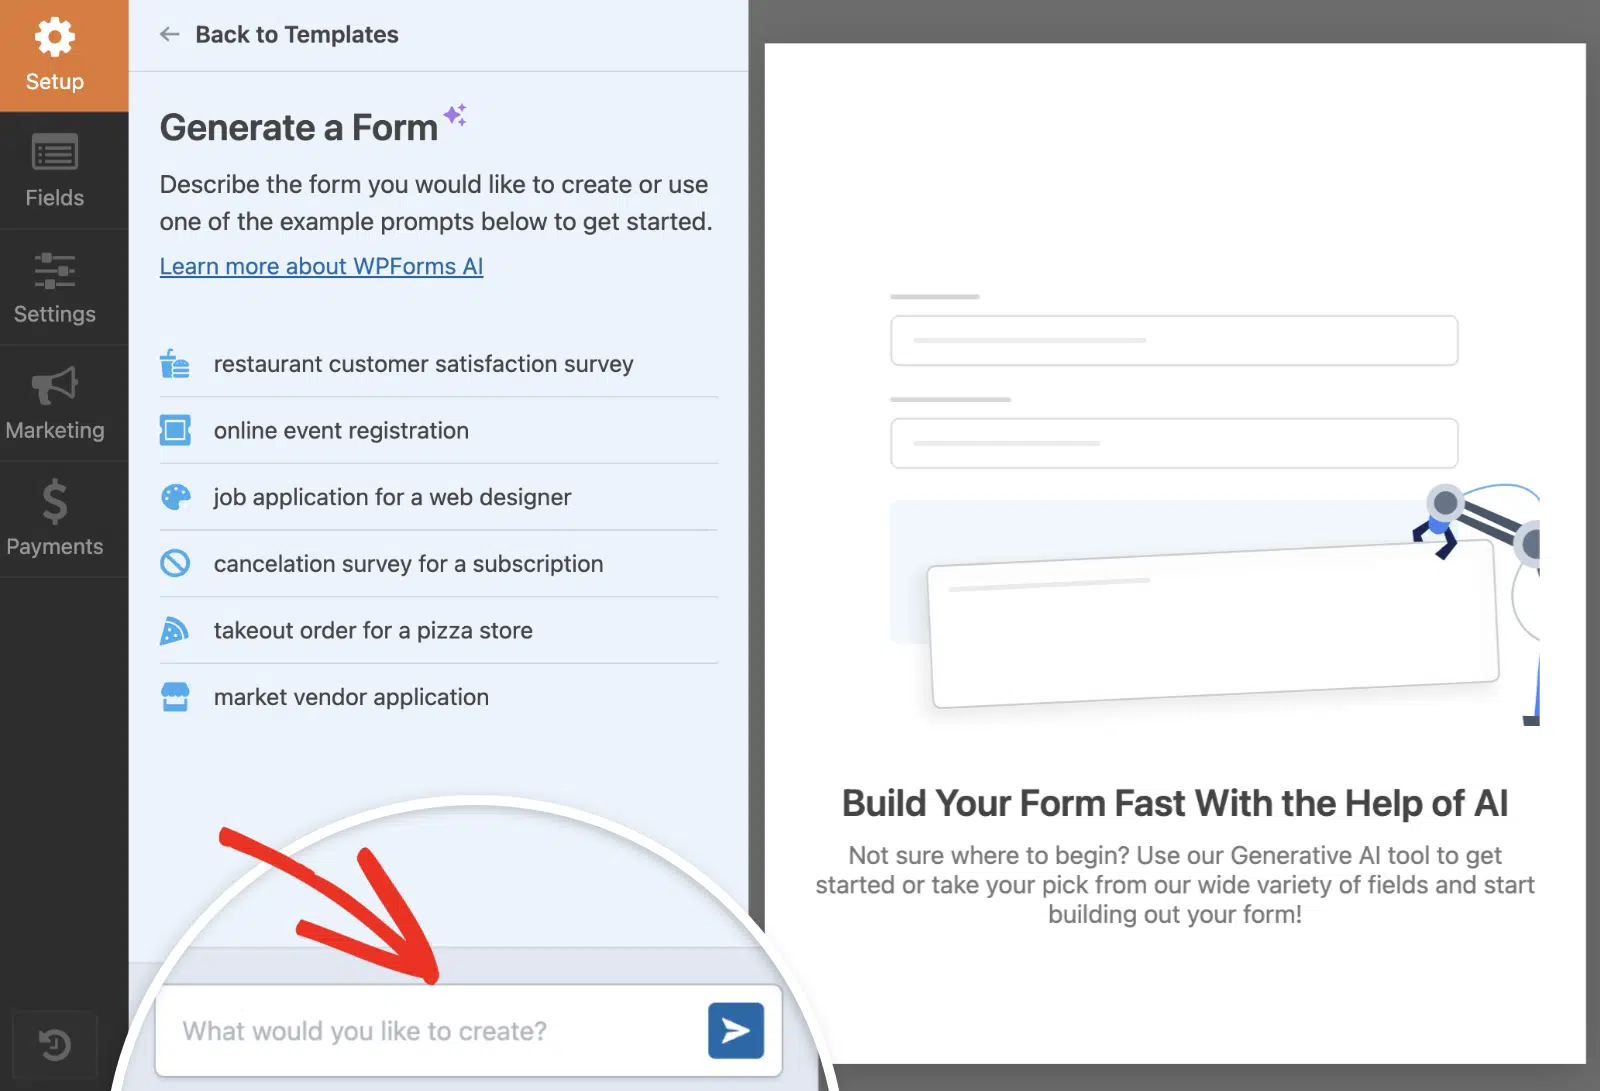
You can type your own prompt or choose from the suggestions on the left. Once you hit generate, the AI takes a few seconds to build your form.
From there, you can change the form layout, add/remove new fields, and make other customizations. Once you’re happy with your form, simply hit the Save button.

Step 4: Add the Map Field to Your Form
Now comes the fun part of adding the interactive map so visitors can see all your locations at once and choose one most suitable for them.
In the form builder, scroll down to the Fancy Fields section on the left side. You’ll see the Map field listed there. Go ahead and drag it into your form preview on the right.
I usually put the map near the top of the form so people can see their options right away, but you can position it anywhere that works for your flow.

Once the Map field is in place, click on it to open the Field Options panel on the left. Scroll down until you see the Locations section. This is where you’ll add all your offices, service centers, or appointment spots.
In the Address field, start typing your first location’s address. As you type, you’ll see autocomplete suggestions pop up. Click on the correct one to select it. This ensures the location gets pinned accurately on the map.

Next, give this location a custom Name. Something like “Downtown Office” or “Main Service Center” works well. This name will appear when visitors click on the map marker, so make it clear and recognizable.
You can also add a Description if you want to include extra details like office hours, contact info, or special notes. I’ve found this helpful when locations have different services or schedules.
To add more locations, click the plus icon (+) right below your first location. A new set of fields will appear. Repeat the same process: type the address, select it from autocomplete, add a name, and fill in the description if needed.

Keep adding locations until you’ve included every office or service center you want on the map. There’s no hard limit here, so if you have five locations or fifteen, you can add them all.
Once you’re done, your map will automatically display all the locations with individual markers. Visitors will be able to click on each one to see the name and description you added.
Customize Map Markers for Each Location
Now that you’ve added your locations, you can make each one stand out by customizing the map markers. This is where you can add personality to your map and help visitors tell your locations apart at a glance.
In the Locations section under Field Options, you’ll notice an Icon dropdown next to each location you added. Click the dropdown and you’ll see two choices: Icon or Image.
If you pick Icon, you can choose from hundreds of Font Awesome icons. I usually go with simple markers like map pins or building icons, but you’ve got options like coffee cups, hospitals, or briefcases if you’re looking for something more specific.
Right next to the icon field, you’ll see a color picker. Click it to change the marker’s color. I find this especially helpful when you’ve got different types of locations. For example, you could use blue for offices, green for retail stores, and red for event venues.
If you’d rather use your own graphic, select Image and upload a custom marker. This works great if you want to match your brand or use something that really represents your business.

You can also adjust the marker size using the Size dropdown. I typically set mine to Medium or Large so they’re easy to spot on the map, especially if you’re showing a lot of locations at once.
Once you’ve customized all your markers, your map will look polished and easy to navigate. Visitors will be able to see exactly where each location is and what type of service or facility it represents.
Enable Location Selection for Bookings
Now that you’ve set up your map with multiple locations, it’s time to make those locations selectable so visitors can actually choose where they want to book.
In the Map field options panel, look for the Show List of Locations toggle and switch it on. This displays all your location addresses in a neat list right below the map itself.
You’ll immediately notice something useful appears below that: the Allow Location Selection option. (This only shows up once you’ve added two or more locations to your map.) Go ahead and turn that on as well.

After you make these changes, here’s what happens on the front end. Radio buttons now appear next to each location in the list below your map.
Visitors can click on any location to select it as their preferred booking spot. The map updates to highlight their choice, making it crystal clear where they’ll be heading.
Now, when someone submits the form, the selected location gets captured along with all the other booking details. You’ll see exactly which office, service center, or venue they picked.
Configure Map Display Settings
Now let’s refine how your map looks and behaves. This step lets you control which map controls appear and how visitors can interact with it.
To get started, click the Advanced tab in the Map field options. This is where you can really dial in the experience. Under Presentation Settings, you’ll see toggles for different map controls.
If you want a cleaner interface, you can hide elements like Full Screen, Map Type, or Street View controls. Next, scroll down to Interactive Settings. This is where you decide how much control visitors have over the map itself.

If you want to keep things simple and prevent accidental scrolling or dragging, you can disable Draggable or Scroll to Zoom. I’ve found this helpful for forms where you don’t want people getting distracted by panning around.
Before you move on, make sure to enable Show Thumbnail in Entry. This adds a small map preview to your form entries in the WordPress dashboard, which makes it super easy to see which location someone selected without having to open the full entry.
Step 5: Set Up Notifications and Confirmations
Once your multi-location booking form is ready, take a few minutes to configure notifications and confirmations before going live. Start by heading to Settings » Notifications in the form builder.
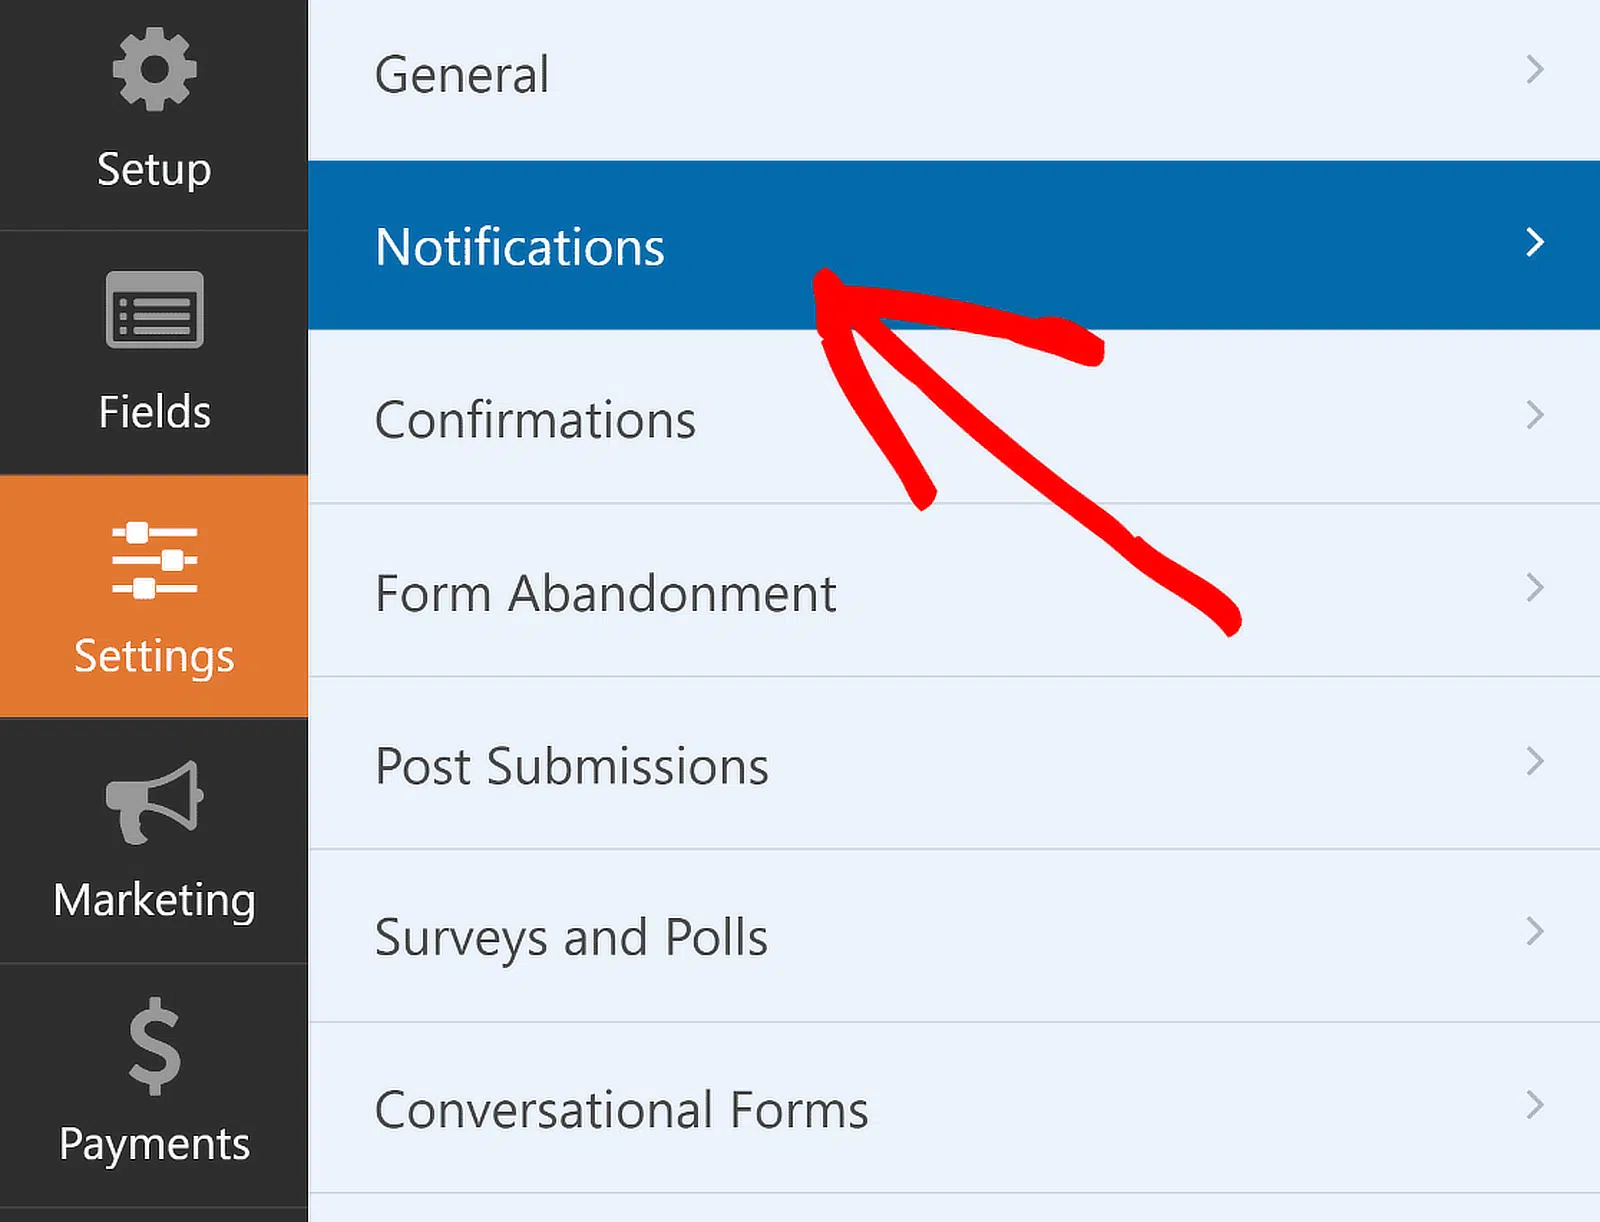
By default, WPForms sends a notification to your WordPress admin email whenever someone submits the form. You can edit the default notification settings, such as the subject line, or change recipient emails as needed from here.
If you use Smart Tags, you can also notify the user’s email address when they submit a form, letting them know you received it and will be in contact shortly.
This is especially true for multi-location forms in WordPress. For help with this step, check out our documentation on how to set up form notifications in WordPress.
Once done, simply navigate to Confirmations in the Settings menu to set up responses for successful form submissions. You’ve got three options here:

- Message: Shows a simple thank-you message right on the same page. I use this when I want to keep things quick and straightforward.
- Show Page: Redirects visitors to a specific page on your site, like a detailed confirmation page with next steps or contact info.
- Go to URL (Redirect): Sends them to an external URL, useful if you’re using a third-party booking system or a custom landing page.
Pick whichever fits your workflow. If you go with the message option, you can edit the default text to something more specific, like: “Thanks for booking with us! We’ll send a confirmation email to the address you provided shortly.”
For help with other confirmation types, see our documentation on setting up form confirmations.
Step 6: Publish Your Multi-Location Booking Form
Once your multi-location booking form is ready, it’s time to put it on your site where visitors can actually use it. WPForms lets you add your forms to multiple places on your website including your pages, blog posts, and sidebar widgets.
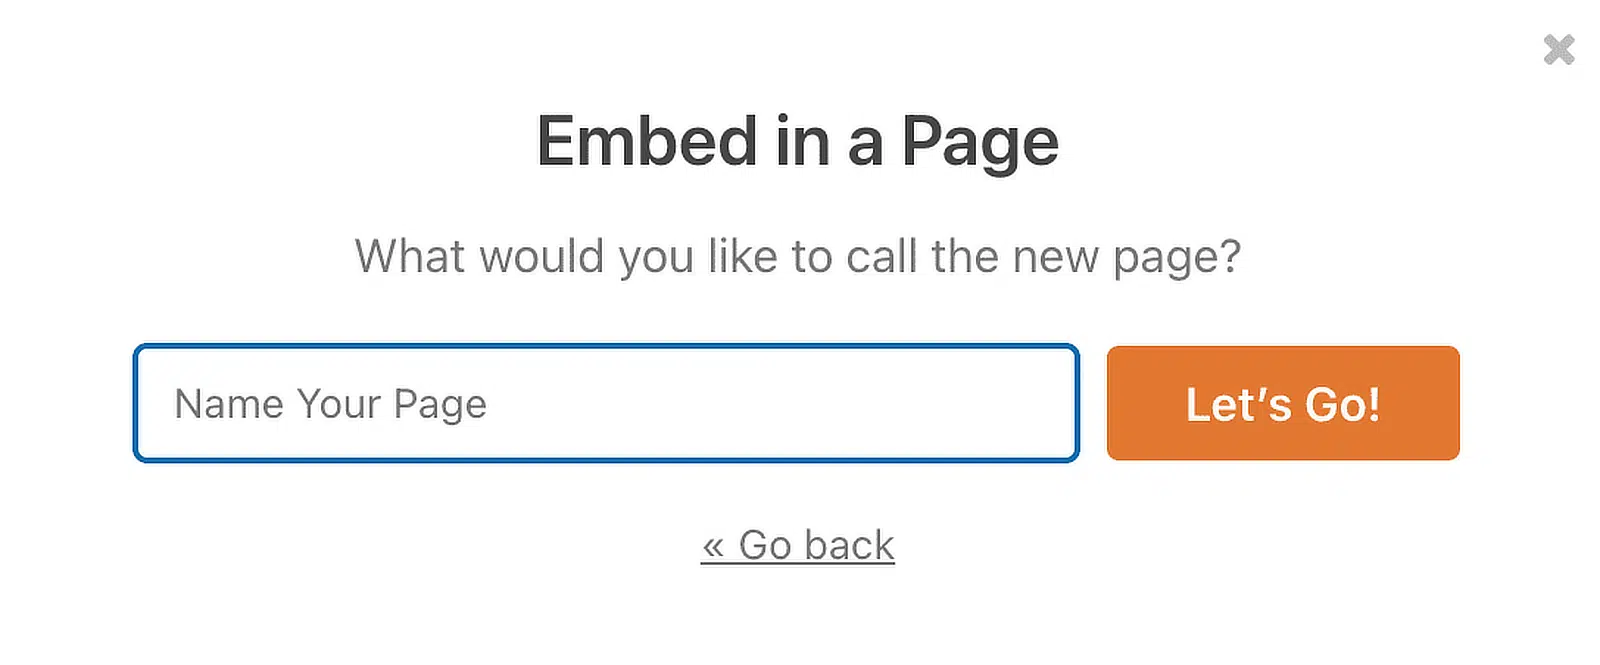
Click the Embed button at the top of the form builder. A popup will appear with two options: you can either create a new page or add the form to an existing page.

If you’re building a dedicated booking page, click Create New Page. Give your page a title like “Book an Appointment” or “Schedule a Visit,” then click Let’s Go!
WPForms will open the WordPress block editor with your form already embedded. From here, you can add introductory text above the form, adjust the page layout, or style your form a bit.
Simply click on the area around the embedded form in the page editor to open a new panel on the right. Here, you’ll find all the basic and advanced styling options for WPForms.
To make quick work of styling your form, you can select a ready-made theme under the Form Theme section. In this example, I’m using the Tranquil theme (which is one of my favorites).

Feel free to try other themes; you’ve got lots of options. If you like experimenting directly, you can also manually customize different elements of the form more precisely.
If the map looks good and the form fields are working as expected, go ahead and Publish the page. Your multi-location booking form is now live and ready to start collecting appointments.

FAQs on How to Create a Multi-Location WordPress Booking Form
If you’re setting up a multi location booking form in WordPress, you probably have a few questions. I’ve answered the most common ones below to help you get everything working smoothly.
What is a multi location booking form in WordPress?
A multi location booking form lets visitors choose from multiple physical locations when scheduling an appointment or making a reservation. Instead of creating separate forms for each office or venue, you can use one form with an interactive map that displays all your locations at once.
This is especially helpful if you run a business with multiple service centers, event spaces, or appointment locations. Visitors can see where each location is, pick the one that’s most convenient, and book right there on the spot.
How does the Map field help with booking forms?
The WPForms Map field displays all your locations on an interactive map inside your form. Visitors can zoom, pan, and click on markers to see details about each location.
Once they select a location, that choice gets captured in the form submission. You can use it to route bookings to the right team, send location-specific confirmation emails, or just keep your records organized.
Can I customize the map markers for each location?
Yes, you can. When you add locations to your Map field, each one gets its own marker on the map.
You can customize the title, address, and description for each marker. This helps visitors understand what makes each location different (like parking availability, hours, or services offered).
Can I send different notifications based on the selected location?
Absolutely. You can set up conditional logic in your form’s notification settings to send different emails depending on which location the visitor selects.
For example, if someone books at your downtown office, the notification goes to your downtown team. If they pick the uptown location, it routes to that team instead.
Can customers select multiple locations in one booking?
Not with a single Map field. The Map field is designed for visitors to choose one location per submission. If your business model requires booking multiple locations at once, you’d need to use separate Dropdown or Radio Button fields for each selection.
Does the Map field work on mobile devices?
Yes, it works great on mobile. The map is fully responsive, so visitors can tap, zoom, and interact with it just like they would on desktop.
I’ve tested this on phones and tablets, and the experience stays smooth. Your visitors won’t have any trouble picking a location, no matter what device they’re using.
Can I use the Map field with payment forms?
Yes, you can. The Map field works alongside payment fields like Stripe or PayPal Commerce.
If you charge different amounts based on location, you can use conditional logic to adjust the total.
For example, appointments at one location might cost more due to premium facilities or longer service times.
Next, Hidden Features of WPForms You Didn’t Know About
WPForms is packed with tools and options that aren’t immediately obvious but can significantly improve your workflow and the forms you create.
Check out our guide to learn about some of these hidden gems and features that might have slipped under your radar but have the potential to take your WordPress forms to the next level.
Ready to build your form? Get started today with the easiest WordPress form builder plugin. WPForms Pro includes lots of free templates and offers a 14-day money-back guarantee.
If this article helped you out, please follow us on Facebook and Twitter for more free WordPress tutorials and guides.

