AI Summary
Are you looking for powerful ways to manage file uploads to your WordPress site? One of the many handy things you can do with WPForms is allow your users to attach files to a form on your site.
But that’s not all! You’ll also be able to have file uploads sent directly to your email, so you don’t have to log into your website to view them.
We’ve covered all the steps you’ll need to set this up. Let’s get started!
Create Your File Upload Form Now
How Do I Create a Form to Upload Files?
The easiest way to create a form to upload files is to use the WPForms file upload field. This will allow you to easily create and add a file upload field to any WPForms form. You can also simply use the pre-built file upload form template.
You’ll just need a WPForms Pro license to get started. Check out the detailed step-by-step guide below:
How to Attach Files to Form Email Notifications in WordPress
Step 1: Install WPForms

WPForms is the top WordPress form builder, with 6+ million active installations and 13+ thousand 5-star reviews on WordPress.org.
For businesses looking for the most competitive features, the WPForms Pro license is ideal. So that’s where we’ll get started!

You can install WPForms just like you would with any other WordPress plugin, but if you need some help, please follow this beginner’s guide to uploading WordPress plugins.
Once you’re done with this, the next step will be creating a file upload form.
Step 2: Create a File Upload Form
Now that we’ve got WPForms Pro installed, we can dive under the hood to create a powerful file upload form that will send attachments to your email.
One of the really cool things about WPForms is how easy it is to get started with form building. You’ll have 2,000+ WordPress form templates to choose from, including a pre-built file upload form template.
For this guide, we’ll simply use this template, but don’t forget that you can add a file upload field to any form.
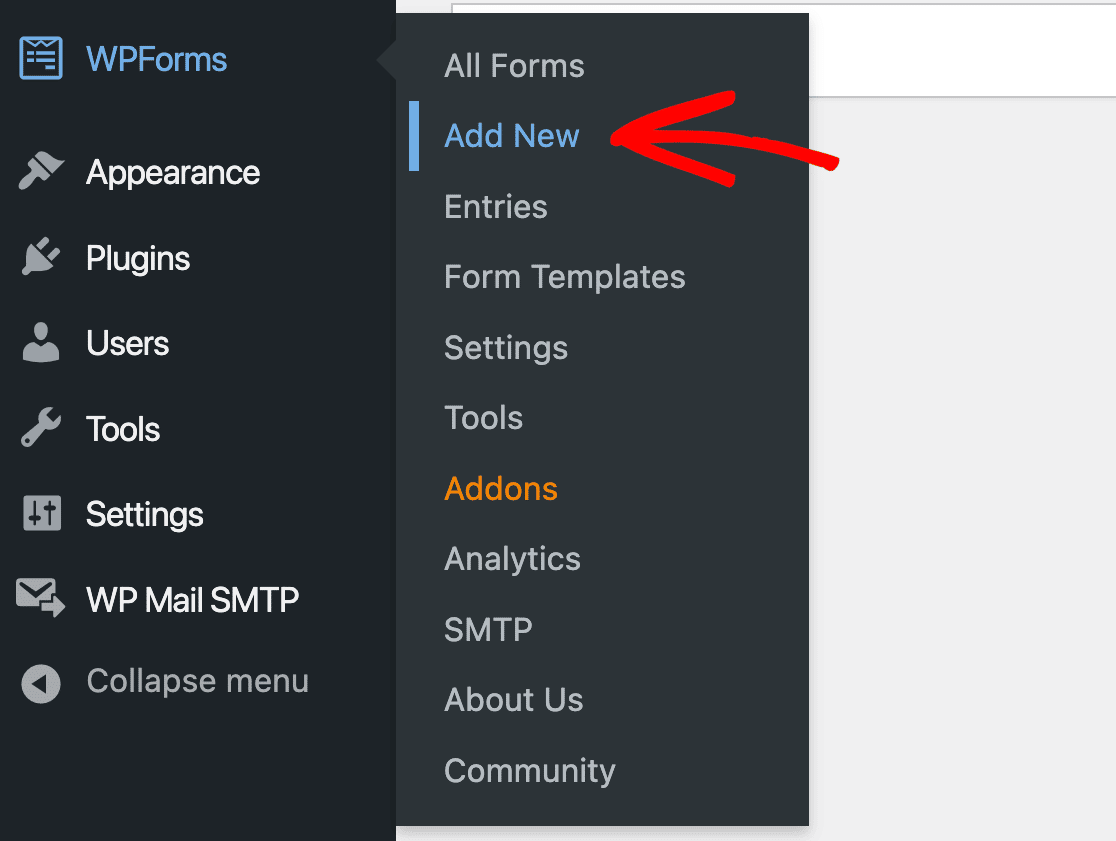
So, to get on with building our form, we’ll head on into the WordPress admin area and click through WPForms » Add New. You can also get to this page by clicking Form Templates.
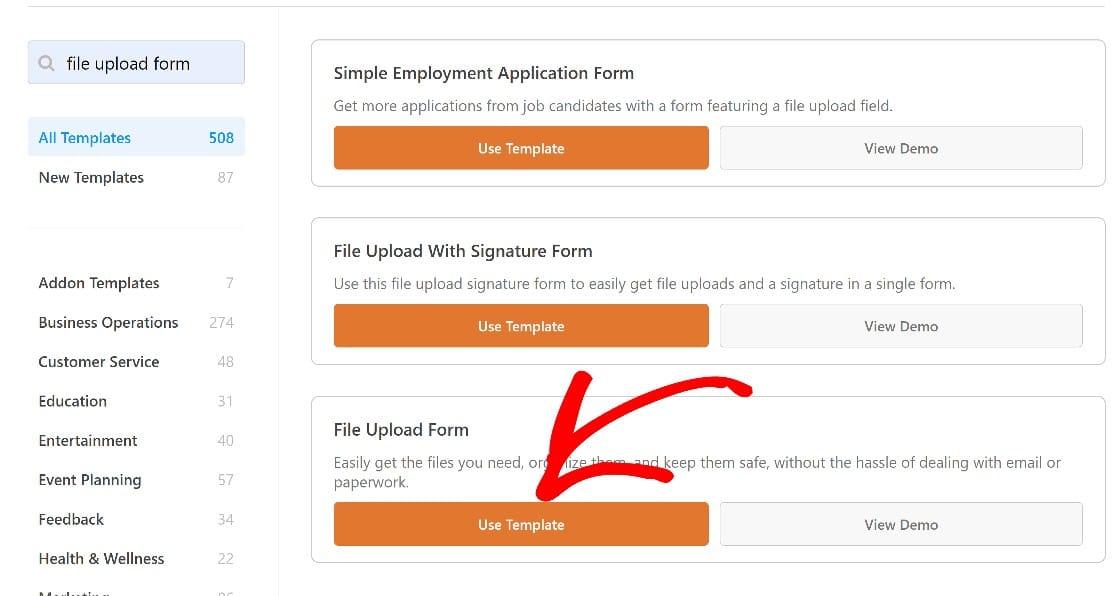
Once in here, we’ll look for the file upload form using the search bar. When you find it, click Use Template, and the form will open up in the form builder.
If you’re starting from scratch with a blank template or any other template, you can find the file upload field by scrolling through the form field panel to the Fancy Fields section.
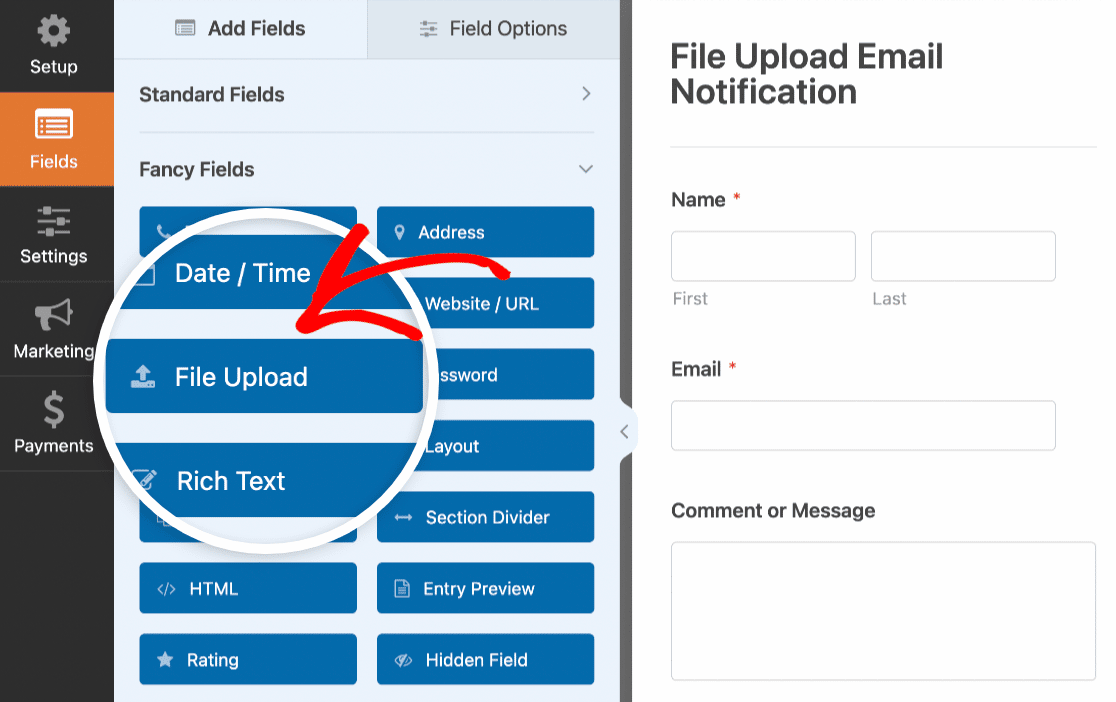
Drag and drop the file upload field on the form at the point where you want it to be. At this point, you’ll have a basic file upload form that you can enhance by:
- Adding additional file types
- Setting a maximum file upload size
- Allowing for multiple file uploads to a single file upload field
- Setting up attachments to form email notifications
- And more
For this guide, we’re particularly concerned with setting up the file upload field to attach file uploads to the email notification you get when a user submits a form. This is covered in the next step.
But if you’d like to explore some of the ways you can customize the file upload form, here’s our complete guide to creating a file upload form in WordPress.
Step 3. Enable Email Attachments
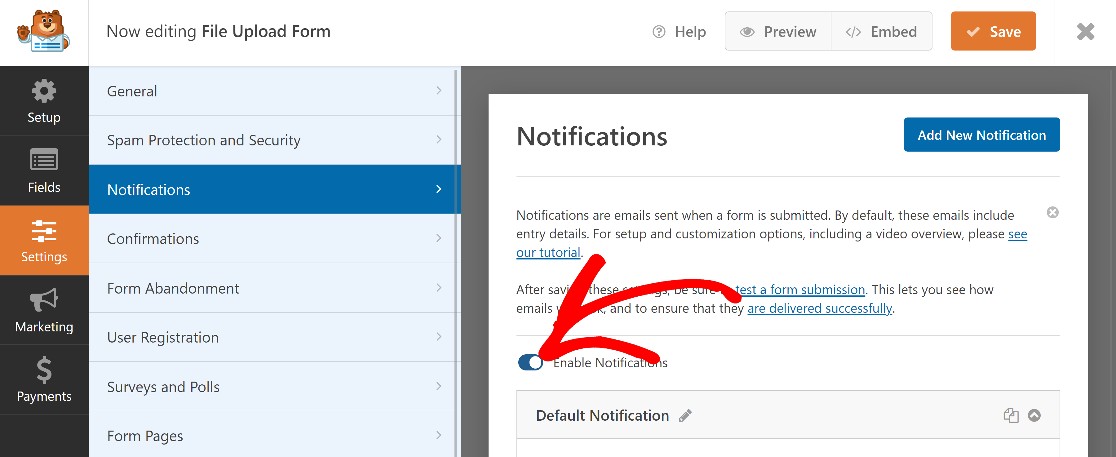
From the form builder, navigate to the menu on the left of the form field panel, and click on Settings » Notifications. Once in, first, make sure the Enable Notifications button is toggled on.
Scroll down and click Advanced to reveal more options, then toggle the button labeled Enable form file upload attachments.
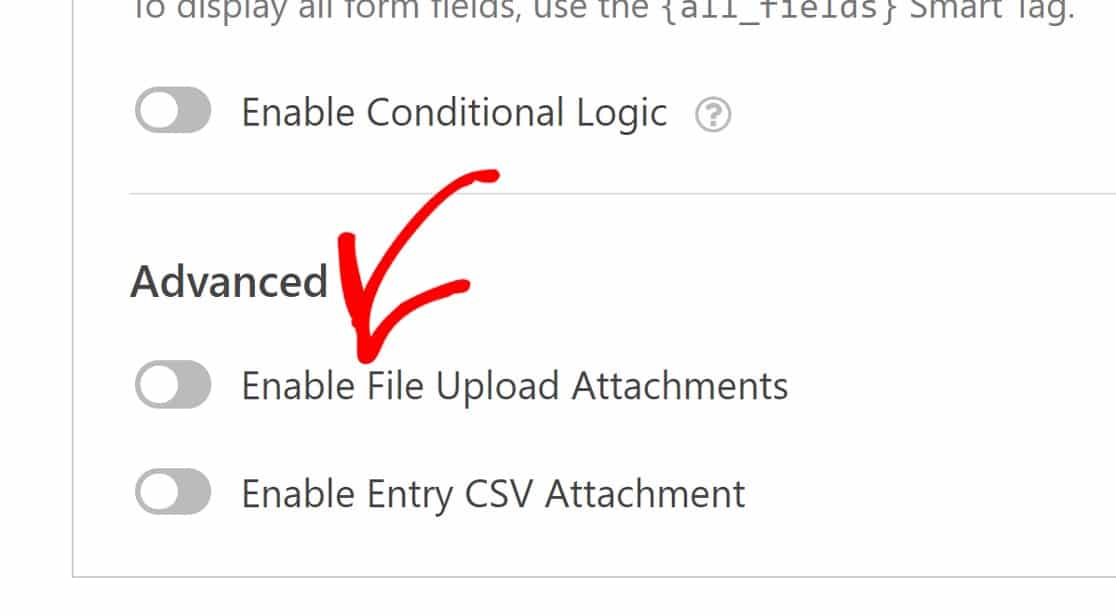
You’ll then see another section labeled File Upload Fields, which will have opened up in a dropdown below it.
Click on the dropdown to choose the form field to pull attachments from. In this case, you have only one file upload field on your form labeled File Upload. Select this field and save these settings.
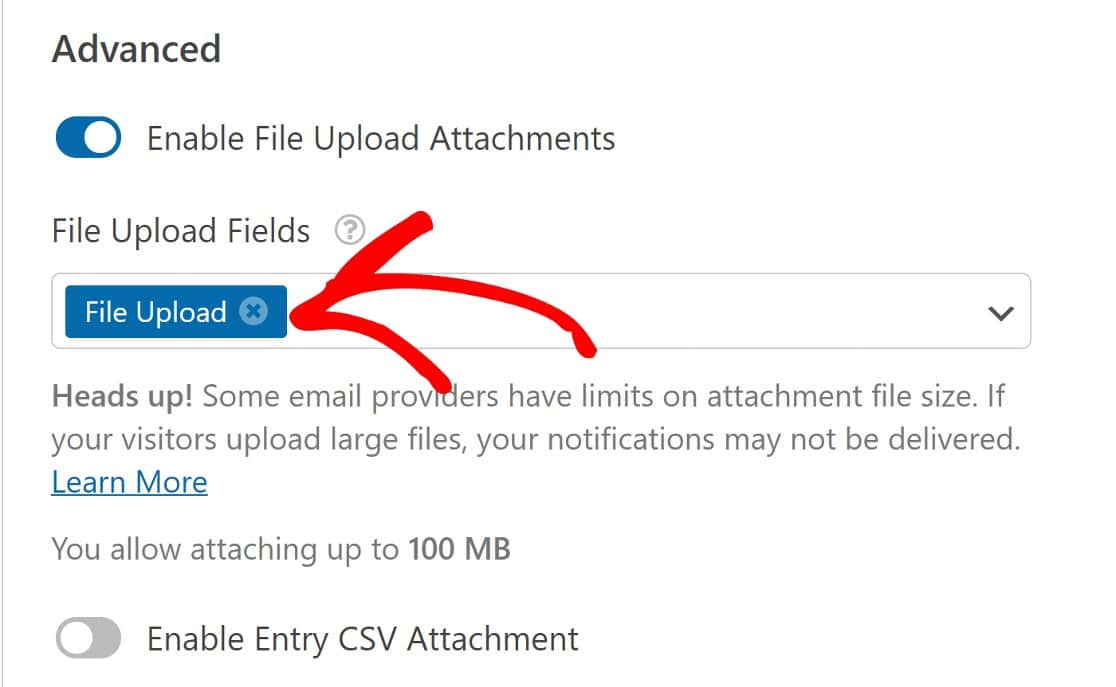
Now, any file uploads attached to this form will be sent along with the form submission email notification.
Step 4: View or Download the Attached Files from Notificaitons
To check that your form sends file uploads to your email as it should, we’ll need to embed it into a page and publish that page on the frontend of your site. For detailed steps, please take a look at our guide to embedding a form on a page in WordPress.
With your form published on the frontend of your website, go ahead and fill it out and attach a file to it using the file upload field.
And when you check your email, you’ll now see the file upload attached to the email which you can directly view or download.
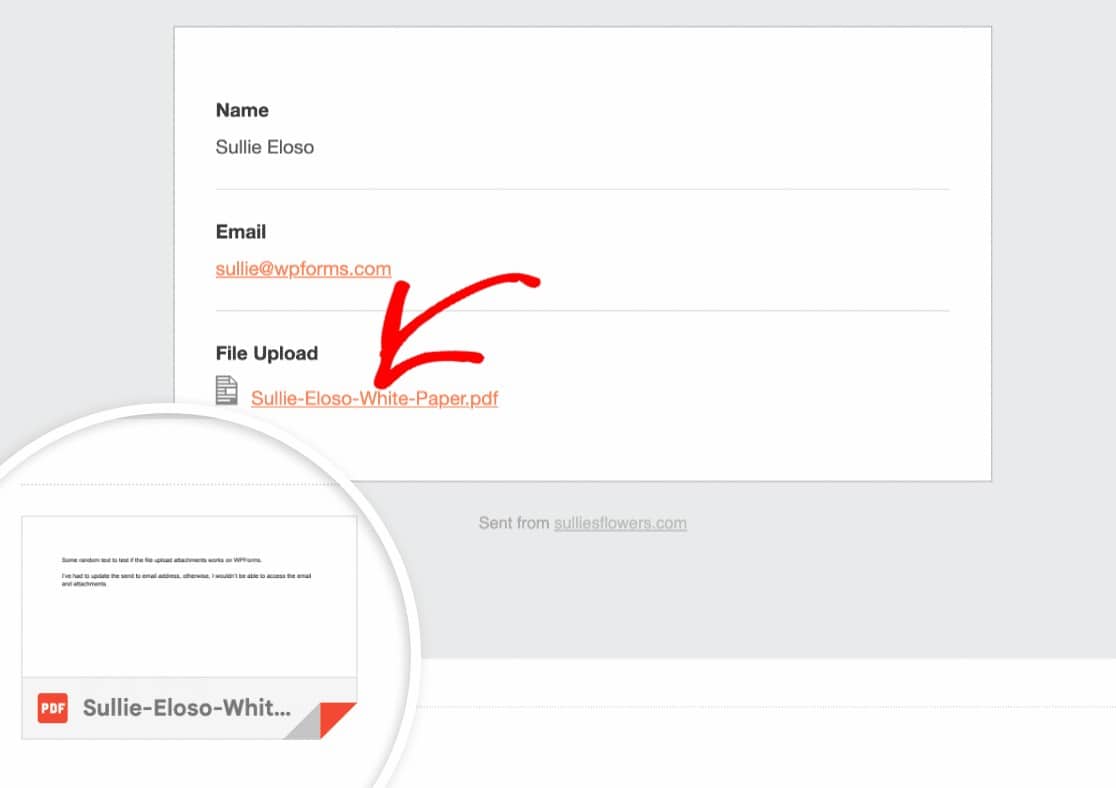
And that’s it! You now know how to set up a form that sends file attachments to your email address.
You can also check out this guide for more information on how to customize form notifications with email templates, typography, and more.
Next, Adjust the Max File Upload Size For Your Website
One of the things you can do with the file upload field is determine the max file upload size. But you’ll never be able to increase this above the default WordPress file upload limit for your site. So here’s how to change the max file upload size in WordPress.
Also, if you want to automate your form notifications, see our guide on connecting WPForms with ChatGPT for automated notifications.
Create Your File Upload Form Now
Ready to build your form? Get started today with the easiest WordPress form builder plugin. WPForms Pro includes lots of free templates and offers a 14-day money-back guarantee.
If this article helped you out, please follow us on Facebook and Twitter for more free WordPress tutorials and guides.



What if you want to send the person who fills out your form an email with an attachment?
Hey Jonathan – you can absolutely set up an auto response / thank you email where you can write HTML response, include attachment (by adding URL of the attachment) to the user who filled up the form. We have a step-by-step tutorial about this (and other aspects of setting up form emails) in this doc.
I hope this helps. Thanks 🙂
Hi,
How can I get the uploads not as a link and only as an attachment. Right know it is really insecure because you can access the data via a the link…
Hey Hannah – If you don’t want to have the file upload URL on your email notification, just use {field_id=”#”} instead of {all_fields} in the email message as shown here.
Just in case it helps to share, we add a unique hash to the end of the file URL that are uploaded by the user (eg: my-logo-570543445db74.png) so that a malicious user couldn’t easily open up a bunch of files that have been uploaded to your site or can’t guess other fiels URL unless they get the exact file URL via email.
Hope this helps! Thanks 🙂
Is there any way to control how the file is attached versus embedded? I have multiple recipients setup and some of them are having trouble printing the e-mails with images. I’ve suggested they change their e-mail programs printer settings but they still end up missing when printed. Our company does this for record keeping.
Hi Travis – When you get a chance, please drop us a line with more details about the issue you are facing in support so we can assist further.
If you have a WPForms license, you have access to our email support, so please submit a support ticket.
Otherwise, we provide limited complimentary support in the WPForms Lite WordPress.org support forum.
Thanks 🙂