


AI Summary
Do you want to use a Facebook Pixel to track your form submissions? Embedding a Pixel can help you to easily remarket your site to people who have already used your forms.
I’ll walk you through the easiest way to get Pixel tracking working on your WordPress forms. This will let you easily track form submissions and optimize your ad campaigns.
Facebook renamed the Facebook Pixel to the Meta Pixel in 2022, so you’ll see both terms online and inside your account. They point to the same tool, and every step in this guide works the same way.
Create Your WordPress Form Now
What Does the Facebook Pixel Track?
The Facebook Pixel tracks user activity on your website. It’s useful for measuring the number of conversions you get through your checkout or measuring important actions on your website. It tracks events like:
- Items viewed, purchased, or added to a wishlist
- Add to cart buttons clicked
- Pages visited
- Payment info added
- Appointments booked
- And more.
These are examples of what Facebook calls Standard Events. You can add your own custom events and custom conversions. Based on the data gathered by your events, Facebook can:
- Show Facebook ads to your site visitors – For example, if a visitor views products and doesn’t buy them, you can create ads that encourage them to come back to a special landing page, or show them a promo code.
- Create audiences with similar characteristics to your visitors – This lets you advertise to an audience that’s similar to the people browsing your site already. Since Facebook knows your target demographic, it can show ads to people with similar age, gender, interests, or location.
- Show ads to customers who are most likely to spend – You can create custom audiences who have already spent money and target ads at those people. This can help you to get a better return on investment when advertising on Facebook.

Tracking your form conversions is a great way to boost your revenue from social media ads. Once you know who’s converting, you have a goldmine of data that can help increase sales by focusing on your ideal customers.
Bear in mind though that Pixel isn’t flawless, and it’s worth knowing why before you lean on it. Because it runs in the visitor’s browser and relies on cookies, its accuracy dropped after Apple’s iOS 14.5 privacy update.
Ad blockers can stop it from firing at all, and that’s why I’ll also point you to the Conversions API during setup, and why I’ll show you WPForms’ own built-in analytics near the end. For now, let’s install a form-tracking pixel on your site.
How to Use a Facebook Pixel to Track Form Submissions
To follow along, you’ll need a business Facebook page set up and ready to go. I’ll show you the easiest way to set up the Meta Pixel to track form submissions.
If you use an ad blocker, it’s a good idea to turn it off before you start working through these steps. If your ad blocker is active, you might have trouble following along since some of the buttons and options might be hidden.
Step 1: Install the WPForms Plugin
To track form submissions, you first need a form. WPForms is the best form builder for WordPress, and it lets you make any kind of form without writing code.
It comes with 2,100+ WordPress form templates and a drag-and-drop builder, so you can put a contact form, order form, or lead form together in a few minutes.

What I like most about WPForms for conversion tracking is how cleanly it handles confirmations. You can send people to a dedicated thank you page the moment they submit a form, and that page load is exactly the trigger the Meta Pixel needs to record a conversion.
You can follow this whole tutorial on any WPForms plan, including the free WPForms Lite, since building a form and setting a page confirmation are core features.
If you also want WPForms’ built-in Analytics, which I cover near the end, that’s part of WPForms Pro. To get started, choose your WPForms plan and install WPForms on your website.
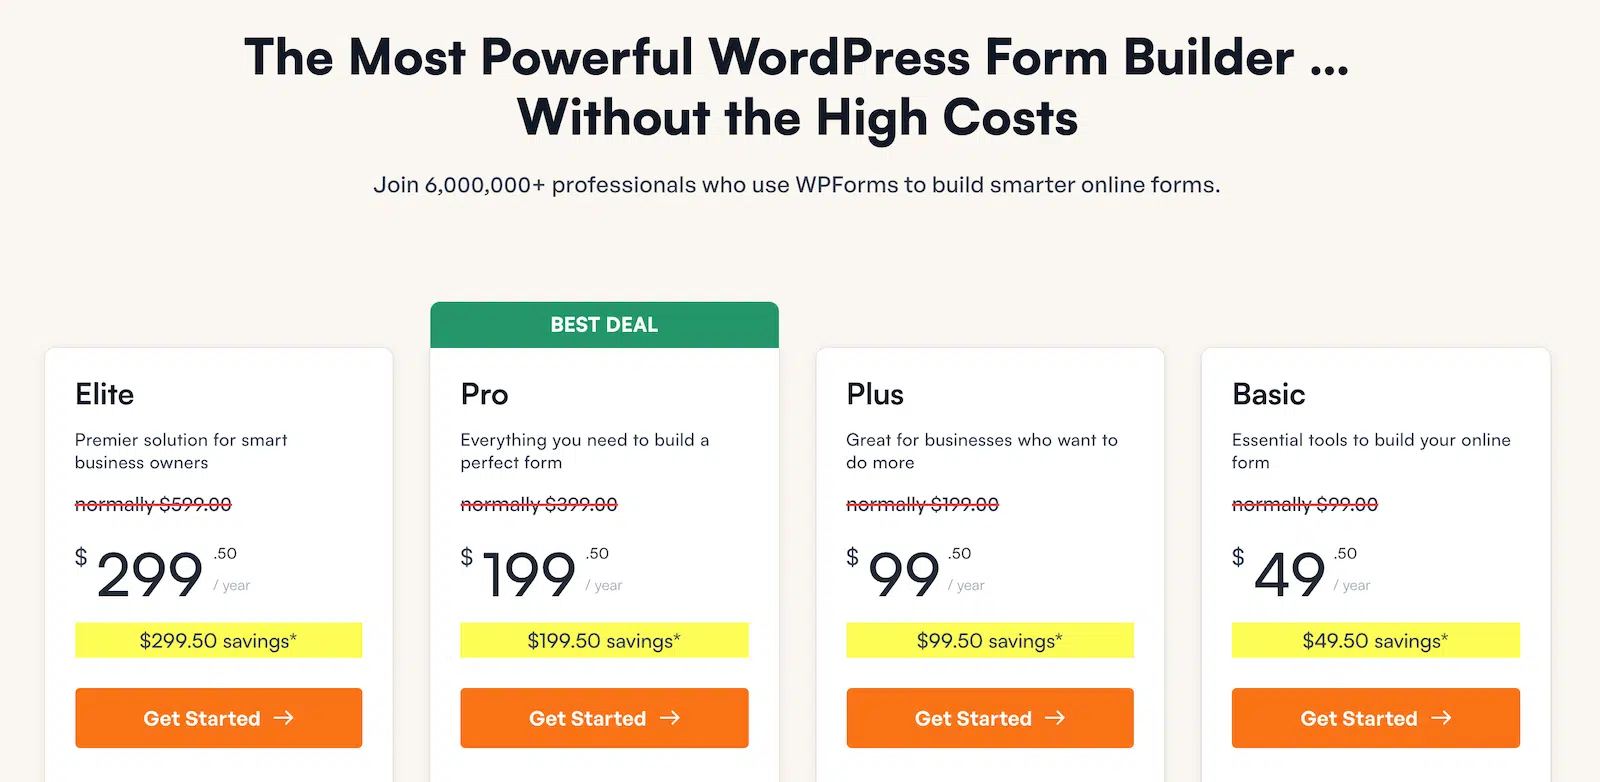
If you need help, follow these instructions on how to add a plugin to WordPress. Once WPForms is active, create the form you want to track.
If you’re new to the builder, here’s a guide to creating a simple contact form in WordPress that walks you through it. When your form is ready, come back here and pick up from Step 2.
Get Started With WPForms Today
Step 2: Create a Thank You Page for Form Submissions
Now you’ll create a new page in WordPress that visitors see right after they submit the form. That page load is the trigger that records the submission as an event.
You’re also going to hide this page so nobody stumbles onto it from a search result. That way, when the page loads, the Meta Pixel knows a form was actually submitted rather than someone just wandering in.
To start, click Pages » Add New.
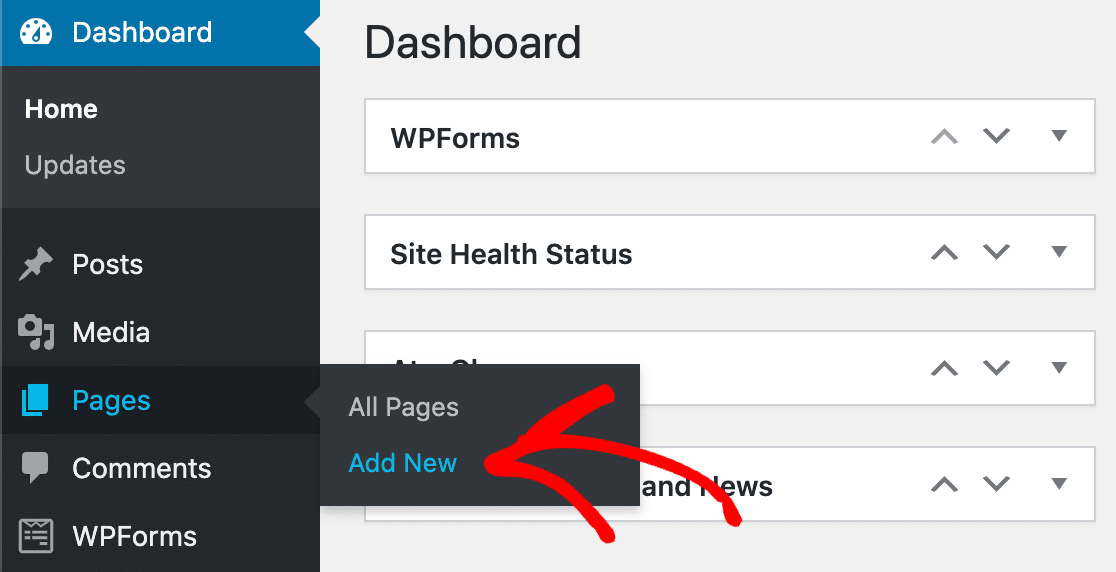
Create a thank you page that shows up once your form has been submitted. You can type any message you like here. For more ideas on what to include, see how to create a thank you page in WordPress.
Next, type a slug for your page in the URL Slug box on the right.
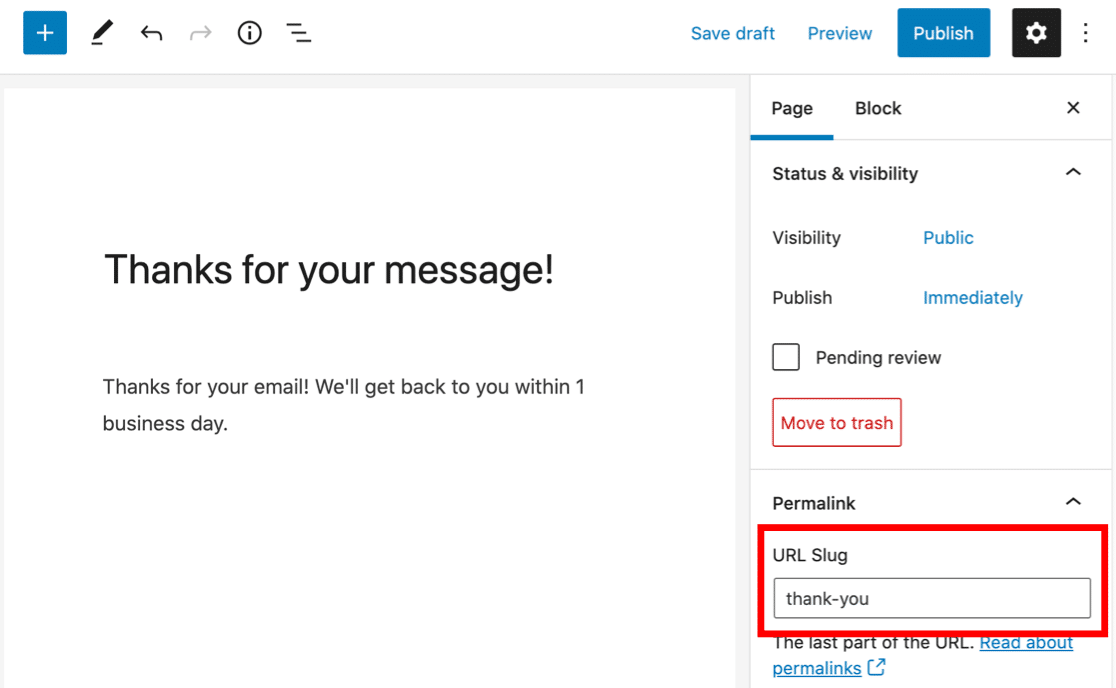
I’m using thank-you as the slug for this page. Choose something unique here, because you’ll need the Pixel to identify this exact page later.
Hiding Your Thank You Page
Next, you’ll want to make sure that this thank you page isn’t indexed by search engines. We don’t want anyone coming to this page from a search and triggering the Pixel without submitting the form.
To hide the page, we’re going to change the indexing settings with our SEO plugin. All in One SEO is the best search engine optimization plugin for WordPress, and it lets you easily control how your site is indexed.
Be sure to change the setting for the thank you page only, not your entire site. In the AIOSEO Settings panel, turn off Use Default Settings. Then set the page to No Index.
In the AIOSEO Settings panel, turn off Use Default Settings. Then, you’ll want to make sure that the page is set to No Index.
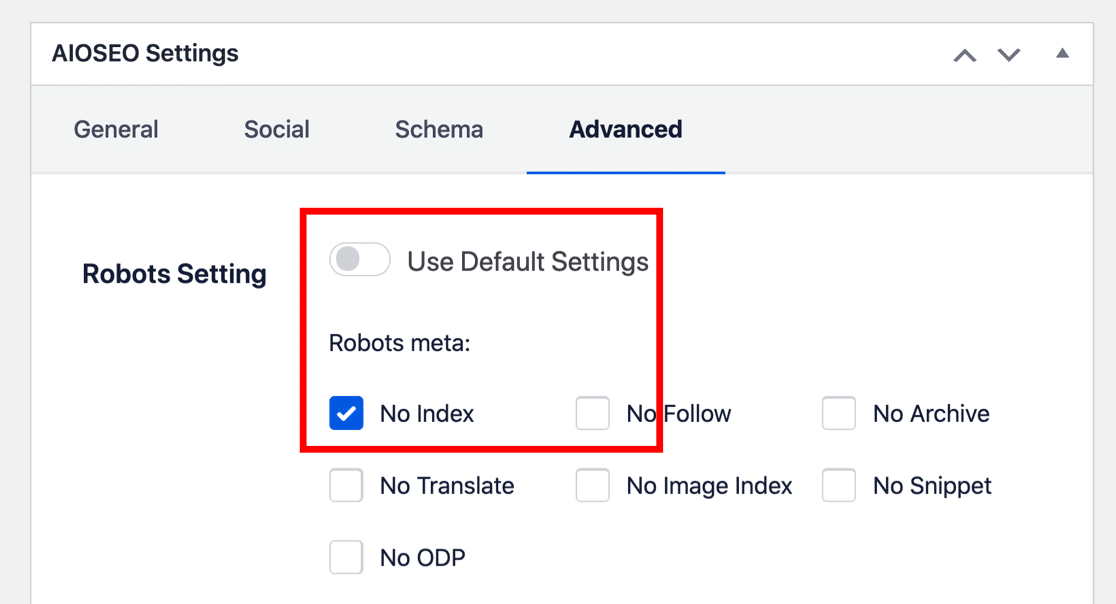
When you save your new web page, search engines will be discouraged from indexing it in their results. This means the event tracking can only record a visit if someone comes from a form submission.
You can set a page to No Index in other ways. For example, you could add a line to your robots.txt file. To find out about different ways to noindex a page, visit this tutorial on how to hide a WordPress page from search engines.
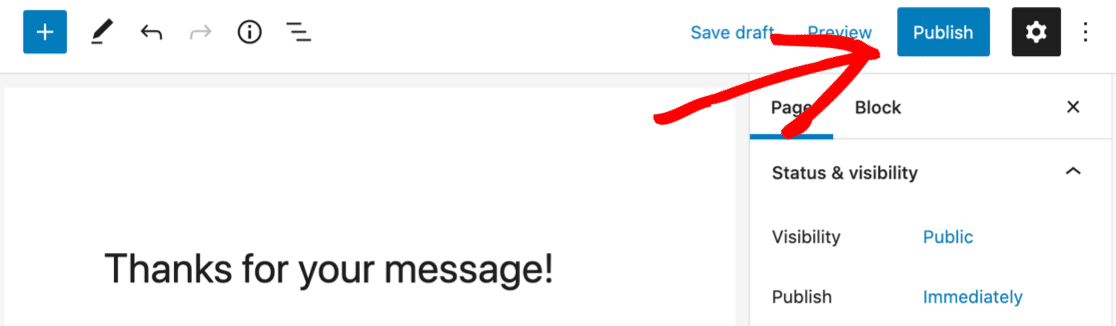
When that’s done, click Publish to publish your page.
Finally, check that your new Thank You page hasn’t been automatically added to any of your navigation menus.
If it has, you’ll want to go to Appearance » Menus and remove the page from each menu so nobody can visit it directly. Check out this guide to editing the navigation menu in WordPress if you need more help removing the page from your menus.
Now we’re ready to go back to the form.
Step 3: Set Up Your Form Confirmation Page
By default, your form confirmation is probably set up to show a thank you message. This is a great way to quickly confirm that the form submission worked.
But for this tutorial, you’ll want to change this setting so that WPForms loads your new thank you page instead. To start, click WPForms in the sidebar. Now go ahead and click Edit underneath the name of the form you created.

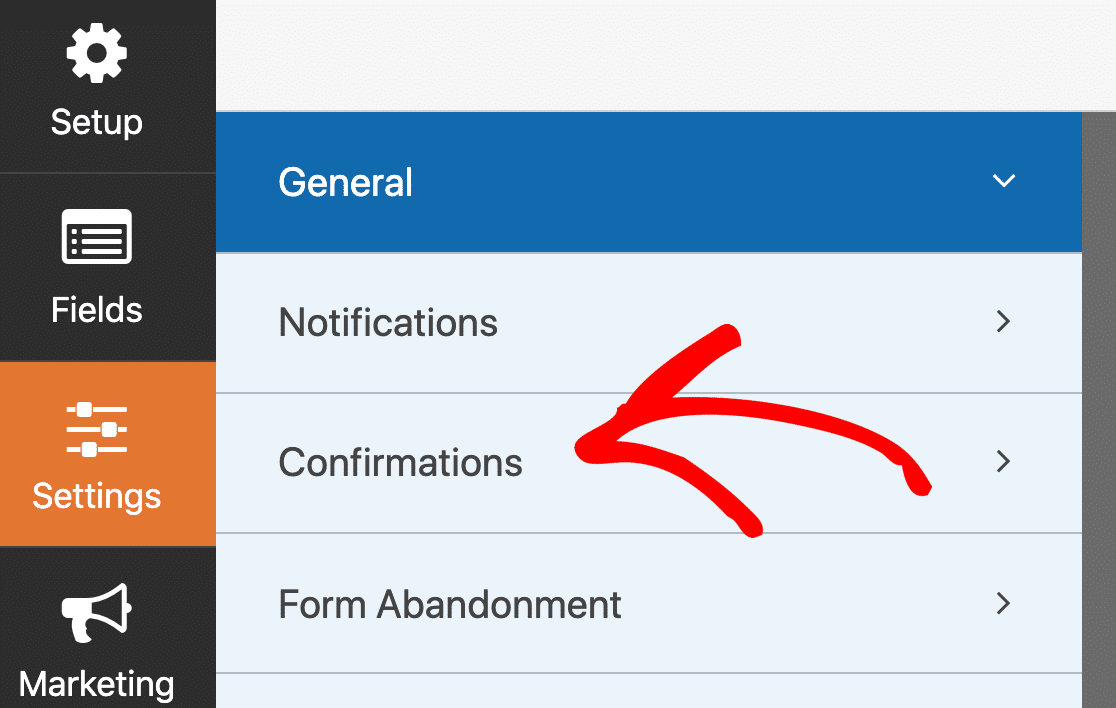
In the form builder, click Settings on the left. After that, click on the Confirmations tab.
On the right-hand side, check to see if your confirmation type is set to Message. This will show a box with some text or HTML.
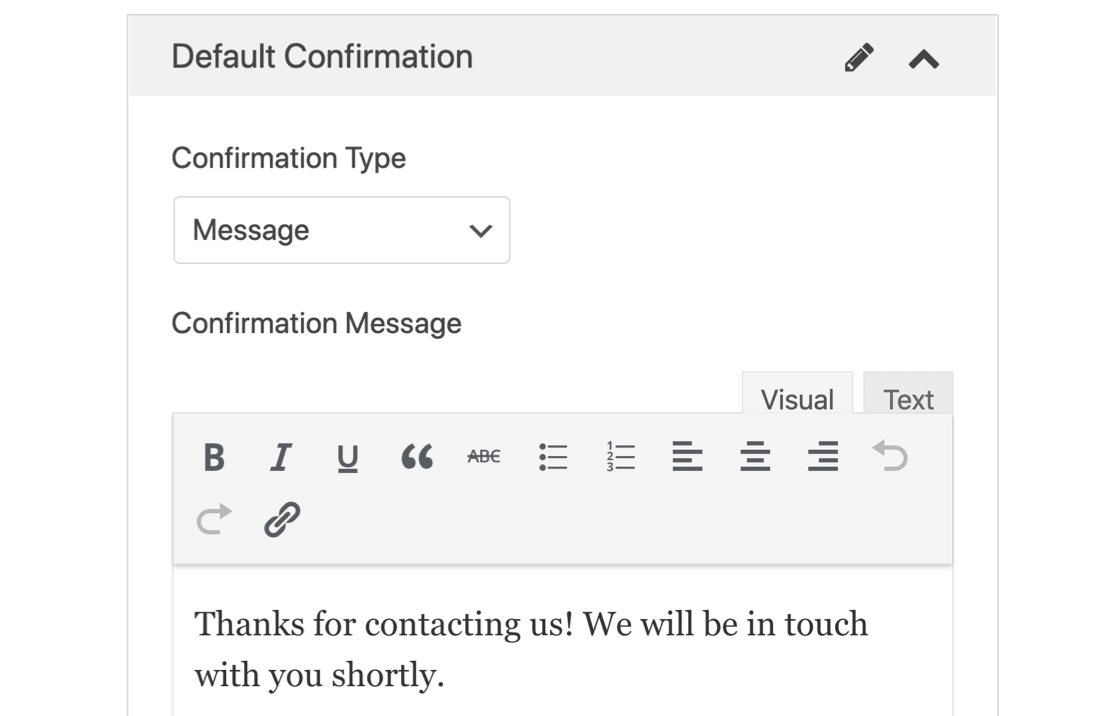
In the first dropdown, select Show Page. Then choose the name of your new thank you page in the second dropdown.
The confirmation settings will look like this:
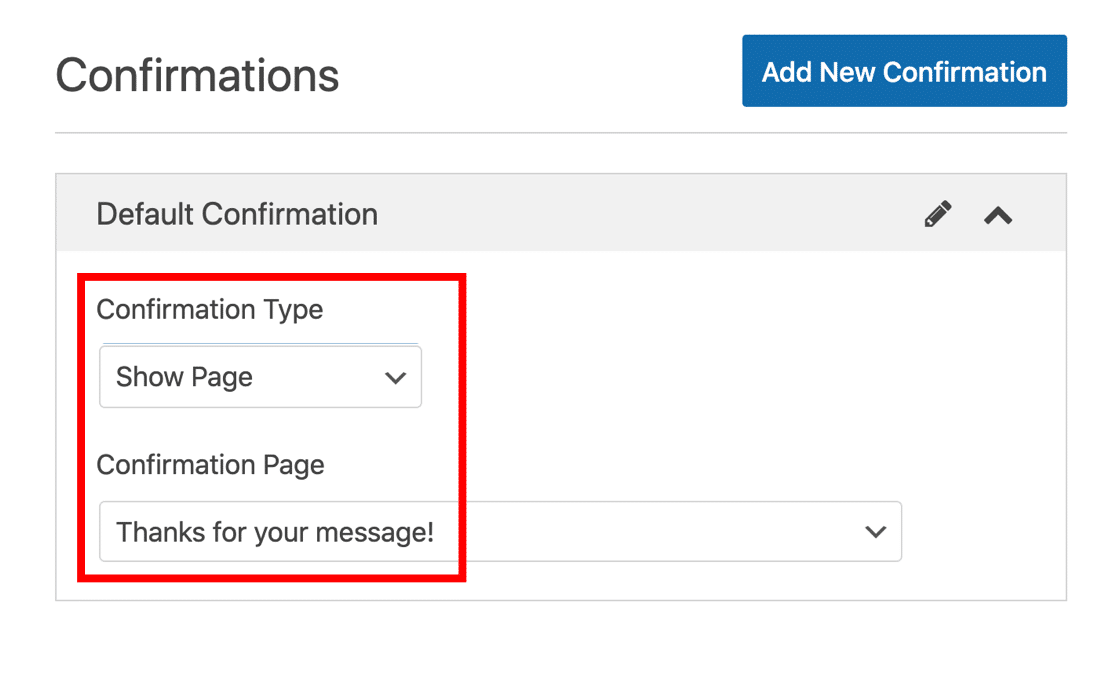
To finish, click Save at the top of the form builder. If you want to explore the other options here, see the full guide to WPForms form confirmation settings.
Step 4: Create Your Meta Pixel to Track Form Submissions
In this section, you’ll create your Meta Pixel (the tool most people still call the Facebook Pixel). Meta’s business tools are powerful, so I’ll keep to the basic settings you need for form tracking.
Start by opening Meta Events Manager. Sign in to your Meta Business account first if you haven’t already. If you manage more than one account, pick the correct one from the menu at the top.
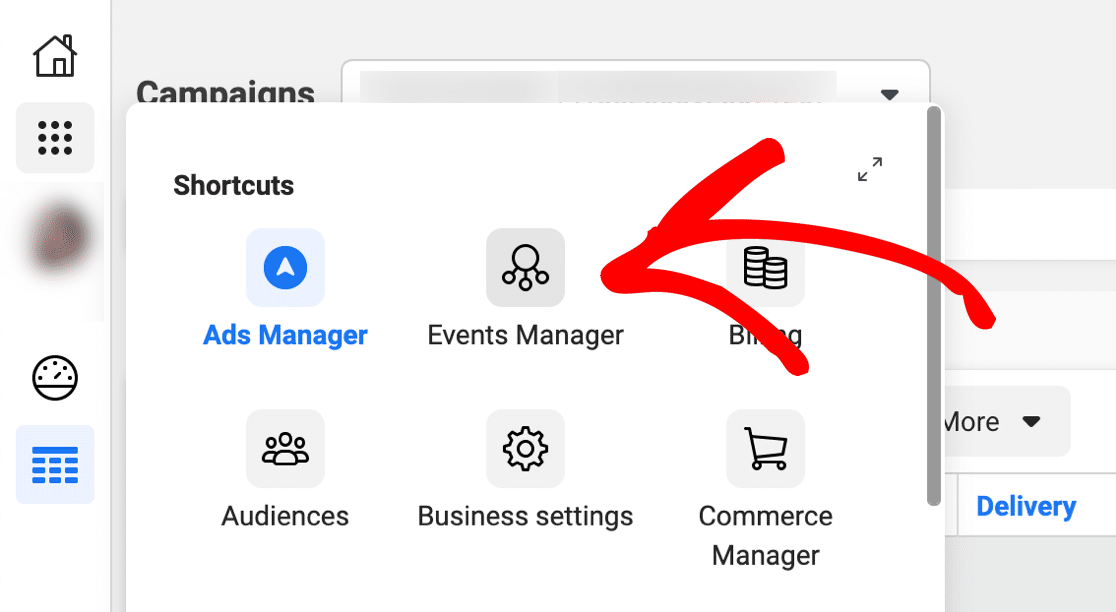
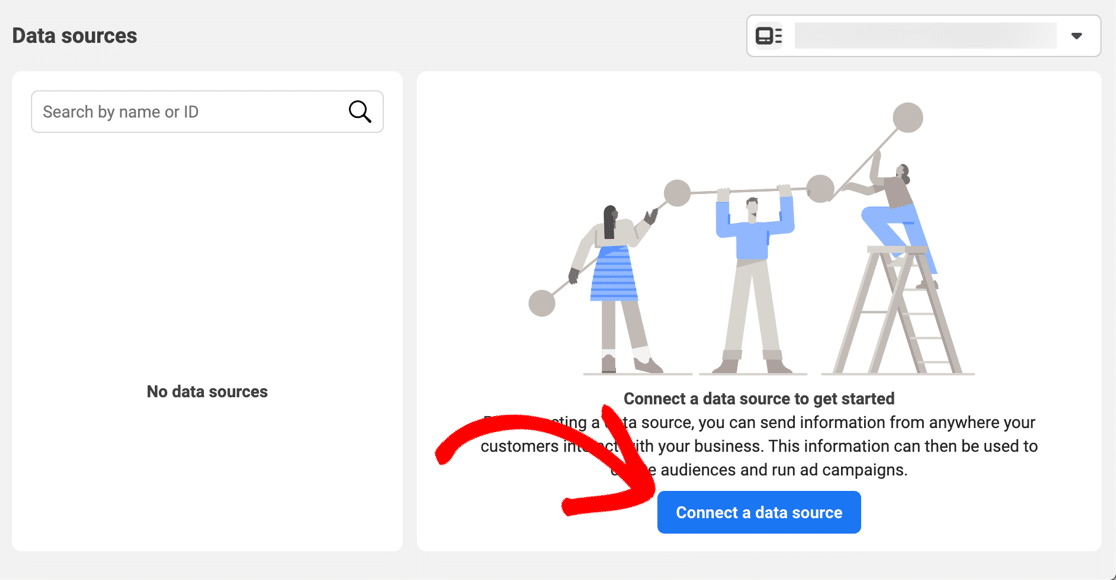
If your account is brand new like ours, you won’t see any data sources yet. Go ahead and click Connect a data source.
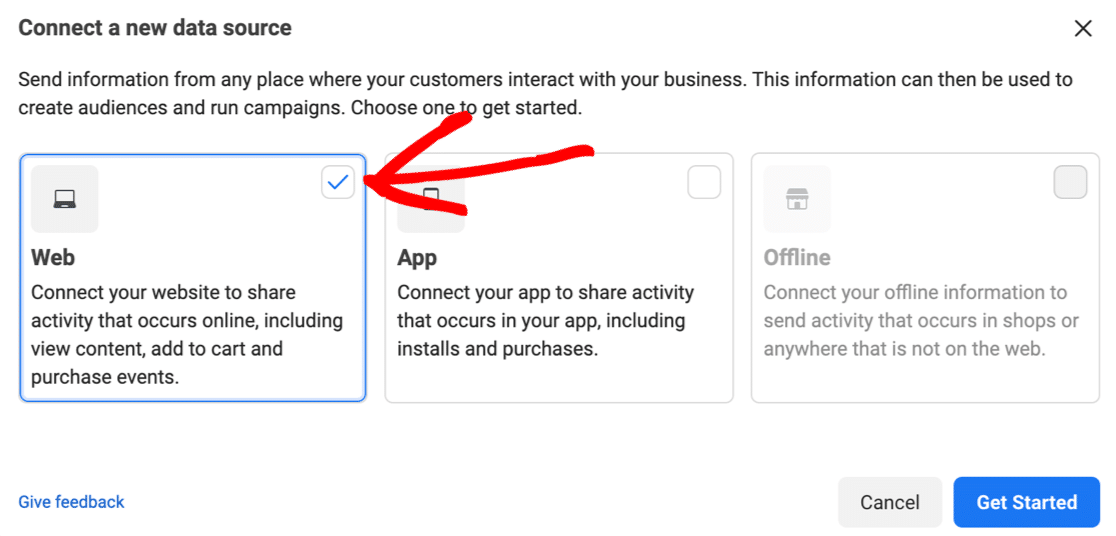
In the popup, you’ll want to select Web, then click Get Started.
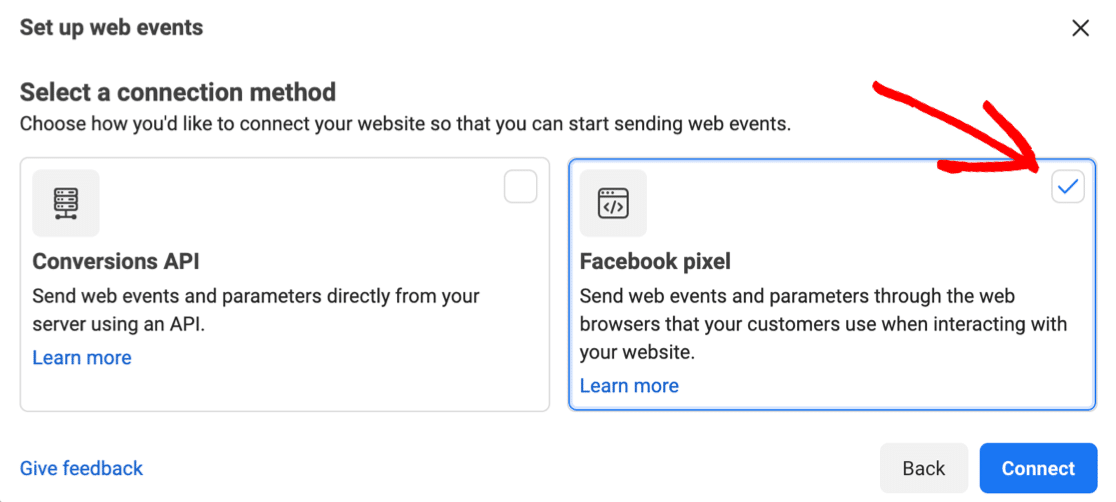
In the next menu, click Facebook Pixel, and then click Connect.
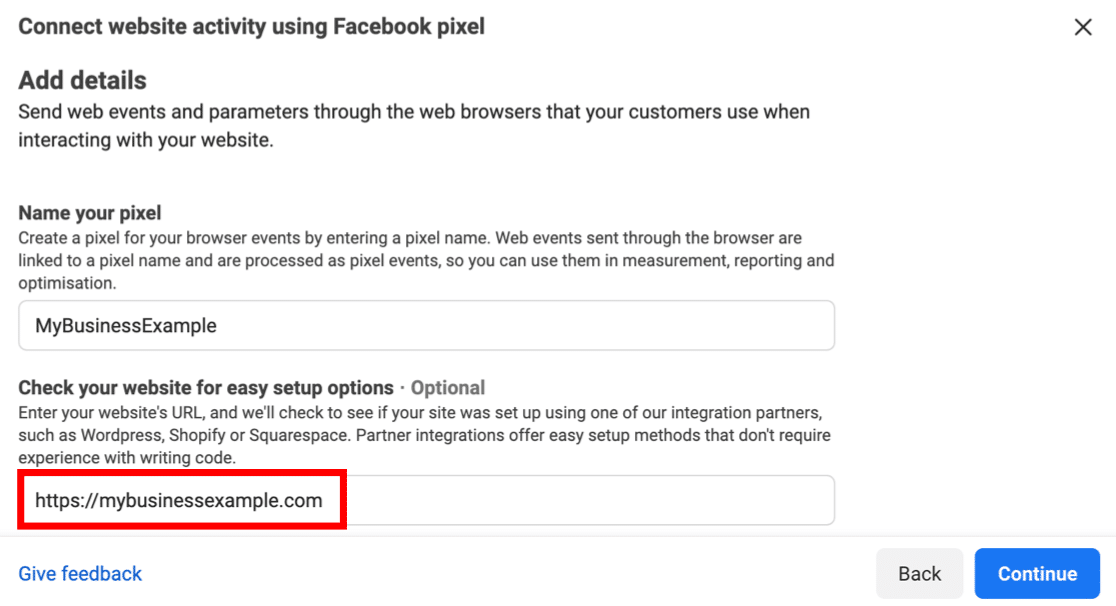
Now you’ll have a chance to name your new Pixel and let Facebook detect the platform you’re using – in our case, WordPress.
The second field that we marked in red is optional, but you should definitely fill it in because it’ll make the next few steps faster.
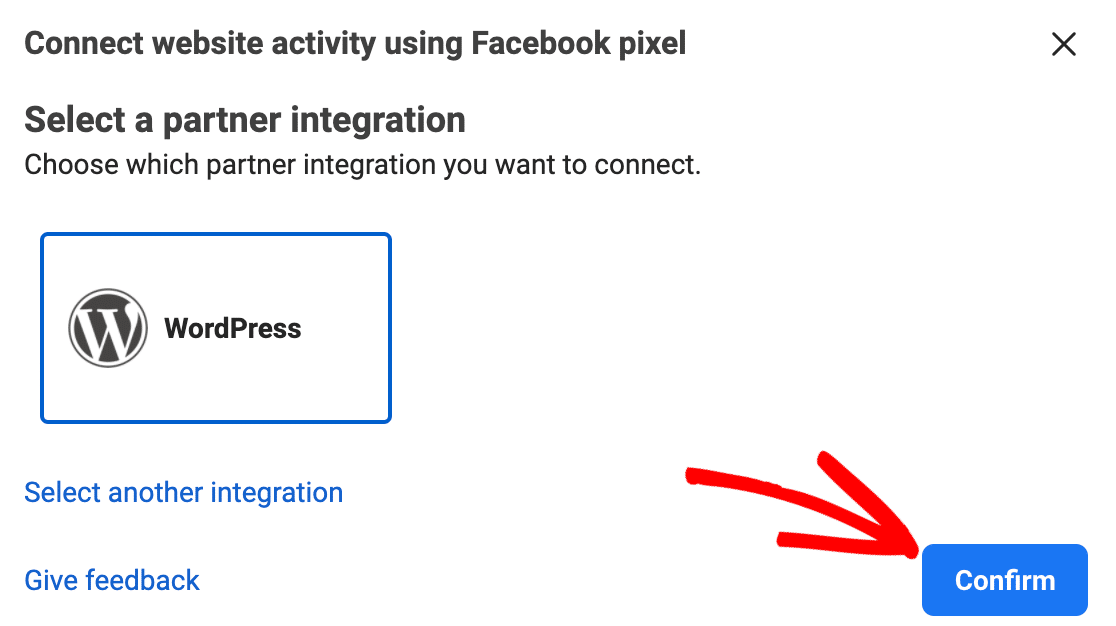
Click Continue, and Meta will try to detect the platform your site runs on, such as WordPress. Click Confirm.
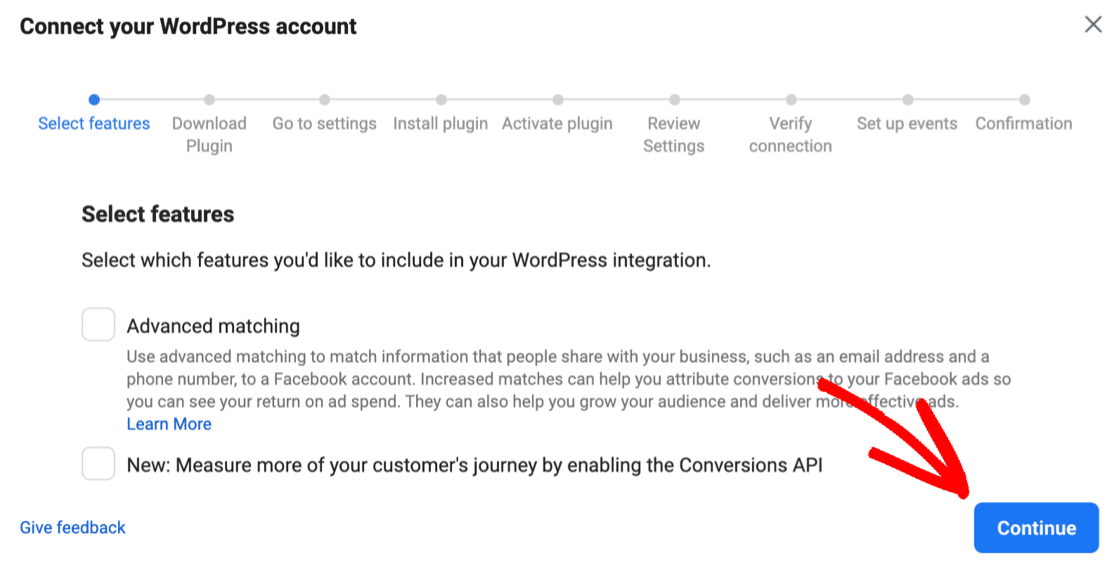
You’re almost there! A new wizard will open and guide you through installing the Facebook Pixel plugin. Select the options you want to use here and click Continue.
Click Download to download the Facebook Pixel WordPress plugin, then walk through the remaining steps to install the Pixel on your website. The wizard will connect to your site using your Pixel ID.
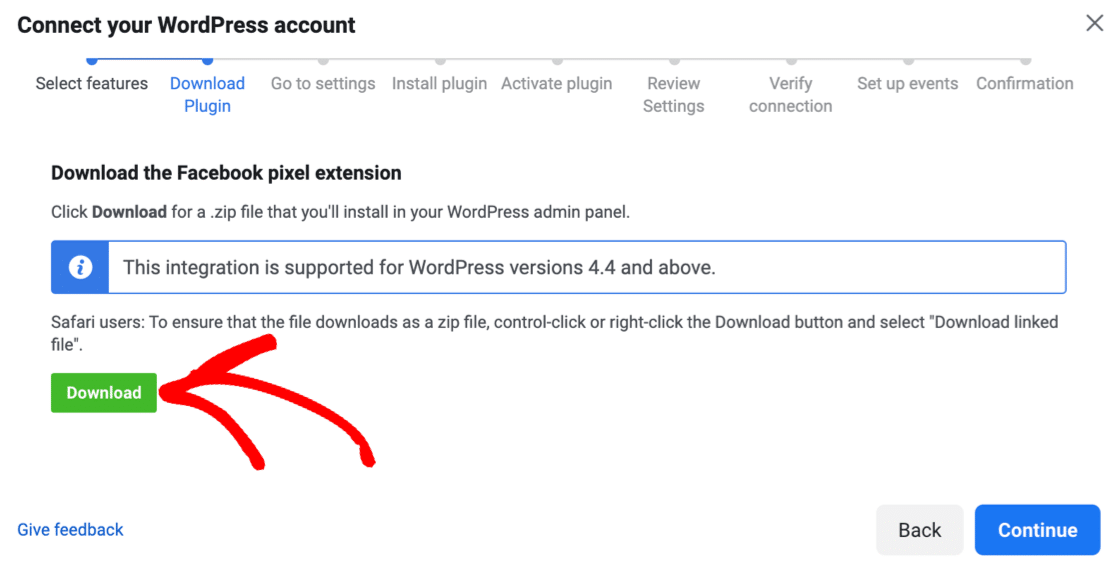
Remember how we mentioned ad blockers earlier? If you have an ad blocker running, the download link for the plugin might not appear. You’ll want to disable your ad blocker and reload the page, then pick up the installation from this point.
Testing Your Facebook Pixel in WordPress
However you install it, the Pixel starts capturing events and sending them to Meta right away. Still, you’ll want to confirm it’s working before you move on.
Click the Test Events tab in Events Manager. Keep it open, then open your site in another tab and browse a few pages. Each pageview should appear in Test Events almost in real time, which shows the code is firing.
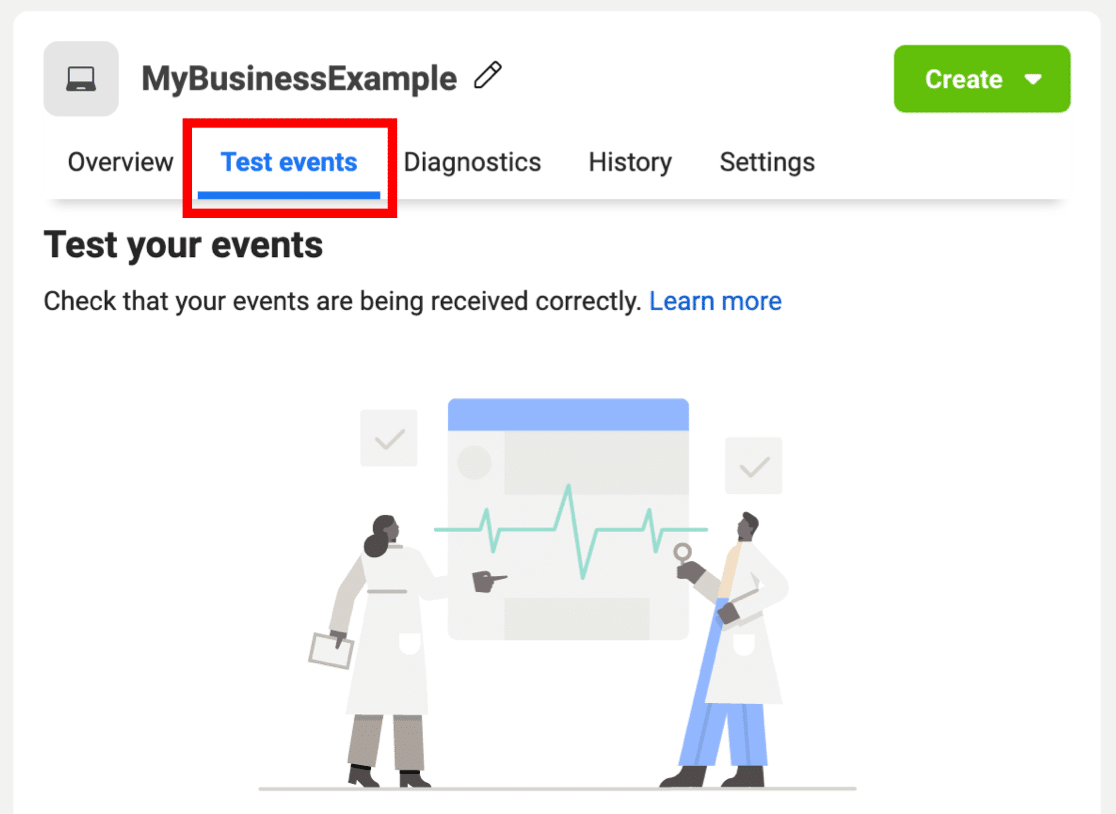
There’s also a handy Chrome extension called the Meta Pixel Helper (formerly the Facebook Pixel Helper) that flags whether your Pixel is present and firing on each page.
The hard part is done now that you have a working Meta Pixel on your website. Next, you’ll tell it to track your form submissions.
Step 5: Create Your Custom Conversion
Now we’re into the final stretch and we can add our custom conversion. This will let us track conversions from our form’s thank you page.
Start by clicking the Create dropdown. Select Create Custom Conversion from the dropdown list.
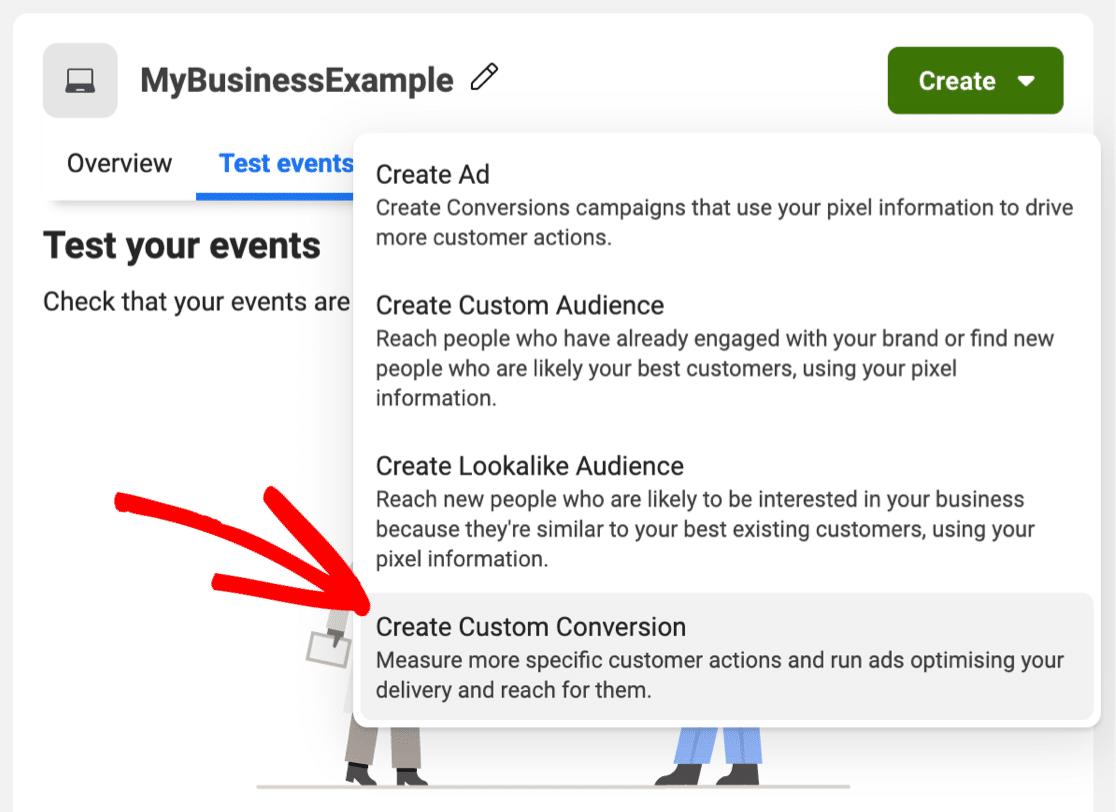
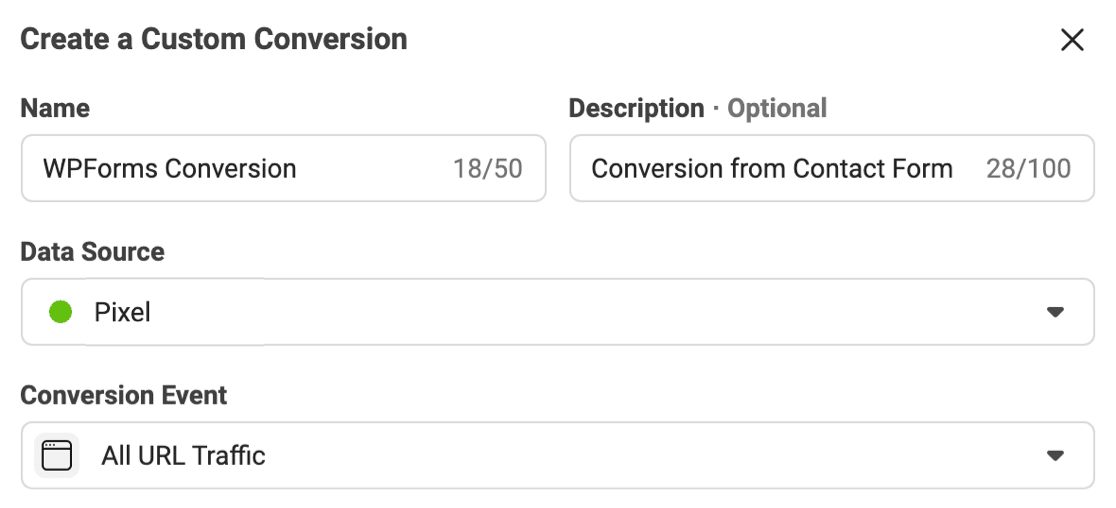
At the top of the popup, fill in the first set of details for your new conversion:
- Name: Type a name you’ll easily recognize in your reports.
- Description: This is optional, but it helps if you’re tracking more than one form so you can tell your conversions apart in the dashboard.
- Conversion Event: Select All URL Traffic.
A little further down, you have a couple more fields to set:
- Rules: Remember the page slug you set for the thank you page? Paste it in here. Even better, change the rule to URL equals and paste the full thank you page URL as an exact match.
- Enter a conversion value: This one is built for eCommerce sites, but it can be useful for forms too. For instance, you can assign a value to each conversion if you want to track sales from a simple order form.
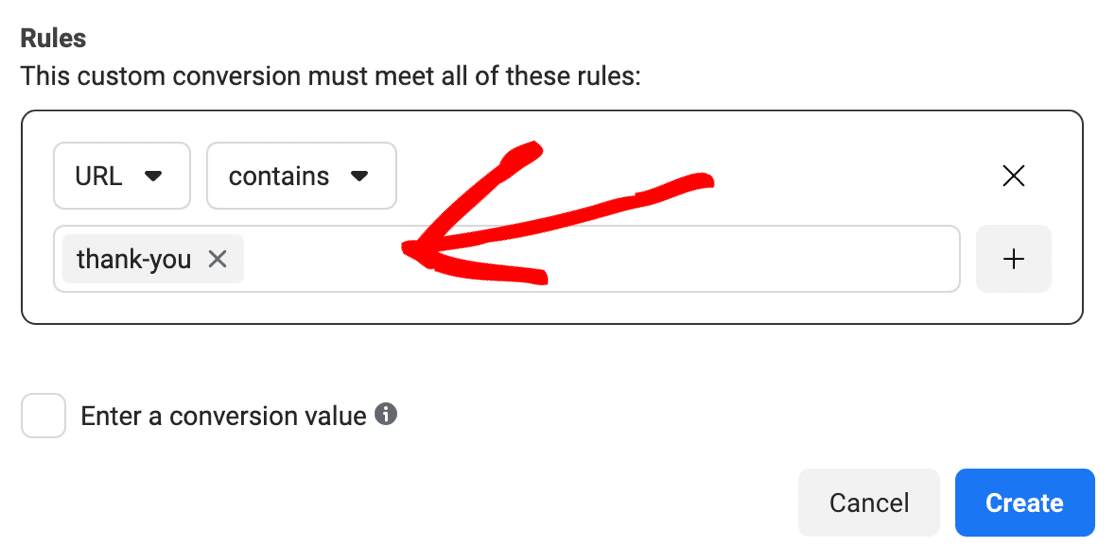
All set? Now click Create. You’re ready to track your form submissions with your new Facebook Pixel!
Let’s do a quick test. Log out of WordPress and disable any ad blockers you have running. Then fill out your form and submit it.
You’ll see the conversion showing up in the chart like this:
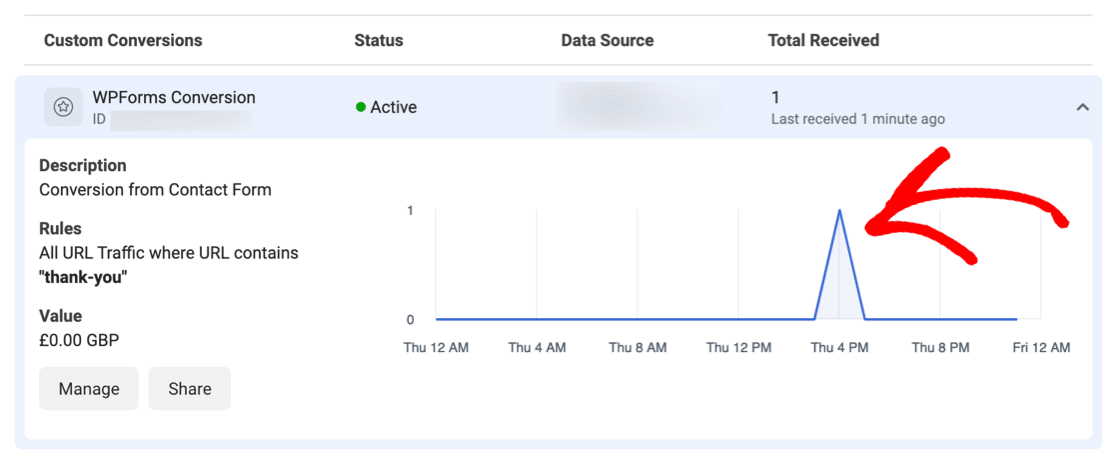
It can take up to 30 minutes for the data to show here, so you might need to wait a while before your conversion appears.
And that’s it! You successfully installed a Facebook Pixel to track form submissions on your site. Now you can use the data from your conversion tracking data to improve your ad targeting on Facebook.
Prefer First-Party Data? Track Conversions With WPForms Analytics
The Meta Pixel is built for one job, and that’s helping you remarket to visitors and optimize your Facebook and Instagram ad campaigns. If that’s your goal, everything above gets you there.
WPForms Analytics answers a different question about your own site. It tells you how many people see a form, how many submit it, and where they drop off.
It tracks all of that natively through built-in WPForms Analytics, with no cookies, no third-party scripts, and nothing sent to an outside company. Your data stays in your WordPress database.
I like it as a companion to the Pixel because it covers what the Pixel misses:
- See Every Form’s Health at a Glance: Your All Forms page now shows Views, Entries, and Conversion Rate for every form on your site. One look tells you which forms are pulling their weight and which ones need attention.

- A Dedicated Analytics Dashboard: Open any form’s analytics and you’ll find stat cards for views, interactions, conversion rate, abandonments, and errors. Filter everything by the last 7, 30, or 90 days, or set a custom range.

- Find the Exact Field Where People Give Up: A field-by-field table shows interactions, time spent, errors, and abandonment for every field. Pair it with the Form Abandonment addon to capture those visitors’ partial entries.

- Set a Conversion Goal and Watch Your Progress: Set a target conversion rate for any form and track your progress over time. The built-in goal tracker makes it easy to see how close each form is to hitting the number you care about.

- Built-In AI Chat for Form Insights: Instead of digging through charts yourself, ask WPForms AI what is hurting conversions, which form is underperforming, or where people are dropping off, and get answers based on your real form data.

- CSV Export and Print Reports: Need to share the numbers with a client, your team, or your own records? You can export your analytics report as a CSV or print it directly from the dashboard.
FAQs on Tracking Form Submissions With the Facebook Pixel
Meta Pixel tracking raises a few common questions, especially since Facebook renamed the Pixel and tightened its privacy rules. Here are quick answers to the ones that come up most when you track form submissions in WordPress.
Is the Facebook Pixel the same as the Meta Pixel?
Yes. Facebook renamed the Facebook Pixel to the Meta Pixel in 2022, when the company rebranded to Meta. The code and the way it tracks form submissions are the same, so older guides that say “Facebook Pixel” still apply. You’ll just see “Meta Pixel” in the Events Manager interface today.
Can I add the Meta Pixel to WordPress without a plugin?
Yes. Copy your Pixel base code from Meta Events Manager and paste it right before the closing head tag in your theme header. If you’d rather not edit theme files directly, a code snippets plugin like WPCode adds the same code safely and keeps it in place through theme updates.
How do I stop the Pixel from counting the same submission twice?
Two things help. First, keep your thank you page set to No Index so it only loads after a real submission, not from a search result. Second, use the URL equals rule with the exact thank you page URL in your custom conversion, rather than a broad match, so a page refresh or a similar URL doesn’t trigger an extra count.
Do I still need the Meta Pixel if I use the Conversions API?
In most cases you’ll run both. The Pixel tracks events from the visitor’s browser, and the Conversions API sends the same events from your server, which fills the gaps when a browser blocks the Pixel. Meta recommends using them together for the most complete conversion data.
Next, Get More Form Conversions
Now you’re tracking form conversions with a Facebook Pixel, you’ll want to drive as many conversions as possible.
The more conversions you track, the more data you’ll have about your target audience. And the more leads you have for your business.
If you need help, we have some awesome tips on:
- How to Get More Form Conversions
- How to Track Your Form Submissions in Google Analytics
- Track Form Submissions as Google Ads Conversions
- Best Social Media Plugins for WordPress
Create Your WordPress Form Now
Ready to build your form? Get started today with the easiest WordPress form builder plugin. WPForms Pro includes lots of free templates and offers a 14-day money-back guarantee.
If this article helped you out, please follow us on Facebook and X (Twitter) for more free WordPress tutorials and guides.





Hey guys,
If at all possible, you should update to include the FB Ads API connection. With this method, I am missing out on a couple of conversions due to the iOS update (the FB pixel isn’t recording everything). It should be fairly straightforward to update. Just the IP and goal should be enough.
Best wishes,
Andrea
Hey Andrea, thank you for the feedback, I have shared this with our team.
Thanks,