AI Summary
Are you planning an event and looking for an efficient way to manage event ticketing directly on your WordPress site?
With the right tools, you can optimize the entire process—from ticket sales to attendee management.
In this guide, I’ll walk you through the process of managing event ticketing in WordPress using WPForms and Sugar Calendar. By the end, you’ll have a fully functional ticketing system integrated into your website.
Why Use WordPress for Event Ticketing?
WordPress is easily customizable and offers numerous advantages for managing event ticketing. Below, I’ll highlight some of them:
- Cost-effective solution: The core WordPress software is free and open-source. This means you only have to worry about domain name and web hosting costs.
- Easy to setup: Anyone can add event ticketing to their existing WordPress site without any technical knowledge.
- Variety of plugins: With over 60k plugins in the WordPress directory, you’ll likely find a plugin for every customization you hope to implement on your site.
- Full control over ticket sales and data: Plugins like Sugar Calendar include the functionality to manage event ticketing in WordPress. You can control ticket sales, issue refunds, and track order details with this plugin.
Combining WPForms and Sugar Calendar gives you more flexibility and features in your event ticketing platform. For example, you can allow users to submit events on your site through an online form.
How to Manage Event Ticketing in WordPress
Step 1: Install the Sugar Calendar Plugin
The first thing you’ll need to do is install and activate the Sugar Calendar plugin on your WordPress site. If you’re new to WordPress, check out WPBeginner’s guide on installing a WordPress plugin.
After installing the plugin, you’ll also need to install and activate the Event Ticketing addon for Sugar Calendar. The addon is available with the paid version of the plugin. This addon will allow you to accept payments for events on your site.
To install the addon, head over to Sugar Calendar’s addons page. Then click the DOWNLOAD button under the Event Ticketing addon box.
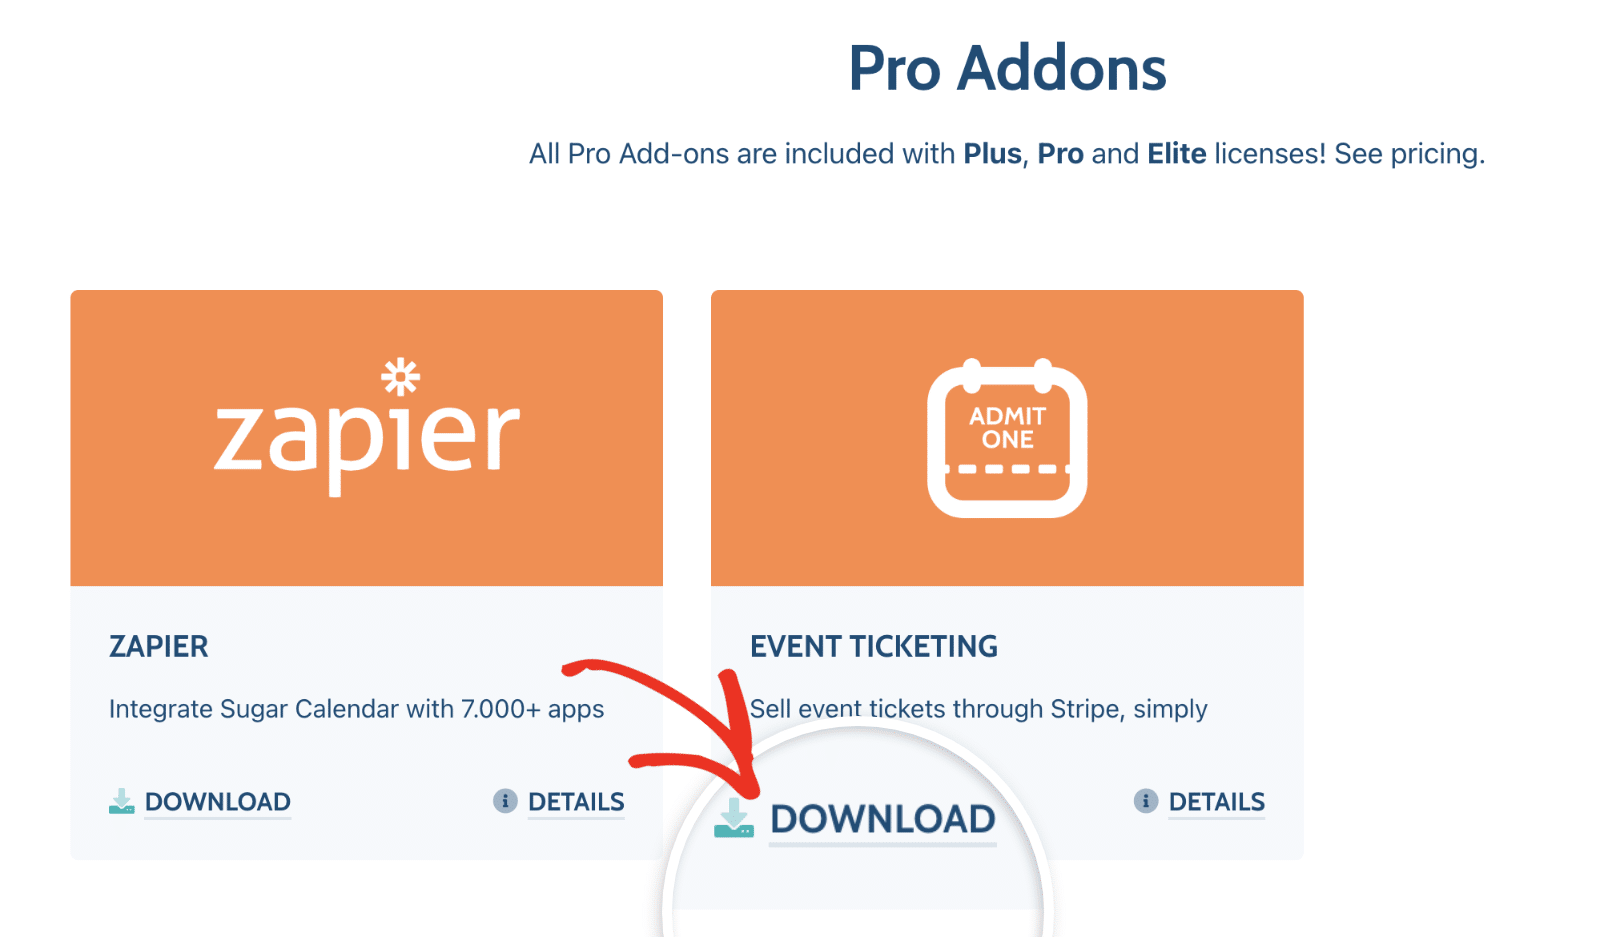
Note: You’ll need to log in to your Sugar Calendar account to download the addon.
This will download a zipped version of the addon to your computer. You’ll need to upload this addon like you would a regular plugin.
For this, log in to your WordPress admin area and go to Plugins » Add New Plugin. Next, click the Upload Plugin button located at the top right corner of the page.

After that, click Choose file and select the Event Ticketing addon zip file you downloaded. Then click the Install Now button to install the addon.

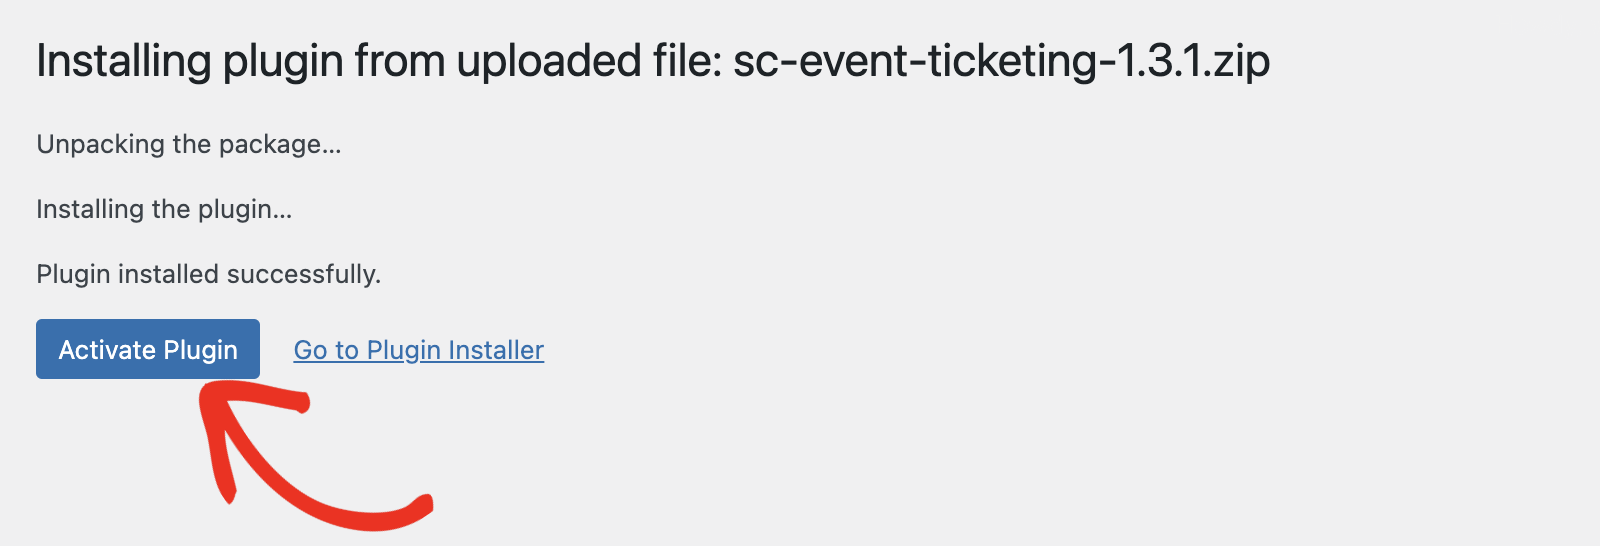
Finally, click Activate Plugin to complete the installation process.
Step 2: Configuring Event Ticketing Payment Settings
After installing the Event Ticketing addon, you’ll need to connect it to your Stripe account before you can accept event ticket sales.
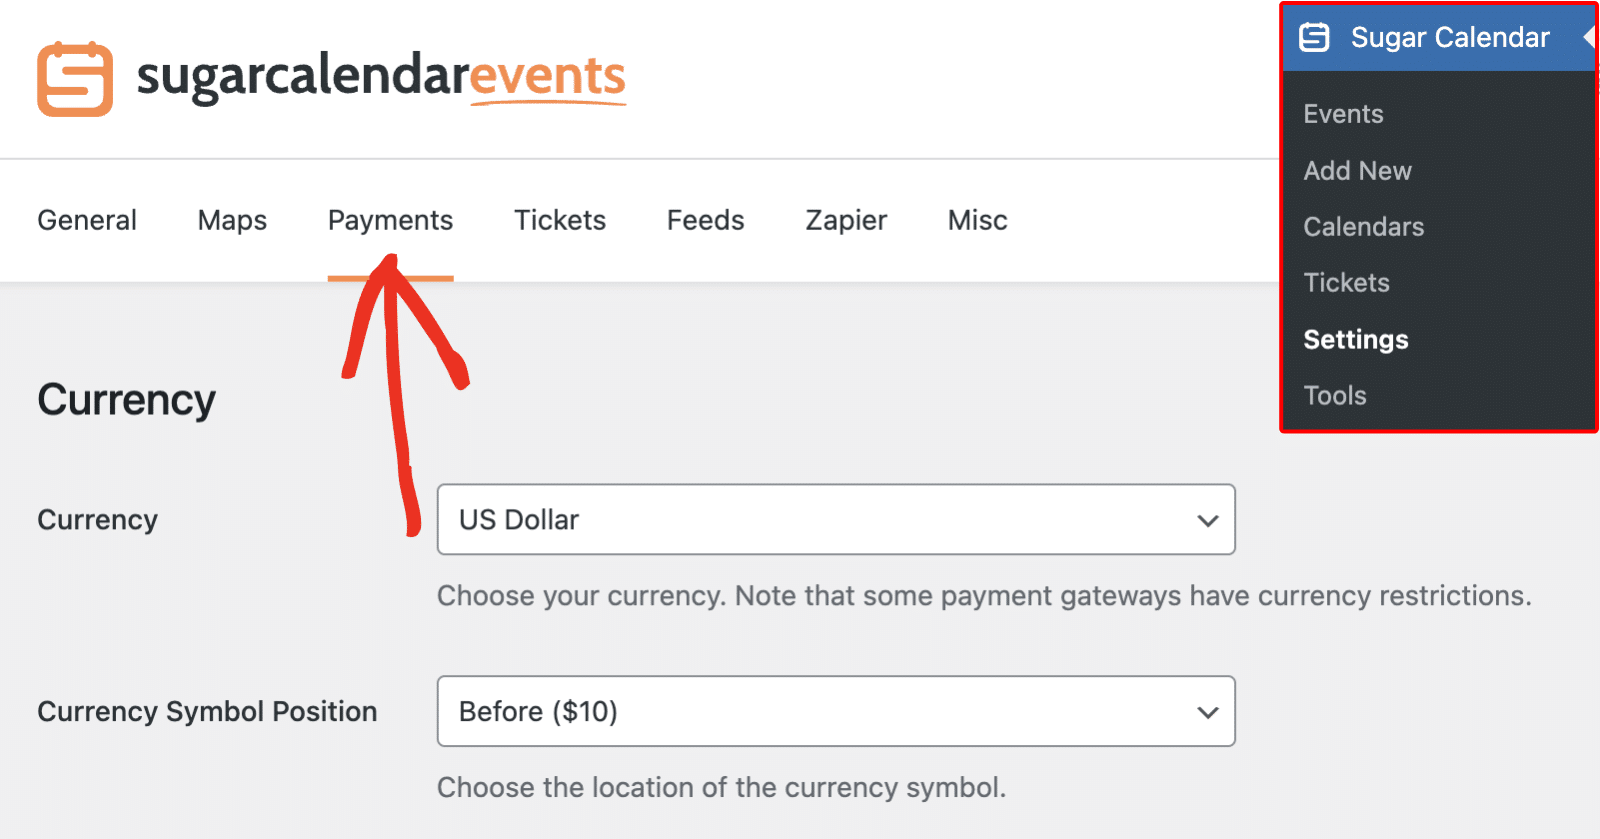
To do so, go to Sugar Calendar » Settings and select the Payments tab. Sugar Calendar allows you to choose your preferred currency and also customize the currency symbol’s position.
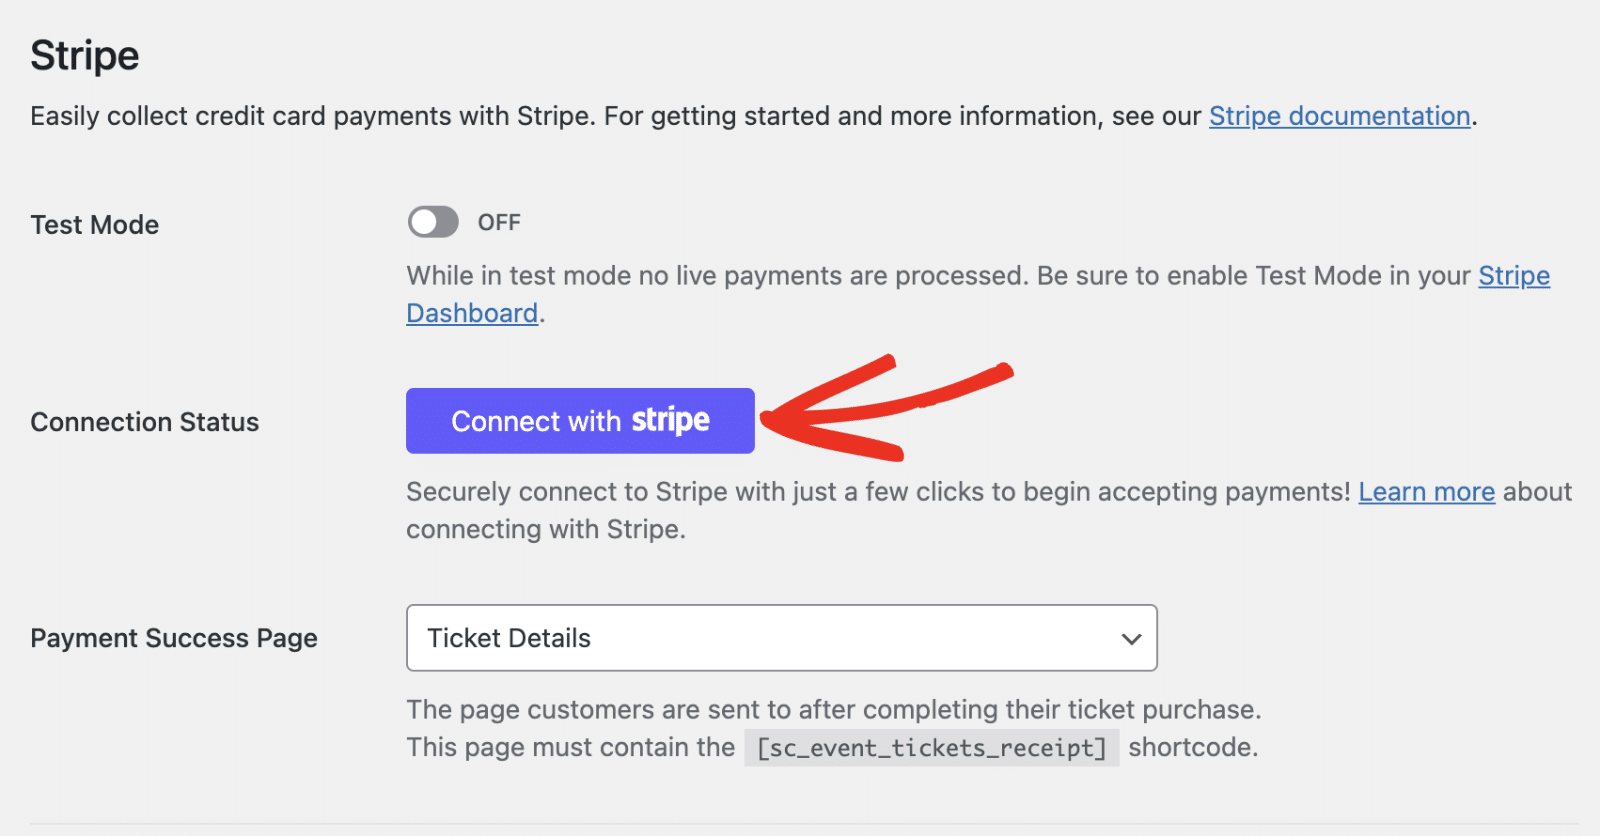
Next, scroll down to the Stripe section and click the Connect with Stripe button.
Pro Tip
You can enable Test Mode to simulate the functionality before rolling it out to your users. This is helpful as it lets you use test credit card details to confirm that the connection is set correctly.
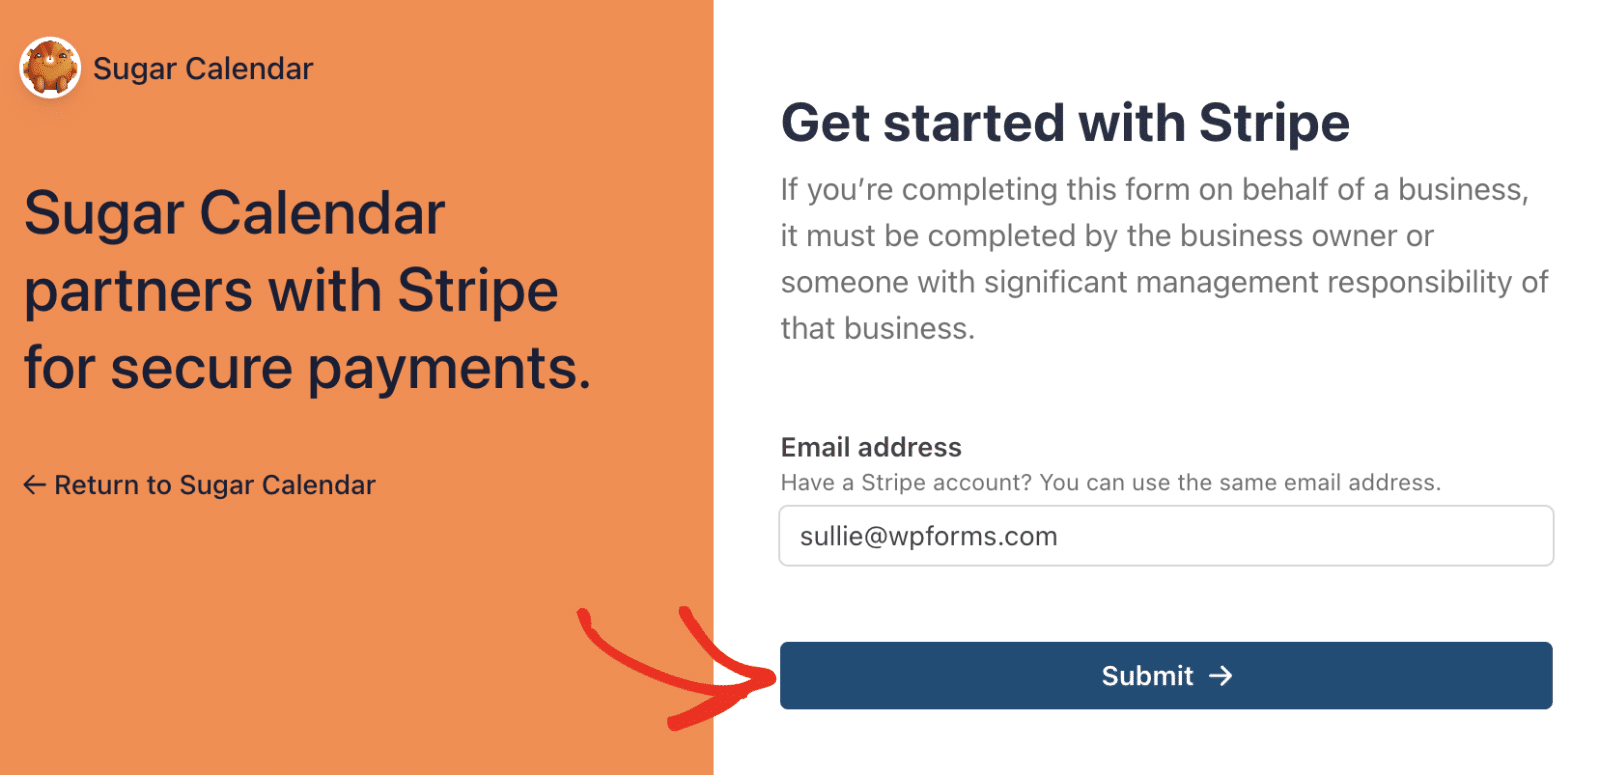
On the next page, enter your email address to log in to your Stripe account. Follow the prompts to complete your Stripe account setup.
Once done, you’ll be redirected to your Sugar Calendar settings page. The Connection Status will now read that your account is connected.
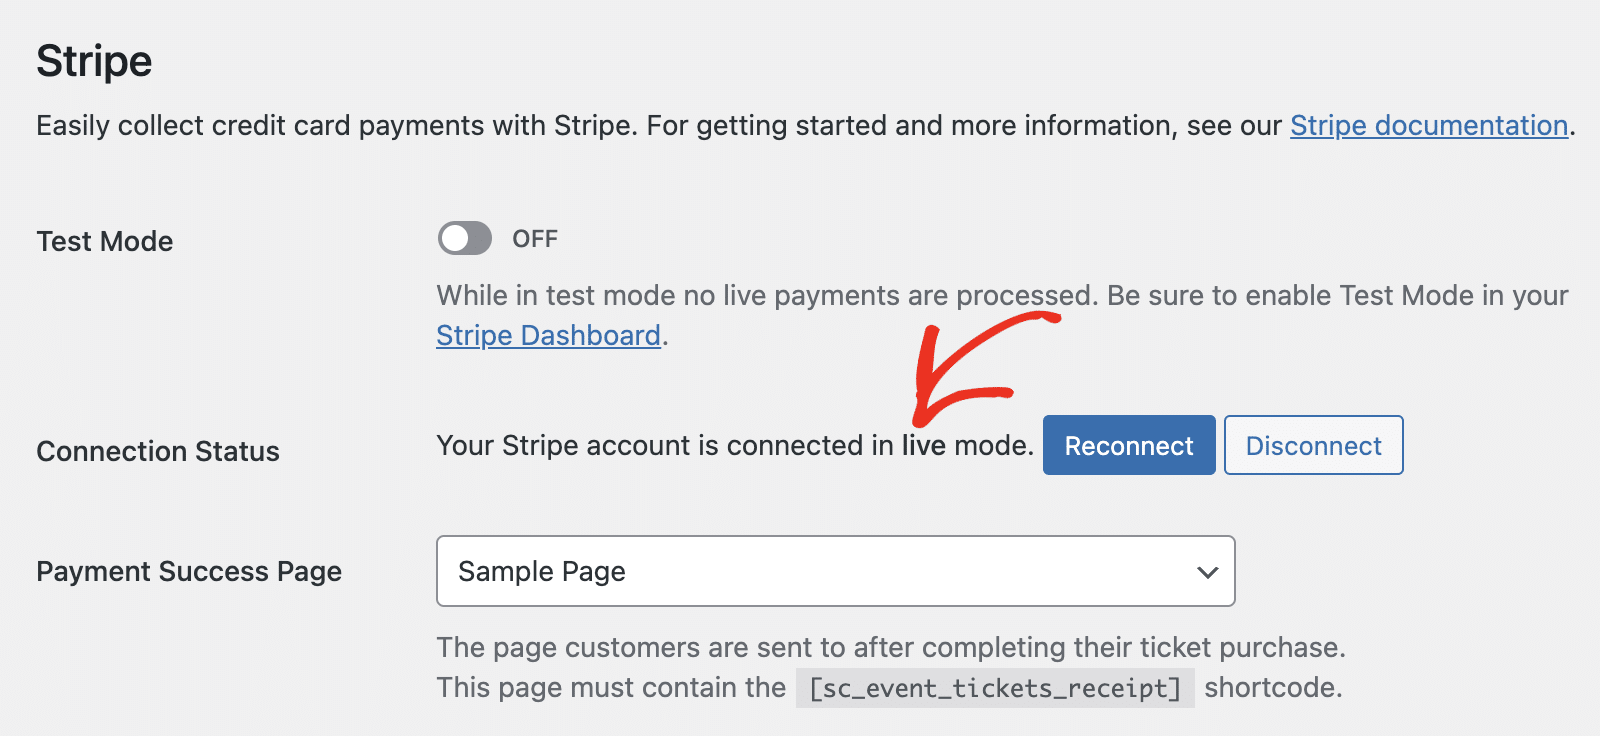
The Payment Success Page is where users are redirected after making a ticket purchase. You can choose any page from your site. Just make sure the page includes the [sc_event_tickets_receipt] shortcode. This ensures users are able to view and confirm their payment status.

Be sure to save your changes after connecting your account.
Event Ticketing Notification Settings
Sugar Calendar lets you set up and customize notification emails for order and ticket receipts. To customize these settings, select the Tickets tab from the plugin’s settings page.
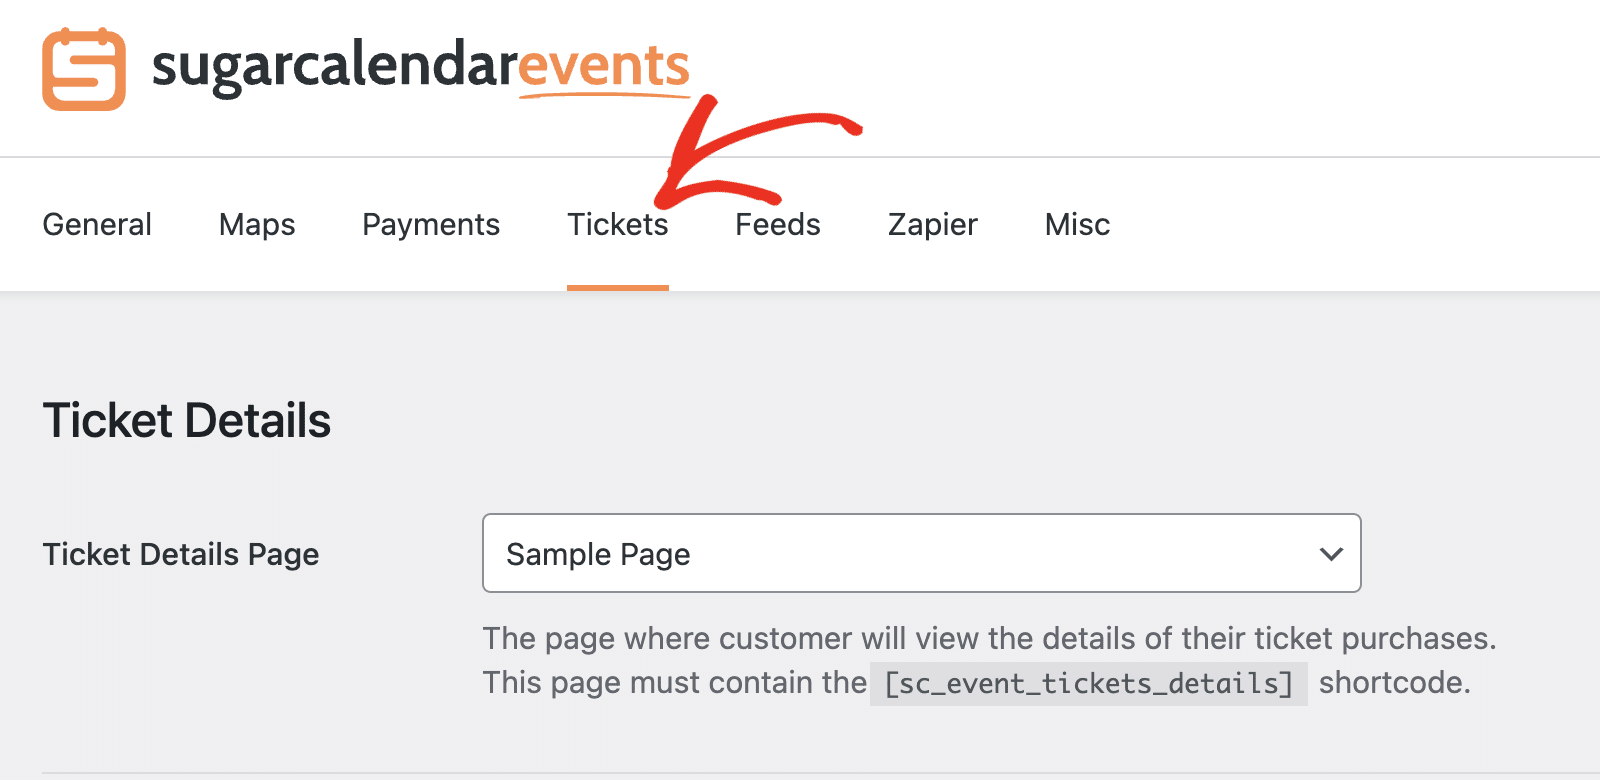
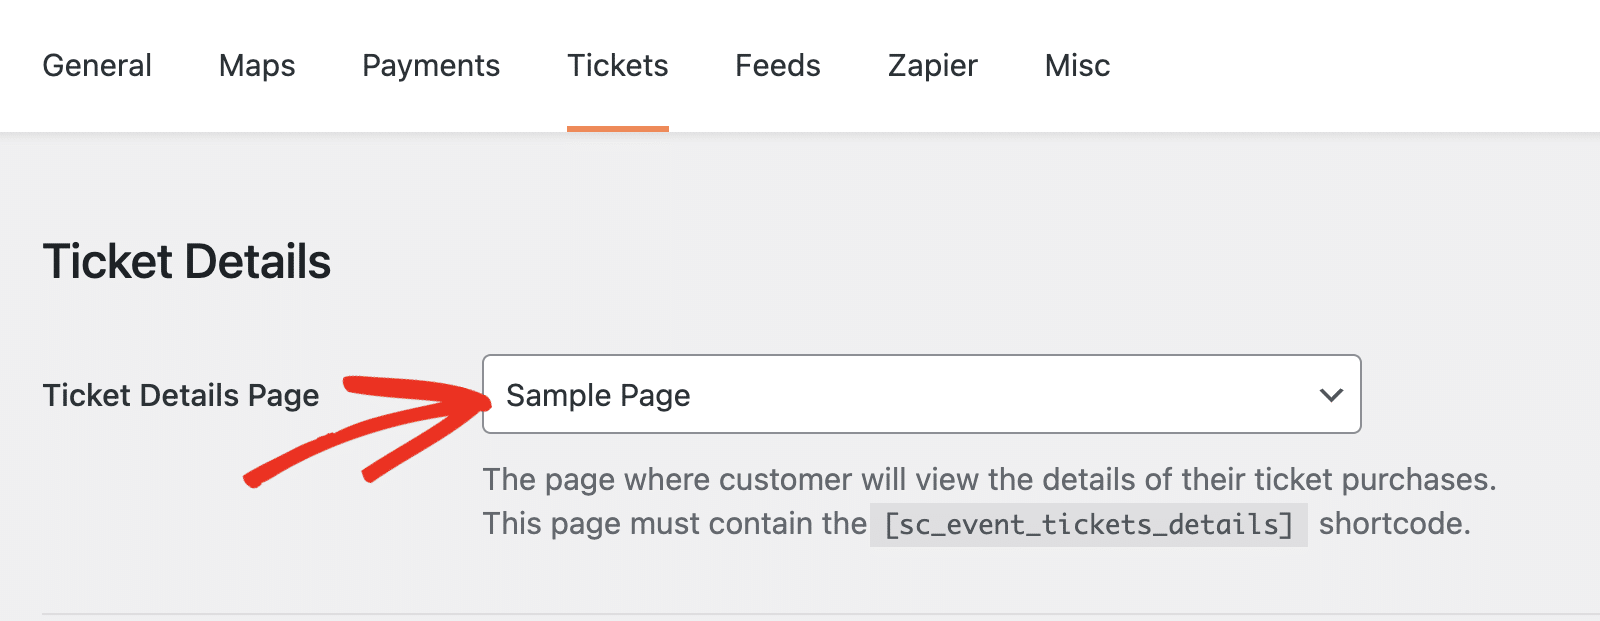
The Ticket Details Page is where users are directed to view details about their ticket purchases. You can select any page on your site from the dropdown. However, you’ll need to add the [sc_event_tickets_details] shortcode. Otherwise, it won’t work as expected.
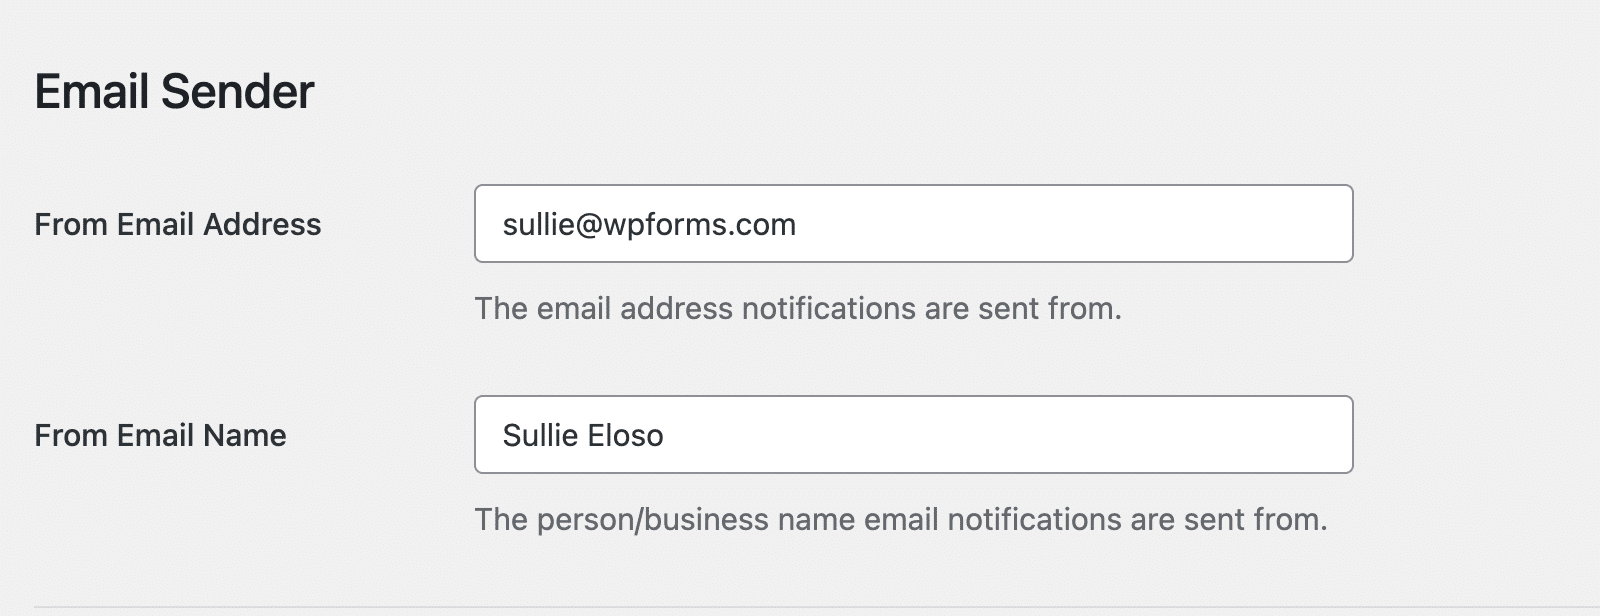
In the Email Sender section, fill in the From Email Address and From Email Name fields with your site’s admin email address and brand name.
Pro Tip
To ensure emails from your site are delivered promptly, I recommend setting up an SMTP plugin like WP Mail SMTP. This can greatly improve your email marketing efforts for event promotions. For more details, see our tutorial on how to set up WP Mail SMTP with the Gmail mailer.
Sugar Calendar lets you customize the Order Receipt Email and Ticket Receipt Email. It also supports using smart tags to display event details like customer name, order amount, ticket code, etc.
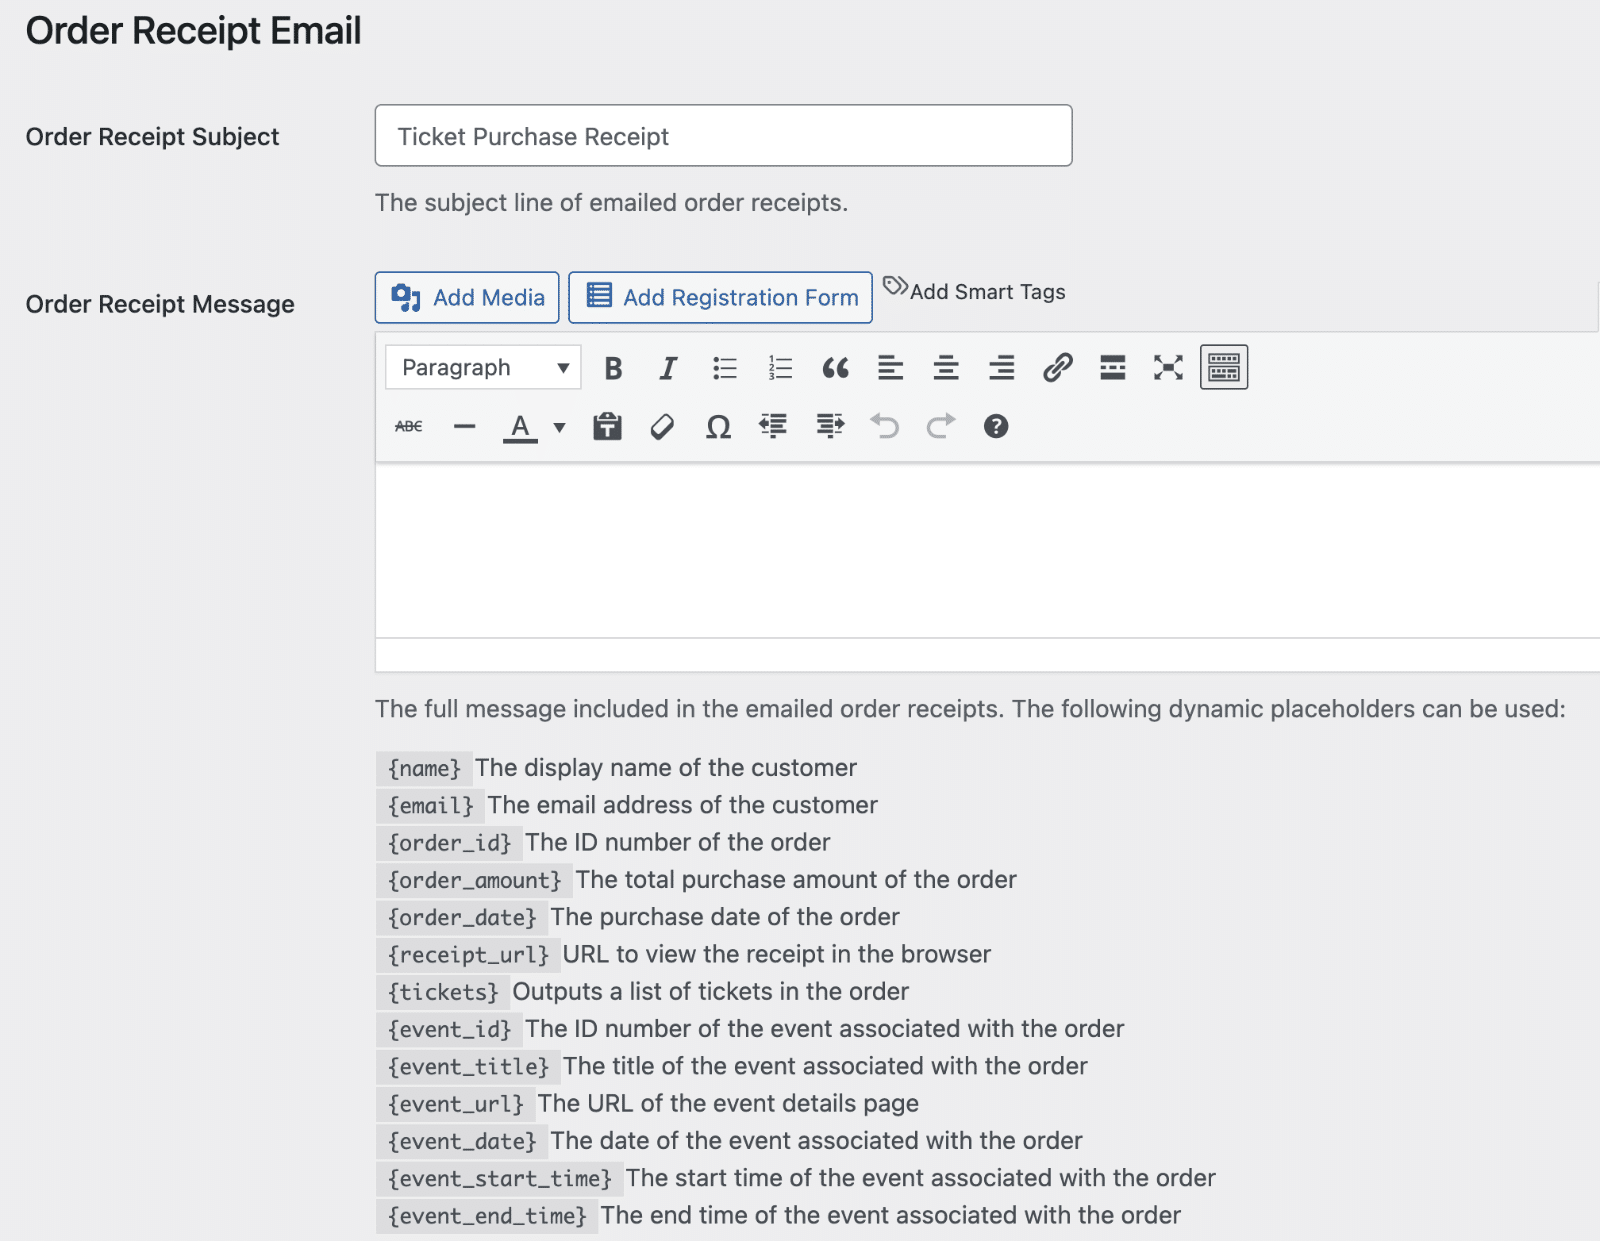
After customizing your email settings, be sure to save your changes.
Step 3: Creating Calendars and Events
The next step after setting up the Events Ticketing addon is to create events. Before that, however, I suggest creating a Calendar to organize your events. This is especially helpful for event organizers and event planners managing multiple events.
Creating Calendars
To do so, go to Sugar Calendar » Calendars and click the + Add Calendar button.
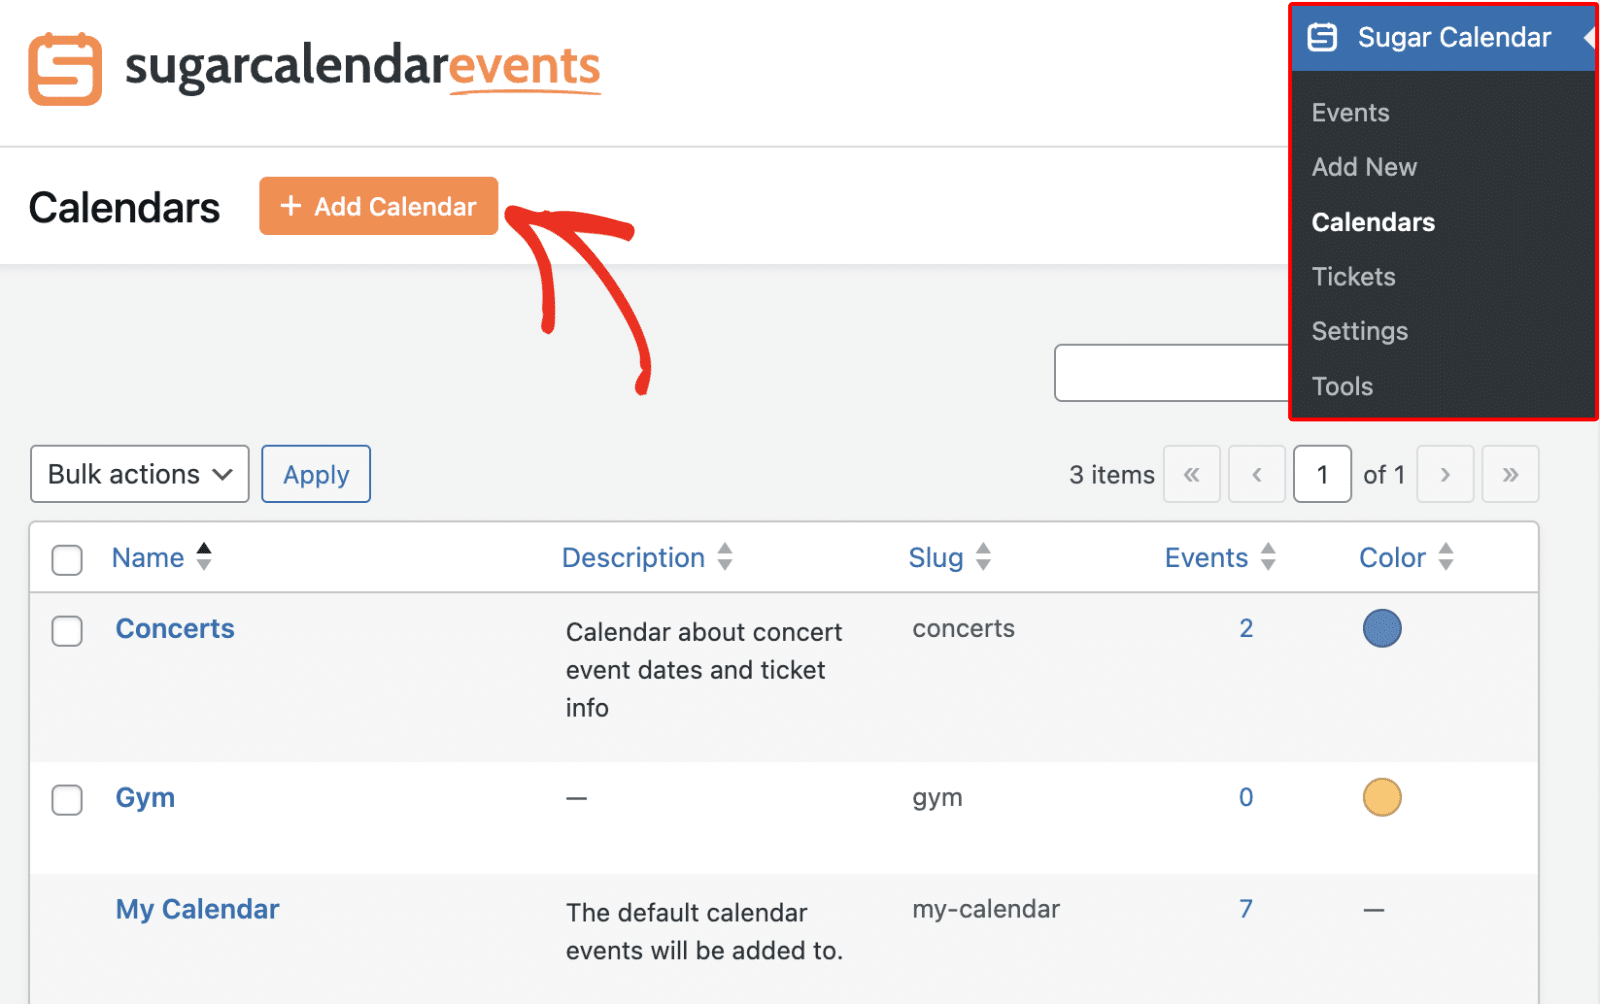
In the Add New Calendar page, enter a name and a slug for your calendar. The slug should ideally be a URL-friendly version of the name.
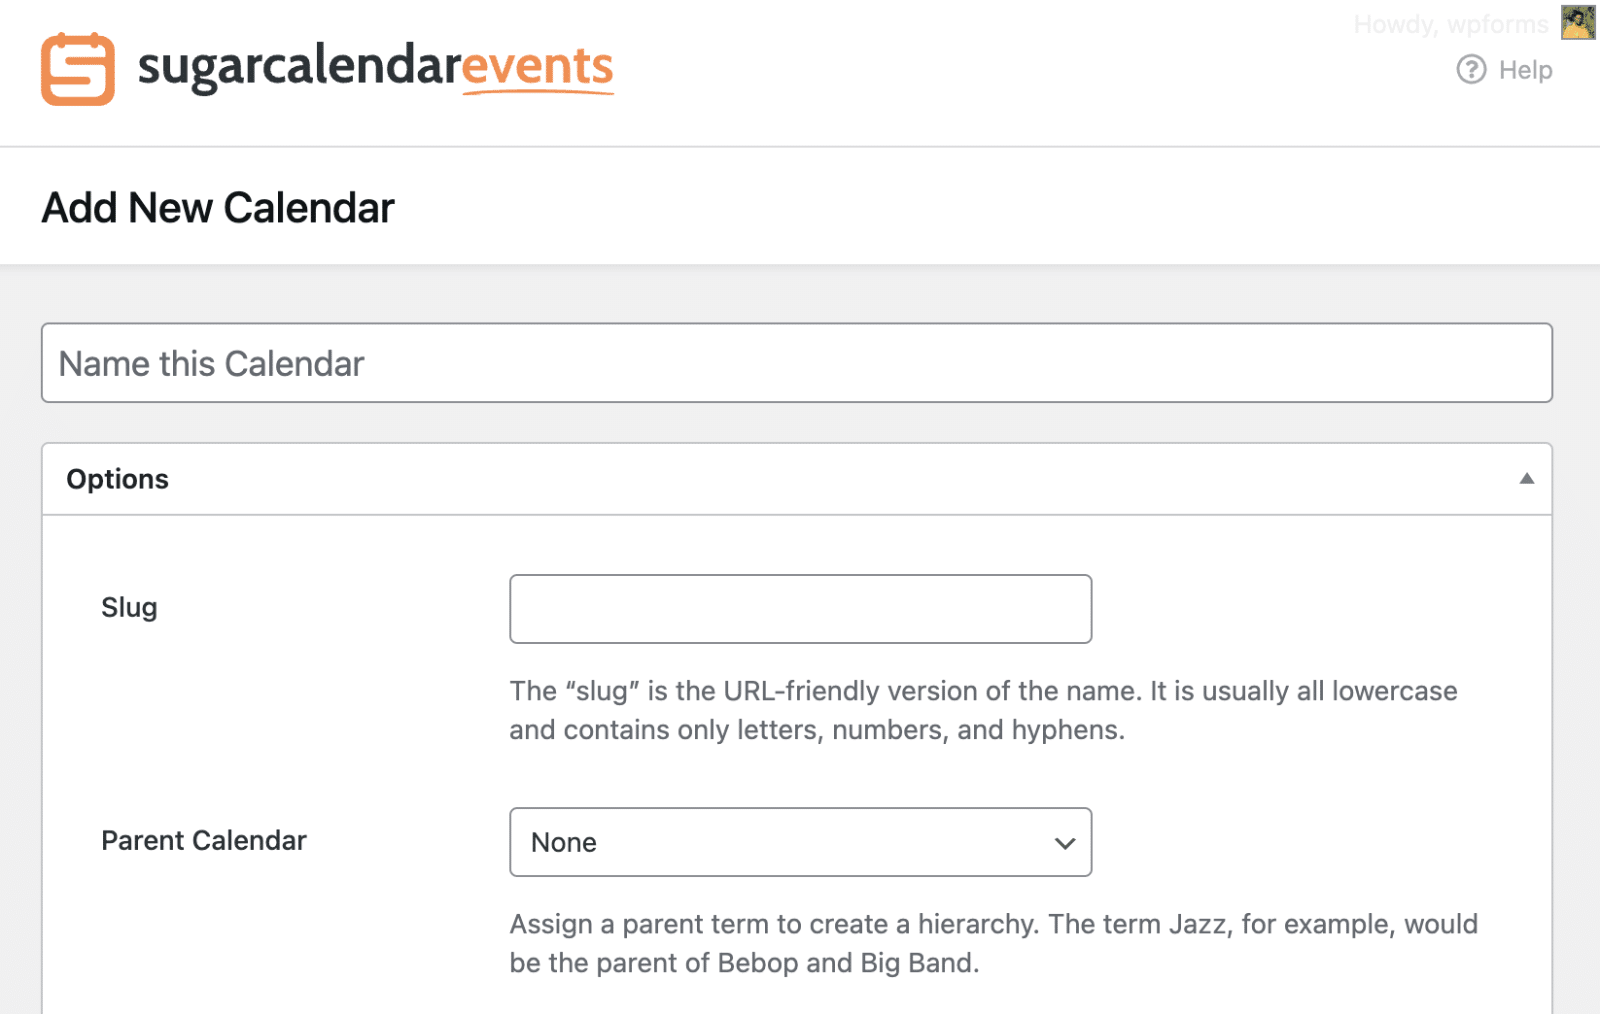
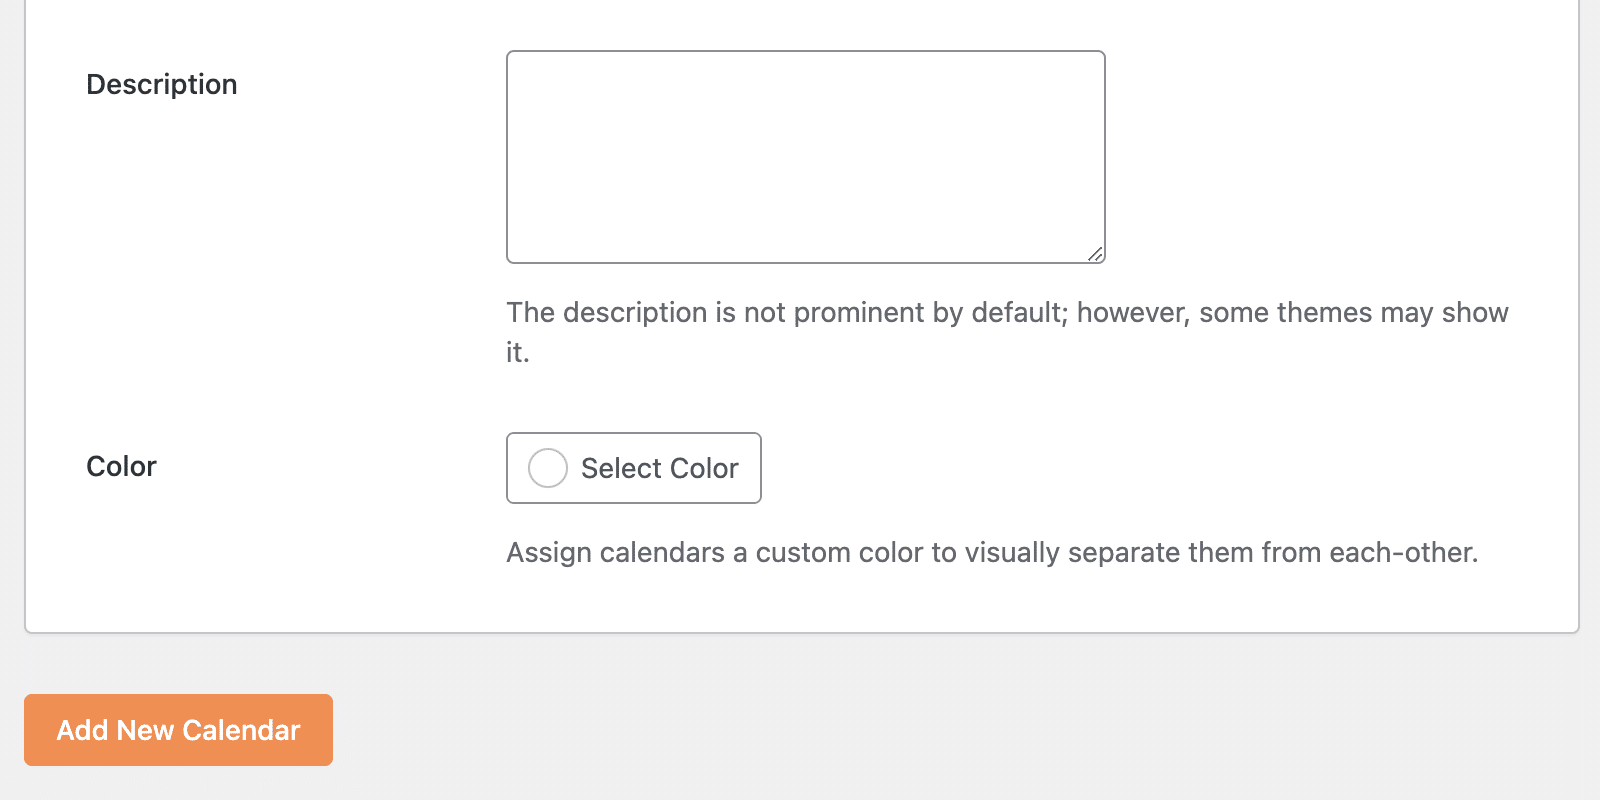
Next, you can enter a description and choose a color for your calendar. The color helps you differentiate your calendars when viewing them on your site’s frontend. When you’re ready, click the Add New Calendar button to save your changes.
Creating Events
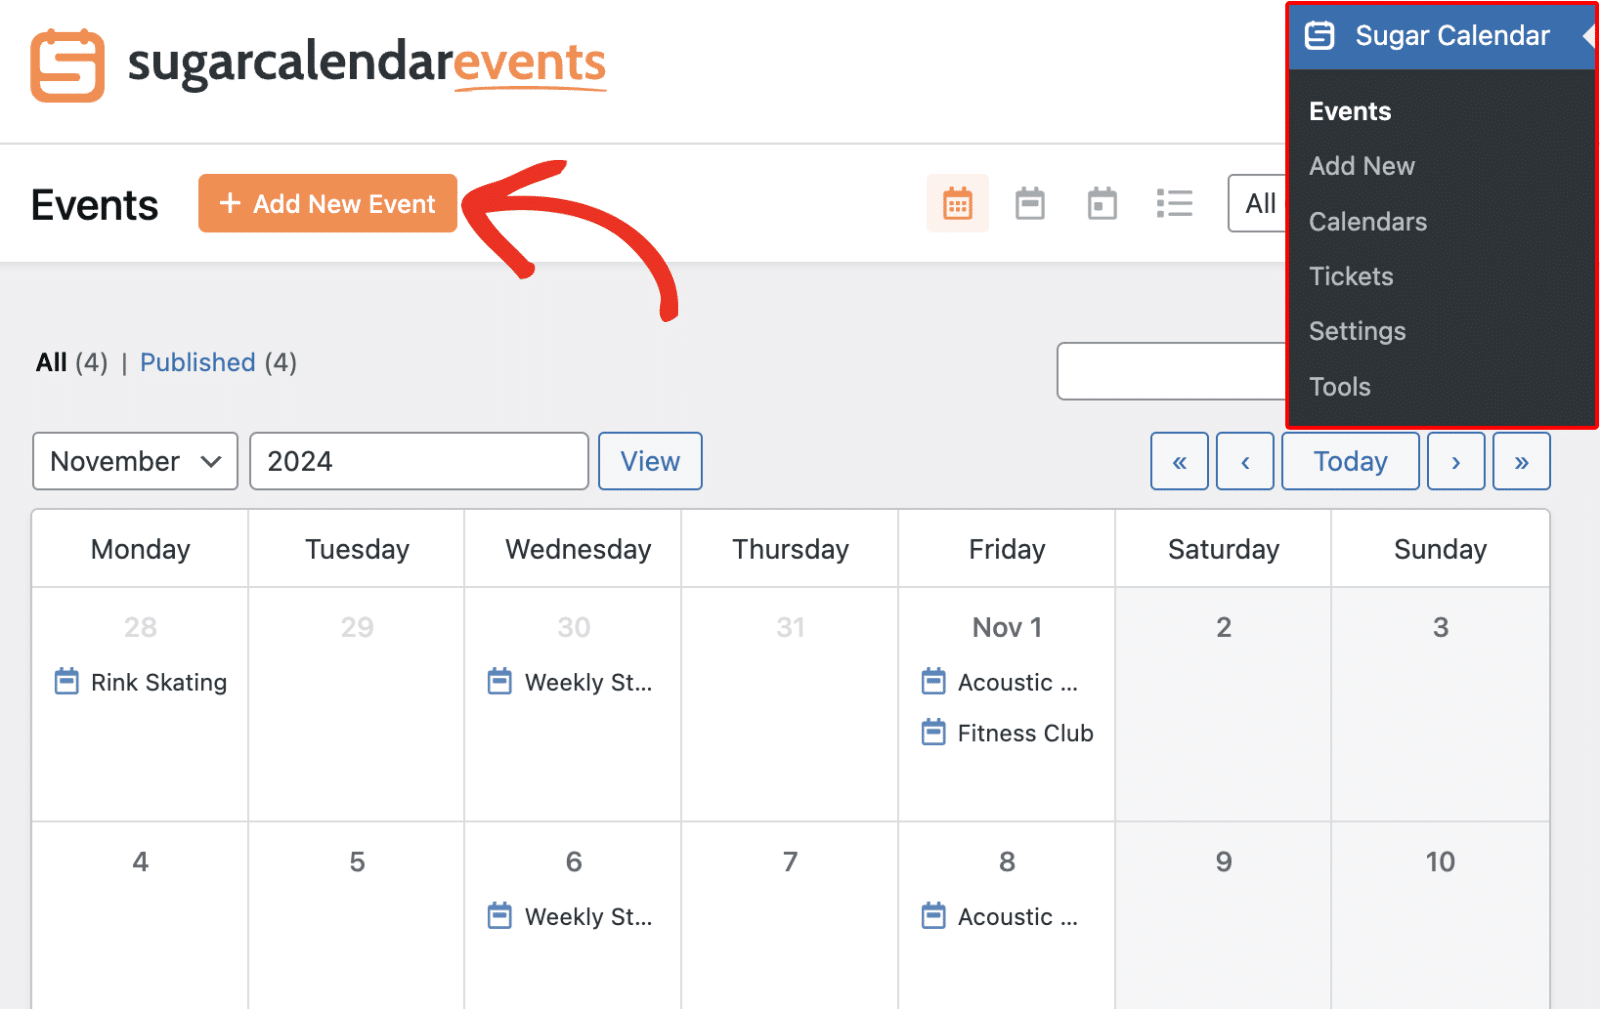
After creating the calendar, you’re ready to start creating events. To do so, go to Sugar Calendar » Events and then click the + Add New Event button.
In the Add New Event page, enter a name for the event you’re creating.
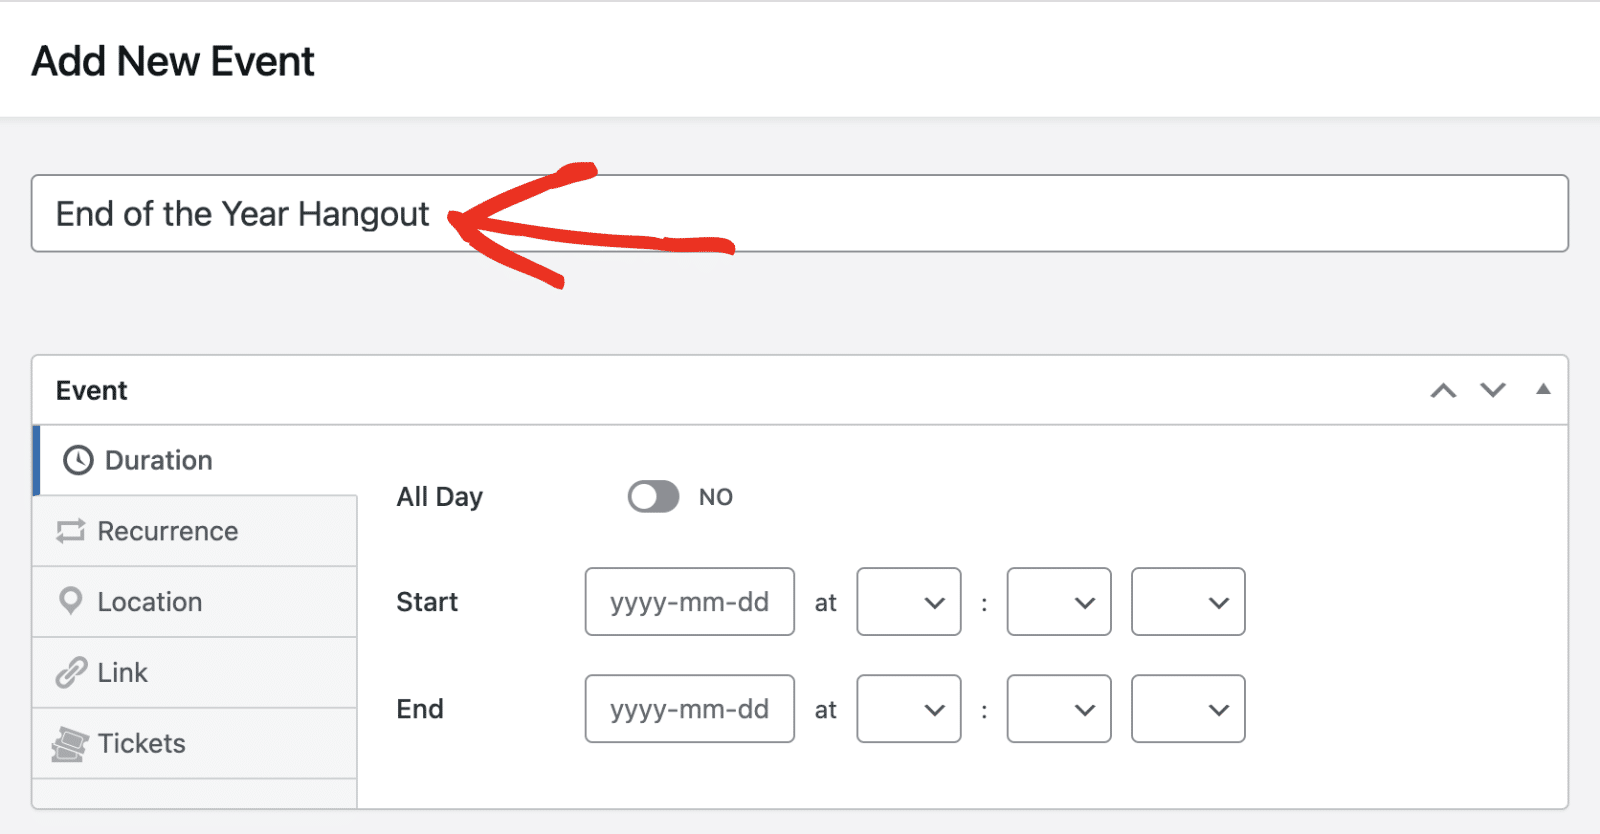
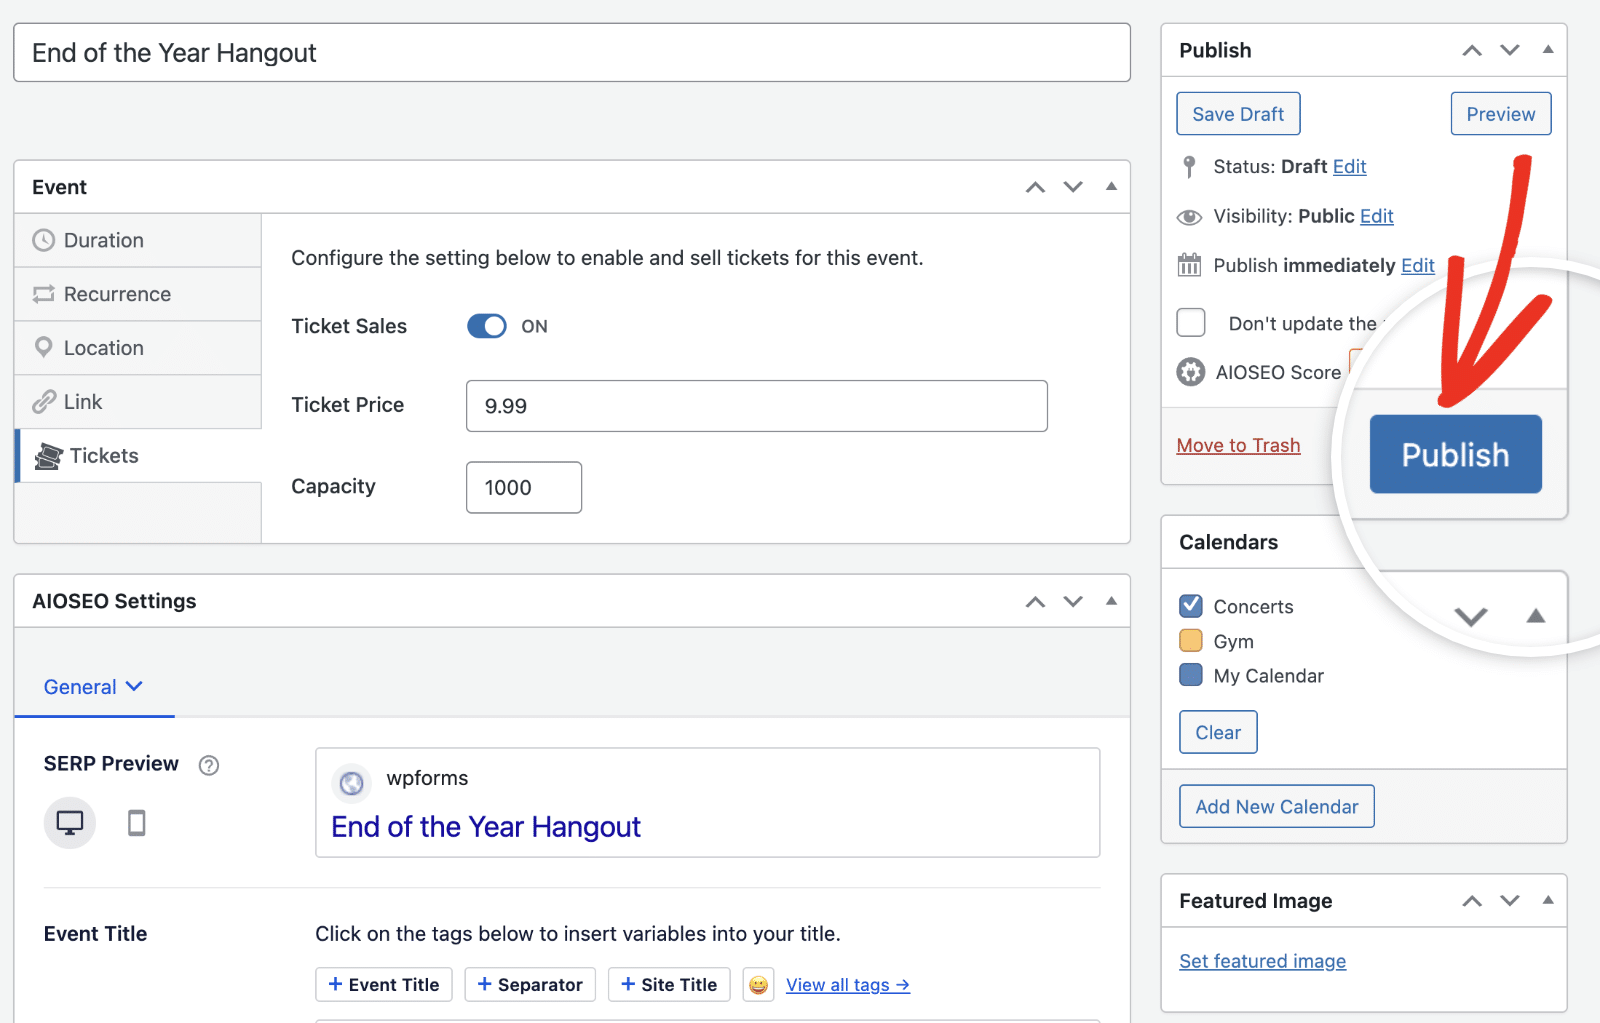
In the Event section, you’ll need to specify the event duration. You can do so by updating the event Start and End date.
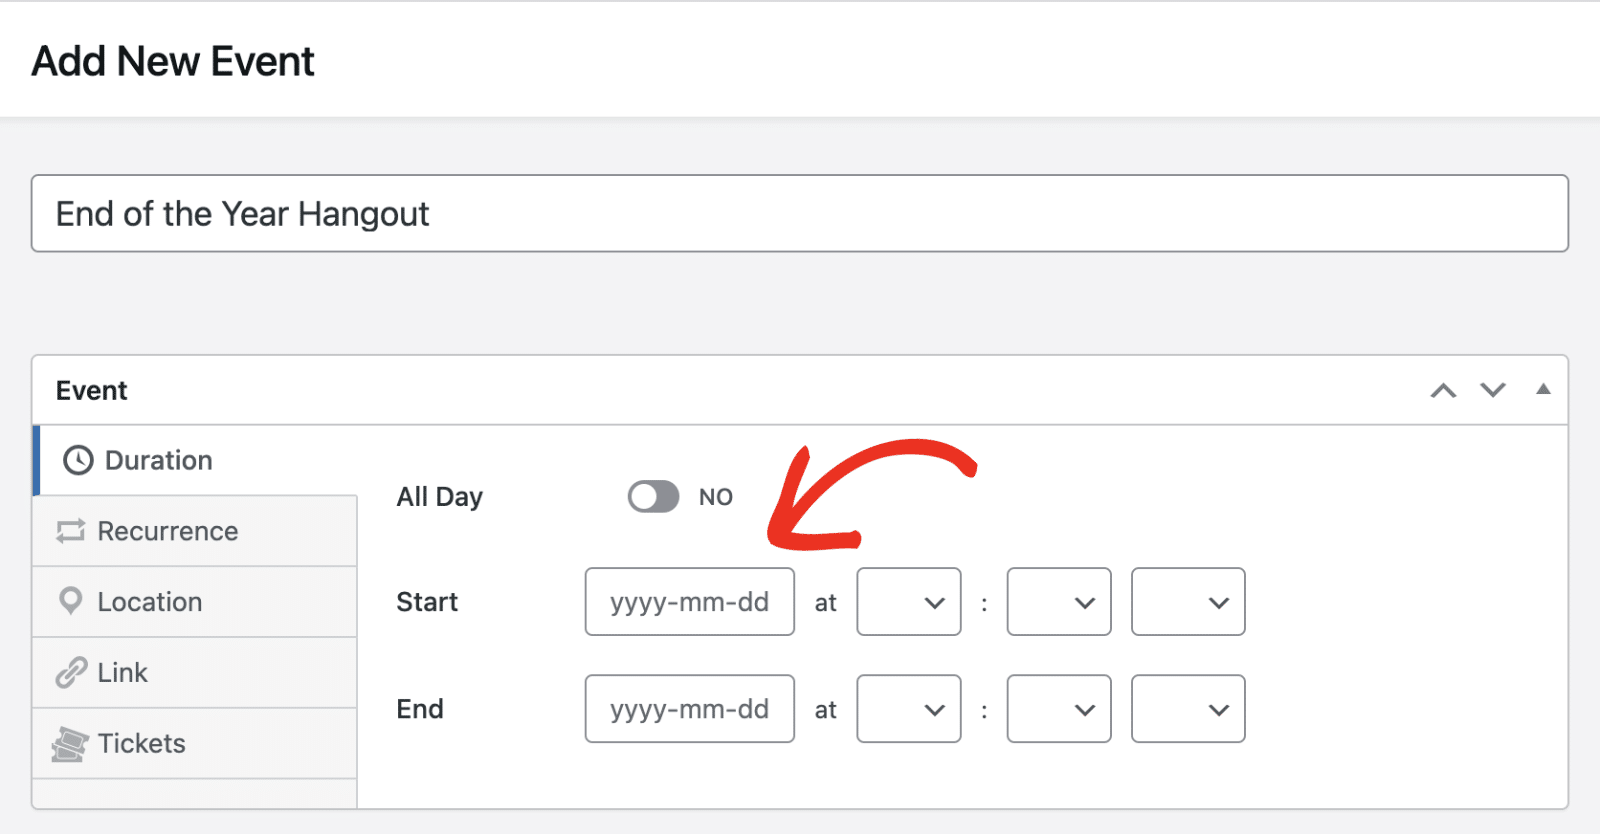
Sugar Calendar also lets you configure additional options like recurring events, adding a location, selling tickets, etc. For this tutorial, I’ll focus on the Event Ticketing functionality. If you’d like to learn more, see this guide on setting up events in Sugar Calendar.
To allow ticket sales in your event, select the Tickets tab and toggle the Ticket Sales option to the ON position.
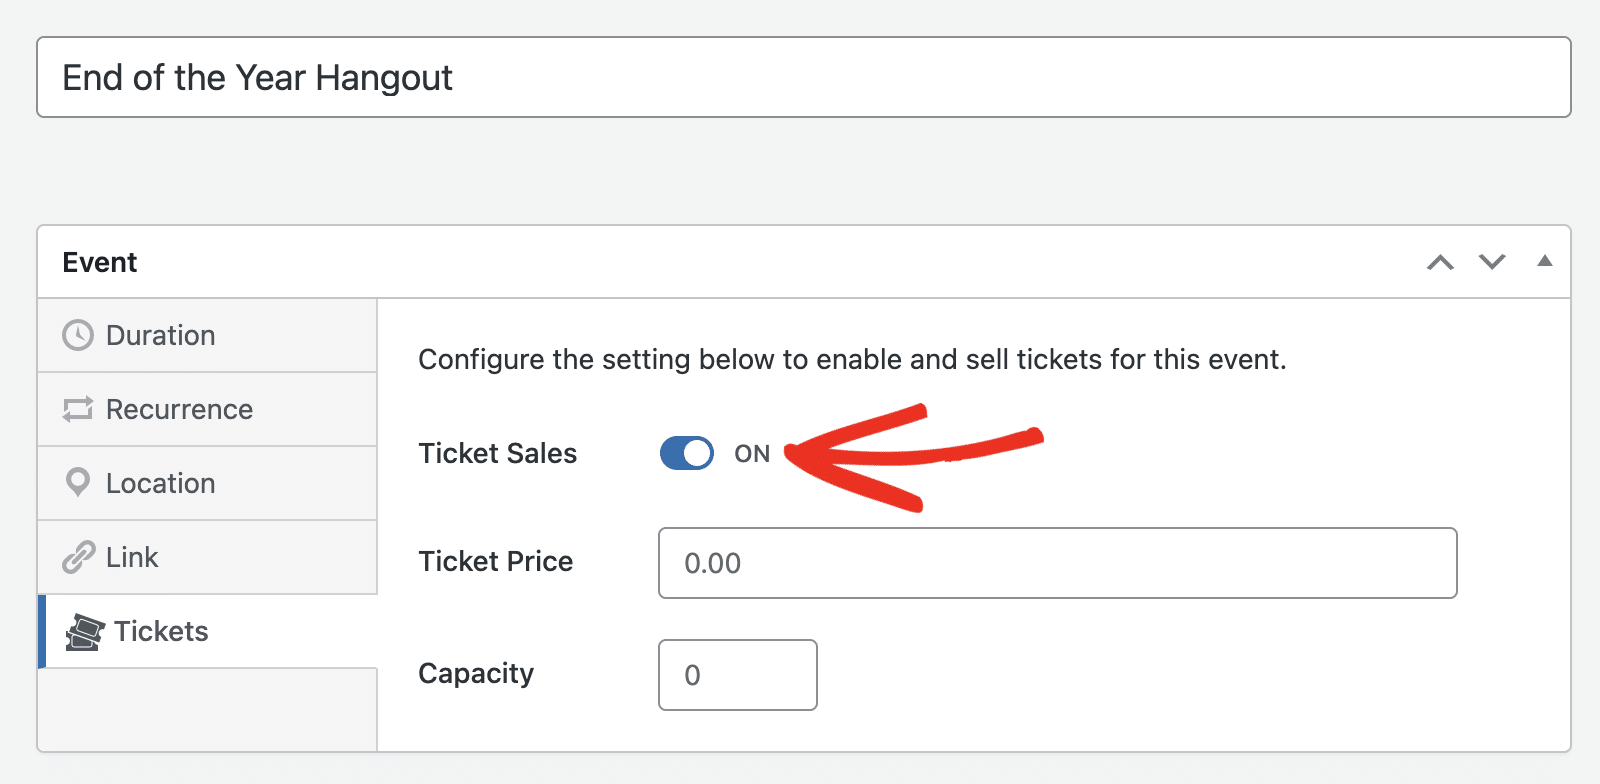
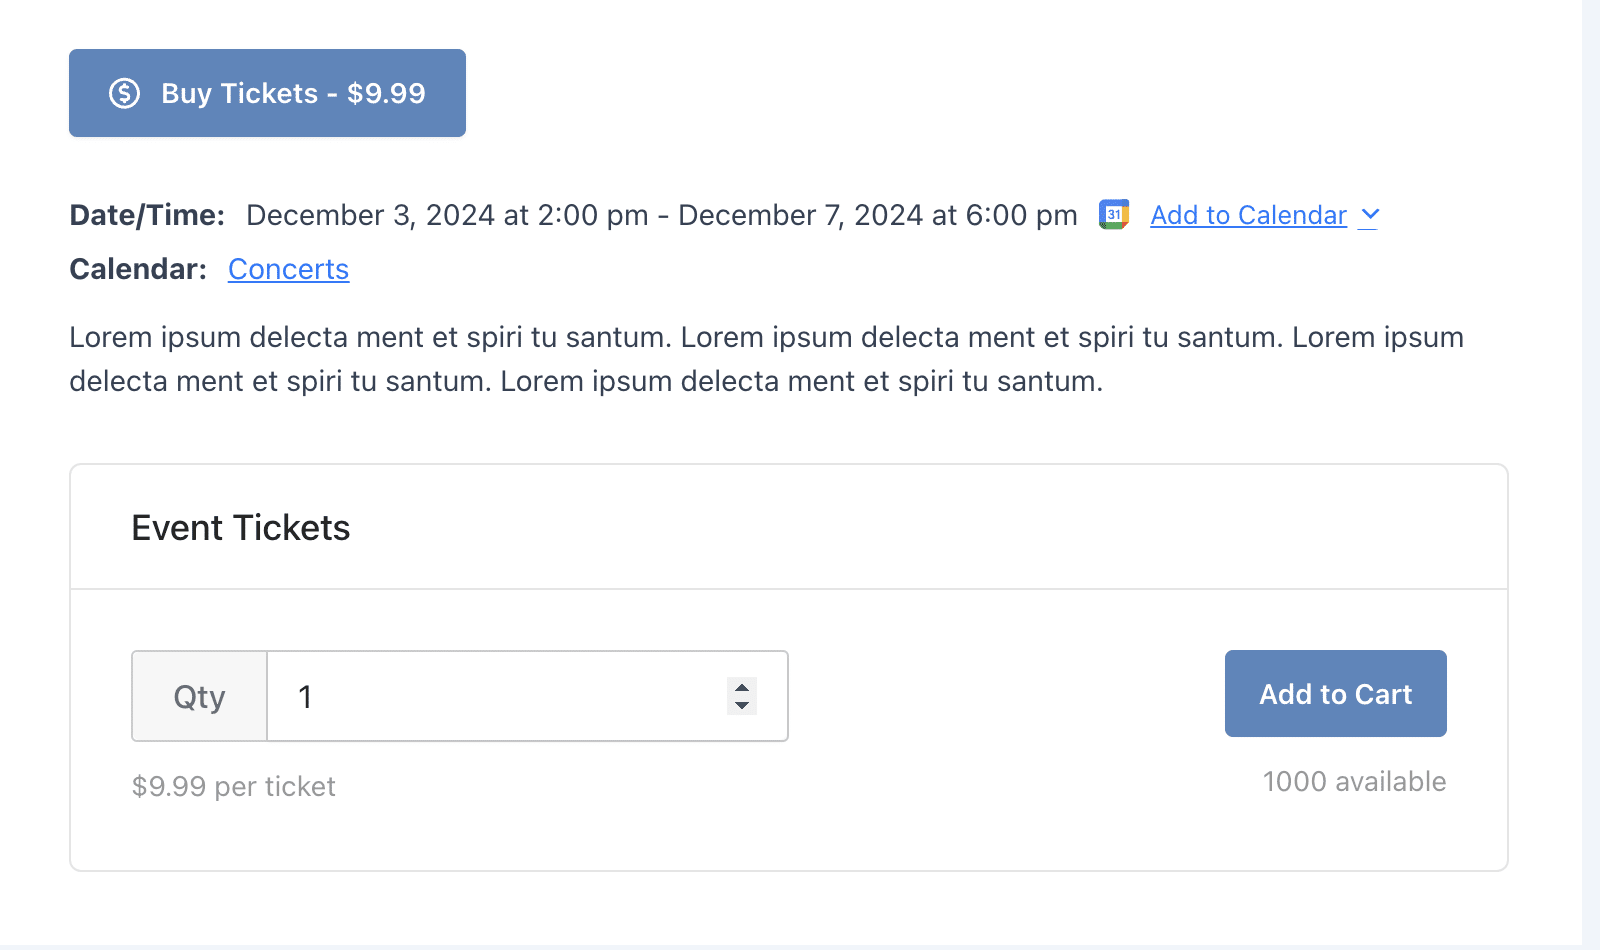
Then, you’ll need to specify the cost per ticket in the Ticket Price field. Also, enter a number in the Capacity field. The Capacity determines the number of tickets available for sale. This number automatically decreases as users purchase tickets from your site.
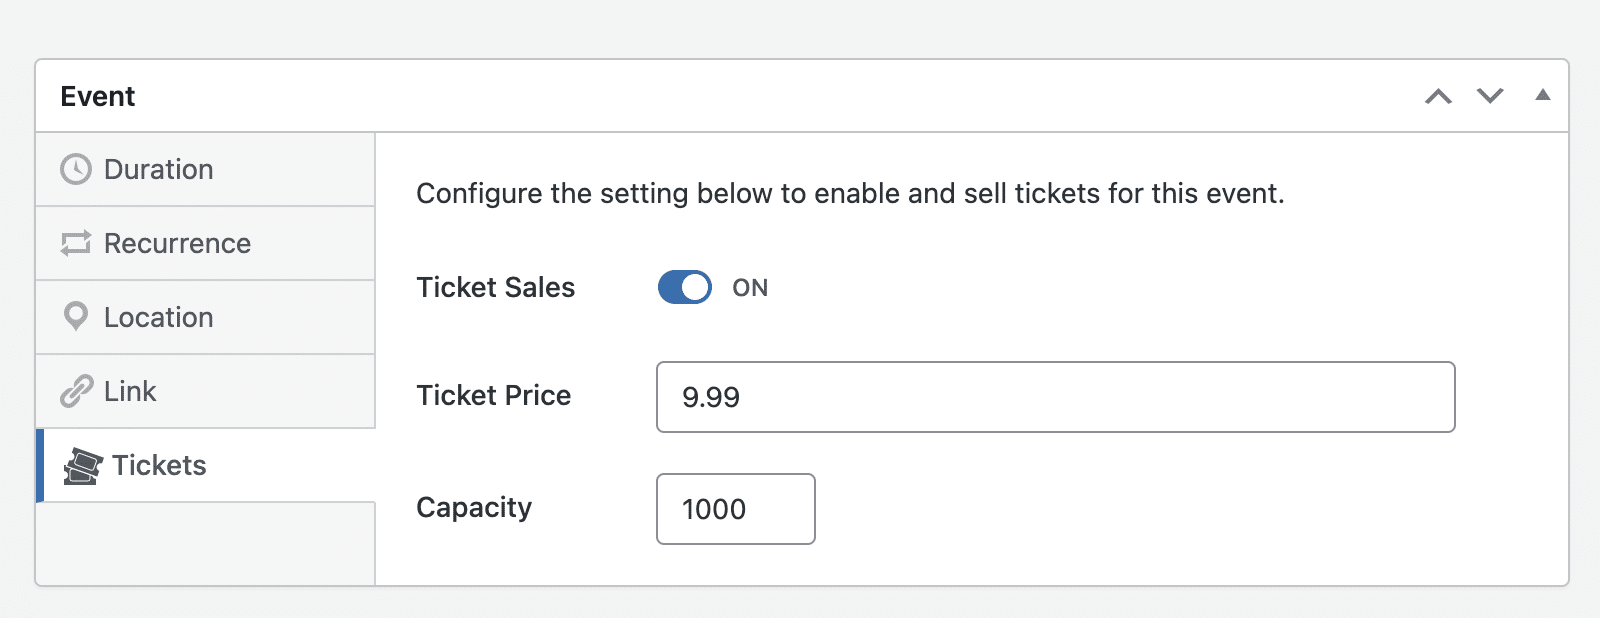
Once you’re done customizing the event, add it to one or more of your Calendars. I also suggest adding a featured image to make it visually appealing to users on your site’s frontend.
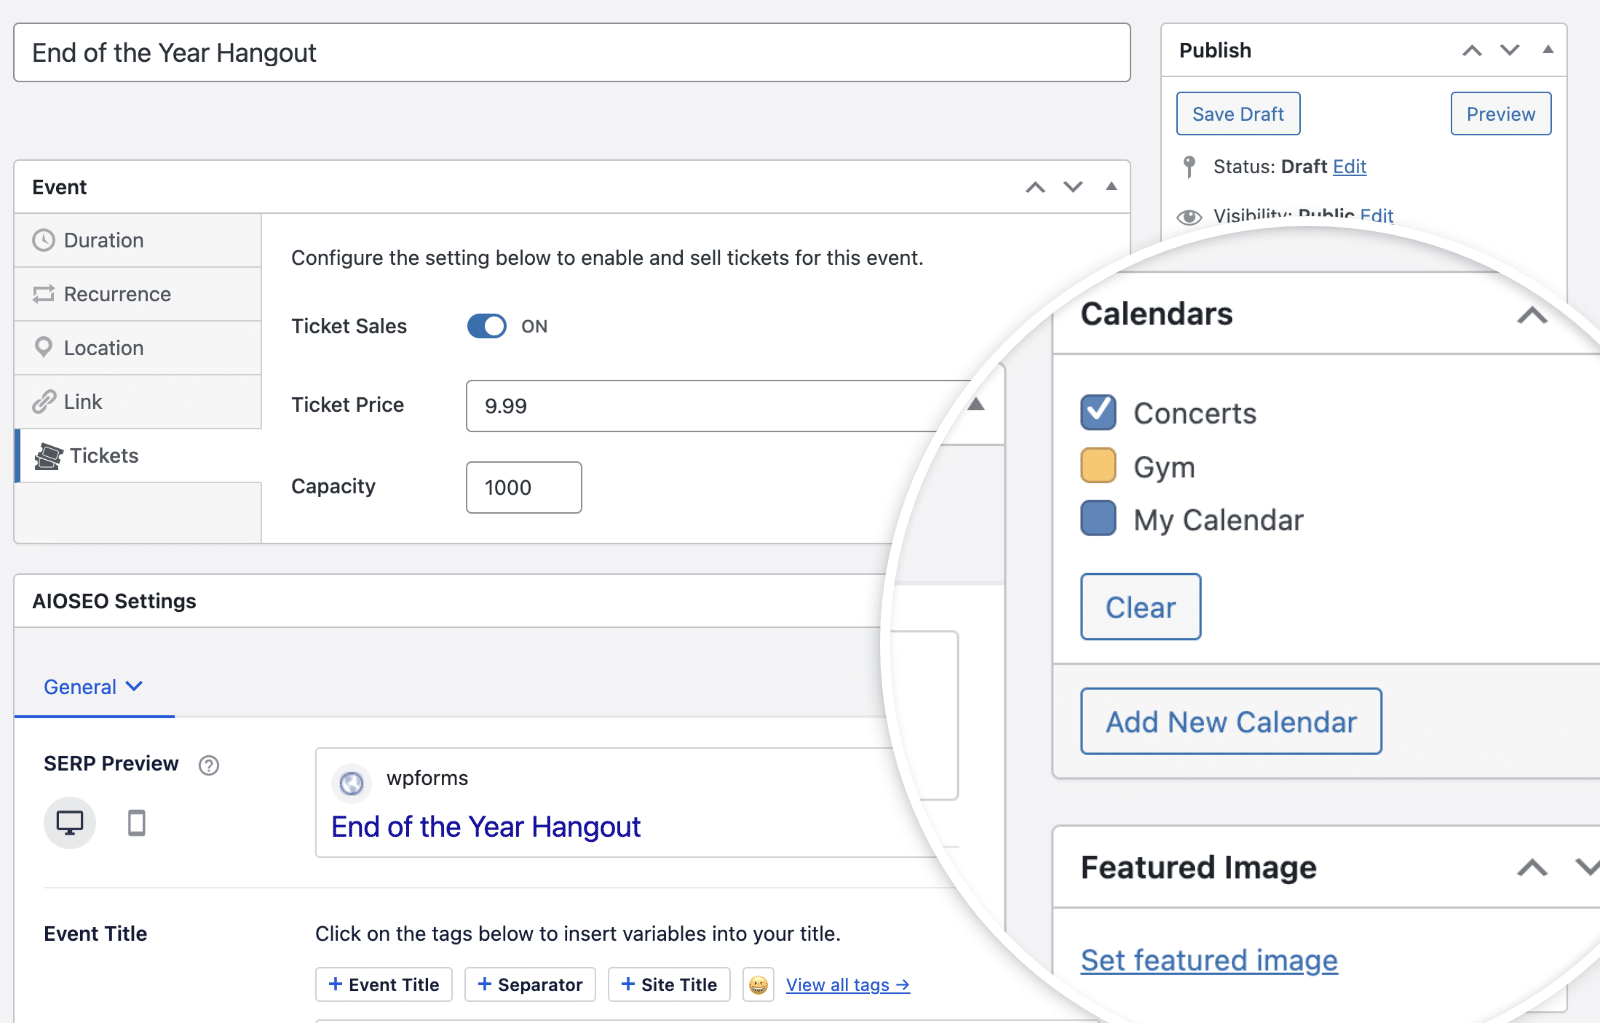
Finally, click Publish to create the event.
Step 4: Displaying and Testing Your Events
Before going live, I recommend testing your ticketing system to ensure everything works smoothly. Sugar Calendar lets you display events and calendars using blocks in the block editor.
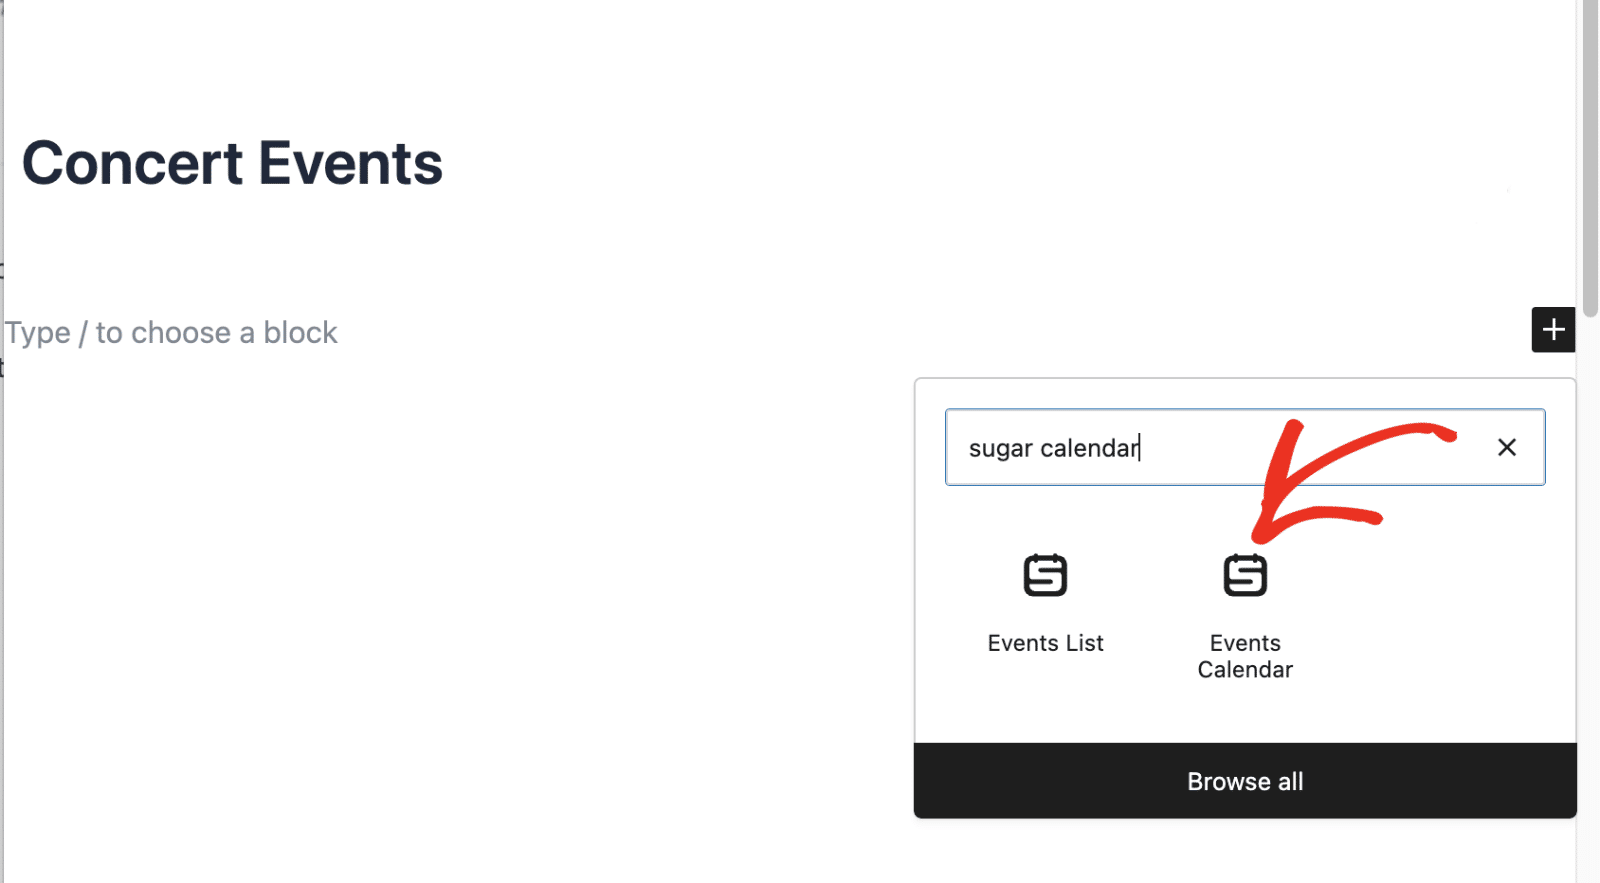
You can display your calendar in any post or page on your website. To do so, open the page or post you want to show your event. Then click the + icon to add a new block. Type ‘Sugar Calendar’ into the search bar and select the Events Calendar block.
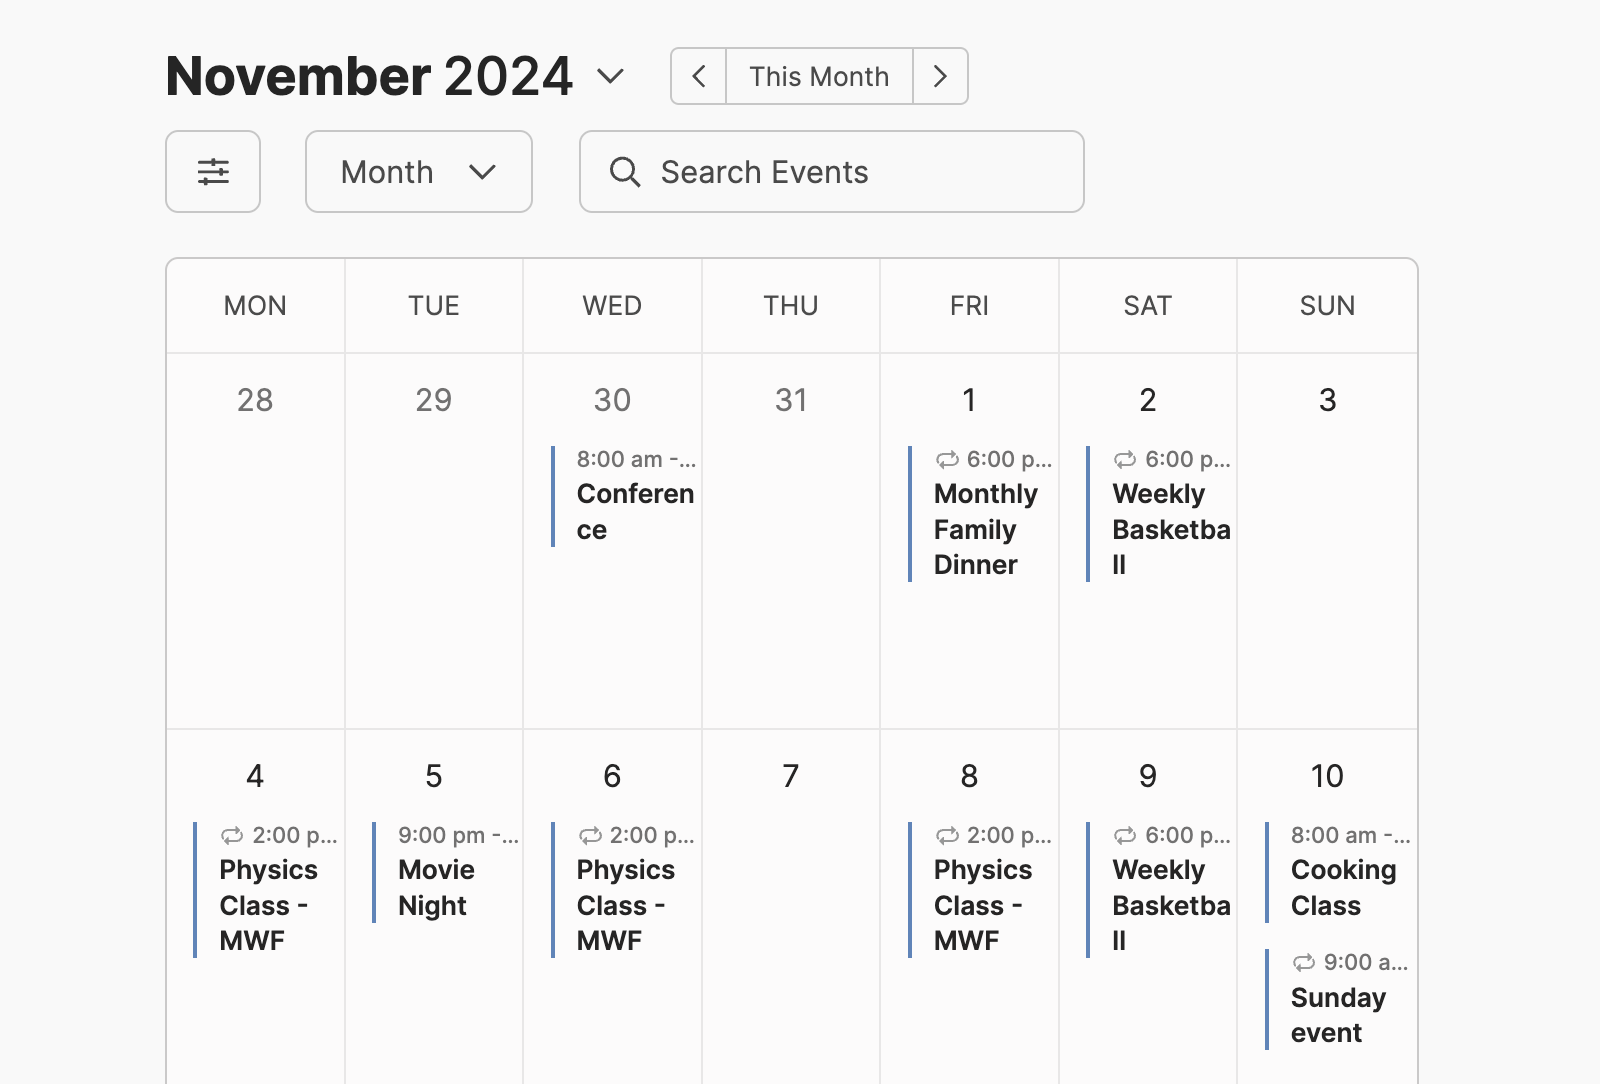
You’ll see a preview of your calendar in the editor.
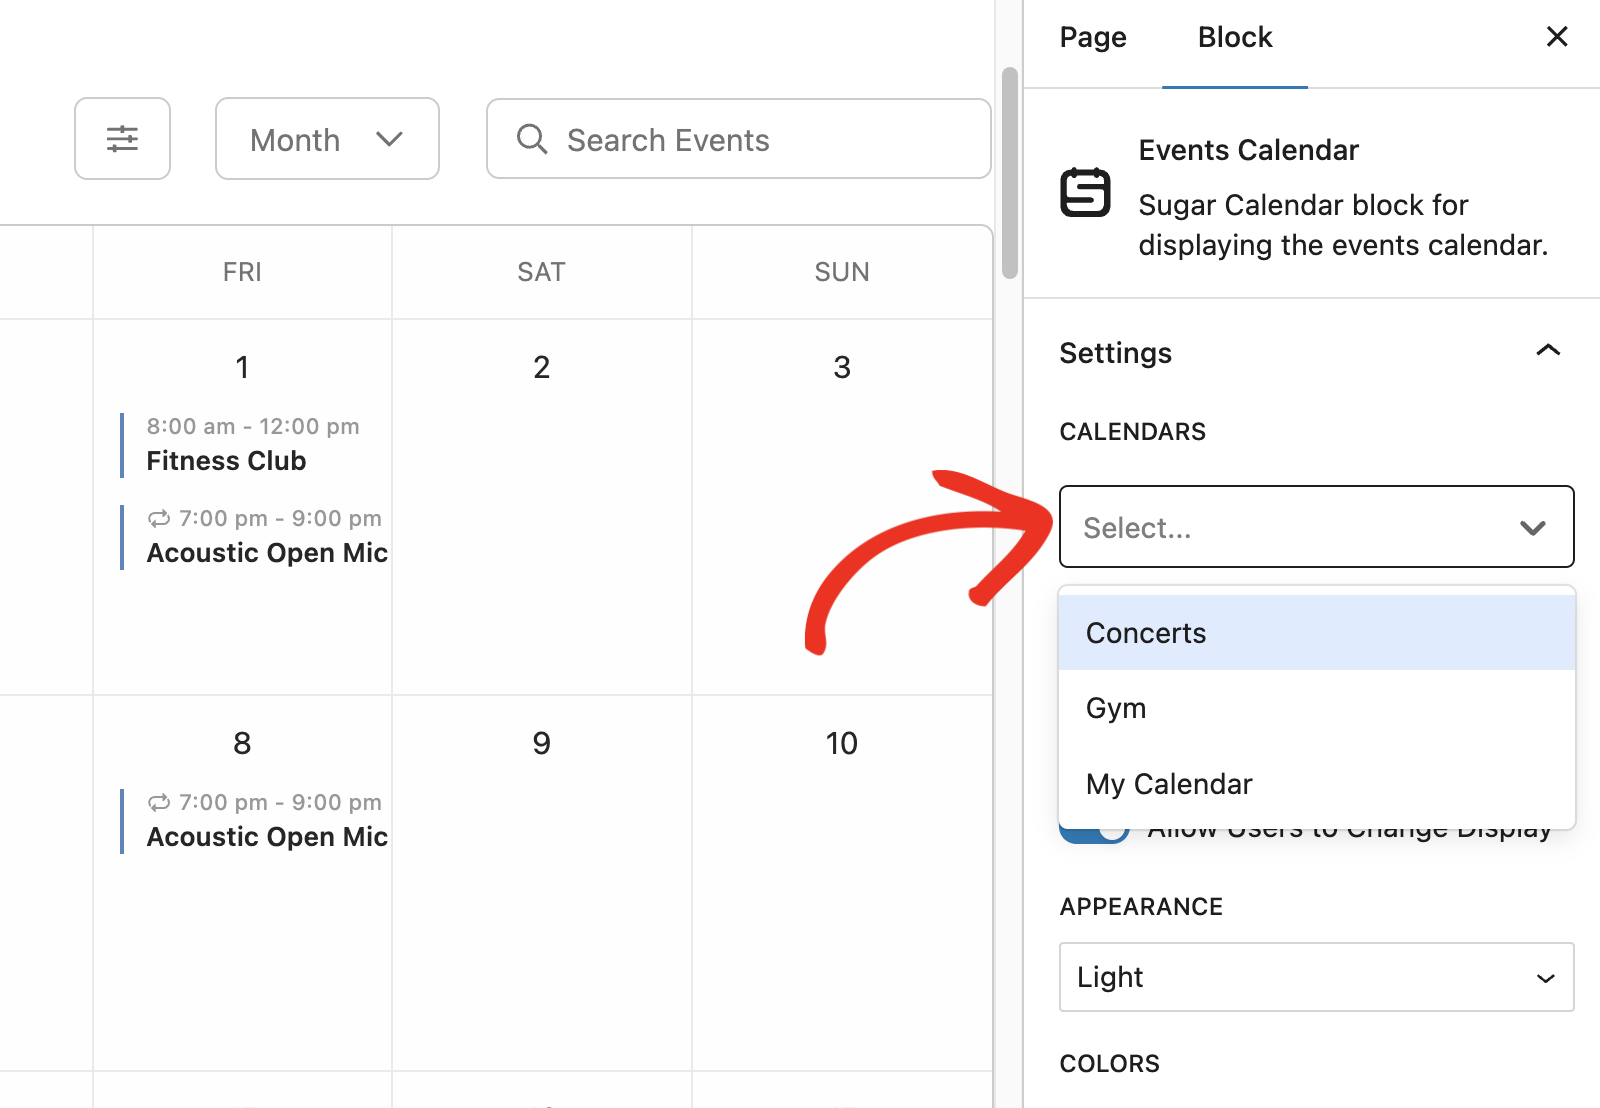
You can select the calendar(s) you’d like to display from the Calendars dropdown.
Be sure to publish your page after customizing the Events Calendar block. Now, when you view the page on your site’s frontend, you’ll see all the events in the calendar. I’ll select the event I created above that allows ticket sales.
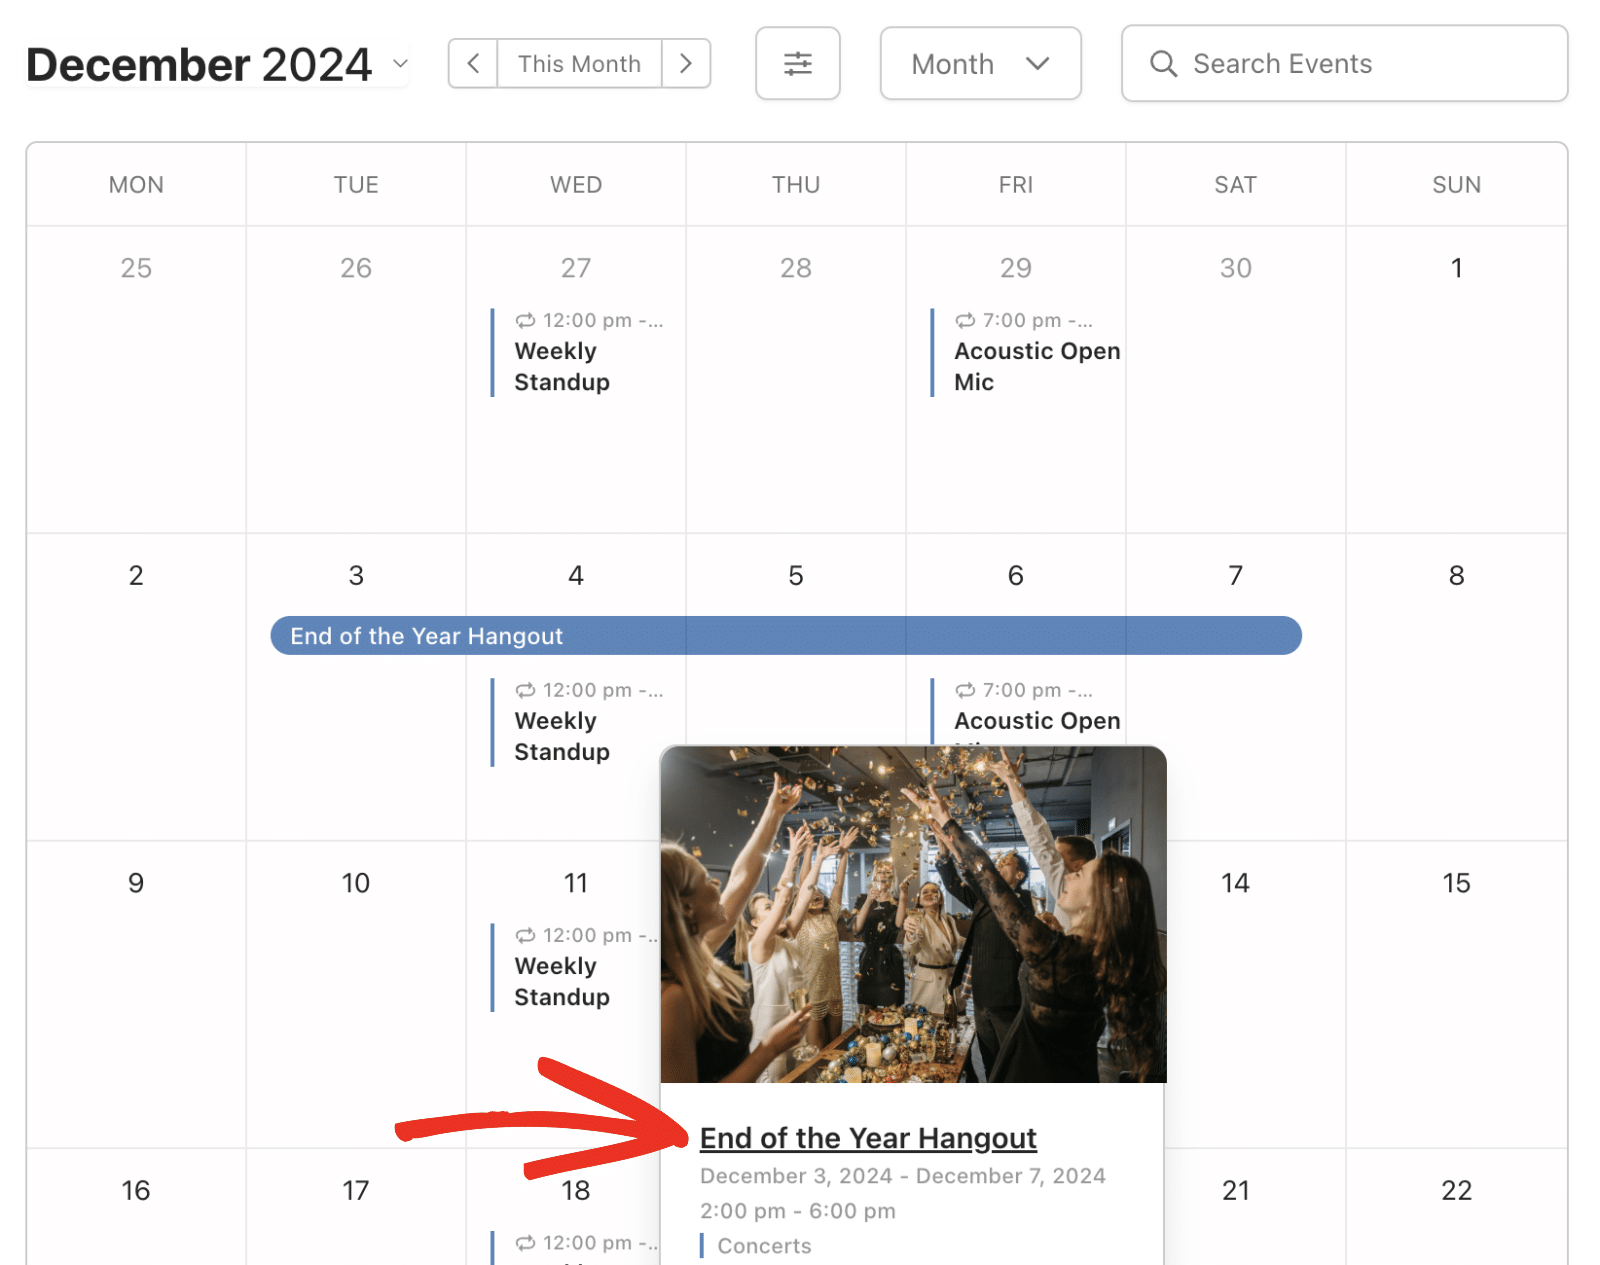
Doing so will direct you to the event detail page, where users can purchase their tickets.
Step 5: Managing Event Ticketing
The next step after publishing your event is to track your ticket sales and attendee list. This is crucial for event organizers to manage their event registration process effectively.
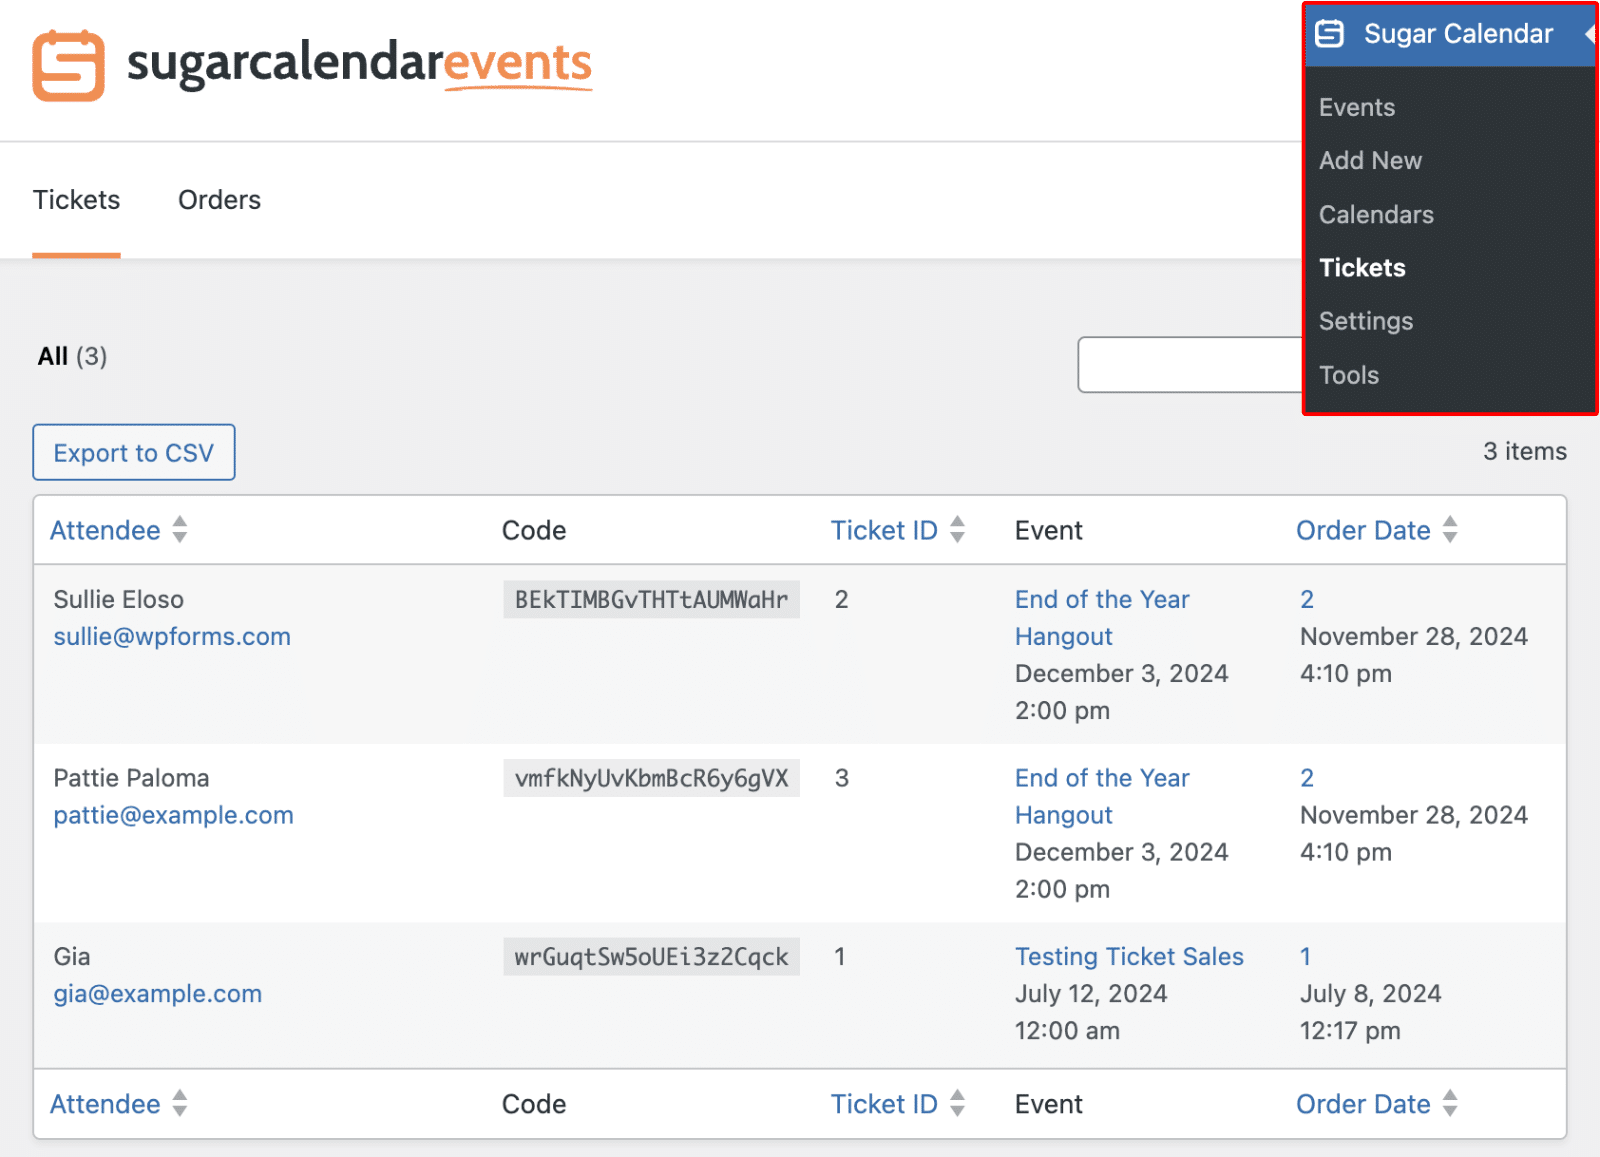
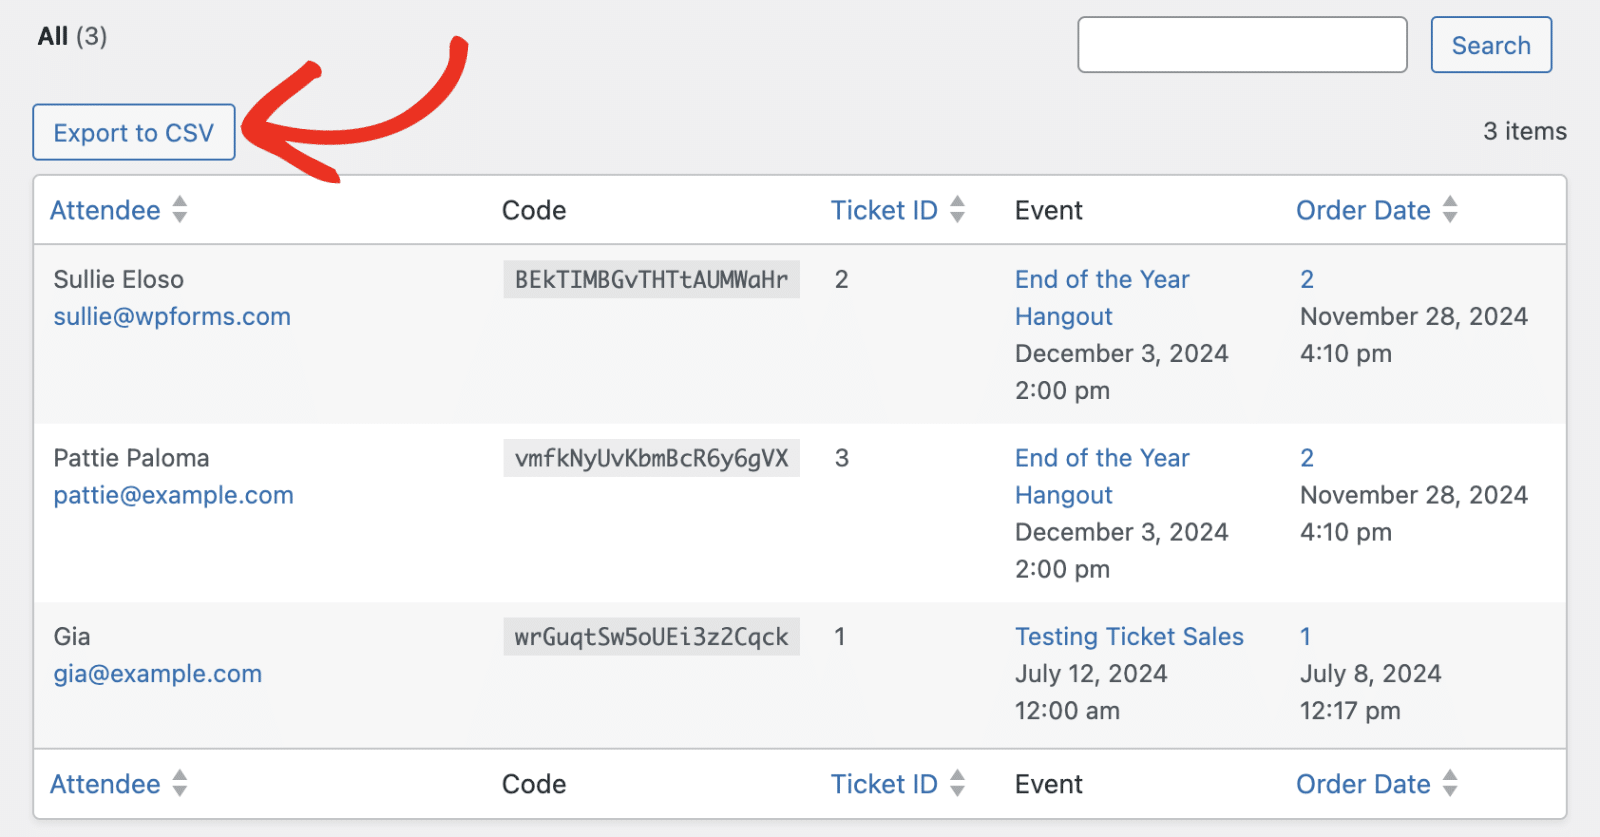
To do so, go to Sugar Calendar » Tickets. Here, you’ll see an overview of all ticket sales. This page includes details about each attendee, their unique ticket code, the event they registered for, and the date they completed their payment.
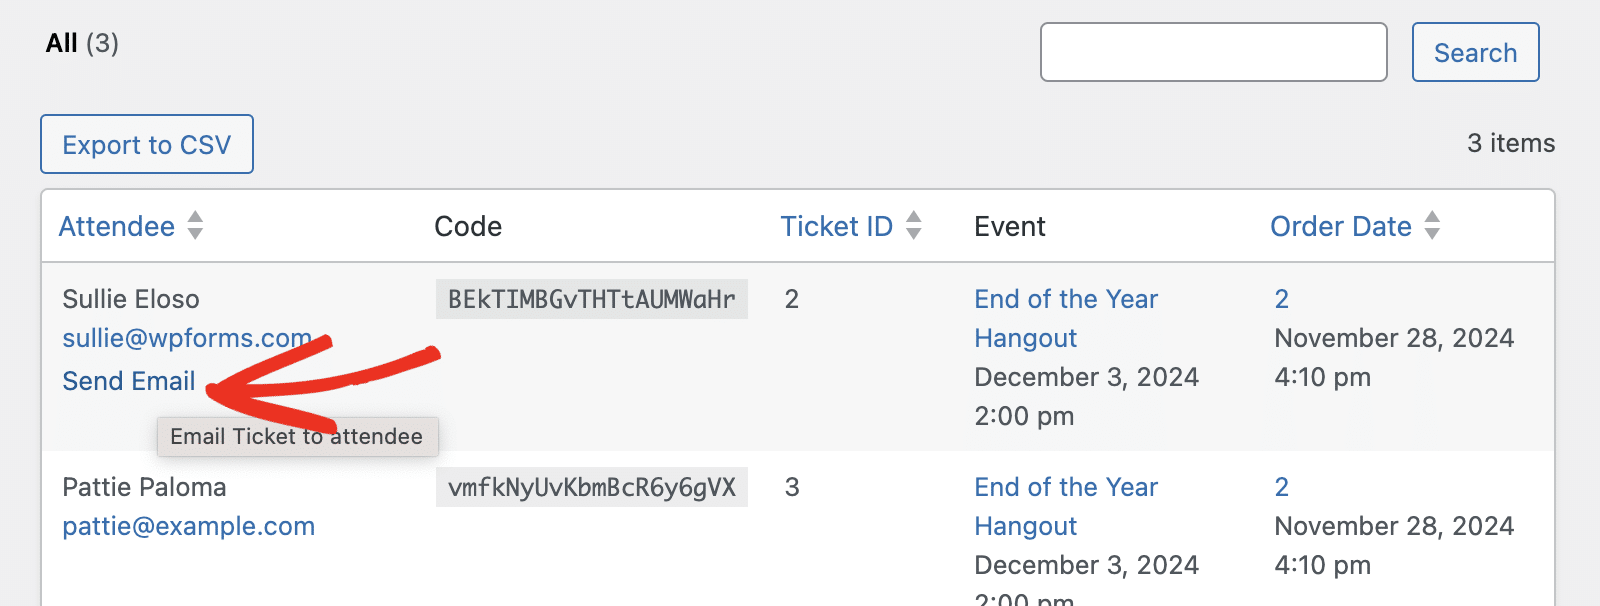
When you hover over a specific ticket record, you’ll see the option to resend the ticket to the attendee.
Sugar Calendar also lets you export event tickets. To do so, simply click the Export to CSV button. This will download a CSV file containing all your ticket sales and attendee lists. The CSV file can be helpful if you’d like to verify users’ tickets before granting them access to your event.
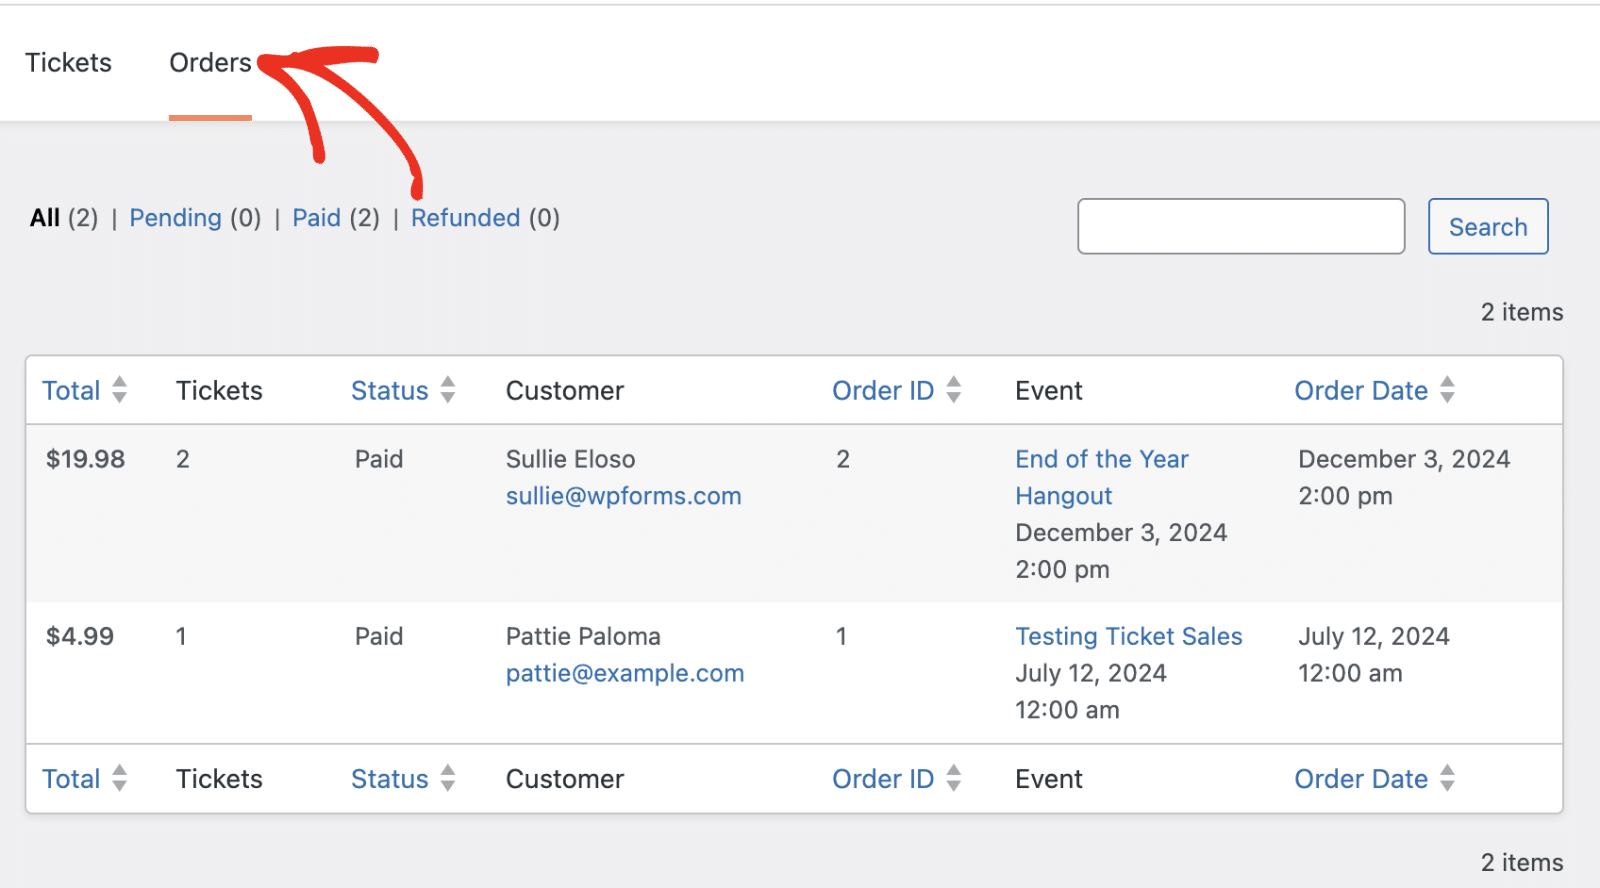
Navigating to the Orders tab will show additional details about ticket sales and payments. The Status indicates whether an order is Paid, Pending, or Refunded.
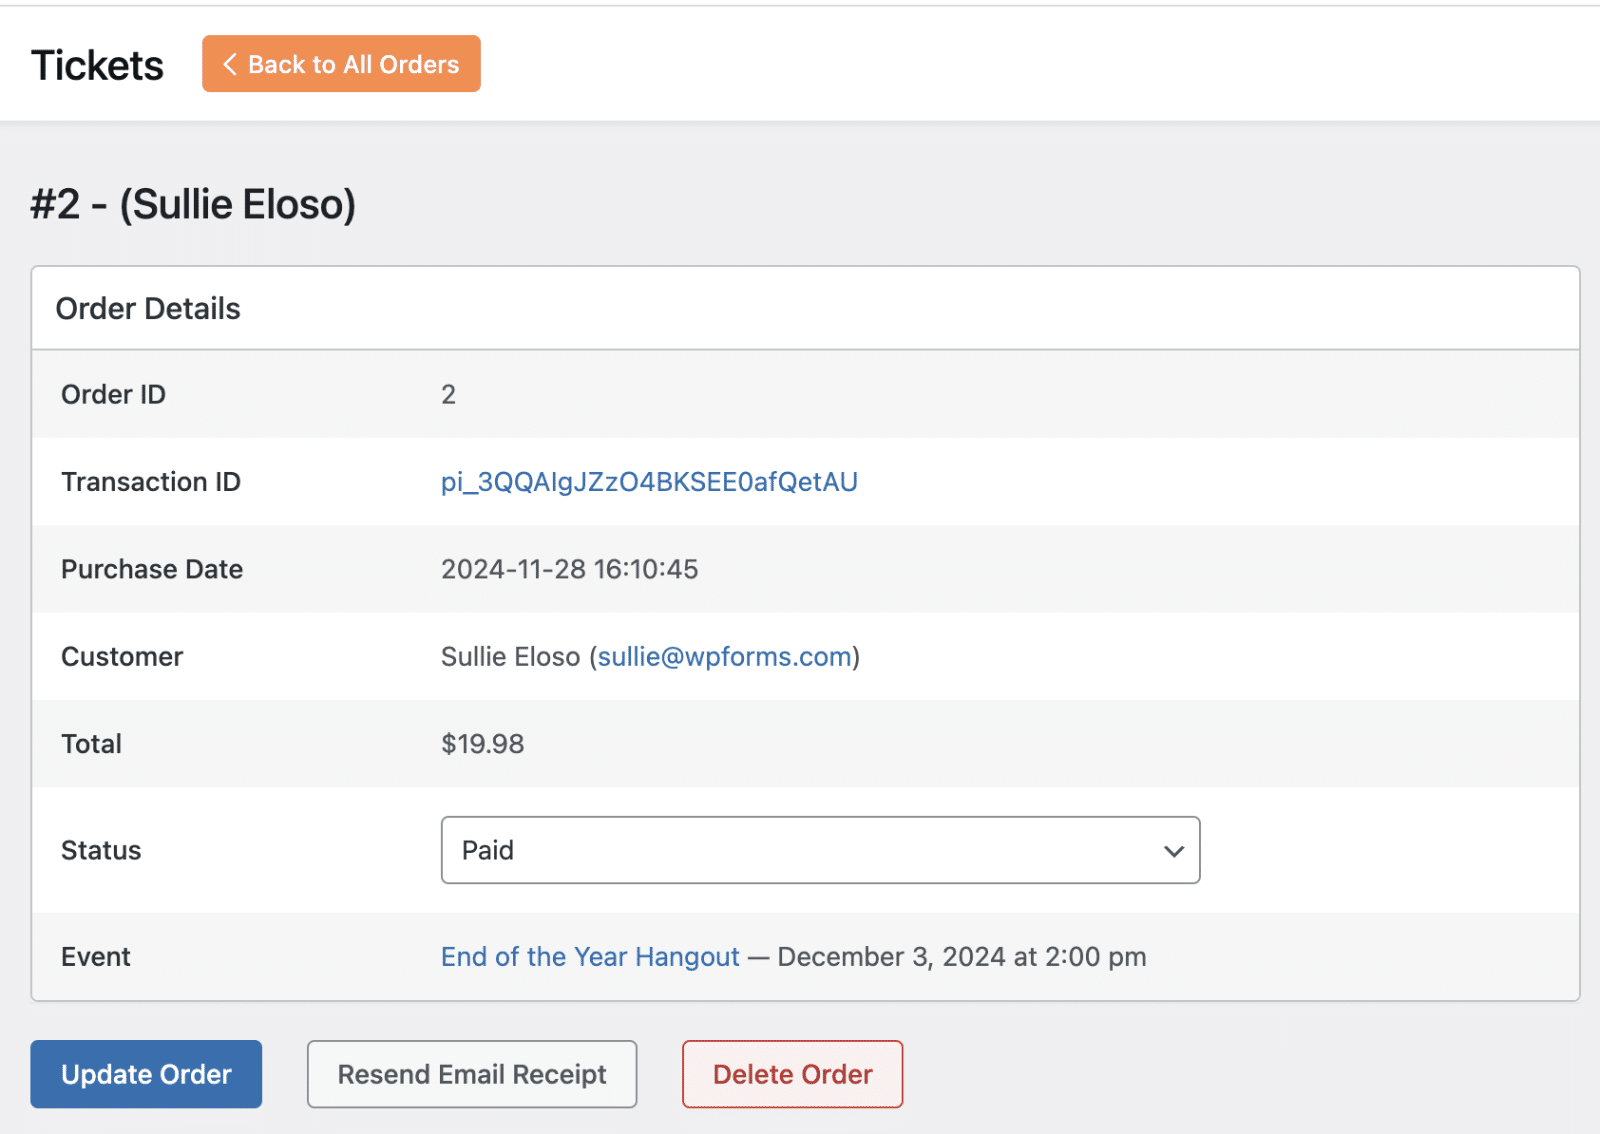
You can manually update a ticket order by hovering over it and selecting the Edit option.

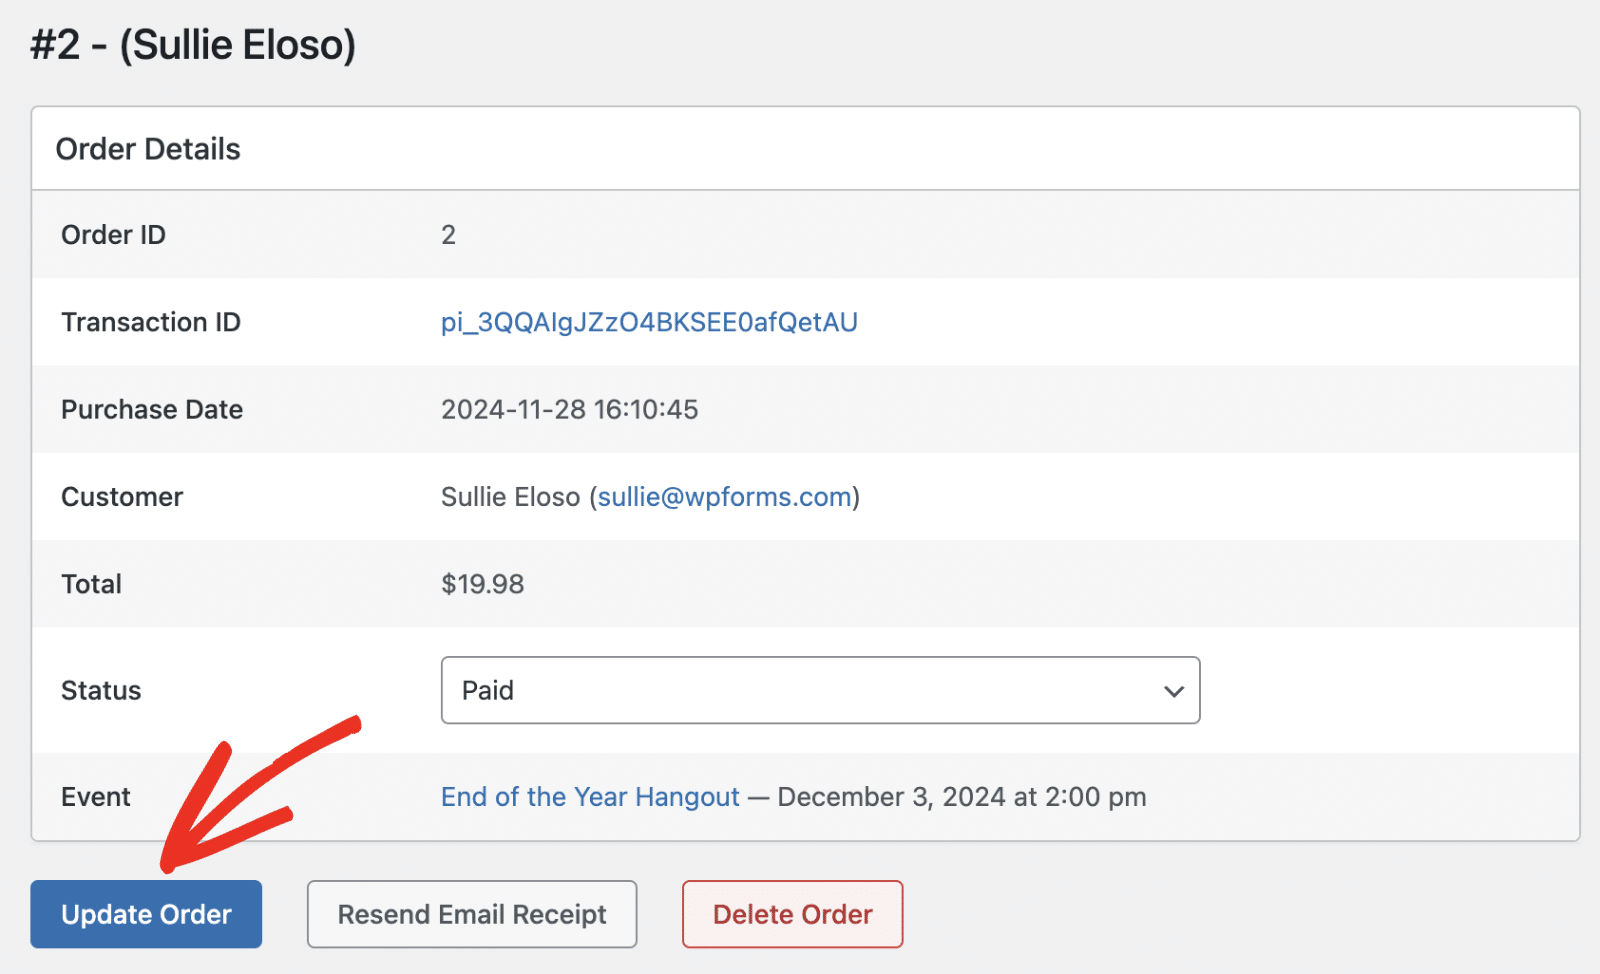
This will direct you to the order detail page containing additional details about the order. You can update the order status, resend the email receipt, or delete the order entirely.
Scrolling down will show the Tickets table with the attendee details and their ticket code.
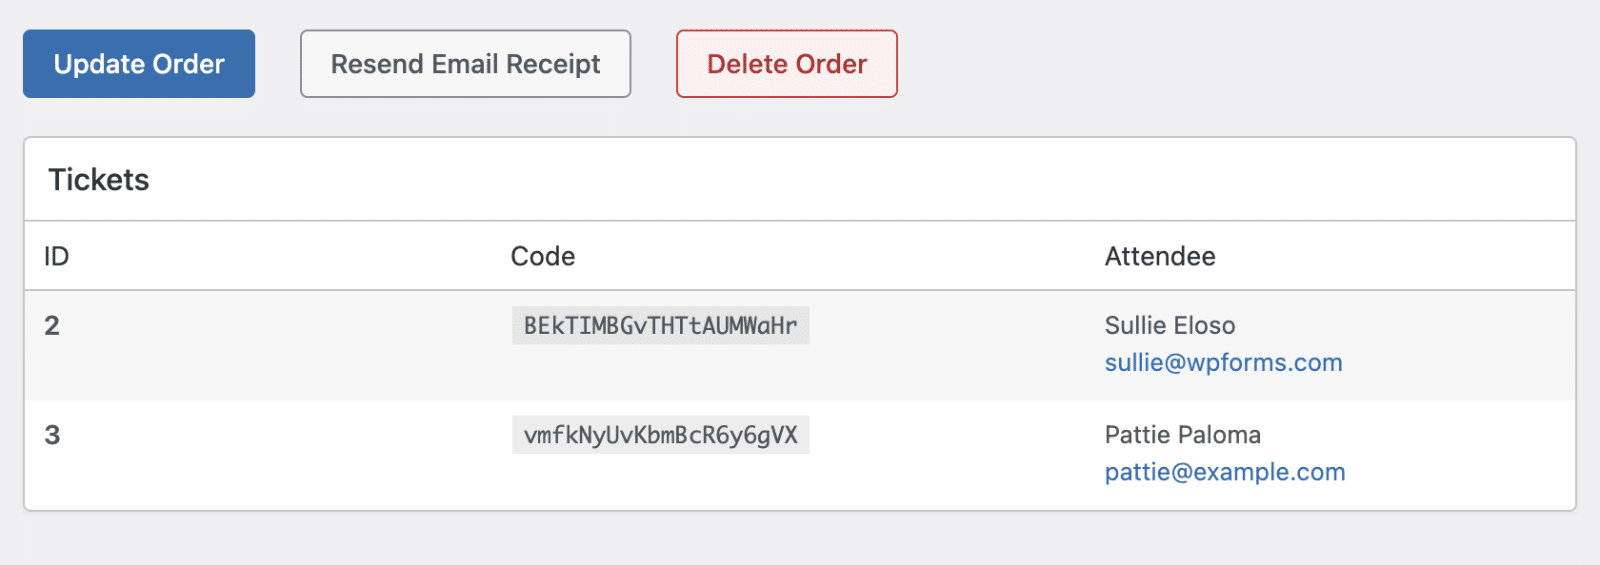
After making any changes to an existing order, make sure to save your changes by clicking the Update Order button.
Now, you have a solid grasp on how to create and manage event ticketing in WordPress using the Sugar Calendar plugin. In the next section, I’ll show you how to allow users to submit events on your site through a WordPress form plugin like WPForms.
Step 6: Allowing Users to Submit Events Using WPForms
WPForms is the best WordPress form builder plugin with advanced functionality like conditional logic and AI form generator.
It integrates with the Sugar Calendar plugin to allow users to submit events through your form. This is handy if you’d like to run a business model that allows users to submit paid events on your site.
In this section, I’ll show you how to connect Sugar Calendar to WPForms. The first step is to install and activate the WPForms plugin on your WordPress site.
After that, you’ll need to create a new form or edit an existing one to access the form builder. You can create one from scratch or use one of our customizable templates. Alternatively, you can generate your form with WPForms AI.
I’ll be using WPForms AI to speed up the form creation process. Please see our tutorial on how to generate forms with WPForms AI.
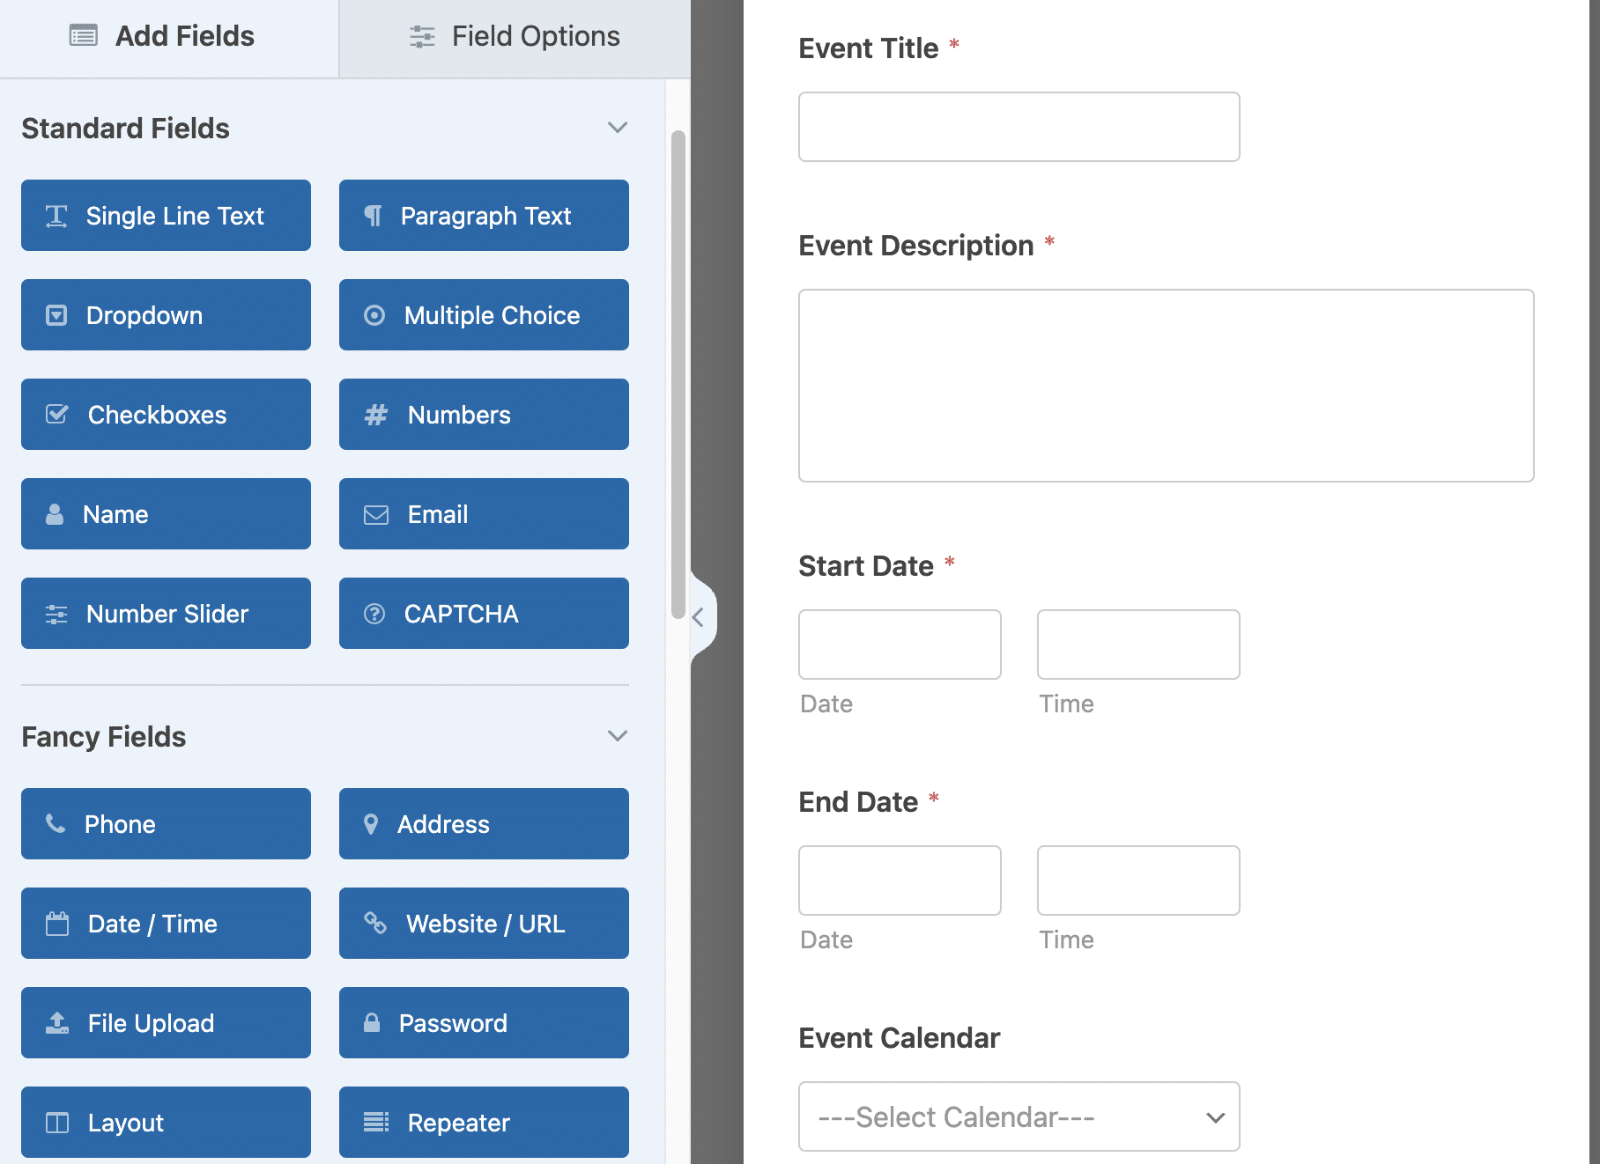
In the generated form, I’ve included the following fields:
- Event Title (Single Line Text field)
- Event Description (Paragraph Text field)
- Start Date and End Date (Date / Time field)
- Event Calendar (Dropdown field)
- Event Location (Single Line Text field)
- Featured Image (File Upload field)
Customizing Form Fields
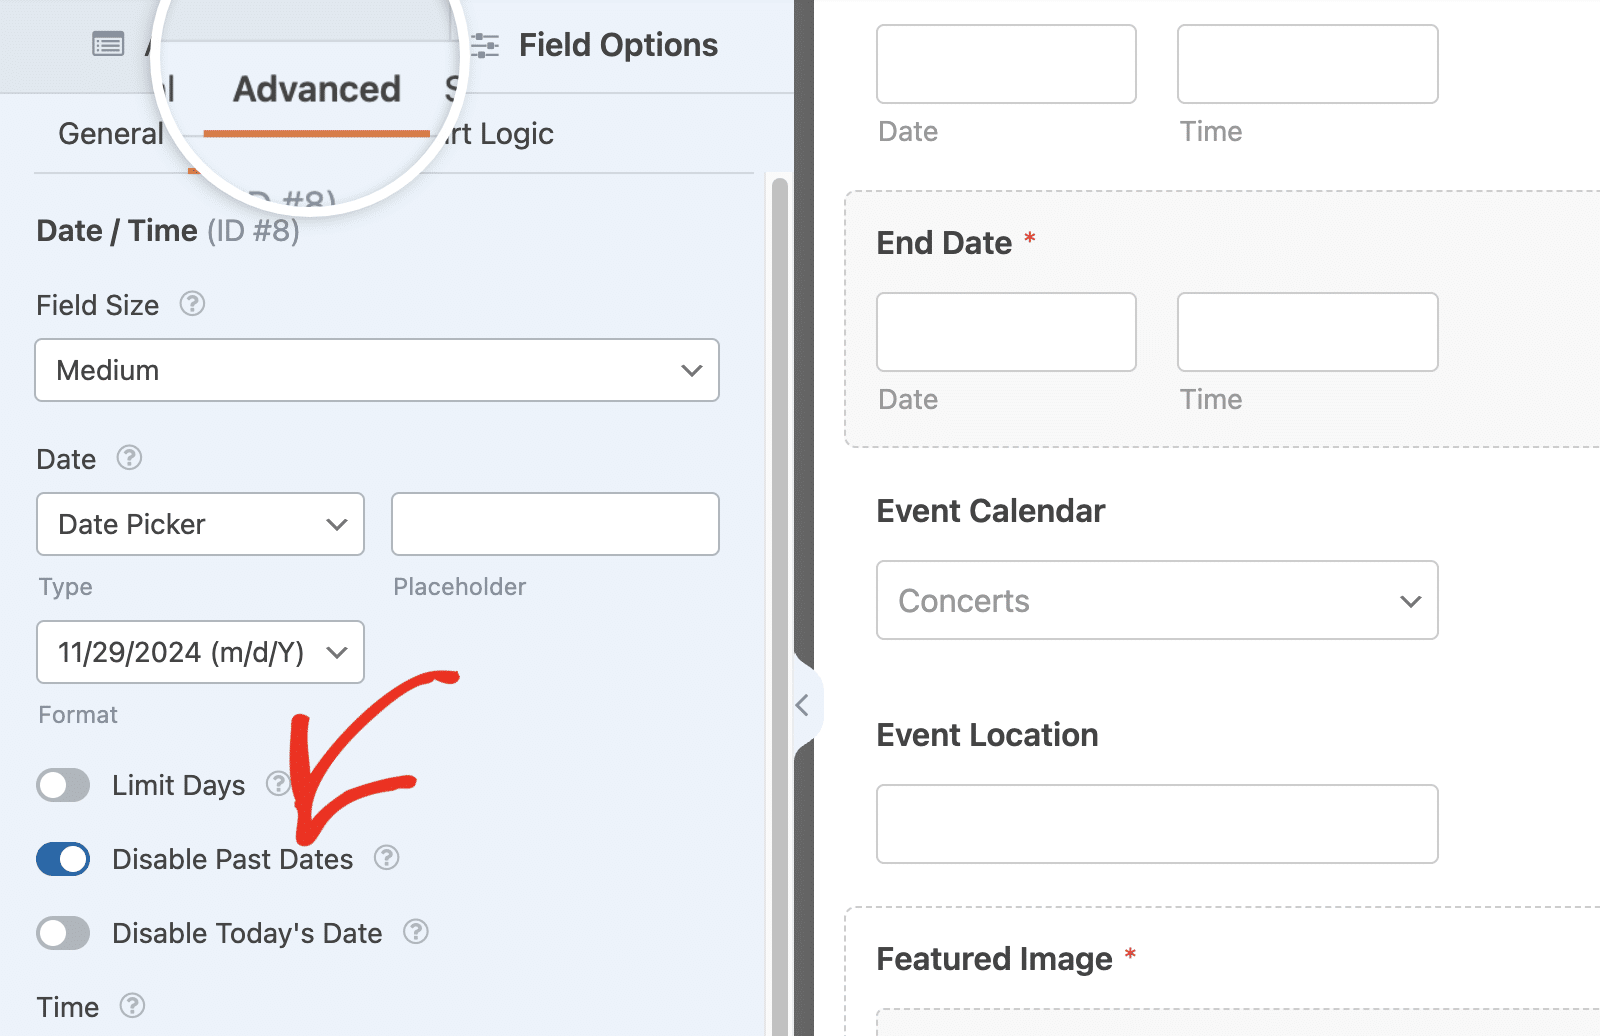
Since users will likely create an event scheduled for a future date, I suggest disabling past dates on the 2 Date / Time fields. To do so, click on the field to open its Field Options panel. Then navigate to the Advanced tab and toggle the Disable Past Dates option to the on position.
Now, you’ll need to map the form fields you created to Sugar Calendar event data. To do so, go to Settings » Sugar Calendar in the form builder. Then select On from the Enable Sugar Calendar Event creation dropdown.
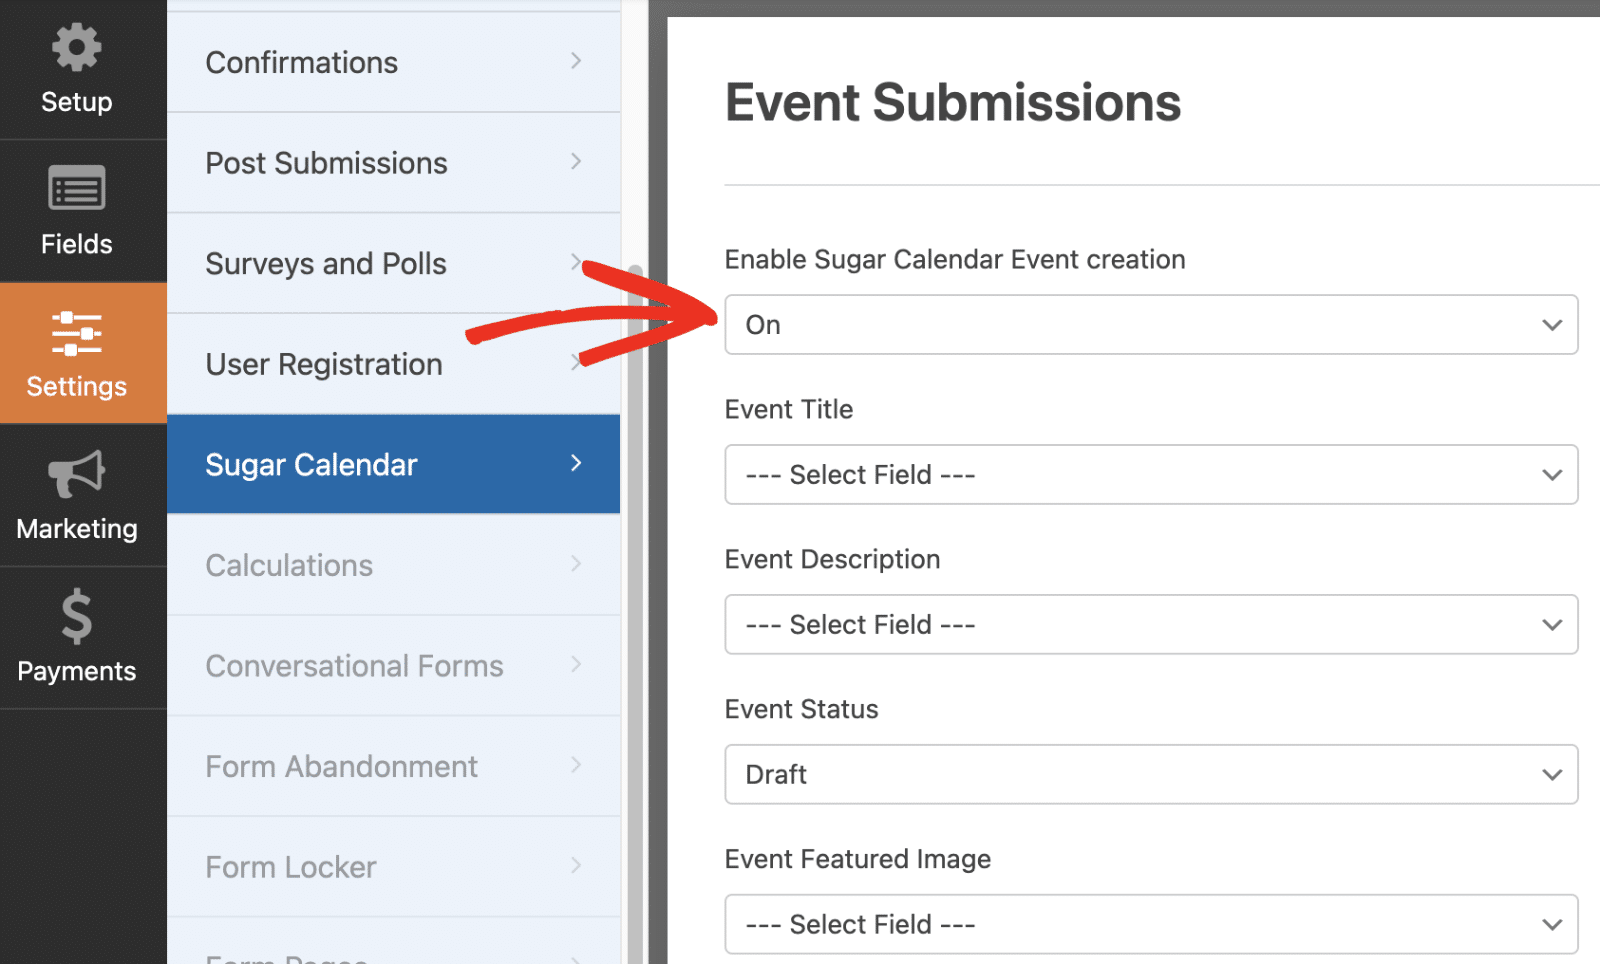
After enabling it, go ahead and map the Sugar Calendar event data to the appropriate WPForms form fields.
In the Event Status field, you can specify whether the submitted event should be saved as a draft, published immediately, or set to pending review.
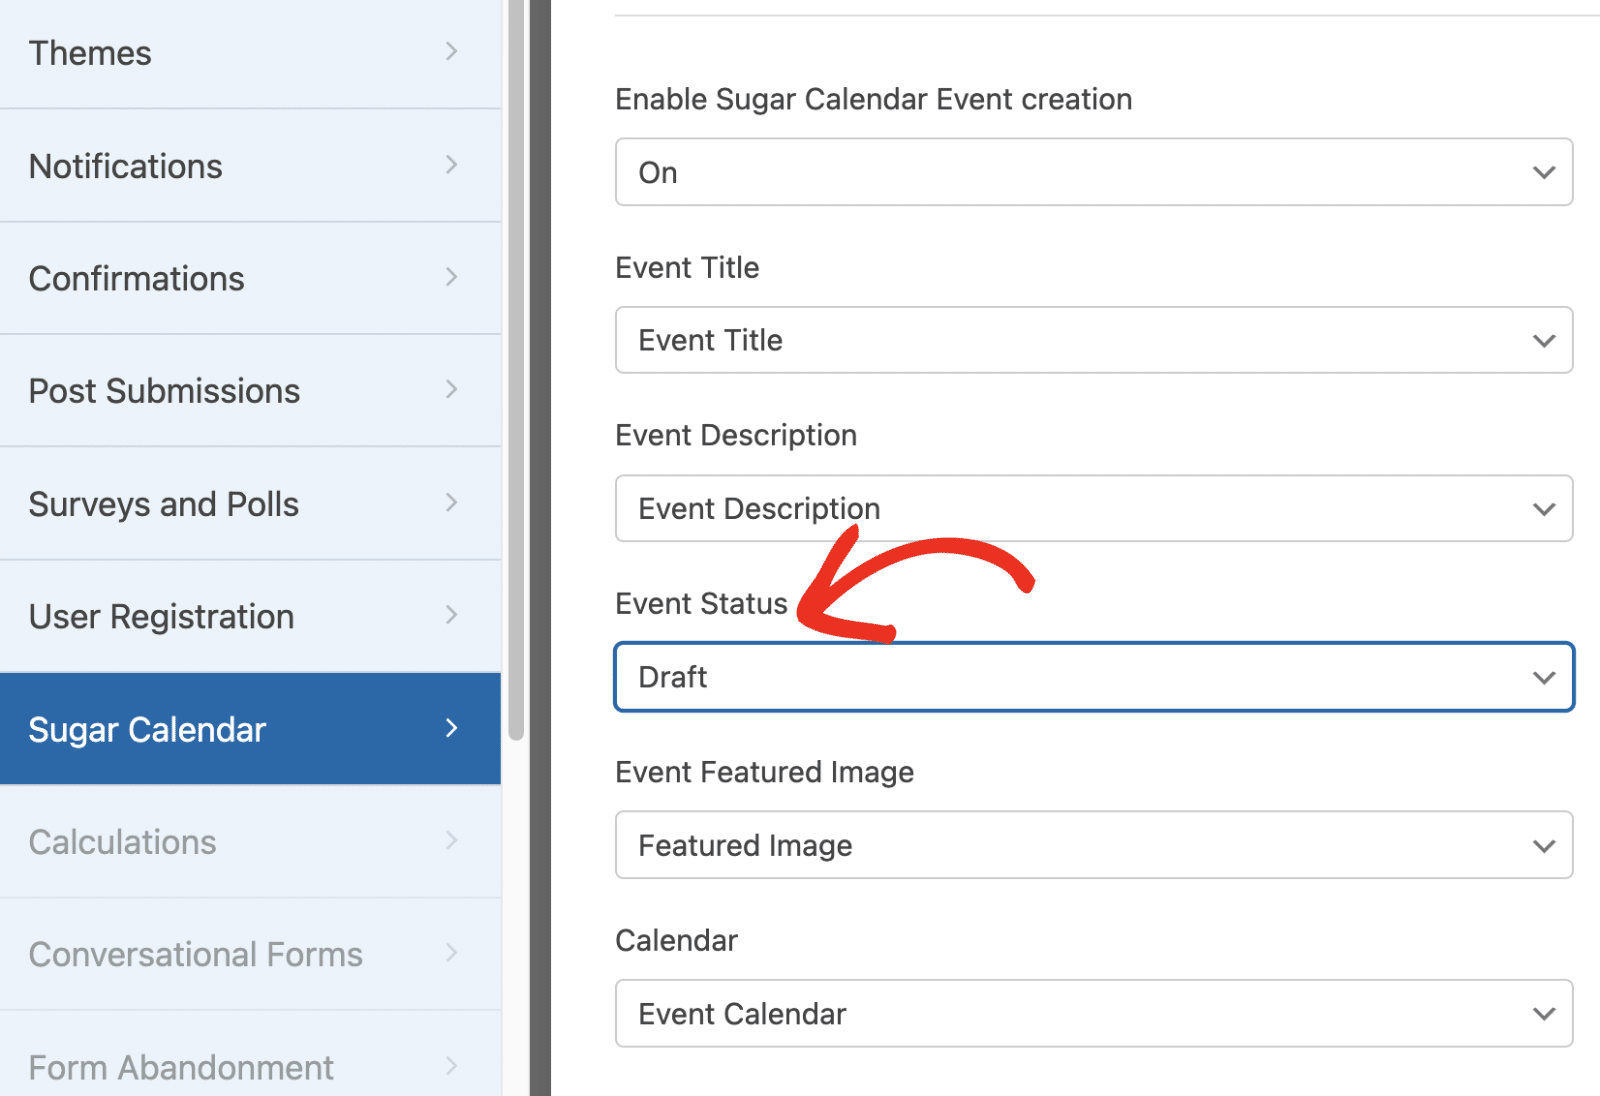
Once you’re done mapping the fields, make sure to save your form. Then, I suggest submitting some test entries to confirm everything works as expected.
Viewing Submitted Events
Entries from this form will be added as new events in Sugar Calendar. To access these events, go to Sugar Calendar » Events. Here, you’ll see details about all the events on your site.
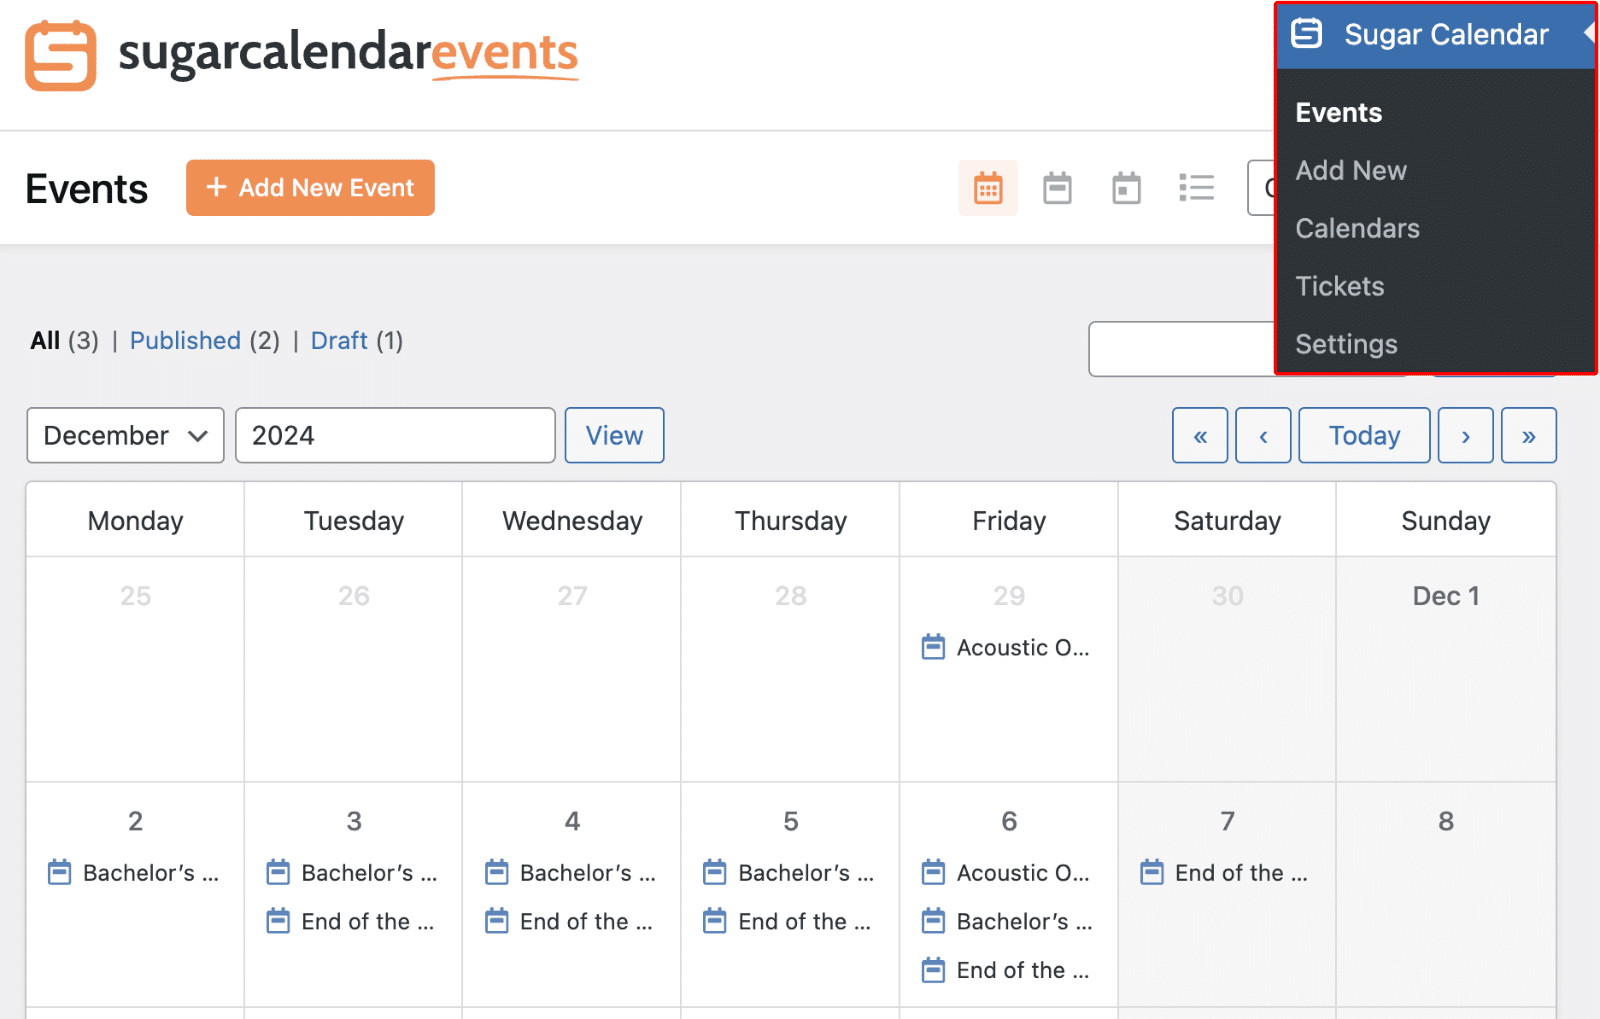
Locate the one you submitted through WPForms, click on it, and then select Edit.
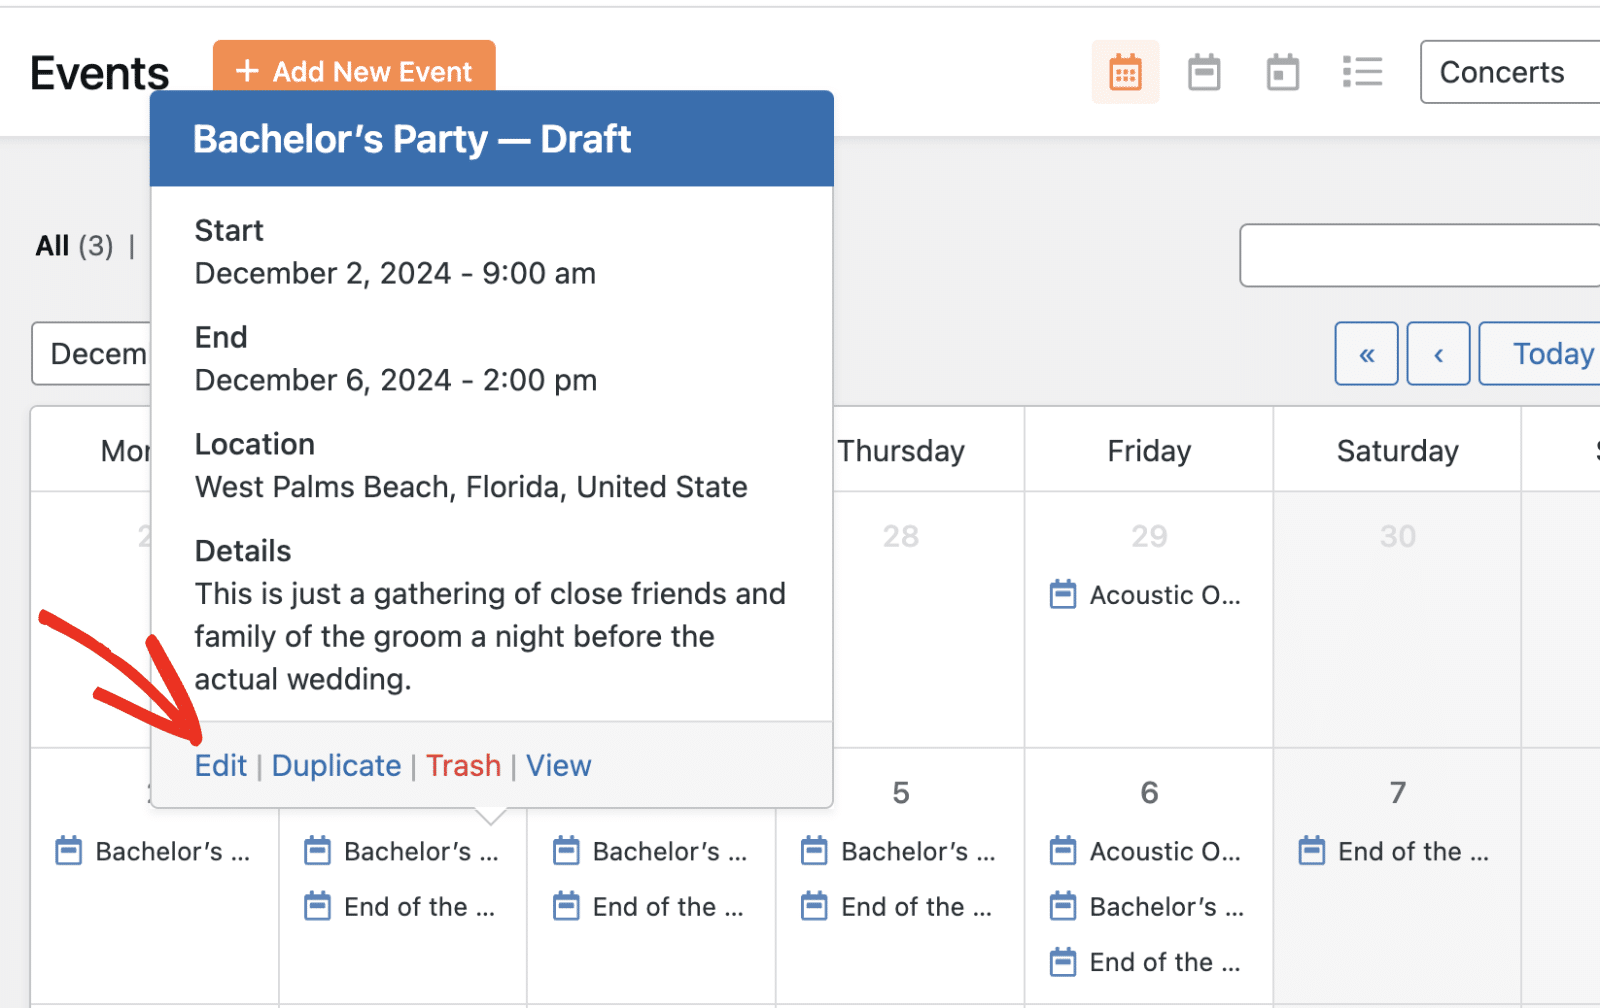
Recall that we’re yet to publish this event as we set the event status as Draft in WPForms form builder settings. When editing the event, you can enable ticket sales following the same process we covered above. When you’re ready, publish the event to make it live.
Now, users can submit events on your site using a WordPress form plugin. You can review each user’s submission, edit, and customize the event to allow ticket sales before publishing it on your site. This feature is handy for event planners who want to crowdsource events or allow third-party organizers to use their online ticketing system.
FAQs – How to Manage Event Ticketing
These are answers to some of the top questions users ask regarding managing event ticketing in WordPress.
How do I create a ticket in WordPress?
You can easily create an event that supports ticket sales using a plugin like Sugar Calendar.
How do I create an event management website in WordPress?
The first step is to make sure you have a functional WordPress site. Then, you can proceed to install the essential tools like WPForms and Sugar Calendar. These plugins provide a comprehensive event ticketing platform that allows you to manage events, sell tickets online, and handle event registration. See our tutorial for a complete walkthrough.
Are there other plugins that allow you to sell event tickets online?
Of course! Plugins like WPForms, Easy Digital Downloads, and The Events Calendar allow you to accept user payments for digital products like online courses, event tickets, etc. However, combining the features of WPForms and Sugar Calendar gives you a powerful solution for creating and managing event ticketing in WordPress.
Can I use this system for virtual events?
Absolutely! The event ticketing software we’ve discussed can be adapted for virtual events as well. You can use it to sell tickets for online conferences, webinars, or any other type of digital event. The ticketing platform allows you to manage online ticket sales just as easily as for physical events.
Next, Customize Notification Emails
In this post, I showed you how to manage event ticketing in WordPress using Sugar Calendar. If you use WPForms to allow users to submit events on your site, you should also consider sending a custom notification email to the user after they submit their event entry.
Ready to build your form? Get started today with the easiest WordPress form builder plugin. WPForms Pro includes lots of free templates and offers a 14-day money-back guarantee.
If this article helped you out, please follow us on Facebook and Twitter for more free WordPress tutorials and guides.

