
AI Summary
How often do you read reviews and testimonials before purchasing a product or service? Probably pretty often. Same! Social proof can have a big impact, but did you know it’s pretty easy to add it to your own site? With just a few tools, you can collect customer testimonials and display them on your website.
In this post, I’ll show you how you can create custom testimonial forms and display your reviews on your site in 3 easy steps.
Create Your WordPress Testimonial Form Now
Collect Customer Testimonials From WordPress Form Submissions
I know your time is valuable and you want to get right down to business, so here’s a quick overview of my process for displaying authentic customer testimonials and reviews.
See how there are only 3 steps to getting this set up? I’m going into a lot of detail about each of them so it’s easier for you to follow along, but once you get the hang of it, you’ll see that it really only takes a few minutes.
Let’s get into it!
What You’ll Need For This Tutorial
My process is super easy, but you will need to install the following 2 plugins:
- WPForms: Sure, I might be partial, but WPForms is the easiest form-building plugin I’ve ever used. I can create a user feedback collection form in less than 2 minutes, and that’s exactly what we need to do here.
- Reviews Feed by Smash Balloon: Not only can you use this plugin to display reviews you get from social media, but it also integrates with WPForms to allow you to easily collect reviews right on your website.
Once you have both plugins downloaded and installed on your website, come on back and we’ll get started.
Step 1: Create a Testimonial Form in WPForms
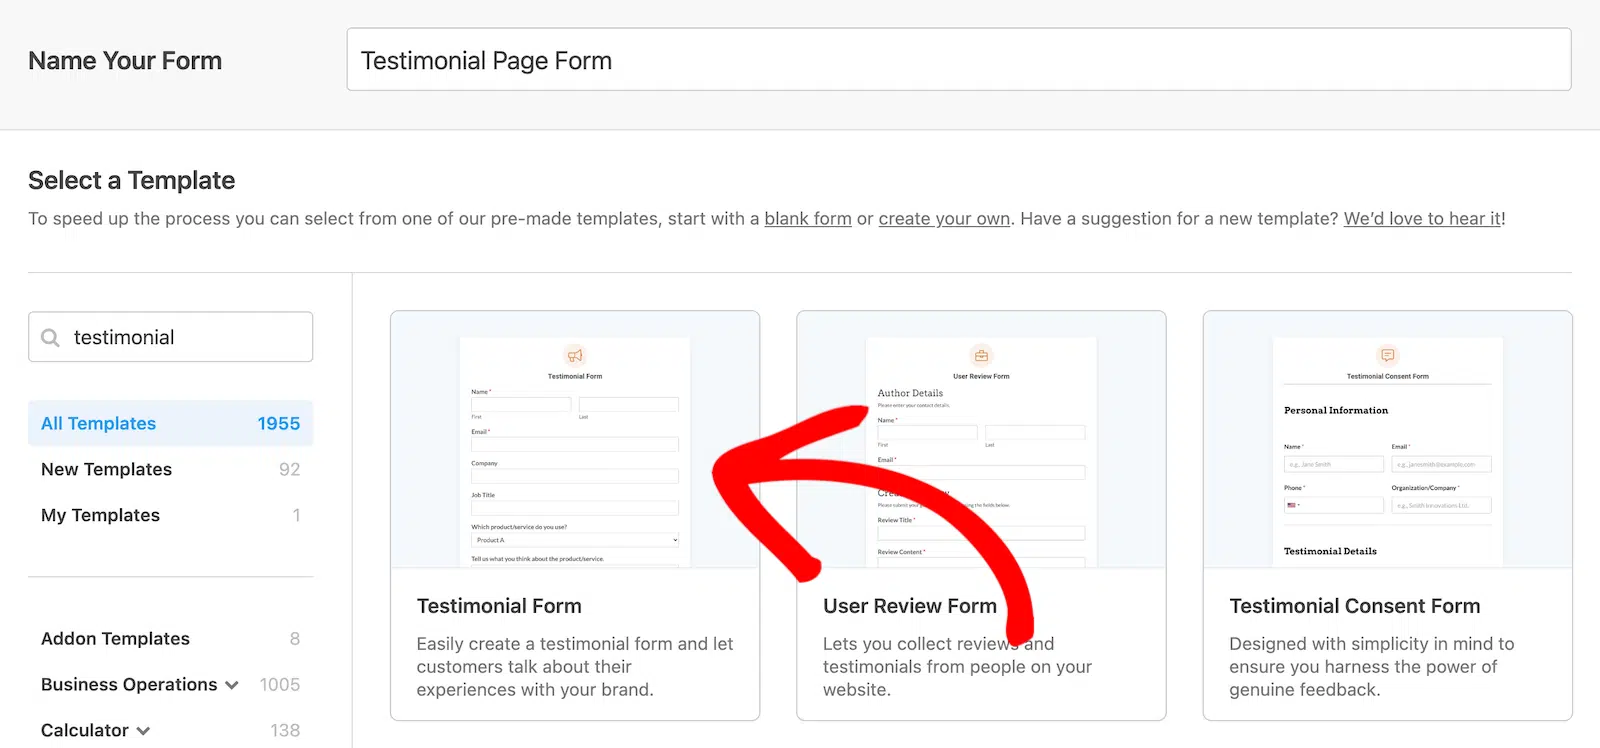
The first thing we need to do is create a testimonial form in WPForms. Fortunately, this won’t take very long because there are several templates available to speed up the process.
First, with your WordPress dashboard open, navigate to WPForms » Add New.
The form builder will open and ask you to name your form and either start with a blank form or select a form template. You can search for testimonial forms and several options will come back.
I’m using the template called Testimonial Form for all of the examples in this guide, but you choose whatever makes the most sense for your site!
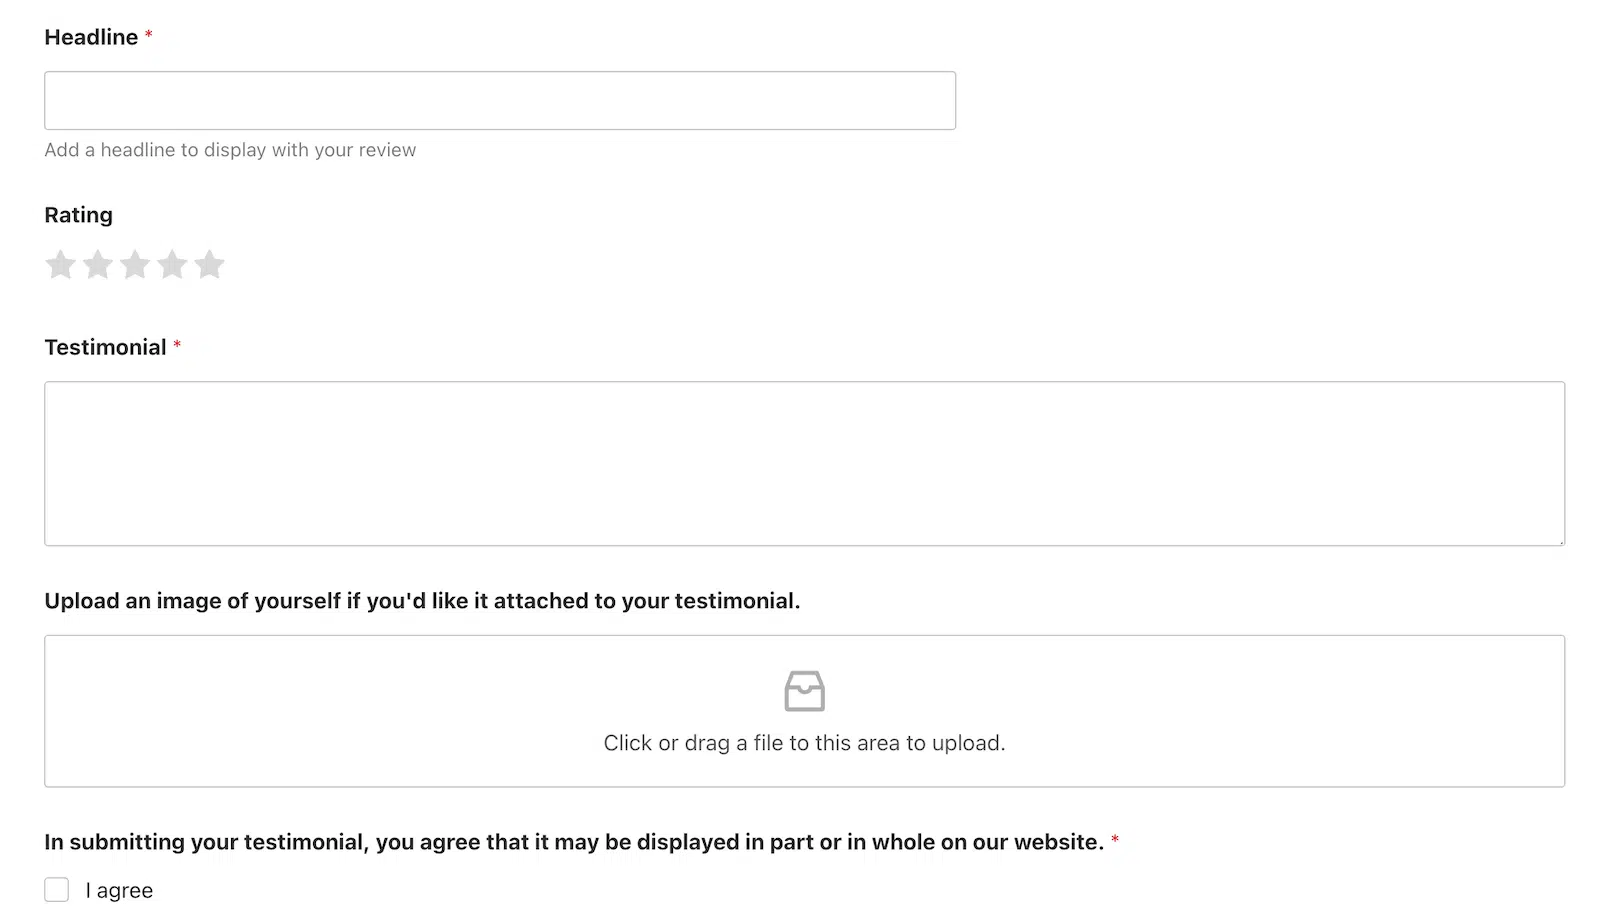
All WPForms templates are 100% customizable, so you can use them as-is or make them your own. Thinking about the testimonial content I want to display, I’m going to make some changes to my form as follows:
- Remove the dropdown list for “What product/service do you use?”
- Remove the radio buttons for “May we post your testimonial on our website?”
- Change the title of the paragraph text field from “Tell us what you think about the product/service” to “Testimonial”.
- Add a single line text field with the title “Headline.”
- Add a rating field.
- Add a checkbox to the bottom that users must select to acknowledge that testimonials may be published.
This is what the bottom half of my form looks like now, after making those updates.
Easy, right? Starting with a template definitely speeds the process up. The whole process took just about 2 minutes for me to do. If it took you a little longer, don’t worry. Once you’re more familiar with the form builder, you’ll be zipping around like nobody’s business! 🙂
If you want to go a bit further, you can also click on Settings from the left menu and configure any settings you like.
- General: Update the form name, description, tags, button text, and CSS
- Spam Protection & Security: Enable spam protection using built-in tools from WPForms, reCAPTCHA, hCaptcha, Custom Captcha, or Akismet.
- Notifications: Set up the notification emails that are sent when someone submits your form.
- Confirmations: Make adjustments to how and where users see submission confirmations.
When you’re happy with it, go ahead and embed your form on your website so it can start collecting those valuable testimonials!
Step 2: Connect WPForms to Reviews Feed & Collect Customer Testimonials
The Reviews Feed plugin by Smash Balloon is going to make it really easy for you to publish the testimonials or reviews that you collect through your form. There’s just a little bit of configuring to do first. Don’t worry. I’ll show you!
First, from your WordPress dashboard, navigate to Reviews Feed » Collections. Click on Add New.

Once you click the Add New button, you’ll receive a prompt to give your new collection a name. This is for internal use only, so you can name it anything you’d like. Ideally, it will be something that indicates what’s in your collection. I named mine Testimonials.

After naming your collection, click on the Create Collection button.
The next screen you see is going to look like you should be seeing reviews there. You will, but we have to connect them first! To do that, click on the Connect a Form button at the top.
The next screen includes a dropdown of all of your forms on WPForms so that you can select the one you want to use.
There’s also an option to create a new form from a template if you don’t already have one.
Since I created my form in the first step, I’m going to select that one from the dropdown and click Connect.

After connecting the form, I can decide whether or not to add rules for auto-approving or auto-deleting.
This is a useful feature to have if you only want to display certain rules, like maybe only 5-stars or 3-stars and above. It’s totally up to you! If you don’t want to use any auto rules, you don’t have to. For my form, I want to manually add testimonials to my collection, so I’m not going to do anything with the rules.
Now your form is ready to start collecting testimonials that you can add to your collection!
I want to share something I learned here so that you’re prepared for it. This is going to apply if, like me, you decide to manually select content for your collection rather than using the rules to do it automatically.
If you go to your Collections page and you don’t see any reviews or testimonials there, don’t panic! (Can you tell that I definitely panicked?)

Here you can see that there’s a form connected but nothing is there in terms of reviews. Remember, unless you set a rule to auto-approve, you have to manually add reviews to your collection. Fortunately, that process is so easy that you’ll forget you ever panicked in the first place. Again, speaking from experience.
First, from that screen, click on the Form Submission button.

Now you can see the testimonials that you’ve received through the form on your website. You’ve probably guessed this by now, but if you want to add the testimonial to your collection, you just click on that Add to Collection button.
Now if you go back to your Collections page, you’ll see the testimonials you added.

So now you’re probably wondering how you actually get these reviews to display on your website. Onward we go!
Step 3: Display Review and Testimonial Collections on Your Website
Collections populate Feeds, and the Feed is what you’ll show on your website. From your WordPress dashboard, navigate to Reviews Feed » All Feeds.
Click on the Add New button.

Now I’m going to select the sources that will populate my feed. In my case, it’s my Testimonials collection.

If you connect your Reviews Feed plugin to other sources such as social media platforms, Google, Yelp, and so on, you can include those, as well. You can add multiple collections to your feed.
After you select the collections you want to include, click Next.
Now you can choose the template you want to use for how the reviews will display. There are several options. Choose what works best for your site. I’m going to use the Simple Cards.

Smash Balloon will work its magic for a few seconds and then you’ll your feed. Think of it as a draft. You can customize it with all the options on the left. When it’s to your liking, look for the Embed button at the top (it doesn’t hurt to save it first, too).

When you click Embed, you get options. Who doesn’t love options?
You get a shortcode that you can copy and paste wherever you’d like to publish your feed.

I copied the shortcode, opened the page where I wanted to publish my reviews, and added it to a shortcode block in the WordPress Block Editor. Now I have a nice review feed published to my site.

And if someone wants to leave a review, they can click the Write a Review button and go straight to the connected form that’s collecting testimonials.
And that’s it! Now you know how to collect customer testimonials with a custom form and display them on your website. Nice work!
Next, Learn How to Manage Your Invoicing in WordPress
After this tutorial, you’re on your way to becoming a power user. And if you’re running a business where you’re collecting testimonials, there’s a good chance you’re also managing invoicing. Are you looking for ways to do that in WordPress? If so, check out our post to learn 2 ways to bill smarter, not harder.
Do you manage events for your business? If so, you’ll also want to check out our guide to using the WPForms Repeater Field and Google Sheets to streamline event management.
Ready to build your form? Get started today with the easiest WordPress form builder plugin. WPForms Pro includes lots of free templates and offers a 14-day money-back guarantee.
If this article helped you out, please follow us on Facebook and Twitter for more free WordPress tutorials and guides.


Hi
Got WPForms and wonder if the above solution also works with the plugin Strong Testimonials?
Hi Peter,
We have updated this article to use the Strong Testimonials plugin.
is this free or licenced
Hi Satyendra- The Post Submission Addon is available with Pro and Higher license levels.
In case if it helps, please refer to the complete comparison table of each license level and the features and addons associated with it.
Also, here is a doc on Lite vs Pro comparison.
Hope this helps 🙂
Hey! The feedback form is planned through a questionnaire with emoticons. question. Will you be able to send pictures / smiles to the review?
Hi Maksim,
We currently do not have an inbuilt feature to send pictures/ smilies to the post. I do agree that it would be super helpful and I have added your vote to consider this feature as an enhancement for the future.
Meanwhile, in case if it helps, here is a guide to set up custom meta fields
Hope this helps 🙂
The Easy Testimonial plugin is no longer available. Suggestions?
Hi Lawrence, thanks for spotting that. Our team will update the tutorial as soon as we can. In the meantime, consider checking out this review article for the best testimonial plugins for WordPress to help you decide.
Hi Lawrence, thanks again for letting us know. We’ve updated the article with fresh info and the tutorial now uses Strong Testimonials. I hope this helps!
I need a way to only allow signed in users / users with accounts to be able to submit a review.. is that possible in this setup?