


AI Summary
Form entries aren’t set in stone. A misspelled email address, a booking date that moved after a phone call, a phone number missing its last digit: you can fix all of it right inside WordPress, and nobody has to fill out your form a second time.
That matters more than it sounds. Your entries are the record you reply from, export to your accountant, and pull up three months later when a customer asks what they ordered. If that record is wrong, every step after it inherits the mistake.
In this post, I’ll walk you through editing a submitted form entry in WPForms, which fields you can and can’t change, and how to keep your notifications and connected apps in line after you make an edit.
How to Edit a Form Entry After It’s Been Submitted in WordPress
Why You’d Edit a Form Entry
Most edits fall into one of a few buckets:
- Typos the customer made. A transposed digit in a phone number or a .con instead of .com means your follow-up never lands.
- Details that changed after the fact. Someone books a Tuesday appointment, then calls to move it to Thursday.
- Information you collected somewhere else. A customer gives you their shipping address over email, and you want it on the entry with everything else.
- Cleanup before a report. You’re exporting entries to Excel for a meeting and want the names spelled consistently.
In each case, editing the original entry keeps one accurate record. The alternative, asking someone to resubmit, gives you two entries for the same person and a customer who’s now filled out your form twice.
What You’ll Need:
- WordPress with WPForms installed and activated
- A WPForms Pro license or higher (entry editing is included at this level)
- At least one submitted entry on the form you want to edit
Step 1: Open Your Form’s Entries
In your WordPress dashboard, go to WPForms » Entries. You’ll see a list of every form on your site along with how many entries each one has collected.
Click the name of the form that has the entry you want to change.

Step 2: Find the Entry You Need
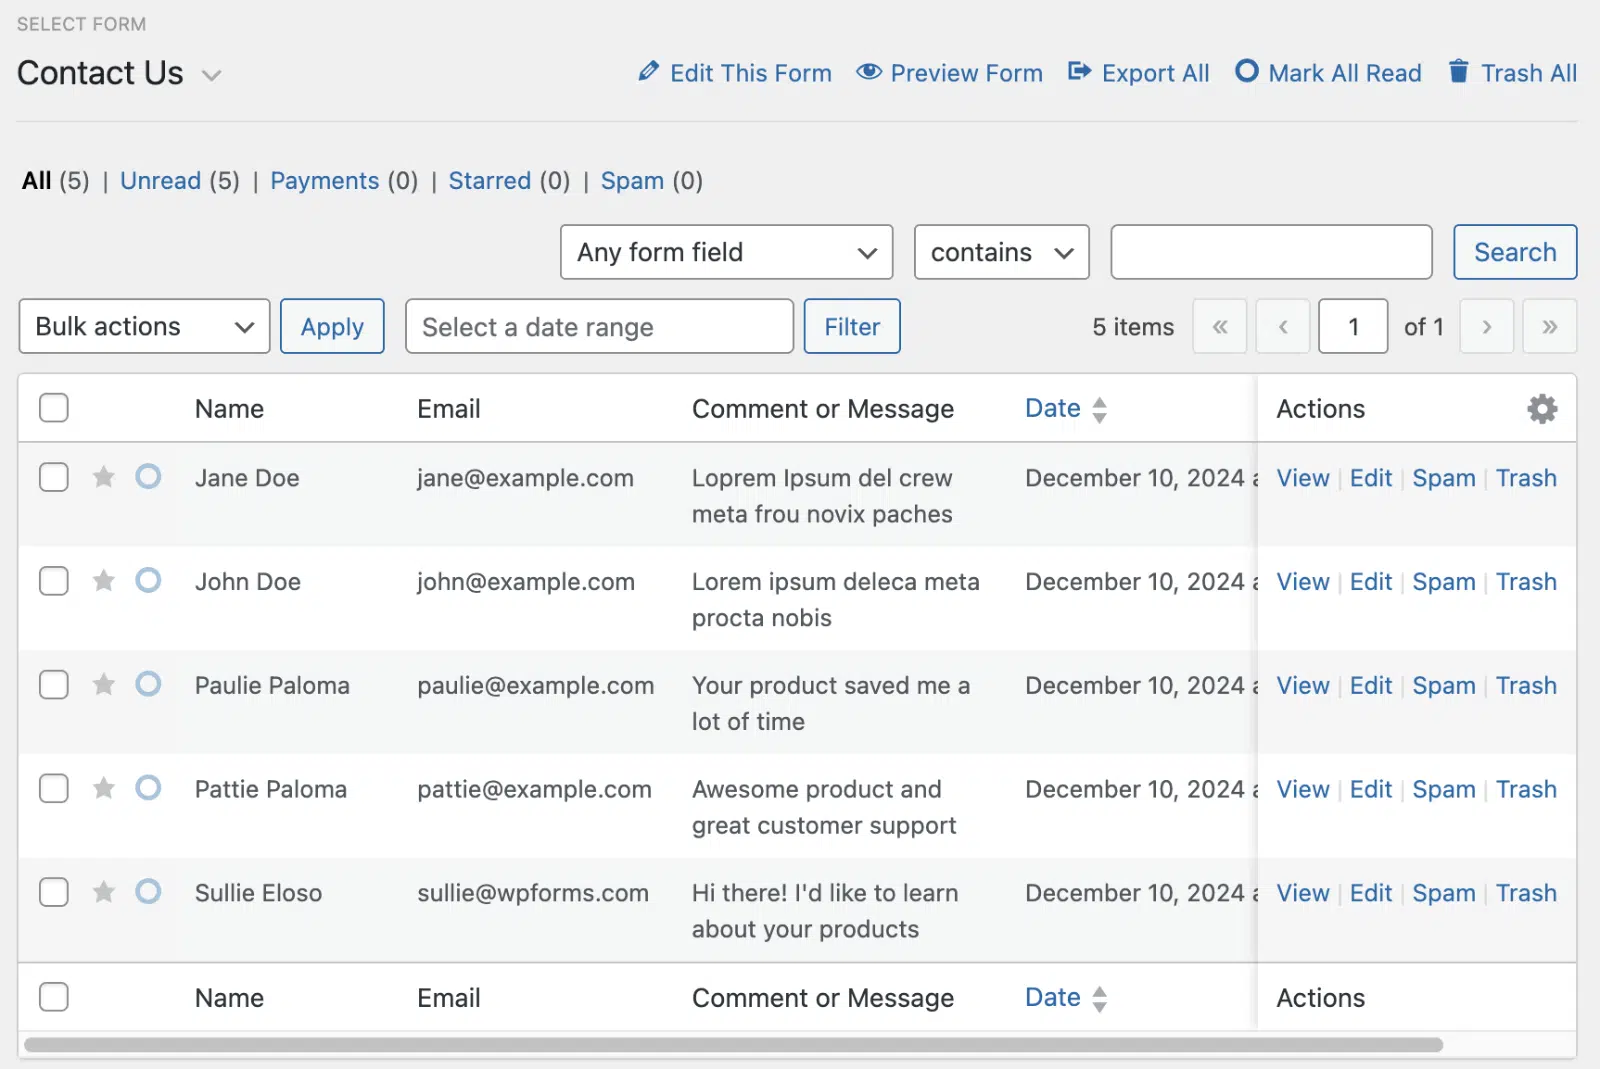
If the form has a lot of submissions, use the search box at the top of the entries list. You can search by any field, so typing the customer’s last name or email address usually gets you there in one try. You can also filter by date range if you know roughly when they submitted.
If you edit the same handful of entries often (open orders, pending applications), star them. Starred entries get their own filter, and the rest of WPForms’ entry management tools make it easy to keep the important ones a click away.
Step 3: Click Edit
You have two ways in:
- From the entries list: click Edit under the Actions column on the right side of the entry’s row.
- From the entry itself: click View to open the full entry, then click the blue Edit button in the Entry Details box in the upper right.
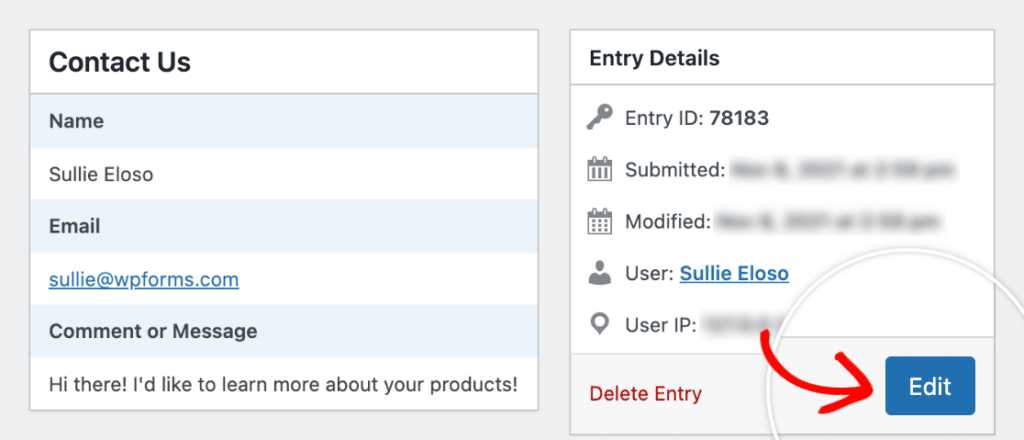
The second route is handy when you want to read the whole submission before deciding what to change.
Step 4: Make Your Changes and Click Update
The entry’s fields are now editable. Click into any field, make your change, and click Update to save it.
A few field types are locked to protect the integrity of the original submission:
| Field | Why it’s locked |
| Payment fields | The transaction already happened with your payment processor |
| Signature | A signature should reflect what the person signed |
| GDPR Agreement | Consent is recorded at the moment of submission |
| Password | Passwords aren’t stored in a readable form |
| Hidden Field | These carry values your form set behind the scenes |
File Upload fields work a little differently. You can remove a file that was uploaded with the entry, but you can’t attach a new one to it. If someone sent the wrong document, ask them to email the right one and add a note to the entry saying where it lives.
Step 5: Add a Note Explaining the Change
This step is optional, but future you will appreciate it. On the single entry view, scroll to the Notes section and click Add Note.
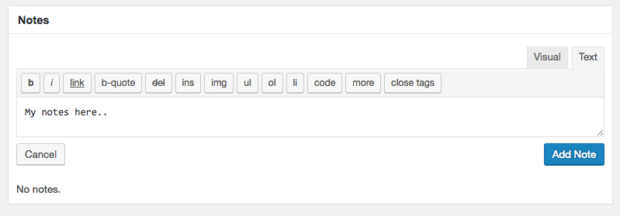
Something like “Customer called 10/9, moved appointment to Thursday” takes ten seconds and answers the question before anyone has to ask it.
WPForms also tracks edits in the entry’s log, so you can see when an entry was changed and who on your team made the change.
Step 6: Resend Notifications (If You Need To)
Editing an entry doesn’t send a new notification email. That’s usually what you want, since nobody needs an inbox alert every time you fix a typo.
When the change matters to someone else, like a rescheduled appointment your technician needs to know about, open the entry and click Resend Notifications in the Actions box.
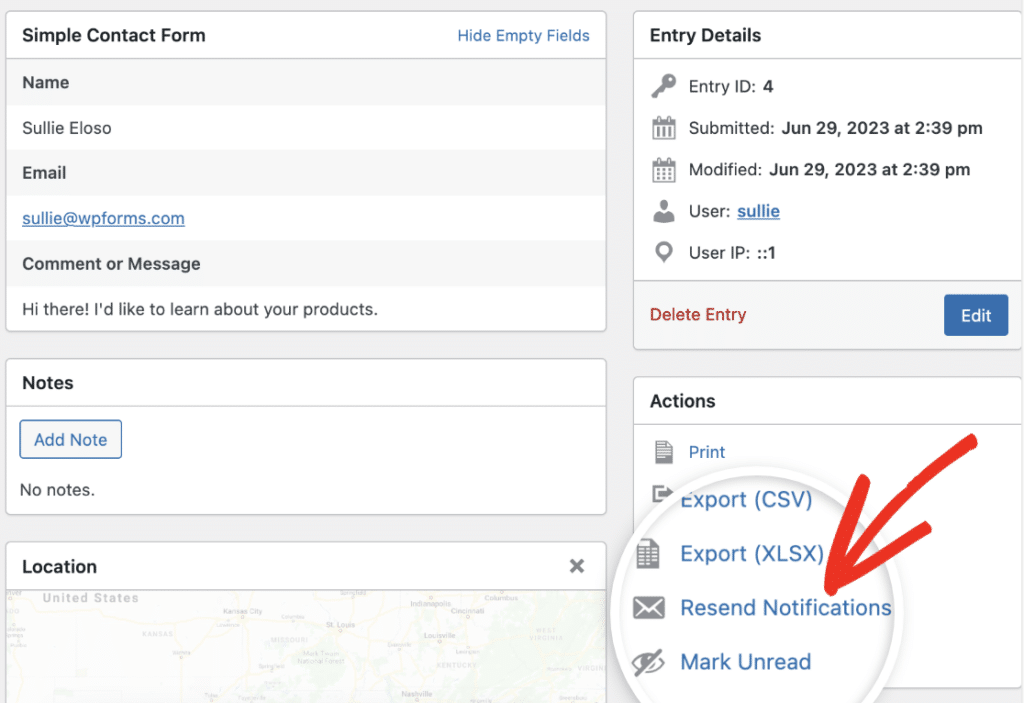
WPForms sends the notification emails you set up for that form again, this time with the updated details.
Update Your Connected Apps Too
Your edit saves in WPForms. It doesn’t travel to the apps your form already sent that entry to.
So if the entry went to Google Sheets, Mailchimp, your CRM, or anywhere else through an addon or Zapier, the old version is still sitting there. Make the same change in those apps by hand, or you’ll end up with a correct entry in WordPress and a wrong one everywhere your team works from.
If you fix a lot of entries in Google Sheets specifically, the simplest habit is to make the edit in WPForms first, then update the matching row in the Sheet right after.
Control Who Can Edit Entries
By default, administrators can edit entries. If you have staff logging into WordPress, you probably don’t want everyone who can read entries to be able to change them.
WPForms has built-in Access Controls for this. Go to WPForms » Settings » Access, and you can decide which user roles can view entries, edit them, and delete them, either for every form or only for forms they created.

A front-desk role could read appointment requests without being able to rewrite them, for example.
FAQs
Can I edit form entries in WPForms Lite?
Entry editing is part of WPForms Pro and higher. Lite users can still connect Lite Connect, which backs up your entries so they’re waiting in your dashboard when you upgrade.
Can my users edit their own form submissions?
Not after they’ve submitted. The easiest way to cut down on mistakes is to add an Entry Preview field to your form, which shows people a summary of their answers so they can catch errors before they hit submit. For anything after that, they can reach out to you and you can make the change from your dashboard.
Does editing an entry send a new notification email?
No. Edits save without triggering a notification. If you want the updated details to go out, open the entry and click Resend Notifications.
Will my edits update Google Sheets, Mailchimp, or my CRM?
No. Edits stay inside WPForms. Any app the entry was already sent to keeps the original data, so you’ll need to update those by hand.
Can I see who edited an entry?
Yes. Each edit is recorded in the entry’s log, showing when the change happened and which user made it. Adding a note when you edit gives your team the why behind it too.
Why can’t I edit some fields in an entry?
Payment, Signature, GDPR Agreement, Password, and Hidden fields are locked. These record something that happened at the moment of submission, like a payment or a consent, so changing them afterward would make the entry less trustworthy.
Can I add a new file to an existing entry?
No. You can remove a file that was uploaded with an entry, but you can’t upload a new one to it. Ask the person to send the file another way, then add a note to the entry about where it’s saved.
Can I undo an edit to a form entry?
There’s no undo button, so give your changes a quick read before you click Update. If you’re about to make bigger changes, print or export the entry first so you have a copy of the original.
Next, Export Your Form Entries
Now that your entries are accurate, you can put them to work. Check out our guide on how to export WordPress form entries to CSV so you can share clean records with your team, your accountant, or your next spreadsheet.
Ready to build your form? Get started today with the easiest WordPress form builder plugin. WPForms Pro includes lots of free templates and offers a 14-day money-back guarantee.
If this article helped you out, please follow us on Facebook and X (Twitter) for more free WordPress tutorials and guides.





