AI Summary
Do you want to use a Facebook Pixel to track your form submissions? Embedding a Pixel can help you to easily remarket your site to people who have already used your forms.
We’ll walk you through the easiest way to get Pixel tracking working on your WordPress forms. This will let you easily track form submissions and optimize your ad campaigns.
Once you’ve installed the Pixel on your website, you’ll be able to use your visitor data to create custom audiences easily for your ads.
Create Your WordPress Form Now
What Does the Facebook Pixel Track?
The Facebook Pixel tracks user activity on your website. It’s useful for measuring the number of conversions you get through your checkout or measuring important actions on your website.
The Facebook Pixel uses a cookie to identify a user as they look at your site. It tracks events like:
- Items viewed, purchased, or added to a wishlist
- Add to cart buttons clicked
- Pages visited
- Payment info added
- Appointments booked
- And more.
These are examples of what Facebook calls Standard Events. You can add your own custom events and custom conversions.
![]()
Based on the data gathered by your events, Facebook can:
- Show Facebook ads to your site visitors – For example, if a visitor views products and doesn’t buy them, you can create ads that encourage them to come back to a special landing page, or show them a promo code.
- Create audiences with similar characteristics to your visitors – This lets you advertise to an audience that’s similar to the people browsing your site already. Since Facebook knows your target demographic, it can show ads to people with similar age, gender, interests, or location.
- Show ads to customers who are most likely to spend – You can create custom audiences who have already spent money and target ads at those people. This can help you to get a better return on investment when advertising on Facebook.
Tracking your form conversions is a great way to boost your revenue from social media ads. Once you know who’s converting, you have a goldmine of valuable data that can help increase sales by focusing more effectively on your ideal customers.
Now we understand what the Facebook Pixel can do, let’s install a form-tracking pixel on your site to track your form submissions.
How to Use a Facebook Pixel to Track Form Submissions
To step through this tutorial with us, you’ll need to have a business Facebook page set up and ready to go. We’ll show you the easiest way to set up the Facebook Pixel to track form submissions.
- Install the WPForms Plugin
- Create a Thank You Page for Form Submissions
- Set Up Your Form Confirmation Page
- Create Your Facebook Pixel to Track Form Submissions
- Create Your Custom Conversion
If you use an ad blocker, it’s a good idea to turn it off before you start working through these steps. If your ad blocker is active, you might have trouble following along since some of the buttons and options might be hidden.
Step 1: Install the WPForms Plugin
First up, we’re going to install the WPForms plugin. WPForms is the best form builder for WordPress, and it lets you make any kind of form without writing code.
If you need help installing the plugin, hop over to this guide to installing a plugin in WordPress.
Next up, we need to create a form. WPForms comes with 2,000+ WordPress form templates.
Here’s a guide to creating a simple contact form in WordPress that will help you get your form set up.
When your form is ready, come back to this guide and pick up from step 2 below.
Step 2: Create a Thank You Page for Form Submissions
Now we need to make a new page in WordPress. We’re going to show visitors this page after submitting the form to record the form submission as an event. You can do this by manually adding event code, but we’re using a super quick and easy method.
We’re also going to hide this page so that it can’t be accessed by someone who accidentally found it in a search result. So when this page loads, the Facebook Pixel will know that the form’s been submitted and we haven’t just had a random visit.
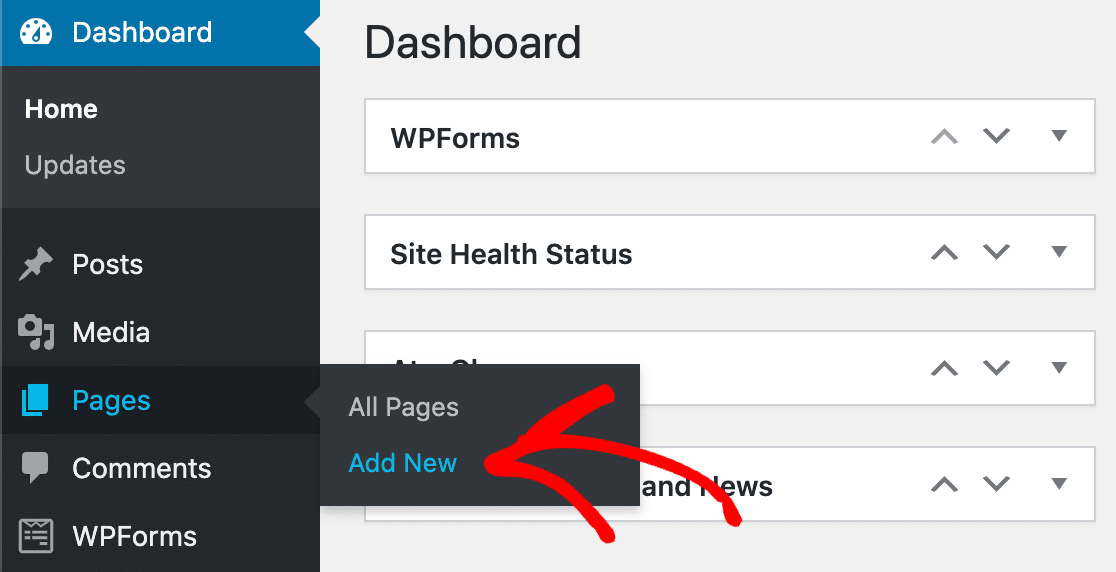
To start, click Pages » Add New.
Create a thank you page that will show up when your form’s been submitted. You can type anything you want here.
We’ll type a quick thank you message.
Now type in a slug or your page in the URL Slug box to the right.
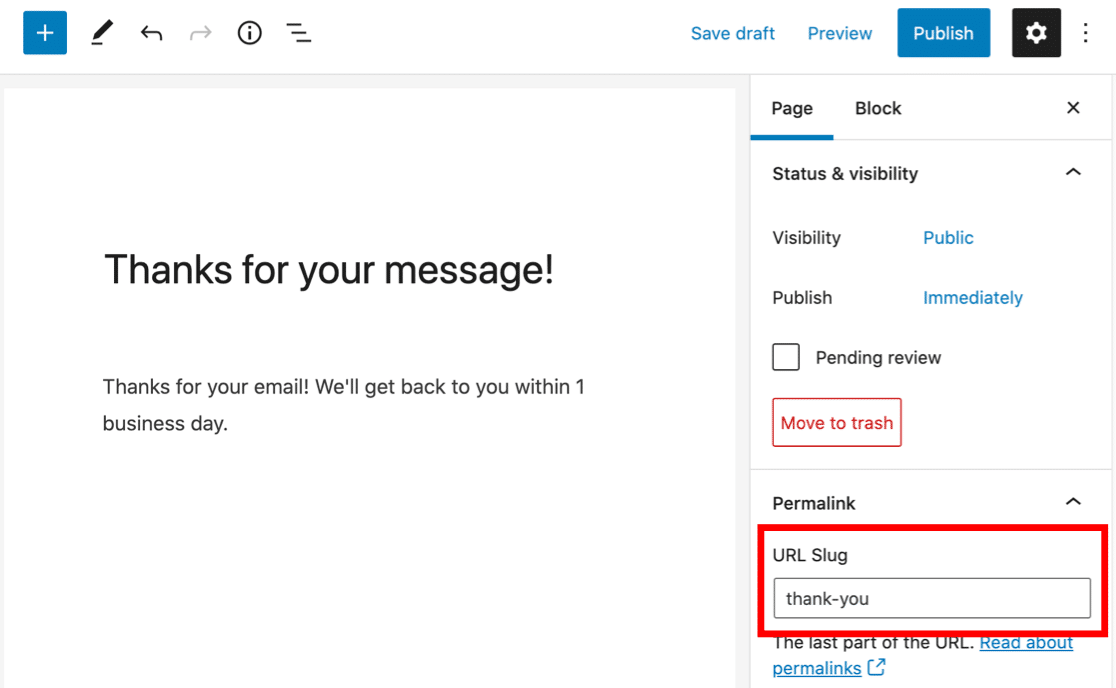
We’re going to use thank-you as the slug for the page. Be sure to type something unique here. This is important because we need the Pixel to easily identify this page later.
Hiding Your Thank You Page
Next, you’ll want to make sure that this thank you page isn’t indexed by search engines. We don’t want anyone coming to this page from a search and triggering the Pixel without submitting the form.
To hide the page, we’re going to change the indexing settings with our SEO plugin.
All in One SEO is the best search engine optimization plugin for WordPress, and it lets you easily control how your site is indexed. We can use the settings on the page to make sure it isn’t indexed by search engine crawlers.
Be sure to change the settings for the thank you page, not your entire site.
In the AIOSEO Settings panel, turn off Use Default Settings. Then, you’ll want to make sure that the page is set to No Index.
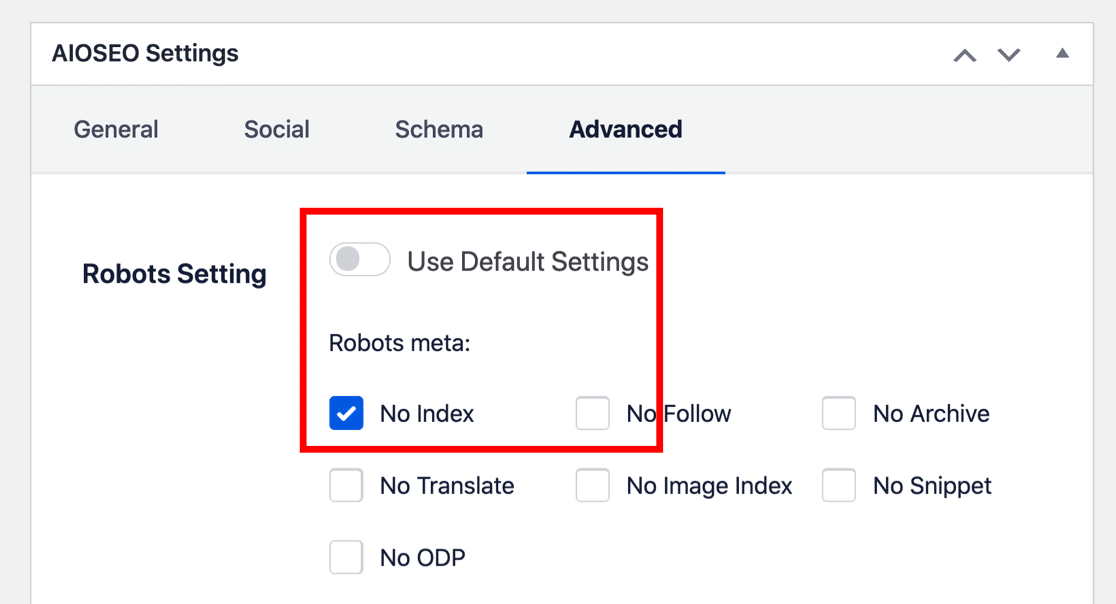
When you save your new web page, search engines will be discouraged from indexing it in their results. This means the event tracking can only record a visit if someone comes from a form submission.
You can set a page to No Index in other ways. For example, you could add a line to your robots.txt file. To find out about different ways to noindex a page, visit this tutorial on how to hide a WordPress page from search engines.
When that’s done, click Publish to publish your page.

Finally, check that your new Thank You page hasn’t been automatically added to any of your navigation menus.
If it has, you’ll want to go to Appearance » Menus and remove the page from each menu so nobody can visit it directly. Check out this guide to editing the navigation menu in WordPress if you need more help removing the page from your menus.
Now we’re ready to go back to the form.
Step 3: Set Up Your Form Confirmation Page
By default, your form confirmation is probably set up to show a thank you message. This is a great way to quickly confirm that the form submission worked.
But for this tutorial, you’ll want to change this setting so that WPForms loads your new thank you page instead.
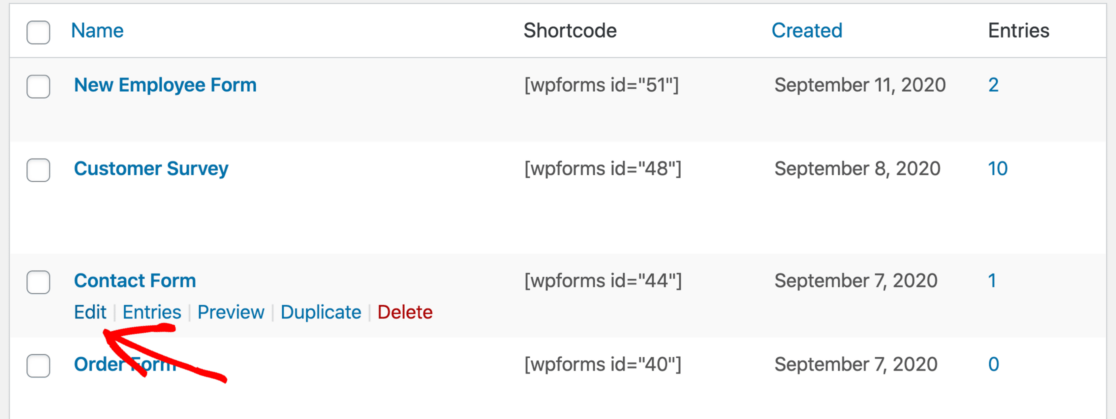
To start, click WPForms in the sidebar. Now go ahead and click Edit underneath the name of the form you created.
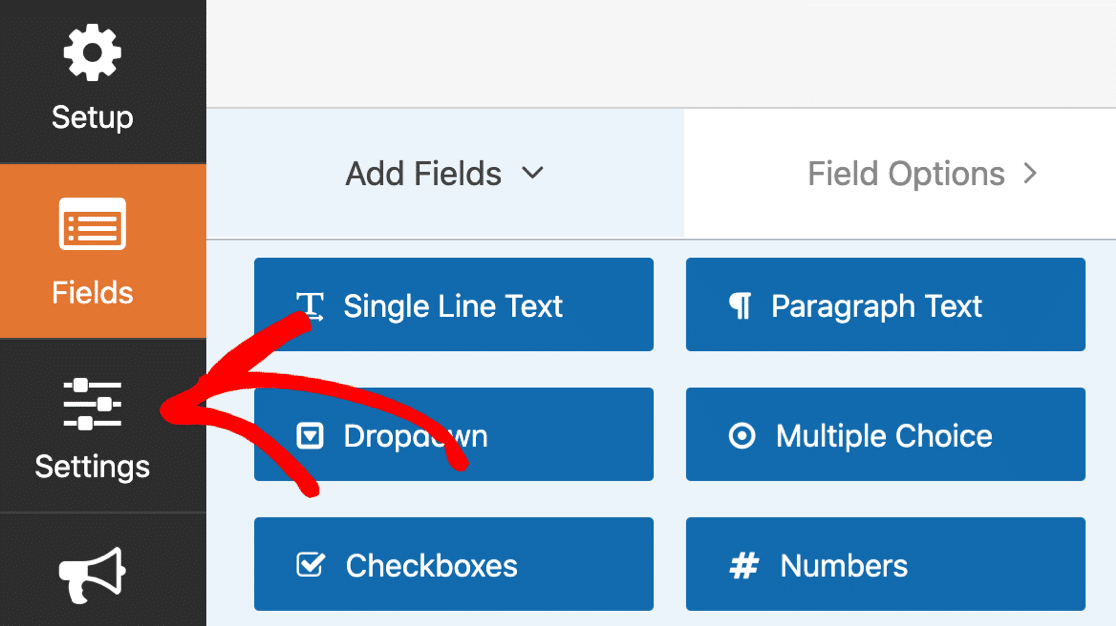
In the form builder, click Settings on the left…
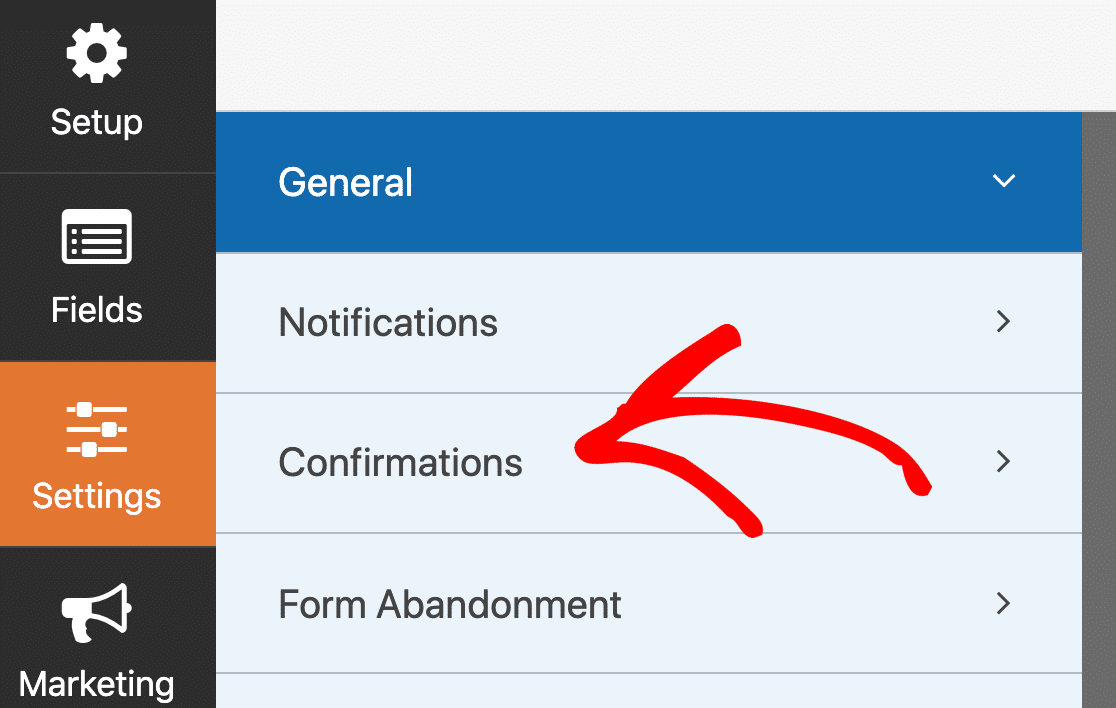
And now click Confirmations.
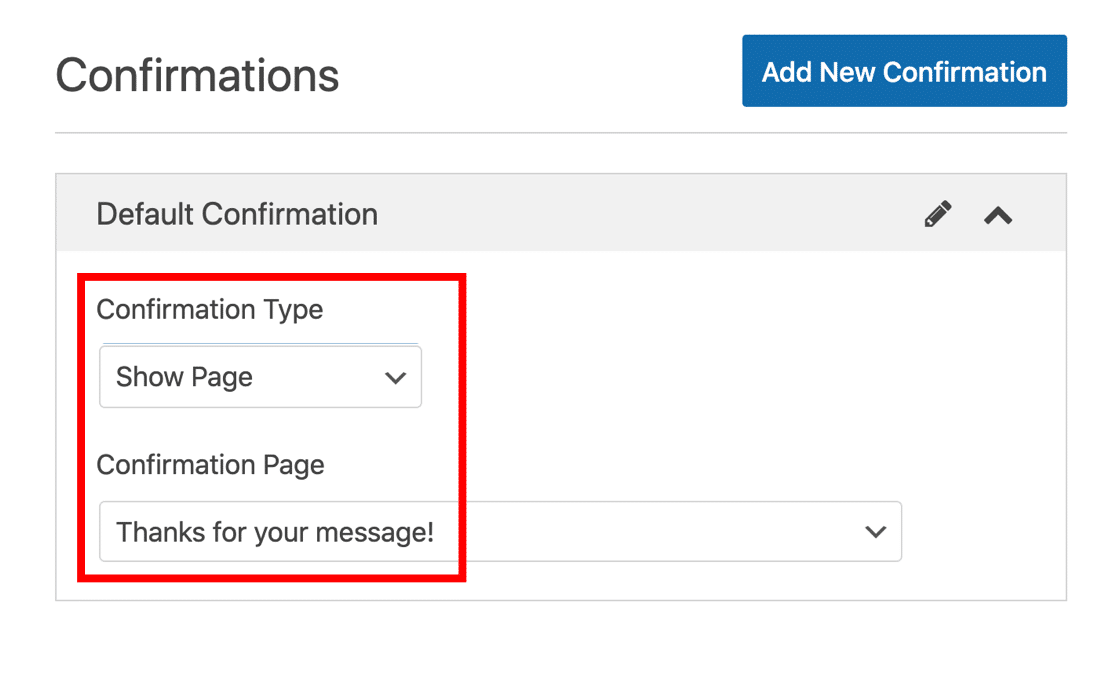
On the right-hand side, check to see if your confirmation type is set to Message. This will show a box with some text or HTML.
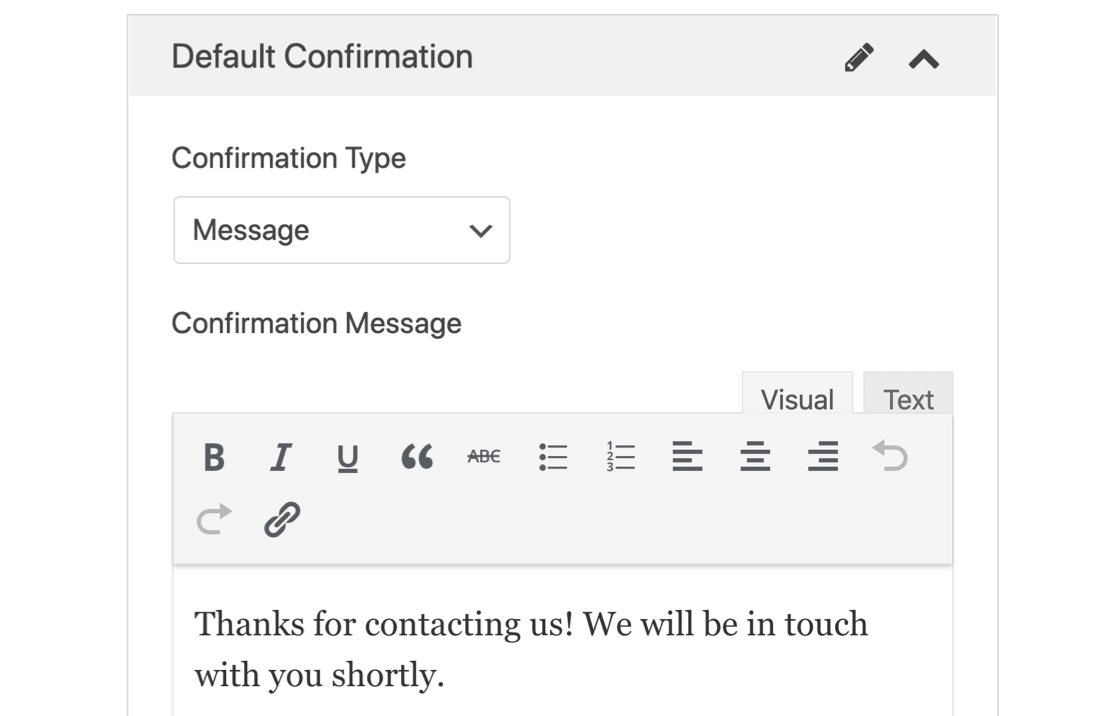
Let’s change this.
In the first dropdown, select Show Page. Then choose the name of your new thank you page in the second dropdown.
The confirmation settings will look like this:
To finish, click Save at the top of the form builder.
Great. The form is ready. Now we can switch to Facebook for the next step.
Step 4: Create Your Facebook Pixel to Track Form Submissions
In this section, we’ll walk you through the basic steps of creating a Facebook Pixel ID. Facebook’s business tools are super powerful, so we’re just going to use the most basic settings in this tutorial.
Start by visiting the Facebook Ads manager. Log in to Facebook if you haven’t done that already. If you have more than one ads account, select the correct one from the dropdown at the top right.
Look to the sidebar and click the icon with 9 dots on it. From the menu that pops out, click on Events Manager.
![]()
If your account is brand new like ours, you won’t see any data sources yet. Go ahead and click Connect a data source.
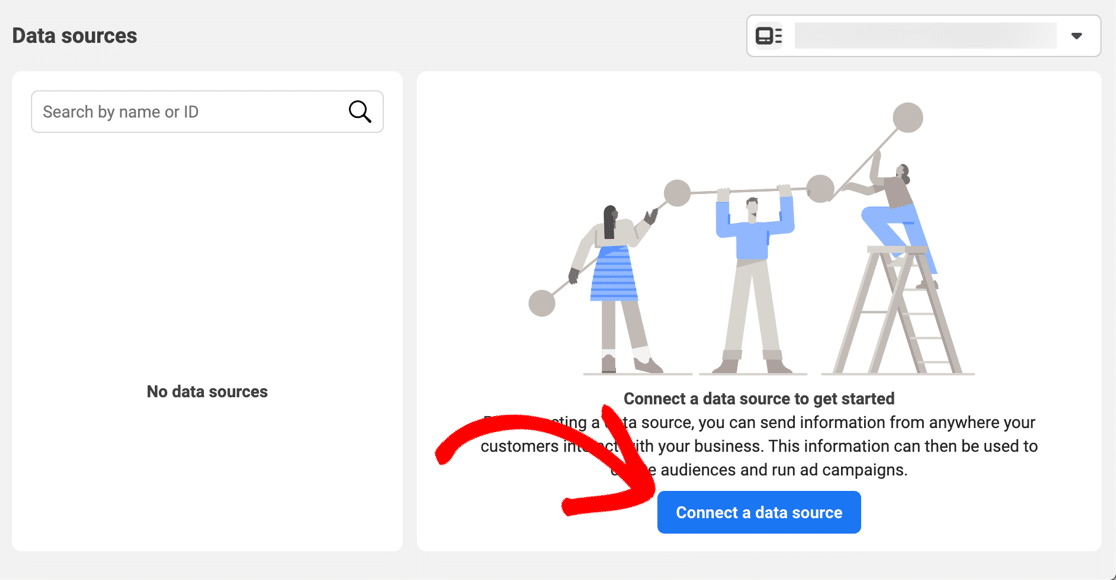
In the popup, you’ll want to select Web, then click Get Started.
![]()
In the next menu, click Facebook Pixel, and then click Connect.
![]()
Now you’ll have a chance to name your new Pixel and let Facebook detect the platform you’re using – in our case, WordPress.
The second field that we marked in red is optional, but you should definitely fill it in because it’ll make the next few steps faster.
![]()
Facebook should now be able to tell that you’re using WordPress.
Click Confirm.
![]()
You’re almost there!
A new wizard will open and guide you through installing the Facebook Pixel plugin. Select the options you want to use here and click Continue.
![]()
Click Download to download the Facebook Pixel WordPress plugin, then walk through the remaining steps to install the Pixel on your website. The wizard will connect to your site using your Pixel ID.
![]()
Remember how we mentioned ad blockers earlier? If you have an ad blocker running, the download link for the plugin might not appear. You’ll want to disable your ad blocker and reload the page, then pick up the installation from this point.
Testing Your Facebook Pixel in WordPress
When you install the Facebook Pixel plugin, it’ll automatically add the Facebook Pixel tracking code to every page on your website. This is a super convenient way to track user activity, and it’s a lot easier than adding a snippet to your templates by hand.
Your Pixel should start capturing Facebook events and sending the data over to Facebook right away. But you’ll want to check before you move on to the next section.
Click Test Events here to try out your tracking pixel. Keep this open, then open up your site in another tab and browse it.
You should be able to see each pageview appear almost in realtime to show you that the code is working.
![]()
There’s also a handy Chrome extension called the Facebook Pixel Helper that you can use to check the Pixel code is working on your website.
That’s it! The tough part is done, and you now have a shiny new Facebook Pixel on your website.
Now all we need to do is tell the Pixel to track our form submissions. Stay on the same screen for the final section of the tutorial.
Step 5: Create Your Custom Conversion
Now we’re into the final stretch and we can add our custom conversion. This will let us track conversions from our form’s thank you page.
Start by clicking the Create dropdown. Select Create Custom Conversion from the dropdown list.
![]()
We’ll step through the next set of options in 2 groups.
At the top of the popup, you’ll want to type in the first set of details for your new Facebook conversion:
- Name – Type in a name you’ll easily be able to recognize in reports
- Description – This is optional, but you’ll want to add a description if you’re tracking multiple form submissions with your Facebook Pixel code. That way, you can easily tell them apart in the dashboard
- Conversion Event – Select All URL Traffic
![]()
A little further down, we have a few more fields to fill in:
- Rules – Remember the page slug we set up for our new thank you page? You’ll want to paste that in here. If you prefer, you can use the dropdowns to change the rule to URL equals and paste in the entire page URL as an exact match. This helps to avoid issues with multiple pages that have similar slugs.
- Enter a conversion value – This setting is designed for eCommerce website, but there are some situations where it’s useful for forms. For example, you can assign a value to each conversion if you want to track sales on a simple order form.
![]()
All set? Now click Create.
You’re ready to track your form submissions with your new Facebook Pixel!
Let’s do a quick test. Log out of WordPress and disable any ad blockers you have running. Then fill out your form and submit it.
You’ll see the conversion showing up in the chart like this:
![]()
It can take up to 30 minutes for the data to show here, so you might need to wait a while before your conversion appears.
And that’s it! You successfully installed a Facebook Pixel to track form submissions on your site. Now you can use the data from your conversion tracking data to improve your ad targeting on Facebook.
Create Your WordPress Form Now
Next, Get More Form Conversions
Now you’re tracking form conversions with a Facebook Pixel, you’ll want to drive as many conversions as possible. The more conversions you track, the more data you’ll have about your target audience. And the more leads you have for your business.
If you need help, we have some awesome tips on:
- How to Get More Form Conversions
- How to Track Your Form Submissions in Google Analytics
- Track Form Submissions as Google Ads Conversions
- Best Social Media Plugins for WordPress
Ready to build your form? Get started today with the easiest WordPress form builder plugin. WPForms Pro includes a free contact form template and offers a 14-day money-back guarantee.
If this article helped you out, please follow us on Facebook and Twitter for more free WordPress tutorials and guides.


Hey guys,
If at all possible, you should update to include the FB Ads API connection. With this method, I am missing out on a couple of conversions due to the iOS update (the FB pixel isn’t recording everything). It should be fairly straightforward to update. Just the IP and goal should be enough.
Best wishes,
Andrea
Hey Andrea, thank you for the feedback, I have shared this with our team.
Thanks,