AI Summary
Do you want to customize the login page on your WordPress website? With WPForms, you have lots of ways to style your login forms, without any need for coding!
In this post, we’ll show you 7 different examples of login pages from popular sites, and how to recreate them. We’ll walk you through the process of building each form in the same style of the examples we feature here, with just a few clicks of your mouse.
Let’s dive in!
What Do You Write On a Login Page?
Your login page likely contains a few fields where users type in their username, email address, password, and more.
Your site’s login page is a place where website users enter their credentials to gain access to your site. These visitors may have an account on your site, or some other reason for needing to log in to your website.
You probably want to to include some form of text on your login page too, in order to inform or guide your website users on how to get into the site. You might also add imagery like logos and illustrations on your login, and you may opt for extra security features to keep unwanted spam from clogging up your login page.
7 Login Page Examples
In This Article
1. Simple Login Form
This login page on the HubSpot website is fairly basic and without many details included on the form. The form simply consists of an email entry, password, checkbox, and log in button.

The thing about a form like this, is that it’s a bit like the foundation of all other login form examples. It has the most basic elements needed for a login page.
And, if you prefer, your own login page can be simplified like this, too. WPForms is the best form builder plugin for WordPress, and it makes it super easy for you to add a custom login page to your website.
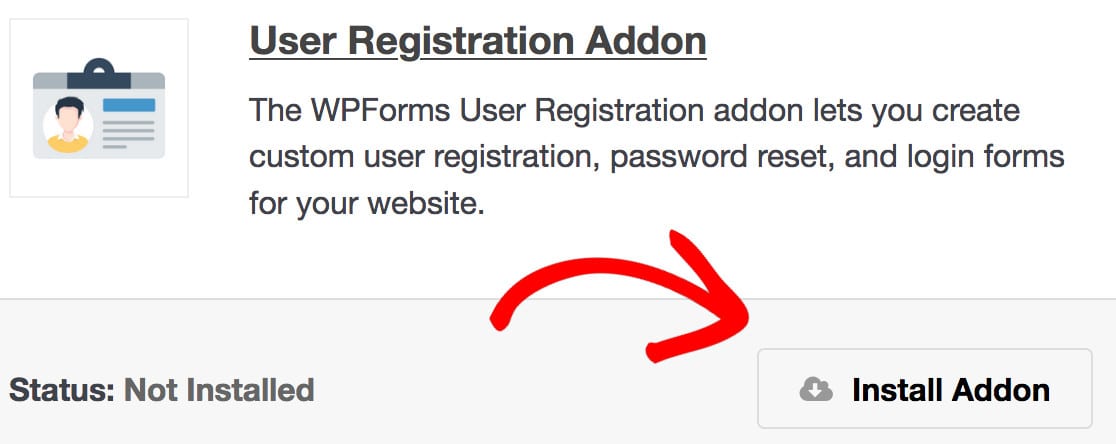
First, you’ll need to install WPForms and sign up for the Pro Plan to access the User Registration addon.
After entering your license key in your WPForms settings, go to WPForms » Addons in your dashboard. Scroll through the available addons to find the User Registration addon, which you’ll install too. Be sure to also activate the addon once you’ve installed it.
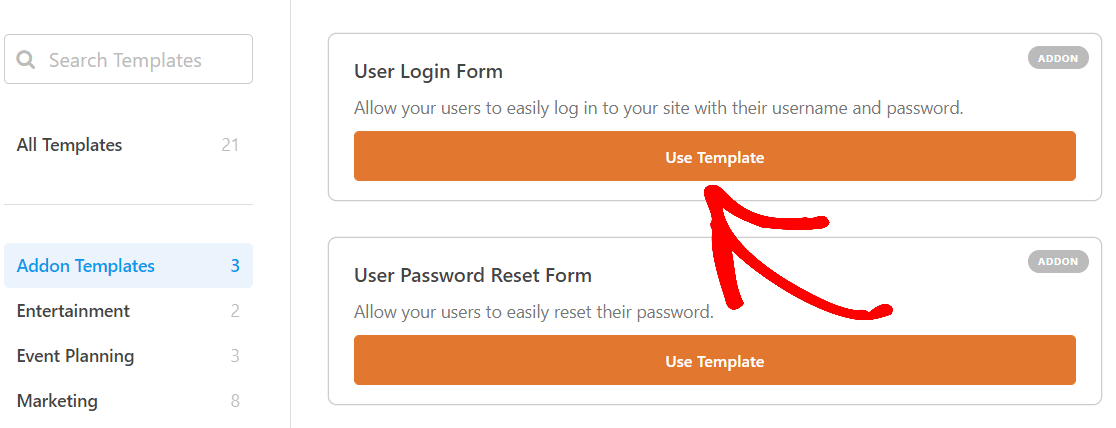
Now you’re ready to build your login form. Go to WPForms » Add New and find the User Login Form template from your available Addon Templates. Click on the Use Template button to select this template and open the form builder.
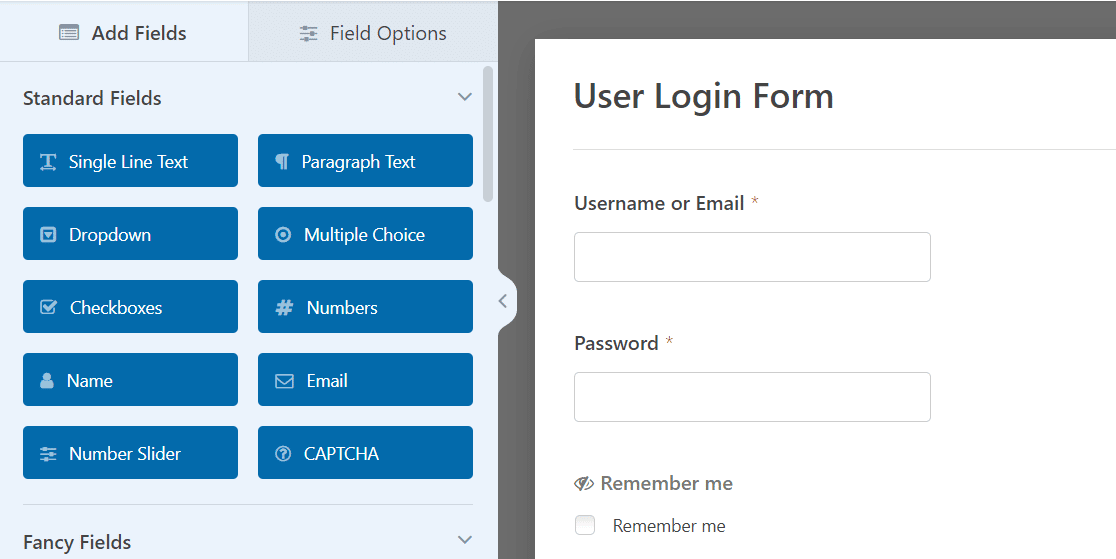
The WPForms form builder makes it easy for you to edit this premade template to suit your needs. You’ll find an extensive selection of form fields that cover virtually any element you would want on your online form. All you need to do is simply drag and drop each field into place.
You’ll see that the User Login Form has already loaded the necessary fields.
But, like all WPForms templates, this form is highly customizable, so you can add and edit fields on your form in a variety of ways.
For this form, let’s edit the Submit button at the bottom of the form to read ‘Log in’ like the HubSpot login page example.
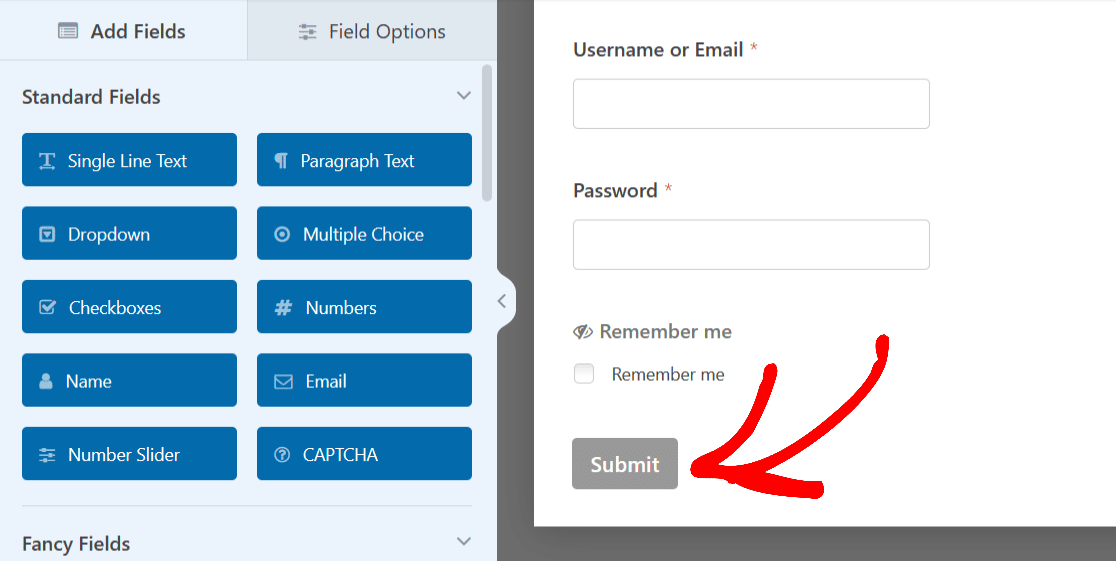
Just click on the button to expand its settings.
Then, to change the text of the button, open the General tab, and scroll to the Submit Button Text box.
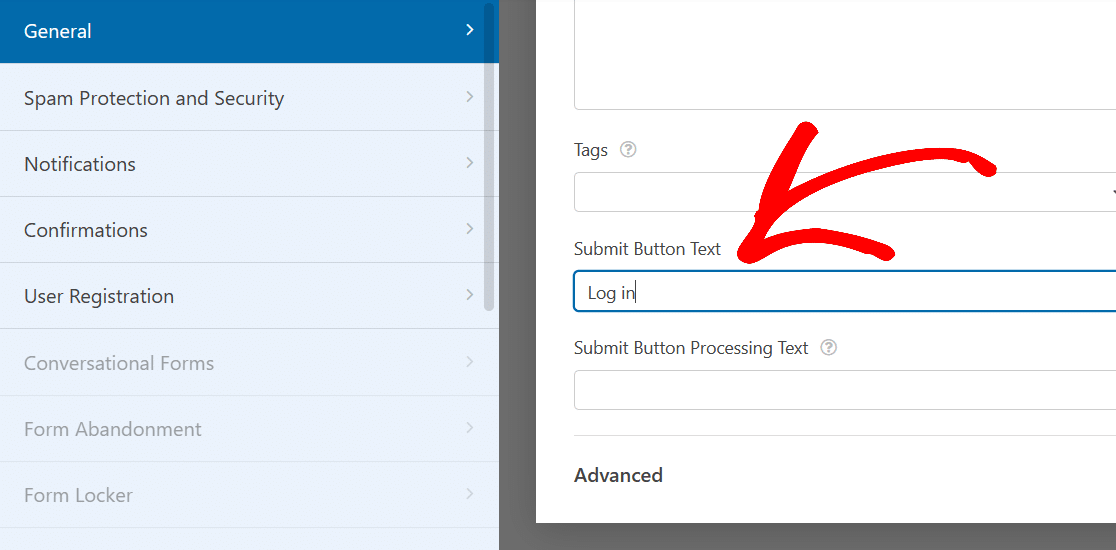
Now, type what you’d like for the button to read, such as ‘Log in’.
Looking at the form again, the button at the bottom of the form better aligns with the login nature of this page.
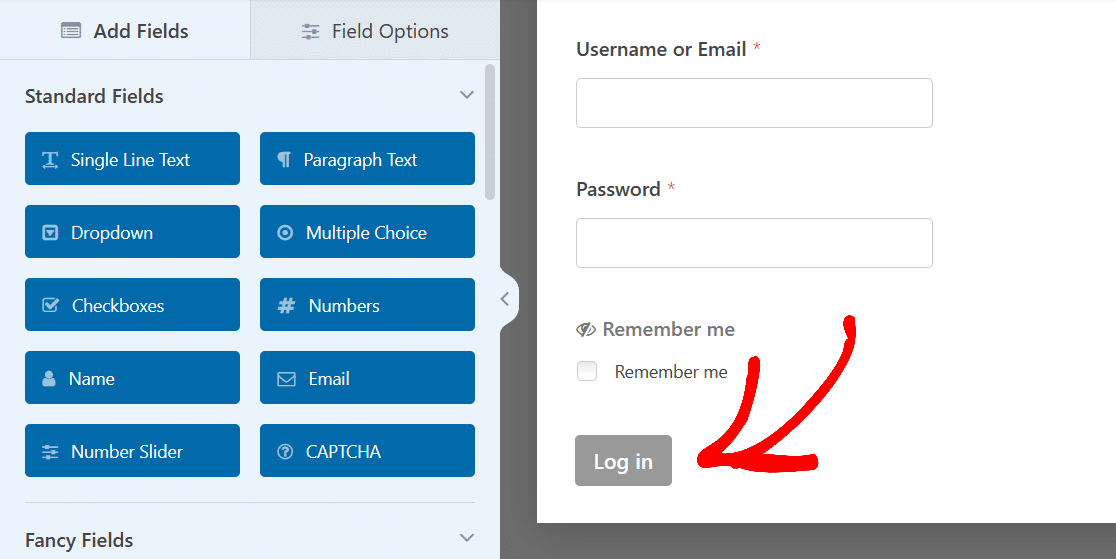
And that’s all you need to do to make a basic login form like the one used on the HubSpot login page.
From here, go ahead and Save this form.
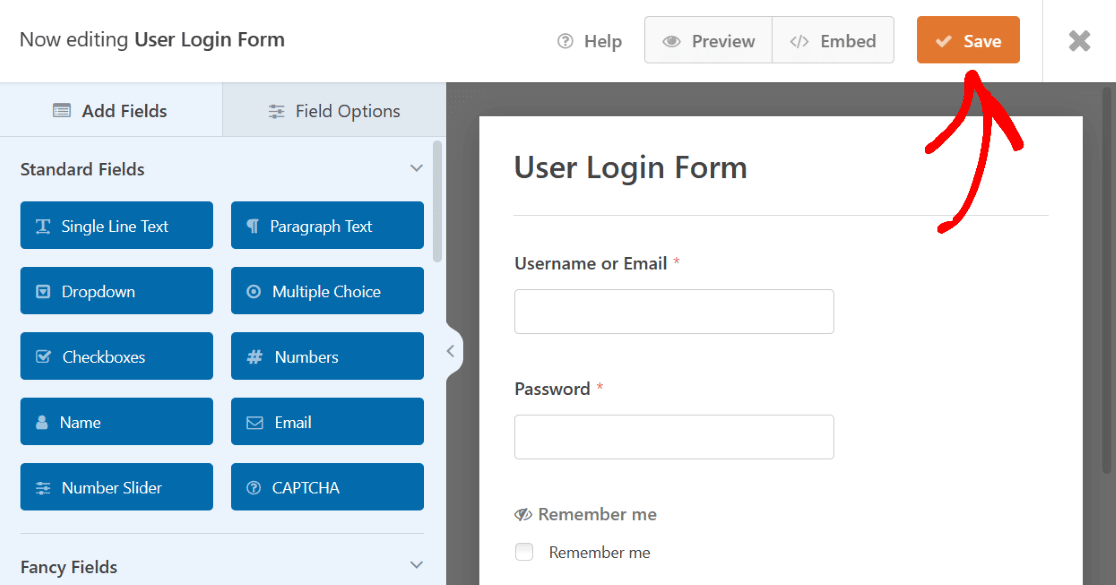
Once it’s saved, this form will be available for use in the WPForms All Forms page on your WordPress dashboard.
Now you have a simple login form that you can quickly publish on your site, or that you might use as the basis to create more detailed login pages. These are the basic steps required for all the login page examples covered here.
2. Login Form With Instructional Text
Take a look at the login page for WordPress.org. Like the first example we covered, this one is fairly basic.
But it does have a snippet of instructional text at the top, and your form can have that, too.
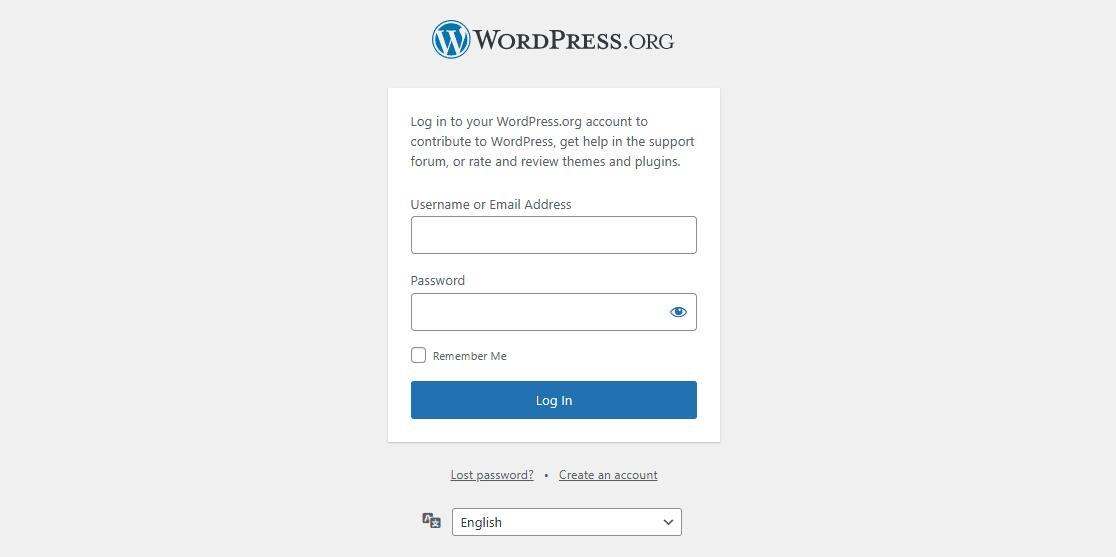
Like we mentioned, each form made here first requires the User Login Form template, including this one. Go ahead and select the template again.
Then, in the form builder, drag the Content field to the top of the form and drop it there.
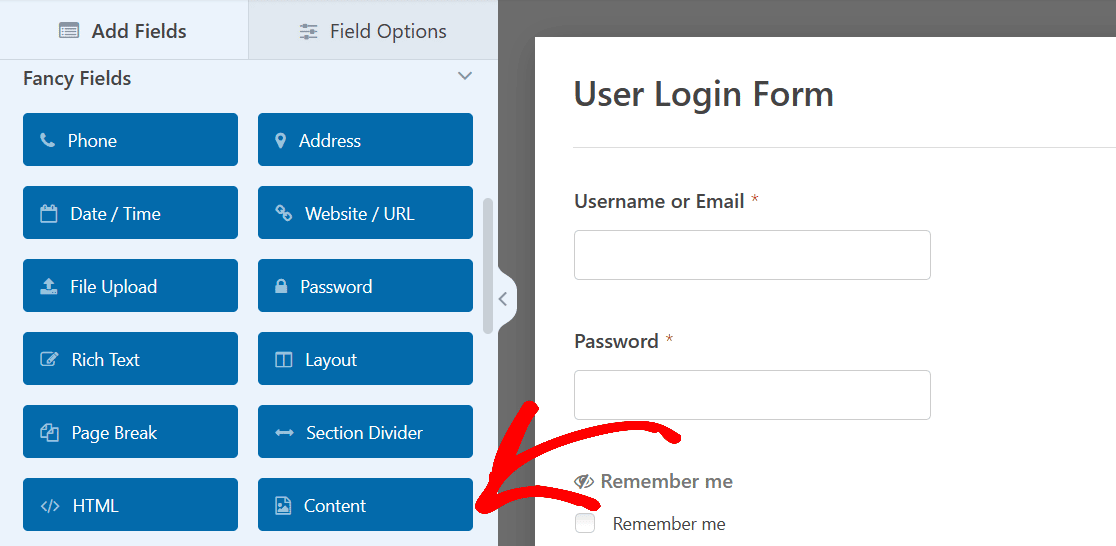
Like we said before, you can drag-and-drop this field on your form wherever you like.
But to resemble the instructional text on the login page above, let’s put the field at the top.
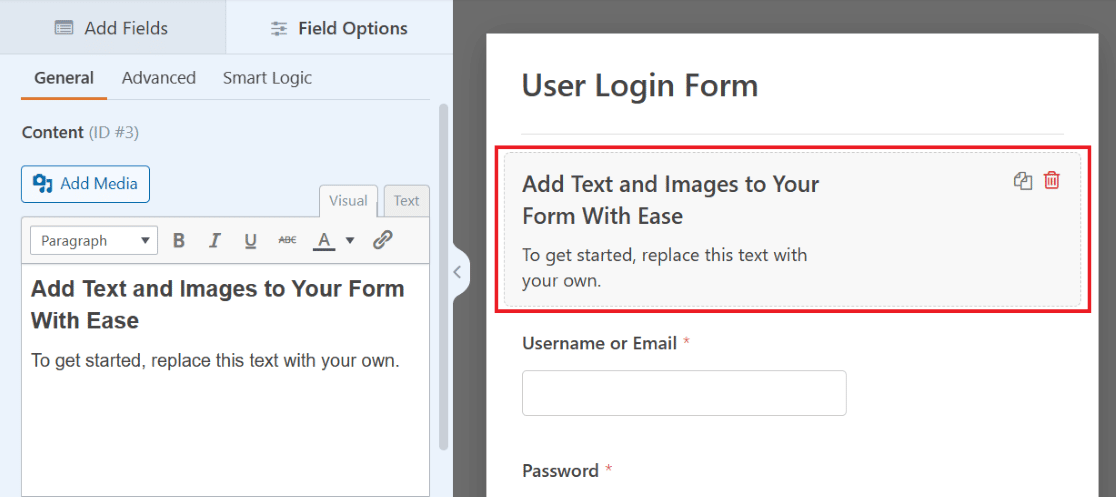
Click on the field to open up its customizable options, found on the left side of the screen. Then, use the text editor to type out the instructional text you want displayed in this field.
Like the above example, you might instruct users on entering their information to log in to your website.
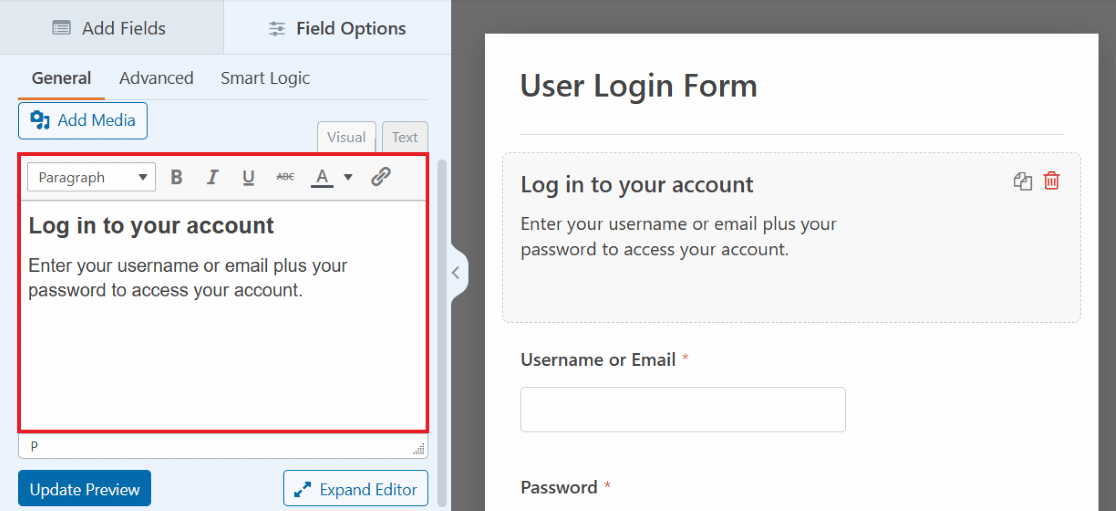
Lots of options are at your fingertips thanks to the text editor, with customizable font stylings, colors, and more all available within this field.
For instance, look again at the HubSpot login page from example 1. Notice that there is a very short snippet of instructional text. The instructional text reads, ‘Don’t have an account? Sign up’ and provides a link to a page where users can create an account.
This is also possible with the text editor of the Content field on your form.
First, type out your instructional text, and highlight the portion you want linked. Then, click on the link icon in the text editor toolbar.
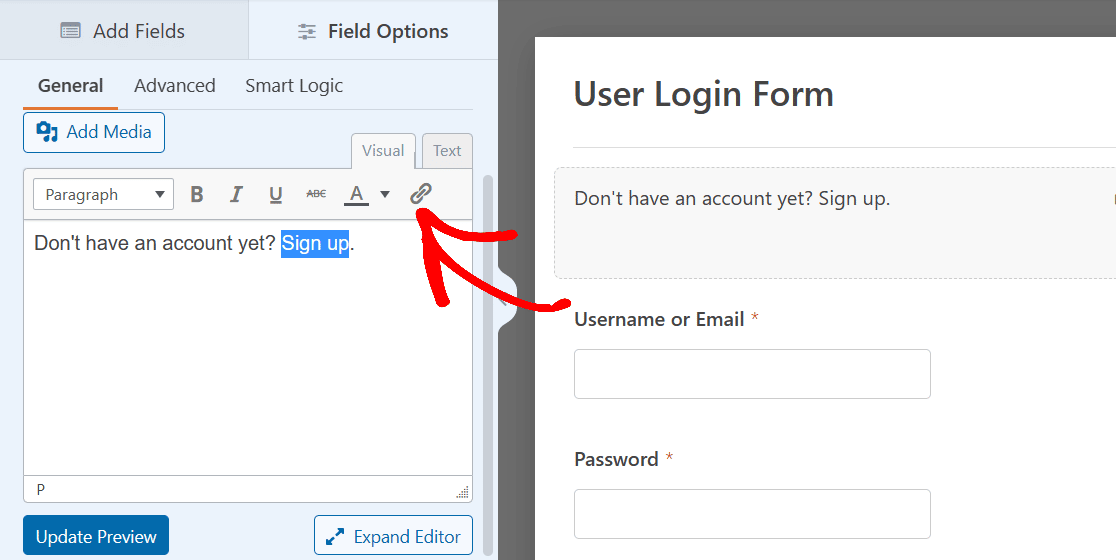
Now, you’ll insert the URL to the page you want users to land on. Click OK when finished.
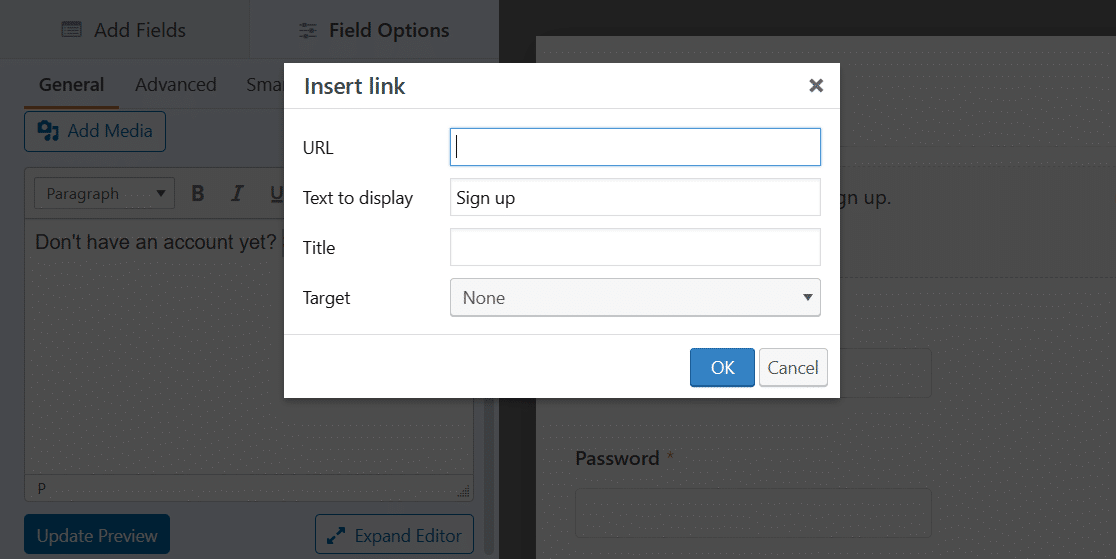
And that’s it! You now have instructional text, and a link, on your form.
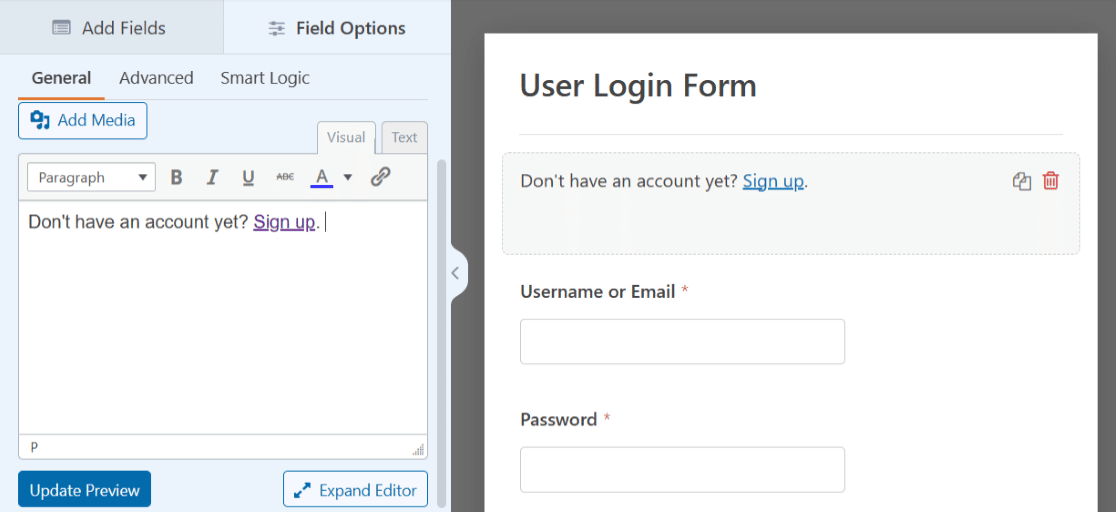
As always, save your form for later or embed it onto a page. We’ll share details on how to publish when you’re ready for the login page to go live on your site at the end of this post.
3. Login Form With Header Image
Another way to customize the User Login Form for your login page is by adding a header image of your choice. Using an image at the top of your form is a good way to personalize your form, or complement the styling of your website.

To add a header image, you’ll once again utilize the Content field and the User Login Form template. Go ahead and drag-and-drop this field at the top of the your form like before.
But this time, click the Add Media button above the text editor.
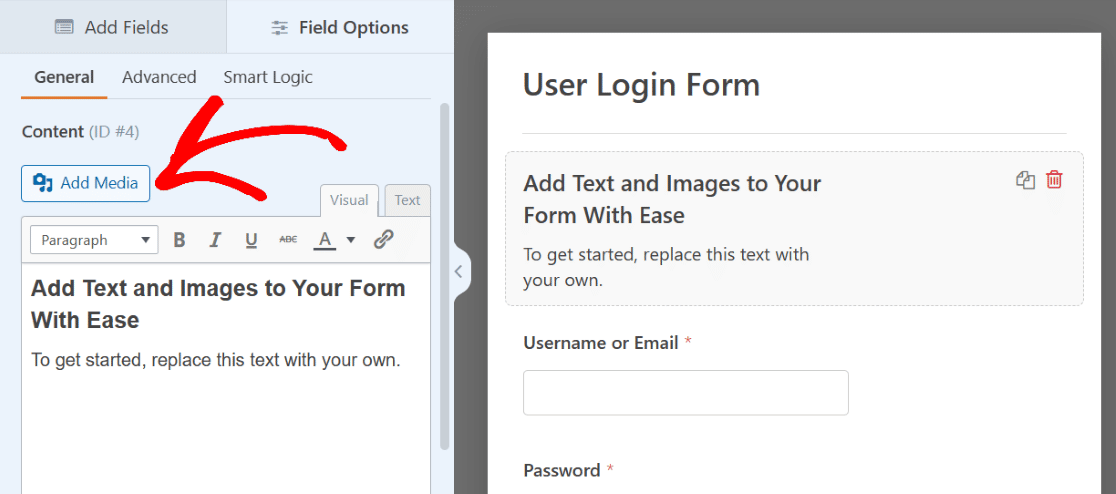
Now, you’ll upload an image of your choice, which will appear above the text in the text editor.
You can also delete the text this time if you’d like, and work with the image only.
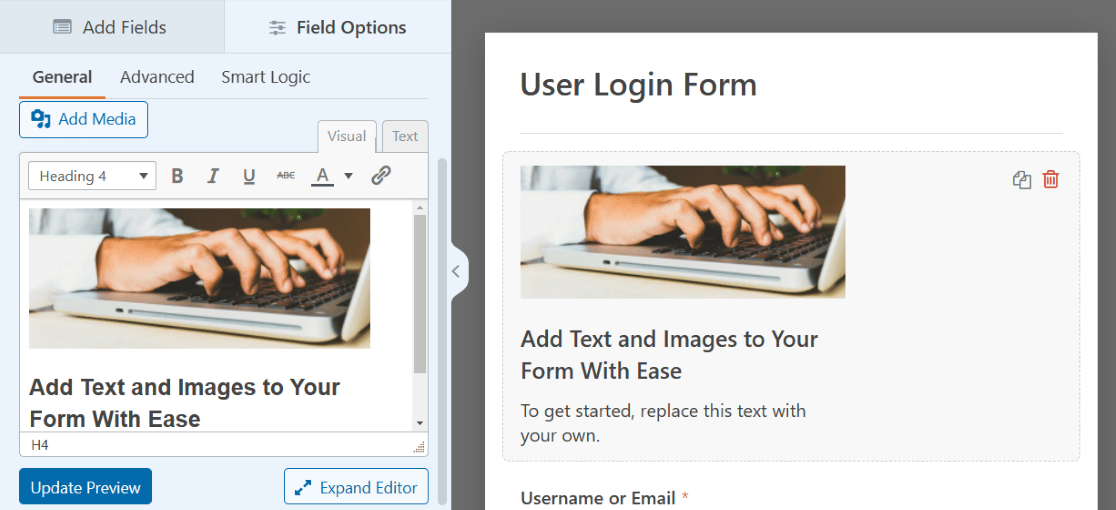
Click on the image to access its Display Settings and position the image how you like.
To make the image in our example act as a true header image, we’ll center the alignment and select the full sized version. You may adjust these settings a few times to figure out what you prefer.
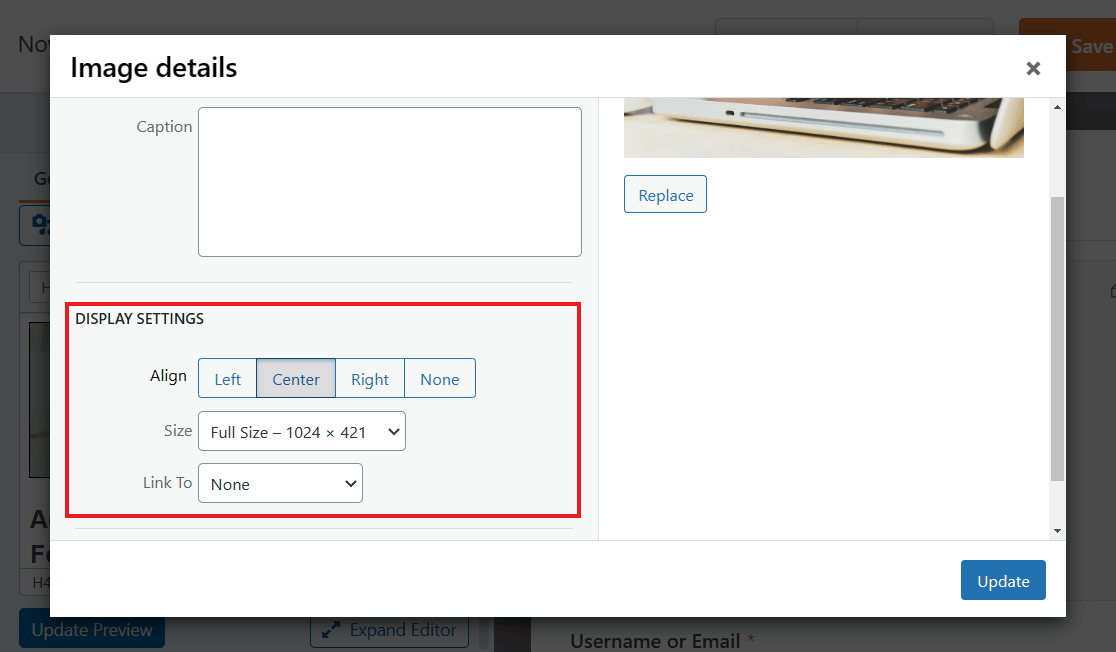
Be sure to click the blue Update button to apply any changes.
You can also explore the other settings tabs for more options, such as changing the Field Size in the Advanced tab.
Try the Large field size to see your image displayed even bigger across the top of your form, in true header image fashion.
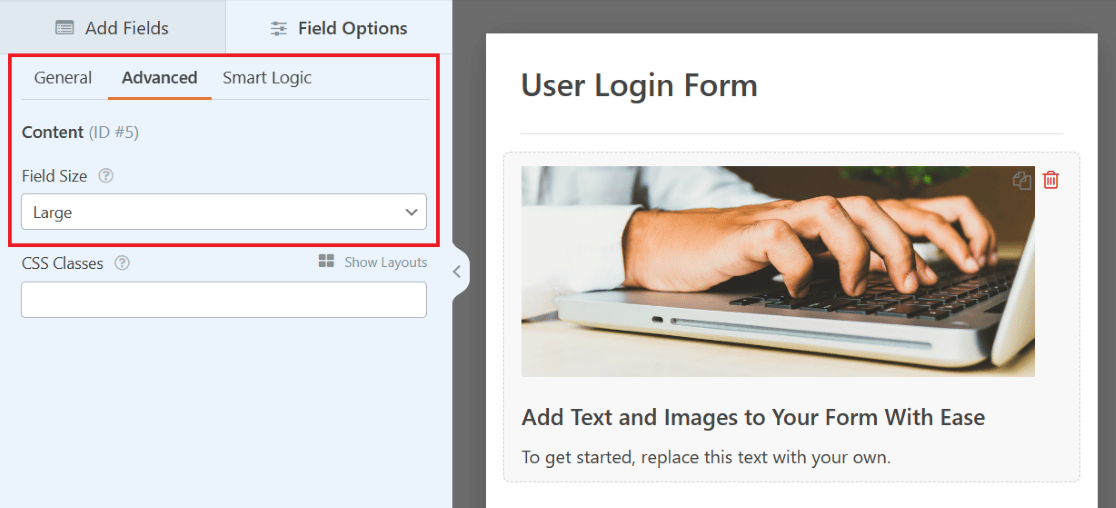
Once again, be sure to save your form for later. And for more tips related to this example, check out this full post about adding a header image to your forms.
4. Login Form With a Company Logo
Let’s take a look at the SendLayer login page. At the top of the form, above the instructional text we covered previously, sits a logo for the website.
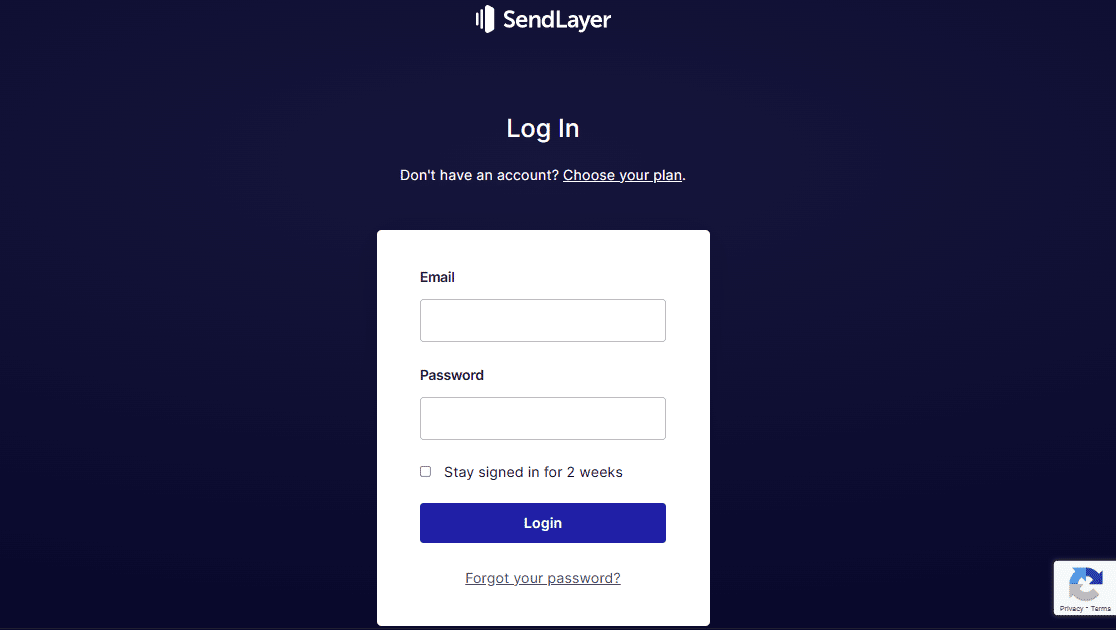
You can add a logo to your form, too, by once again utilizing the Content field on your User Login Form.
Remember how you used the Content field to upload a header image? Why not use a similar process to display a logo? Thanks to the form builder, you have multiple options for placing logos on your form.
Simply drag the Content field to where you want it on your form.

To resemble the example above, let’s place the logo at the top of the form. And since this is a bit like a header image, a horizontally styled logo might look best here.
Remember to simply click the Add Media button of the Content field to upload your logo.
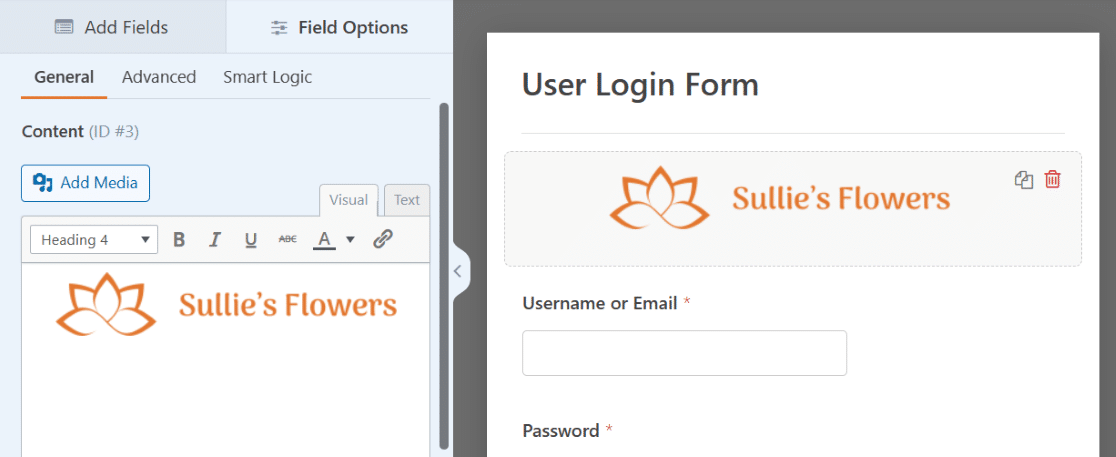
And don’t forget about the additional settings. You might want to center the logo, make it full sized, or change the field size in the Advanced settings.
You can also edit the text below the logo like we covered in the instructional text example, which would make your form here closely resemble the example.
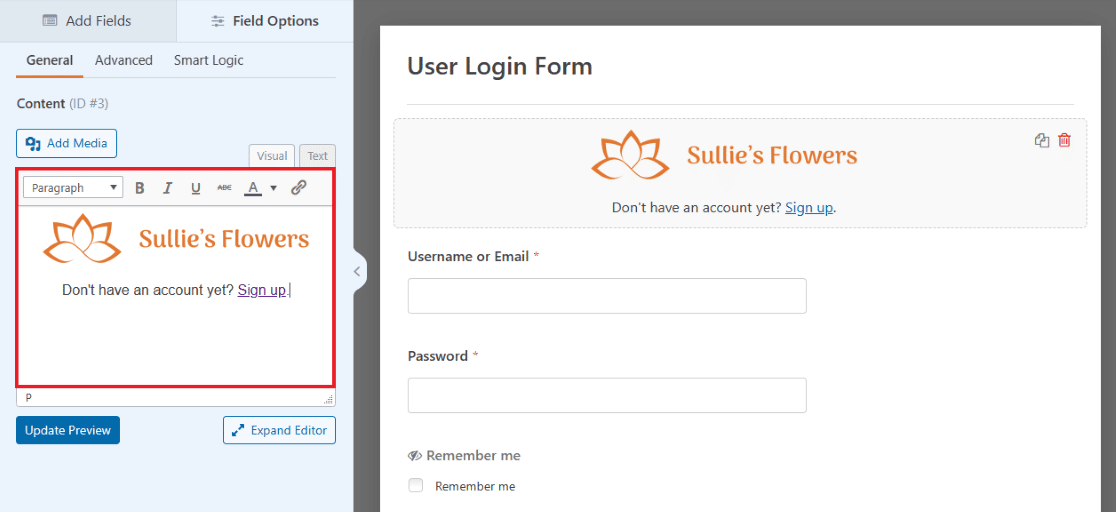
Your login page now has your logo clearly displayed on your form. Feel free to add another logo to the bottom, or wherever else you’d like to drag the Content field, too!
5. Login Form With Illustration
Now let’s take note of the login page for TrustPulse. This login form has credentials entered on one side of the screen with a small logo above, and a large illustration displayed on the other side.

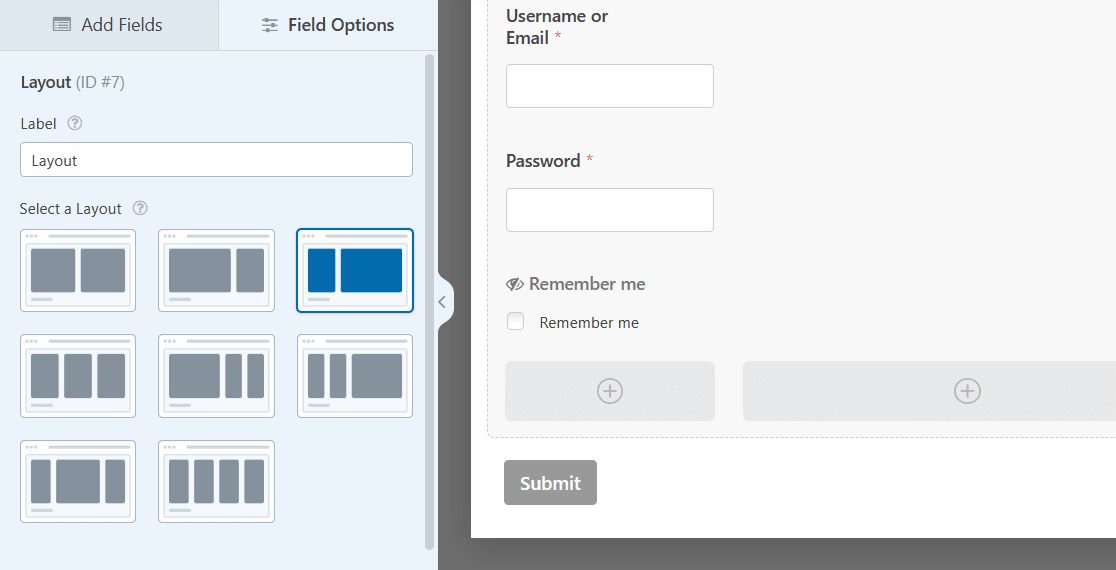
You too can build a form that looks like this by using the Layout field and Content field together.
First, drag the Layout field onto your User Login Form.
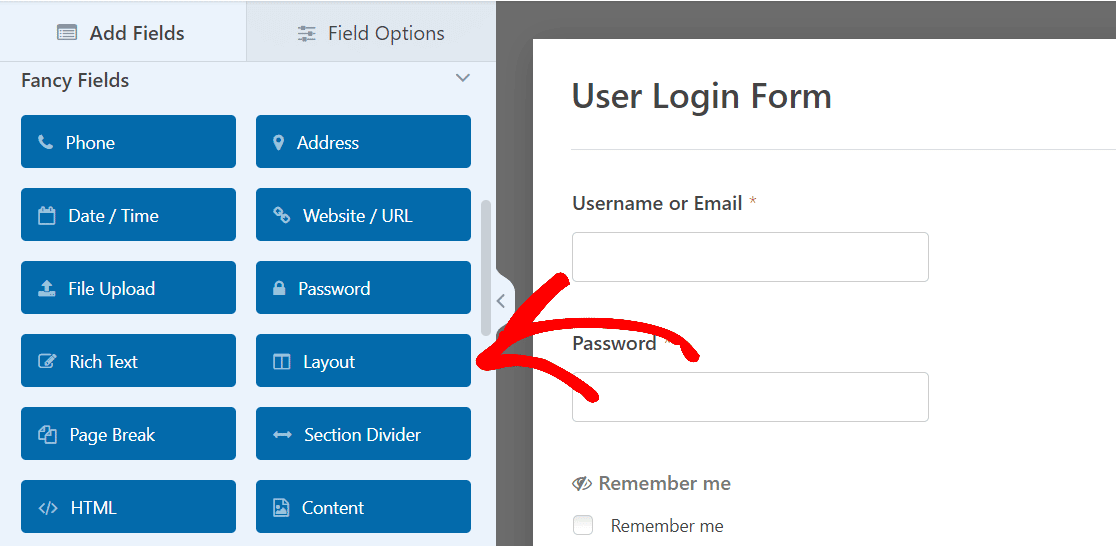
It doesn’t really matter where you drag-and-drop the Layout field right now, because you’ll eventually drag the preloaded fields of the form into the Layout field itself.
For now, let’s just drag it to the top of the form to stay organized. You’ll also select the orientation of columns within the layout, which will determine the size and placement of content in this field.
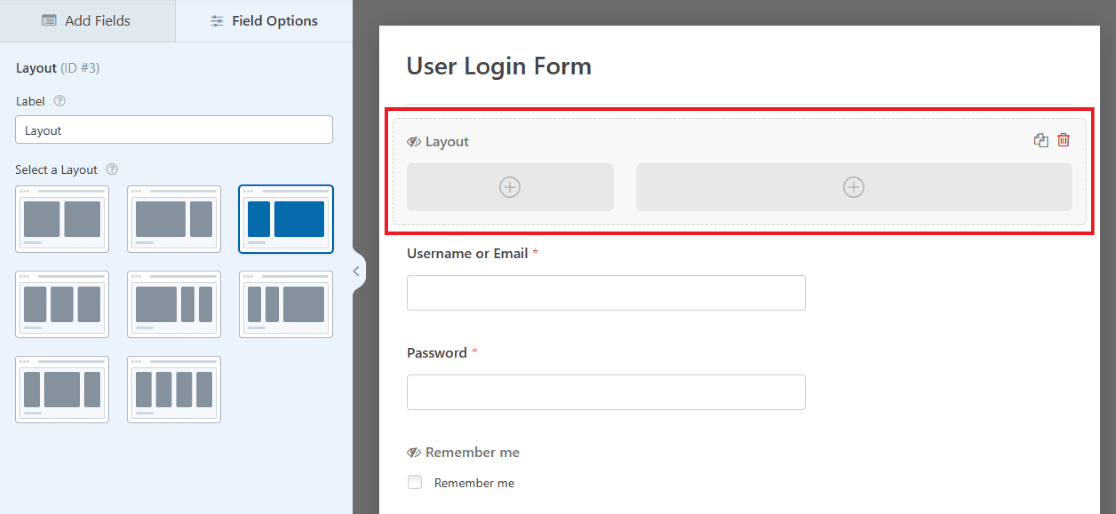
Now, drag the Content field into the first column of the Layout field on your form, so that you can display a logo here like the TrustPulse example.
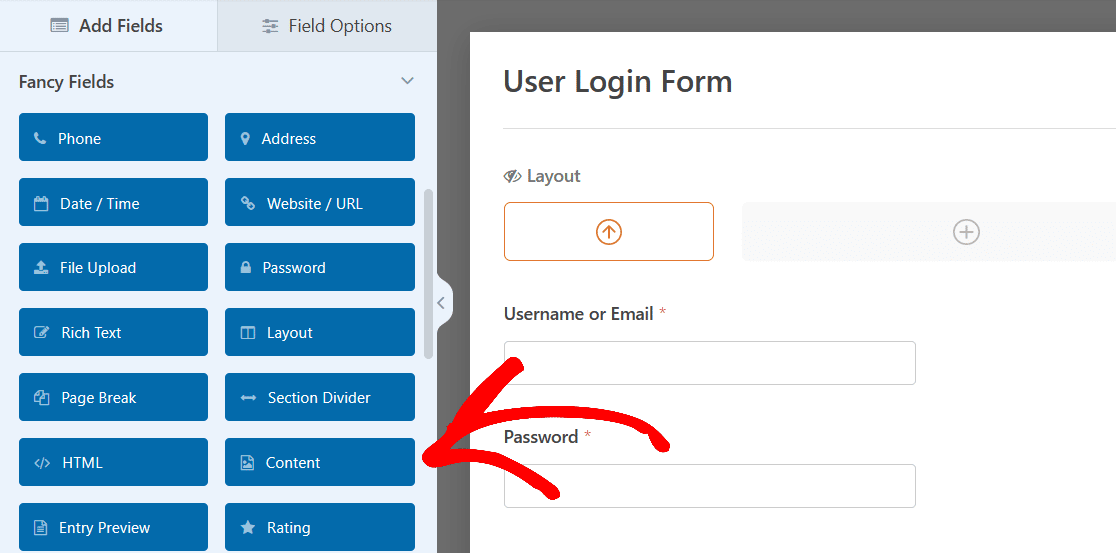
Use the Add Media button to once again upload your logo, and then ensure the settings of the image have it oriented and sized how you want.
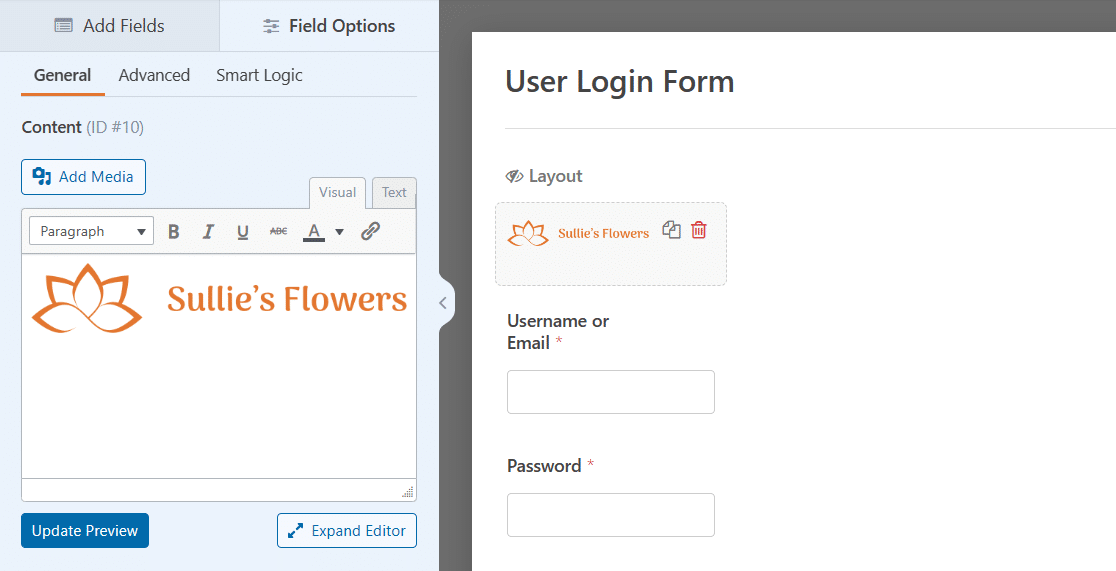
Next, drag and drop the other fields on the form into that side of the Layout field.
Simply grab each field with your mouse, drag it into the Layout column, and drop it. The Email field, Password field, and checkbox will now be in the left column of your form.
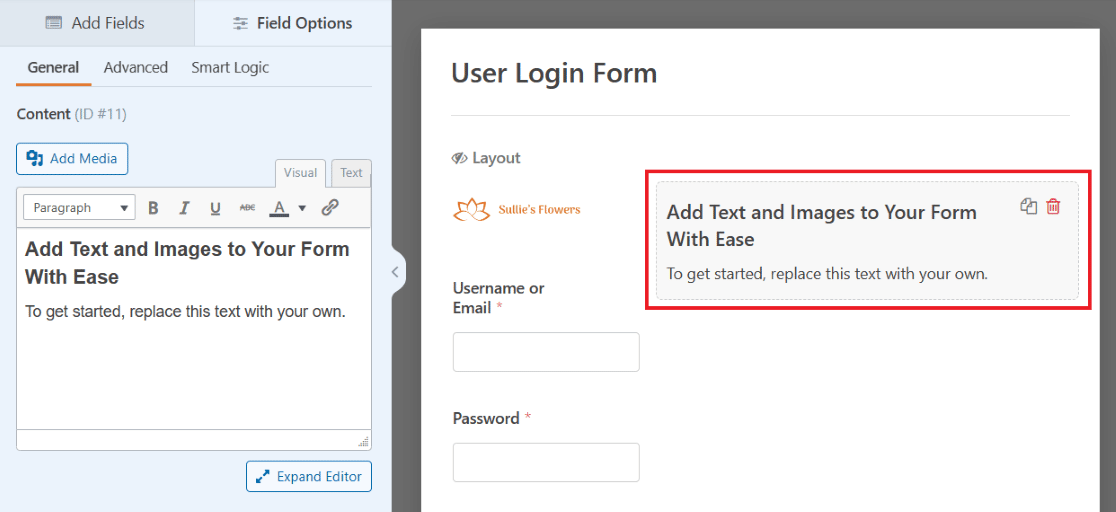
Now, you’ll add content to the other column in the Layout field.
Select the Content field again and drag it to the larger column on the right side of your form.
Now you can add an illustration of your choosing to be displayed largely on this side of your form.
Click the Add Media button like you did on the other side to upload an illustration.
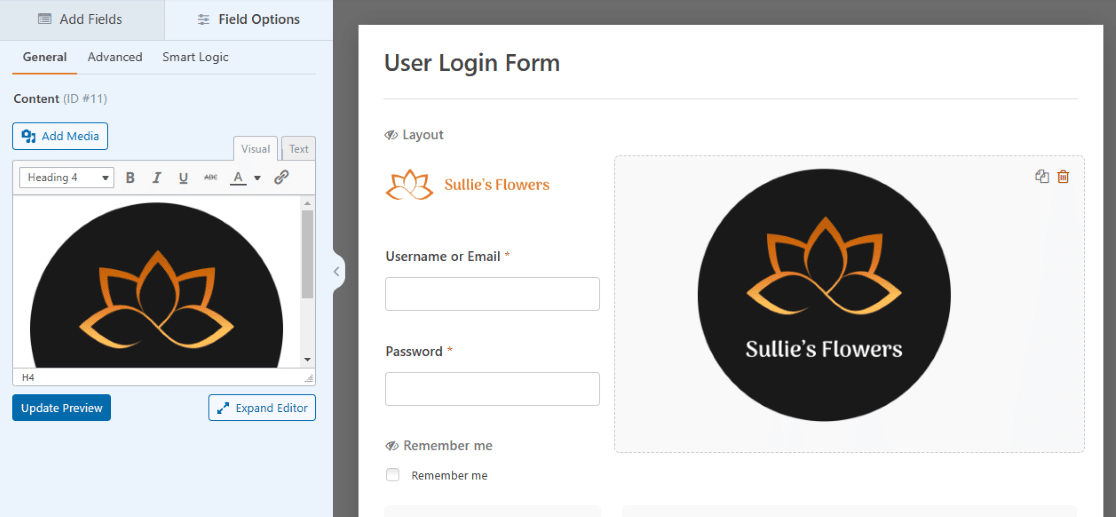
And, once again, be sure to adjust the field settings to customize the size and placement of your illustration.
For a large illustration like the example, you may want to remove any additional text from the Content field.
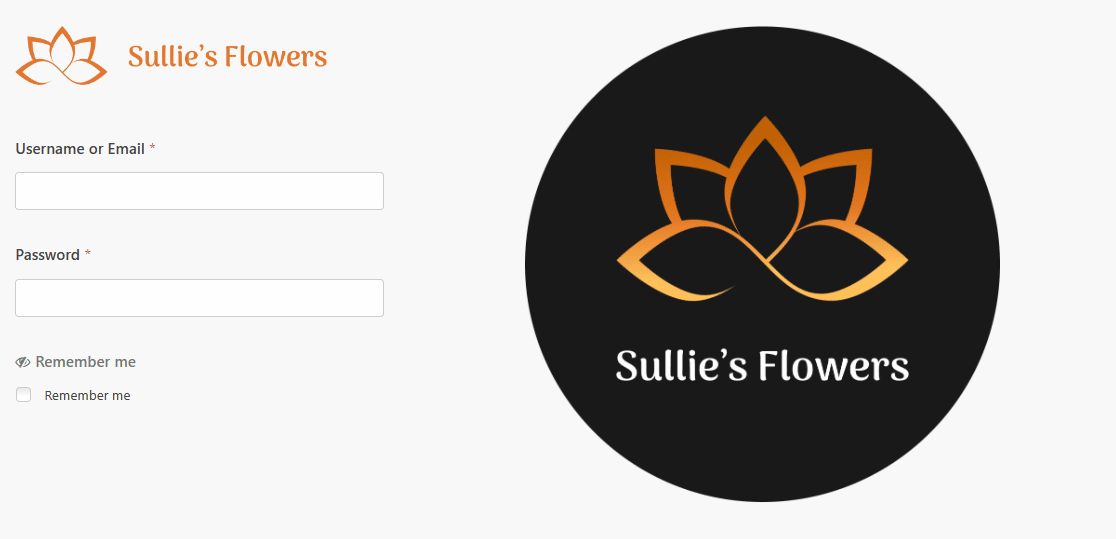
And now your form has the small logo and credential entries on one side, and a large illustration displayed on the other side.
As always, you’ll need to save this form to keep it in WPForms on your dashboard, and then embed it on a WordPress page when you’re ready to use it.
6. Login Form With CTA
Next, we’ll look at the login page from ExactMetrics, which is somewhat similar to the previous login, but with a call-to-action button on one side of the form instead of an illustration.

One side has a small logo, email entry, password entry, and log in button, and the other side has quite a bit of a text, followed by a clickable CTA.
To create a similar look with your own form, you simply need to follow the steps we covered in the previous example: first adding the Layout field to your User Login Form, and dragging fields to one side or column of the layout.

Remember, you simply drag the Content field into the Layout to upload your logo, and then drag the remaining fields on the form into that side of the Layout as well.
But then, for the other side of the Layout field, in the second column, don’t worry about uploading anything. You’ll just edit the text that’s already here.

Notice how some of the preloaded text is larger and bolder than what’s underneath it, similar to the text style in the example.
This makes it easy to fashion your text like that of the example, but don’t forget about all the other ways to use the text editor to your advantage. You can change the text’s size, orientation, coloring, and more as you see fit.
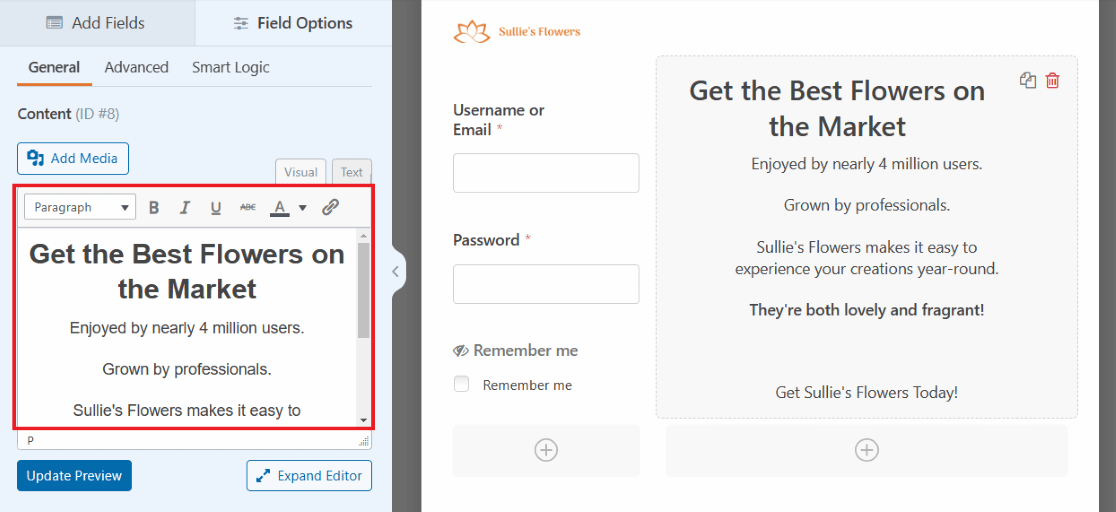
And within the text editor of the Content field, you can even insert a snippet of code to create create a CTA button.
Click on the Text tab of the text editor box to copy and paste the code you’d like to use to create a button.
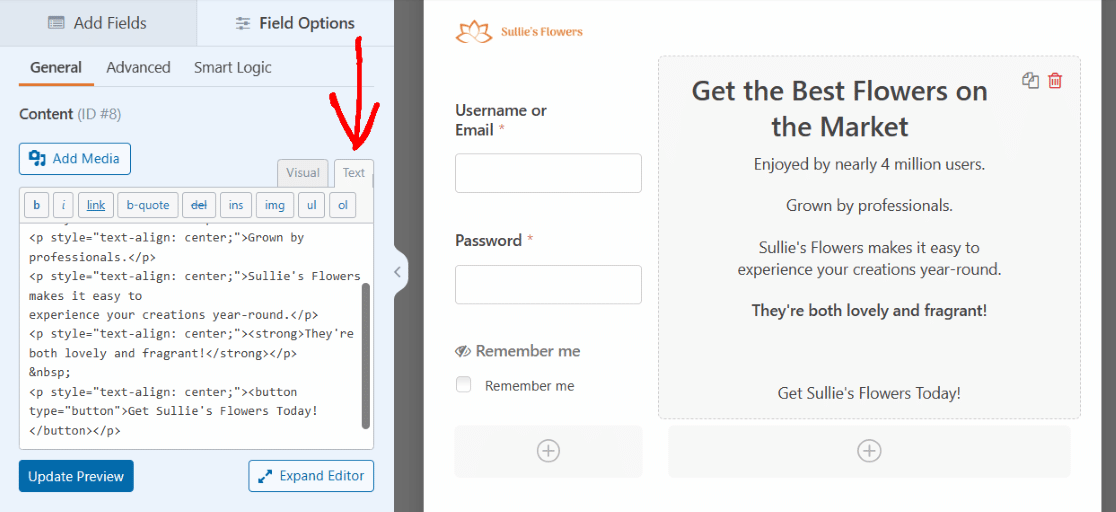
You can edit your code snippet to style the appearance of your CTA button however you’d like.
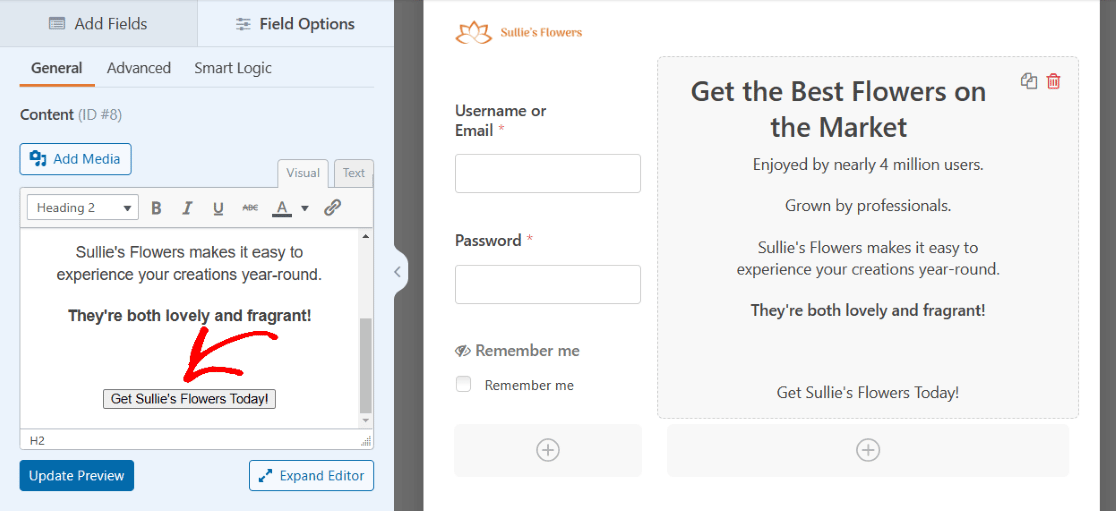
You now have a CTA button on your form!
Once again, you’ll need to save this form and then embed it on a WordPress page when you’re ready to use it.
7. Login Form With a reCAPTCHA
Now that we’ve worked our way through the more complex ways to style a login form, let’s look at one of the easiest security elements to add to your form, anywhere you want it.

The reCAPTCHA verification helps protect your WordPress website from bots and spam that would try to use your forms to get into your site.
As you can see, we use it on our own login page here at WPForms.
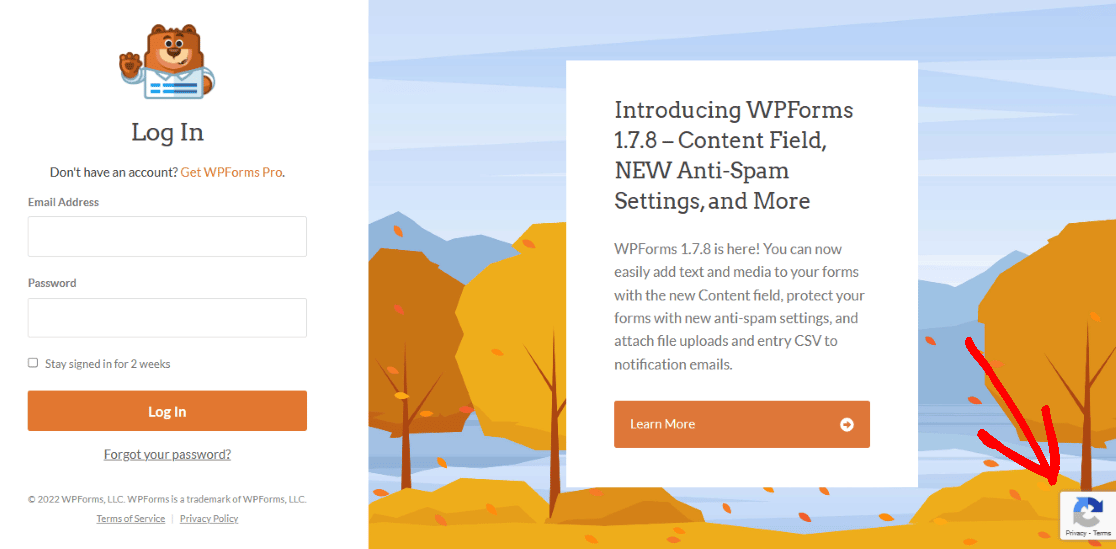
You can easily add a reCAPTCHA field to any of your login forms, too. But first, you’ll need to configure it in your WPForms settings.
From your WordPress dashboard, navigate to WPForms and then Settings. Then, make sure you are on the CAPTCHA screen.
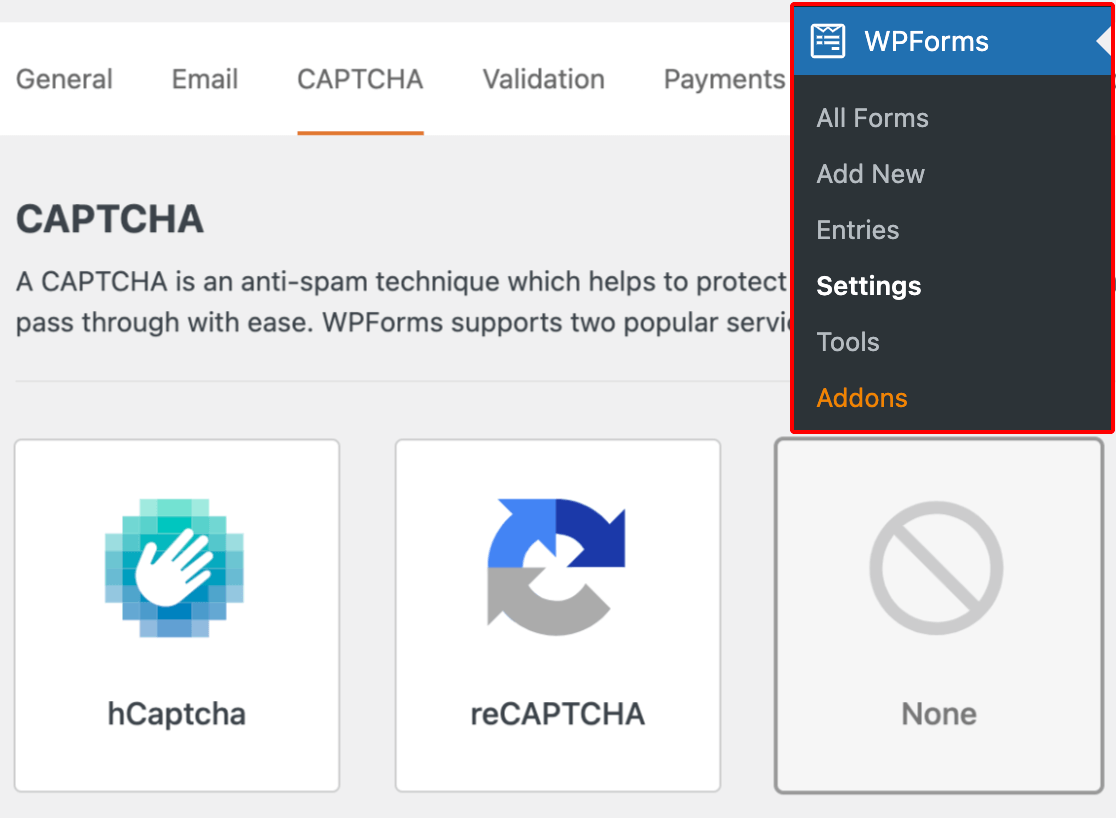
Select the reCAPTCHA option from the middle of the screen.
You will then choose the type of reCAPTCHA verification you want to use.
Let’s select the Checkbox reCAPTCHA v2.

Next, you will need to enter in a Site Key and Secret Key on this settings page, provided by Google. To receive these keys, you must follow the setup process in Google’s reCAPTCHA admin console.
For more information, along with a fully detailed tutorial on how to do this, check out our article on setting up and using reCAPTCHA with your WordPress forms.
Don’t forget to click Save at the bottom of this screen in order to apply these settings to your reCAPTCHA field.
Now you’re ready to add the reCAPTCHA verification to your form.
Back on the form building page, you just need to click on the reCAPTCHA field to enable it on your User Login Form.
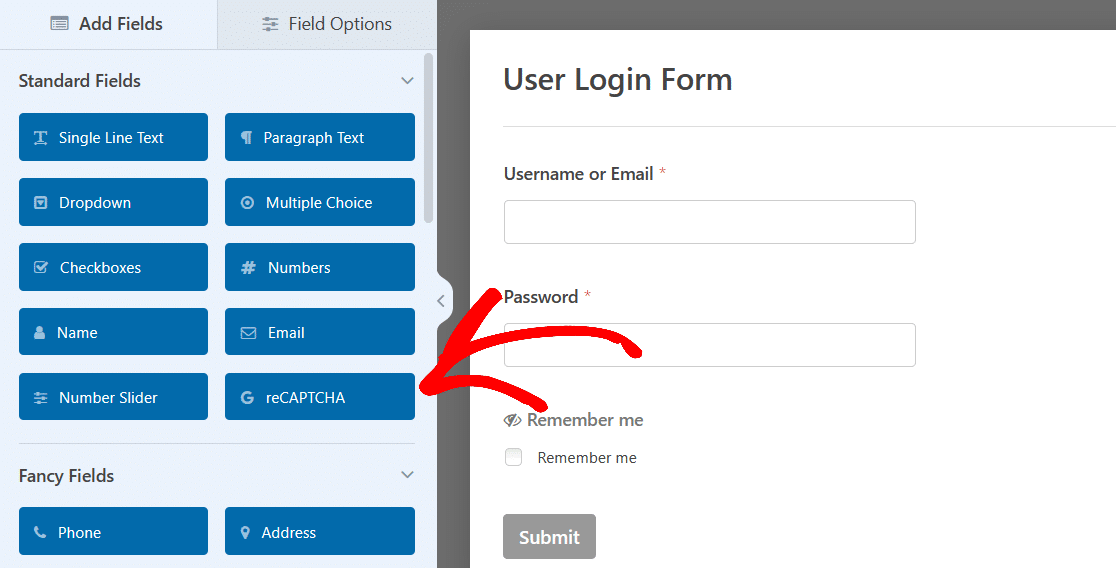
And that’s it! Your login form is now protected against bots and spam that might otherwise infiltrate your site.
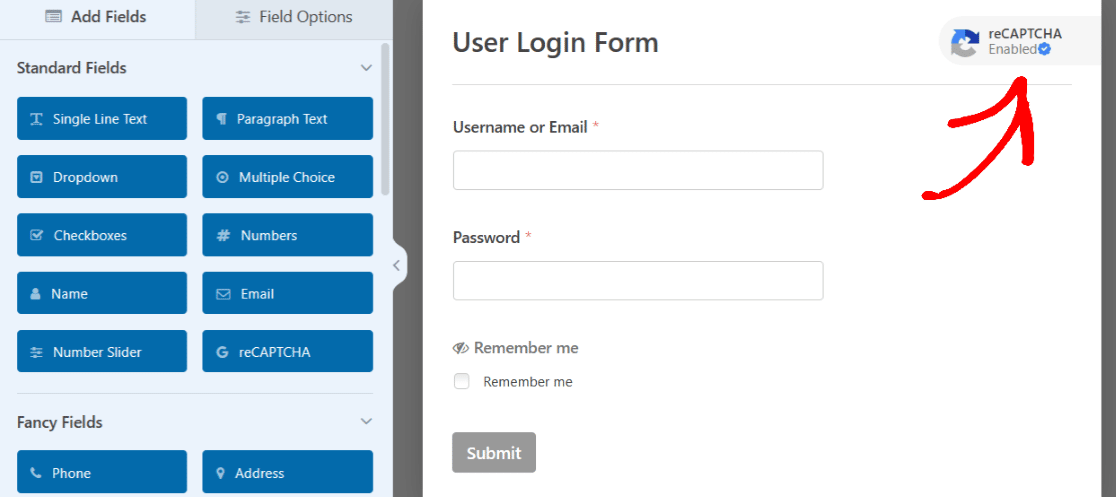
Plus, the reCAPTCHA icon is then displayed on your form, which tells your users that their information is secure.
How to Add a Custom Login Page to WordPress
The helpful thing about the form builder from WPForms is that all of the customizable options and styling choices inspired by these examples can be created on the form itself.
However, some of the styles achieved in these examples may be the result of extra editing on the login page.
So, for additional in-depth tips on how to achieve even more styling with WPForms on your WordPress page, check out this full article on how to style forms with CSS.
Also, keep in mind that with all of your created forms and the examples we’ve covered here, you’ll need to save the form when you’re finished editing it. Then, perhaps later if needed, you can embed the form on a page and publish it when you’re ready.
Or, from the form builder, you can go ahead and embed your form on a page now.
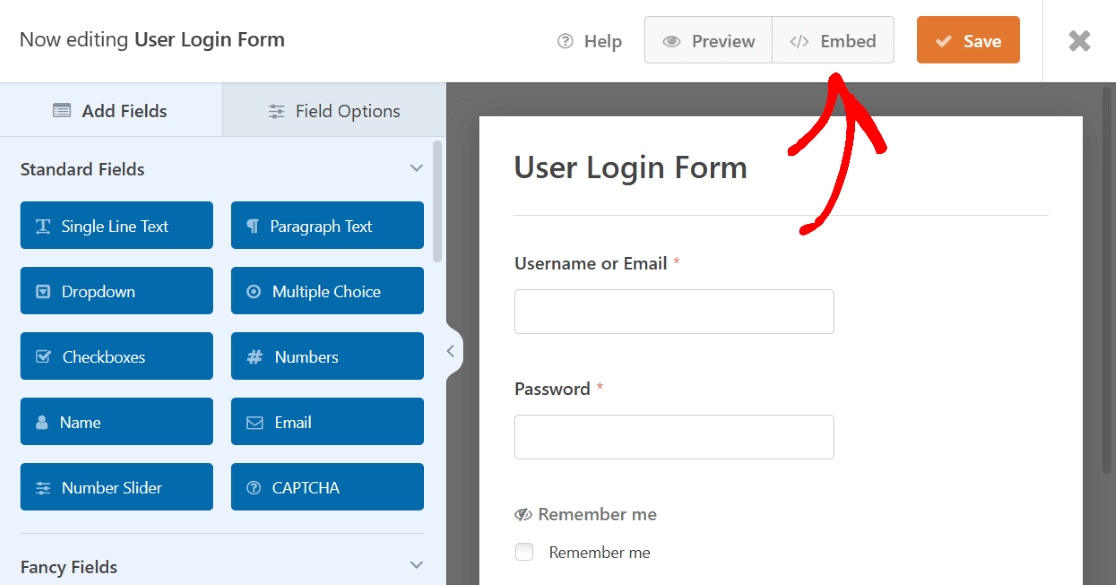
By clicking Embed you can either embed your login form on a page you’ve already created for your website, or you can create a new page now for this login form.
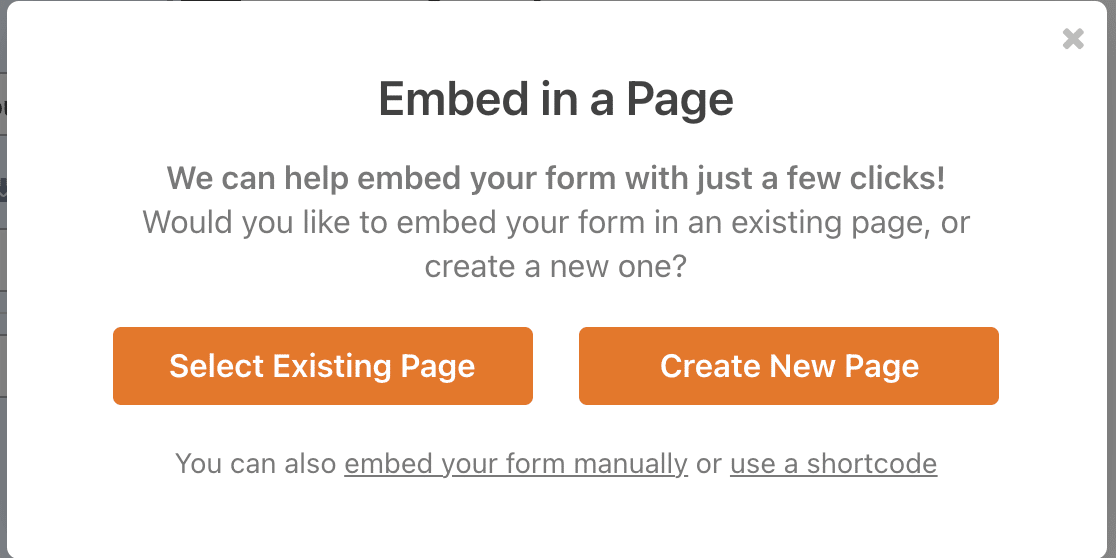
If you decide to create a new page, you will need to name the page, just as the other pages throughout your website are named so you can find easily them in the WordPress dashboard.
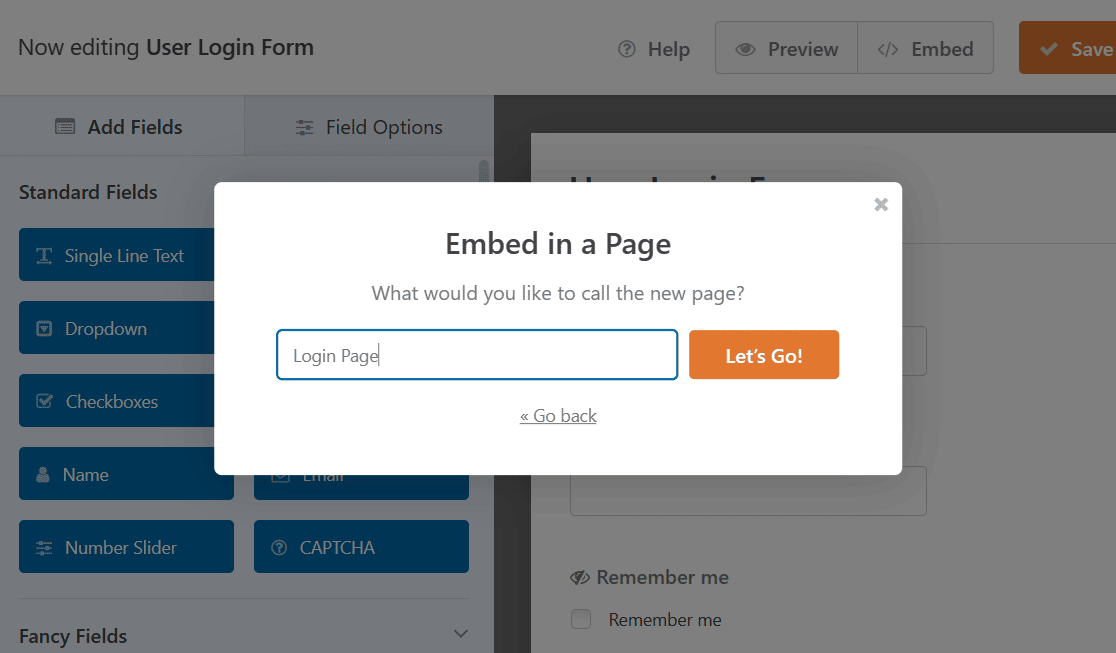
Click Let’s Go! to continue. WPForms will automatically add your login form to your new page.
After your form is embedded, you can always edit a few more things on the WordPress page itself by accessing the settings of the WPForms block and by editing other styling elements of the page.
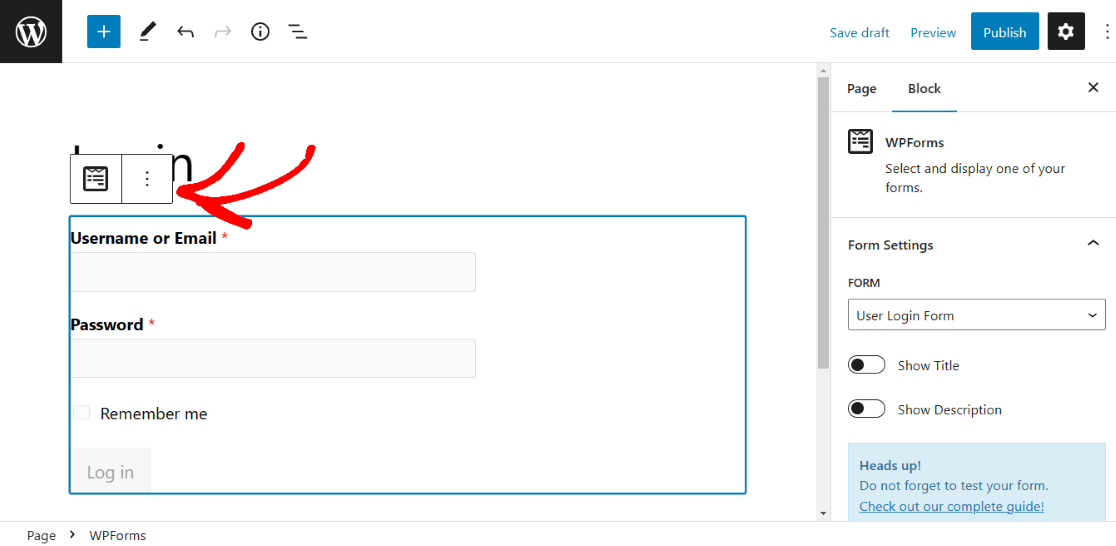
Check out this article for more ideas on how to edit and customize your WordPress login page.
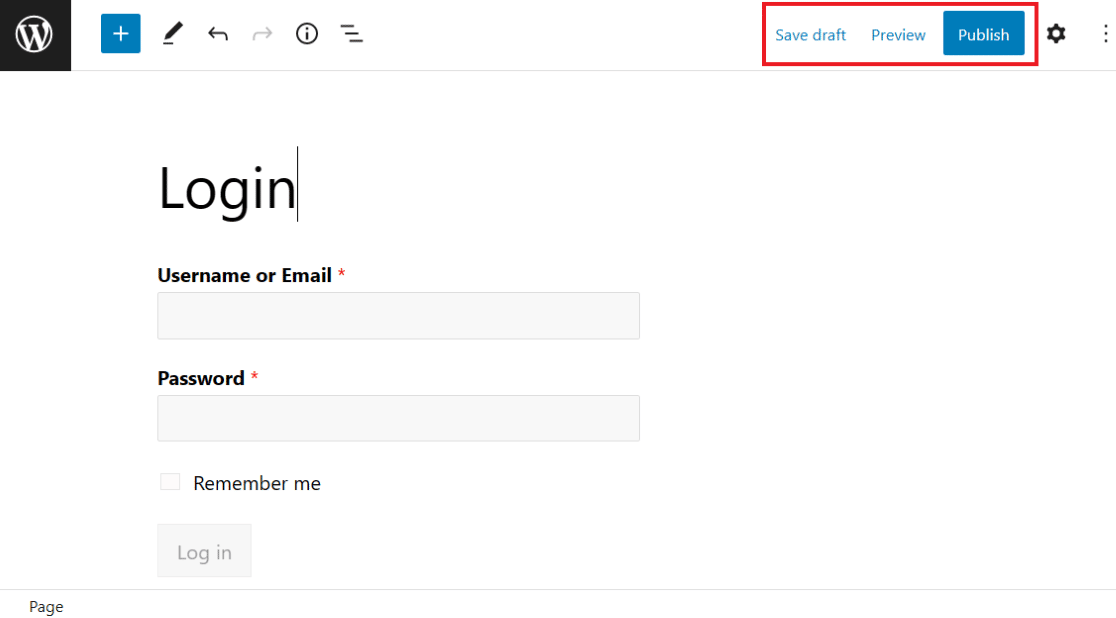
And remember that, like all of your WordPress pages, you’ll need to publish the page with your embedded form to take it live on your website.
You can also preview the page before publishing, or save the draft for later.
For even more reading on this topic, check out this tutorial covering how to display login and registration forms.
Next, Create a Registration Form with PayPal
Now that you’ve learned all about making login forms for your WordPress website, why not try your hand at creating a WordPress registration form with PayPal? That way, you can register your website users and begin collecting payments.
If you’d like a print of your form entries, we recommend checking out our guide on printing WordPress forms to PDF.
Ready to build your form? Get started today with the easiest WordPress form builder plugin. WPForms Pro includes lots of free templates and offers a 14-day money-back guarantee.
If this article helped you out, please follow us on Facebook and Twitter for more free WordPress tutorials and guides.

