
AI Summary
Are you wondering how to get guest writers to contibute content to your blog? Accepting guest posts is a great way to build your brand and attract a wider audience.
You can also save time and money during a content marketing campaign by publishing free content from other writers.
Create a Post Submissions Form Now! 🙂
In this guide, we’ll discuss ways to attract more awesome writers for your website and, ultimately, boost your brand presence.
How to Find Writers For Your Blog
If you want to get blog contributors, we’ve got some pro tips. We’ll start with the easiest tip: asking for submissions.
1. Publish a ‘Write for Us’ Page for Guest Bloggers
If you’re wondering how to find guest bloggers quickly, the answer is simple:
- Make a dedicated ‘Write for Us’ page
- Optimize it so it’s easy to find in search.
List the page in the navigation menu in WordPress so it easily grabs the attention of your visitors.
On your ‘Write for Us’ page, it’s important to use keywords that writers will search for if they’re looking for places to contribute.
This will help your page to be indexed by search engines so that guest bloggers can easily find it. For example, you could mention keywords like:
- Write for our blog
- Contribute a guest post
- Accepting guest posts
For the best chance of ranking your page, use the All in One SEO plugin to optimize your ‘Write for Us’ page for your chosen keywords.
All in One SEO makes it easy to include them in your meta description and title, and it can also suggest ways to improve keyword inclusion.

Many writers search for guest posting opportunities by typing in matching keywords on Google, so this is a quick and easy way to get more contributors just by leveraging the right keywords.
2. Publish Blog Contributor Guidelines
Now you have a brand new ‘Write for Us’ page, think about including contributor guidelines. In your guidelines, you can explain:
- The topics you want to cover
- Target word count or length for the guest post
- Your image requirements
- Links you’ll allow in the post.
It’s best to bullet your guidelines and make sure they’re easy to understand. Here’s a great example:

Adding guidelines for receiving guest post submissions is important for numerous reasons, such as:
- You can filter out guest posts that you don’t want. Explaining your criteria and standards helps you find suitable guest bloggers quickly. It also means you’re more likely to get high-quality content.
- It helps your page to rank. Adding ‘Contributor Guidelines’ as a keyword will also help Google send more blog writers your way.
If you want to avoid getting tons of posts you can’t use, it’s a good idea to get an outline from your writer first. Let’s talk about that next.
3. Ask for Guest Post Proposals First
When you think about how to find guest bloggers, it’s tempting to rush right in and publish any blog posts that are offered.
But it’s smart to ask the author to send a proposal first. Reviewing a proposal is a lot easier than a full post.
It also saves your writer time if they can’t provide what you’re looking for, and you’ll spend less time editing content that doesn’t fit.
By using a proposal form, you can quickly review ideas and decline any that are:
- Low quality
- Irrelevant to your audience
- Spammy or self-promotional
- Duplicates of content that’s already on your website.

You can easily make a guest post proposal form in WPForms. We have a blog post pitch form template that’s ready-made, so you can easily customize it in minutes.
If you’d prefer to make a custom blog post outline form, you’ll want to include:
- Post headline
- A small description or outline of the post
- Author bio
- Links to previously published work
- The author’s website or portfolio
- Topics the author is interested in writing about for future guest posting.
If you like the proposal, you can invite the author to submit a guest post on your website and add it to your blog editorial calendar.
We’re going to look at the easiest way to get contributions next.
4. Create a Frontend Blog Submission Form
If you want to get more guest posts on your site, you might be tempted to let anyone register for an Author account. But if you do that, you’ll probably get a lot of spam user registrations.
This can be a security risk. And you don’t want someone to have an account on your site so that they can write anything they want.
With WPForms’ post submission addon, you can allow your website visitors to submit guest blog posts without having to log into the admin area of your site.

When you install the addon, you get a brand new post submission form template that you can easily customize.
The template ships with the addon, so you’ll see it in the form templates area once the addon’s active. Our template has fields for things like:
- Author’s name, email, and bio
- Post Title
- Post Content
- Featured Image
- Post Excerpt
- Post Category
- Custom fields (custom post meta)

Create a Post Submissions Form Now! 🙂
By using the Rich Text field to collect post content, you can even let writers style their posts and upload images in their content right from your submission form.
When someone submits a guest post from your guest post submission form, it will be automatically added to your posts area in the WordPress dashboard.
It will be marked as ‘pending’ so you can easily review and publish it. For help with automating this process, check out how to allow users to submit blog posts.
After creating your guest post submissions form, embed it on a page that is blocked from search engine crawlers.
This will stop search engines from indexing the page. When you accept a proposal from a writer, you can send them the link to submit their article.
For help with hiding your proposal form, read this tutorial on how to hide a WordPress page from Google.
Allow Anonymous Guest Posts
Guests posts usually provide an opportunity for the writers to promote themselves. However, some writers may prefer anonymity.
In WPForms, it’s pretty easy to enable anonymous submissions from writers. You can click on the Name field to open Field Options. Then, find the switch labeled Required and toggle it off.
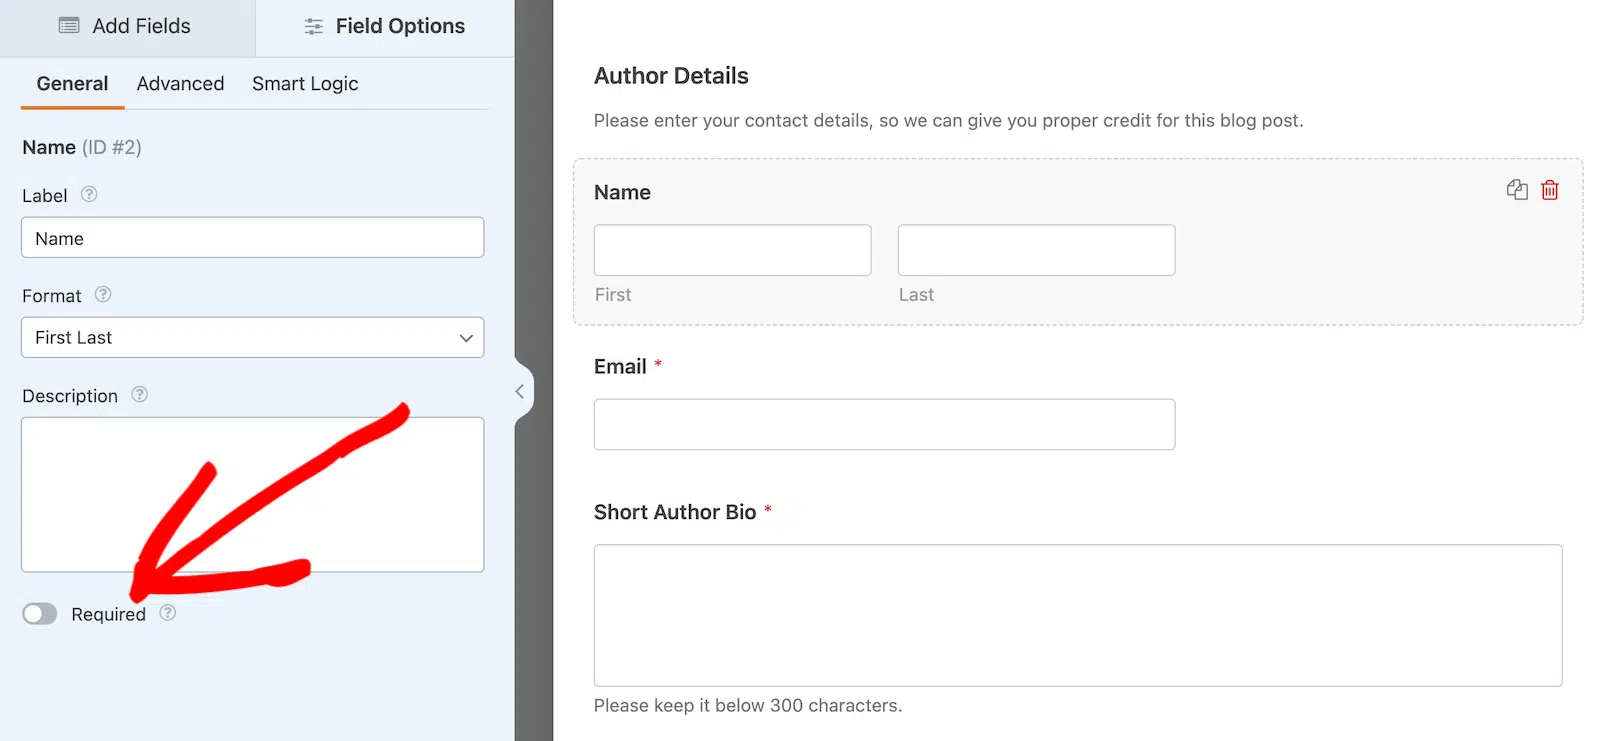
This will turn the Name field optional, allowing authors to skip it entirely if they wish to remain anonymous.
In fact, you can also turn the Author Bio field optional to add even greater anonymity. However, I recommend keeping the Email field required. Otherwise, you’ll have no way of contacting the author.
Writers who wish to remain anonymous use vague email addresses anyway, so they’ve already taken measures to protect their anonymity with email.
5. Invite Guest Authors to Your Website
Inviting guest writers in your niche is a good way to get more post submissions that are a good match for your site.
Approaching writers is easy, but finding the right people requires a little research:
- Browse for like-minded guest posters – Check out popular blogs in your niche and create a list of people who regularly contribute to those blogs. Let them know that you’ve started accepting guest posts on your blog.
- Attract bloggers with a contest – Create a guest blogging contest to gather quality guest post submissions. You can reward one guest author every month and even use the contest entry form template to help you get started. This will likely boost guest post submissions, especially among those trying to build a portfolio and gain exposure.
- Ask clients and contacts – Ask brands you already work with if they’d like to write for your blog. Be sure to suggest some topics that overlap with your niche so that the content is relevant to both audiences.
- Use social media – Many sites promote their guest posts and often mention those exact words in their social media updates. By searching for your keywords plus the words ‘guest post’, you’ll find recent posts by like-minded writers.

If you want to know how to get contributors for your blog quickly, finding prolific guest bloggers is often the best way. Always promote these posts heavily to attract a wide audience.
You might also want to use a multi author WordPress plugin to make it easier for you to manage writers on your site and feature them on your pages.
6. Include an Author Bio as an Incentive
Here’s another pro tip: professional writers will provide high-quality content if they know their names will be attached to the article when it goes live.
That’s because many guest bloggers are hoping to:
- Build a portfolio
- Expose their brand to a broader audience base
- Network with like-minded professionals
- Create partnership opportunities
And including an author bio also gives your guest blogger a chance to link back to their own site. If they own a small business, this could be a big boost for them.

You don’t always have to let guest writers link to their websites within the actual blog content as well, but there’s no harm in this if the links are relevant and useful.
Want an easy way to add an author byline to your posts? Check out this post on how to add an author bio box in WordPress.
7. Pay Guest Bloggers to Get More Contributors
Finally, let’s look at a powerful way to get more contributors for your blog: offering payment for each post.
You might think there’s no point in doing this if writers will provide free content. But paying writers for their time can show that you’re serious about publishing great content.
If you’re prepared to pay, you’ll also attract awesome freelancers and influencers who work with other brands.
They might even promote their guest posts on their own social media channels to give them a boost. Remember: guest bloggers will help you to:
- Save time
- Increase your keywords
- Drive traffic to your site
- Increase conversions
- Help you post more frequently.
Paying people is a good way to recognize the benefit that their content is bringing and encourage them to write for you in the future.
Create a Post Submissions Form Now! 🙂
Guest post submissions are a popular topic of interest among our readers. Here are answers to some common queries about it.
FAQs – Finding Guest Authors for Your Website
How Do I Get Free Content For My Blog?
Invite guest bloggers to write for your site. Publishing guest posts is a great way to get free content and benefit from the insight and expertise of different writers.
And because you don’t need to write posts yourself, you can free up time to work on other business areas.
You can spend that time developing your content marketing strategy or promoting your content more widely on social media.
(Check out our list of awesome social media plugins for ideas on how to do that!)
Should I let guest bloggers create a bio on my website?
Publishing free content is a 2-way street. By allowing other people to post on your site, you should let them create a bio to publicize their business.
In some cases, you’ll also want to let them link back to their own site.
Do blog contributors get paid?
Whether blog contributors get paid varies by the blog. Some blogs offer monetary compensation, while others might offer exposure, experience, or other forms of non-monetary benefits.
How do you get people to your blog?
Attracting visitors to your blog typically involves using SEO techniques, sharing content on social media, engaging with readers through comments, and consistently providing valuable and relevant content.
How do you get people to your blog?
Attracting visitors to your blog typically involves using SEO techniques, sharing content on social media, engaging with readers through comments, and consistently providing valuable and relevant content.
How much does Blogger pay for 1,000 views?
Blogger itself does not pay for views. Bloggers can earn money through ads, sponsored content, or affiliate links.
The earnings depend on the blog’s niche, the audience’s engagement, and the chosen monetization strategy.
How do I get my blog ranked?
Getting your blog ranked involves optimizing your content for search engines (SEO), using relevant keywords, updating your blog regularly with high-quality content, and building backlinks from credible sources.
Next, Get Paid For Accepting Guest Posts
Do you want to know how to get contributors for your blog and charge them for the placement? This works well for user-submitted events and sponsored posts.
To add a payment field to your post submission form, check out this guide on how to require users to pay to submit blog posts.
Create a Post Submissions Form Now! 🙂
Ready to build your form? Get started today with the easiest WordPress form builder plugin. WPForms Pro includes lots of free templates and offers a 14-day money-back guarantee.
If this article helped you out, please follow us on Facebook and Twitter for more free WordPress tutorials and guides.

