We’ve been hard at work behind the scenes to make WPForms even better and more user-friendly for our customers.
Today, we’re thrilled to announce the release of WPForms 1.7.5. This update includes important new features designed to take form management to the next level.
Introducing… form tags!
With form tags, organizing your WordPress forms becomes easier than ever before. Now, you can add tags to your forms, which will allow you to categorize forms by type or relevance and easily locate them in your WordPress dashboard.
Tags Make Form Management Easy
Creating forms with WPForms has always been easy, so you can quickly create as many forms as you need to run your business. But once you’ve got enough forms on your site, it can be difficult to keep track of all of them.
We wanted to make it easier for you to manage your forms even if you’ve got tons of active forms!
Our form tags feature gives you a faster and simpler way to organize your forms, so you can always find them quickly.
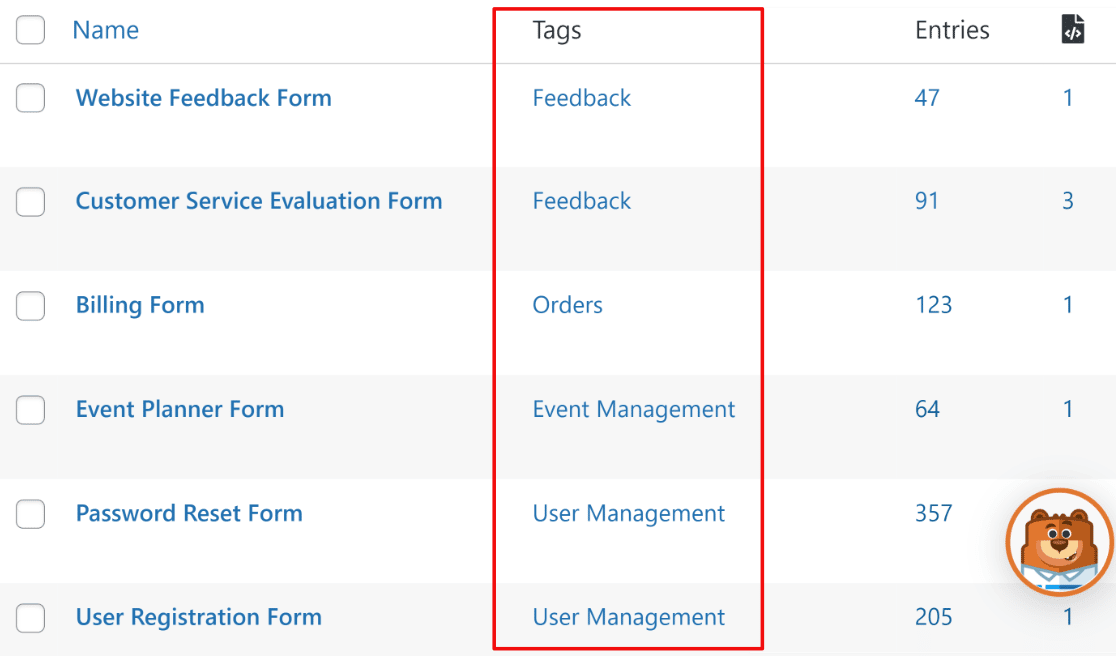
To access form tags, just select the Tags column from the Screen Options on the top of the Forms Overview page.
Tagging is a simple and lightweight solution to grouping your forms by topic, relevance, department, or any other kind of categorization you want.
The form tags feature is available right out of the box with WPForms 1.7.5. No extra extensions or addons are needed to get it working!
Note: Form tags are only visible from your backend. Your visitors won’t be able to see any tags assigned to your forms.
Form Tagging With Full Flexibility
WPForms 1.7.5 gives you full control over how you want to manage your form tags.
For instance, you can create new tags on the go and assign them to your forms individually right from the Forms Overview screen.

Tags are immediately saved as you create them. So you can easily select the ones you’ve already created and assign them to any form.
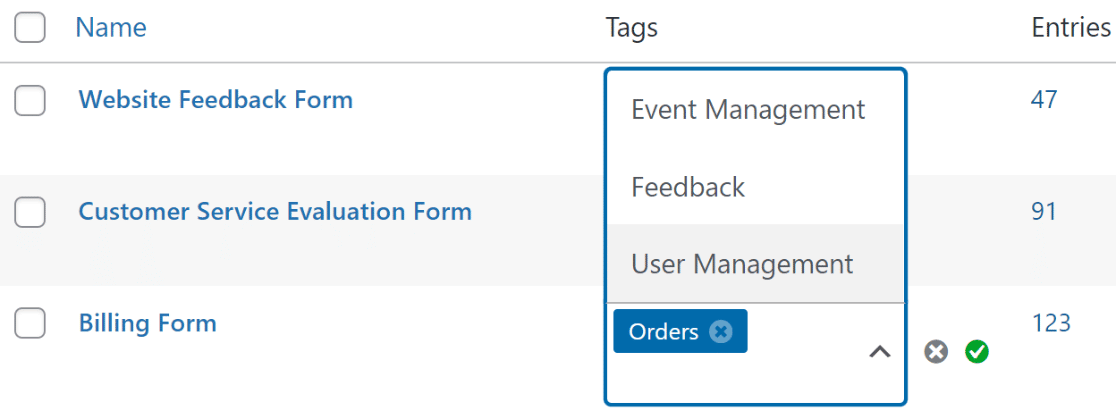
It’s entirely up to you how many tags you wish to create and assign to each form. A form may have multiple tags, just a single one, or none at all.
Removing tags from a form is just as easy. All you need is to press the cross button (x) on the tag to remove it from your form.

As you can see, creating, assigning, and removing tags from individual forms is super easy.
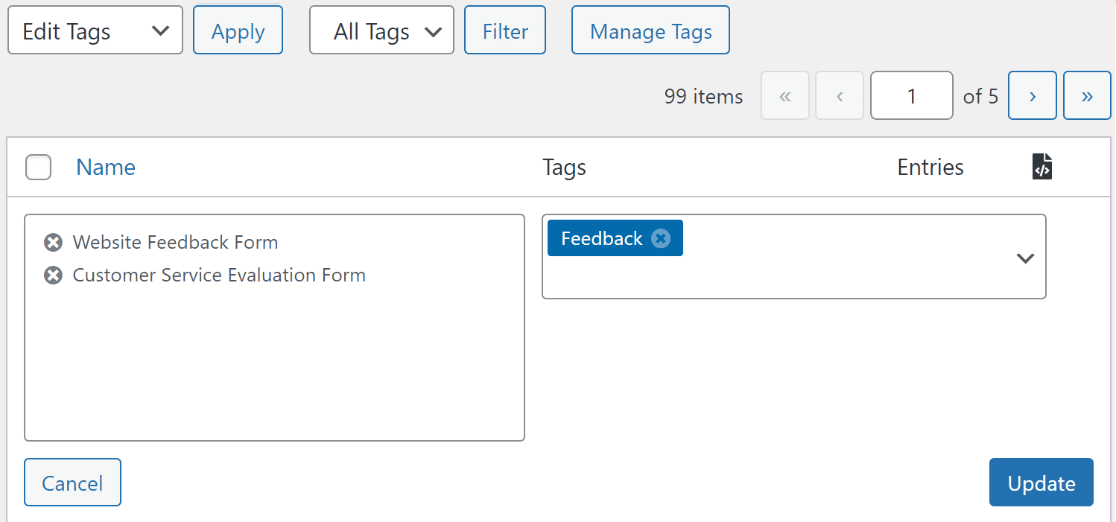
But what if you wanted to edit tags for a bunch of your forms at the same time? We’ve got you covered!
Our form tags feature fully supports bulk actions, so you can add or remove tags for multiple forms super quick.
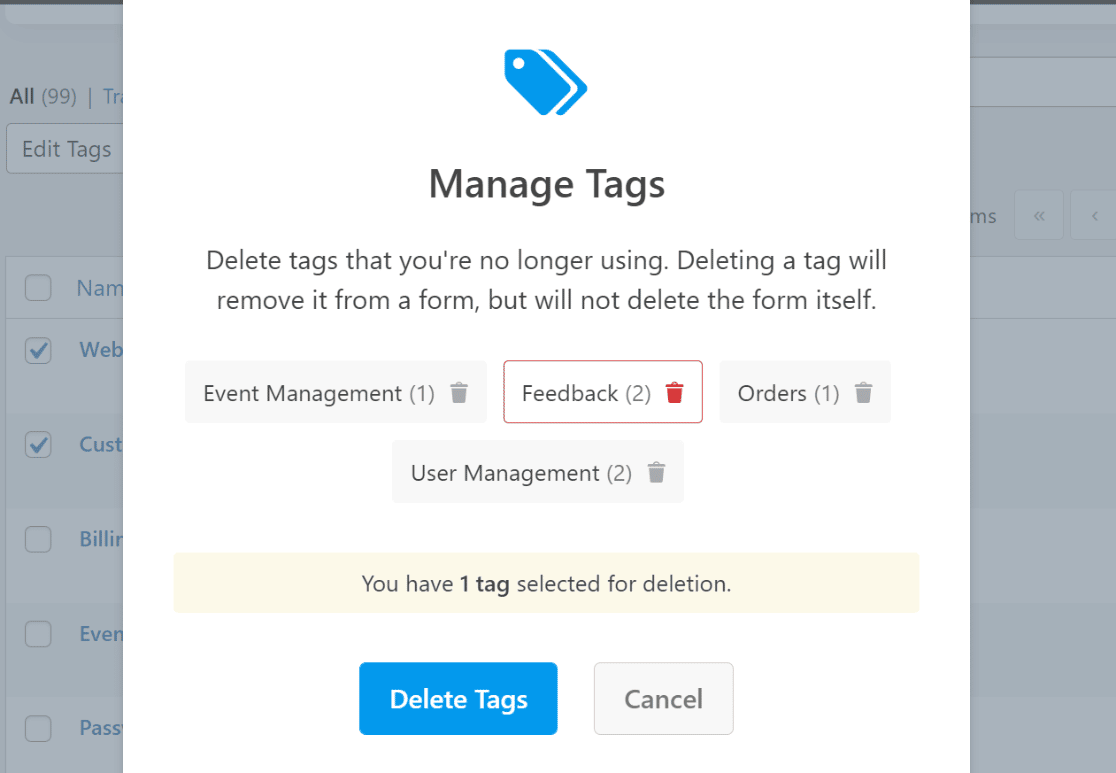
If you wish to delete a tag entirely, you can do that with a single click from the tag management modal. This modal also displays the number of forms that each tag is assigned to, so you can easily decide which tags you’d like to delete.
That’s not all!
We’ve also added a form tag edit field within the form builder itself. Meaning you can assign tags to a new form while you’re building one.
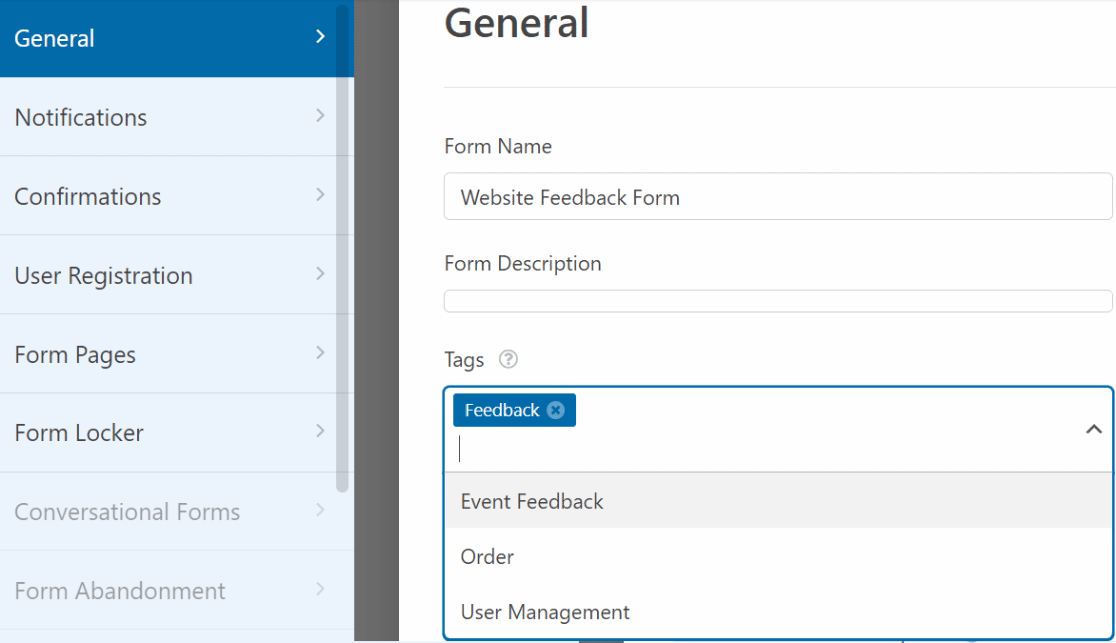
Smooth, right?
We haven’t even mentioned the biggest benefit of form tagging yet…
Find Forms Instantly With Tag Filters
As soon as you’ve assigned tags to your forms, WPForms 1.7.5 will enable you to filter your forms by tags. This is super useful when you want to quickly locate forms of a similar type and edit their settings, fields, or any other options.
No more scouring through pages on the backend to look for the form you need!
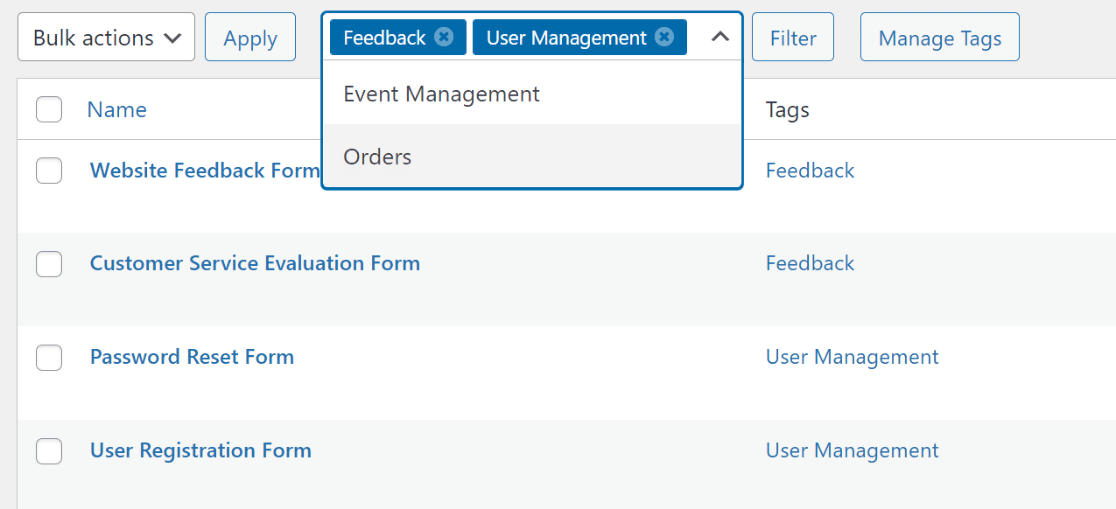
If you’ve got tons of different forms active on your site, we’re sure you will love filtering by tags to locate specific forms.
Form tags and filtering has massively simplified our workflow even though we have thousands of active forms on our sites. We hope it will help make your form management easier too.
But we’re not quite done yet! There’s another feature that we’ve packed into this update…
Advanced Payment Details Searching
We know that our payment forms are popular with many of our customers. We think that it should be easy and painless for you to search entries by any type of payment detail.
Previously, you could search entries in payment forms only by the data entered by the user within available fields (such as Total Amount). But payment services like Square, PayPal, and others also add metadata like transaction IDs.
Our update makes these extra payment details searchable too!
In this example, we performed an entry search using the Square receipt number for an order.

This can be a lifesaver in cases you only have a transaction ID or receipt number of a user’s payment and need to make an entry search based on that. You can then gather other pieces of data stored in the user’s entry.
To access this feature, you’ll need WPForms Pro. We hope that the new payment detail search options will enable you to keep track of your payments in a more advanced way right from your WordPress dashboard. Go ahead and take it for a spin!
A Word on Form Management Updates
You may have noticed a common theme in our past few WPForms updates. We’ve been consistently adding new features aimed at improving form management in different ways.
This is no accident. After careful research and feedback from our customers, we found that quick and straightforward form management is a priority for many site owners.
And that’s what led us to release a variety of features making form management more efficient. These include:
- Form search
- Form revisions and form trash
- Form locator
- Form tags.
These features are available to ALL license levels including Lite!
If you’re unable to access these features, make sure to update WPForms to the latest version to unlock the full power of these form management features.
Feel free to contact us with any questions.
On to the Next Milestone…
And that wraps it up for this release.
But before we get right back to working on the next update (which is coming very soon), we’d like to share another exciting news.
Thanks to the support and appreciation of our customers, we’ve just crossed 11,000 5-star reviews on WordPress!
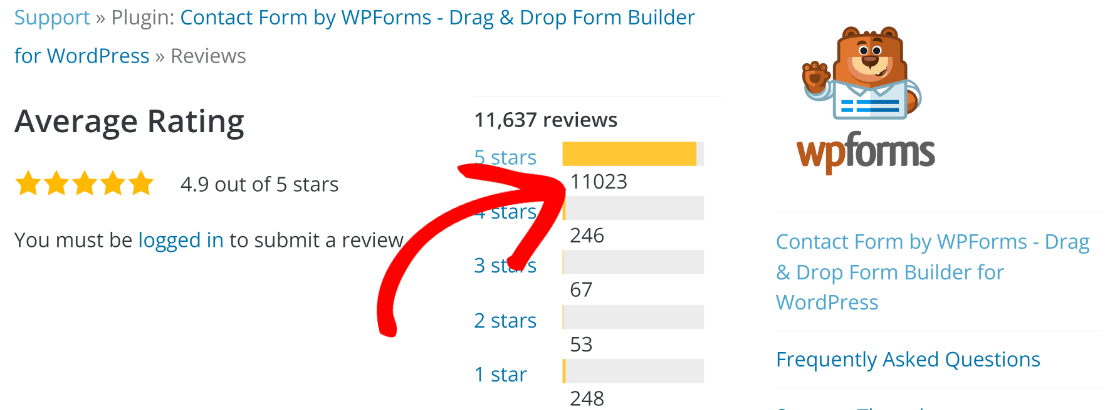
We’re only the second WordPress plugin to have achieved this milestone. And it’s thanks to you that we’ve been able to reach this landmark achievement.
Our commitment to making WPForms the easiest and best WordPress form builder is only getting stronger as we continue to win great things together with our customers.
We’re so grateful to the entire extended WPForms family. We hope that you enjoy using form tags and searchable payment details.
-Jared Atchison.




Please, add repeater functionality…
Hi Mauro- We don’t currently have the ability to allow front-end users to replicate fields or sets of fields, though this is on our feature request list to consider adding down the road.
For now, the best alternative solution is to use conditional logic to display the right number of fields (or sets of fields). If you’d like to give this a shot, here’s what you’d need to do (it’s actually pretty easy, but can be confusing when you’re just getting started):
1) Add a Dropdown field where each option is a number — include the full range of possible numbers of fields.
2) Add the field(s) you want. Then click on each to open its Field Options screen and click on Smart Logic. Enable this, then add logic to make this field appear for every number available in the dropdown.
Here’s a screenshot to demonstrate what the conditional logic would look like if your dropdown options are 1, 2, and 3: (screenshot) using the Single Line Text field as an example. The key is to make sure you use the Add new group button — which applies ‘OR’ logic.
Why you need OR logic can get confusing, but if you’re curious here are more details.
What you’ve just created is a field that will display with every single number that gets selected.
3) Now duplicate this field (with the double paper icon shown here). On this copied field, go into the Conditional Logic section and remove the ‘If Dropdown is 1’ logic, like in this screenshot.
This will mean that this field only appears if 2 or higher is selected from the dropdown.
4) Continue this process for every other possible number (duplicate previous field, then remove the lowest number’s conditional logic).
When you’re done, this will look super professional to the front-end user — it just takes a bit of doing for setup 🙂
I have WPForms 1.7.5 updated/installed and the “Tags” column is not there or visible.
Hey there — We are sorry for any trouble. In order to make sure we answer your question as thoroughly as possible and avoid any confusion, could you please contact our team?
You have access to our email supportby submitting a support ticket here.
Thanks.