Do you want to include an Add to Calendar option to your WordPress forms?
Giving site visitors an easy way to add event dates to their calendars after registering on your site is an added personal touch that people will appreciate. If you prefer, you can always add this option to your form’s confirmations or email notifications too.
In this article, we’ll show you how to include an Add to Calendar option to your WordPress forms, so site visitors can start planning for your upcoming events from the moment they submit a form on your website.
Create Your WordPress Form Now
How to Include an Add to Calendar Option to Your WordPress Forms
In This Article
Step 1: Create a WordPress Form
The first thing you’ll need to do is install and activate the WPForms plugin. For more details, see this step by step guide on how to install a plugin in WordPress.
In our example, we’ll create a simple birthday party RSVP form that people can fill out and submit. For help with this step, be sure to check out this tutorial on how to create an RSVP form in WordPress.
Here’s what the Birthday Party Invitation RSVP Form template looks like in the form builder:
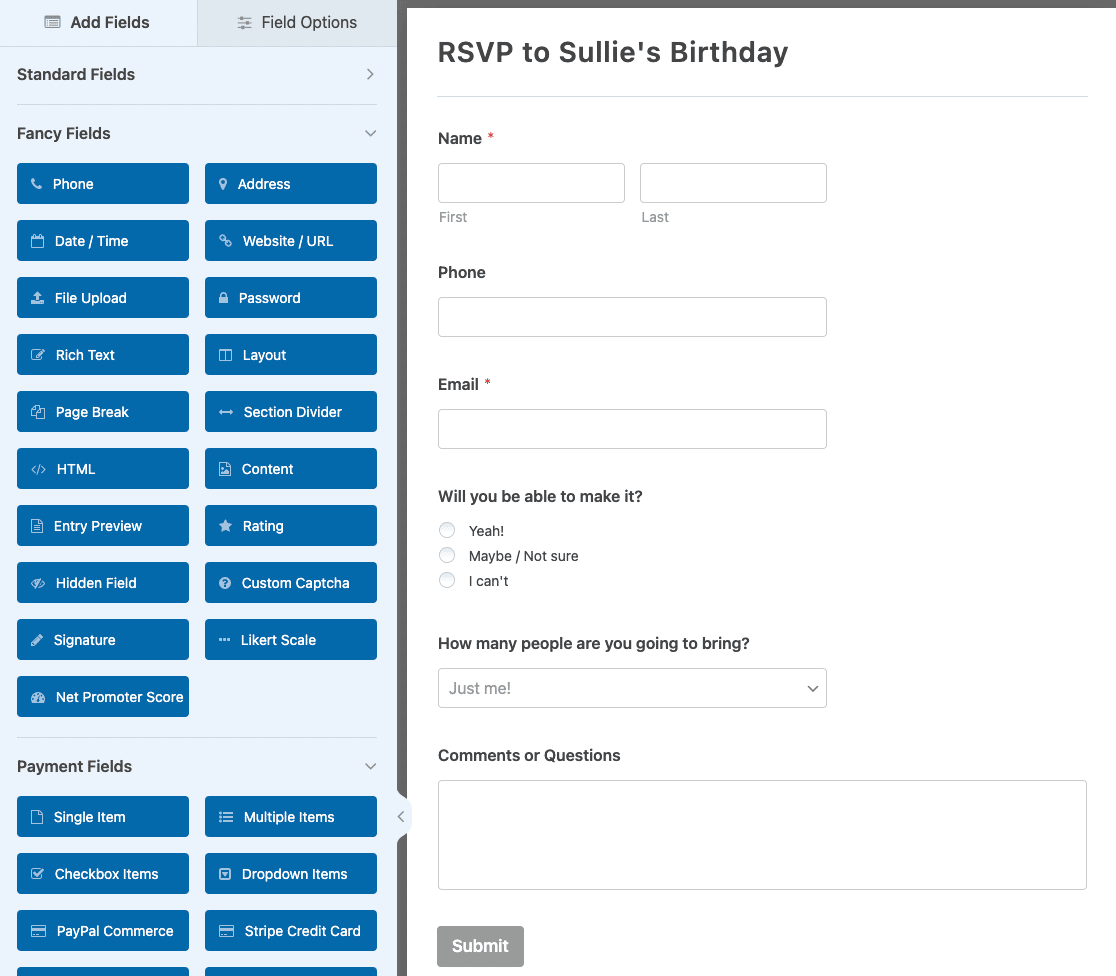
To add a small message to your form letting people know when the party is, just drag the Content form field from the left hand side of the form builder to the preview area on the right hand side. Then click on the field to make changes.
Here’s what we added to our form:
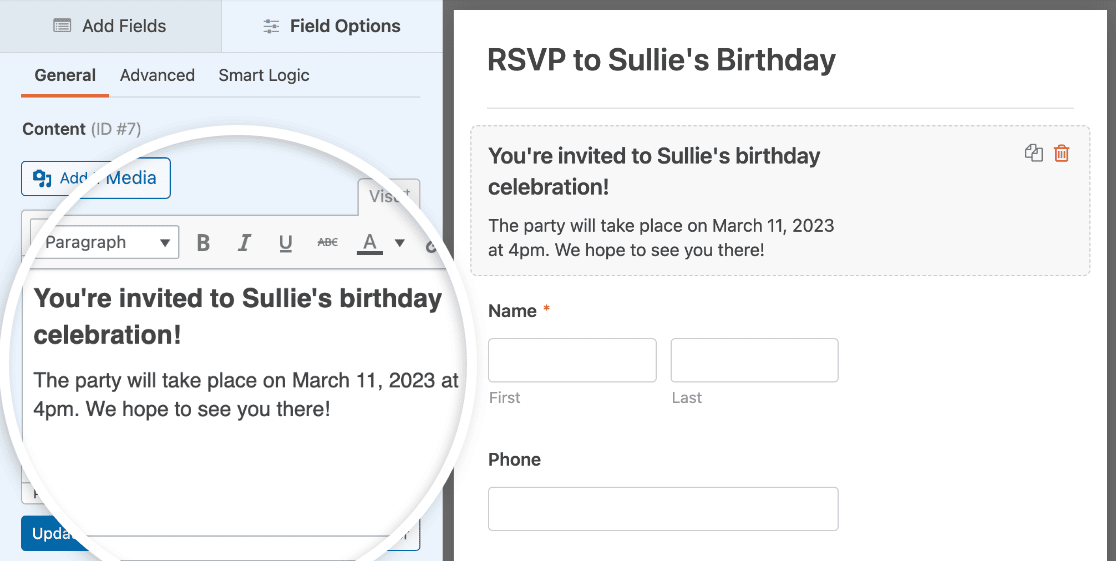
Now it’s time to include the Add to Calendar option to your form.
Step 2: Create an Event in Google Calendar
The first thing we’ll do before adding the calendar option to our form is create an event in Google Calendar.
To do this, log in to your Google account and go to your Google Calendar. Then click Create » Event and fill in the event details.
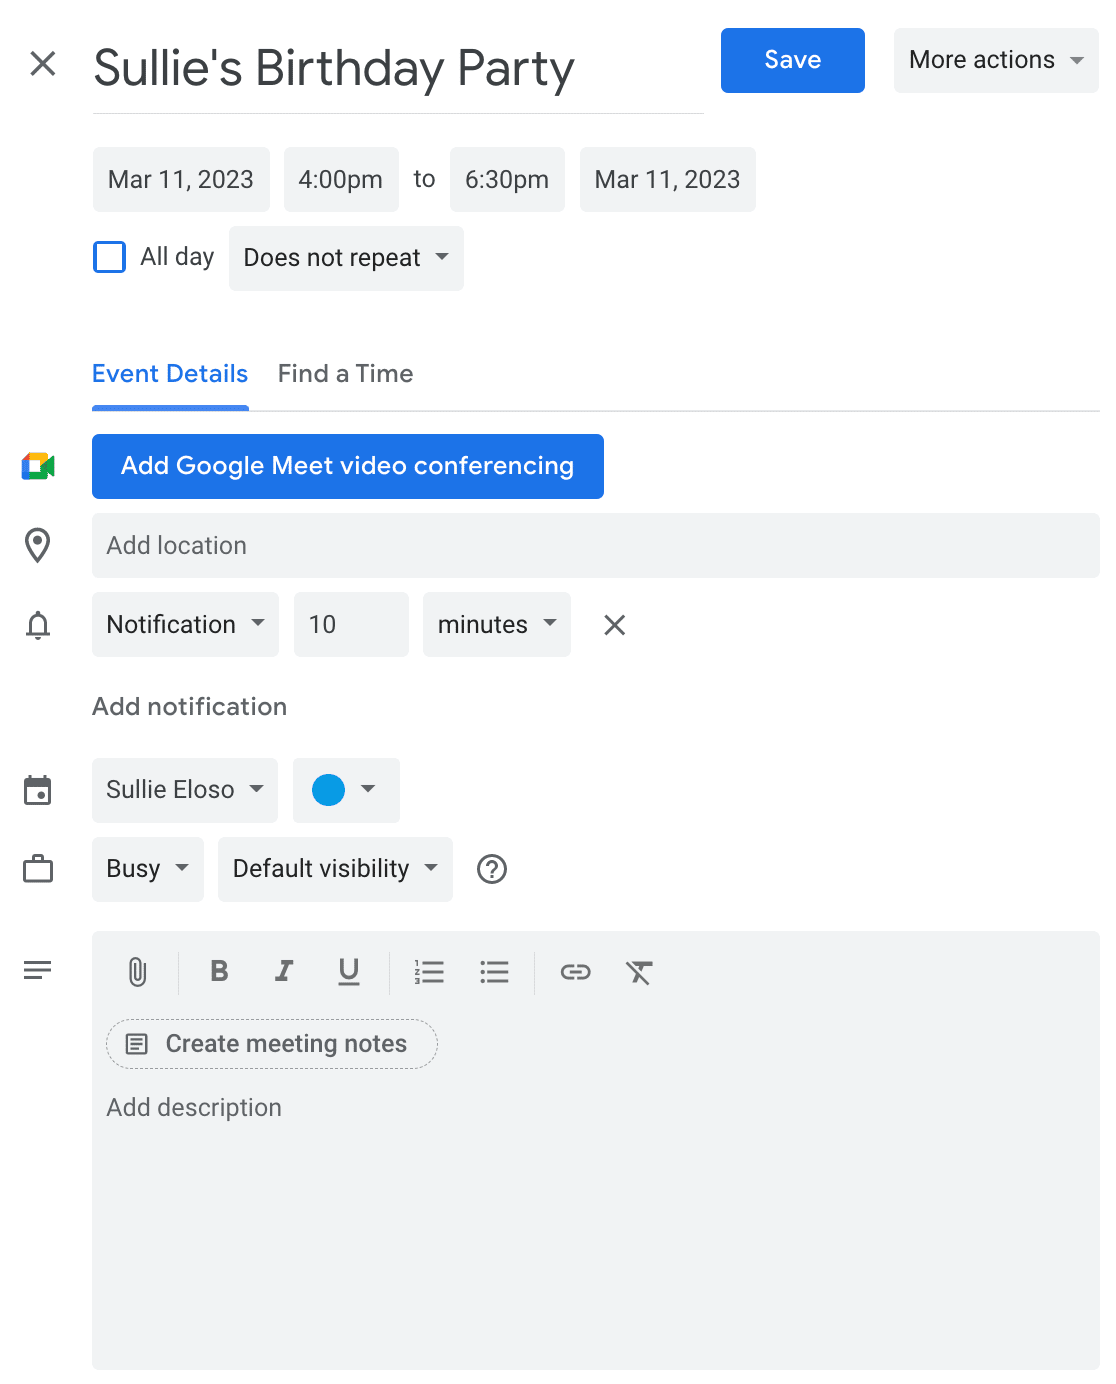
Click Save so that your event is saved to your calendar.
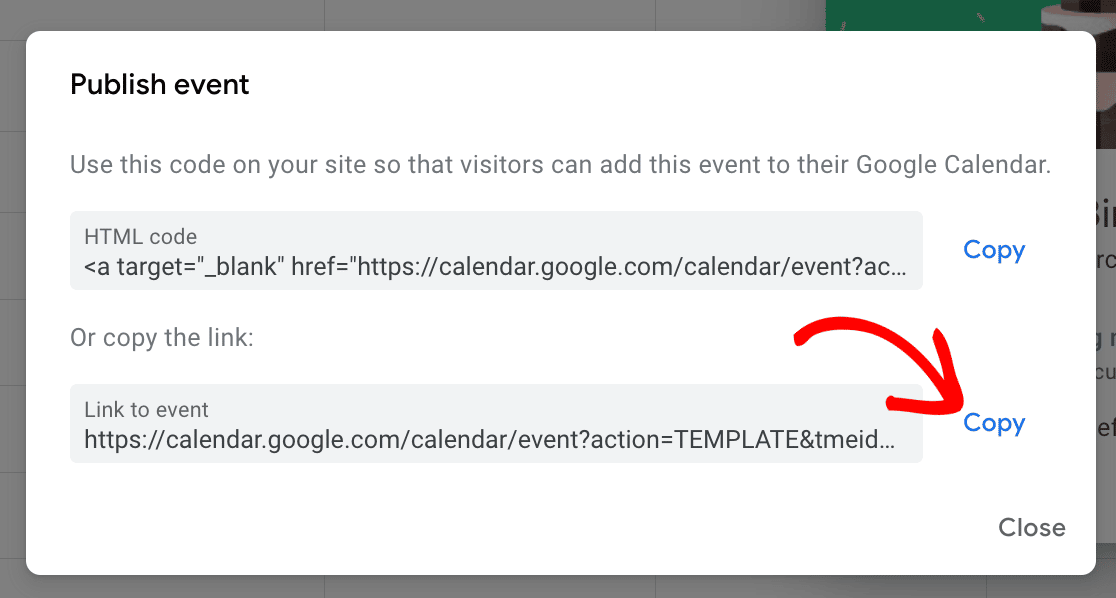
Then, find the event in your calendar and click on the 3 dot icon. From the dropdown menu, select Publish event.
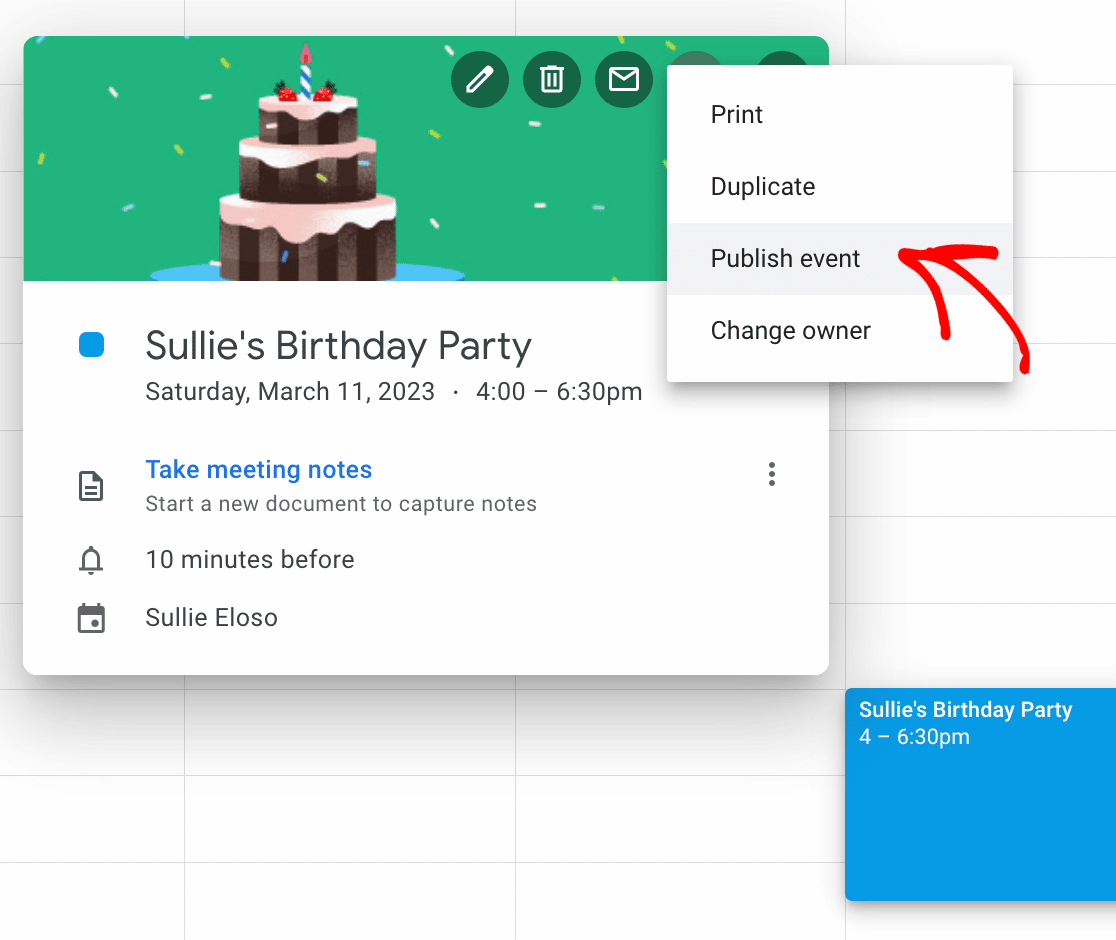
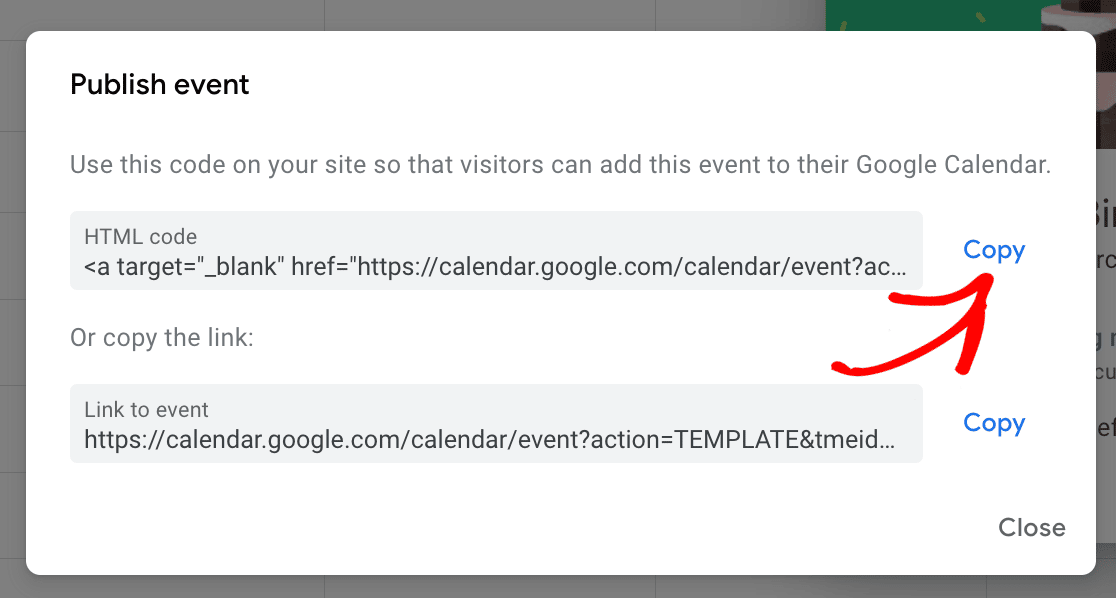
When you do, a popup modal will appear with links to your event. You’ll want to copy the link for use on your WordPress form.
In order for your site visitors to see your published event, you’ll need to make sure your Google Calendar is set to “Public.”
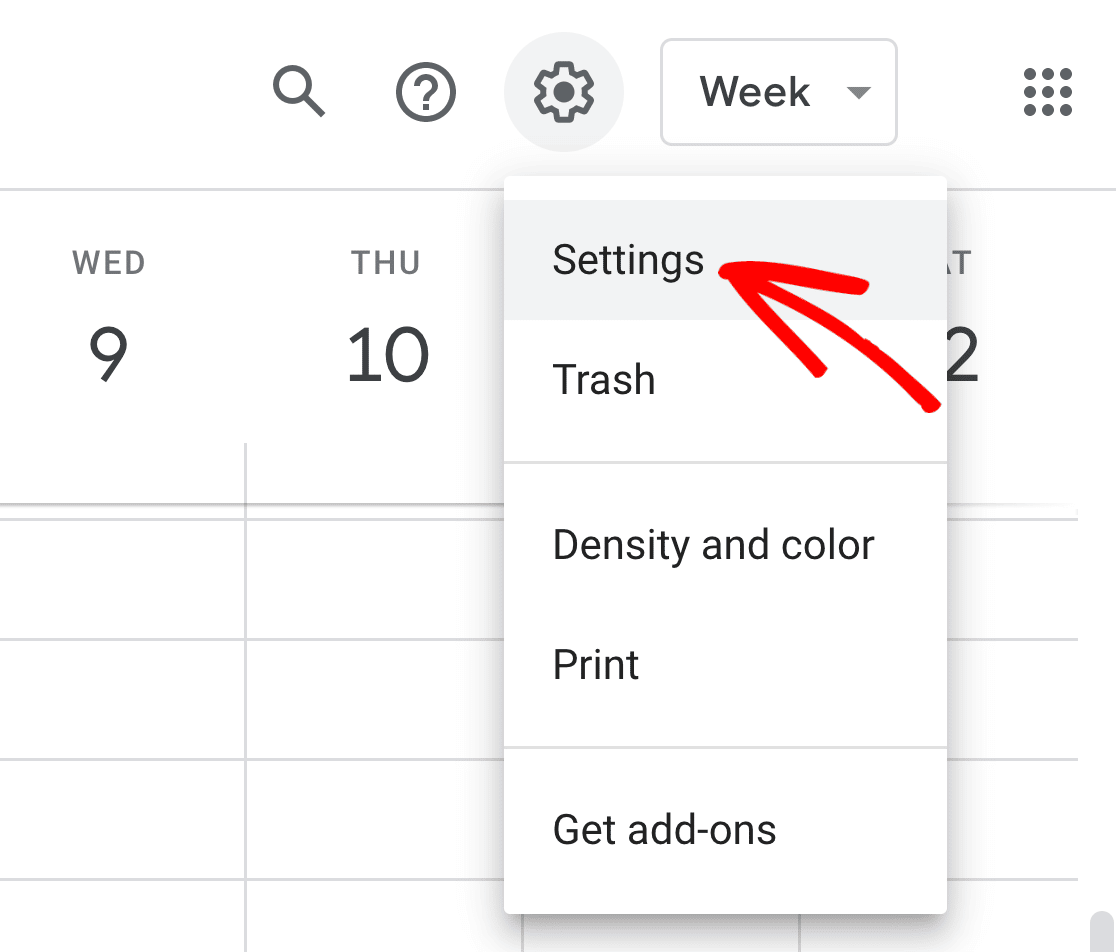
To change your Google Calendar to “Public” for all to see, first choose Settings from the dropdown in your calendar.
Then, click on the calendar you want to make Public, scroll down to Access permissions for events and click on the Make available to public checkbox.
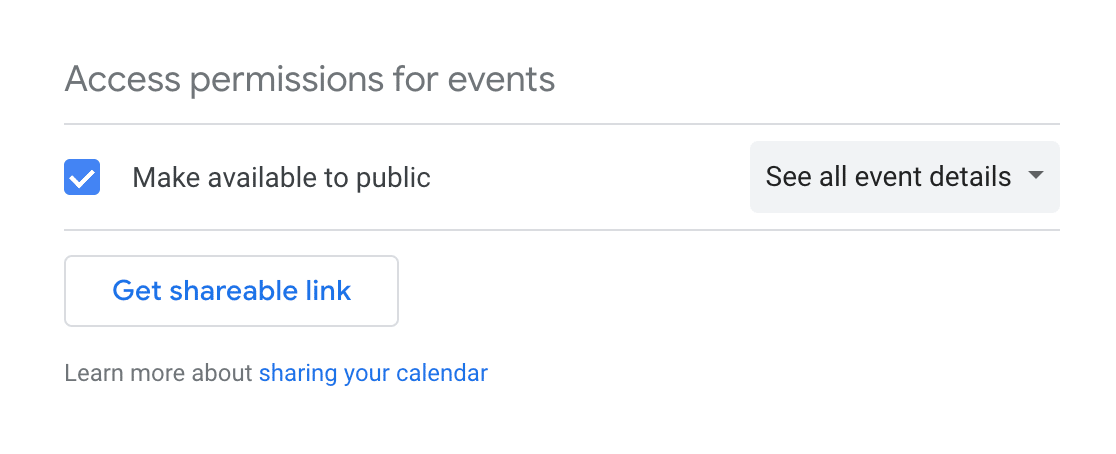
Making your Google Calendar Public will make all of your calendar events visible to the world, even via Google search. If you have private matters on your calendar, it’s suggested you create a separate Google Calendar for events you want site visitors to add to their own calendars.
Now your event is ready to be added to your WordPress form.
Step 3: Include an Add to Calendar Option to Your WordPress Form
There are several places you can include your Add to Calendar option on your forms:
- On the form itself
- In form confirmations
- In email notifications
Let’s first take a look at how to include the Add to Calendar option to your actual form first.
If you haven’t already, add a Content form field to your event form by dragging it from the left hand side to the right hand side panel.
We added this form field from the beginning because we wanted to make sure people knew a little bit about our event.
Once the Content form field is added, click on it to make changes. Add the link you copied from Google Calendar.
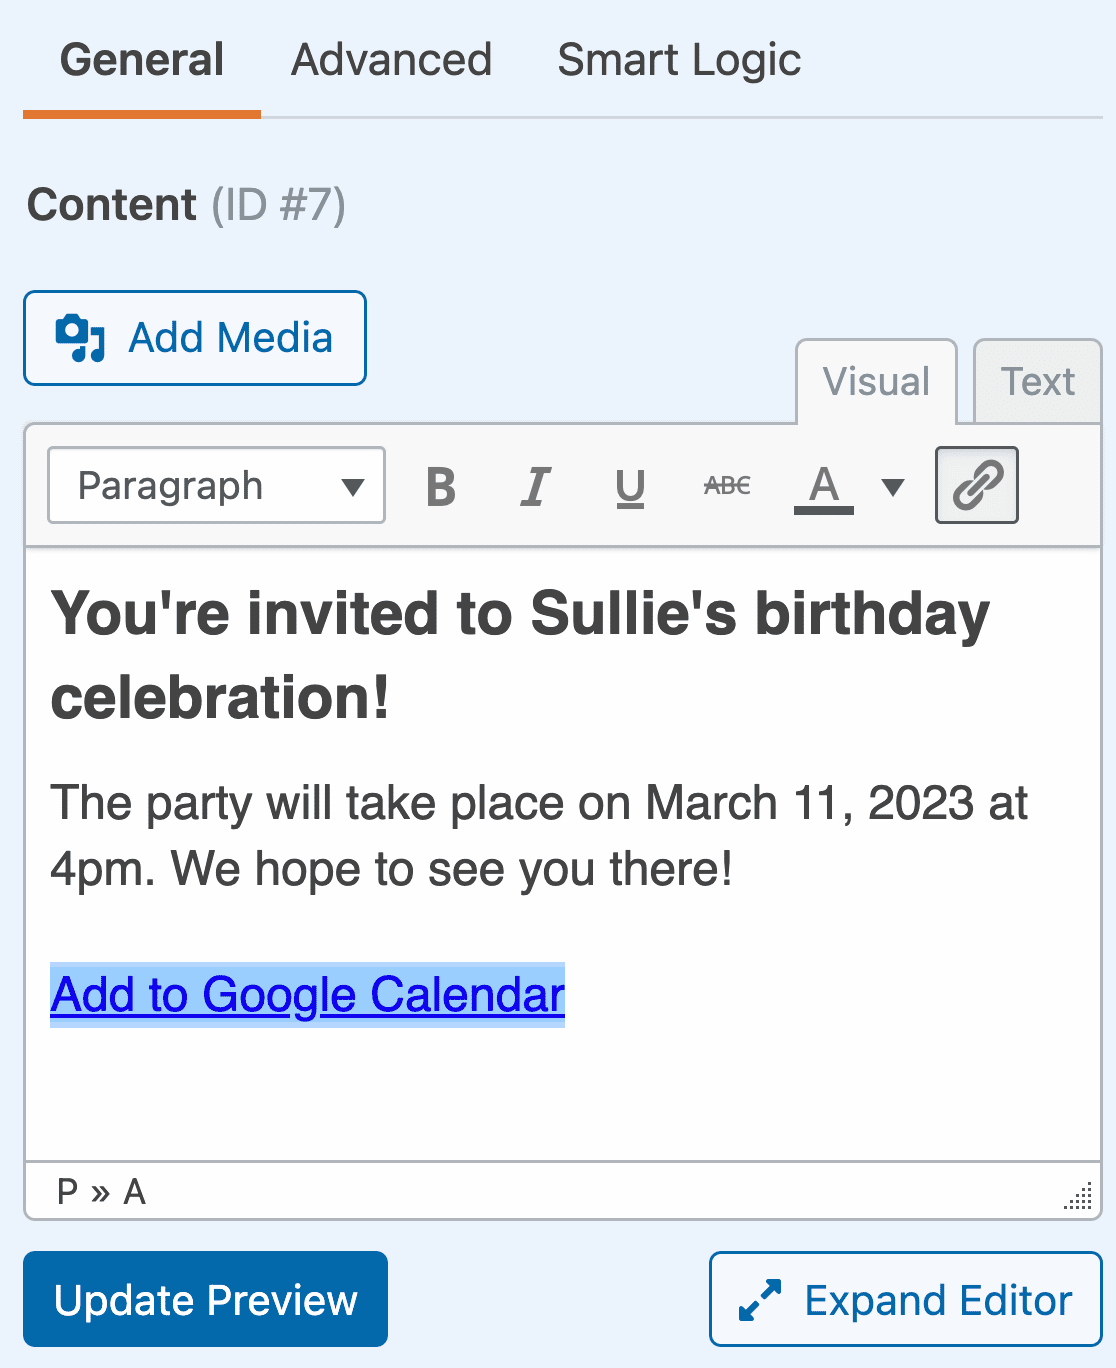
Click Save at the top of the form builder when you’re done.

When a site visitor clicks on the CTA button labeled Google Calendar, Google will open and prompt them to sign in to their account. Then the event will appear with all the details you added so they can save it to their own calendar if they choose to do so.
Now, if you’d rather not have an Add to Calendar option on your actual WordPress form, you can always add the link to your event in your form’s confirmations or notifications.
Step 4: Include an Add to Calendar Option to Your Form’s Confirmation Message
Form confirmations are messages that display to site visitors once they submit a form on your website. They let people know that their form has gone through and offer you the chance to let them know what the next steps are.
WPForms has three confirmation types to choose from:
- Message. This is the default confirmation type in WPForms. When a site visitor submits your RSVP form, a simple message confirmation will appear letting them know their form went through.
- Show Page. This confirmation type will take site visitors to a specific web page on your site thanking them for their RSVP. For help doing this, check out our tutorial on redirecting customers to a thank you page.
- Go to URL (Redirect). This option is used when you want to send site visitors to a different website.
For our event form, we’ll create a confirmation message, complete with the Add to Calendar option so site visitors can immediately add our upcoming event to their Google Calendars.
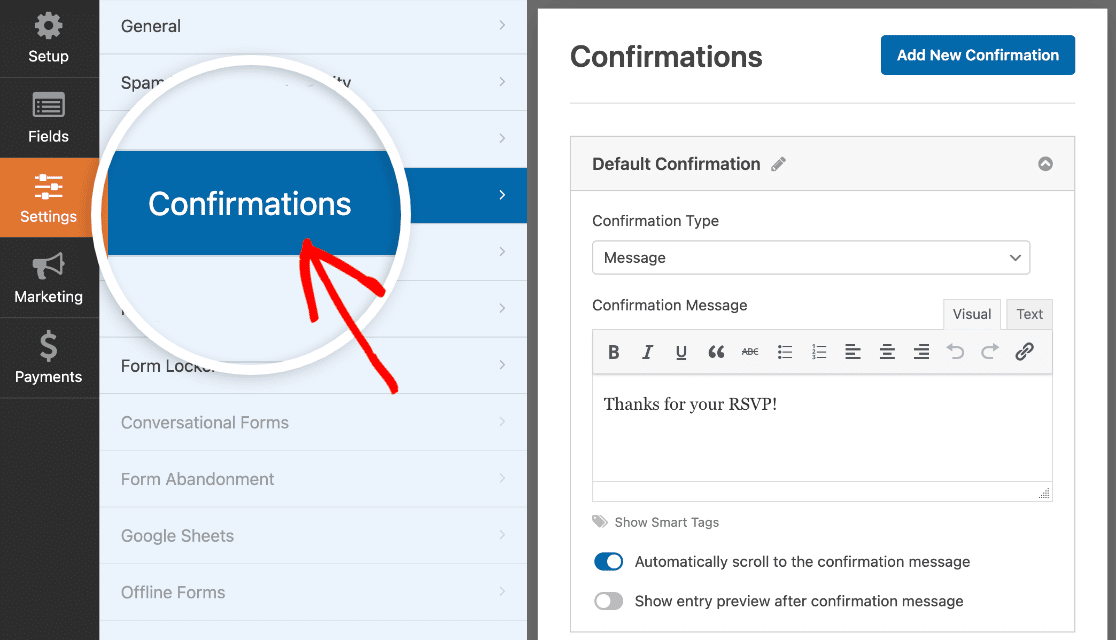
To start, click on the Confirmations tab in the Form Editor under Settings.
Next, select the type of confirmation type you’d like to create. For this example, we’ll select Message.
Because we’re adding the option to add your event to a calendar in the form confirmation, we have two options:
- Create 1 simple message, adding the Add to Calendar option in the message, whether people will attend or not.
- Create multiple form confirmations and enable smart conditional logic so that only those who will attend or might attend will see the confirmation message with the Add to Calendar option.
For simplicity, we’ll create 1 confirmation message that displays to all site visitors whether they plan to attend the event or not. Just enter some text and add your Google Calendar event link to it.
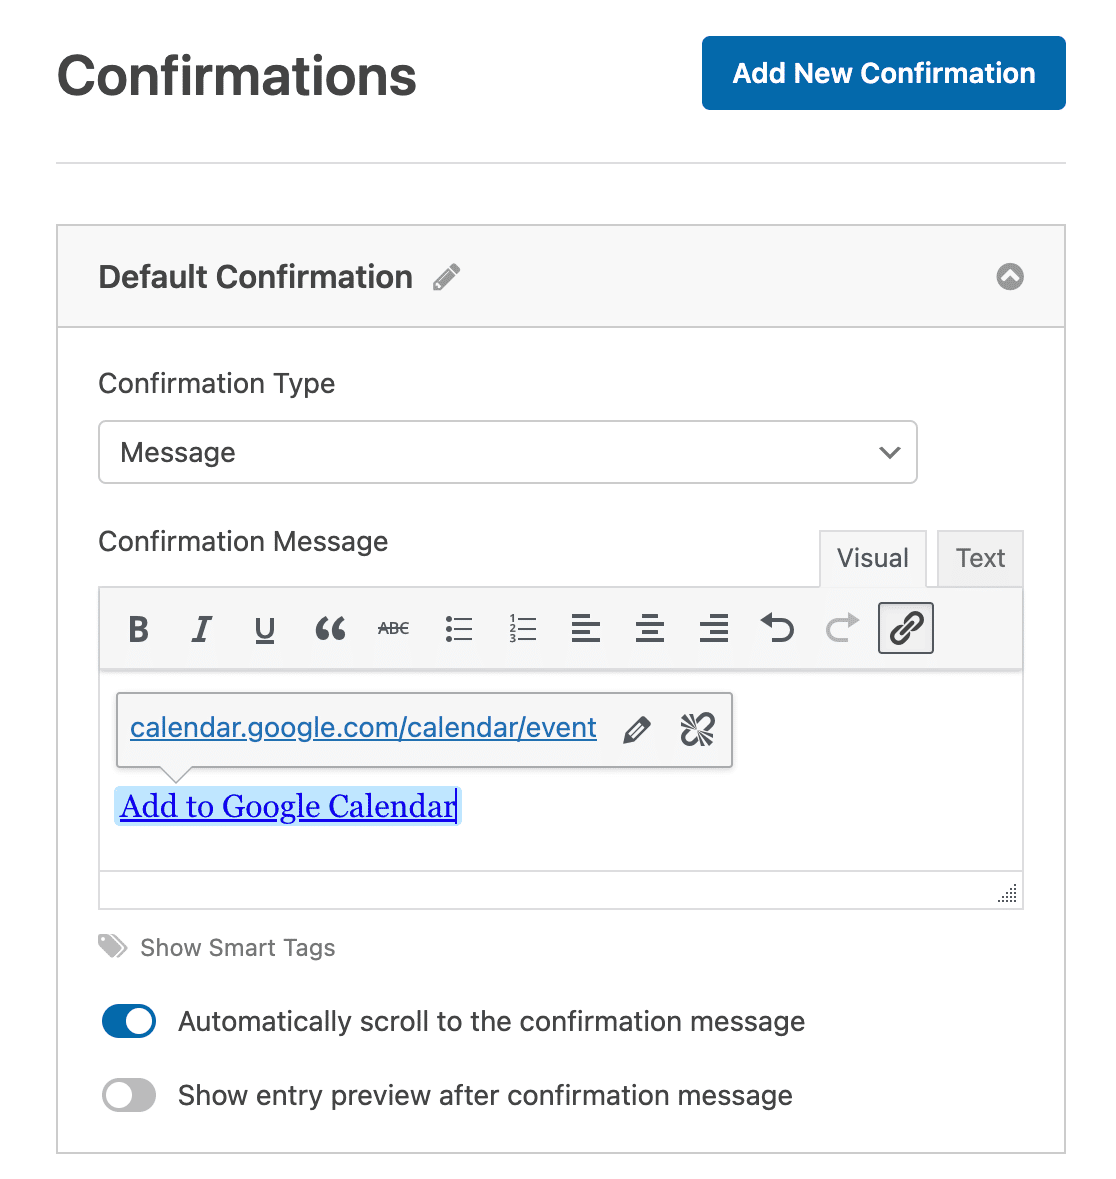
This is what the form confirmation looks like when someone submits an RSVP form:

Again, all your site visitor needs to do is click the Google Calendar link and add your event to their own calendar.
If you want to create multiple form confirmations and use conditional logic to display different messages to people depending on their RSVP answers, check out this tutorial on creating conditional form confirmations.
Step 5: Include an Add to Calendar Option to Your Form’s Email Notifications
The last place you can include an Add to Calendar option on your WordPress forms is in the email notification people receive when they submit a form on your website.
But before we jump into how to do this, you’ll need to make sure you have an Email form field on your RSVP form, which in our example we did not. This is the only way WPForms will know to email a notification to your site visitors.
After you’ve added an email form field to your event form, go to Settings » Notifications in the Form Editor.
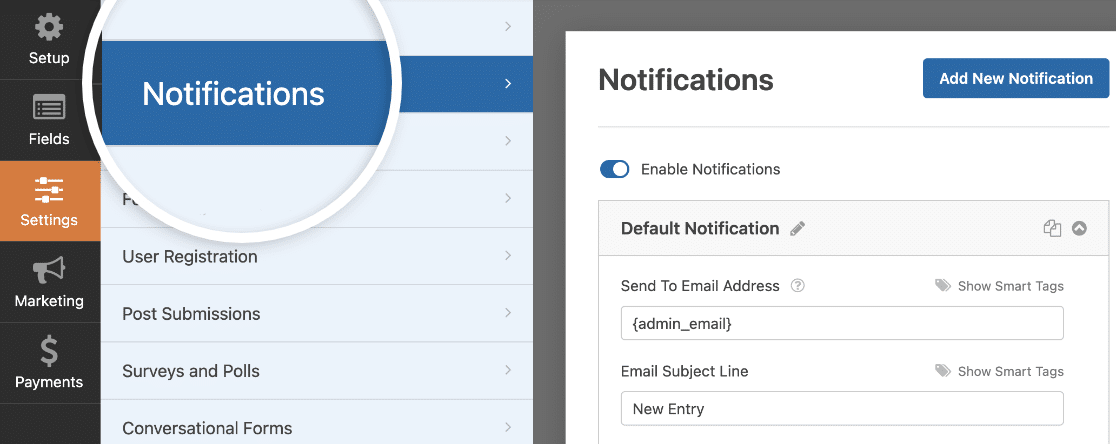
By default, you’ll always receive an email notification when someone submits a form on your site.
To make sure site visitors receive a notification too, however, you’ll need to use Smart Tags to add your site visitor’s email to the email notification.
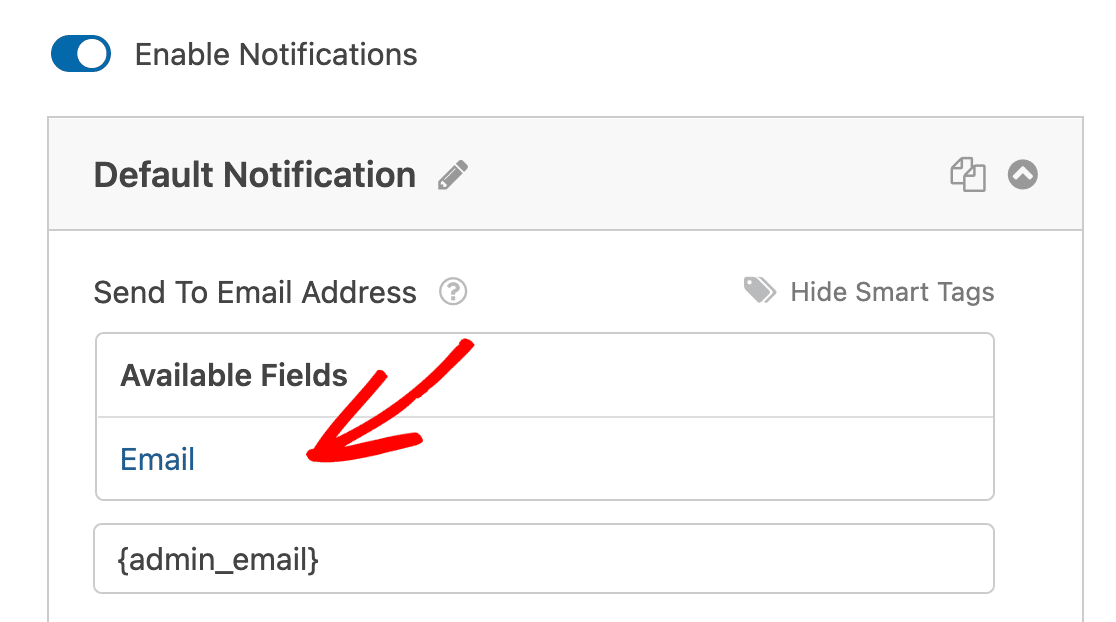
To do this, click Show Smart Tags.

Next, select the Email option from the dropdown menu so WPForms knows to send an email notification to the email your site visitor entered on your RSVP form.
Now it’s time to customize the message with the Add to Calendar option.
For this method, you’ll need the HTML code for your Google Calendar link. Go back to the publish settings in Google Calendar and copy the HTML option from the popup modal.
Back in the form builder, scroll down to Email Message and add the message you want people to see in their email. Then paste the HTML code for your Google Calendar event.
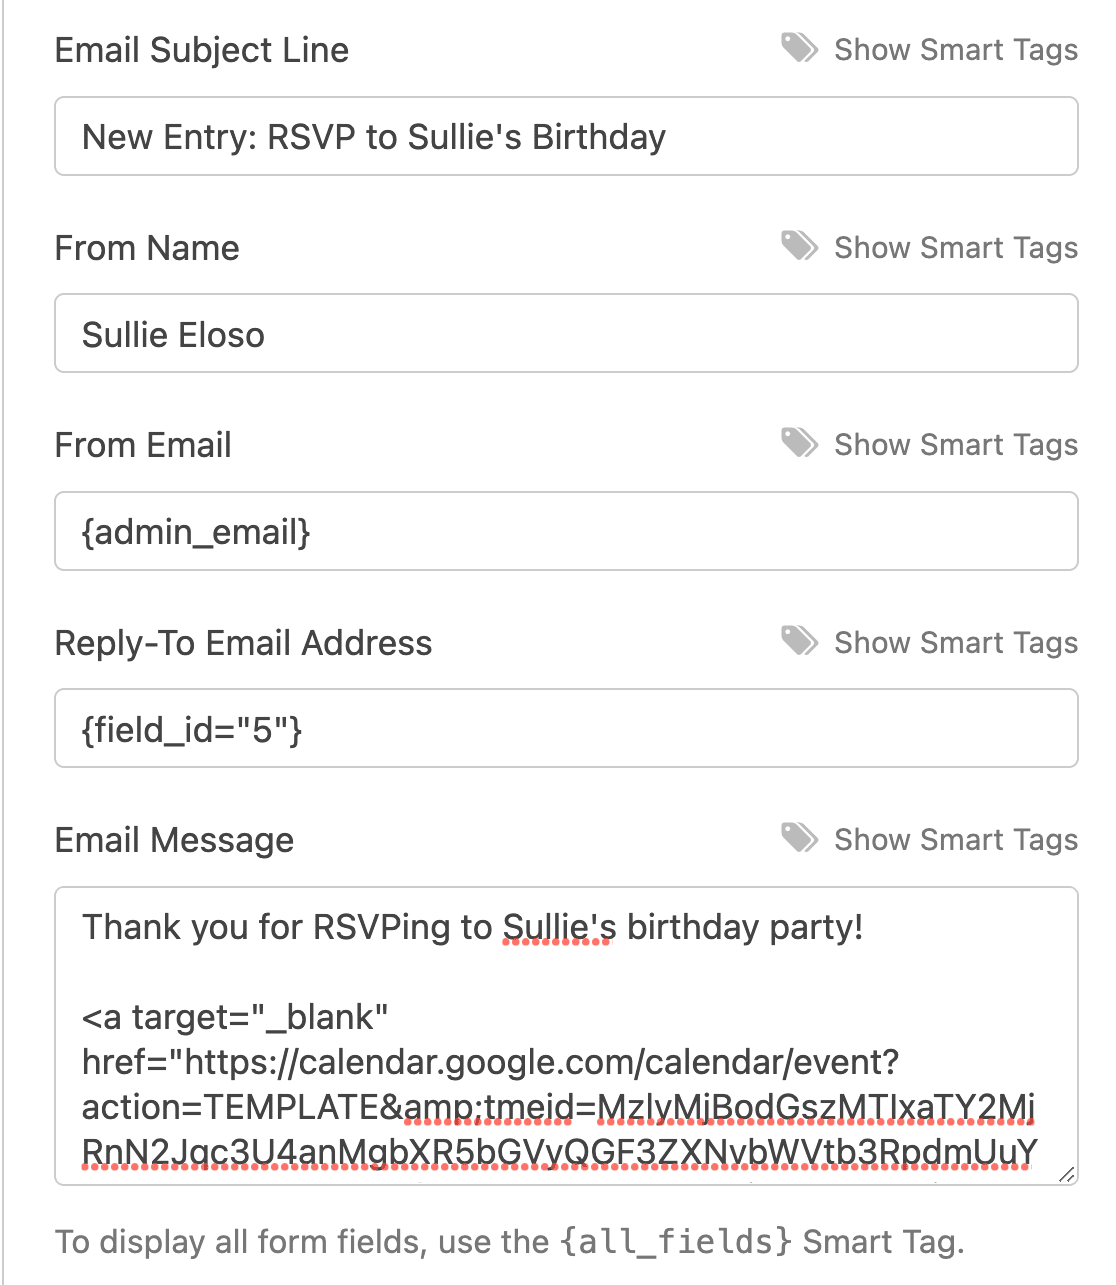
Now whenever someone fills out your event form, they’ll receive a notification complete with a button to add the event to their Google Calendars.

Next, Add a Datepicker to Your WordPress Forms
And there you have it! You now know how to include an Add to Calendar option to your WordPress forms so site visitors can easily add your upcoming event to their own Google Calendar.
If you’re making forms for events or bookings, you’ll also like this guide on how to make a WordPress form with a date picker.
Did you know that you can let your visitors add calendar events to a shared WordPress calendar? Here’s our easy guide to adding a form for user submitted events.
If you’re worried about all site visitors seeing and filling out your event form, know that WPForms lets you enable specific form permissions so that only those with a password can fill out and submit your event form. For help with this step, check out this easy to follow tutorial on how to password protect your WordPress forms.
So, what are you waiting for? Get started with the most powerful WordPress forms plugin today.
And don’t forget, if you like this article, then please follow us on Facebook and Twitter.


Hello, how can I insert icalendar into my email? (apple).
Hello, How to Include an Add .ICS WordPress Forms to email notifications
Hi Jan,
I apologize as we do not have an inbuilt way to insert the iCalendar in the Email Notifications. I agree that’s going to super helpful! I have gone ahead and added your vote to consider this as a Feature Request for future enhancements.
Thank you for understanding! 🙂
Not all the members of my organisation have a google agenda. Some use outlook, others icalender, some no calender. This project serves only google users, is’nt it?
Hey Patrick – To include an add-to-calendar option in Google Calendar, the users will require a Gmail account. If in case you’re wanting to connect with Outlook, you can consider using our Zapier integration. In case it helps, you can integrate Google Calender with iCalendar . Having said that, if you’re referring to a different integration, please feel free to reach out using our contact form with additional details.
This is very helpful, thanks! How can I include ‘add calendar option’ for scheduling appointments? For appointments, the google calendar event cannot be created ahead of time since the customer can pick any day on the calendar
Hey Michael – We’d be happy to help! When you get a chance, please drop us a line in support so we can assist.
If you have a WPForms license, you have access to our email support, so please submit a support ticket.
Otherwise, we provide limited complimentary support in the WPForms Lite WordPress.org support forum.
Thanks 🙂