AI Summary
Have you ever wondered how to assign user roles conditionally in WordPress based on certain criteria? This can be incredibly useful for sites that require unique roles based on user actions, membership status, or other criteria.
While WPForms and the User Registration addon are powerful tools for creating registration forms, sometimes you need to assign user roles dynamically based on specific conditions.
In this guide, I’ll walk you through how to conditionally assign user roles in WordPress using WPForms.
Understanding WordPress User Roles and Capabilities
WordPress has several built-in roles. Below, I’ve highlighted the default user roles WordPress supports:
- Administrator: Full access to the site’s backend. This role can perform activities like adding new users, editing user roles, installing plugins and themes, etc.
- Editor: Can manage and publish content, even content written by others. The role is often limited to post-related activities.
- Author: The Author role in WordPress lets users publish and manage their own posts only.
- Contributor: In WordPress, the contributor role can write and manage their posts but can’t publish them.
- Subscriber: Has limited access, usually for reading or commenting.
Each role has a set of “capabilities” that dictate what users can and can’t do. It is important to familiarize yourself with WordPress’ user role capabilities so you’ll know what permission users will get upon registering on your site. I recommend checking out WPBeginner’s guide if you’d like to learn more about user roles and capabilities in WordPress.
How to Assign User Roles Conditionally in WordPress
Here’s a step-by-step on how to assign user roles conditionally in WordPress.
Step 1: Install and Activate WPForms Plugin
WPForms is the best plugin for creating basic and advanced forms in WordPress.
From simple contact forms to more advanced features like conditional logic, it’s a reliable tool that has worked well for me on multiple sites.
The Pro license of WPForms includes access to the User Registration addon, which lets you create registration and login forms on your WordPress site.
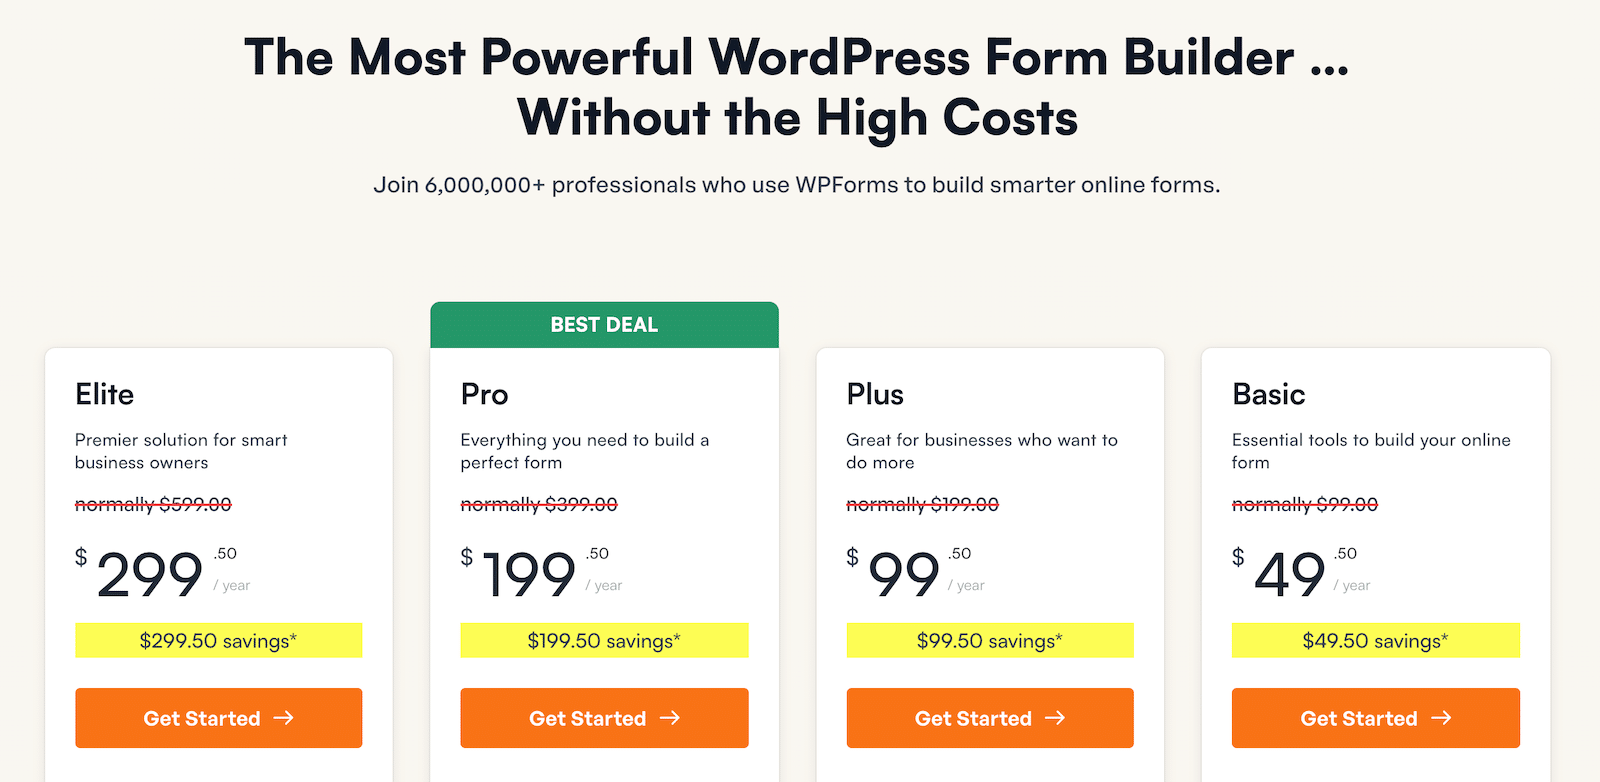
Once you’ve purchased the Pro license, you should install and activate WPForms on your WordPress site. If this is your first time, check out this guide to learn how to install WPForms.
Create Your User Registration Form Now
Step 2: Install and Configure User Registration Addon
After installing the WPForms plugin, you’ll also need to install the User Registration addon.
To install the addon, head into the WordPress admin area and go to WPForms » Addons. Then scroll down till you find the User Registration Addon, or use the search bar. When you find it, click Install Addon.

Once you’ve installed and activated the User Registration addon on your site, proceed to create your registration form.
Creating Your Form
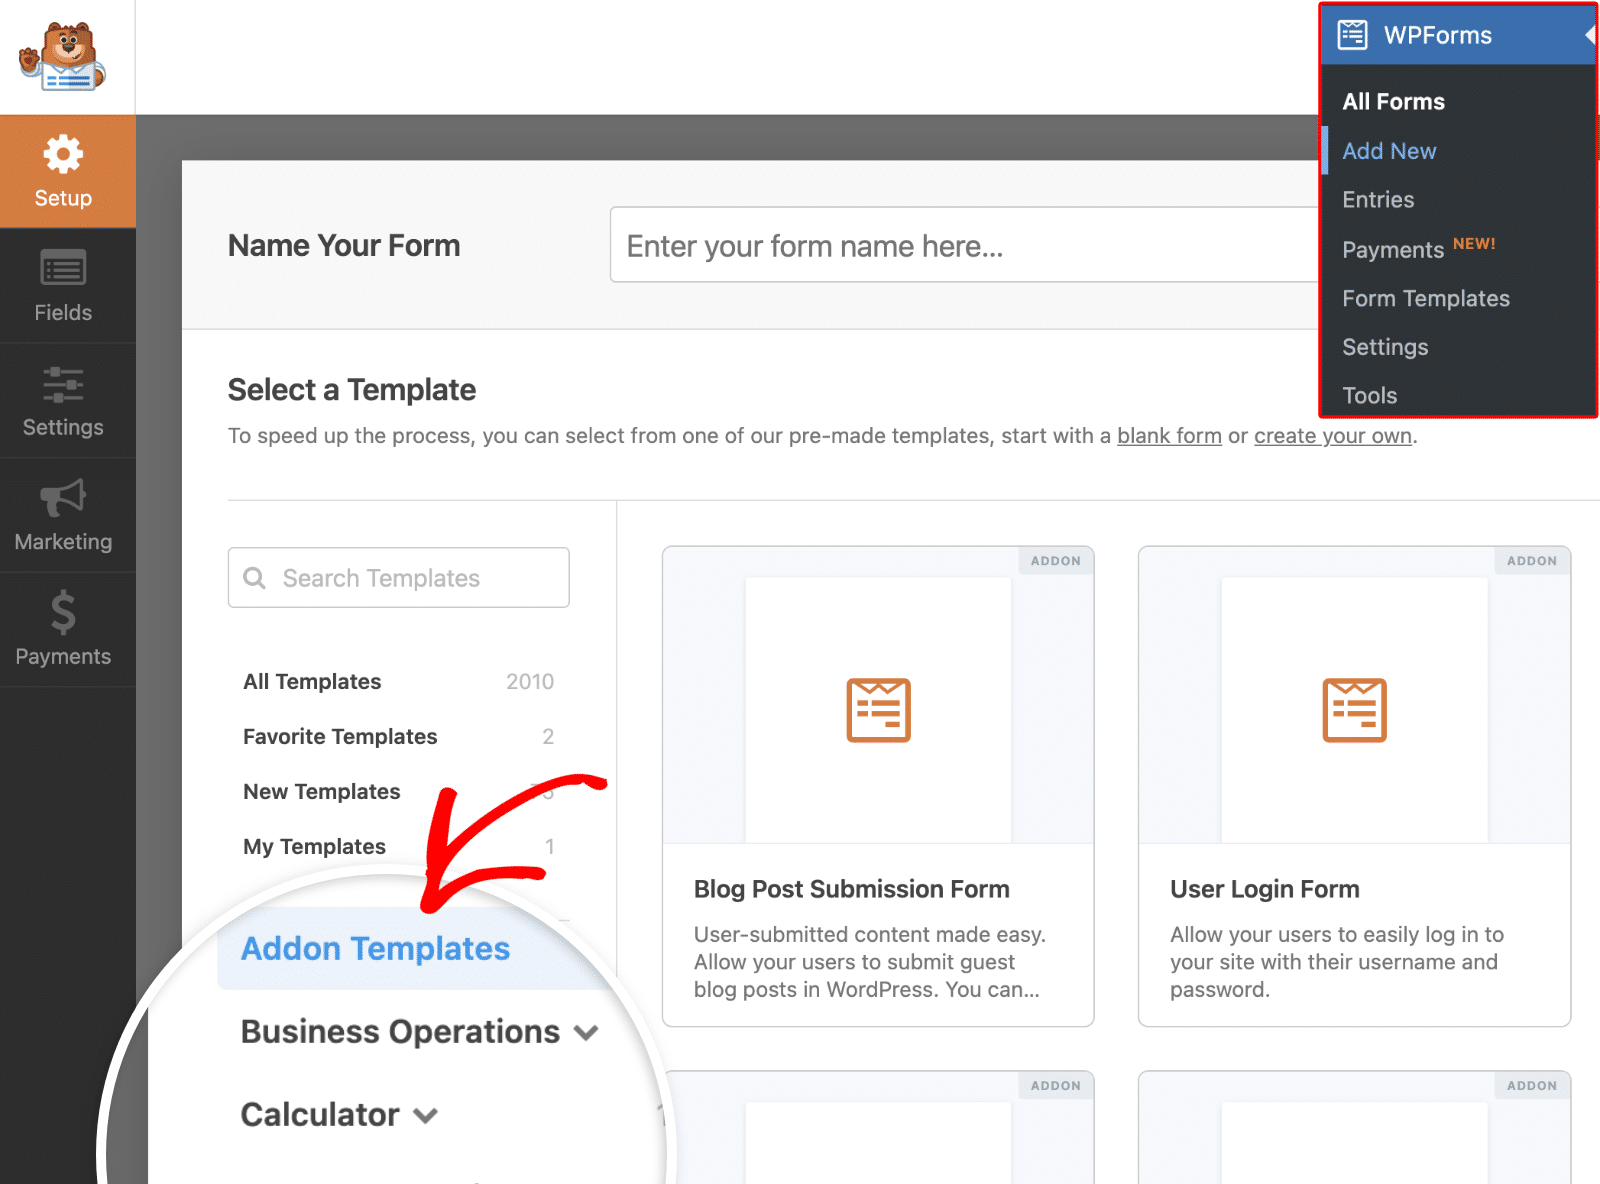
You can build your form from scratch or use our User Registration form template to speed up the form creation process. For this tutorial, we’ll use the User Registration form template. To access this template, navigate to WPForms » Add New. Then, select Addon Templates from the sidebar menu.
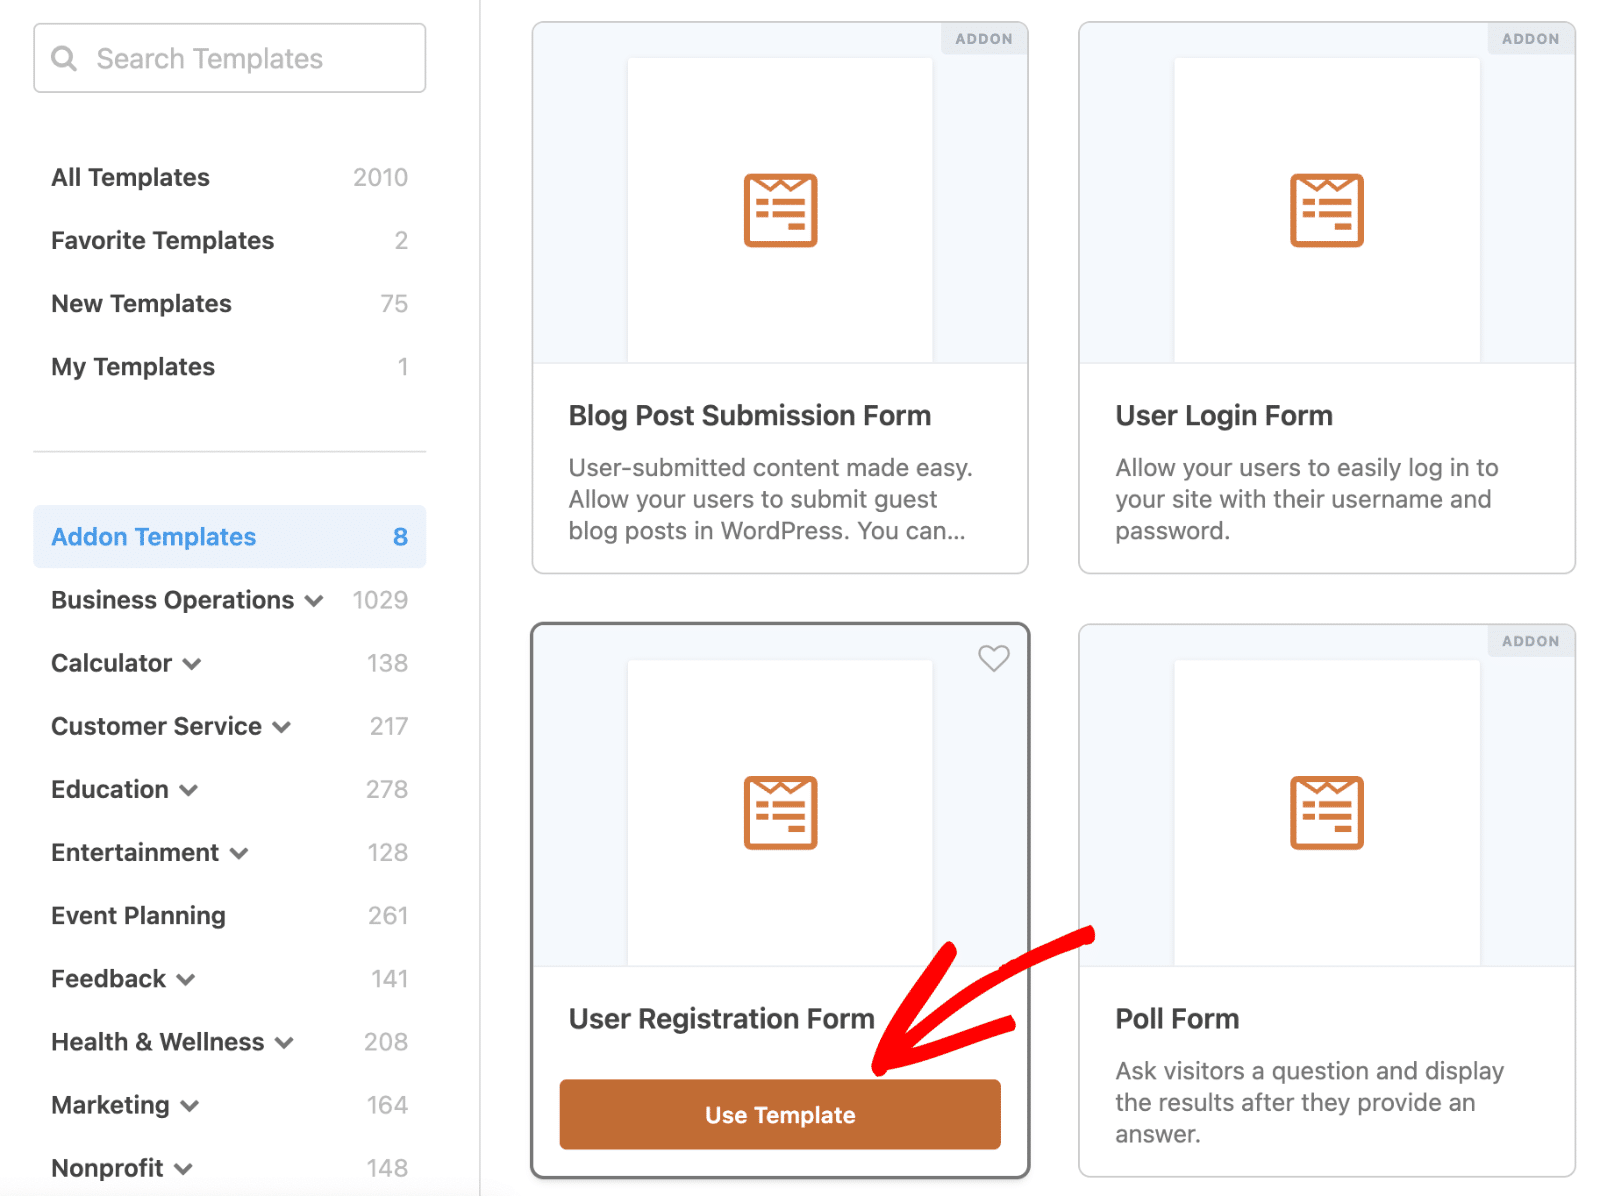
From here, click the Use Template button below to the User Registration Form template.
This will direct you to the form builder, where you’ll be able to customize the template further.
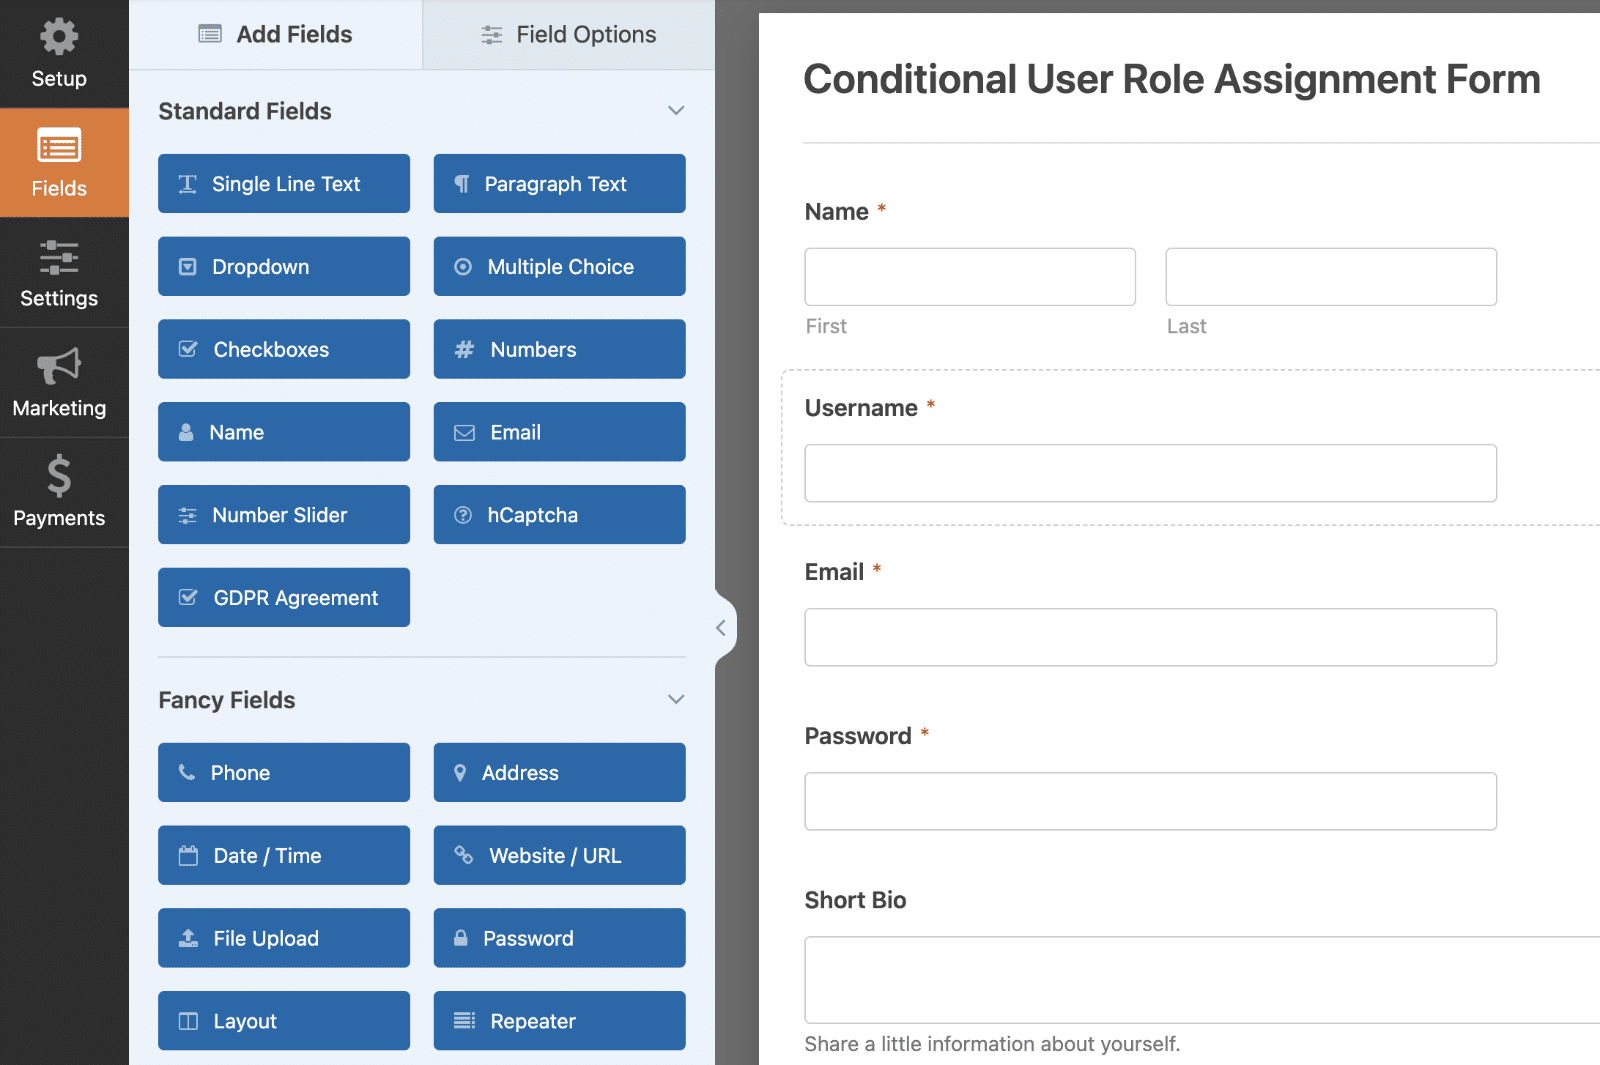
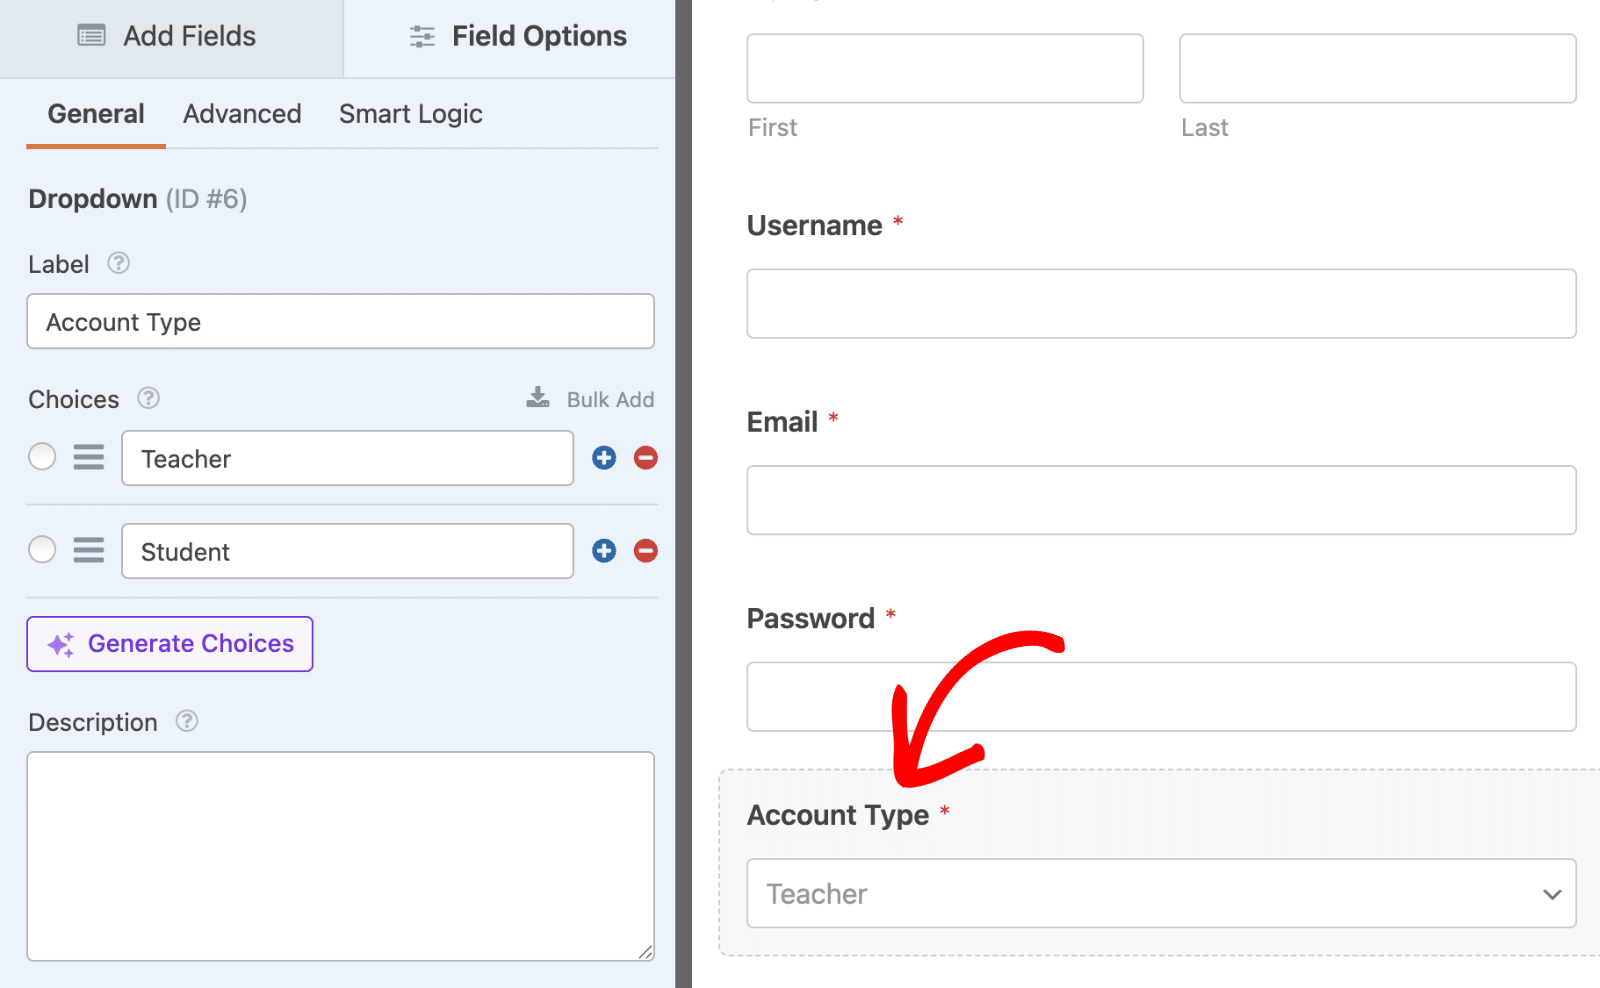
In the form builder, go ahead and add a choices field to your form. For this tutorial, I’ll add the Dropdown field with 2 options: Teacher and Student.
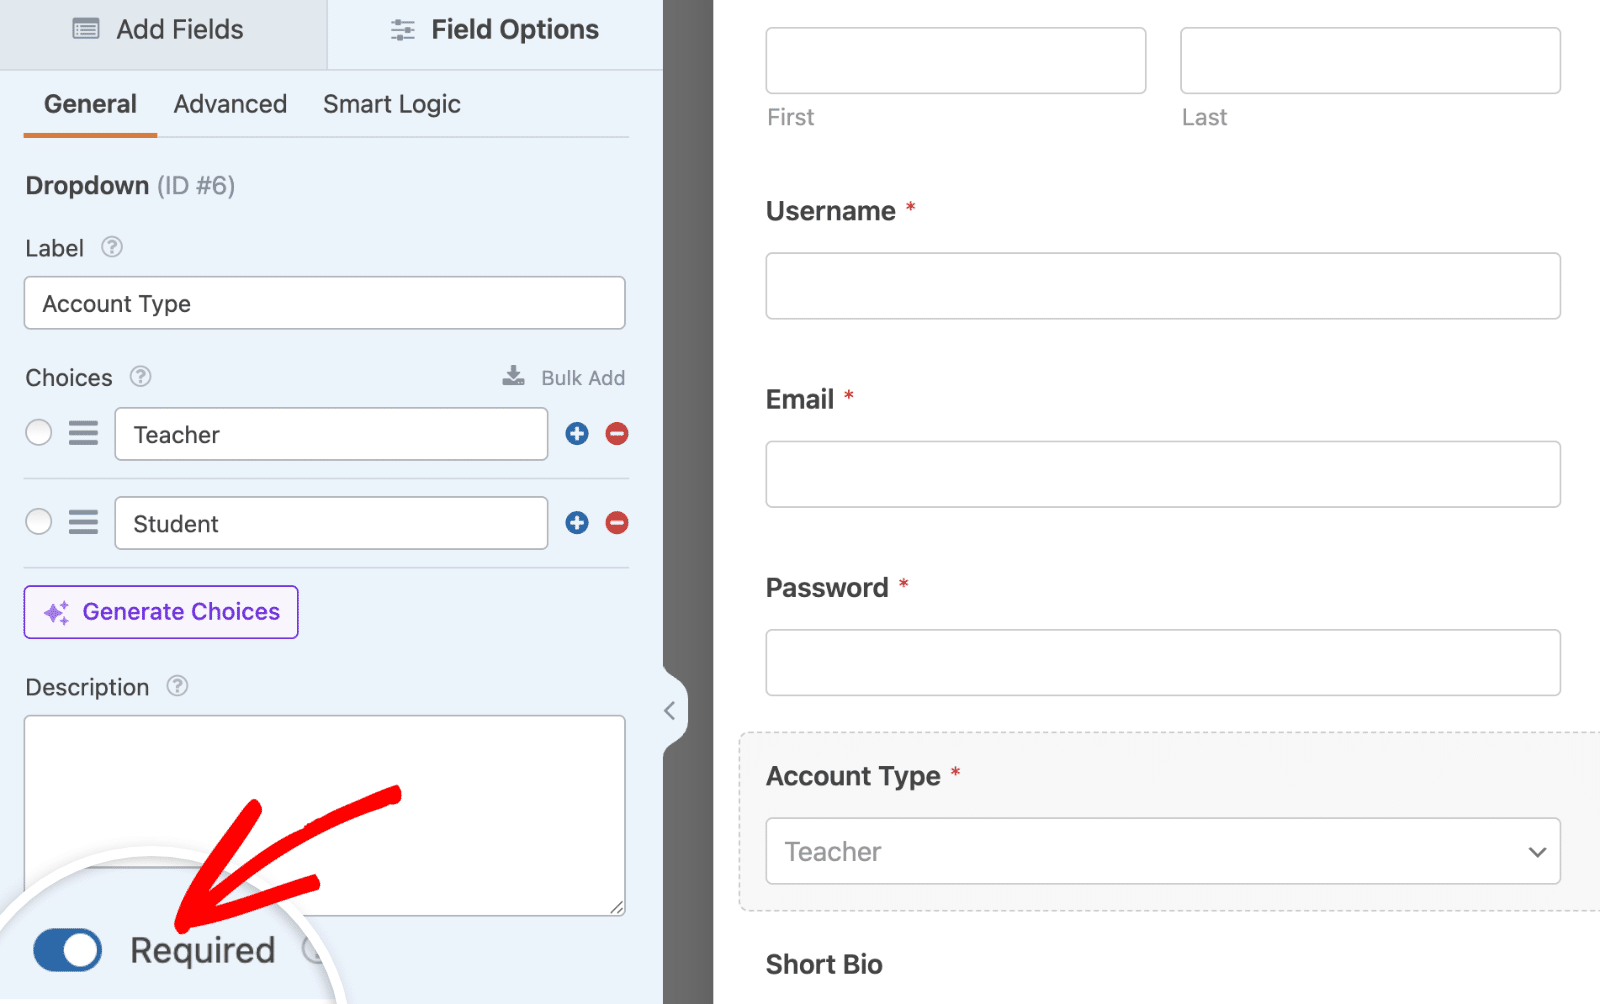
I’ll also enable the Required option so users must select an account type when registering.
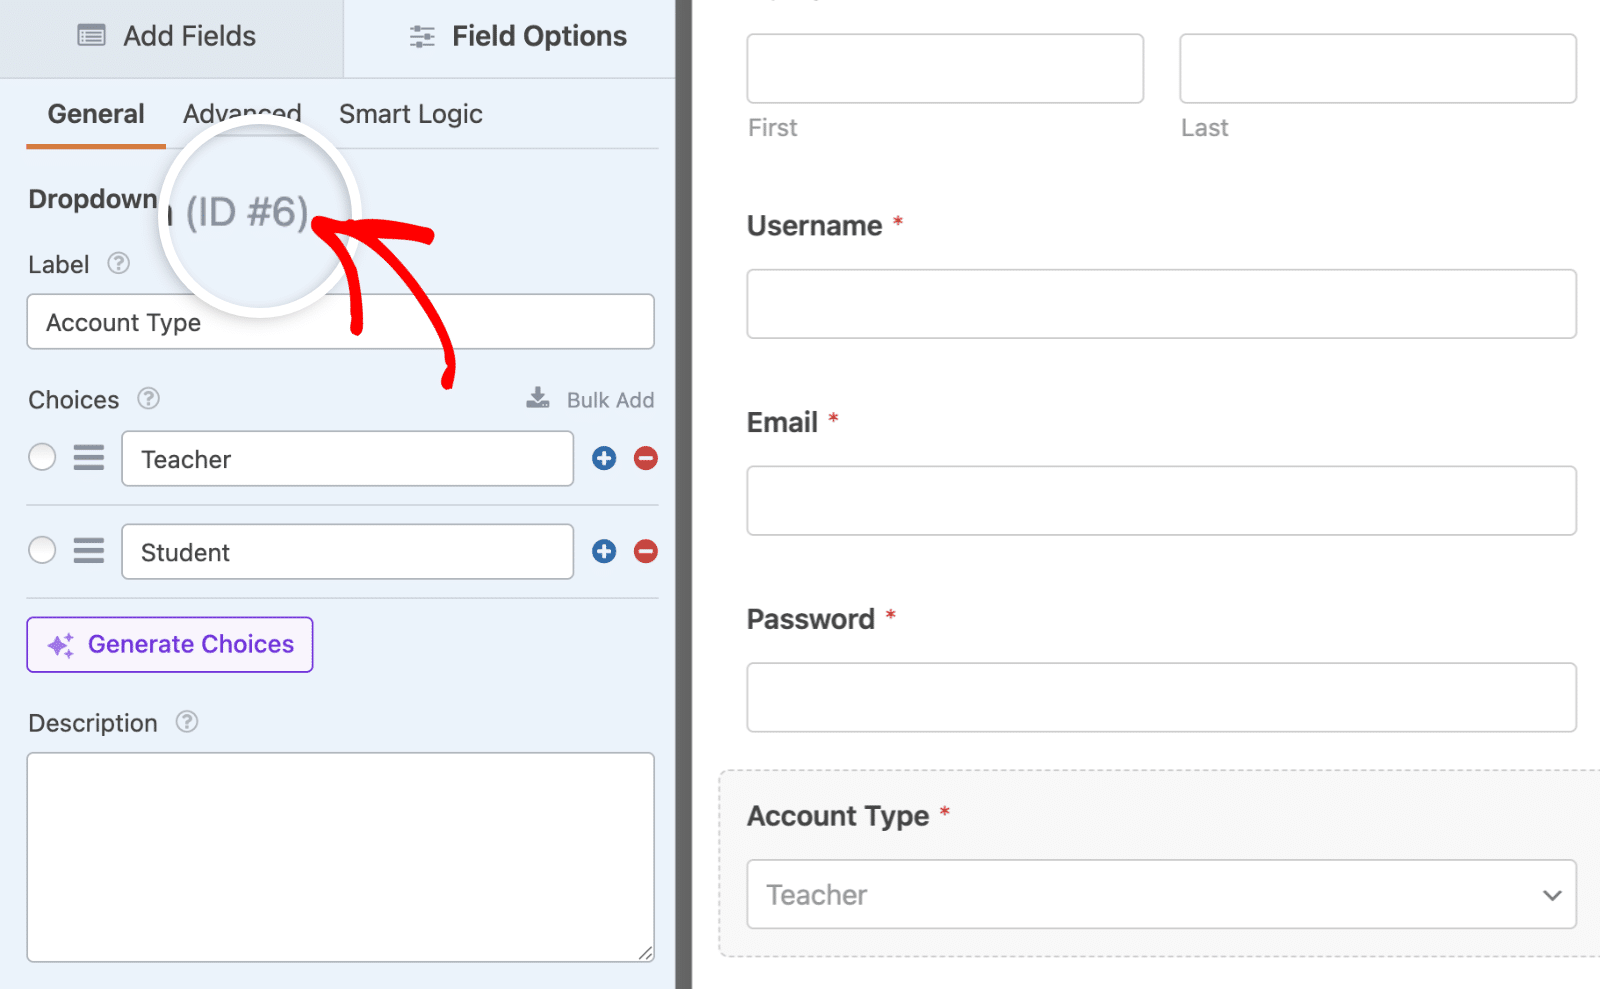
Note the ID for the Dropdown field, as we’ll need it in the next step.
After adding the fields and customizing the field options, go to Settings » User Registration to access additional settings for the addon.
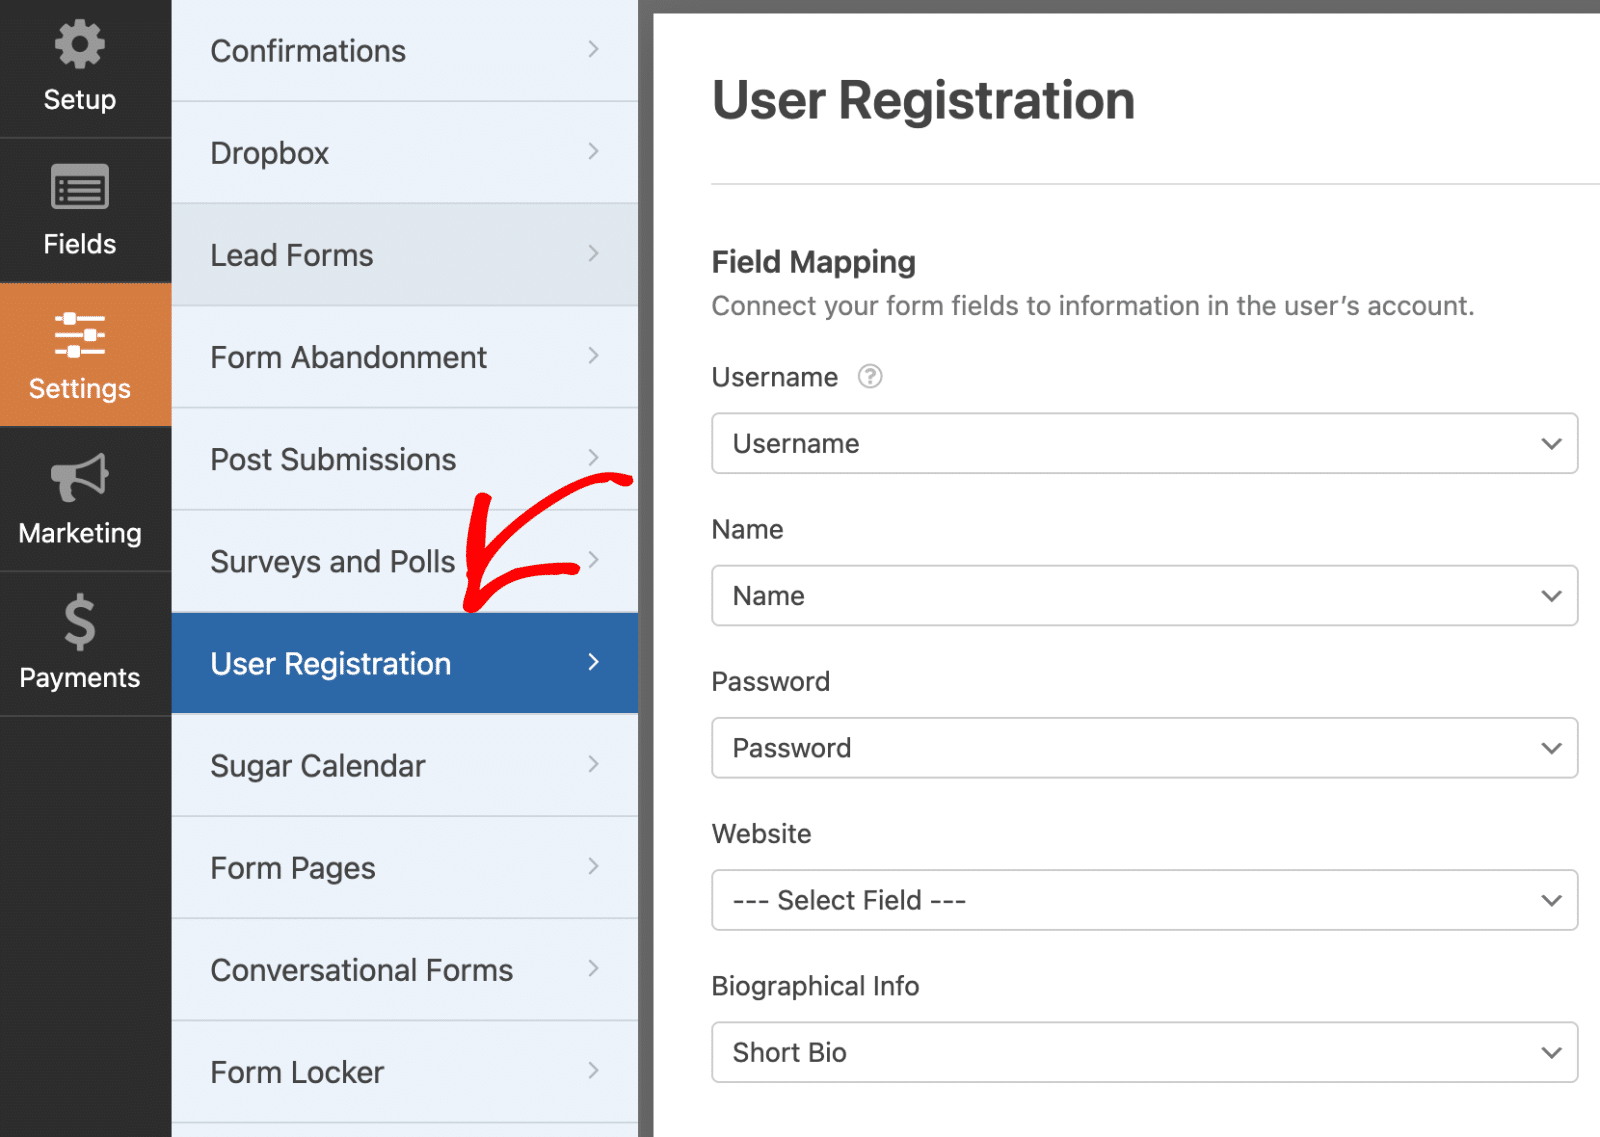
If you used the User Registration form template, all the field mapping will be completed. However, if you’re building your registration form from scratch, you’ll need to map your form fields to WordPress user metadata.
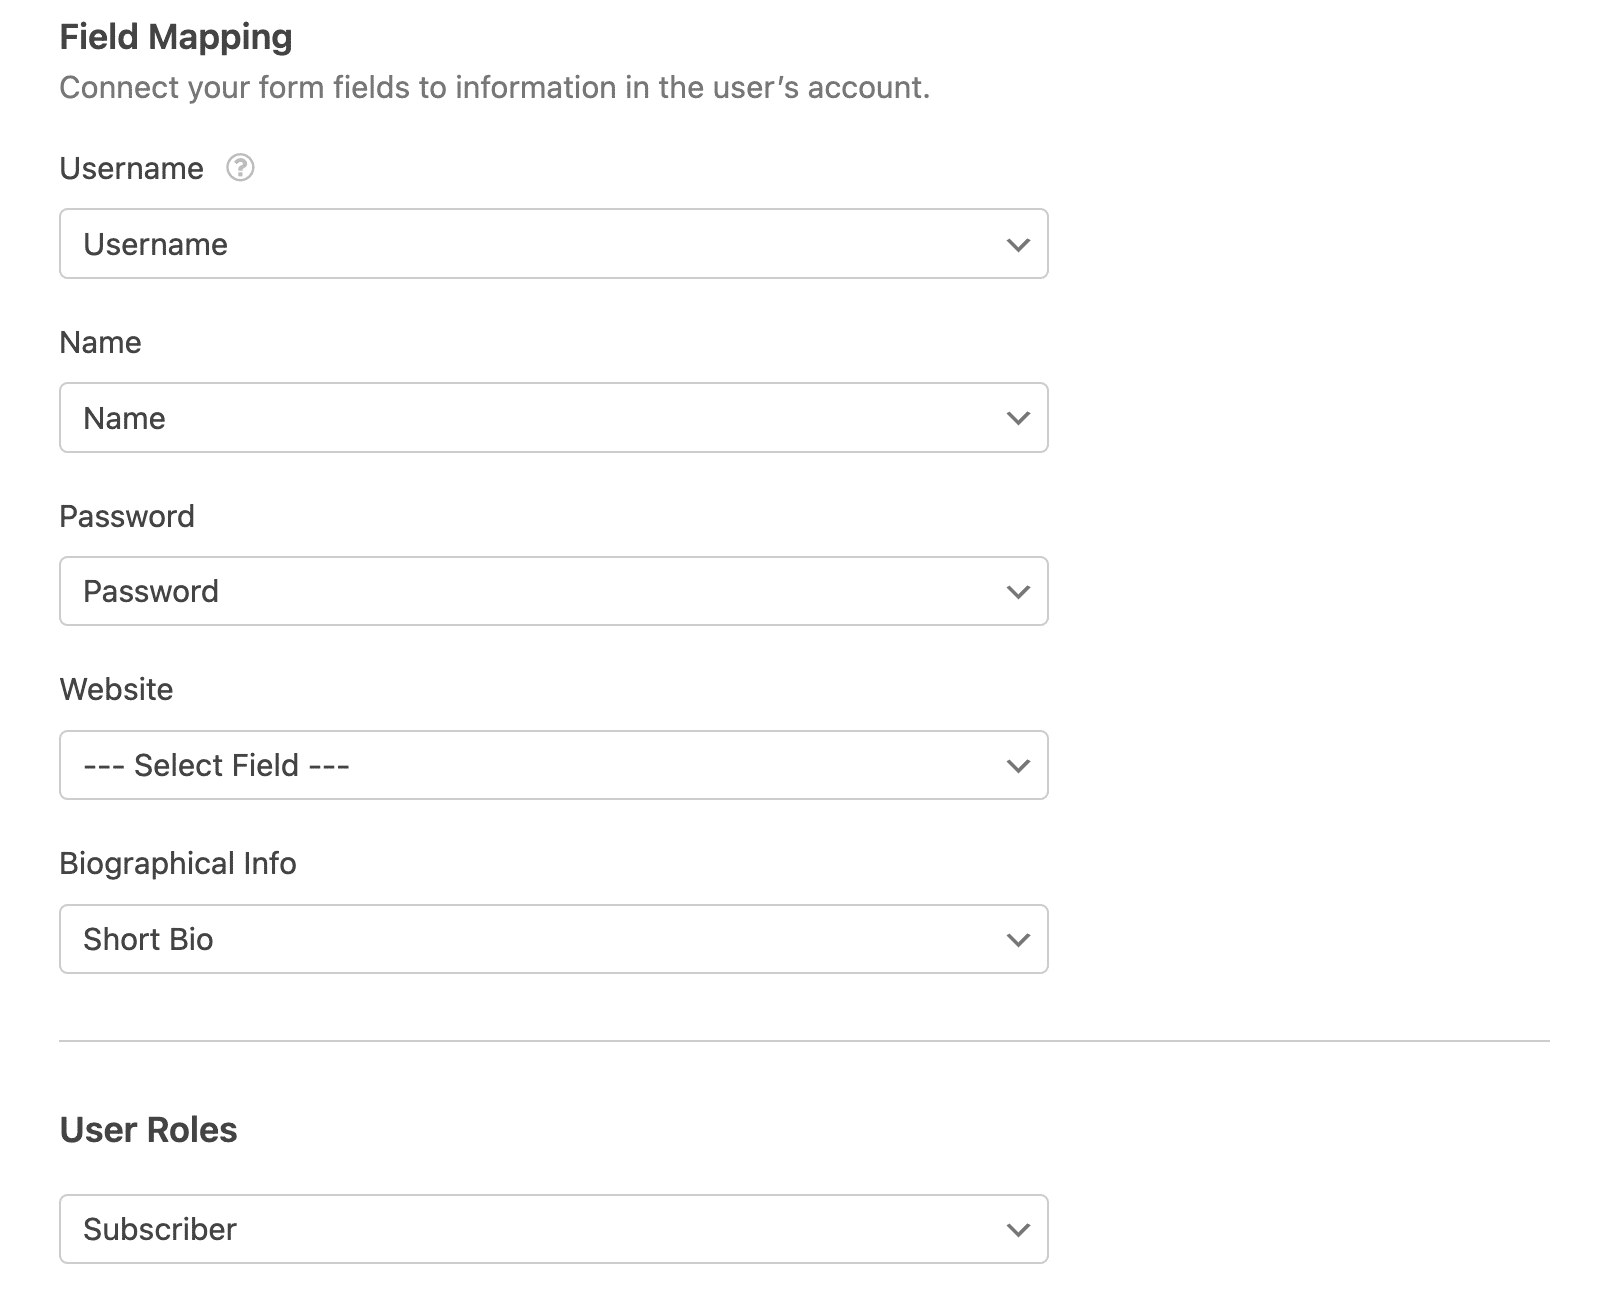
By default, the User Roles section is set to Subscriber. No need to worry about the role assignment for now since this will be handled using conditional logic. However, note that this will be the default role assigned to users if the snippet doesn’t work properly on your site.

Once you’re done customizing your form, be sure to click the Save button to save your changes.

Step 3: Add Snippet to Assign User Role Conditionally
WPForms currently doesn’t support assigning user roles based on input from other fields by default. However, with a custom PHP snippet, you can customize your registration form to assign user roles conditionally based on form input.
For our example, we’ll set it to check the Dropdown field we added to the registration form. If the user selects Teacher as their account type, we’ll assign an Editor role to the user. If they select Student, the snippet will assign them an Author role.
To proceed, copy and paste the snippet below to your site. I recommend using the WPCode plugin to add the snippet to your site. This plugin makes it easy to add custom code snippets to WordPress sites without having to mess with the functions.php file or worry about breaking the site.
For details on how to use the WPCode plugin, please see our tutorial on adding custom snippets to WordPress.
Code Explanation
The snippet above uses the wpforms_user_registration_process_registration_get_data filter to capture user data after they submit your registration form. We’re checking the Dropdown field in the form and assigning the user a role based on their input.
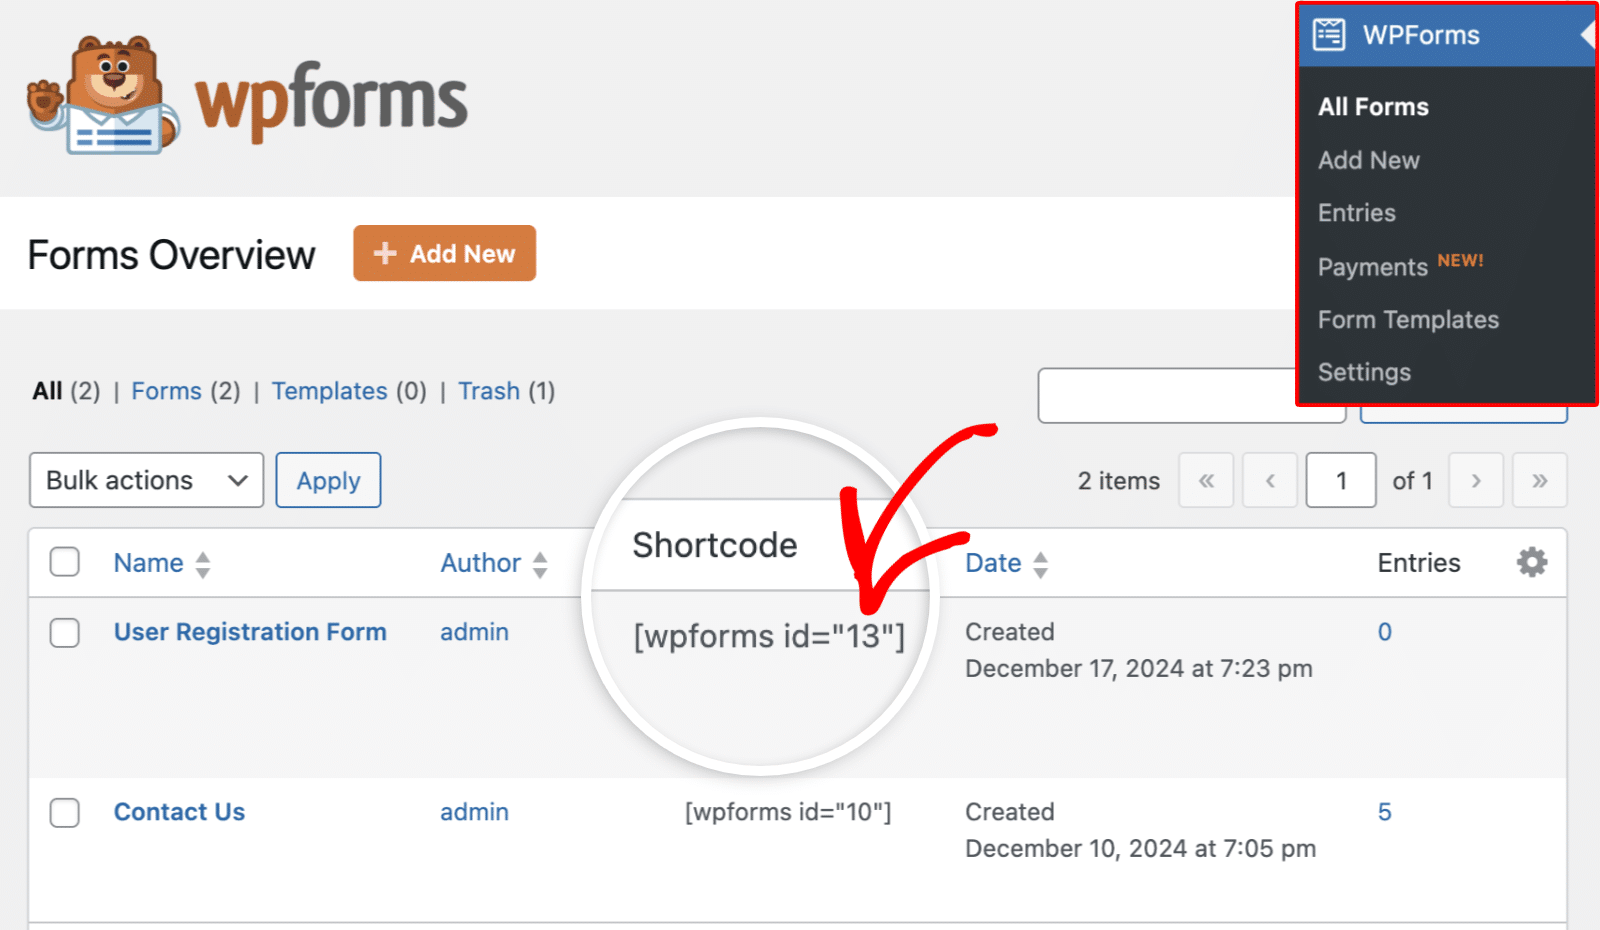
We’ve set the snippet to work only on the form with an ID of 13. This corresponds to my registration form’s ID. You’ll need to update this ID to match your form’s ID. To get your form’s ID, go to WPForms » All Forms and look under the Shortcode column. The number in the shortcode is the form’s ID.
Also, the $role_field_id variable, which is the Dropdown field’s ID, is set to 6 in the code above. You’ll need to replace it as well to match that of your Dropdown field. Recall that I asked you to note the ID of the Dropdown field. This is where we’ll use the value.
The $role_mapping array is where we define the mapping for the Dropdown field values. Teacher maps to the Editor role in WordPress, while the Student option maps to the Author user role. You can add more key-value pairs depending on the number of options on your registration form.
Pro Tip
The Student and Teacher field mapping in the snippet above corresponds to the options I specified in the Dropdown field when customizing the registration form. If the options on your Dropdown field are different from mine, make sure to update the key pairs in the $role_mapping array so they match the values you used in your form.
We use the slug associated with the user role to map it in the snippet. For example, ‘editor’ corresponds to the Editor role in WordPress. Below, I’ve highlighted the default WordPress user roles and their slugs:
- Administrator – ‘administrator’
- Editor – ‘editor’
- Author – ‘author’
- Contributor – ‘contributor’
- Subscriber – ‘subscriber’
Step 4: Testing the Form to Assign User Roles Conditionally
The next step after adding the snippet is to test the form to ensure it works properly before rolling it out to your users. For this, I recommend submitting a test entry to see if the user role is dynamically set.
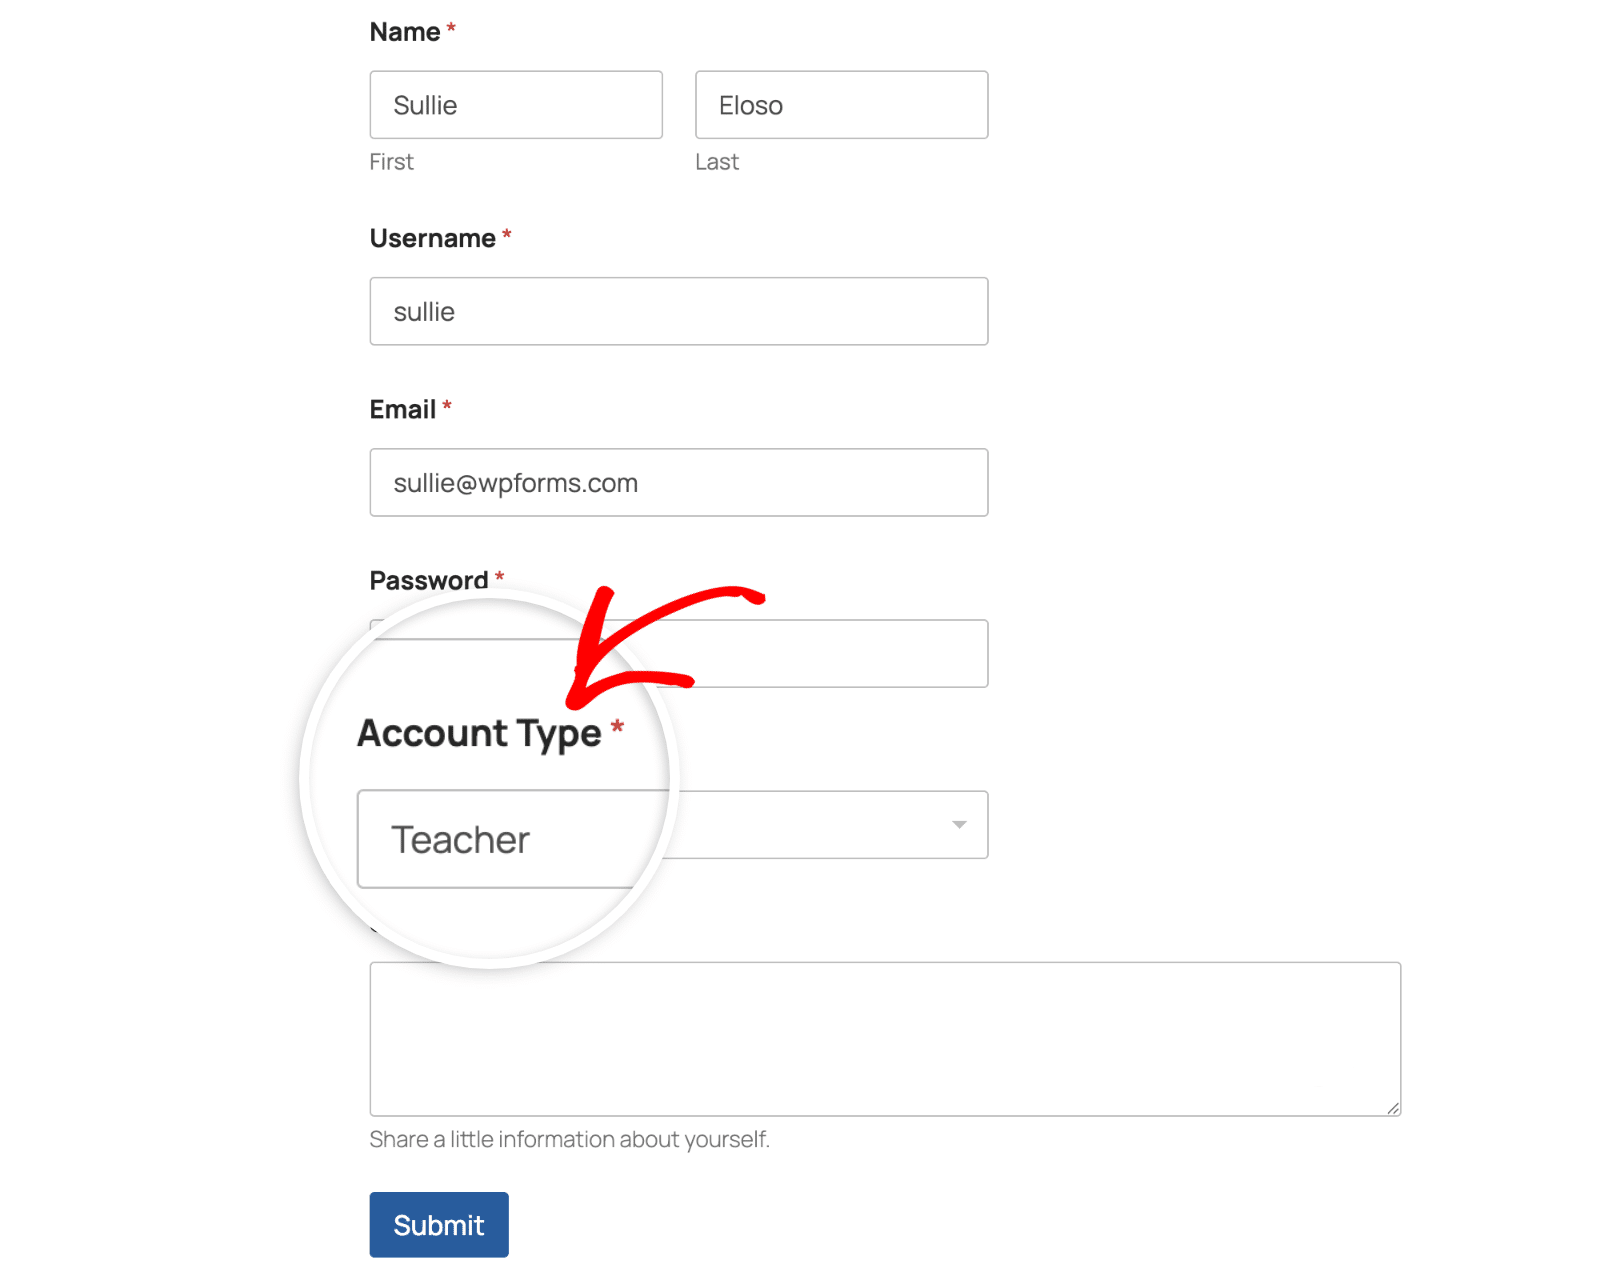
I’ll submit a test registration on my form and set the Account Type field to Teacher.
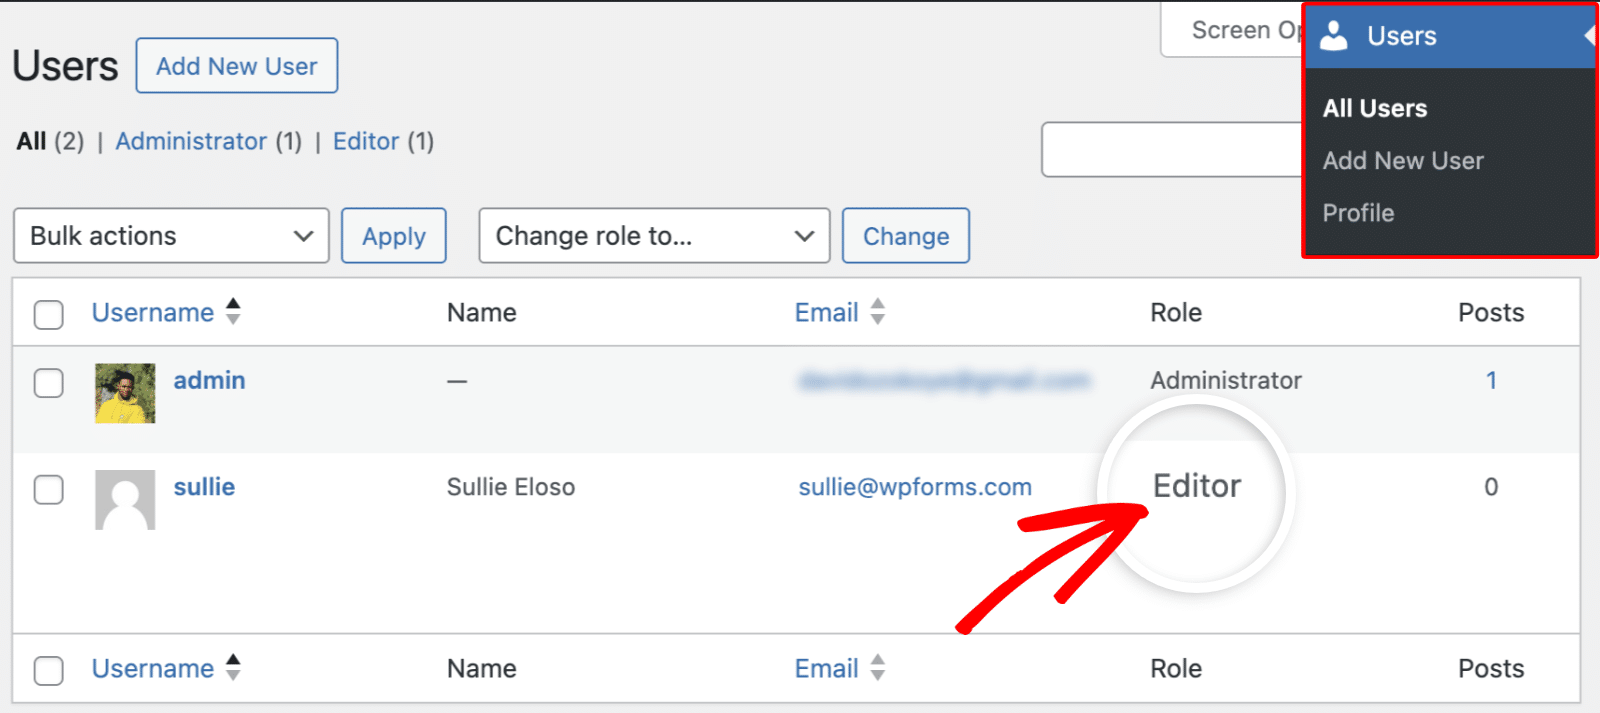
Now, to check the user account in the WordPress admin area, go to Users » All Users. Here, you’ll see all the user accounts on your site. Because I chose Teacher when completing the registration form, the test user’s role is dynamically set as Editor.
Something to keep in mind when allowing users to choose their role on the frontend is that you can’t control the options users will select. In our implementation, for example, a student can still choose the Teacher account type, and the form will still be submitted.
You can use our Form Locker addon to restrict access to your registration form. This ensures only users with a specific password can access the form.
Alternatively, you can enable user activation for the registration form by navigating to Settings » User Registration in the form builder. Then, toggle on the Enable user activation option and select the Manual Approval method.
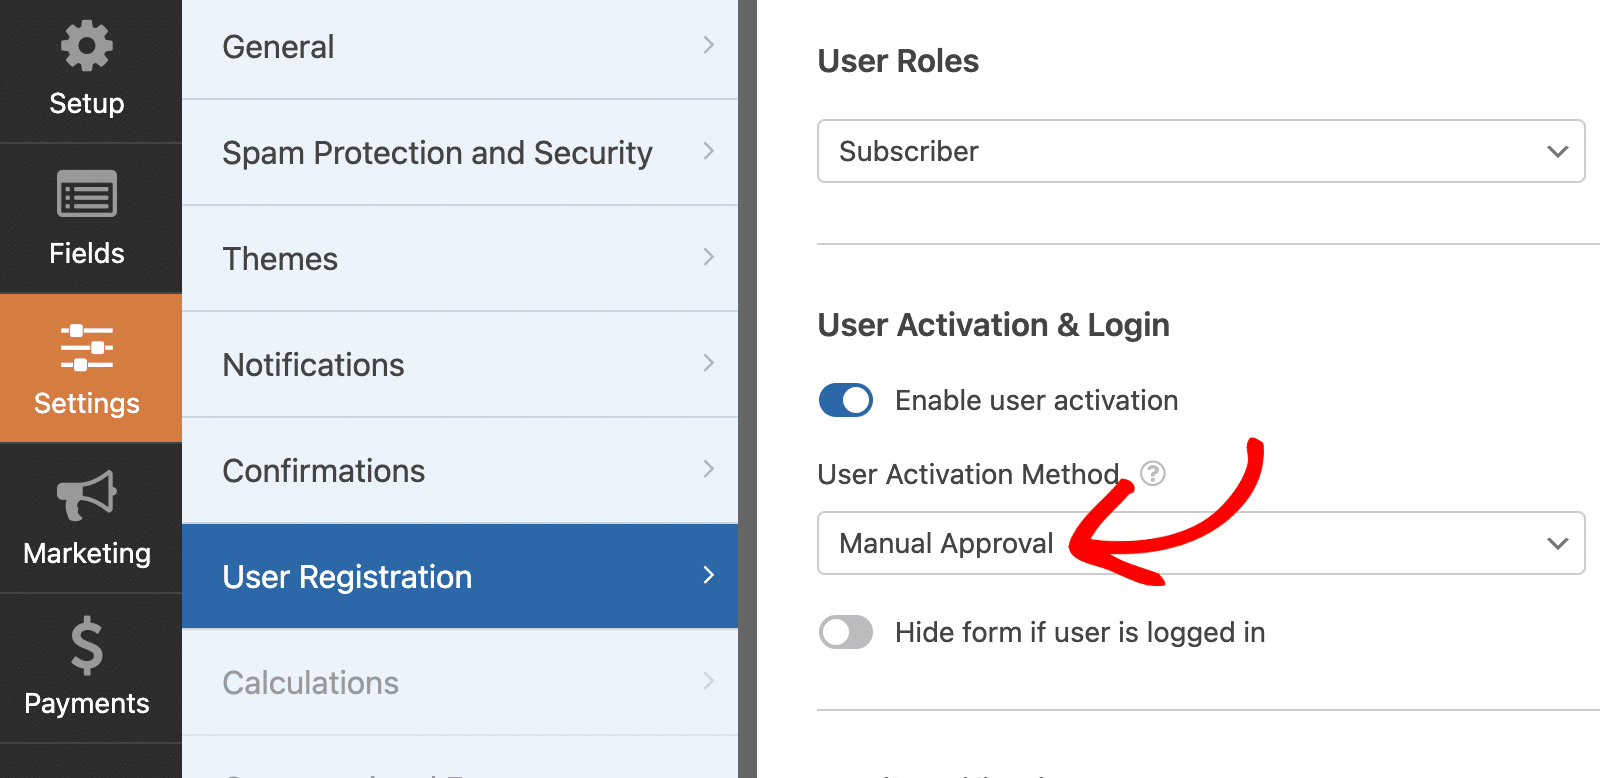
This way, the site admin will manually review each user registration and approve user accounts if they meet your requirements. You can confirm whether the user chose the correct account type before approving their account.
Read Also: File Upload Security: Top Tips for Online Forms
Step 5: Publish Your WordPress Registration Form
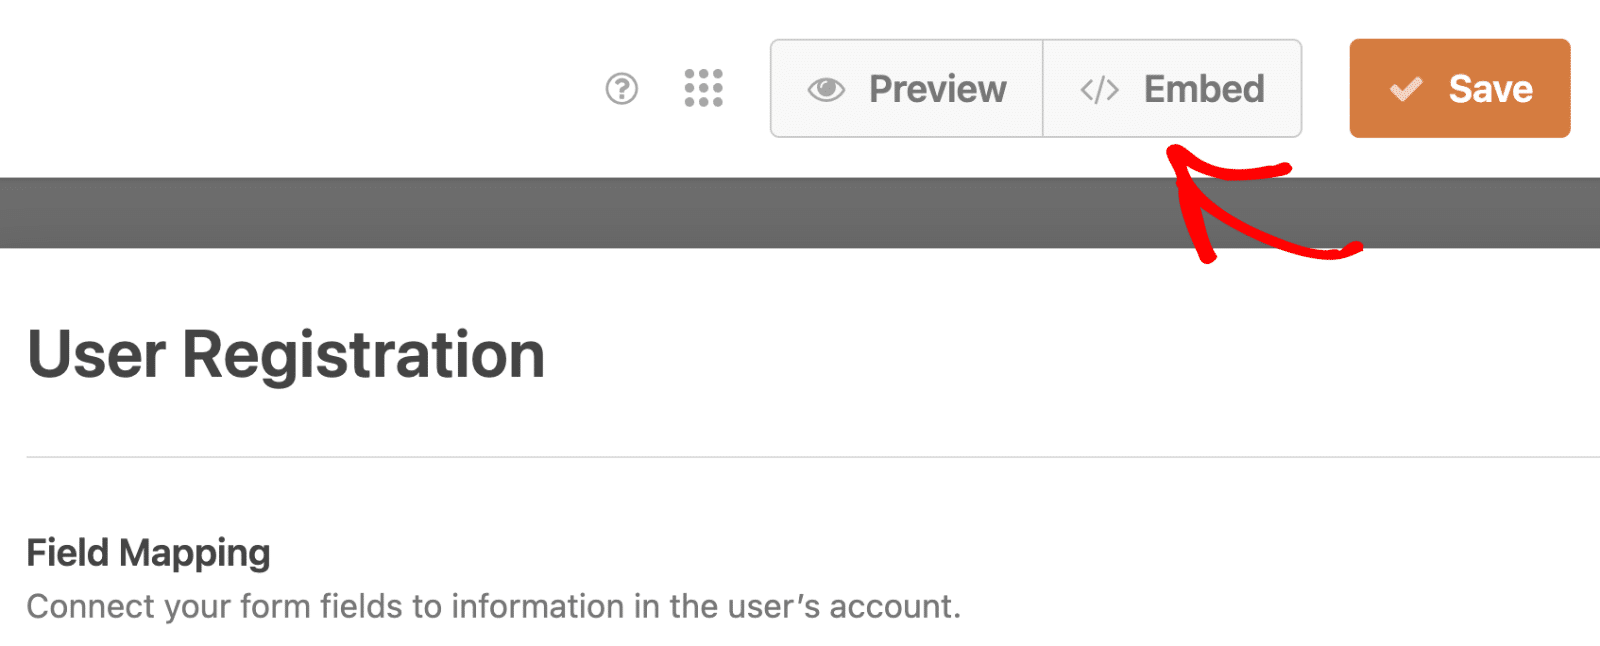
To wrap things up, let’s add the registration form to a page. To do so, edit the form to access the form builder. Then click the Embed button at the top right corner of the form builder page.
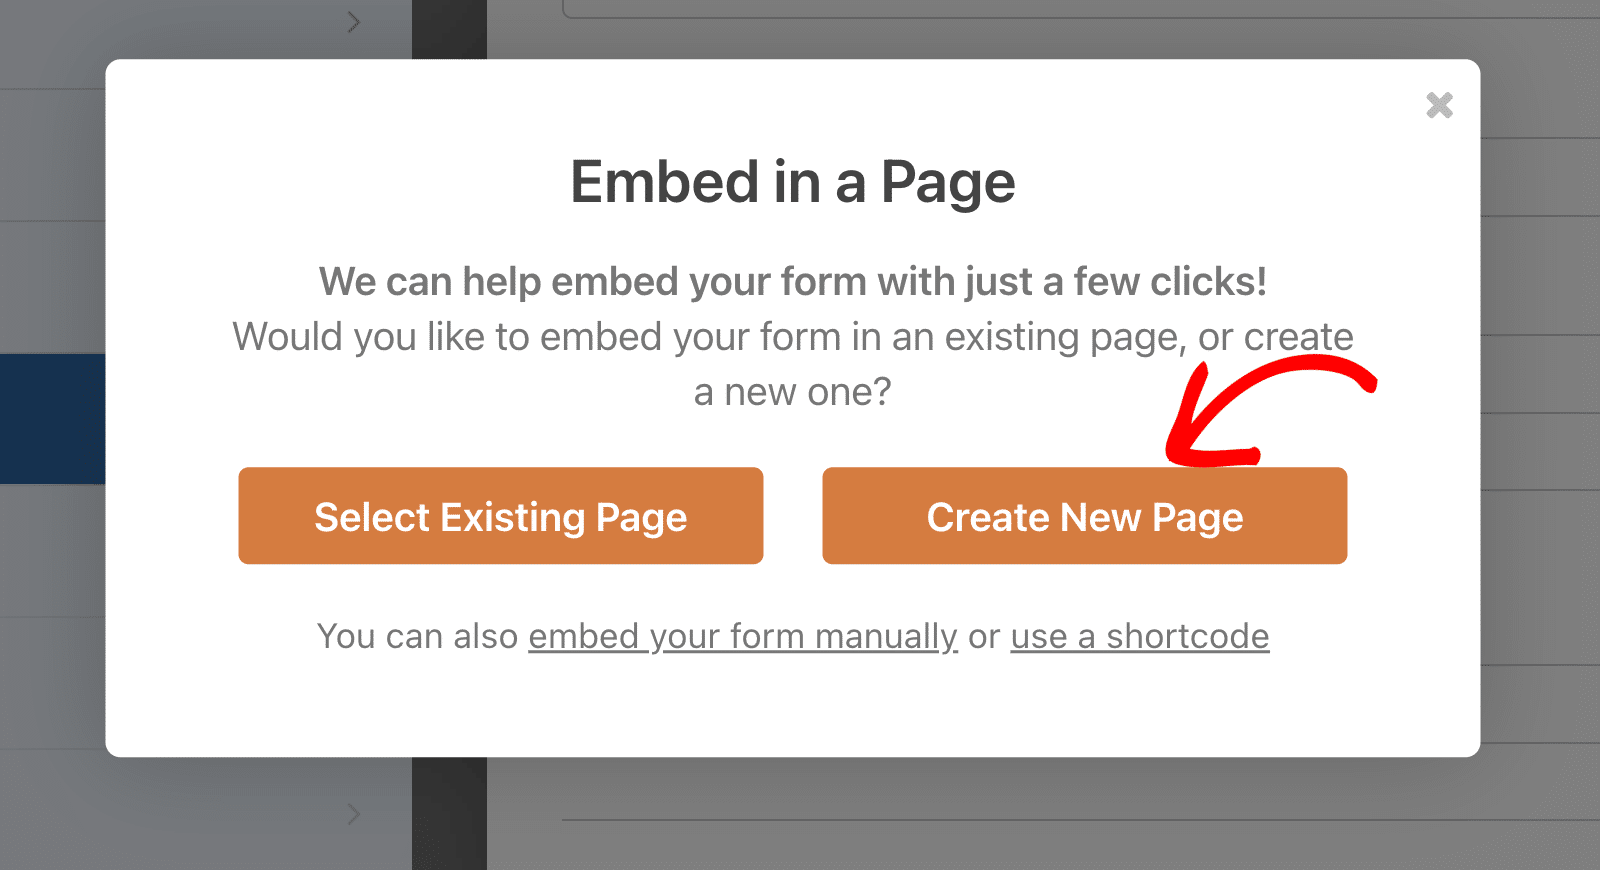
You’ll have the option of publishing your form on a new or existing page. For this guide, I’ll choose the Create New Page option.
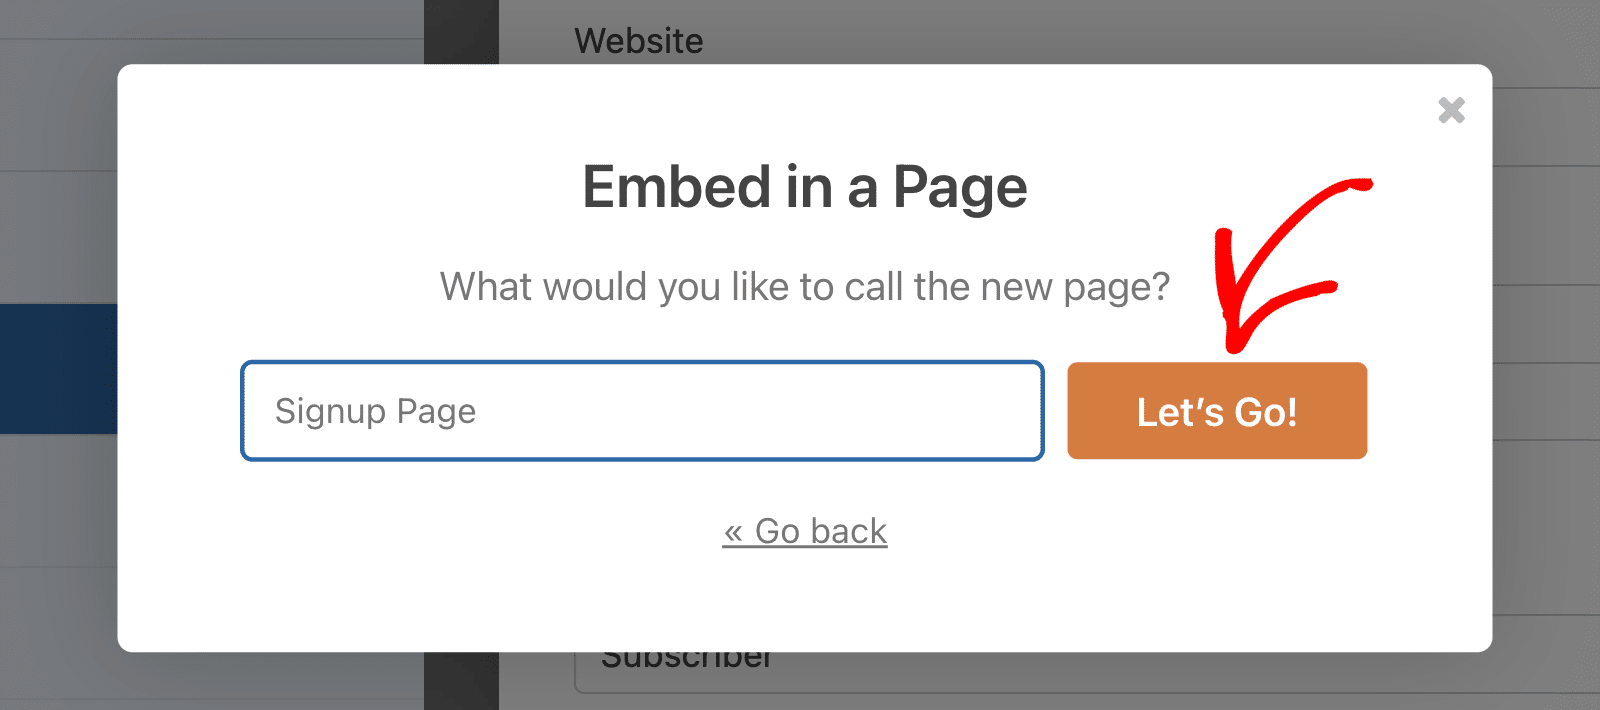
Give your new page a name and click Let’s Go.
You’ll be directed to the WordPress page editor with your form embedded on the page. Click the Publish button to publish your page.
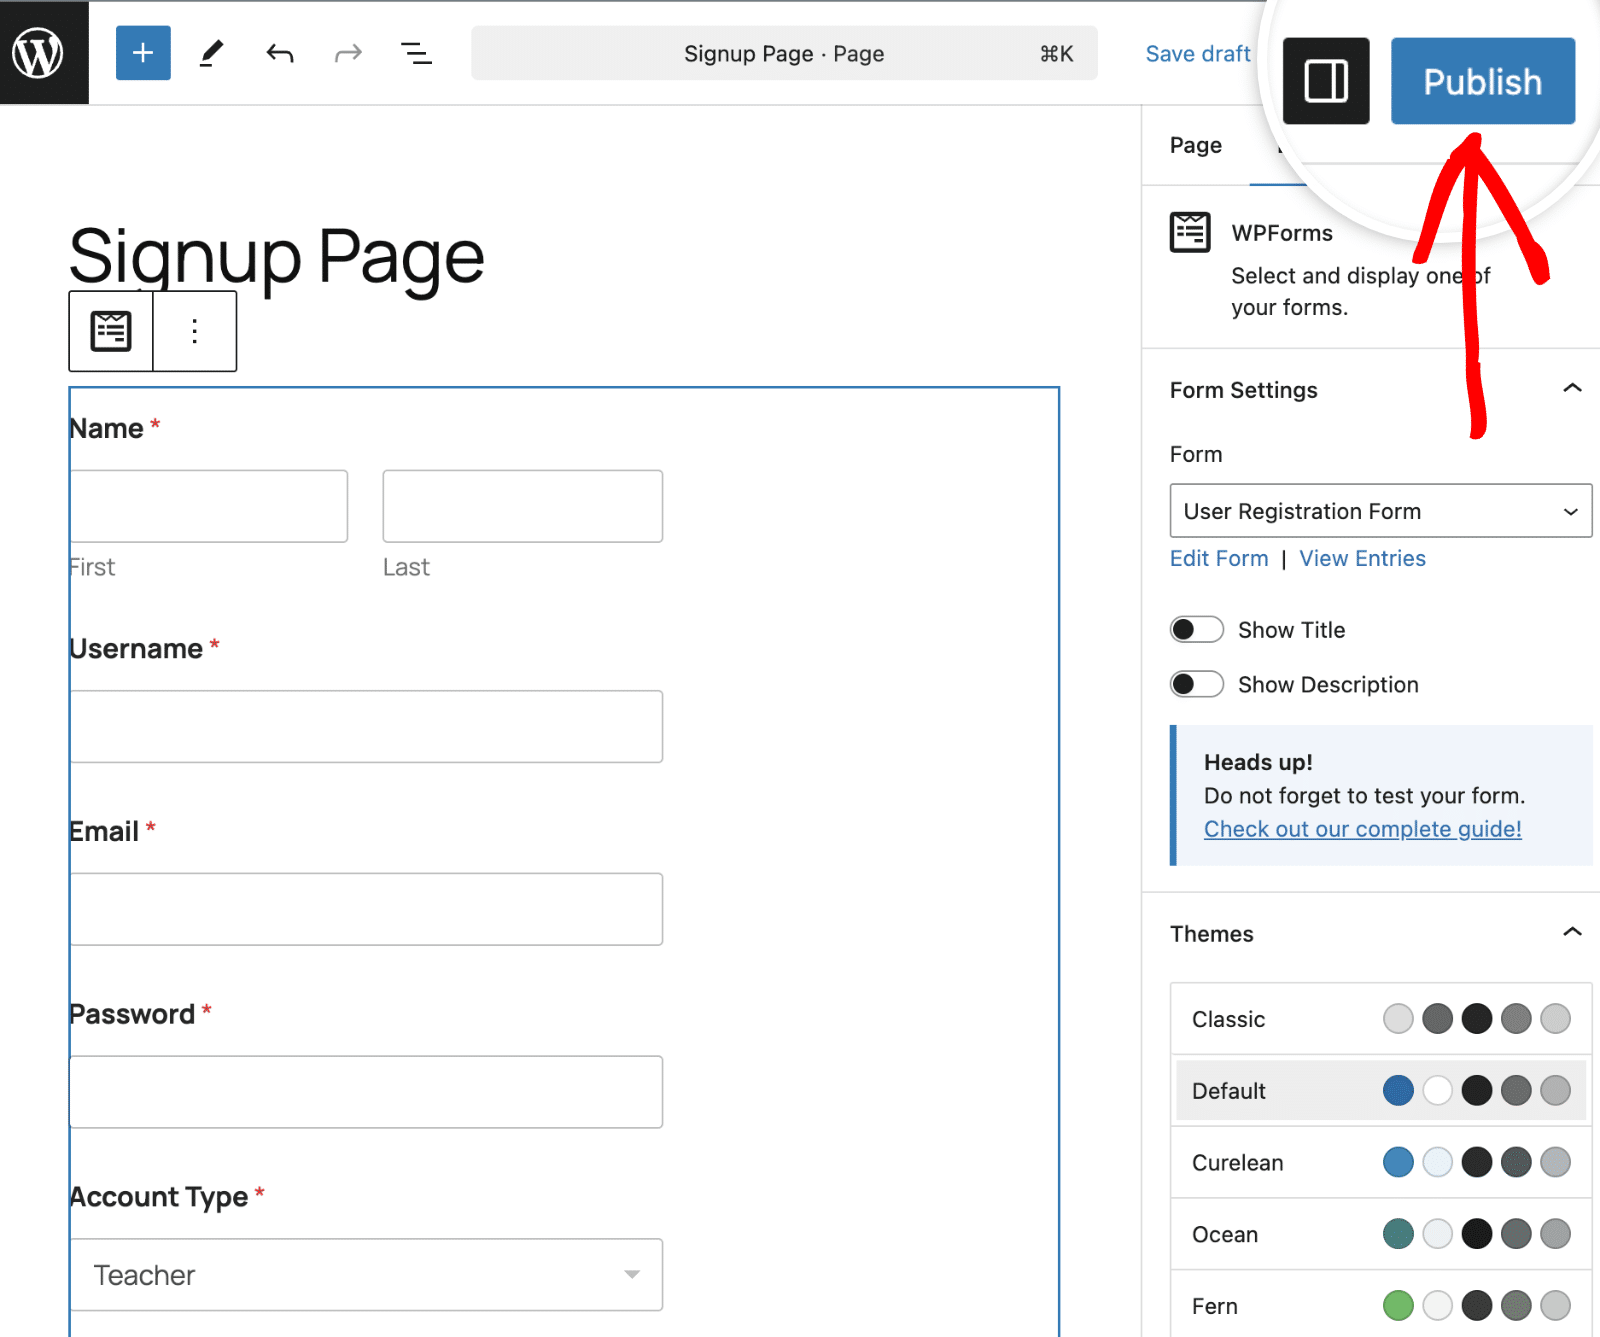
When you check this page on the frontend, you’ll see that you have a fully functional user registration form. Note that it’s also possible to embed your forms using a shortcode or widget, as well.
FAQs – How to Assign User Roles Conditionally
These are answers to some of the top questions we see about assigning user roles conditionally in WordPress.
Can I assign multiple user roles conditionally?
No, WordPress core only supports one role per user by default. However, you can use plugins like User Role Editor to manually assign multiple roles.
Will existing users be affected when I implement conditional user role assignment?
No, this only affects new user registrations through WPForms. Existing users’ roles remain unchanged.
How do I create a custom user role in WordPress?
The easiest way to achieve this is with a WordPress plugin. With the Members plugin, you can add new user roles on your site and customize each role’s capability. The new role you create will appear in the User Roles dropdown when customizing WPForms’ User Registration addon.
Why is the snippet not working on my site?
This can occur if the form ID or field ID doesn’t match the one on your registration form. Make sure to update the snippet with your form and field IDs.
Also, if the options on the Dropdown field don’t match the roles specified in the snippet, WPForms will assign the user the default role specified when configuring the User Registration addon.
Next, Customize the Style of Your Registration Form
Now, you have a functional registration form that dynamically assigns user roles based on input from fields on your form. I showed you how to display the registration form on your site’s frontend. But did you know you can go a step further and beautify your form? WPForms lets you style your WordPress forms without writing any CSS.
You can also create a custom login page branded with your site’s logo to allow users to log into their accounts.
Ready to build your form? Get started today with the easiest WordPress form builder plugin. WPForms Pro includes lots of free templates and offers a 14-day money-back guarantee.
If this article helped you out, please follow us on Facebook and Twitter for more free WordPress tutorials and guides.


