AI Summary
Do you want to add tooltips to your form? Tooltips are little boxes that pop up when you hover over an area on your WordPress site, and they’re great for adding extra info about a field without crowding things.
In this post, we’ll show you how to add tooltips in WordPress.
In This Article
- What’s a Tooltip in WordPress?
- Installing a WordPress Tooltip Without a Plugin
- Step 1. Create a WordPress Form
- Step 2. Install the Shortcodes Ultimate Plugin
- Step 3: Get Your Tooltip Shortcode
- Step 4: Add Your Tooltip to Your Form
- Step 5: Customize Your Tooltip
- Step 5: Turn Your Tooltip into an Icon (Optional)
- Final Thoughts
Create Your WordPress Form Now
What’s a Tooltip in WordPress?
Tooltips are hints, glossary terms, or messages that pop up when your visitor hovers over or touches (on mobile devices) an element on your WordPress website. And in your WordPress forms, tooltips can be used to add extra information about a particular field.
For example, take a look at the screenshot below.
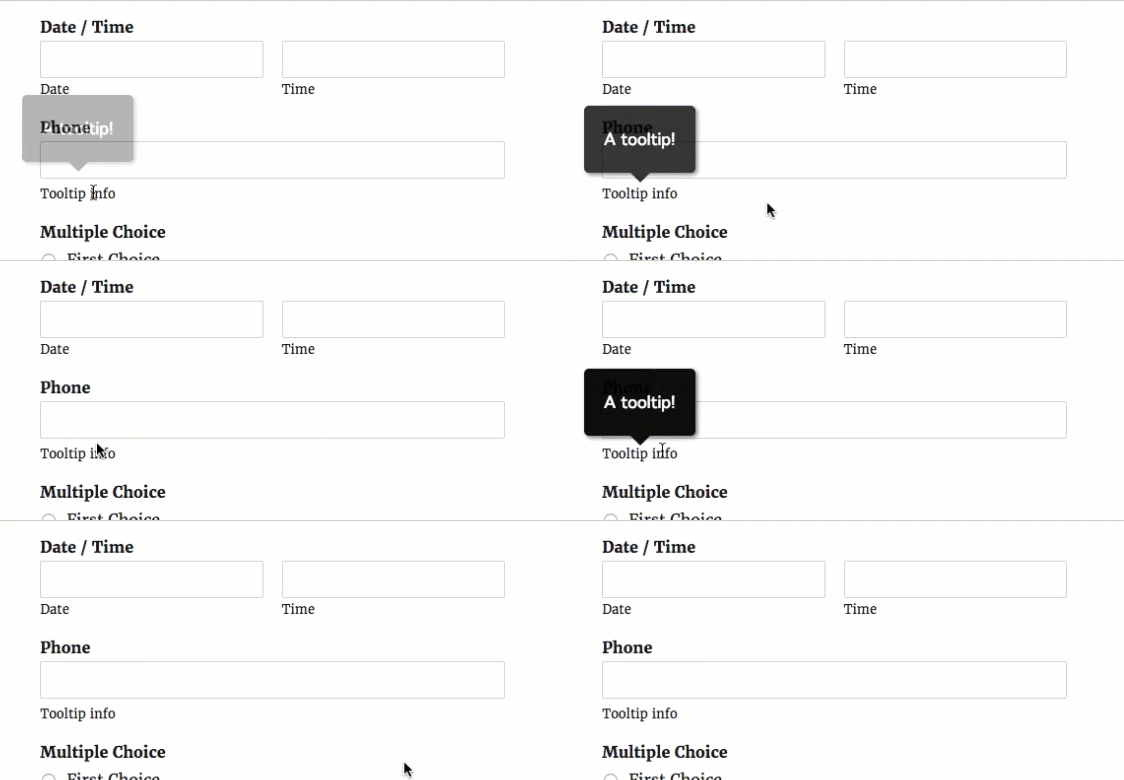
WPForms lets you easily add a description for each field in the form builder. Unlike a typical field description, tooltips are hidden by default. It only appears when your user wants to know more details about a certain field by hovering over the field description.
Adding a tooltip is a great idea if you want to provide more details about a certain field without creating unnecessary distractions on your form.
Now that you know what a tooltip is, read on to find out how to add them to your site.
Installing a WordPress Tooltip Without a Plugin
Yes, it’s possible to install a WordPress tooltip without a plugin. However, if you don’t want to use a tooltip plugin to easily add a tooltip to your WordPress site, you’ll need to be an advanced user and use html or jquery (or hire a developer to do it for you).
Luckily, you can save yourself time and money by using a tooltip plugin. For WPForms users, we recommend the free Shortcodes Ultimate plugin.
Shortcodes Ultimate is easy to use and works great with the most popular and best WordPress themes.
This wildly helpful and free WordPress plugin will give you 50+ shortcodes to use to easily add various functions to your site, including the tooltip shortcode. Up next, we’ll show you exactly how to add this WordPress tooltips plugin.
How to Add Tooltips in WordPress
Let’s take a look at the step-by-step guide on how to add tooltips in WordPress.
Step 1. Create a WordPress Form
The first thing you need to do is install and activate WPForms on your site. If you need help, check out this guide on how to install a WordPress plugin.
Then, you’ll need to create a simple form in WordPress.
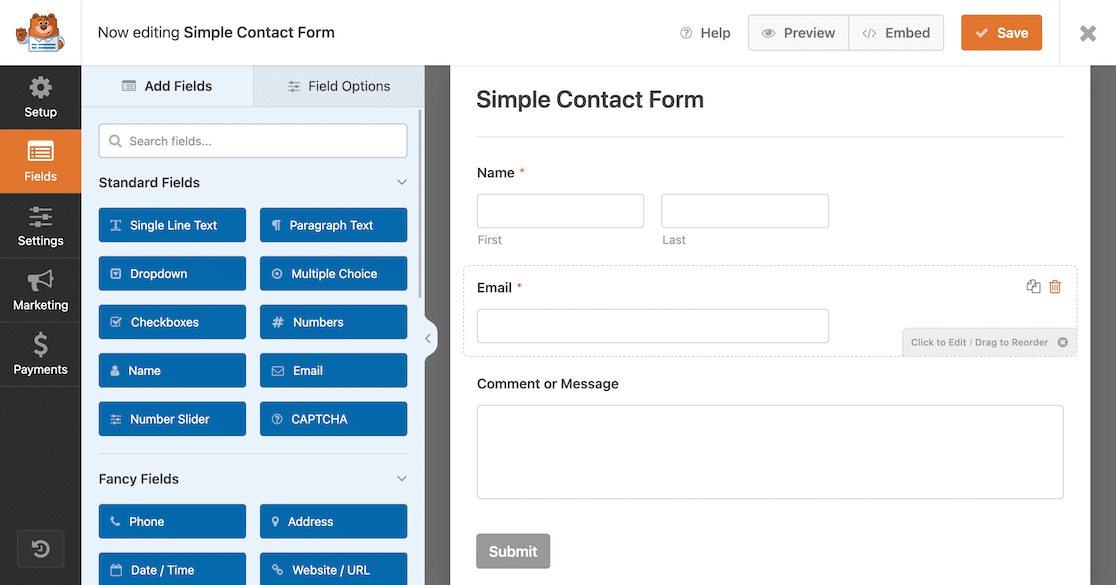
Great job creating your form. We’ll come back to it in a later step.
Step 2. Install the Shortcodes Ultimate Plugin
Next, click here to go to WordPress and download the free Shortcodes Ultimate plugin.
Or if you’re already in your WordPress dashboard, click on Plugins » Add New, search for Shortcodes Ultimate, and click Install Now.

Once the plugin is activated, you’re ready to start using it.
Step 3: Get Your Tooltip Shortcode
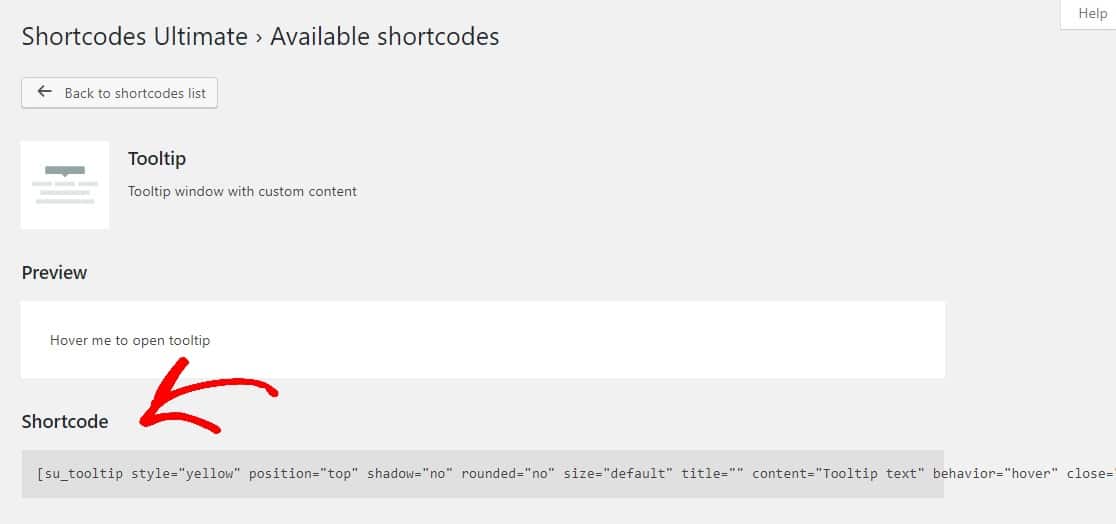
Now, find the Shortcodes Ultimate plugin on the left-hand side of your WordPress dashboard and click on Available shortcodes. Scroll down that page and select the Tooltip button.
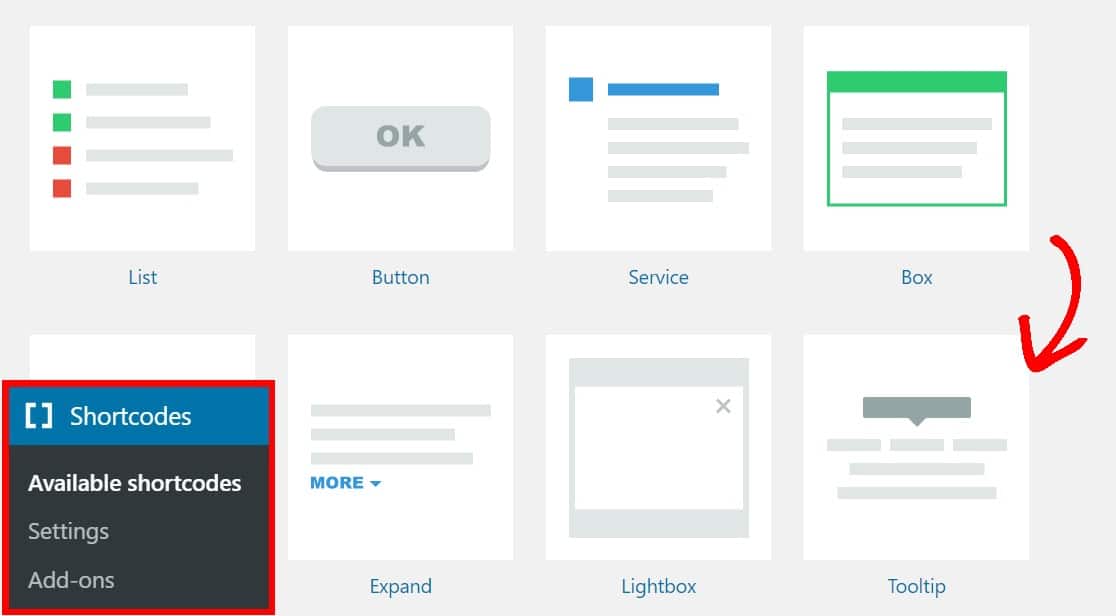
On the next page, highlight and copy the shortcode:
Step 4: Add Your Tooltip to Your Form
Now that you have your tooltip shortcode, it’s time to add it to your Simple Contact Form.
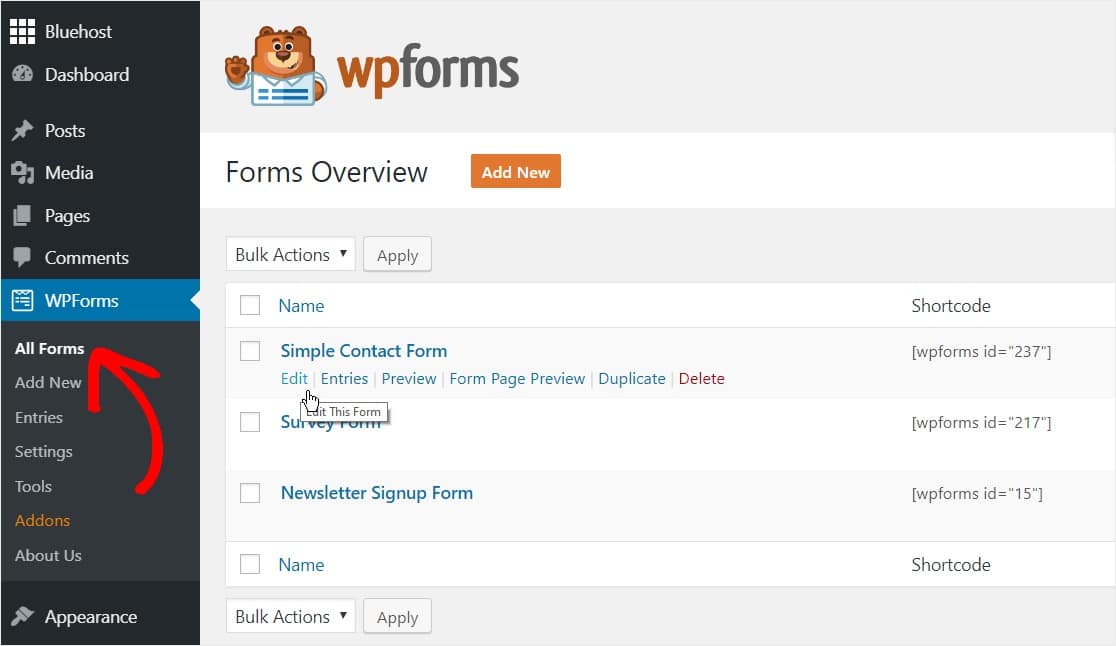
Head back into your form by clicking on WPForms » All Forms and then select Edit under the form where you’d like to add your tooltip.
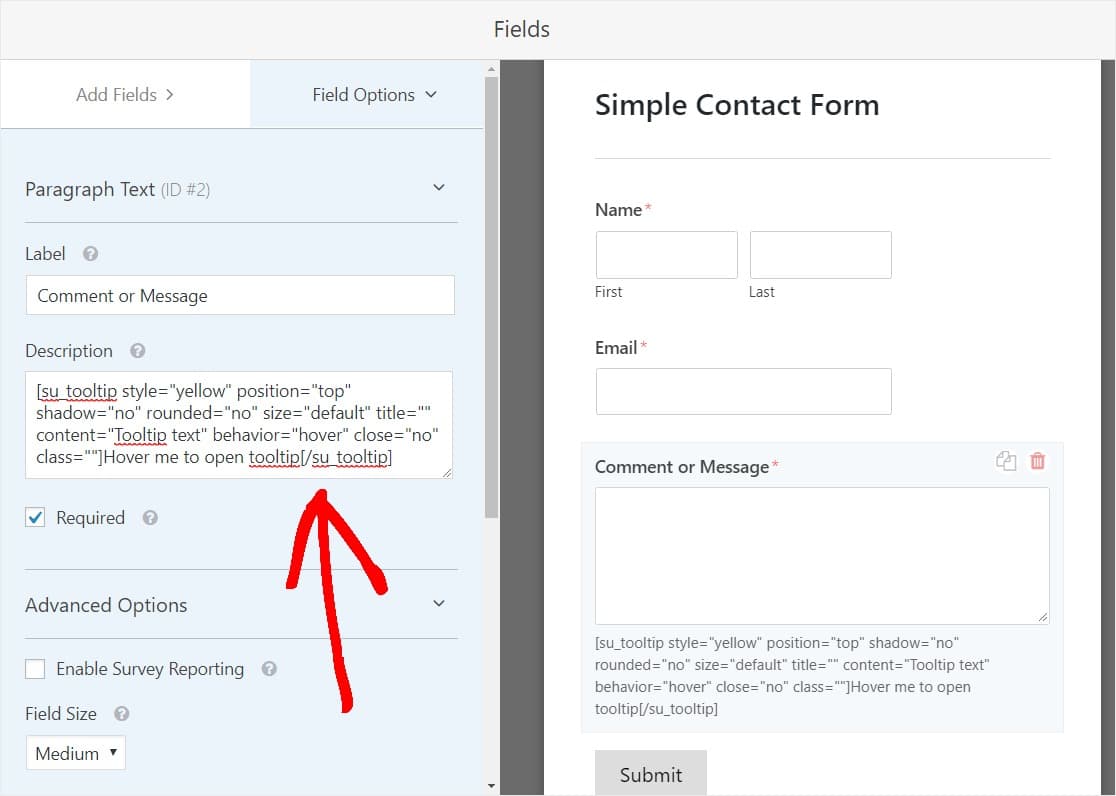
Once you’re on the form, click on the field you’d like to add your tooltip to and paste your tooltip shortcode into the description box.
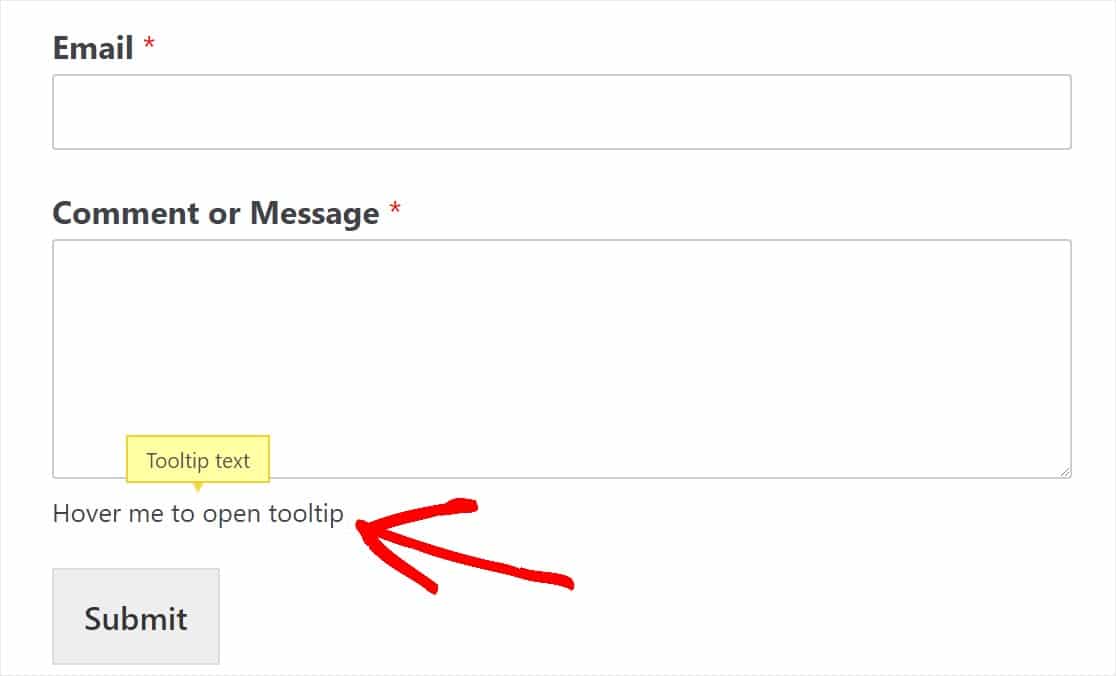
Once you save your form and view it from the frontend, it will now display the tooltip:
Step 5: Customize Your Tooltip
You can also modify the code to display your own text. Here’s an example with the changes made in bold:
[su_tooltip style="yellow" position="top" shadow="no" rounded="no" size="default" title="" content="This is the content area which will be shown in the Tooltip bubble after the user hovers over it!" behavior="hover" close="no" class=""]This is the text that will be always be displayed and will show the Tooltip content when hovered over![/su_tooltip]
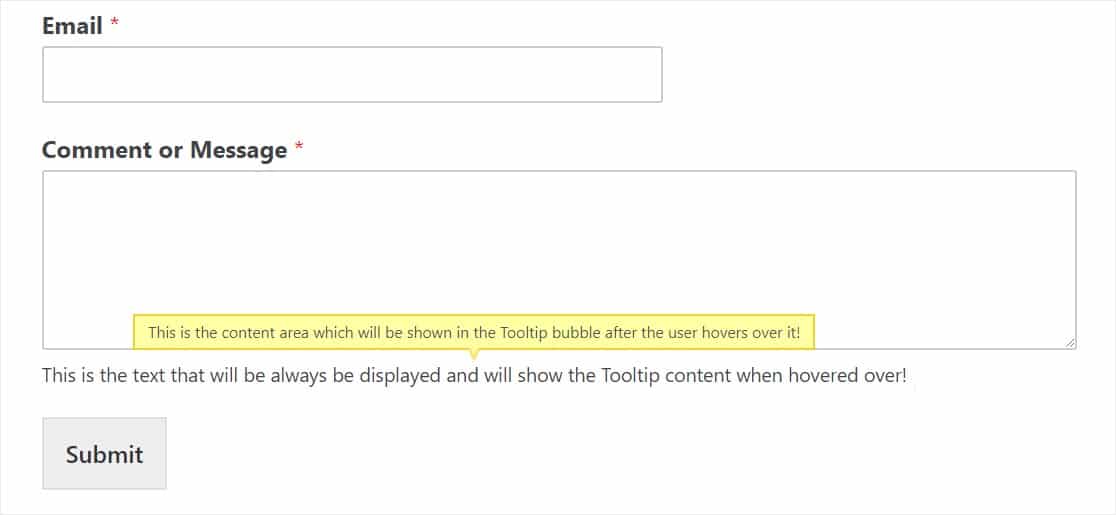
You can also change a bunch of different options in your tooltip settings which you can find by scrolling to the bottom of the Shortcodes » Available shortcodes page like:
- Style + Colors
- Position
- Size
- Behavior
- And more
The next step is optional but will make your tooltip look even more customized and keep your forms even more clean and distraction-free.
Step 5: Turn Your Tooltip into an Icon (Optional)
Unless you specifically state and invite people to hover over your tooltip in your tooltip shortcode, your visitors may not even realize that there’s extra content waiting to be shown in that tooltip! A great way to make sure your readers hover over the tooltip is to make it an icon instead of just using text.
For example, many people add an “i” information icon and then when the user hovers over that icon, the tooltip displays. How snazzy is that?
![]()
To do this, first, download and activate the free Better Font Awesome plugin. If you jumped straight to this part of the post, here’s a link to how to install a WordPress plugin if you need it.
![]()
Once the plugin is activated, you’ll have access to thousands of free icons that you can use anywhere on your WordPress site with a simple shortcode. Now, let’s go ahead and add the Info icon’s shortcode to our tooltip.
We’re about to put one plugin’s shortcode inside another plugin’s shortcode. But don’t worry, they’ll both still work!
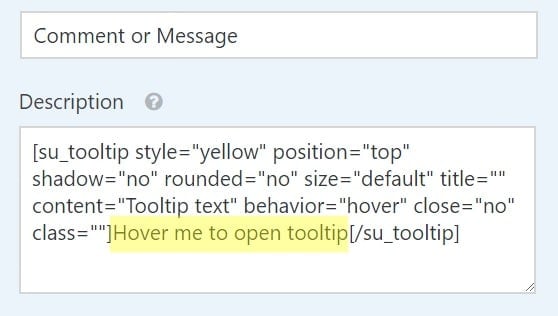
Head back to your form’s Field description box that contains your tooltip and simply replace the displayed text inside your tooltip shortcode with this shortcode:
[icon name="info"]
The text area you should replace with the above shortcode is highlighted below:
And here’s what the code should look like once you’ve added the icon shortcode:
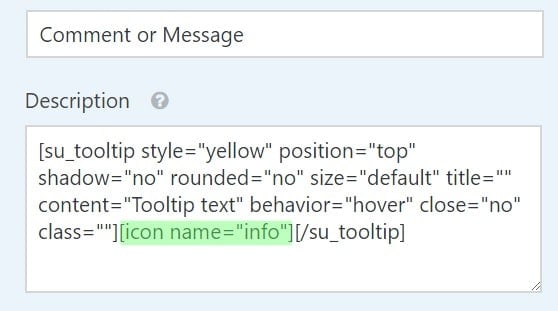
Alternatively, you can just copy and paste the below shortcode into your description box and tweak it to your liking.
[su_tooltip style="yellow" position="top" shadow="no" rounded="no" size="default" title="" content="Tooltip text" behavior="hover" close="no" class=""][icon name="info"][/su_tooltip]
Next, save your form and check it out on the frontend to see your tooltip icon.
![]()
Great job! Now, if you’d like to get even more advanced and place the tooltip icon above the field next to the label, check out our in-depth tutorial on how to add icons to WordPress forms.
Final Thoughts
That’s it! You now know how to add tooltips in WordPress.
If you want to change the look of your forms’ buttons, read how to customize button styles with CSS. Or if you prefer, see our guide on how to style WPForms with CSS Hero (no coding required).
What are you waiting for? Get started with the best WordPress forms plugin today.
If you like this article, then please follow us on Facebook and Twitter for more free WordPress tutorials.



Is it possible to add multiple Tooltips with different messages?
Thanks
Hi there!
Sure, you can create different tooltips for different fields, however, one field can only have one tooltip as once you will hover it over the only one tooltip can be displayed for it.
I hope that makes sense.
Have a good one 🙂
How can you add a tooltip to an icon or image on Wordpress?
Hi Joshu!
You can simply cover an image or icon HTML tag with the Tooltip shortcode according to the instructions provided in this tutorial.
I hope this helps.
Have a good one 🙂
Hi, thanks for the tip.
I think the form would look more neat if the tooltip icon was positioned next to the field’s label instead of down the bottom of each field just like you have in your form settings section with the question mark icon tooltip. If you’ve done it that way, I guess you also agree it’s better. How do we achieve a similar effect?
Hi Chris!
You can try to put the Tooltip shortcode to the Label field. I didn’t personally test this, but you can give it a try.
I hope this helps!
Have a good one 🙂
It works, but then all the code and description of the tooltip comes through on your email and can be hard to read
Hi Gareth.
In this case, you can try to use the fields’ Smart Tags in the Notification settings instead of {all_fields} one.
And in case it helps, we have a great tutorial on how to use Smart Tags in the notification email.
When you are using Smart Tags it won’t automatically add the field label, but only its value, so you will have to add the labels manually.
I hope this helps.
Have a good one 🙂
Hi there, I wanna add a tooltip icon after the label but when I put the [tooltip shortcode] on this section, just recognize it as a plain text. is there any workaround?
Hey Sina – Currently the label field does not support shortcode, only the description field support shortcode. If you need it in the label field, our support team might be able to help with some custom code. If you are a paid license user, you can create a support ticket here.
Have a good one 🙂
Hello…
Could i use this for column titles in woocommerce?
Thanks.
Hey Octavio– I apologize, but we don’t support any integration with WooCommerce, mainly because they’re heavily integrated with their own forms systems.
If you need forms to work within WooCommerce, I’d suggest contacting the Woo team directly to be sure you can find an option that integrates properly with their system.
Thanks 🙂
Hi,
I am trying to add the tooltips to y site but its not working. The shortcodes ultimate does not have available shortcodes unless I search in their documentation. Would that be the cause?
Hi – am I able to change the colour and size of the icon tooltip? What code would I need for this?
Hi Emma,
Good question! Please refer to this guide by Shortcode Ultimate to format the text.
Hope this helps! 🙂
How can I make a tool tip show if the user has not filled out a field. I know there already exists that message, but it is quite small and a lot people are getting confused when filling out the form. Ideally I would like it to flash it somehow
Hey Myur – While we currently don’t have the option to show the message in the tooltip, if you prefer, you can increase the font size of the validation message using the following CSS:
div.wpforms-container-full .wpforms-form em.wpforms-error {font-size: 16px !important; /* Please change the values as per your preference */
}
In case it helps, you can take a look at our doc here to add custom CSS.
You can also show a required message in field placeholder as shown in this screenshot.