Would you like to add custom CSS styles to your site? This tutorial will give you multiple options on how to add these snippets to your site with step-by-step instructions for each optional way you choose to add your CSS.
With this helpful guide, you’ll be able easily choose which way you would like to add the snippets to your site. Once you’ve selected your method of implementation, you can start exploring the developer documentation to pick and chose which CSS snippets you’d like to start adding to your site!
To have a look at the host of all the snippets available, please explore our developer documentation.
Please see our video tutorial for a more hands-on view of how to achieve adding custom CSS snippets to your site.
Implementation Options
CSS is a powerful tool for styling your site, as well as your forms. There are 3 main approaches to adding custom CSS to your site.
Using WPCode plugin (recommended)
Using the WPCode plugin is super fast and easy to add CSS snippets to your site.
Just one of the many reasons we strongly recommend using this plugin for adding custom snippets to your site is that it has a built-in check before saving your snippet. If a semi-colon is missed or an extra bracket is added, the snippet won’t save. This prevents any issues from being able to happen on your site due to an incorrect copied and pasted CSS snippet. And yes, even with the free version, you’ll receive this extra audit before your snippet would be made active.
To find out more about this plugin, please check out the site for further information including dedicated documentation.
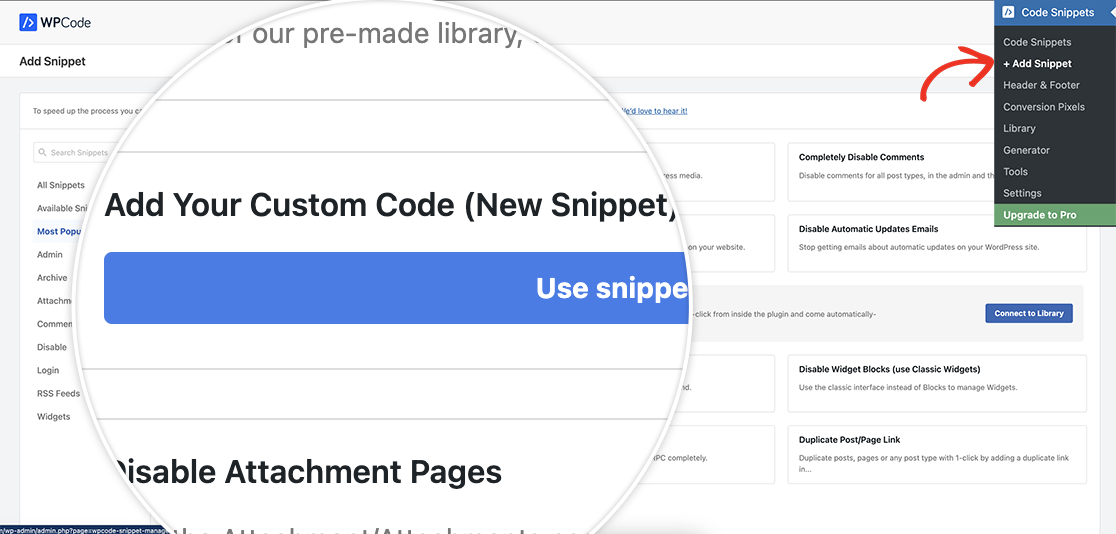
Once the plugin is installed, navigate to the Code Snippets menu from the left-hand side menu on your WordPress dashboard and select + Add Snippet. Next, simply click the Add Your Custom Code (New Snippet), then click the blue Use Snippet button to create a new CSS snippet.

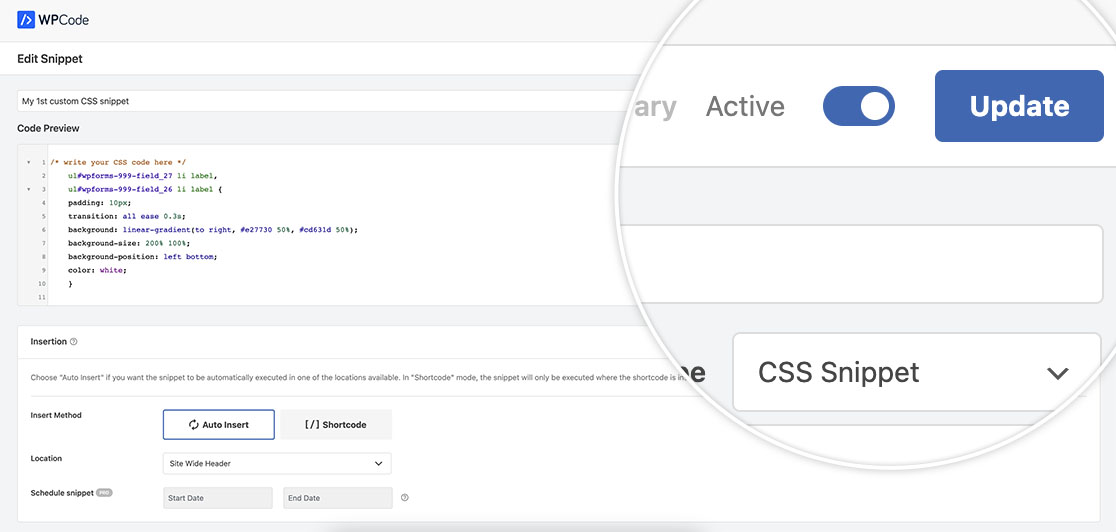
When your new snippet screen appears, give the snippet a name that will make sense to you so you and your site admins will understand it’s purpose. From the Code Type dropdown, select CSS as we’ll be only adding CSS to this snippet.
In the Code Preview section, add your CSS. Here is an example to use for the purpose of this documentation.
/* write your CSS code here */
	ul#wpforms-999-field_27 li label,
	ul#wpforms-999-field_26 li label {
    padding: 10px;
    transition: all ease 0.3s;
    background: linear-gradient(to right, #e27730 50%, #cd631d 50%);
    background-size: 200% 100%;
    background-position: left bottom;
    color: white;
	}

	ul#wpforms-999-field_27 li.wpforms-selected label,
	ul#wpforms-999-field_27 li label:hover,
	ul#wpforms-999-field_26 li.wpforms-selected label,
	ul#wpforms-999-field_26 li label:hover {
		cursor: pointer;
		border-radius: 2px;
		background-position: right top;
	}

	ul#wpforms-999-field_27 li input,
	ul#wpforms-999-field_26 li input {
		display: none;
	}

	ul#wpforms-999-field_27 li,
	ul#wpforms-999-field_26 li {
		float: left;
		width: auto;
		display: inline-block;
		padding: 10px 10px 10px 0!important;
	}
Next, you’ll see the Insertion section. Since we’re adding CSS, we’ll select Auto-Insert for the Insert Method and Site Wide Header for the Location.
Once you’ve added your snippet, click Save Snippet. This will save the snippet, but doesn’t automatically activate it. Once you’ve initially saved, you’ll notice that the status of the snippet is set to Inactive by default. Simply toggle the switch from Inactive to Active and click Update to set the snippet is Active.

Using CSS Hero
If you’d prefer to not touch any code, WPForms has a complete tutorial on how to use CSS Hero. To find out more about this, please follow this tutorial.
Creating a child theme
Child themes are recommended for more advanced development. You can find out how to create a child theme by following this tutorial.
In each child theme is the required style.css, in this file is where you would add your custom CSS.
Using the WordPress Customizer
Since WordPress version 4.5, WordPress has given us a built-in tool to add any custom CSS styles to your theme or any plugin you have installed which makes this a popular choice for adding your CSS.
To learn more about the WordPress Customizer, check out their documentation.
You can find the WordPress customizer by navigating to Appearance » Customize » Additional CSS.

Just remember after you add your CSS to click the Publish button to save your changes. As long as the theme remains active, your custom CSS will be applied.
If you deactivate your theme, your custom CSS will be removed as any custom CSS added here is attached to the theme itself.
Notes
When adding any kind of custom code to your site, it’s important to make sure you protect your code. So no matter what approach you choose, it’s a good idea to always back up your site first. That way, you’ll have access to older versions of site files and the database if needed.
Additional Links
For additional information on custom CSS for WPForms, check out these reference links:
FAQ
Q: How does this help me with adding custom CSS for WPForms?
A: This tutorial isn’t specifically for WPForms custom CSS, but for any custom CSS you may want to add to your site.
Simply find which option above is easier for you to add any code snippets, including the WPForms code snippets mentioned in the Tutorials and Snippets section.
