AI Summary
As a WordPress site owner, you’ll occasionally encounter errors that may prevent your site from functioning correctly. These JavaScript issues can be challenging to troubleshoot, especially for online beginners.
JavaScript is a crucial part of WordPress themes and plugins. This means issues related to JavaScript can quickly break core features, slow down your site, or affect the user experience.
In this guide, I’ll walk through the step-by-step process to identify, diagnose, and resolve common JavaScript issues in WordPress.
How to Troubleshoot JavaScript Issues in WordPress
How to Identify and Troubleshoot JavaScript Issues
JavaScript errors can occur due to a variety of reasons. I’ll show you the best places to look to discover what’s causing the problem on your site.
Pro Tip
Before getting started, consider using a different browser to test the page. It sounds simple, but sometimes, JavaScript problems may be browser-specific.
1. Using Browser Developer Tools
The browser console is your best friend when it comes to identifying JavaScript errors. Here’s how to access it:
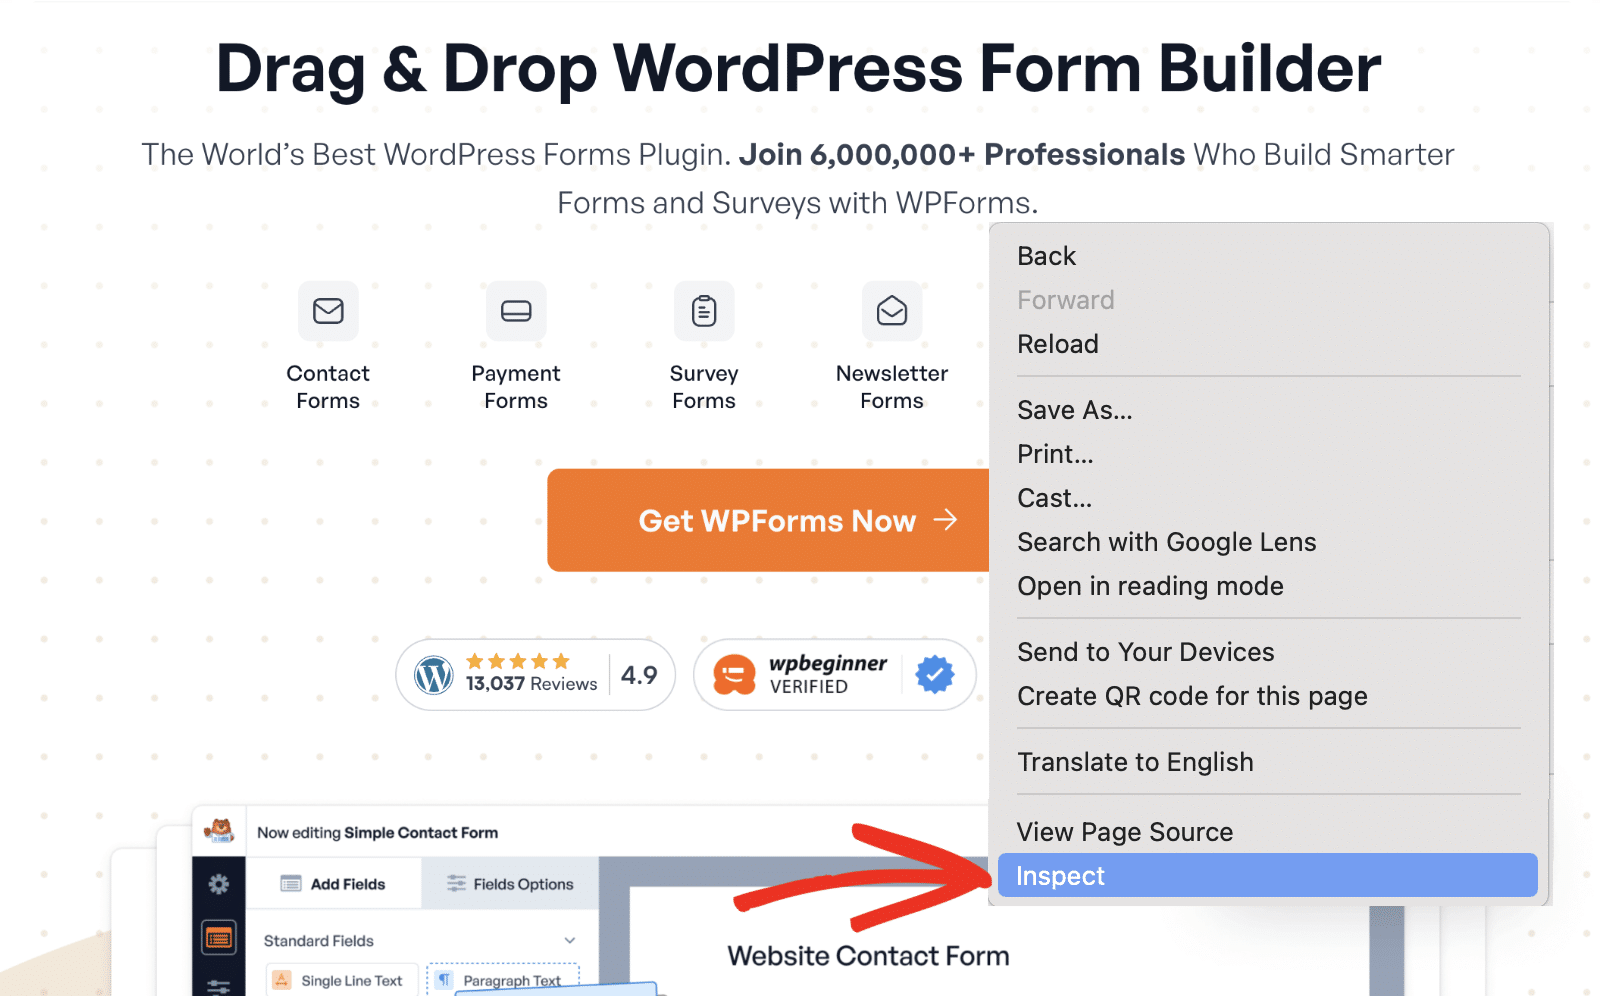
First, open the page you’re experiencing the JavaScript error. Then right click anywhere on the page and click Inspect to open your browser’s developer menu.
Once here, navigate to the Console tab to view JavaScript related warnings. If no errors are displayed, you may need to reload the page.
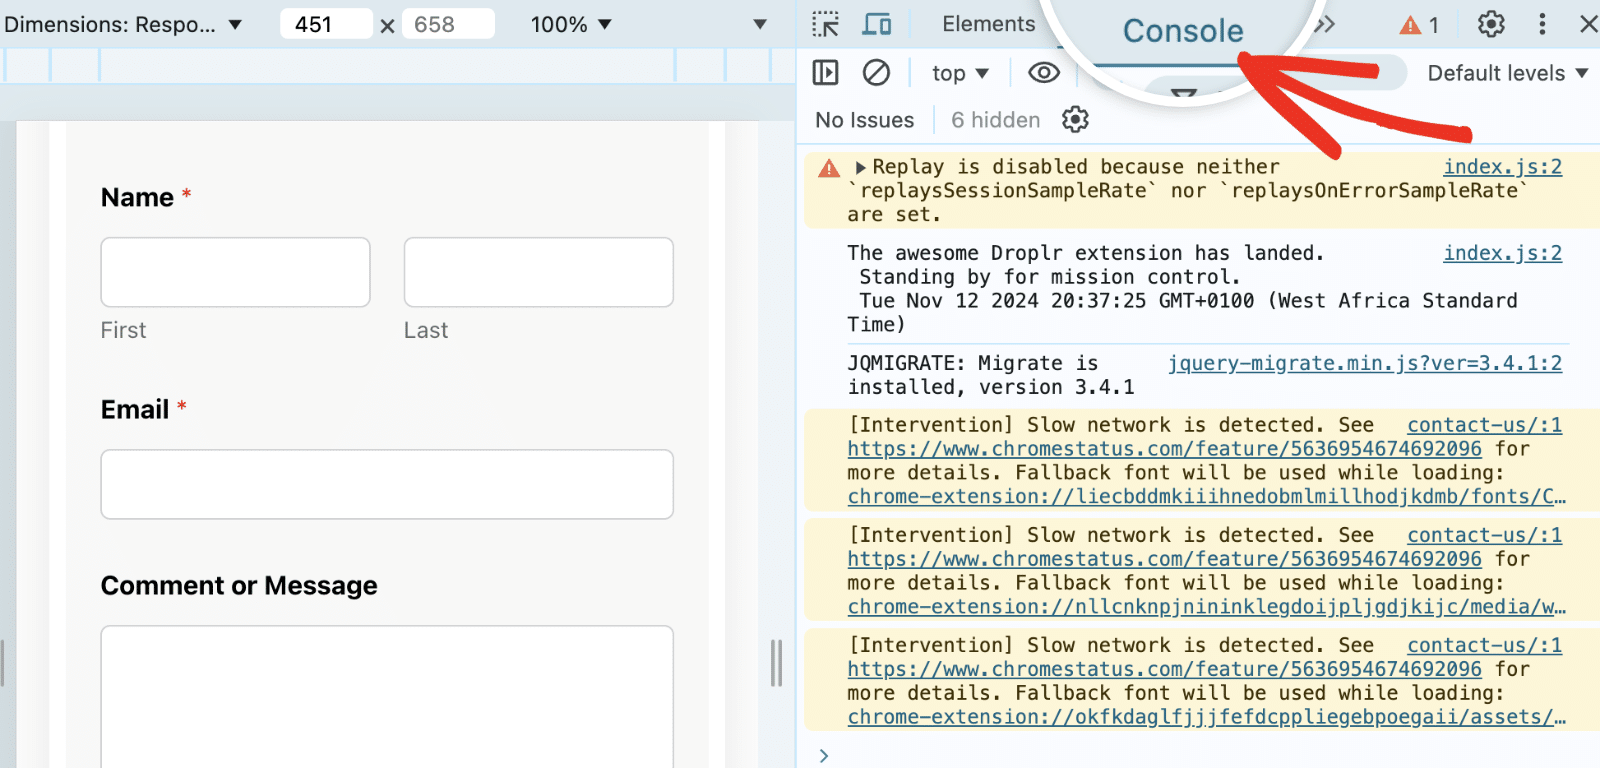
JavaScript problems typically appear in red text in the console. When troubleshooting, look for messages that provide clues about which script, file, or function is causing the issue.
Once you’ve identified JavaScript errors in the console, you can track them back to their origin. Here are some of the most common errors you’ll likely see in your browser’s console.
- Uncaught ReferenceError: This issue indicates a variable or function is missing or undefined.
- Uncaught TypeError: This error suggests an issue with an operation, such as trying to use a non-existent method on an object.
- SyntaxError: Syntax errors often occur due to a typo or incorrect formatting in the code.
In most cases, the issue will show the file/location the error originates from. From there, you can tell if it’s plugin or theme related.
2. Identifying Plugin or Theme Conflicts
Most JavaScript errors in WordPress are often caused by plugin or theme conflicts. If multiple plugins or themes use incompatible JavaScript libraries or duplicate functions, they can create issues.
Here’s how to troubleshoot for conflicts:
Pro Tip
Troubleshooting JavaScript errors in WordPress can affect your site’s performance. I recommend using a staging environment to follow along with this guide. If you don’t have one, consider setting your site to Troubleshooting Mode so users aren’t affected by the changes you implement.
Theme Conflicts
I recommend temporarily switching to a default WordPress theme. At least one of these themes typically comes pre-installed on your WordPress site. They’re always named for the year (for example, Twenty Twenty-Four).
To activate one of WordPress’s default themes, head over to Appearance » Themes from your WordPress dashboard. Then, hover over a default theme and click Activate.
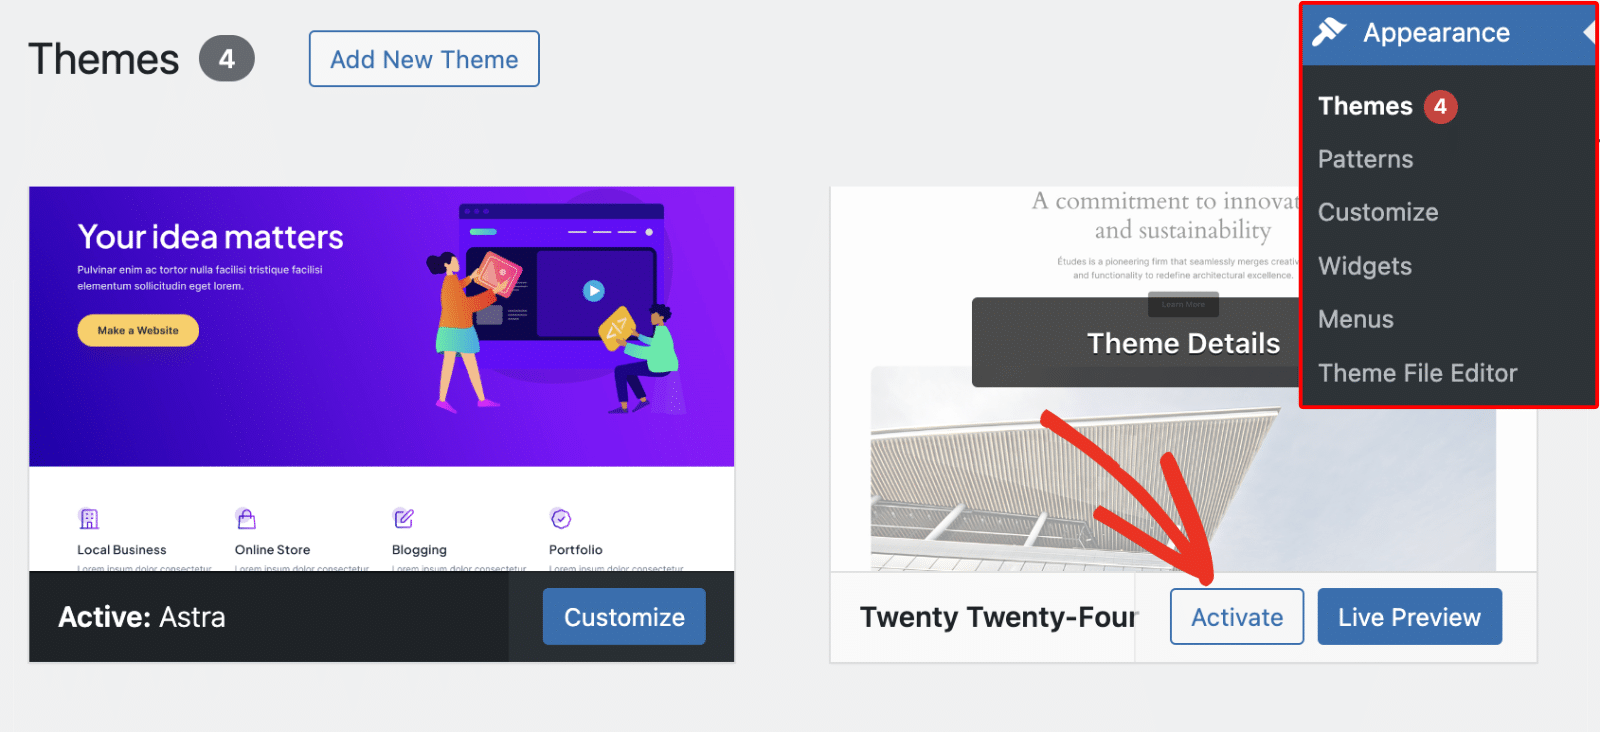
If the issues disappear after you switch your theme, it’s likely an issue with your WordPress theme.
The immediate solution is to check for updates. If a new version is available, click the Update now link to update your theme.
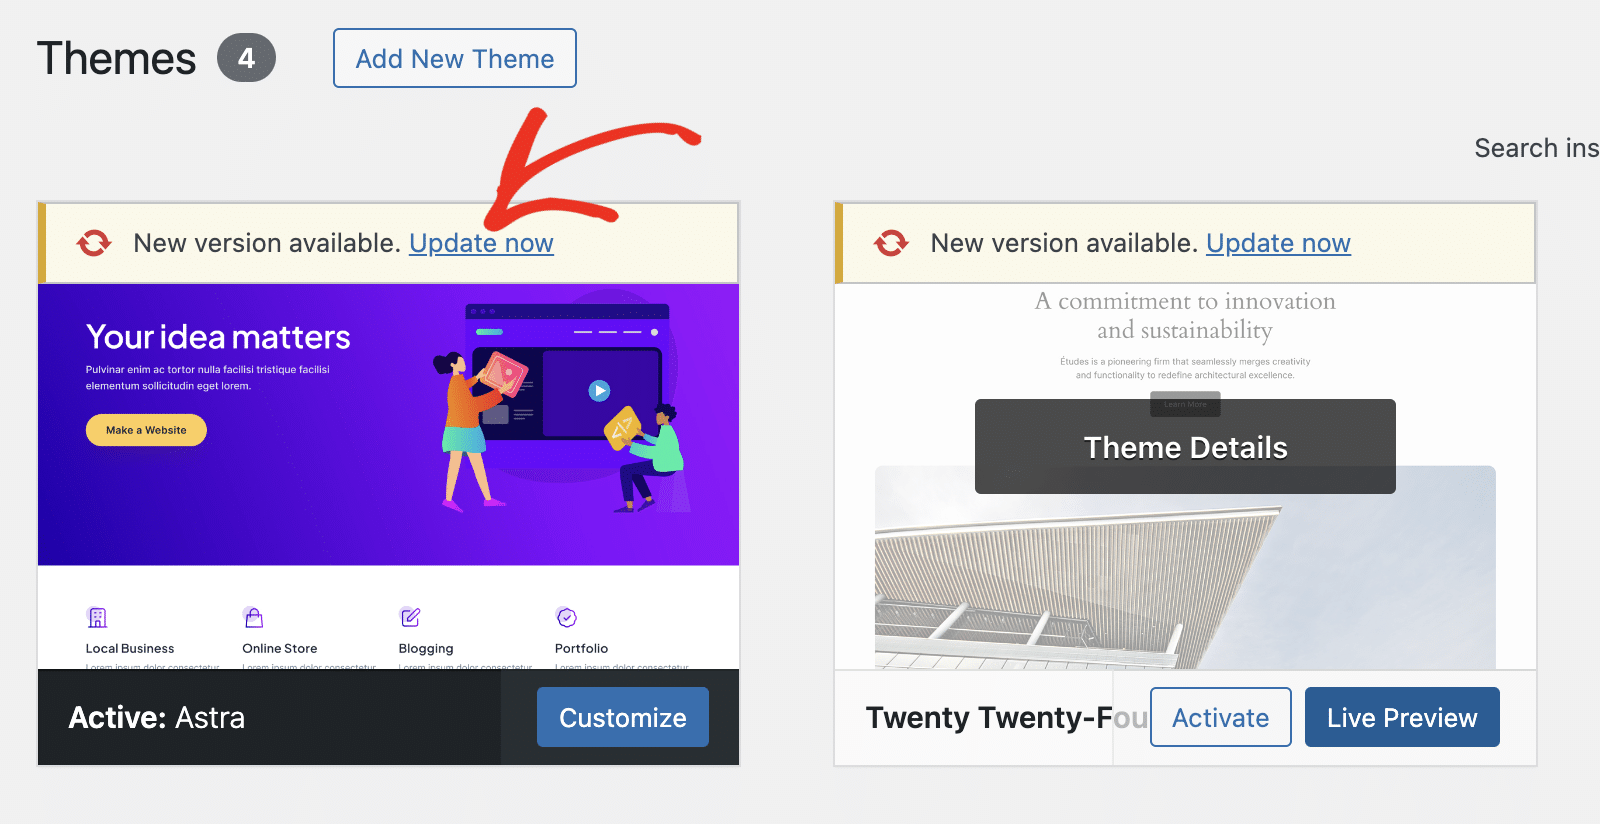
Often, an update to the theme might have fixed critical JavaScript issues. If the issue persists, I recommend contacting the theme developer and temporarily switching to a new theme.
Plugin Conflicts
If switching to a default theme doesn’t resolve the error, the next step is to check for plugin conflicts. To do so, you’ll need to deactivate all plugins on your site and check if the JavaScript error persists.
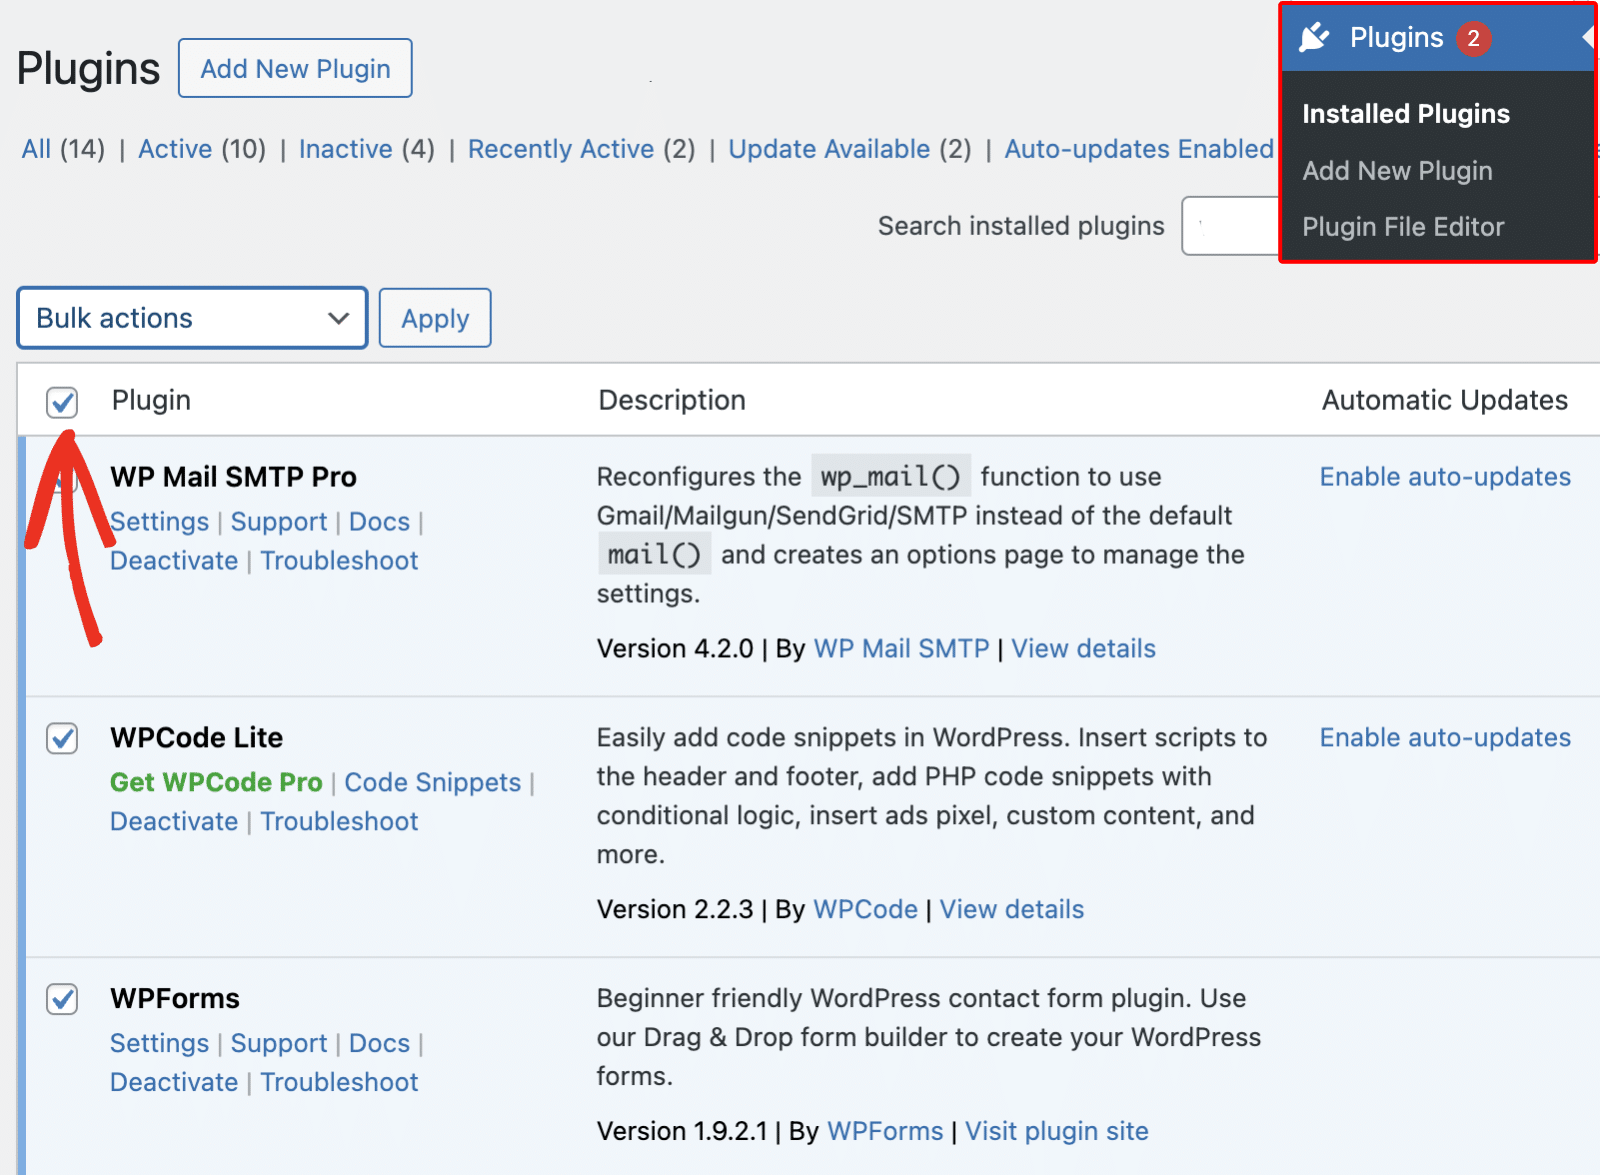
For this, go to Plugins » Installed Plugins and click the checkbox to select all plugins.
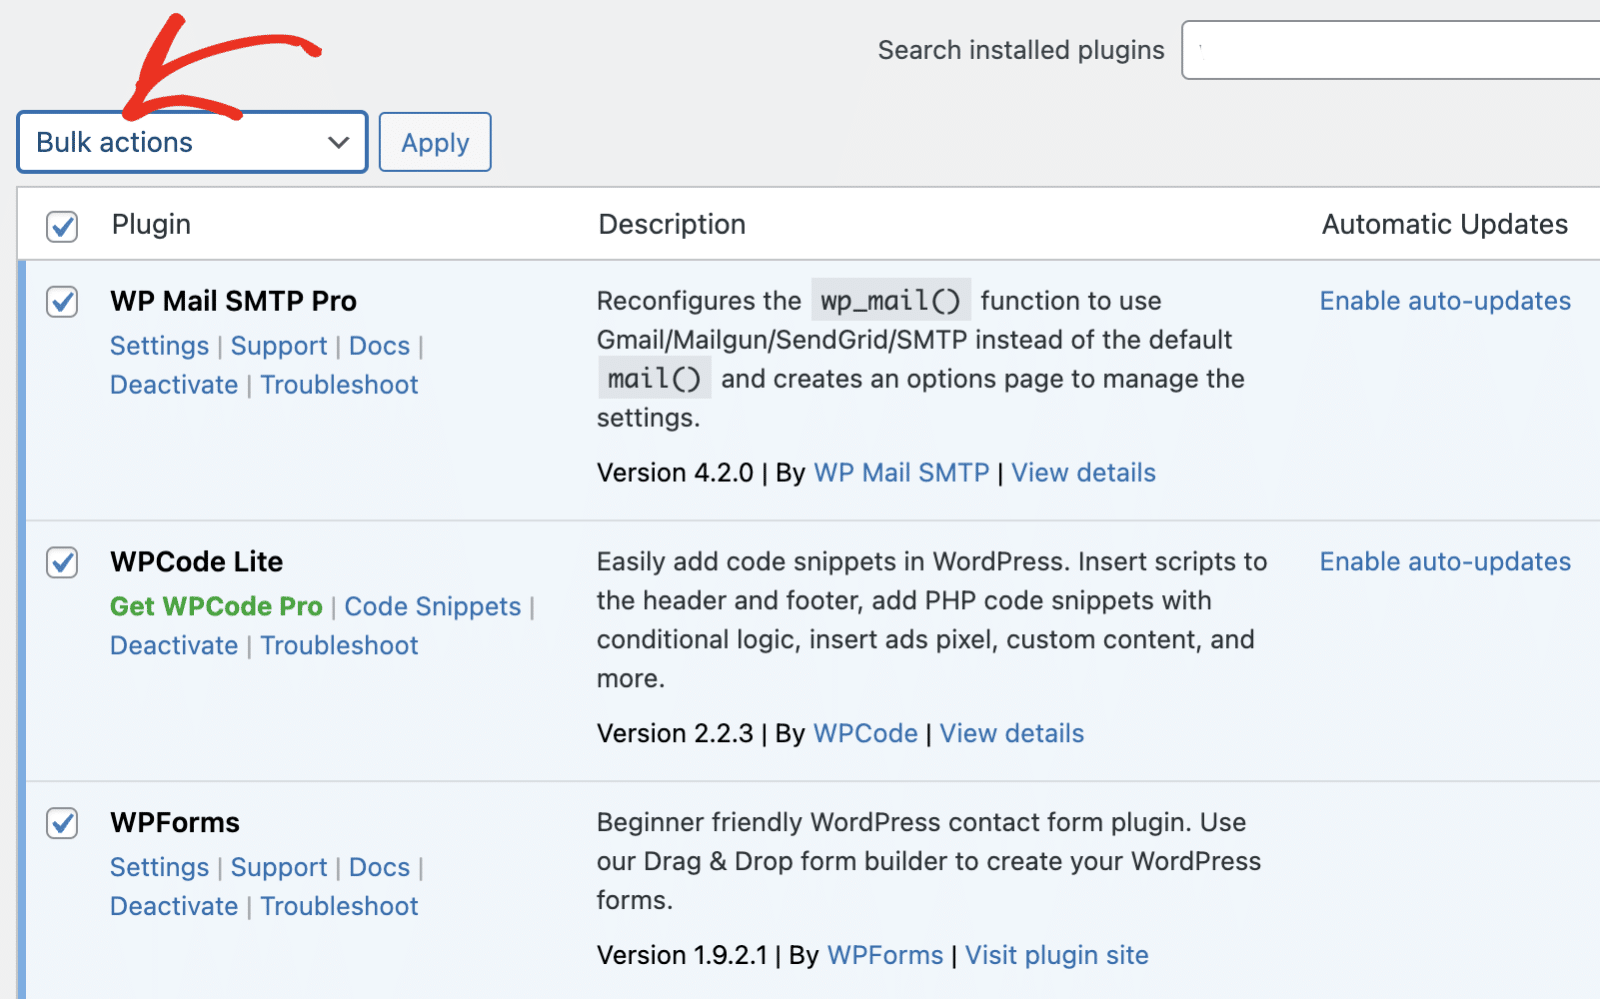
After that, click the Bulk actions dropdown and select Deactivate.
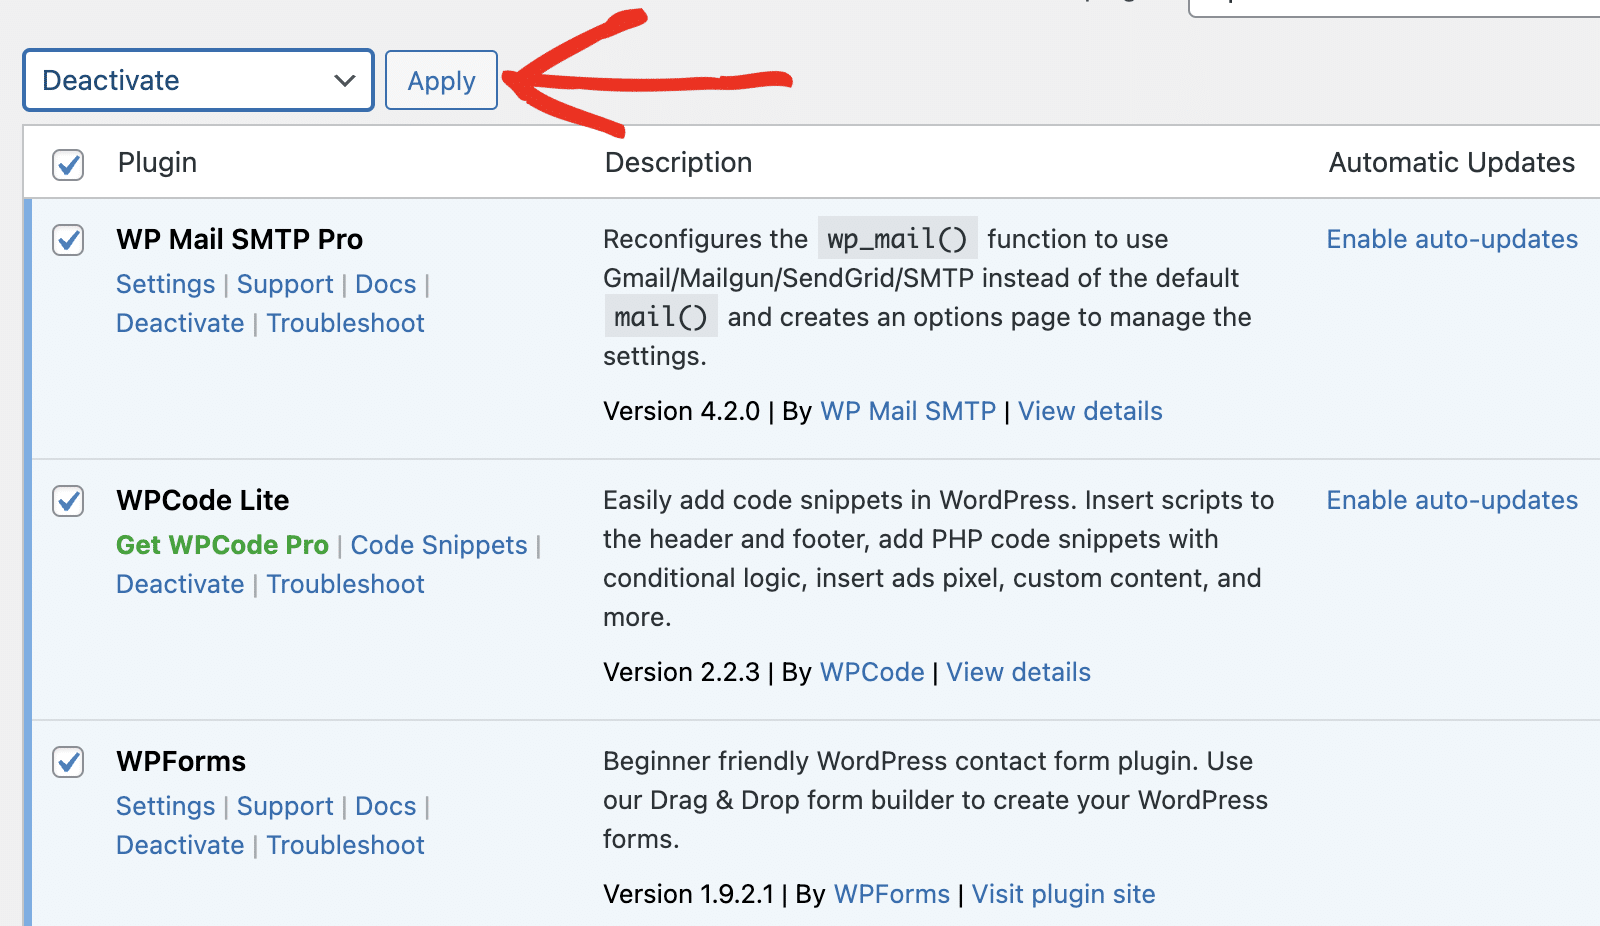
Next, click Apply to deactivate all plugins on your WordPress site.
If the error is gone, then it’s likely that one of your WordPress plugins is the cause of the issue. To find the faulty plugin, reactivate plugins one by one. To do this, click Activate below the plugin name.

Once you activate a plugin, check to see if the error returns. The plugin you activated before seeing the error again is likely the culprit.
After identifying the faulty plugin, I recommend checking for any available updates. If there is, be sure to update the plugin. The plugin’s developer may have released an update that resolves the issue. But if no updates are available, consider deleting the faulty plugin and switching to an alternative plugin.
Pro Tip
Make sure all your plugins and themes are up-to-date. Outdated scripts in older versions can easily lead to compatibility issues.
3. Using Debugging Tools in WordPress
WordPress includes built-in debugging tools that can help you uncover JavaScript issues. When you enable debug mode on your site, WordPress will display any error it encounters on your site’s frontend.
To enable debug mode, you’ll need to access your WordPress files on your server, either through FTP, cPanel, or an FTP File Manager plugin.
Once your site files are open, you’ll need to open wp-config.php for editing. This will be located in your site’s root folder. In your wp-config.php file, set WP_DEBUG to true. This turns on WordPress’s debug mode and logs errors.
define('WP_DEBUG', true);
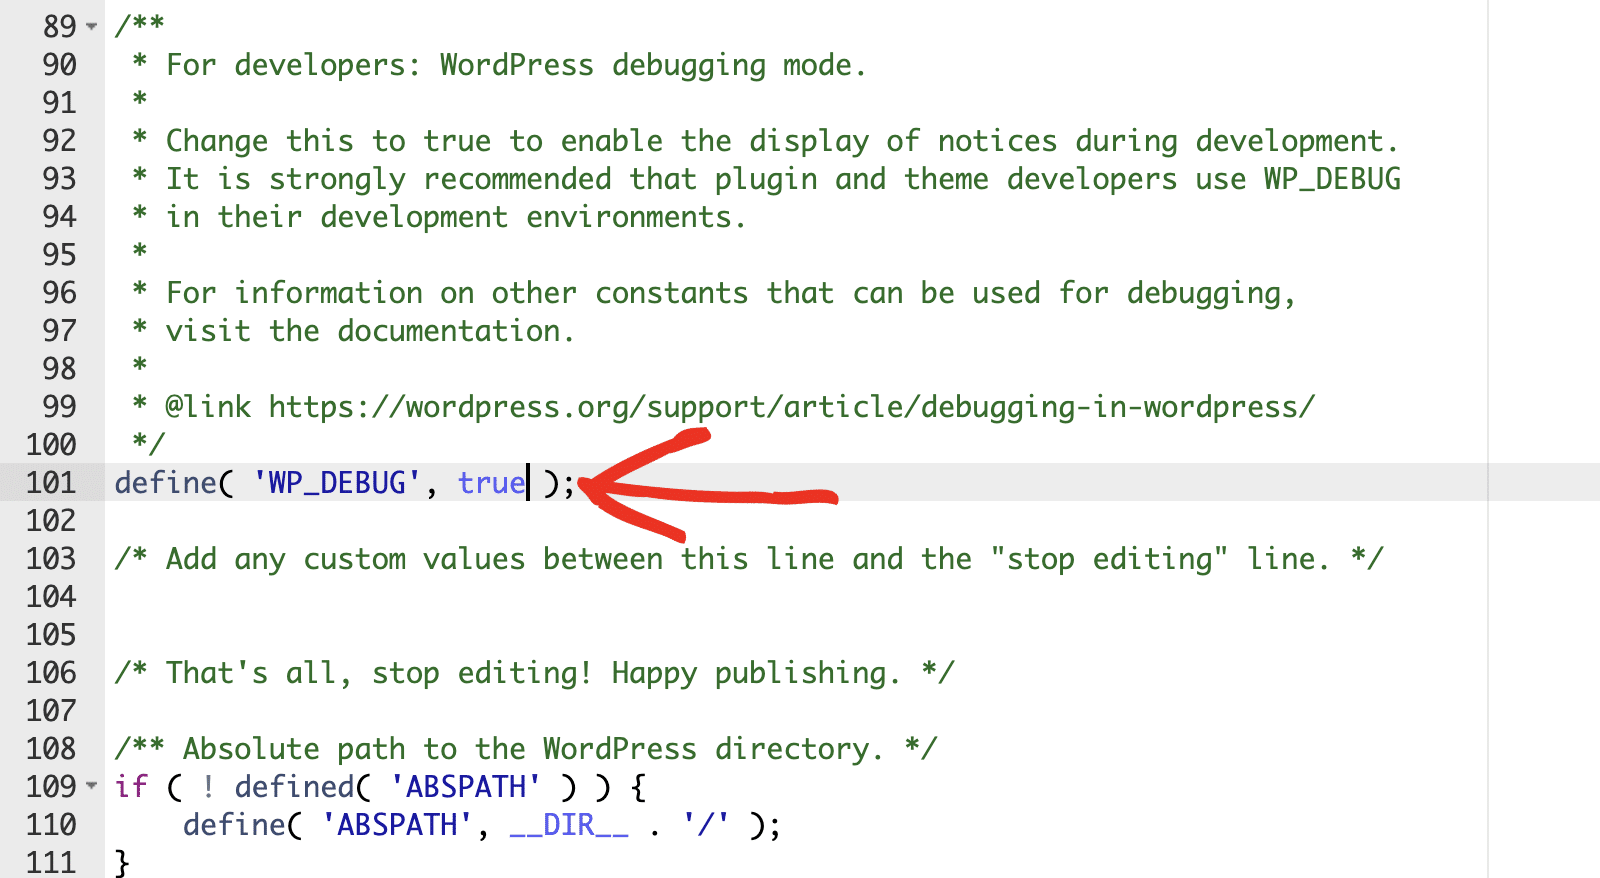
WordPress also includes additional constants that allow you to troubleshoot other areas of the core software. For example, if you’d like to see the non-minified versions of WordPress core scripts, add the following snippet to the wp-config.php code editor:
define('SCRIPT_DEBUG', true);
When SCRIPT_DEBUG is enabled, WordPress will load files like wp-includes/js/script.js instead of wp-includes/js/script.min.js. This can be very useful when developing or debugging a site, as it provides full access to the code for easier inspection and modification.
Note: Loading the non-minified version of scripts can affect your site’s loading speed. Be sure to set SCRIPT_DEBUG to false when you’re done debugging.
If you’d like to store error logs in a file instead of displaying them on your site’s frontend, you’ll need to enable the WP_DEBUG_LOG constant. To do so, add the following line of code to your wp-config.php file.
define('WP_DEBUG_LOG', true);
When WP_DEBUG_LOG is enabled, it logs errors to a file located at wp-content/debug.log. This log often contains valuable information about which scripts are malfunctioning.
4. Enabling Troubleshooting Mode
If disabling plugins or switching themes disrupts your website, consider using Troubleshooting Mode with tools like Health Check & Troubleshooting. To do so, you’ll need to install and activate the Health Check & Troubleshooting plugin on your site.
The plugin allows you to activate Troubleshooting Mode without affecting visitors to your site. This approach is particularly useful on live sites where you can’t afford downtime.
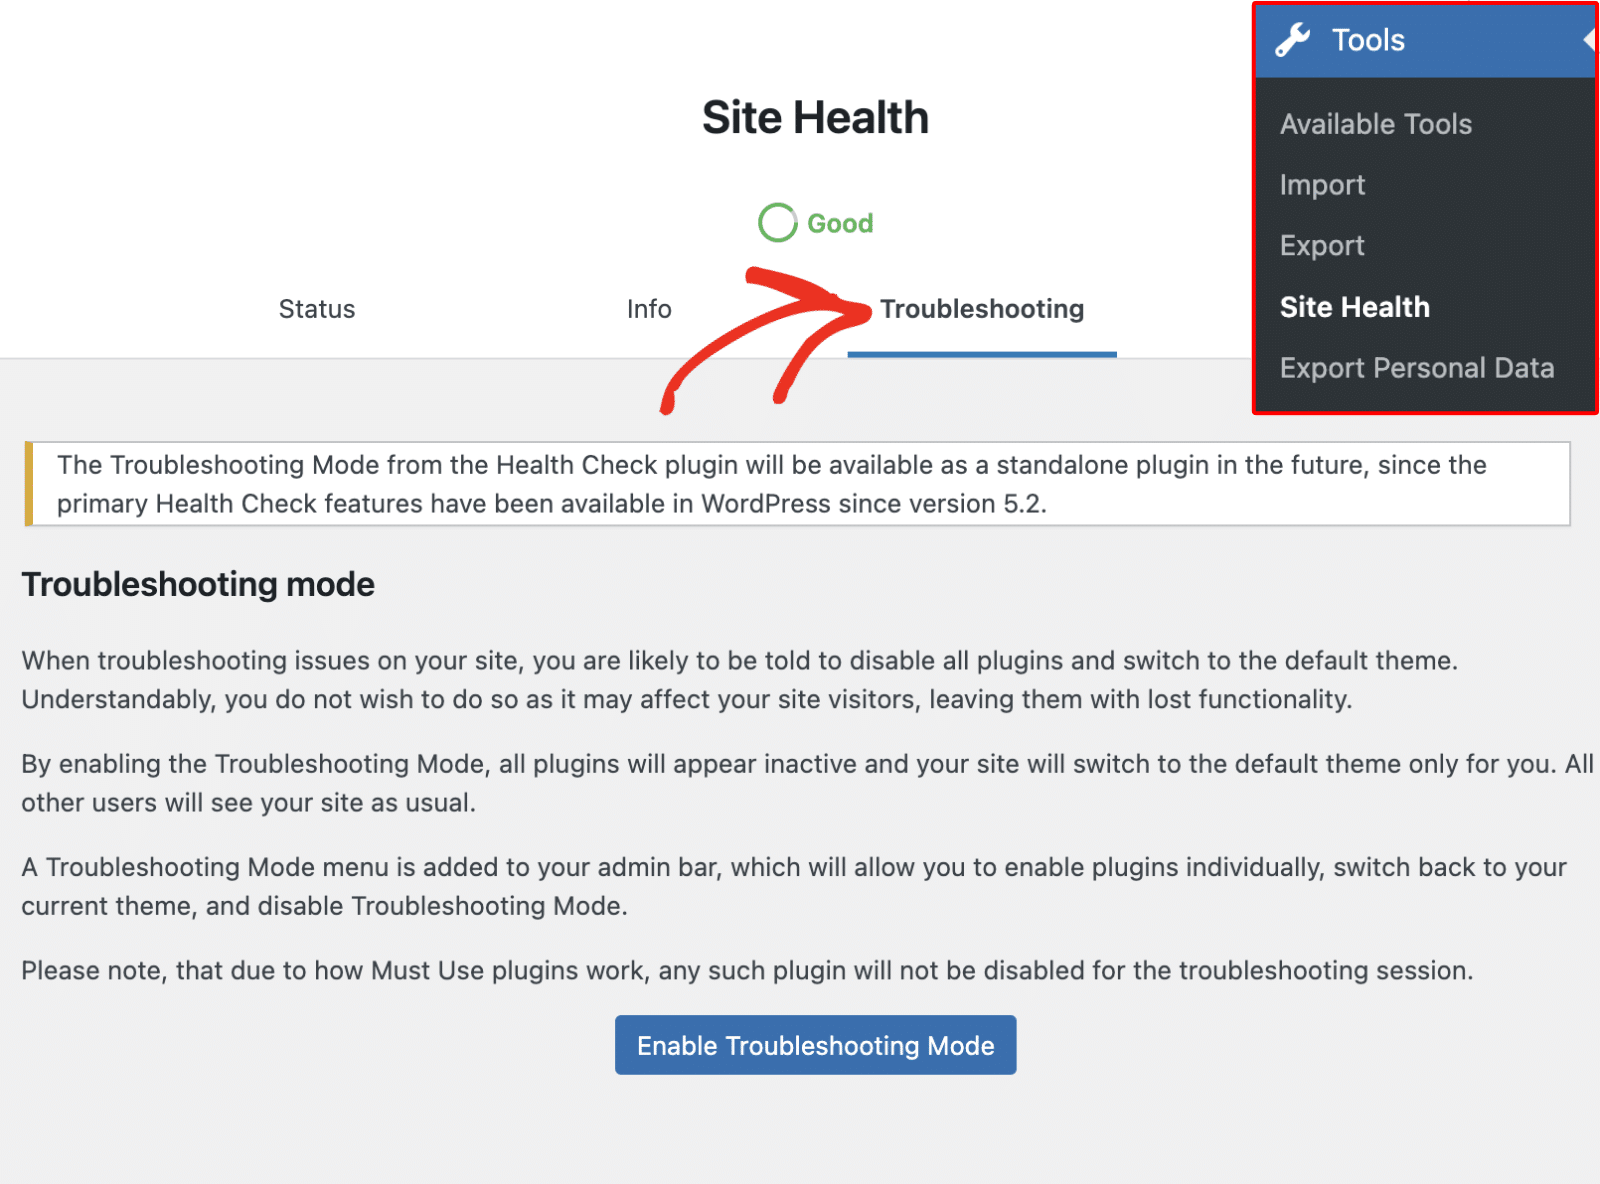
After activating the plugin, go to Tools » Site Health from your WordPress admin area. Then, navigate to the Troubleshooting tab.
Now, click the Enable Troubleshooting Mode button to proceed.
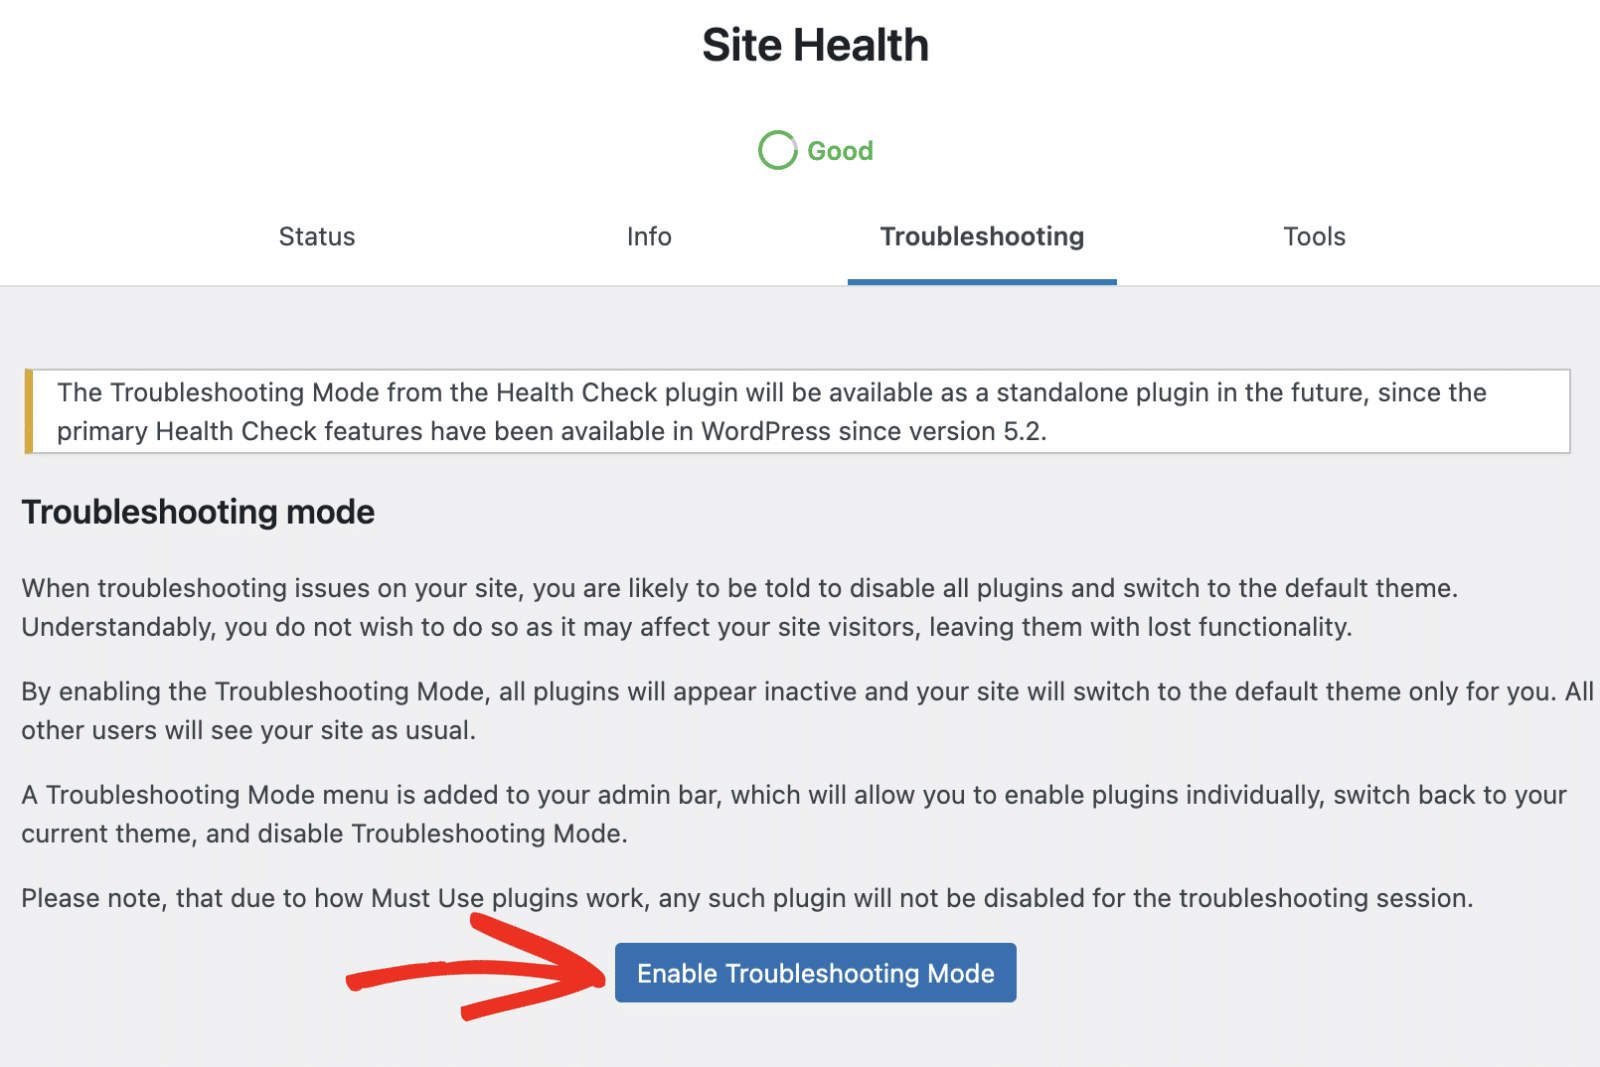
This will deactivate all plugins on your site and also set your site to a default theme. You’ll be directed to the Troubleshooting Mode screen.
Here, you can manage your theme and plugins in a controlled environment. If there are any issues on your site, you’ll see them in the Notices section.
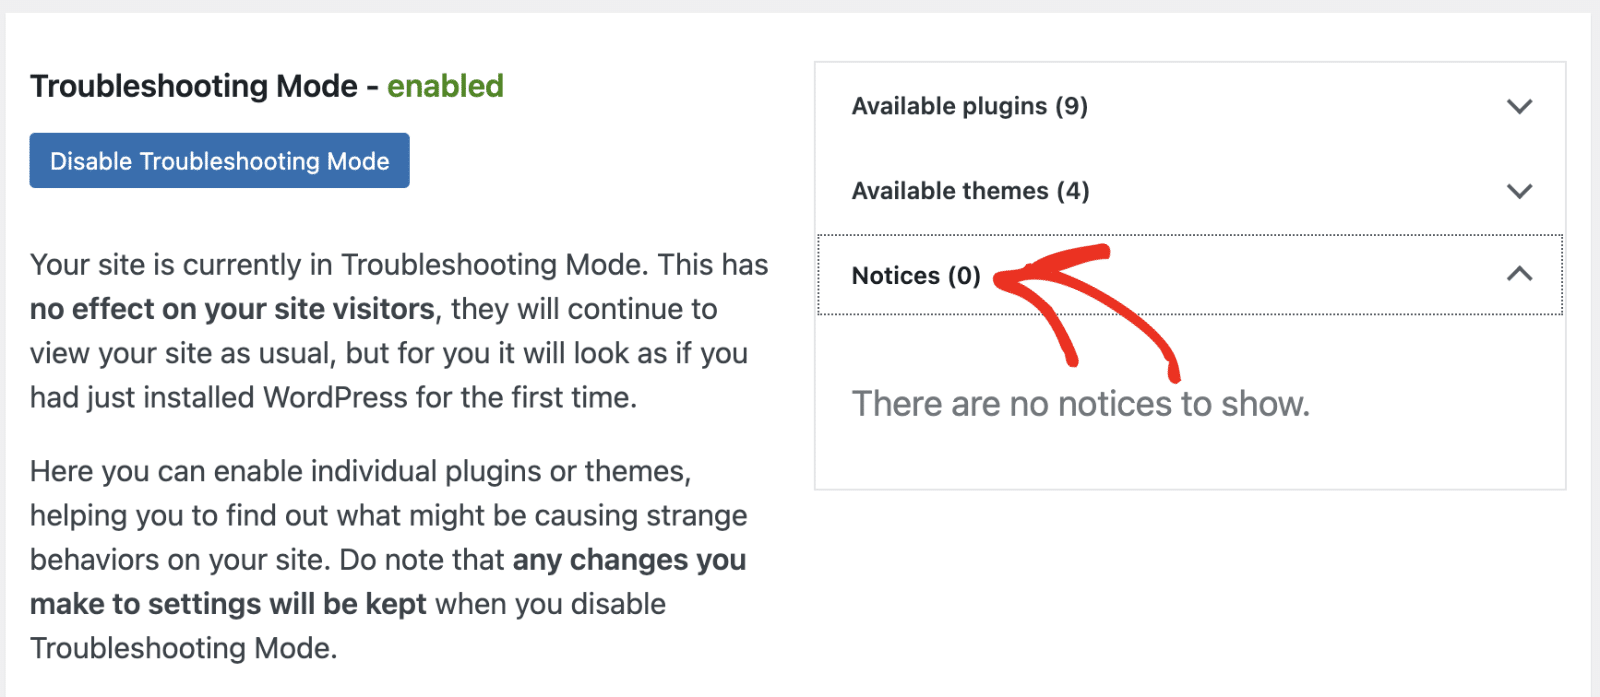
Your site will default to a native WordPress theme after enabling Troubleshooting Mode.
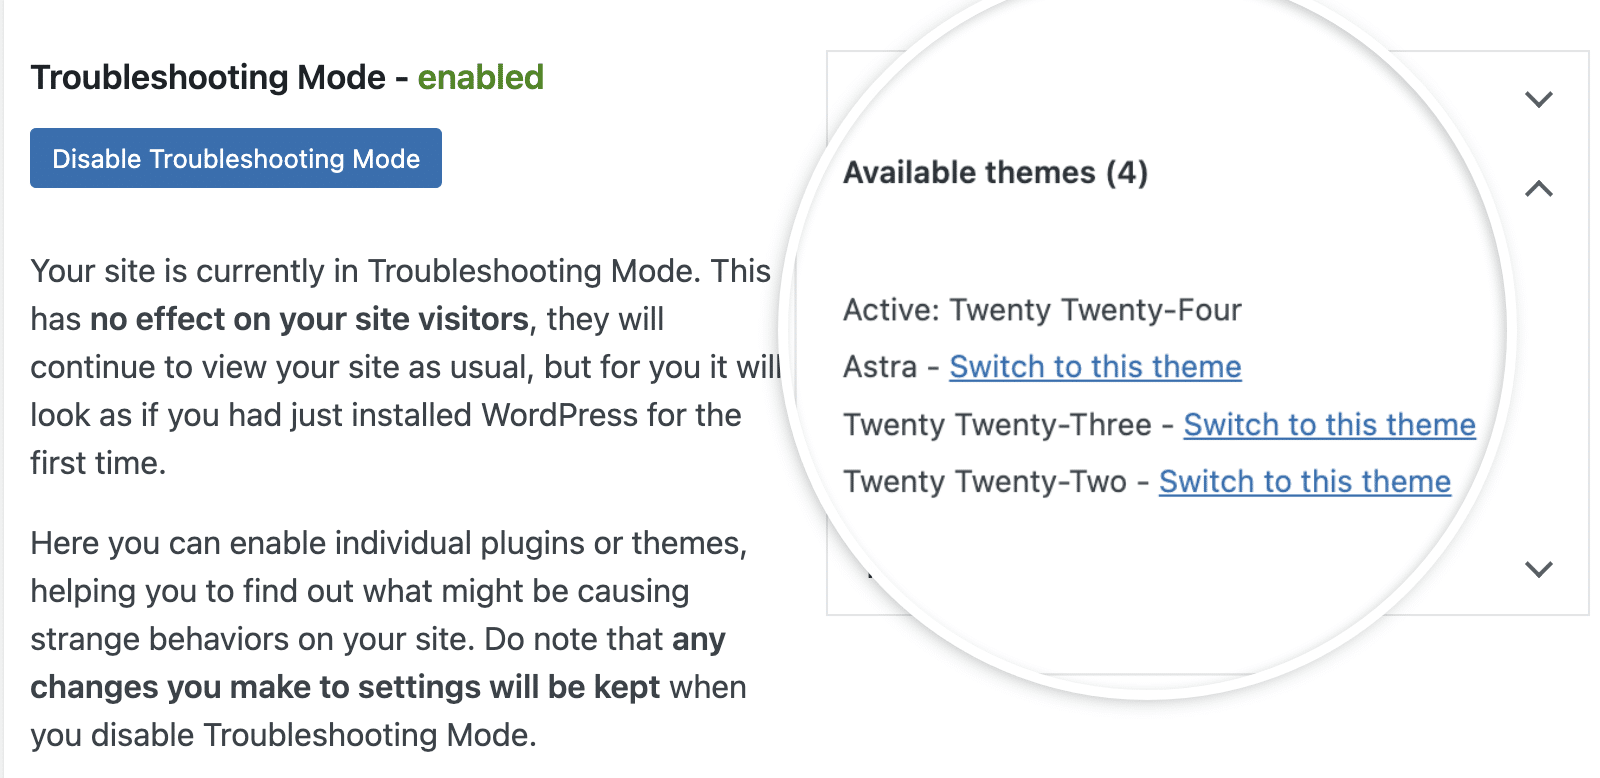
I suggest checking your site to see if using a default theme fixes the error on your site. If it does, the issue is likely related to your WordPress theme.
Clicking on the Available plugins dropdown will show all the plugins on your site. Here, you’ll be able to activate plugins one at a time to check for plugin conflicts. To activate a plugin, click Enable next to the plugin’s name.
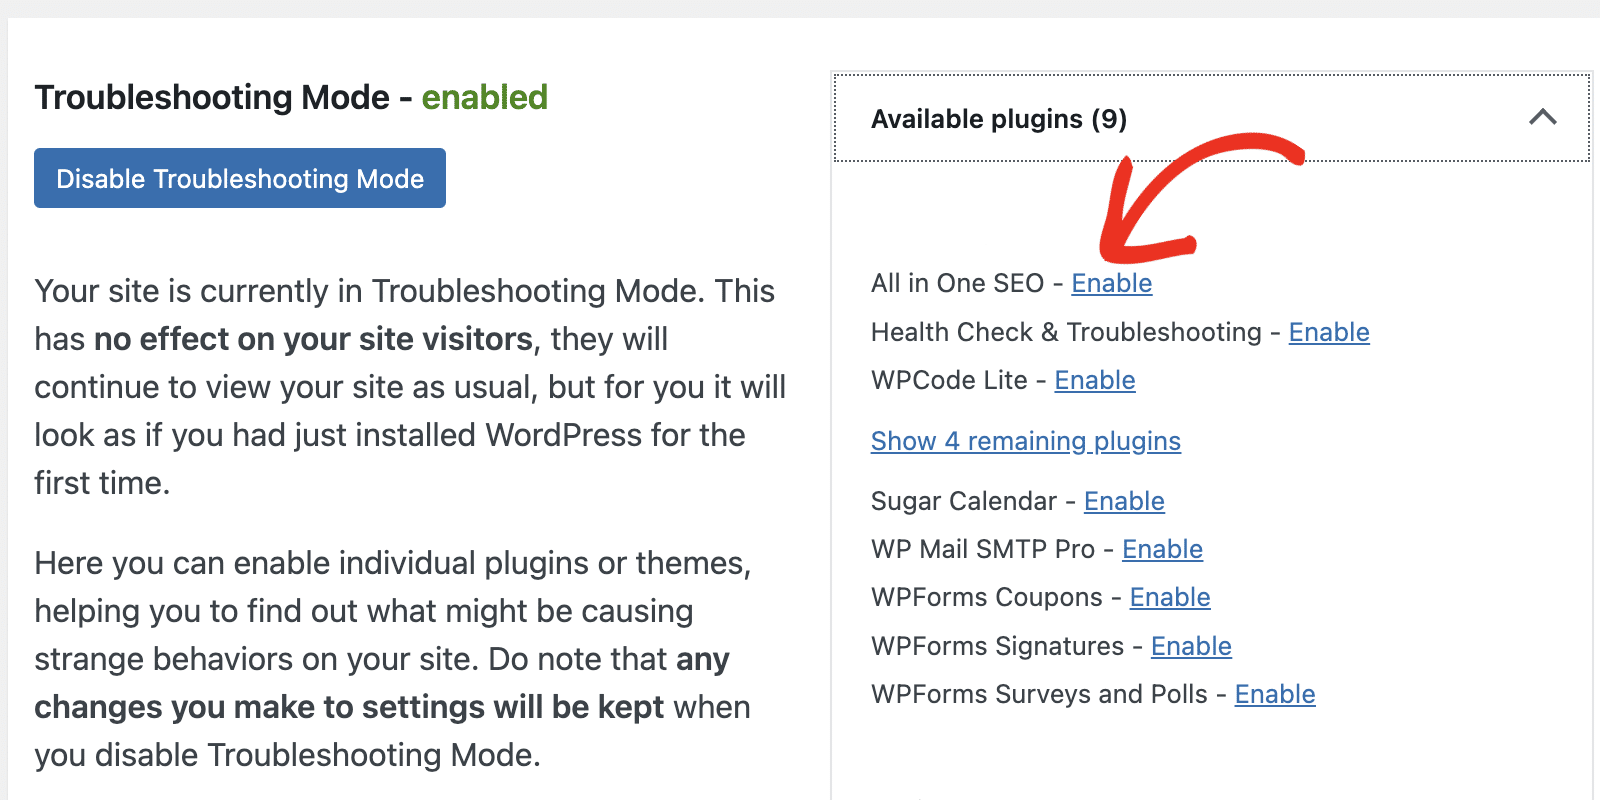
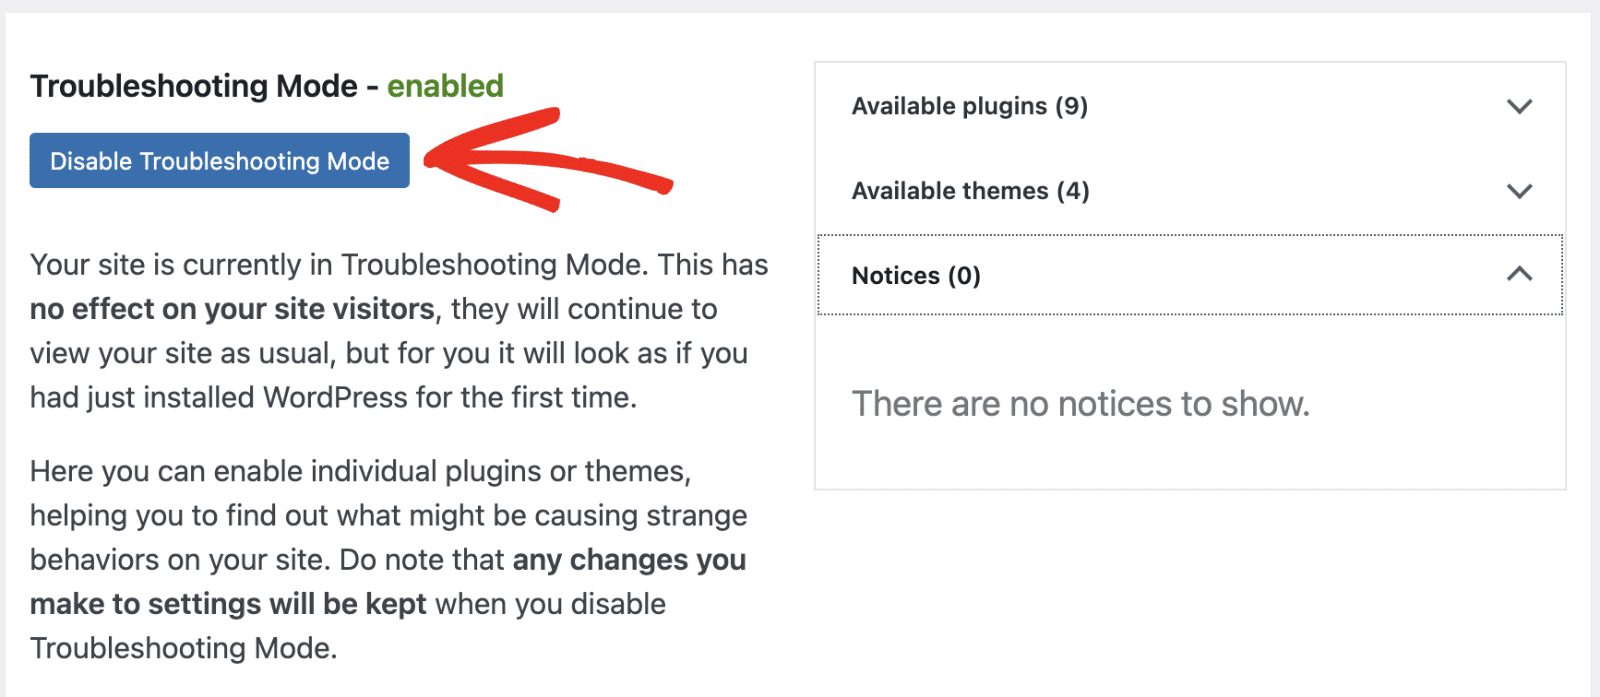
Follow the steps in the troubleshooting plugin conflicts section of this guide for more details. When you’re done troubleshooting your site, click the Disable Troubleshooting Mode button to return it to its original state.
Best Practices for Avoiding JavaScript Errors
Below, I’ll share some tips to help you protect your WordPress site and prevent JavaScript-related issues from occurring.
- Keep Your Site Updated: Regularly updating WordPress, your theme, and other plugins can help avoid conflicts and bugs. Often, the issue you encounter will likely have been resolved by a recent update to the plugin or theme.
- Use a Child Theme for Customizations: Sometimes, updating your theme or plugins will overwrite custom code snippets you’ve added to your site. This can result in broken JavaScript functionalities. Using a child theme ensures your custom snippets are unchanged.
- Double-check Custom JavaScript Snippets: If you’ve added custom JavaScript in your WordPress theme or plugin, verify that it’s formatted correctly. Also, check that it’s compatible with the rest of your site’s scripts. I suggest wrapping inline JavaScript with a function or using
jQueryto avoid conflicts. - Enqueue Scripts Properly: If you’re adding any custom scripts, you should enqueue them properly using WordPress functions to prevent loading issues. Here is an example:
function my_custom_scripts() {
          wp_enqueue_script('my-script', get_template_directory_uri() . '/js/my-script.js', array('jquery'), null, true);
}
add_action('wp_enqueue_scripts', 'my_custom_scripts');
- Test Across Multiple Browsers: Modern browsers have largely standardized their JavaScript implementations. However, it’s still important to test your site across different browsers, including older versions of Internet Explorer. This can help identify browser-specific issues early in the web development process.
- Implement Proper Error Handling: Good error handling practices in your custom JS snippet can prevent many issues from causing major disruptions. This includes using try-catch blocks and providing fallback options where possible.
FAQ – Troubleshooting JavaScript Issues
These are answers to some of the top questions we see about troubleshooting JavaScript issues in WordPress.
How do I debug JavaScript in WordPress?
There are different ways of debugging JavaScript errors in WordPress. The easiest way is to use the built-in browser tool to check for JavaScript warnings in the console.
Alternatively, you can edit your site’s wp-config.php file and enable SCRIPT_DEBUG mode. When set to true, it forces WordPress to load the original, non-minified versions of CSS and JS files rather than the minified versions, which can be harder to read and debug.
What causes JavaScript errors in WordPress?
Compatibility issues, as well as theme and plugin conflicts, often cause JavaScript errors in WordPress. In addition, it could occur if any custom JavaScript snippet you add to your site is incorrect.
How do I read JavaScript console errors?
To do so, you’ll first need to open your browser developer tools. Then click on the Console tab and inspect the error messages there. If you don’t see any warnings or errors, you may need to refresh the page.
How to catch console error in JavaScript?
You can do so by navigating to the Console tab in your browser’s dev tools menu. You’ll often find common JavaScript errors highlighted in red texts.
Next, Explore the Best Plugins to Use in WordPress
In this post, I’ve shown you how to identify and fix JavaScript errors in WordPress. As a rule of thumb, remember to keep plugins and themes updated and follow best practices when adding custom JavaScript.
Also, make sure to use recommended plugins on your WordPress site and avoid using nulled versions of plugins like the WPForms Pro nulled plugin.
Ready to build your form? Get started today with the easiest WordPress form builder plugin. WPForms Pro includes lots of free templates and offers a 14-day money-back guarantee.
If this article helped you out, please follow us on Facebook and Twitter for more free WordPress tutorials and guides.

