Would you like to easily view statistics and results for information you collect in your forms? With surveys and polls, you can easily analyze data, generate reports, and even share results with your users.
This tutorial will show you how to install and set up the Surveys and Polls Addon for WPForms.
Requirements:
- You will need a Pro license level or higher to access the Surveys and Polls addon
- Ensure that you’ve installed the latest version of WPForms to meet the minimum required version for the Survey and Polls addon
Before you get started, be sure to install the WPForms plugin on your WordPress site. Once your license is verified, you’ll be able to quickly install and activate the Surveys and Polls Addon as well.
Creating a Survey or Poll Form
After the addon is installed and activated, you can enable survey functionality for any new or existing form on your site. To access the form builder, create a new form or edit an existing one.
The Surveys and Polls Addon enables you to use the Likert Scale and Net Promoter Score fields to easily gather feedback or other information from users. However, you can include any of the following fields in your survey results:
- Single Line Text
- Paragraph Text
- Dropdown
- Checkboxes
- Multiple Choice
- Rating
- Likert Scale
- Net Promoter Score
Once you’ve customized each field’s options to your liking, save your changes.
Note: Want to build new survey or poll forms quickly? WPForms includes several templates that are ready to use with the Surveys and Polls Addon, including the Customer Satisfaction Survey Form Template. To learn more, see our full tutorial on using templates.
Enabling Survey Reporting
There are two types of reporting available: Survey Reporting and Poll Results. Survey Reporting will collect field result statistics and display them in your WordPress admin area, while Poll Results can be added to your site for your users to view.
In your form, you can choose to enable Survey Reporting, Poll Results, or both. In this section, we’ll specifically focus on Survey Reporting options.
Enabling Survey Reporting Form-Wide (Simplest Option)
The easiest way to quickly add survey functionality is to enable it for the entire form. This will calculate survey results for all supported fields.
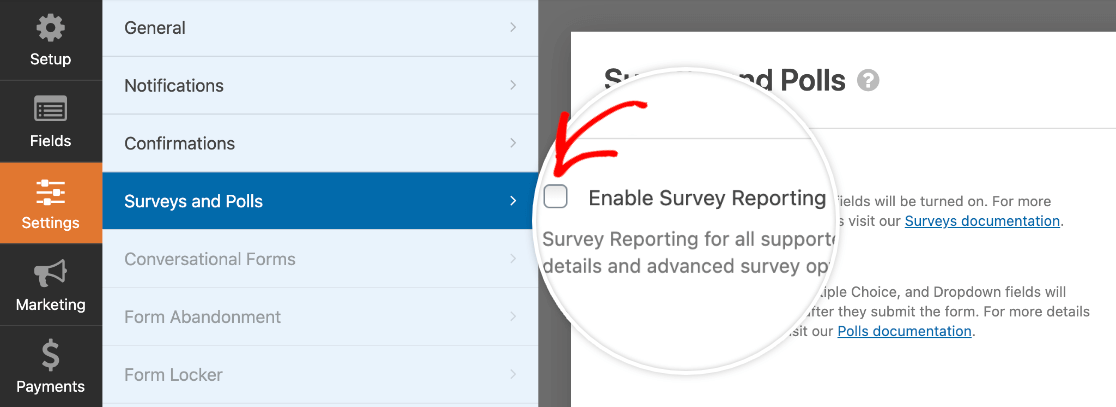
To set up form-wide survey functionality, go to Settings » Surveys and Polls in the form builder.
From here, check the box next to Enable Survey Reporting.
Enabling Survey Reporting for Individual Fields (Advanced Option)
In some forms, you may not need to calculate results for the entire form. For more control, you can instead enable survey functionality for individual fields in your form.
First, you must disable form-wide survey functionality. To do so, go to Settings » Surveys and Polls and make sure that the Enable Survey Reporting option is unchecked.
Then, click Fields to return to the main form builder screen. In the preview area, click the field you want to enable reporting for to open its Field Options panel. Click on the Advanced tab, then check the box to Enable Survey Reporting.
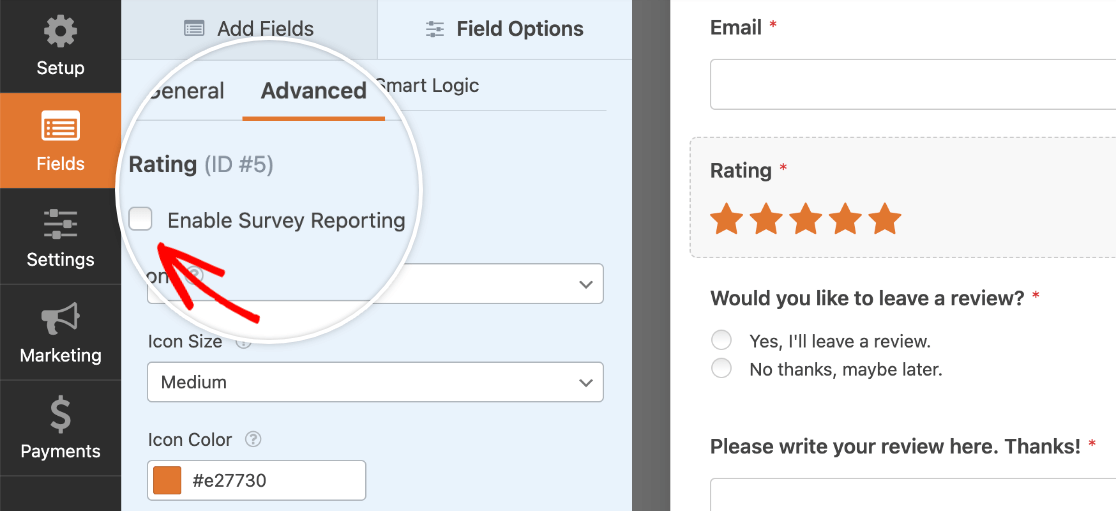
You can enable survey reporting in this way for as many fields as you’d like, as long as the Surveys and Polls Addon supports them.
Note: Unfortunately, WPForms does not include an option to display survey results on the frontend. See the frequently asked questions below for details.
Displaying Poll Results
Poll results will display a summary of all data collected for a field, or multiple fields, in your form. Additionally, you can enable both survey reporting and poll results for the same form if you’d like.
Poll results can be collected and displayed for the following field types:
Note: If you’d like to reduce order bias in the options you provide, consider randomizing the choices for Checkboxes and Multiple Choice fields.
The easiest option is to display poll data within your form’s confirmation message. However, we’ll also cover a more advanced option that lets you display poll results anywhere on your site.
Displaying Poll Results in a Confirmation Message (Simplest Option)
To quickly and easily display poll results to your users, you can enable them form-wide.
This will automatically calculate how many users select each choice for all Dropdown, Checkboxes, and Multiple Choice fields. Then, the results for these fields will be displayed to users after they submit the form, under the confirmation message.
To set this up, first be sure that your form is using the Message Confirmation Type. You can do so by going to Settings » Confirmation and choosing the Message option.

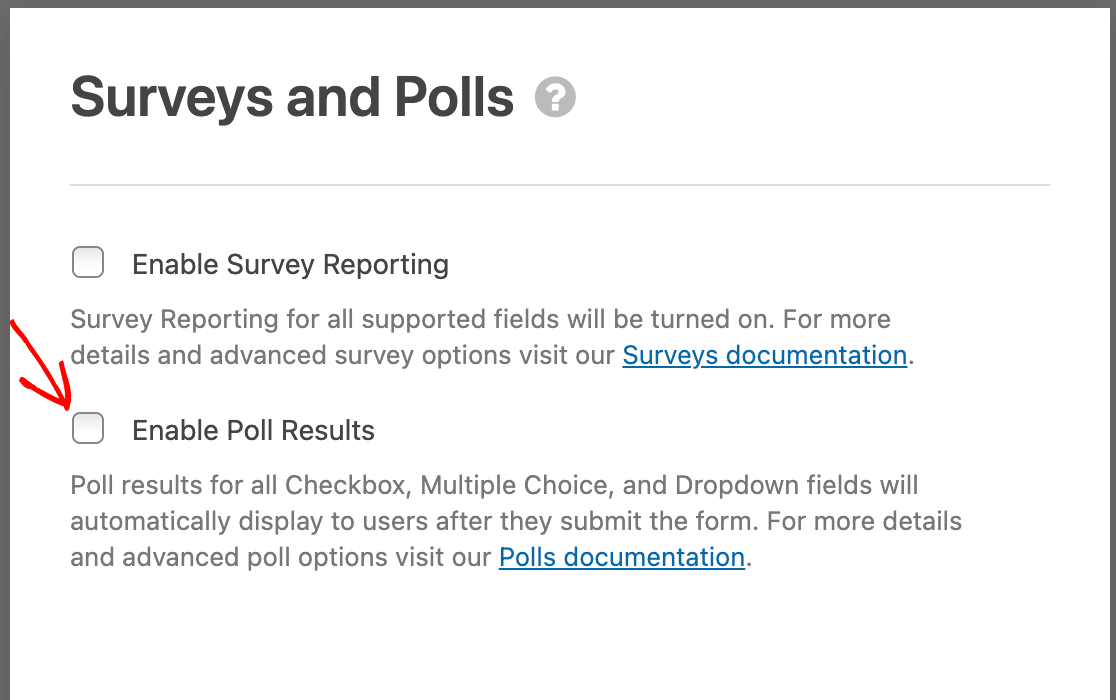
Next, go to Settings » Surveys and Polls. Here, you’ll need to check Enable Poll Results. Remember, you can also have the survey results option enabled if you’d like.
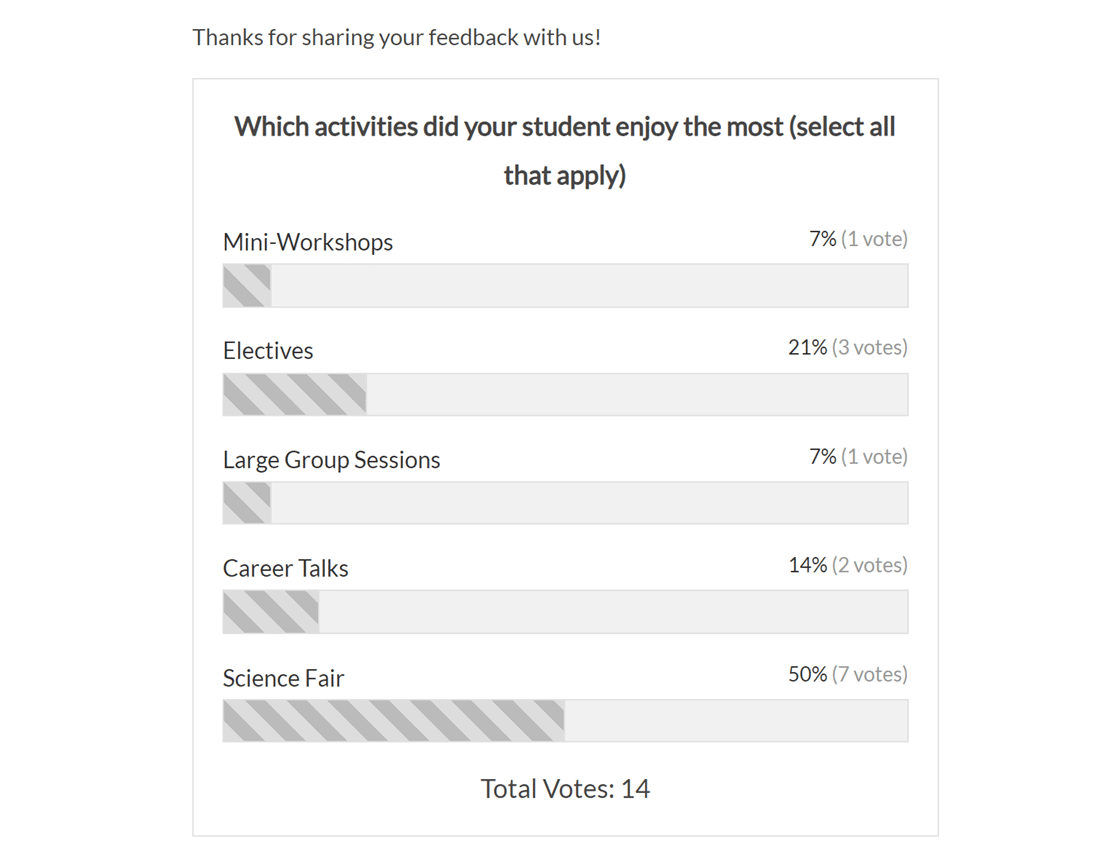
Once poll results are enabled, they will display immediately after a user submits the form, along with any confirmation message text.
Displaying Custom Poll Results Anywhere on Your Site (Advanced Option)
If you’d like to display more customized poll results, you can use a shortcode instead of (or in addition to) enabling poll results within your form’s confirmation message.
For this option, you do not need to have poll results enabled for your form.
To get started, be sure that you have at least one Dropdown, Checkboxes, or Multiple Choice field in your form. These are the fields that you can use to collect poll data.
Next, you can add the poll results shortcode to a page or post, or even to a sidebar or other widget area that accepts shortcodes.
Here’s an example of the shortcode needed:
[wpforms_poll form_id="23" field_id="7" label="true" counts="true"]
You can customize the following values for this shortcode depending on which form, field, and display options you’d like to include:
form_id: The Form ID identifies which form you’d like to display poll results from. To easily find the Form ID number, go to WPForms » All Forms and look in the shortcode field.
field_id: The Field ID indicates which Dropdown, Checkboxes, or Multiple Choice field you’d like to display data for. You can find this ID at the top of the Field Options panel for each field.
label: This will determine whether the field label is included at the top of the poll results. To display the field label, set the value to"true". To hide the field label, set it to"false".counts: With this option, you can choose whether to display the number of votes for each option. To display the vote count, set the value to"true". To hide the count, set it to"false".
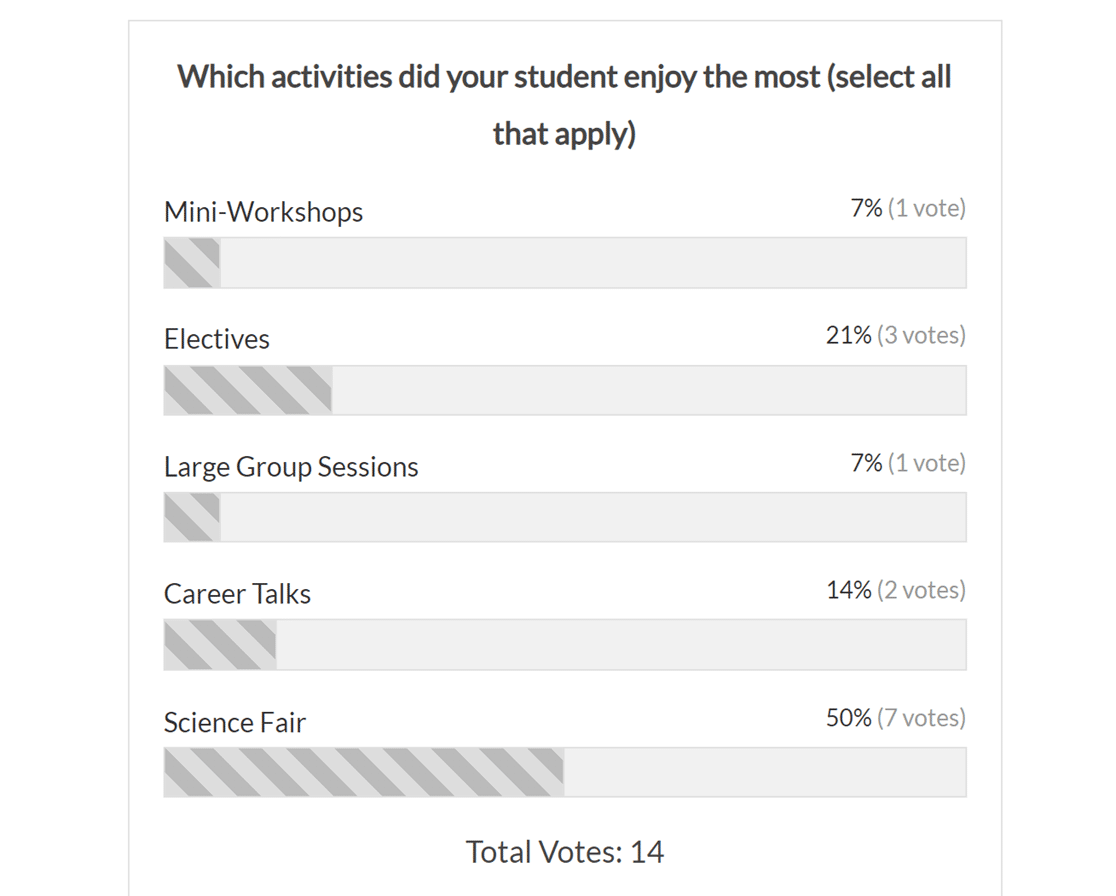
On the frontend, your poll results will look something like this:
Generating Survey Reports
Once you enable survey reporting for a form, you’ll be able to view data for any applicable fields.
Note: If you’ve already collected entries for a form and decide to enable survey reporting at any point, survey reports will include this earlier data as well.
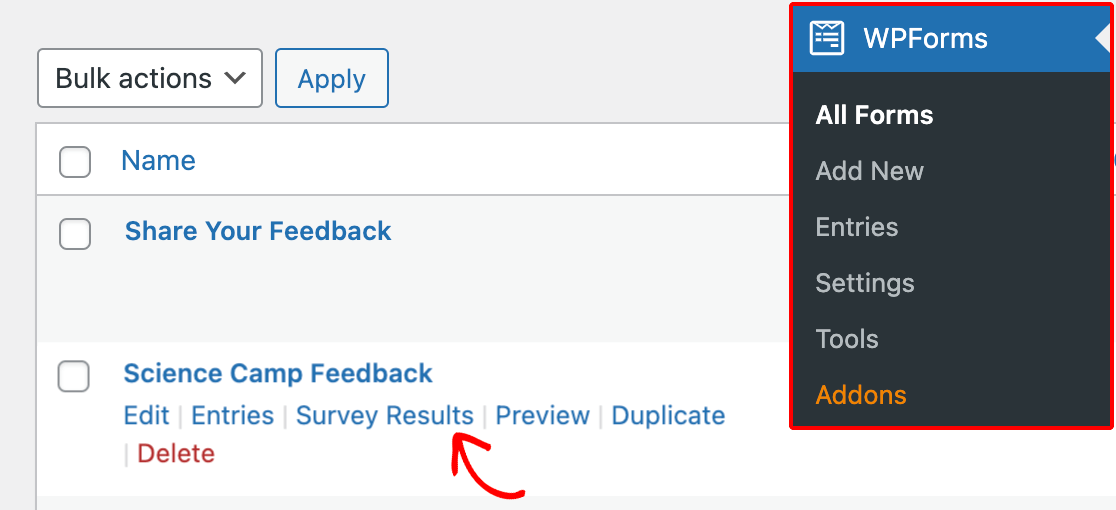
To generate a report for a form, go to WPForms » All Forms and hover over the form title to display additional options. Then, click on Survey Results.
After the results are calculated, the page will display them for each applicable survey field. The format and options included for each field will depend on the field type.
Dropdown, Checkboxes, Multiple Choice, and Rating Field Reports
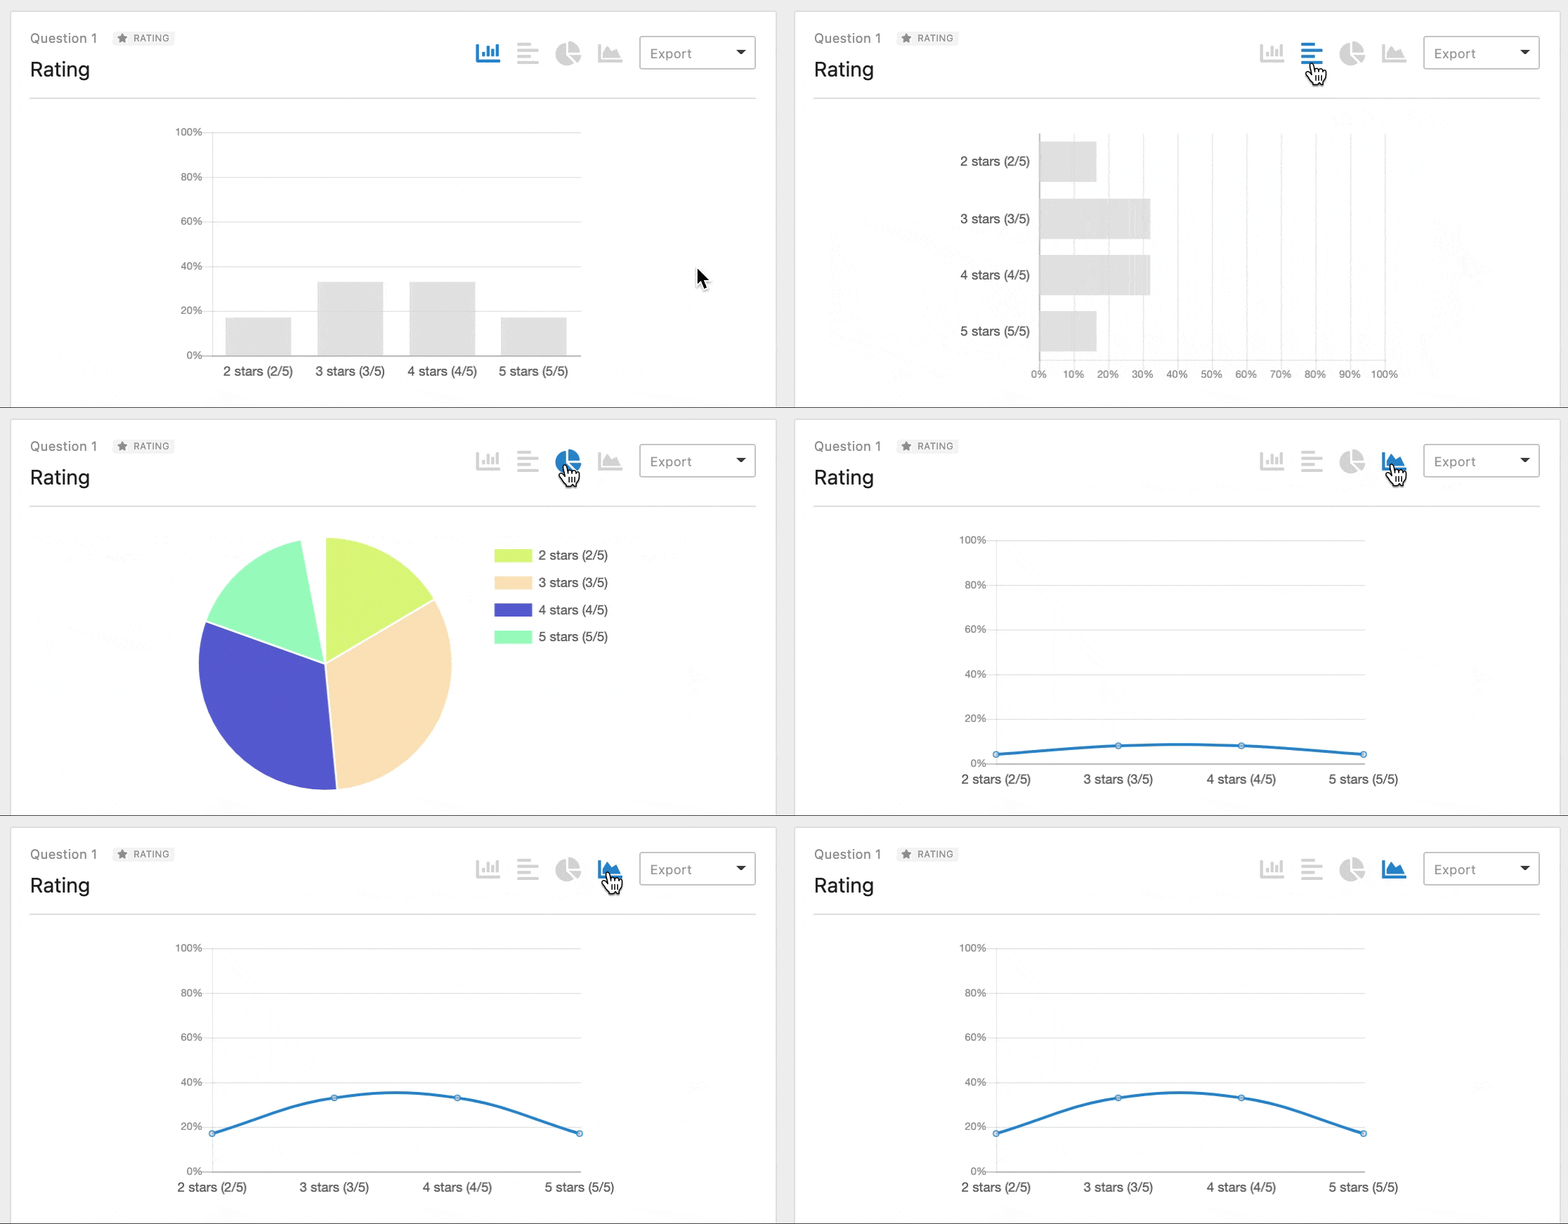
For any of these field types, you’ll see both a graph and a table of results. You can choose the type of chart you want to view in the upper right corner of the field results.
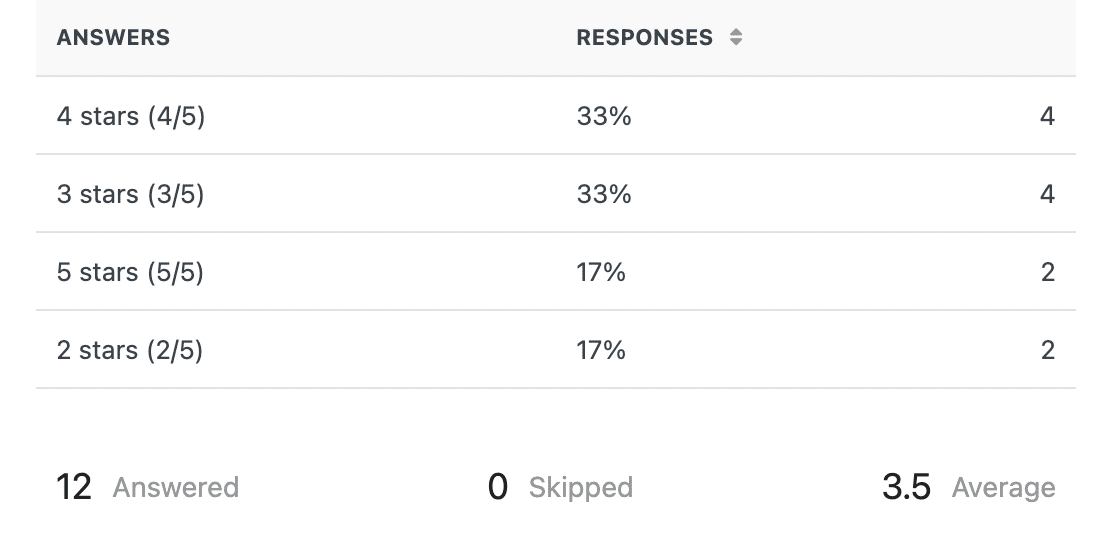
By default, the choices listed in the table will appear in order of most responses to least responses. To change the sort order, click on Responses.
Likert Scale Field Reports
For Likert Scale fields, data will be displayed in a table format. Within the table, you’ll be able to see the number of votes for each option, as well as the percentage of users who chose each option.
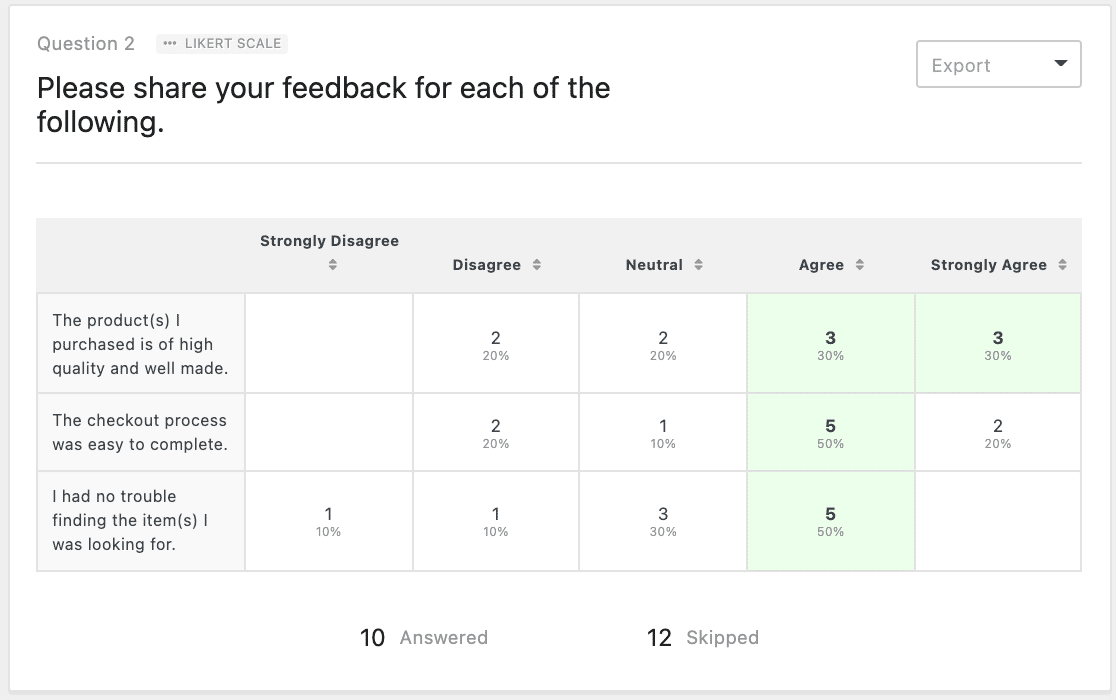
By default, Likert Scale field reports will display the items in the order that they appear in your form. However, you can change the sort order by clicking any of the options at the top of the table.
Net Promoter Score Field Reports
A Net Promoter Score (NPS) field will ask users to respond using a 0 to 10 rating scale. Based on the number they select, the NPS approach divides users into three categories: Promoters, Passives, and Detractors.
In the survey results for a Net Promoter Score field, you’ll see a graph of score results, as well as a table indicating both the number and percentage of users in each category. WPForms will also automatically calculate your Net Promoter Score for you.
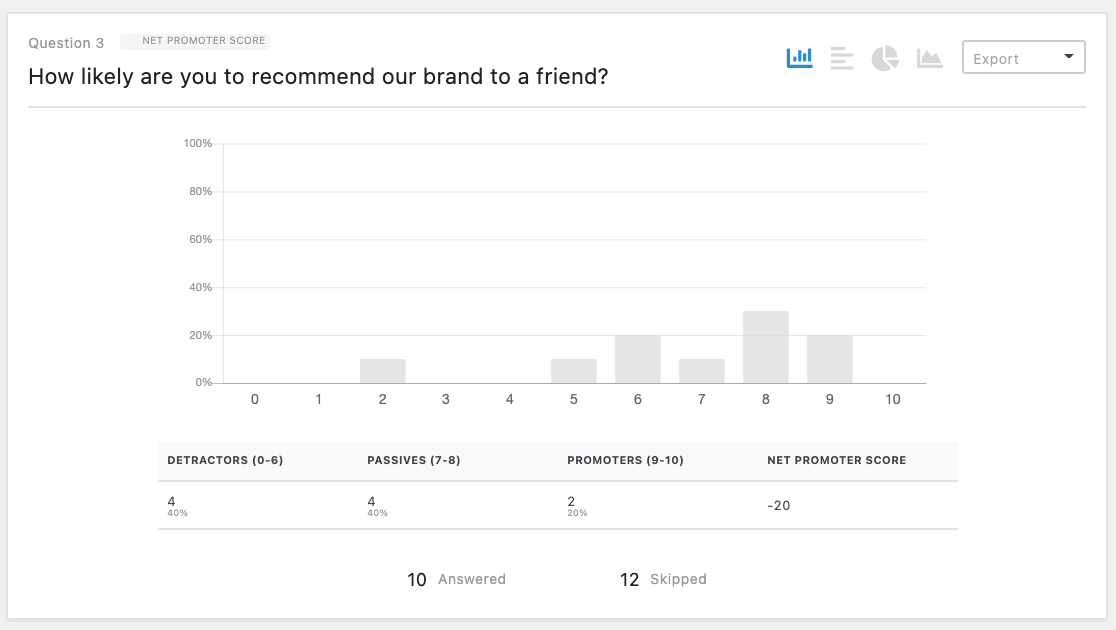
If you’d like more details on the meaning of these categories or your overall score, please see our Net Promoter Score tutorial.
Single Line Text and Paragraph Text Field Reports
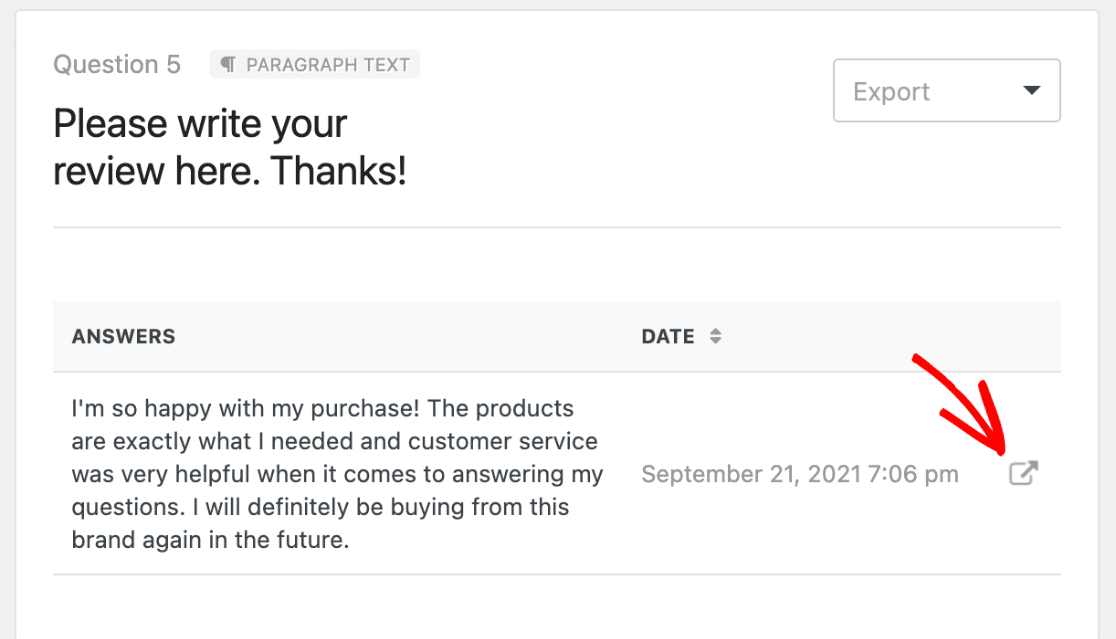
Reports for these field types will display the text entered by users and the date and time of the related entry. To quickly access the full entry, you can click the icon on the far right.
Previewing Survey Results on the Entries Page
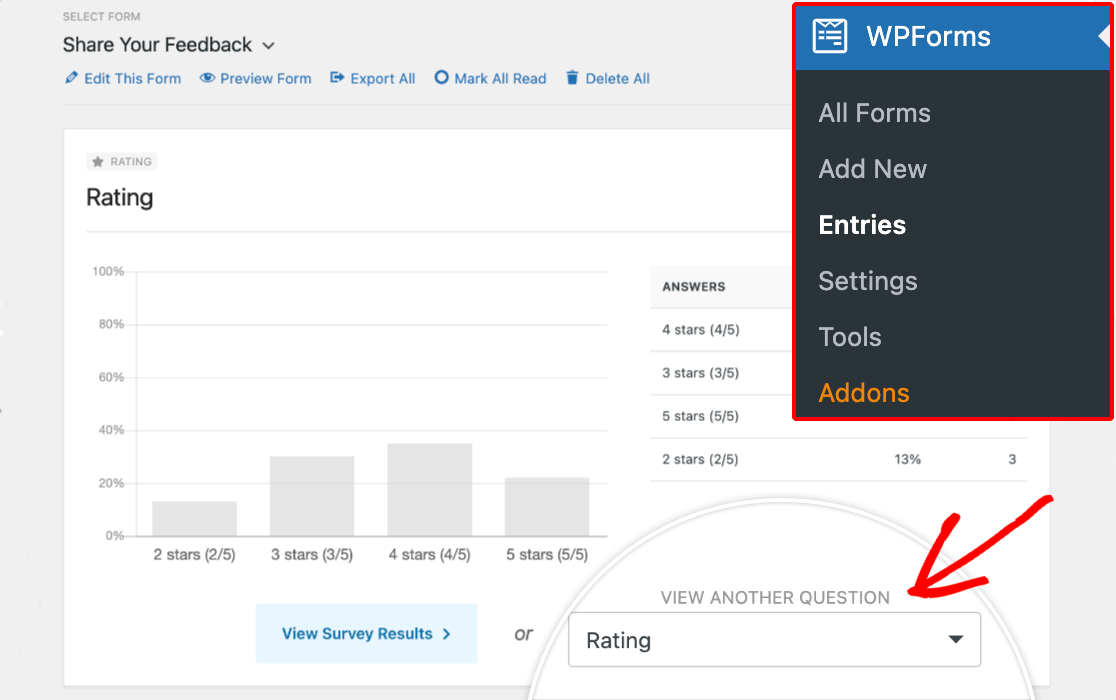
When viewing entries for any form with survey reporting enabled, a single field result preview will be visible at the top of the page.
If you’d like to change the field that’s displayed in this preview area, you can use the View Another Question dropdown. Your selection will be saved for future views of this page, and you can change it again at any time.
Saving and Printing Survey Reports
WPForms enables you to easily save and print survey reports for an entire form or individual fields.
Printing a Full Survey Report
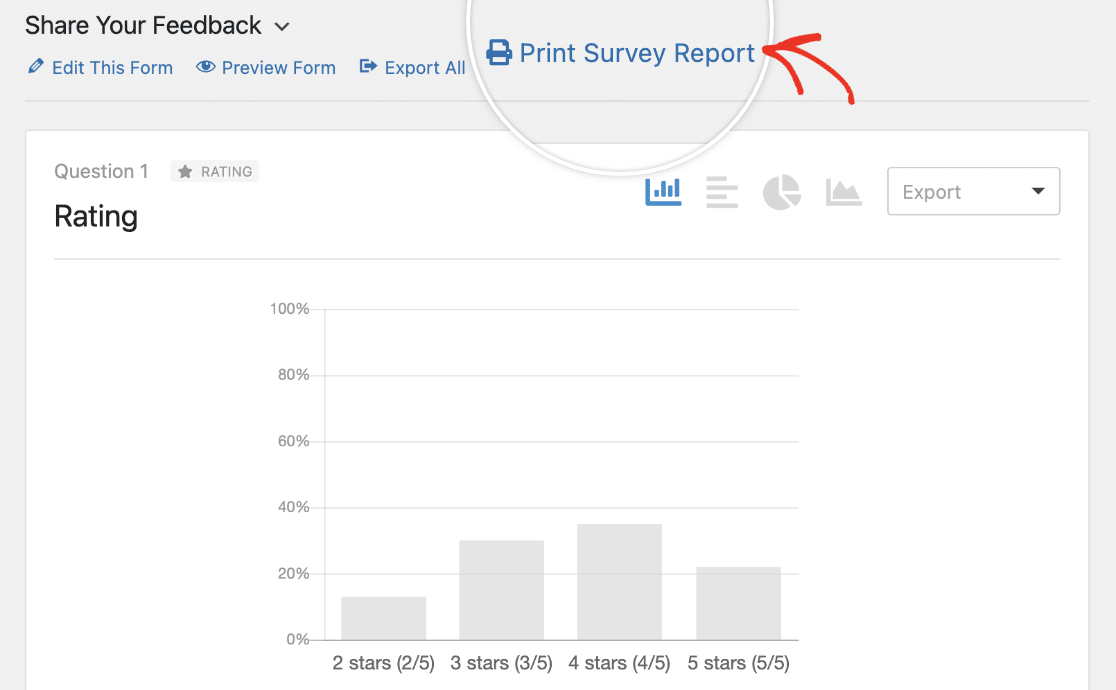
If you’d like to print the complete survey report for a form, you can simply click on Print Survey Report in the top menu of the Survey Results page.
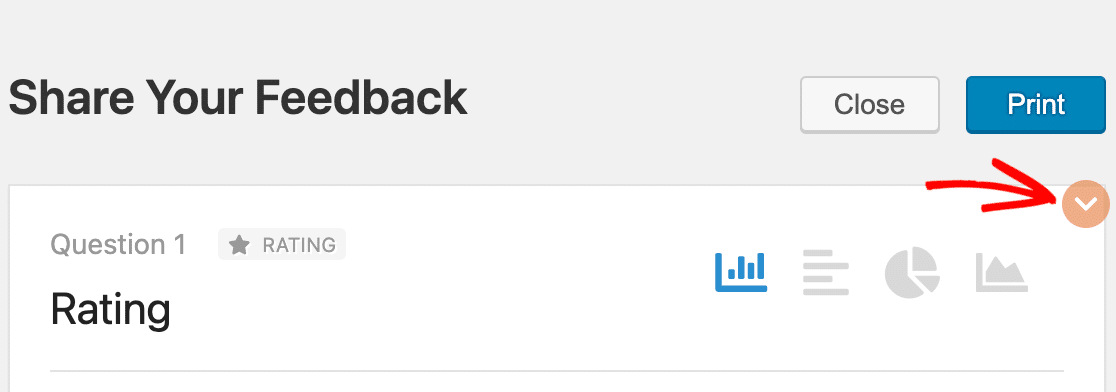
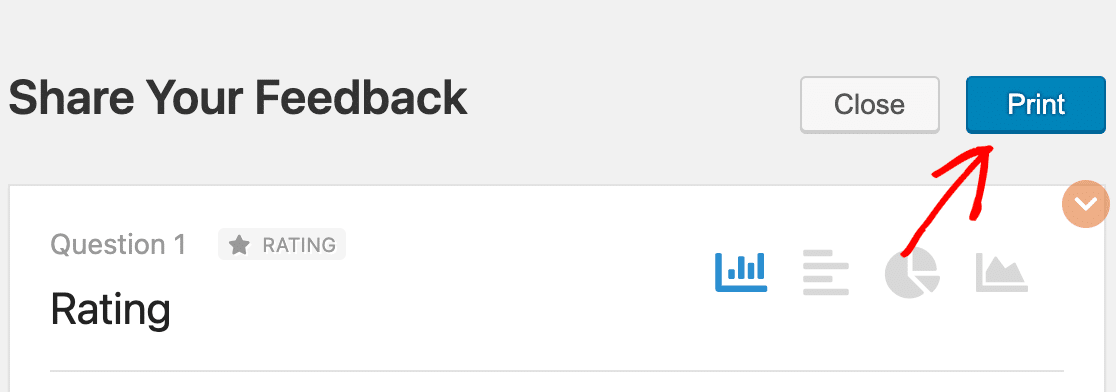
This will open the print preview screen, where you can easily hide fields as needed by clicking the orange circle in the upper right corner of each field box.
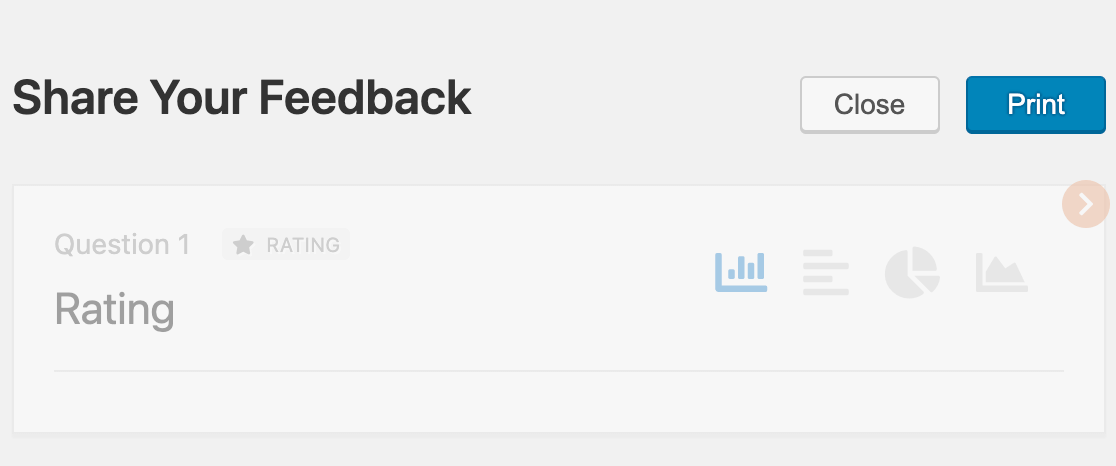
This will grey out and collapse the field results so that only the field label, field type, and question number are visible.
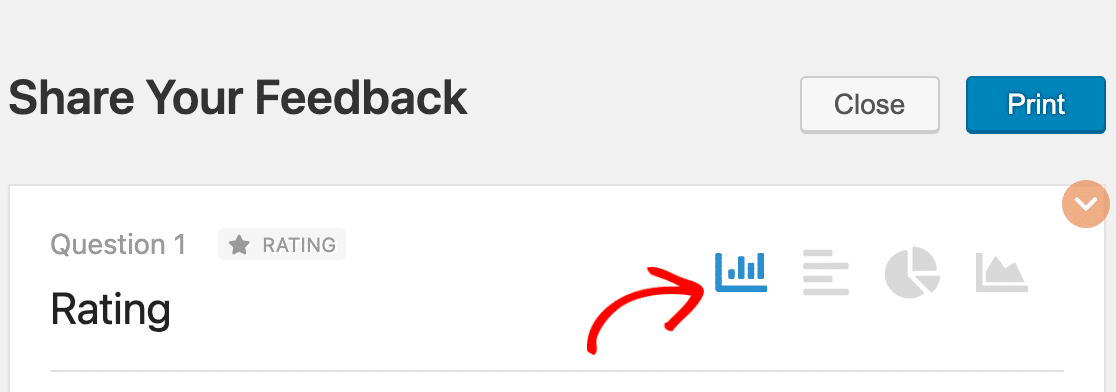
For any graphs in your results, you can choose the type of chart to include in your printed report.
When you’re happy with your customizations, click on Print at the top of the preview screen.
Printing or Saving Survey Reports for Individual Fields
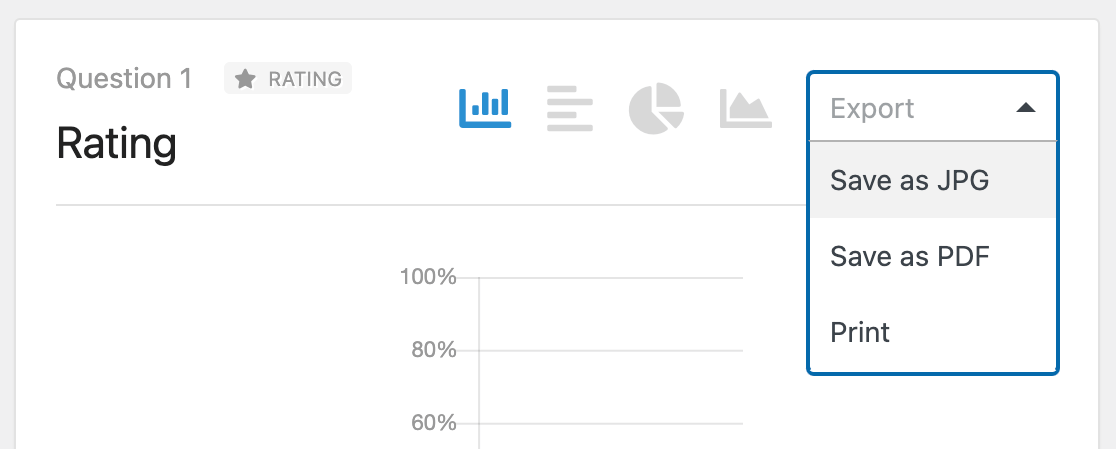
From the Survey Results page, you can choose to print results for individual survey fields instead of the full report or save individual graphs as JPG or PDF files. This can be especially useful if you’d like to include specific results in a presentation or document.
To save or print results for a single field, scroll to it in your report and click the Export option in the upper right corner. From here, you can choose to save the field results as a JPG image, save them as a PDF document, or print them.
Frequently Asked Questions
These are the top questions we get about surveys and polls in WPForms.
Can I display survey results on the frontend?
At this time, there is no built-in way to display survey results on the frontend using WPForms. If you want to make them available to your users, you can save your survey results as a JPG image and embed it on a page on your site.
Can I merge the survey results of two fields?
Currently, there isn’t a way to merge survey results from two separate fields in WPForms.
Can I hide poll options that receive no votes from the results?
Yes, it’s possible to configure your poll to only display options that have received votes. For complete guidance on this setup, visit our developer documentation.
That’s it! You can now create surveys and polls, as well as generate reports and display results to your users.
Next, would you like to learn more about the options for the Rating field? Be sure to check out our Rating field tutorial for details on all of its built-in customization options.


