AI Summary
Would you like to collect PayPal payments on your WordPress site? WPForms makes it super easy to integrate PayPal into your forms for sales, donations, and more.
This tutorial will show you how to install and use the PayPal Standard addon with WPForms.
Requirements
- You will need a Pro license level or higher to access the PayPal Standard addon
- Ensure that you’ve installed the latest version of WPForms to meet the minimum required version for the PayPal Standard addon
Installing the PayPal Standard Addon
First, be sure to install and activate the WPForms plugin on your WordPress site. You’ll also need to verify your license.
Then, you can install and activate the PayPal Standard addon from your WordPress admin area.
Creating a Payment Form
Once you’ve activated the PayPal Standard addon, you’re ready to create a form to collect payments. You may create a new form or edit an existing one and add PayPal functionality to it.
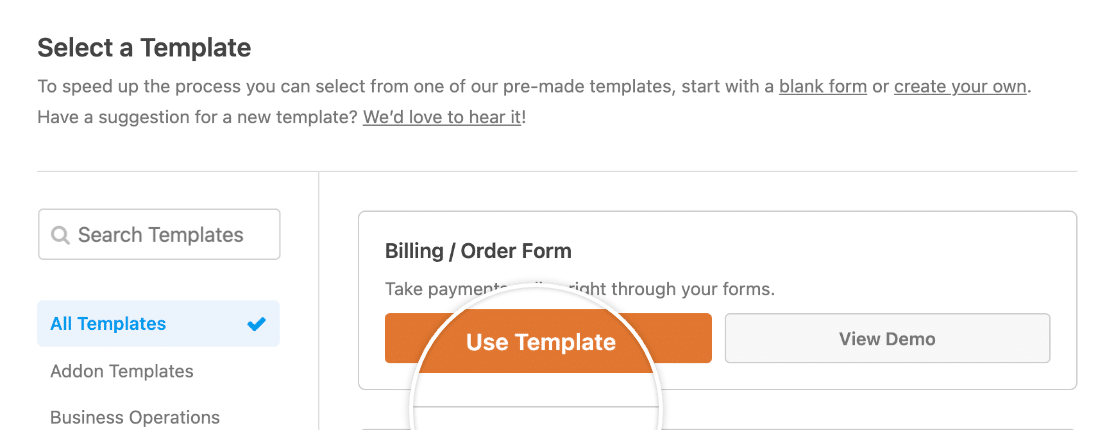
If you’re building a new form, you might want to consider using our Billing/Order Form template.
Whether you use a template or create your own custom form from scratch, make sure to include one of the following payment fields:
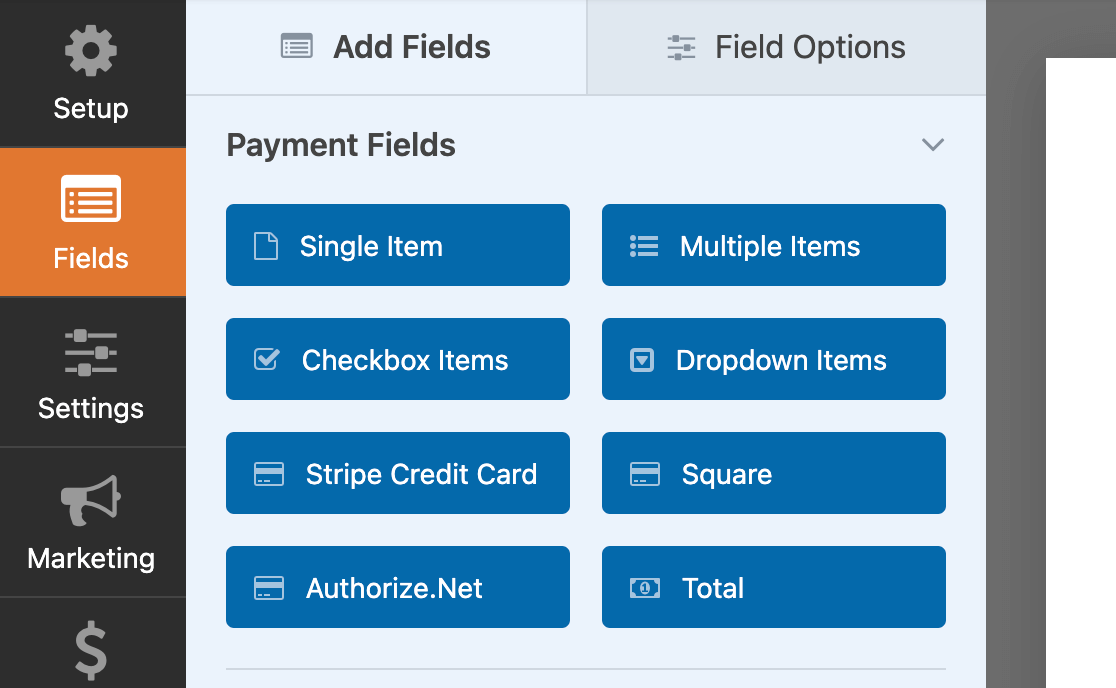
Although it’s not required, you can also include a Total field if you wish. This will show the amount the user will be charged in PayPal based on their selection(s) in your other payment fields.
Enabling PayPal Standard Payments in Your Forms
When you’re happy with your form’s fields, you’ll need to enable PayPal Standard payments for it.
In the form builder, go to Payments » PayPal Standard. Here, check the box labeled Enable PayPal Standard payments.
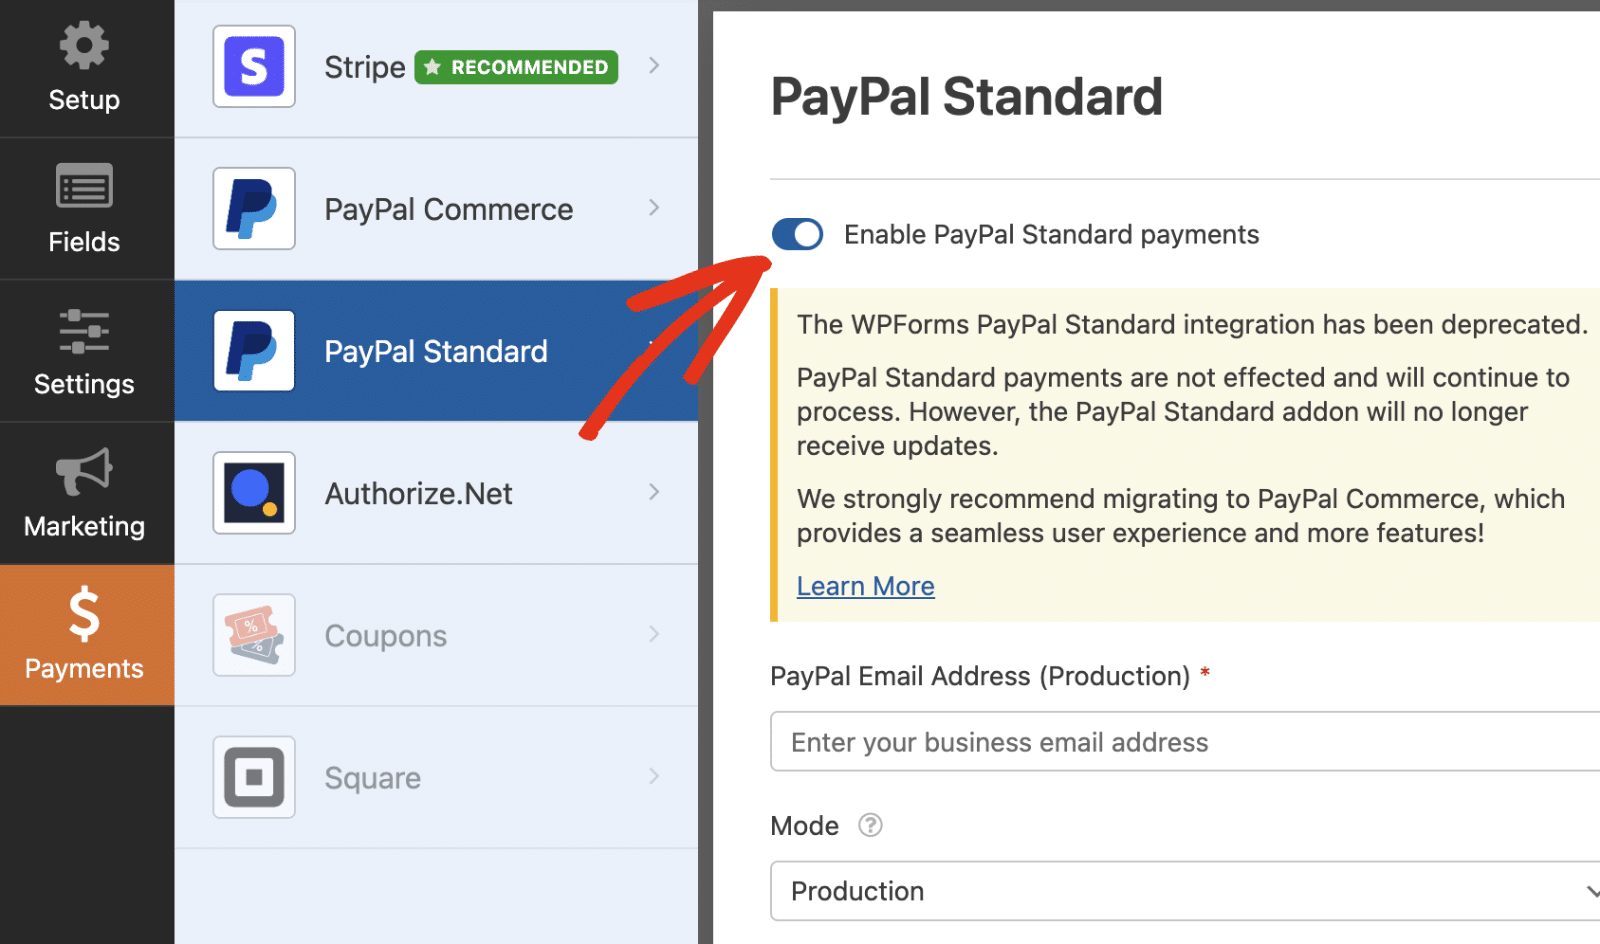
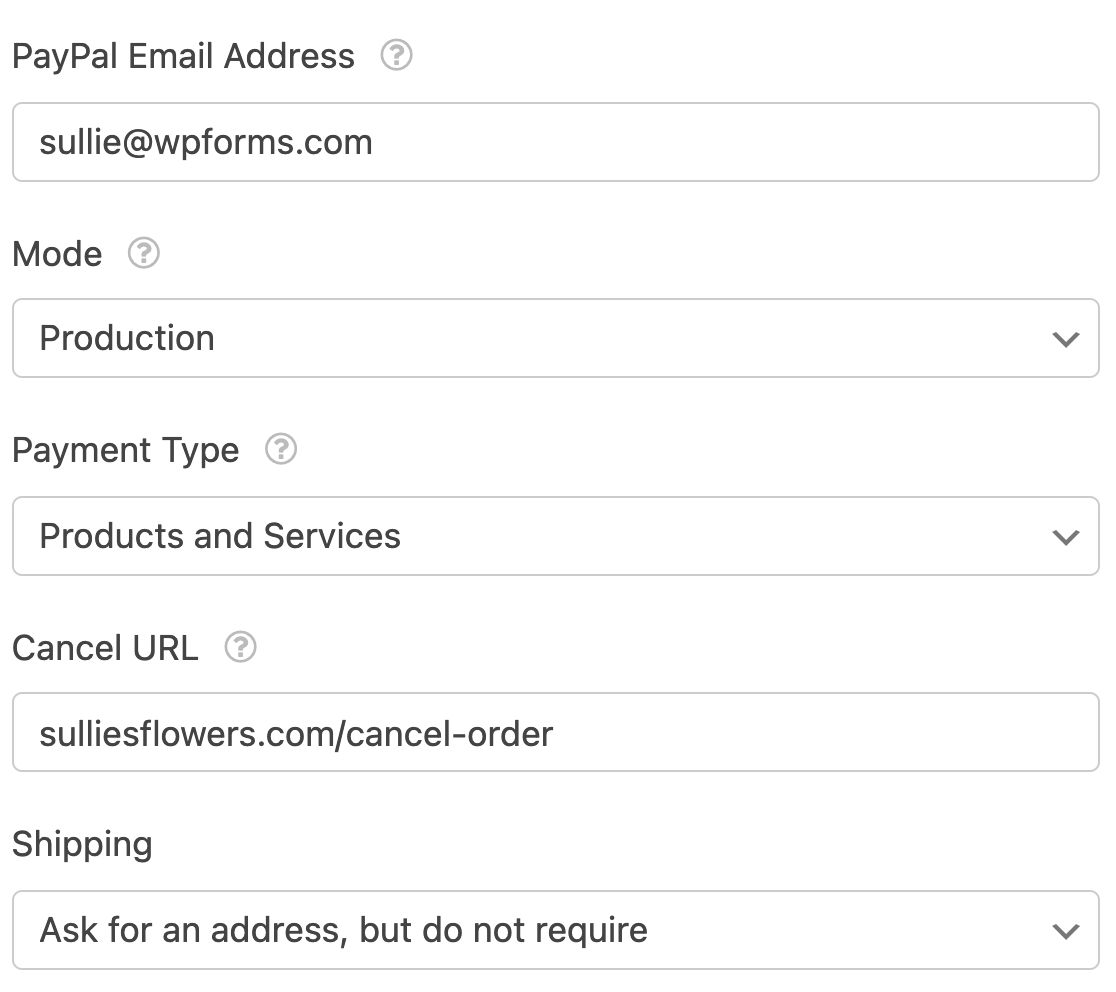
Then fill out the rest of the PayPal Standard settings, which include:
- PayPal Email Address: The email address for your PayPal Business account, to which payments will be sent.
- Mode: Production or Test / Sandbox. To process live payments, set this option to Production.
- Payment Type: Products and Services or Donation. Set this option to the choice that matches the type of transactions you’ll be handling with this form.
- Cancel URL: If users don’t complete their payments in PayPal, this is the URL they’ll be redirected to.
- Shipping: If you’re shipping a product to the user, choose to ask for and require an address field during PayPal’s checkout process.
Additionally, there’s the option to enable conditional logic, which we’ve covered in more detail below.
When you’re ready, be sure to click on the Save button at the top of the form builder to store your payment settings.

Setting Up Conditional Logic (Optional)
Conditional logic allows you to create “smart forms” that automatically change their content or behavior based on a user’s selections.
There are many ways you can use WPForms conditional logic with PayPal Standard payments, such as:
- Letting your users choose a payment method
- Making payment optional
- Creating conditional email notifications
We’ll share a couple of examples of how to use conditional logic with PayPal.
Setting Up Conditional Logic for Payments
As an example, let’s set up a conditional logic rule to only run a PayPal Standard payment if the user selects a checkbox to sign up for our workshop.
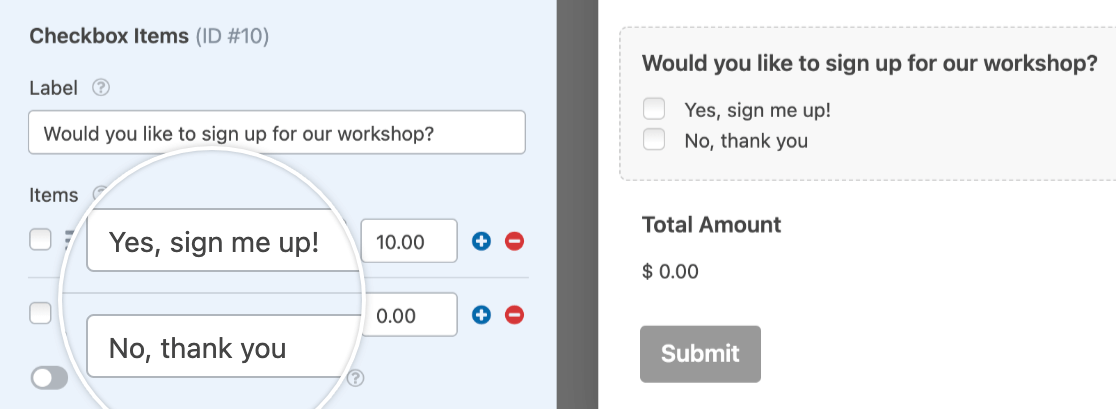
First, we’ll add a Checkbox Items field to our form. In this field, we’ll let users choose whether or not they’d like to sign up for the workshop by adding two choices labeled Yes, sign me up! and No, thank you.
To enable conditional logic for PayPal Standard payments, you’ll need to open the form builder and go to Payments » PayPal Standard. Under the options you configured in the previous step, toggle on the setting labeled Enable Conditional Logic.
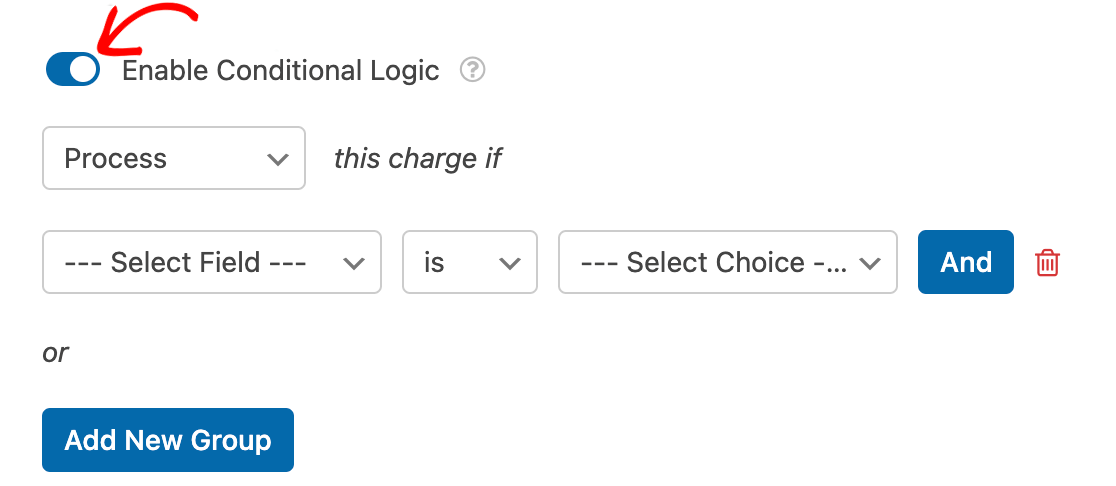
Once this option is turned on, some additional settings will appear. You’ll use these to create your conditional rule(s) to determine when users should be sent to PayPal to complete the payment process.
For our example, we only need to process a payment if a user chooses to sign up. To configure the rule for this, we’ll set the dropdowns to read, Process this charge if Would you like to sign up for our workshop? is Yes, sign me up!

When users submit this form, they’ll only be taken to PayPal to complete the checkout process if they choose to sign up for our workshop.
Creating Conditional Notification Emails for Completed Payments
By default, WPForms sends out all notification emails as soon as a user submits your form. However, in some cases, you may not want notification emails to be sent until users have finished paying in PayPal.
To delay a notification email until users’ payments have been successfully completed, go to Settings » Notifications in the form builder.
For the notification email that you want to delay, check the Enable for PayPal Standard completed payments box.
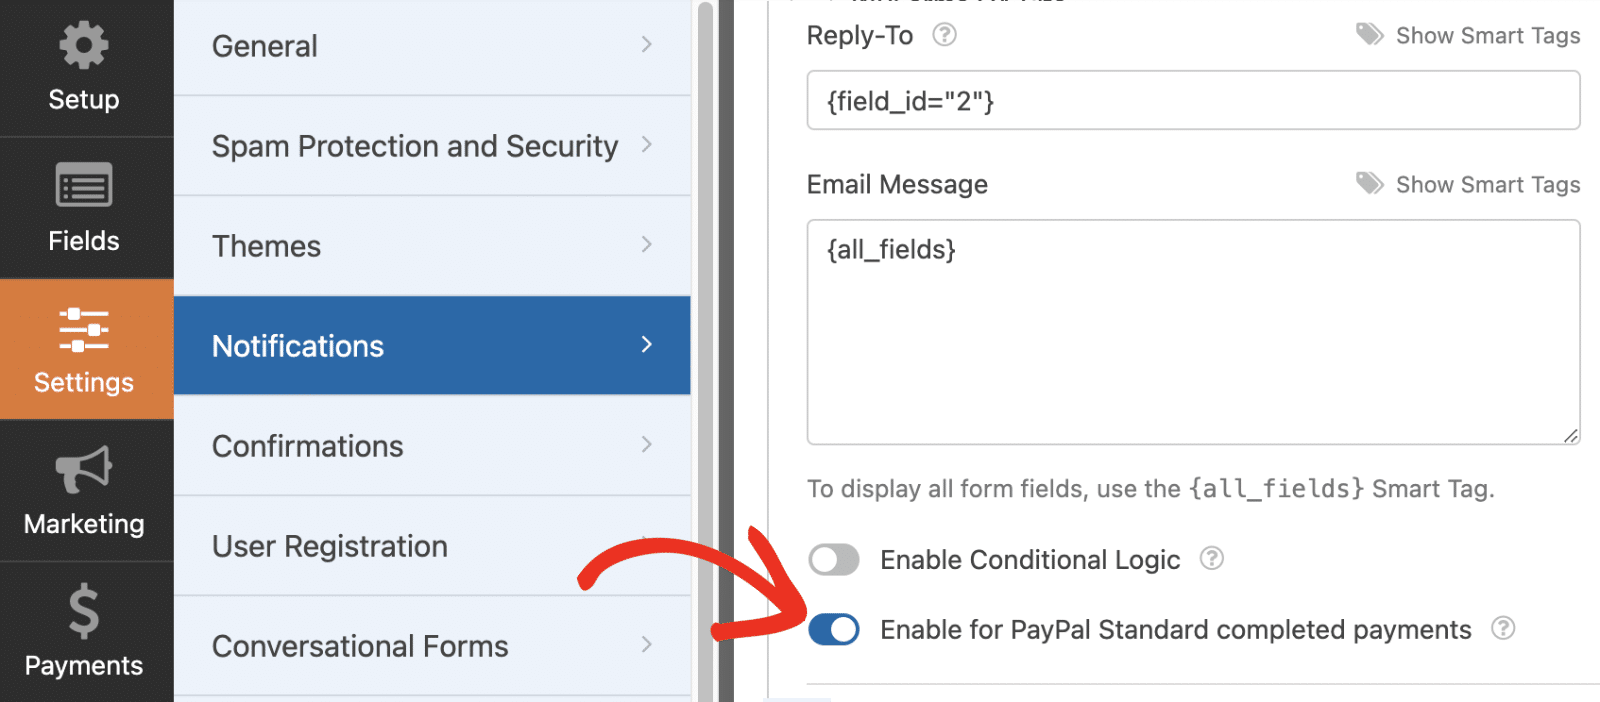
Remember to save your form again after making changes to its settings.
Viewing and Managing Payments
Once you’ve received some payments through your forms, you’ll be able to view and manage them right from your site’s admin area.
To do this, go to WPForms » Payments to access the Payments overview page.
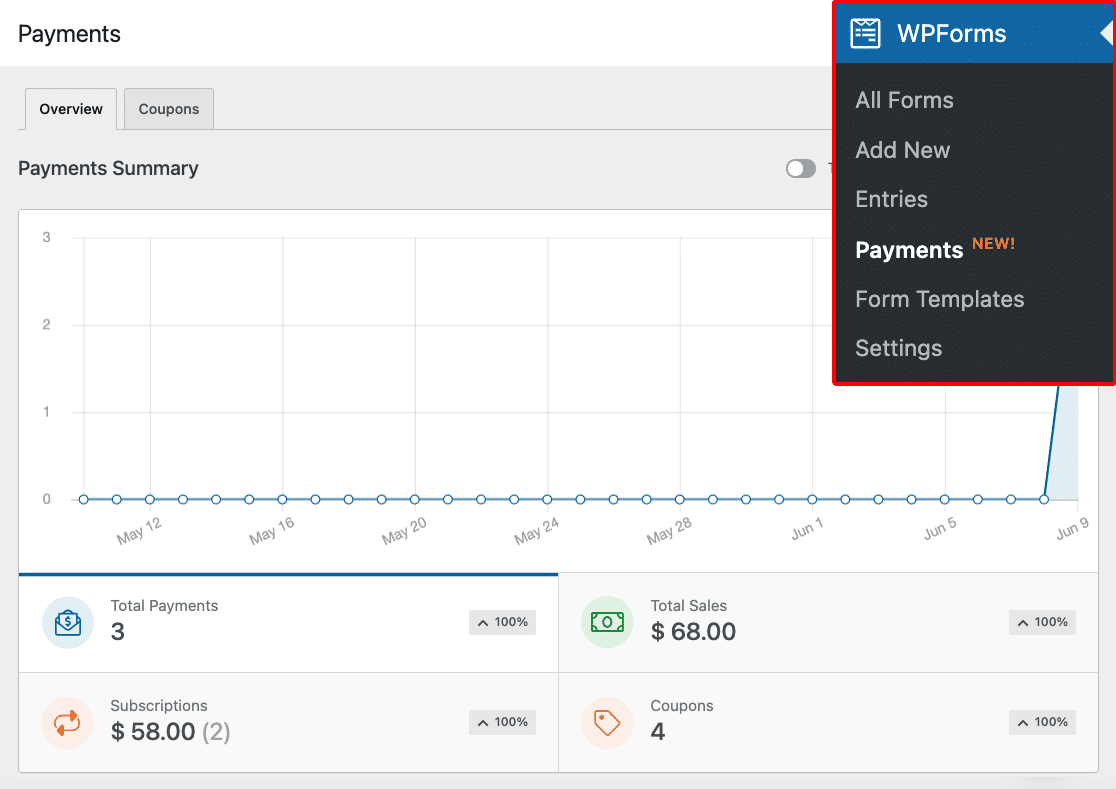
On the Payments overview page, you can view transaction details, track your sales, view revenue trends, measure the success of your payment forms, and much more.
Be sure to check out our guide to viewing and managing form payments for more information.
Frequently Asked Questions
Below, we’ve answered some of the most common questions we receive about the PayPal Standard addon.
How do I test PayPal payments in my forms?
The best way to test out your payment form(s) is to submit an entry and follow the same steps your users will take. We recommend setting up PayPal’s Test Mode before adding your form to a live page, which allows you to test transactions before accepting actual payments.
What happens when a user submits a PayPal Standard payment form?
When a user submits a form with PayPal Standard integration, they’ll immediately be taken to the PayPal website to complete their payment.
At the same time, the form’s notification emails will be sent. You’ll also be able to view the user’s entry as soon as they submit your form.
How do I know when a user completes their payment on PayPal’s site?
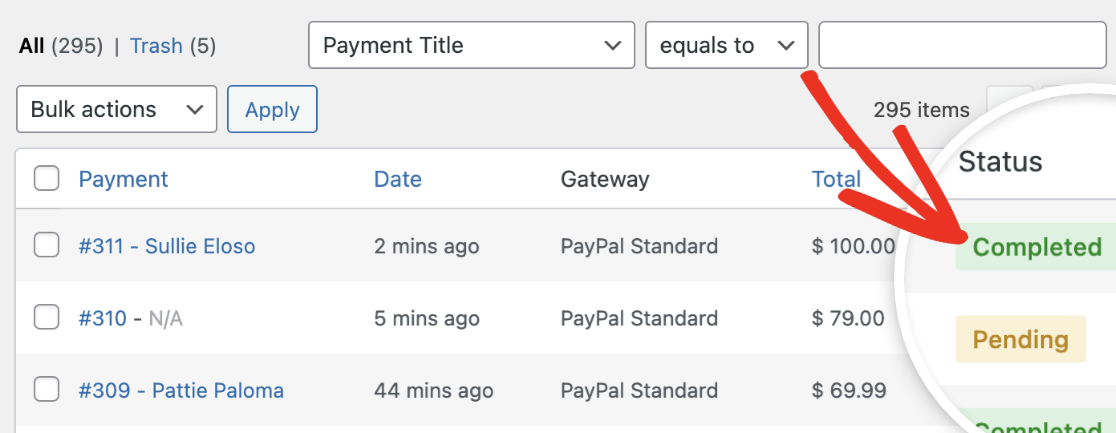
WPForms Payments page will display Completed under the Status column after a user completes their payment through PayPal Standard gateway.
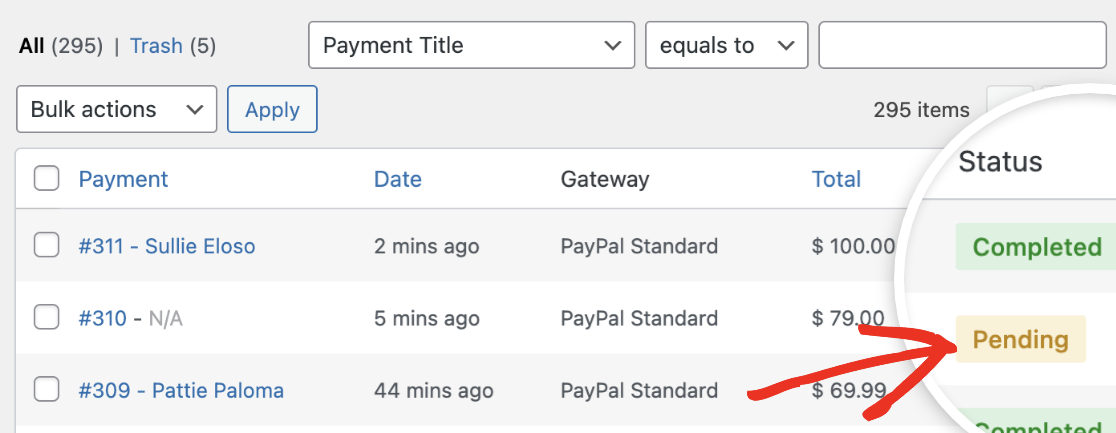
If the user submits the form without completing the PayPal checkout, the Status column will read Pending. Indicating that the payment has not been completed.
However, sometimes the payment status doesn’t change. Here are two possible reasons for this and how you can address them:
1. Encrypted Website Payments (EWP) is enabled: EWP is a feature that PayPal Payments Standard offers. It employs public and private keys to encrypt the payment button code on merchant websites. If EWP is enabled, it can sometimes trigger errors.
To address this, log into your PayPal Business account and navigate to Account Settings. Once there, click on Website payments in the left sidebar and then click Update next to the Website preferences option.
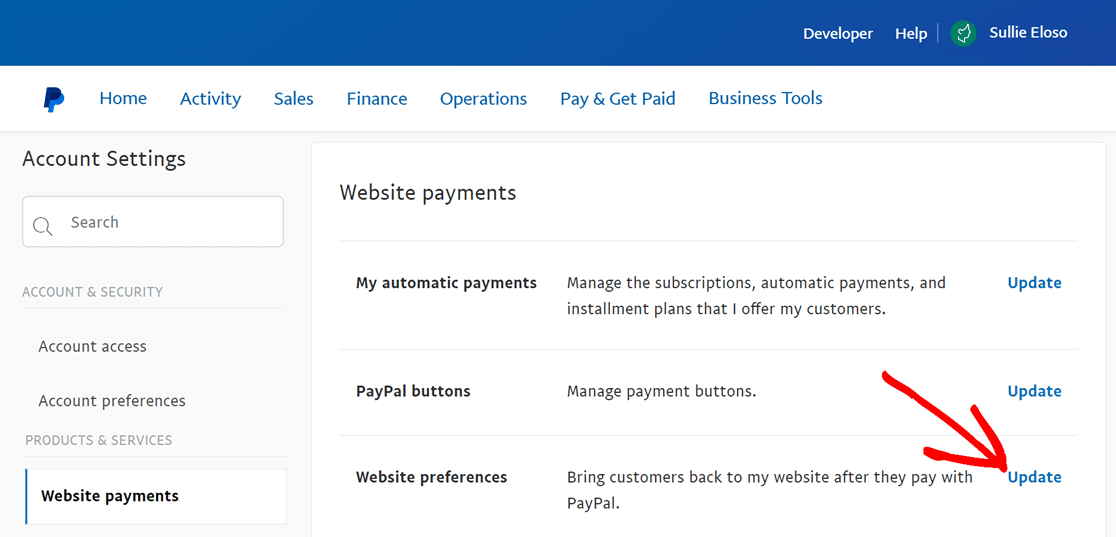
This will bring you to a new page. Simply scroll down until you reach the Encrypted Website Payments section. Here, set the Block non-encrypted website payment option to the off position.
2. Your site’s webhost is blocking incoming messages from PayPal: In rare instances, your webhost might block incoming PayPal messages, which hampers the update of the payment status.
If you suspect this to be the case, reach out to your site’s hosting provider. They can check for any blocks that might be affecting communication with PayPal and help remove them.
Will I be charged any fees for using PayPal Standard in my forms?
WPForms will never charge a fee for using PayPal Standard in your forms. However, PayPal may have its own fees based on your usage. For more details, be sure to check out PayPal’s fees page.
Can I accept recurring payments with PayPal?
Currently, the PayPal Standard addon doesn’t support recurring payments. If you need to take subscription-based payments via PayPal, consider using our PayPal Commerce addon. Our Stripe Pro and Authorize.Net addons also allow you to accept recurring payments.
That’s it! Now you know how to enable PayPal Standard payments in WPForms.
Next, would you also like to send different notification emails to your users based on their selections in your form? Check out our tutorial on conditional notification emails for all the details.

