
Resumo de IA
Você quer enviar facilmente um convite online com confirmação de presença (RSVP) para uma festa de aniversário do WordPress? Usar um formulário de RSVP é divertido, fácil e pode simplificar seu processo de planejamento de festas.
Neste tutorial, mostraremos como criar um RSVP online para uma festa de aniversário em seu site.
Clique Aqui para Começar a Criar Seu Convite de Festa de Aniversário com RSVP Agora
Por que Usar um RSVP Online para uma Festa de Aniversário?
Seja planejando uma festa de aniversário para você, um amigo ou seu filho, festas de aniversário devem ser divertidas. Mas planejar uma festa de aniversário dá muito trabalho e, às vezes, pode ser estressante.
Então, por que não experimentar um RSVP online? Usar um RSVP online pode facilitar muito para você por vários motivos, incluindo:
- Taxas de Resposta Mais Altas — Como o processo é fácil para os convidados, você terá mais pessoas respondendo ao seu convite de RSVP para festa de aniversário em uma taxa mais rápida.
- Obtenha Mais Informações — Há espaço para pedir mais detalhes às pessoas, como preferências de refeição, alergias, um bilhete agradável sobre o homenageado, etc.
- Economize Tempo — Evite esperar que os RSVPs por correio cheguem e obtenha respostas instantâneas dos participantes da festa com o modelo gratuito de formulário de RSVP online do WPForms Pro.
- Convide Convidados para o Seu Site — Se você está dando uma festa para seu filho, esta pode ser uma ótima desculpa para informar outros pais sobre seu pequeno negócio, hospedando o formulário de RSVP em seu site.
- Melhor Organização — Ao abandonar o papel e usar um convite online RSVP para uma festa de aniversário e lista de convidados em vez disso, você e seus convidados podem se manter mais organizados, mantendo todas as informações dos convidados em um só lugar.
- Limite de Respostas — Você pode fechar automaticamente seu formulário de RSVP quando atingir o número máximo de respostas. Também é muito fácil definir uma data de expiração do formulário para que você receba todas as suas respostas até o prazo.
Então, agora que você sabe por que usar um RSVP online para uma festa de aniversário, vamos mergulhar exatamente em como isso é feito.
Como Criar um RSVP Online para uma Festa de Aniversário em Seu Site
Perguntando a si mesmo: "Como configuro um RSVP online no meu site WordPress?" Aqui está um tutorial passo a passo que mostra como.
- Etapa 1: Crie o Formulário de RSVP para Convite de Festa de Aniversário
- Etapa 2: Configure as Definições do Seu Formulário
- Etapa 3: Configure as Notificações do Seu Formulário
- Etapa 4: Configure as Confirmações do Seu Formulário
- Etapa 5: Adicione Seu Formulário Online de RSVP para Festa de Aniversário ao Seu Site
Etapa 1: Crie o Formulário de RSVP para Convite de Festa de Aniversário
Usar o WPForms é a maneira mais fácil de criar um RSVP online para uma festa de aniversário. O WPForms Pro tem uma grande variedade de modelos pré-fabricados para todos os nichos e setores, incluindo dezenas de modelos diferentes de formulários de RSVP online.
A primeira coisa que você vai querer fazer é instalar e ativar o plugin WPForms. Para mais detalhes, confira este guia passo a passo sobre como instalar um plugin no WordPress.
Agora que o plugin está ativo, você precisará criar um novo formulário.
Para fazer isso, vá para WPForms » Adicionar Novo e nomeie seu formulário. Em seguida, role para baixo até a seção Selecionar um Modelo. Além de uma biblioteca de vários modelos de formulário de entretenimento, você também pode encontrar um Formulário de RSVP para Convite de Festa de Aniversário. Passe o cursor sobre este modelo depois de encontrá-lo na barra de pesquisa e clique em Usar Modelo.

Assim que o modelo de formulário pré-construído carregar, a maior parte do trabalho já estará feita para você. Na verdade, você encontrará os seguintes campos já no formulário:
- Nome
- Você poderá comparecer? (Sim, Talvez, Não posso)
- Quantas pessoas você vai trazer?
- Comentários ou Perguntas
Se desejar, você pode adicionar campos adicionais ao seu formulário arrastando-os do painel esquerdo para o painel direito.

Em seguida, clique no campo para fazer quaisquer alterações. Você também pode clicar em um campo do formulário e arrastá-lo para reorganizar a ordem em seu formulário de RSVP.
Precisa coletar dinheiro dos amigos que comparecerão à festa de aniversário que você está organizando? Talvez vocês estejam dividindo o custo da grande celebração para um amigo próximo em comum, ou você quer que as pessoas deem doações para sua instituição de caridade favorita em vez de presentes. É fácil aceitar pagamentos diretamente em seu convite online de RSVP para festa de aniversário.
O WPForms permite que você aceite pagamentos em seus formulários usando Stripe, Square, Authorize.Net ou PayPal. Você pode ler nossa documentação sobre como permitir que os usuários escolham um método de pagamento se quiser usar mais de uma integração em seu formulário, ou conferir como aceitar pagamentos com Stripe.
Quando seu formulário estiver do jeito que você deseja, clique em Salvar.
Etapa 2: Configure as Definições do Seu Formulário
Para começar, vá para Configurações » Geral.

Aqui você pode configurar o seguinte:
- Nome do Formulário — Altere o nome do seu formulário aqui, se desejar.
- Descrição do Formulário — Dê uma descrição ao seu formulário.
- Tags — Use tags para rotular e organizar os formulários em seu site.
- Texto do Botão Enviar — Personalize o texto do botão de envio.
- Texto de Processamento do Botão de Envio — Edite o texto que aparece quando alguém envia seu formulário.
Na parte inferior da página, também há configurações avançadas, que incluem:
- Classes CSS — Adicione classes CSS ao seu formulário ou botão de envio.
- Habilitar Preenchimento por URL — Preencha alguns campos automaticamente com base em uma URL personalizada.
- Ativar envios de formulário AJAX — Ative as configurações AJAX sem recarregar a página.
- Desabilitar o armazenamento de informações de entrada no WordPress — Você pode desabilitar o armazenamento de informações de entrada e detalhes do usuário, como endereços IP e agentes de usuário, para cumprir os requisitos do GDPR. Confira nossas instruções passo a passo sobre como adicionar um campo de acordo com o GDPR ao seu formulário de contato simples.
Em seguida, desça para as configurações de Proteção contra Spam e Segurança .
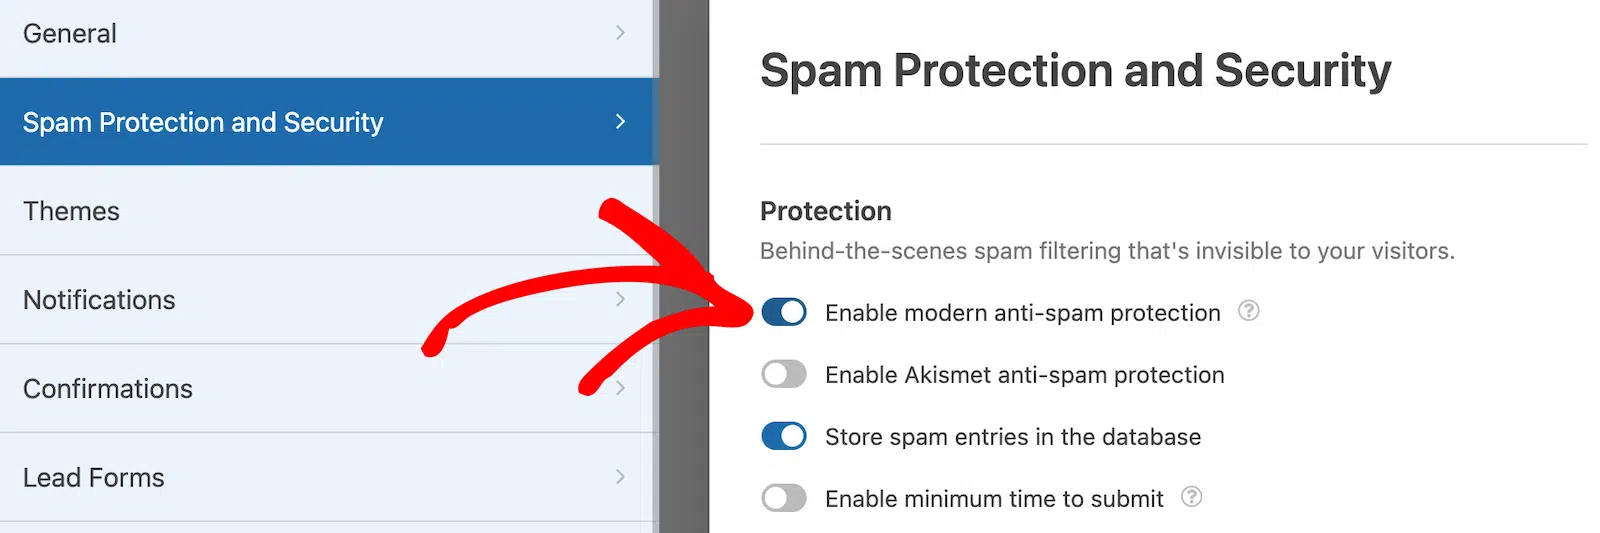
- Ativar proteção moderna contra spam — Interrompa o spam em formulários de contato com a proteção moderna contra spam do WPForms. Ela é ativada automaticamente por padrão em novos formulários, mas você pode escolher se deseja ativá-la ou desativá-la em cada formulário individualmente. Essa proteção contra spam integrada funciona perfeitamente em segundo plano para manter seus formulários seguros. Você também pode combiná-la com outra camada de segurança, como um CAPTCHA.
- Habilitar proteção anti-spam do Akismet — Se você usa o plugin anti-spam Akismet, pode conectá-lo ao seu formulário para bloquear envios falsos.
- Habilitar filtro de país — Impede envios de determinados países.
- Ativar filtro de palavras-chave — Bloqueie entradas que incluam certas palavras ou frases.
Quando terminar, clique em Salvar.
Etapa 3: Configure as Notificações do Seu Formulário
Notificações são uma ótima maneira de enviar um e-mail quando um RSVP é enviado em seu site.

Na verdade, a menos que você desabilite este recurso, sempre que alguém enviar um RSVP para sua festa de aniversário em seu site, você receberá uma notificação sobre isso.
Se você usar Smart Tags, também poderá enviar uma notificação ao visitante do site quando ele confirmar presença em sua festa, informando que você recebeu a confirmação e entrará em contato em breve. Isso garante aos seus convidados que o formulário deles foi processado.
Para obter ajuda com esta etapa, consulte nossa documentação sobre como configurar notificações de formulário no WordPress.
O WPForms também permite que você notifique mais de uma pessoa quando um formulário de confirmação de presença for enviado para sua festa. Por exemplo, você pode enviar uma notificação para você, seu participante, o homenageado e outro amigo que está ajudando a planejar a festa.
Para obter ajuda com isso, confira nosso tutorial passo a passo sobre como enviar várias notificações de formulário no WordPress.
Por último, se você quiser manter a consistência da marca em seus e-mails, pode conferir este guia sobre como adicionar um cabeçalho personalizado ao seu modelo de e-mail.

Etapa 4: Configure as Confirmações do Seu Formulário
Confirmações de formulário são mensagens que são exibidas aos convidados depois que eles enviam o formulário de RSVP do convite de festa de aniversário. Elas informam às pessoas que o formulário delas foi processado e oferecem a você a chance de informá-las quais são os próximos passos, se houver.
O WPForms tem 3 tipos de confirmação para escolher:
- Mensagem — Este é o tipo de confirmação padrão no WPForms. Quando um visitante do site envia seu formulário, uma mensagem simples aparece informando que a confirmação de presença foi processada. Confira algumas ótimas mensagens de sucesso para ajudar a aumentar a satisfação do usuário.
- Mostrar Página — Este tipo de confirmação redirecionará os visitantes do site para uma página específica em seu site, agradecendo-lhes por confirmarem presença em sua festa. Para obter ajuda com isso, confira nosso tutorial sobre como redirecionar usuários para uma página de Agradecimento. Além disso, certifique-se de conferir nosso artigo sobre como criar páginas de Agradecimento eficazes.
- Ir para URL (Redirecionar) — Esta opção é para quando você deseja enviar visitantes do site para um site diferente.
Vamos ver como configurar uma confirmação de formulário simples no WPForms para que você possa personalizar a mensagem que os visitantes do site verão quando confirmarem presença na festa de aniversário que você está organizando.
Para começar, clique em Configurações » Confirmações no construtor de formulários.

Em seguida, personalize a mensagem de confirmação de acordo com seu gosto e clique em Salvar.
Para obter ajuda com outros tipos de confirmação, consulte nossa documentação sobre configuração de confirmações de formulário.
Agora, você está pronto para adicionar seu convite online de RSVP para festa de aniversário ao seu site.
Etapa 5: Adicione Seu Formulário Online de RSVP para Festa de Aniversário ao Seu Site
Agora que você criou seu convite online de RSVP para festa de aniversário, precisa adicioná-lo ao seu site WordPress. O WPForms permite que você adicione seus formulários em vários locais do seu site, incluindo posts do blog, páginas e até mesmo widgets de barra lateral.
Para começar, crie uma nova página ou post no WordPress, ou vá para as configurações de atualização de um existente.
Depois disso, clique no botão mais (+) para adicionar um novo bloco ao seu post ou página. Escolha o bloco WPForms.

O útil widget WPForms aparecerá dentro do seu bloco. Clique no menu suspenso WPForms e escolha qual dos formulários que você já criou deseja inserir em sua página. Selecione seu formulário de RSVP do convite de festa de aniversário.

Agora, publique seu post ou página para que seu RSVP do convite de festa de aniversário apareça em seu site.

Para visualizar as entradas do formulário de RSVP após o envio, confira este guia completo sobre entradas de formulário. Por exemplo, você pode visualizar, pesquisar, filtrar, imprimir e excluir quaisquer entradas do formulário de RSVP, tornando o processo de planejamento do evento muito mais fácil.
Clique Aqui para Começar a Criar Seu Convite de Festa de Aniversário com RSVP Agora
Em seguida, Encontre o Melhor Plugin de Pop-up para WordPress
E aí está! Agora você sabe exatamente como fazer um RSVP online para uma festa de aniversário em seu site WordPress. Certifique-se de conferir também nosso post sobre os melhores plugins de popup para WordPress.
Se você está planejando uma festa surpresa, vai querer manter o site privado até estar pronto para compartilhar os detalhes. Confira nosso guia sobre como ocultar seu site WordPress até que ele esteja pronto para saber como!
Pronto para criar seu formulário? Comece hoje mesmo com o plugin de criação de formulários WordPress mais fácil. WPForms Pro inclui muitos modelos gratuitos e oferece uma garantia de devolução do dinheiro em 14 dias.
Se este artigo ajudou você, por favor, siga-nos no Facebook e Twitter para mais tutoriais e guias gratuitos do WordPress.

