AI Summary
Would you like to connect your WordPress site to your Mailchimp account? With the WPForms Mailchimp addon, you can automatically add users’ email addresses to your marketing lists when they submit your forms.
This tutorial will show you how to use our Mailchimp addon to integrate WPForms with your Mailchimp lists.
Requirements:
- You will need a Plus license level or higher to access the Mailchimp addon
- Ensure that you’ve installed the latest version of WPForms to meet the minimum required version for the Mailchimp addon

Installing the Mailchimp Addon
Before you get started, be sure to install and activate WPForms on your WordPress site. Once you’ve installed the plugin and verified your license, you’ll be able to quickly install and activate the Mailchimp addon.
After installing the Mailchimp addon, the next step is to integrate your site with your Mailchimp account. To do so, navigate to WPForms » Settings and click on the Integrations tab. Then click on Mailchimp to expand this section.

Once you open the Mailchimp section, click the + Add New Account button. This will reveal fields for your Mailchimp API Key and Account Nickname.

Generating Your Mailchimp API Key
In order to fill out the integrations settings for Mailchimp, you’ll need to generate an API key from your Mailchimp account. The API is what allows the WPForms plugin on your site to communicate with your Mailchimp account.
To access the API Key section in Mailchimp, log in to your Mailchimp account. Since you’ll be coming back to your WPForms settings later, we recommend opening Mailchimp in a separate browser tab or window.
Once you’ve logged in to Mailchimp, click on your avatar in the top right corner of the page to open an additional menu. Then click on Account & billing.

On the Account & billing page, you’ll see an additional menu near the top of the screen. From this menu, you’ll need to go to Extras » API keys.

When you open the API Keys page, you’ll see all the API Keys you’ve created on your account. You’ll need to create a new API Key for your WPForms integration since you won’t be able to access existing API Keys.
To create a new API key, click the Create A Key button.

In the Add New API Key page, you’ll need to name your API key by filling out the API Key Name field. This name is for internal use and isn’t available to your users. However, we recommend using a descriptive name to help differentiate your API keys.

When you’re ready, click the Generate Key button to proceed.

After clicking the button, it will generate an API key for you. To copy this key, click the Copy To Clipboard button.
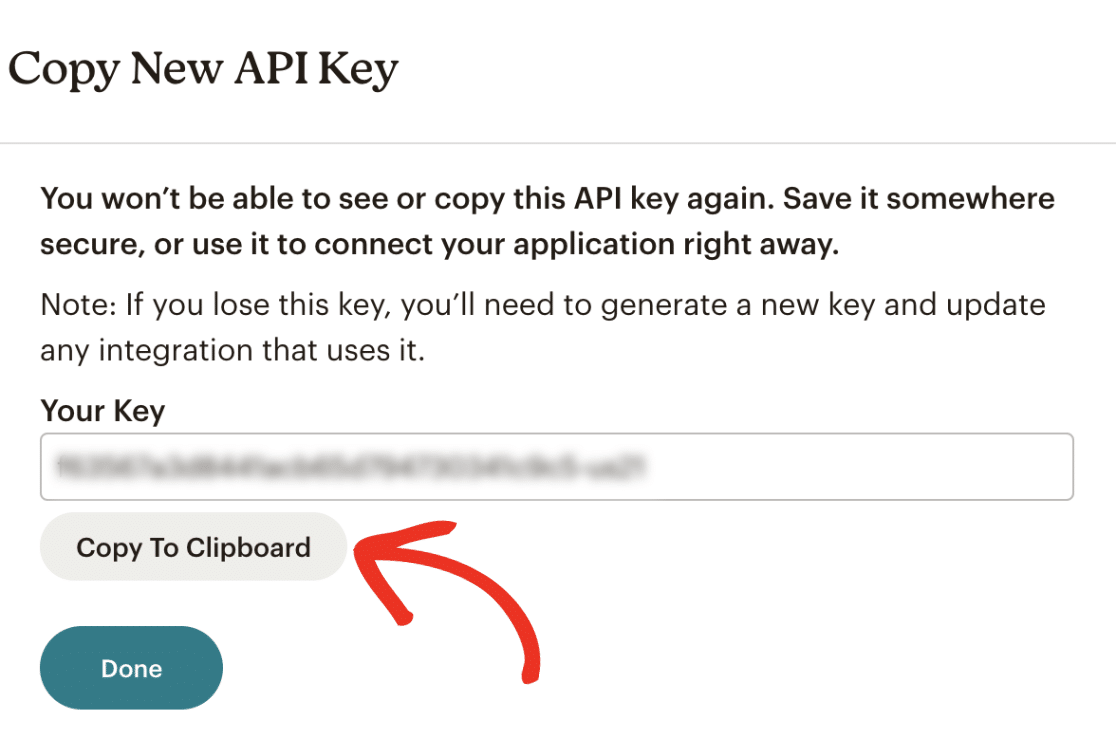
Note: Once you click the Done button, you won’t be able to access your API key from your Mailchimp dashboard. We recommend storing this key in a secure location in case you need to refer back to it. However, you can always create a new API Key if necessary.
After you’ve copied the key, return to the browser tab or window with your WPForms settings and paste it into the API Key field.

You’ll also need to fill out a nickname for this connection. This name will never be visible to your users and can be whatever you’d like it to be. It’s just meant to help you distinguish between connections if you add additional Mailchimp accounts to your site down the road.
When you’re ready, click the Connect to Mailchimp button to save the connection.

Once these settings are saved, you should see a green box next to the Mailchimp section that says Connected.

Setting Up Additional Accounts (Optional)
The Mailchimp addon lets you connect multiple accounts with a single Mailchimp integration. This can be useful if you want to use separate accounts for each form on your site.
To connect an additional account, click the + Add New Account button.

After clicking the button, it’ll reveal the Mailchimp API Key and Account Nickname fields. You’ll need to generate an API key from the Mailchimp account you wish to connect with WPForms. Please see the API key section of this guide for more details.
Once you’ve generated the API key, copy and paste it into the API Key field. Then name the connection and click the Connect to Mailchimp button to save your changes.

After saving your settings, you should see Connected next to the new account you added.

Note: You can add unlimited accounts to your Mailchimp integration. Just be sure to generate a new API key for each connection you’d like to add.
Adding Mailchimp Integration to Forms
The final step is to add your Mailchimp integration to specific forms on your site. To do this, you’ll need to create a new form or edit an existing one.
After opening the form builder, go to Marketing » Mailchimp and click the Add New Connection button.

This will cause an overlay to appear. Here you can enter a nickname for the connection you’re creating. This is useful if you plan to connect this form to more than one mailing list, and will only be visible to you. Your users will never see it on your site.

Then select any Mailchimp account you connected in Step 2 from the Select Account dropdown.

Note: If you’ve set up an additional Mailchimp connection, you’ll be able to choose between all the connected accounts from the Select Account dropdown.
After selecting an account, choose a specific audience within that account to send form data to.

Note: All Mailchimp audiences must be created in your Mailchimp account. For more details, check out Mailchimp’s tutorial on getting started with audiences.
Once you’ve chosen an audience, select which action you’d like to perform when a user submits this form from the Action to Perform dropdown.

Currently, the following actions are available with the Mailchimp addon:
- Subscribe: Adds the user as a new contact to your Mailchimp audience.
- Unsubscribe: Unsubscribes an existing contact from your Mailchimp audience.
- Archive: Archives an existing contact in your Mailchimp audience.
- Permanently Delete: Permanently deletes an existing contact from your Mailchimp audience.
- Record Event: Records an event for a specific contact after form submission.
Once you’ve selected an action to perform, additional configuration settings will appear. We’ve outlined each of these fields below and marked required fields with an asterisk (*):
- Subscriber Email*: Choose the name of the WPForms field where your users will be entering their email addresses.
- Event Name*: Enter the name of the event you want to record in your Mailchimp account.
- Tags to Add: Select any tag(s) from your Mailchimp account that you want to apply to new subscribers. Please see Mailchimp’s tutorial on getting started with tags for more details on how to use tags.
- New Tags to Add: Create a new tag in Mailchimp and add it to all subscribers created through your form.
- Tags to Remove: Select any existing tags from your Mailchimp account that you want to remove from subscribers when they submit this form.
- Note: Automatically add a note to subscribers’ profiles in Mailchimp.

Additionally, the following options are also available for the Subscribe action:
- Enable double opt-in: When enabled, double opt-in will prevent users from being automatically added to your Mailchimp lists. Instead, they’ll receive an email asking them to confirm their subscription. The user will only be added to your mailing list after they’ve clicked the confirmation link in that email.
- Mark subscriber as VIP: Enabling this option will mark all subscribers created through this form as VIPs in Mailchimp. For more details on the VIP designation, be sure to check out Mailchimp’s guide to the VIP status.
- Update the profile if this contact is already in an audience: Enabling this option will update a user’s profile in Mailchimp if they’re already an existing subscriber for the audience connected to this form.
- Notify user that they are already subscribed: If a user attempts to submit your form using an email address that is already in your Mailchimp audience, they’ll see a validation message that reads, “A contact with that email address is already subscribed.” Users will not be notified if the Update the profile if this contact is already in an audience option is also selected.

Once you’ve configured your settings, make sure to save your form.
Connecting Additional Fields
If you’d like to customize your Mailchimp connection further, you can configure it to send more user information from your form to your Mailchimp account.
To send additional entry fields to Mailchimp, you’ll need to map your form fields to available fields in Mailchimp. First, scroll down to the Custom Field Name section in your Mailchimp form connection settings.

From the Custom Field Name dropdown, choose the field from your Mailchimp account that you want to populate when users submit this form. Mailchimp offers the following options by default:
- Email Address
- Address
- Birthday
- First Name
- Last Name
- Phone Number
Then select the corresponding field from your form using the Form Field Value dropdown. For example, if you want to send users’ phone numbers to Mailchimp, you would select Phone Number as the Custom Field Name, then select your form’s Phone field as the Form Field Name.
You can add as many custom fields to your integration as you’d like by clicking the + (plus) icon and repeating this step.
Organizing Subscribers With Groups
Mailchimp gives you the option to further divide your mailing lists into Groups. If you’re not familiar with this feature, please see Mailchimp’s tutorial on Groups for more details on what they are and how Mailchimp recommends using them.
If you’ve set up any Groups for the audience you’ve selected, they’ll automatically populate in the Select Group(s) dropdown. If you want to add users who submit this form to a specific Group, choose it from this field.

Conditional Logic
Conditional logic allows you to set rules for events based on users’ selections or input in their form entries. For example, you could use conditional logic to allow users to choose if they’d like to join your mailing list or which Groups they’d like to be in.
To use conditional logic with the Mailchimp addon, turn on the Enable Conditional Logic option and create your conditional logic rule.

Note: Need help setting up your conditional logic rule? Our beginner’s tutorial on using conditional logic in WPForms has all the details.
Frequently Asked Questions
Below, we’ve answered some of the top questions we see regarding the Mailchimp addon.
Why are new subscribers added to my list as “opted out”?
When enabled, Mailchimp’s GDPR settings will automatically uncheck the opt-in options for any new subscribers.
Mailchimp and WPForms each have their own separate GDPR agreements, so even if a user agrees to the GDPR agreement in your forms, Mailchimp isn’t currently able to see this and will assume they haven’t agreed to the GDPR. It will therefore remove the opt-in function from the user.
You can easily fix this by disabling Mailchimp’s GDPR settings within your Mailchimp account. For more details on how to do this, please see Mailchimp’s GDPR documentation.
Why aren’t my newsletters delivering from my Mailchimp account?
Configuring Mailchimp to send newsletters “from” free email service provider accounts, specifically Yahoo and AOL, can result in email delivery issues. For more details, please contact Mailchimp’s support team.
Why isn’t my Address field showing up in my Mailchimp account?
Currently, the WPForms Address field is incompatible with Mailchimp’s Address field, so this data can’t be directly passed. However, you can always build out your own Address Field with Single Line Text Fields and Dropdowns to send the information to Mailchimp that way.
Can I use a separate Mailchimp account for each form on my site?
Yes, you can connect different Mailchimp accounts and select the account you’d like to use when connecting Mailchimp to a form.

For more details, please see the setting up additional connections section of this guide.
That’s it! You now know how to set up Mailchimp integration with any forms on your site.
Next, would you like to grow your subscriber list even further? Check out our tutorial on leveraging lead magnets to learn how you can offer potential subscribers incentives to join to your mailing lists.