AI Summary
Would you like to accept Authorize.Net payments through your website’s forms? With the Authorize.Net addon for WPForms, your users can make secure credit card payments without leaving your site. Plus, you can set up both one-time and recurring subscription payments.
This tutorial will show you how to install and set up the Authorize.Net addon with WPForms.
In This Article
Requirements:
- You will need an Elite license to access the Authorize.Net addon
- Ensure that you’ve installed the latest version of WPForms to meet the minimum required version for the Authorize.Net addon
- Authorize.Net requires your site to have SSL (HTTPS) enabled on the page where you’re adding a live payment form, as this allows you to securely send credit card data. For setup details, please see WPBeginner’s guide to enabling SSL and HTTPS in WordPress

Before you get started, be sure to install WPForms on your WordPress site. Then you can go ahead and install and activate the Authorize.Net addon as well.
Connecting Authorize.Net to Your WordPress Site
Once the Authorize.Net addon is active on your site, you’ll need to go to WPForms » Settings in the left menu of your WordPress site. From there, click on the Payments tab.
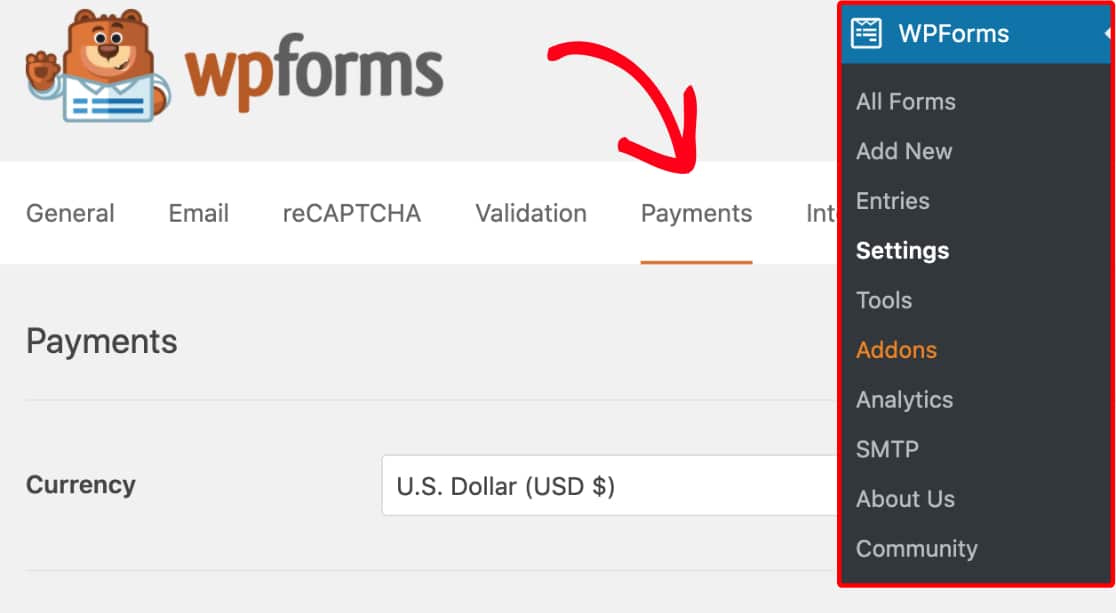
If you’d like to adjust the currency for your payment form, go ahead and select the option you need from the Currency dropdown before proceeding.
Next, scroll to the section labeled Authorize.Net. Here, you’ll need to fill out an API Login ID and Transaction Key to connect your site to your Authorize.Net account.
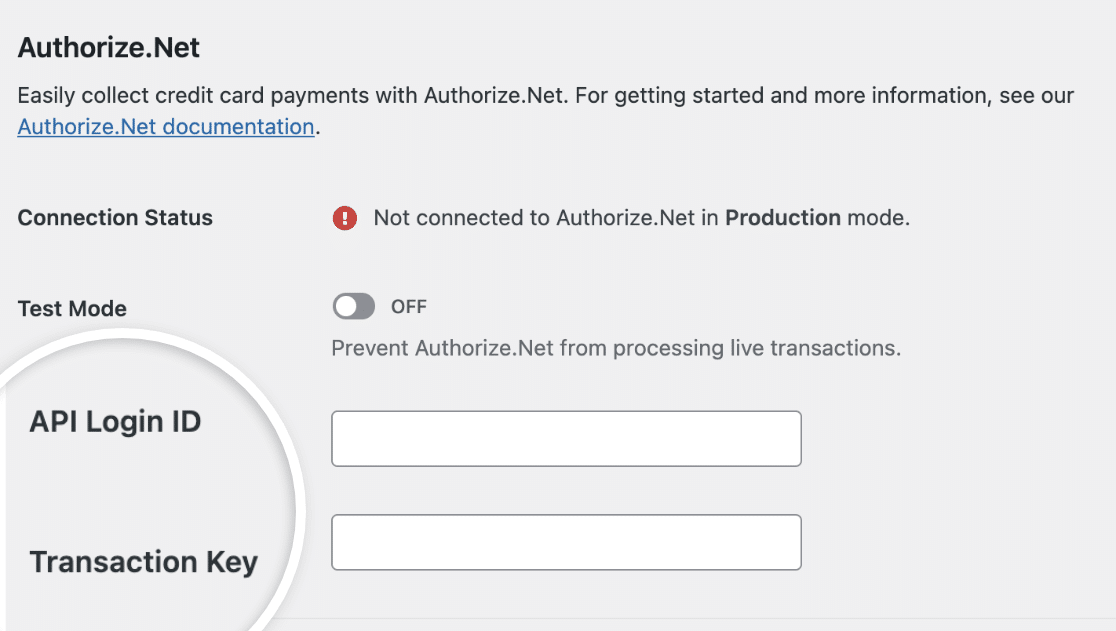
For these settings, you’ll need to get some details from your Authorize.Net account.
Note: These credentials are different for live and test transactions. For this tutorial, we’ll focus specifically on live transactions. If you’re trying to test your connection, please see our tutorial on how to test Authorize.Net payments.
Signing In to Authorize.Net
When you’re ready to sign in to your Authorize.Net account, be sure to do so in a new browser tab or window so you can easily switch back and forth between it and your WPForms settings.
If you don’t have an account with Authorize.Net yet, go ahead and create one now.
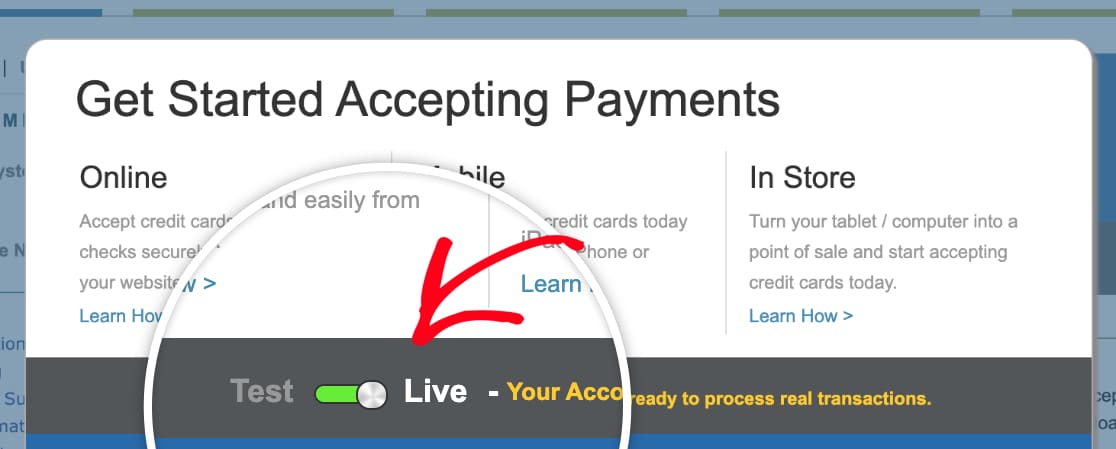
When you log in to your Authorize.Net account, you should see an overlay showing whether your account is in Test or Live mode. Be sure this option is set to Live.
Locating Keys in Authorize.Net
Once you’re logged in and have confirmed that your account is in Live mode, you’ll be able to get the keys you need to connect Authorize.Net to WPForms. In the left sidebar of your Authorize.Net account, click on Settings.
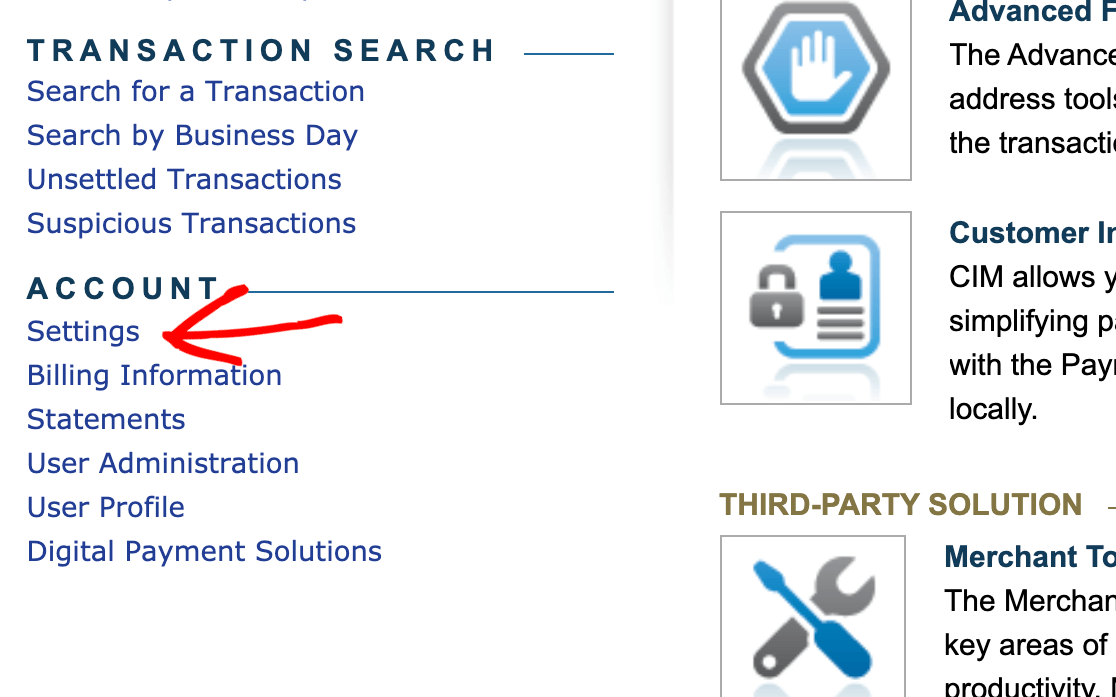
From the Settings page, you’ll then need to click on the option labeled API Credentials & Keys

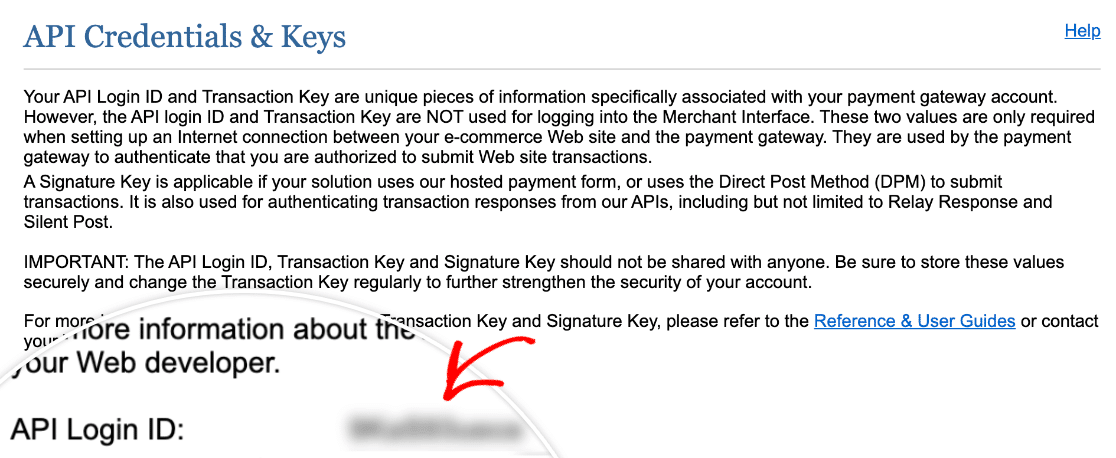
On this page, you’ll need to copy the value next to API Login ID.
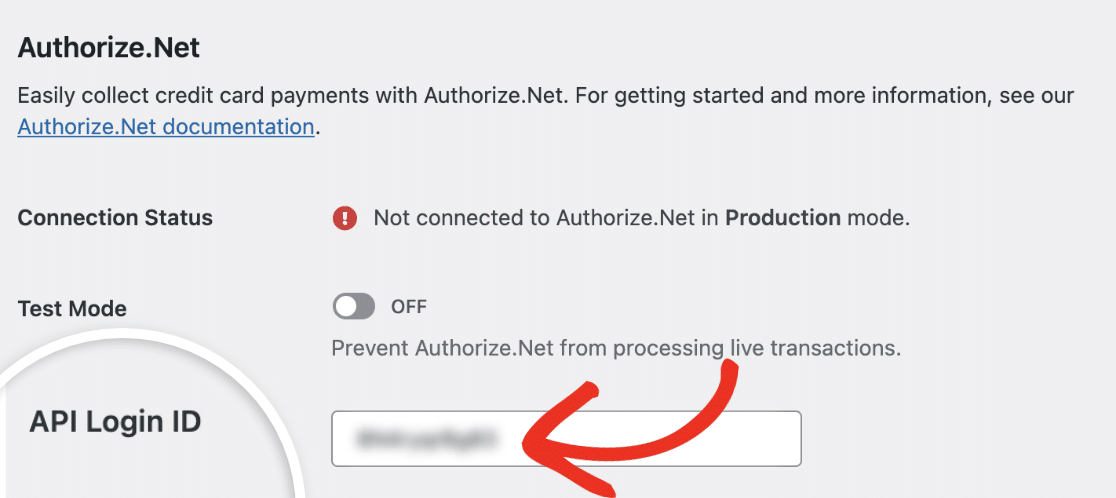
Back in your WPForms Settings, paste this value into the API Login ID field.
Once you’ve added your API Login ID, you’ll need a Transaction Key.
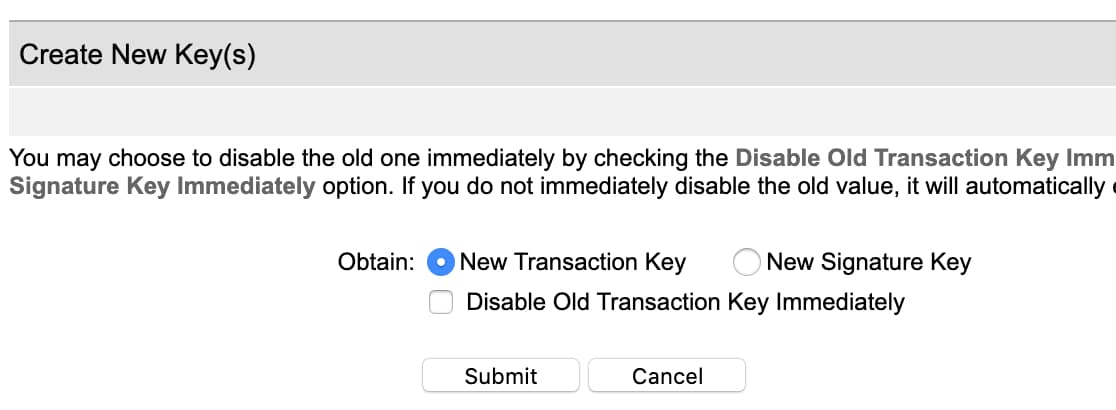
On the API Credentials & Keys page in your Authorize.Net account, look to the section labeled Create New Key(s).
Note: If you have an existing key, you can use it instead of creating a new one. In this tutorial, we’re assuming that you haven’t set up a Transaction Key before or need a brand new one.
For the Obtain option here, select New Transaction Key. Then click the Submit button.
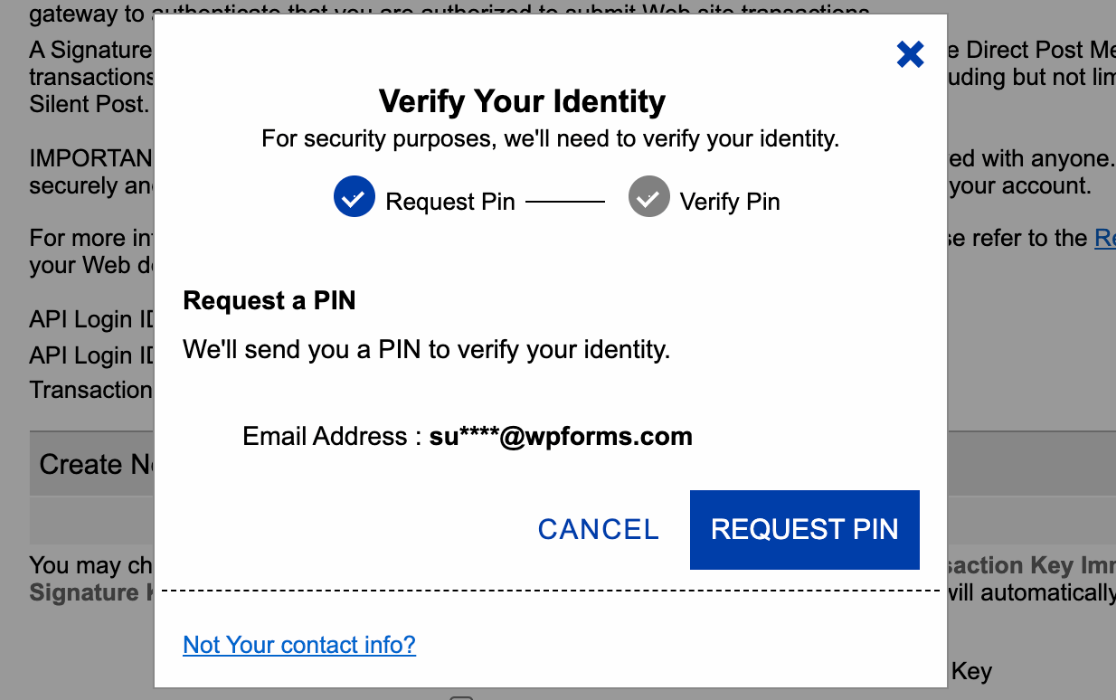
Immediately after submitting, you should see an overlay asking you to verify your identity. Click the Request PIN button to start this verification process.
After submitting the request, you’ll be asked to check your email for the PIN. Enter the code sent to your email, then click the Verify PIN button.
Once you’ve verified your identity, Authorize.Net will display your Transaction Key. Click the Copy to Clipboard button.

Then flip back over to the tab or window with your WPForms Settings, paste your key into the Transaction Key field, and click Save Settings.
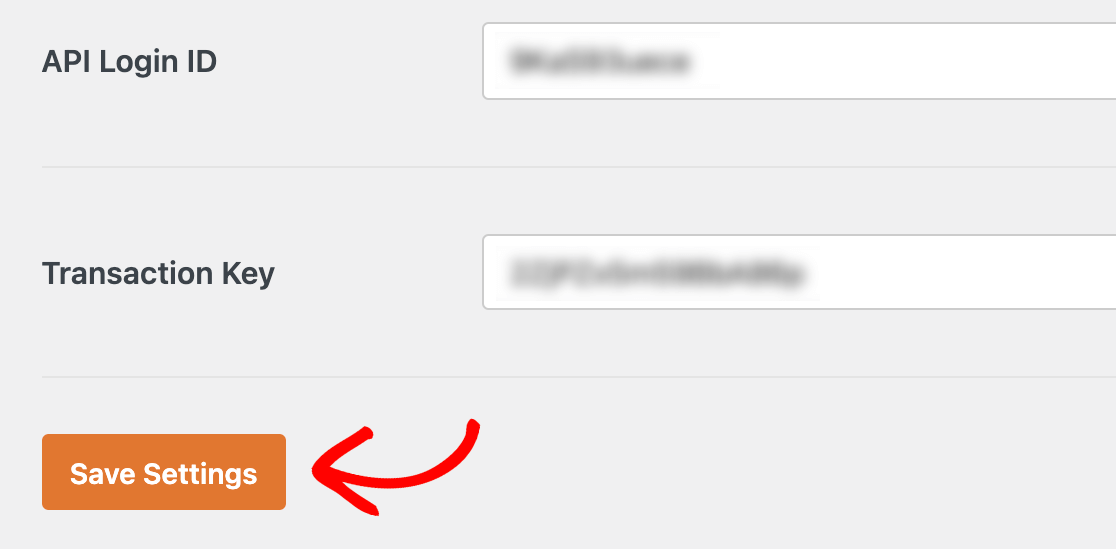
After these settings are stored, you should see a success message at the top of the WPForms Payments page.

Adding Authorize.Net Integration to Your Forms
Once you’ve connected Authorize.Net to your WordPress site, you can start adding payment functionality to your forms.
First, you’ll need to create a new form or edit an existing one.
In order for a form to work with Authorize.Net, it must have at least the following 4 fields:
- Name
- A payment items field (Single Item, Multiple Items, Checkbox Items, or Dropdown Items)
- Authorize.Net (which collects credit card details)
Note: A Total field is not required for Stripe to work. However, it’s often helpful for users to easily see an order summary of the items selected and their quantities in a tabular form. This shows the user the exact amount they’ll be charged. See our guide on using the Total field for more details
Once you’ve added any fields you’d like to include in your form, you’ll need to go to Payments » Authorize.Net. From here, toggle the Enable Authorize.Net payments option to the on position.
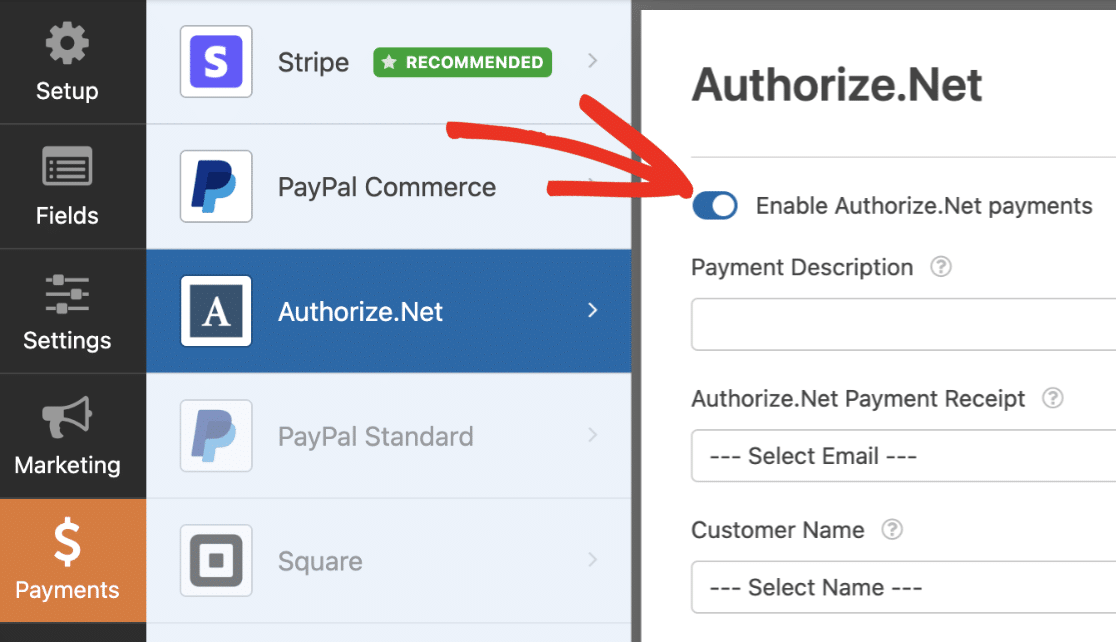
Next, there are a few optional settings you can configure:
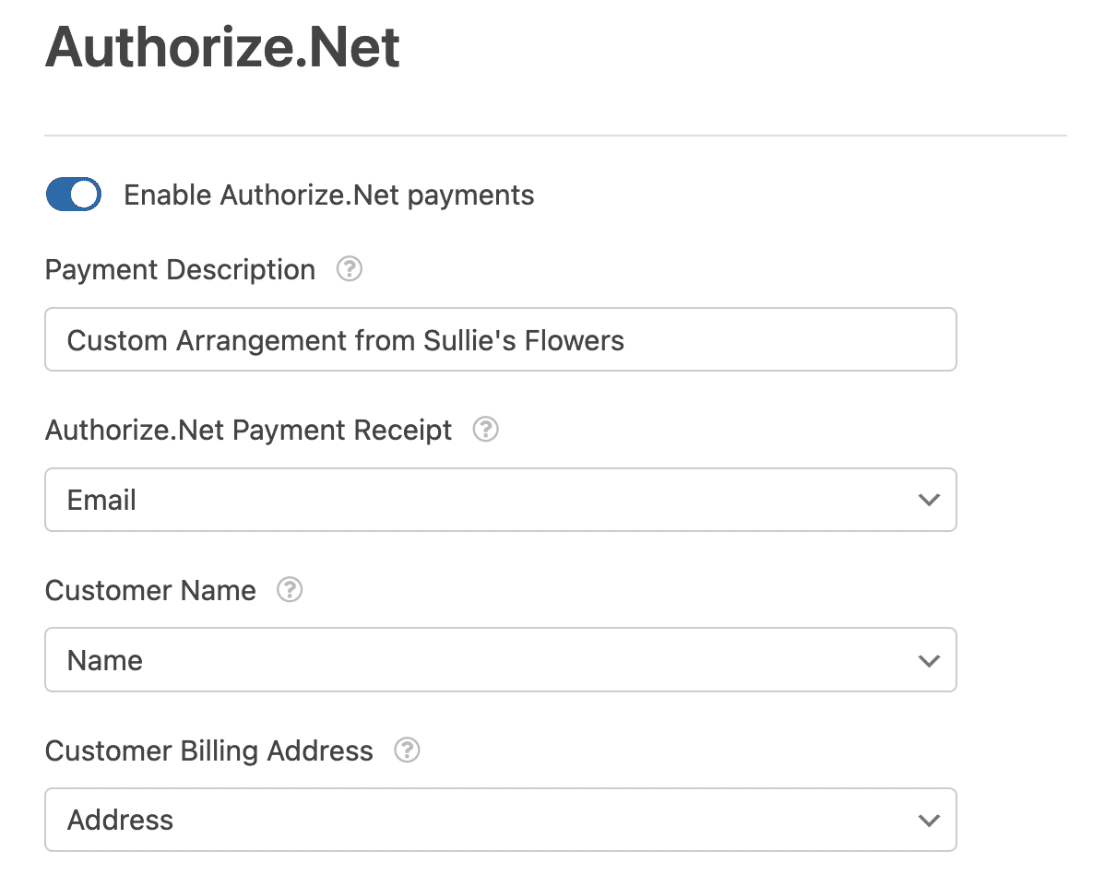
- Payment Description: This can appear on users’ credit card statements to help them identify transactions from your site. It only applies to one-time payments, not recurring subscriptions.
- Authorize.Net Payment Receipt: You can select your form’s Email field from the dropdown to send email receipts to users. While optional, we recommend doing this so that your customers have direct records of payment. This option also only applies to one-time payments, not recurring subscriptions.
- Customer Name: Use this option if you want to send customers’ names to Authorize.Net with their payment details. Just select your form’s Name field from the dropdown.
- Customer Billing Address: This option will send customers’ billing addresses to Authorize.Net with their payment details. Choose the corresponding Address field from the dropdown.
Note: Want to add customers’ invoice numbers to your Authorize.Net account? See our developer documentation on mapping invoice numbers to Authorize.Net payments.
After you’ve configured these settings, be sure to save your form.
If you’re looking to set up one-time payments, then you’re all set! But if you want to let users purchase recurring subscriptions, or to add conditional logic for your payments, then be sure to continue on to the next sections.
Setting Up Recurring Subscription Payments (Optional)
Recurring subscription payments will process one payment right away, and also process future payments based on the schedule you set.
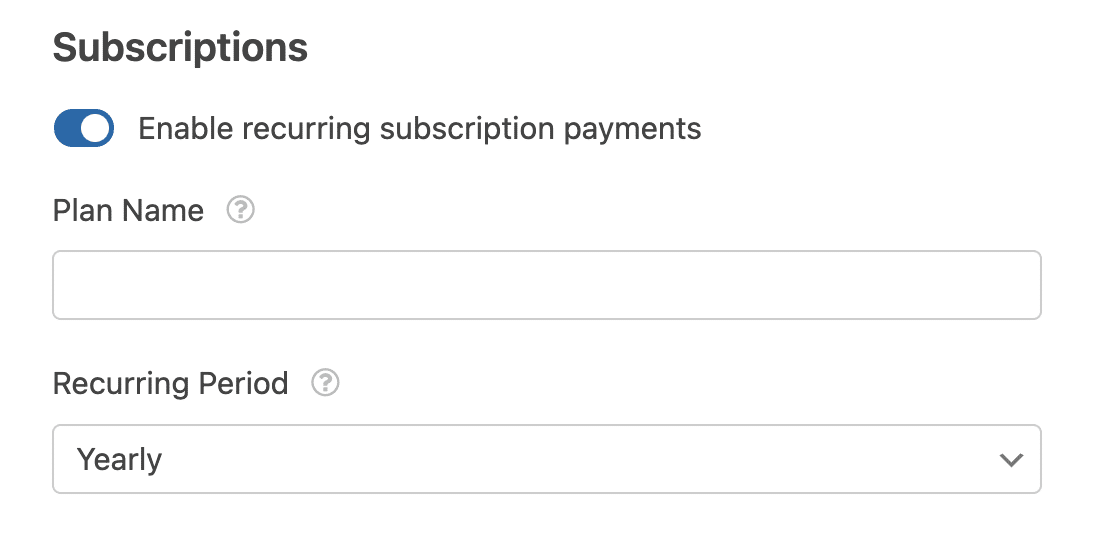
To set up a subscription plan, go to Payments » Authorize.Net in the form builder. Look for the section labeled Subscriptions and toggle on the Enable recurring subscription payments option.
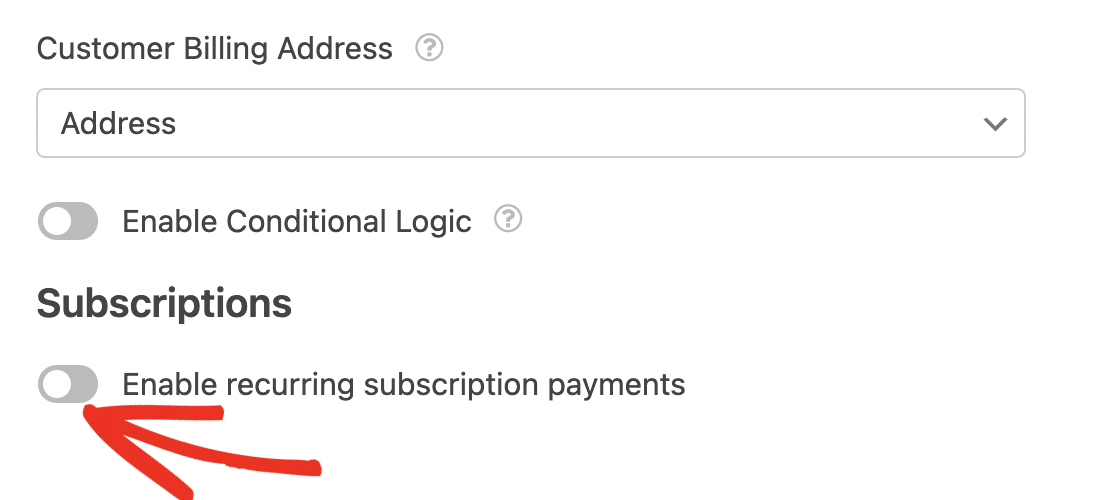
Once you’ve enabled this option, additional settings will appear. First, enter a Plan Name for your subscription. This can appear on users’ credit card statements to help them identify transactions from your site. If you leave this box unchecked, the Plan Name will be listed as the name of the form.
You will also need to select the Recurring Period from the dropdown to determine the payment schedule for your subscription.
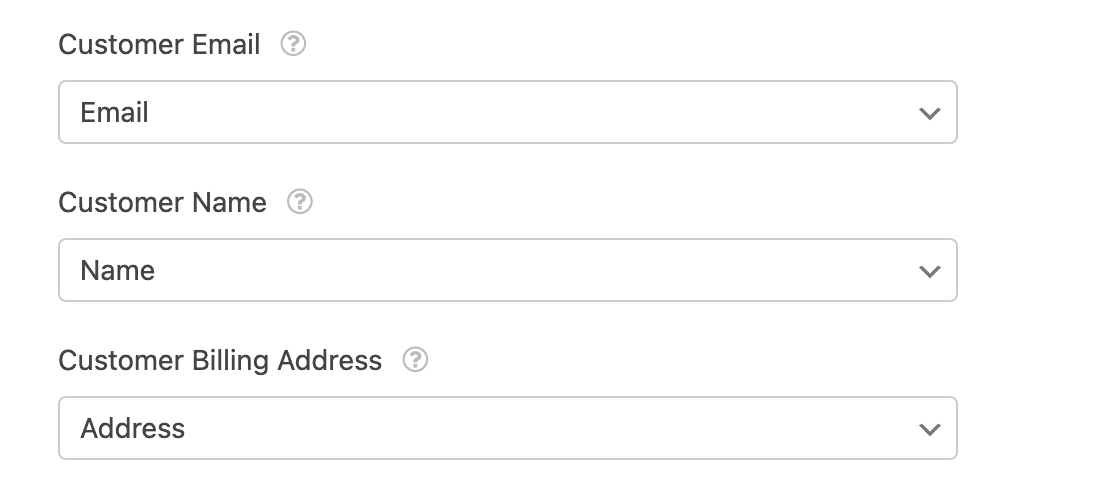
Next, use the dropdowns to select the corresponding fields from your form for the Customer Email, Customer Name, and Customer Billing Address.
 Finally, you can choose whether or not you want to enable conditional logic for subscription payments. We’ve covered these settings in more detail in the next section.
Enabling Conditional Logic (Optional)
Conditional logic lets you create “smart forms” that automatically change certain aspects of your form based on users’ input or selections. Below, we’ve covered examples of how to use this feature for payments as well as notifications.
Setting Up Conditional Logic for Payments
There are many ways you can use conditional logic with an Authorize.Net payment form. For this tutorial, we’ll use an example of letting users choose whether to submit one-time or monthly recurring payments.
First, we’ll add a selection field to our existing Authorize.Net payment form. We’re using a Multiple Choice field, but a Dropdown field would work, too.
Then we’ll edit the field’s label and choices to include an option for one-time payments and an option for recurring subscriptions.
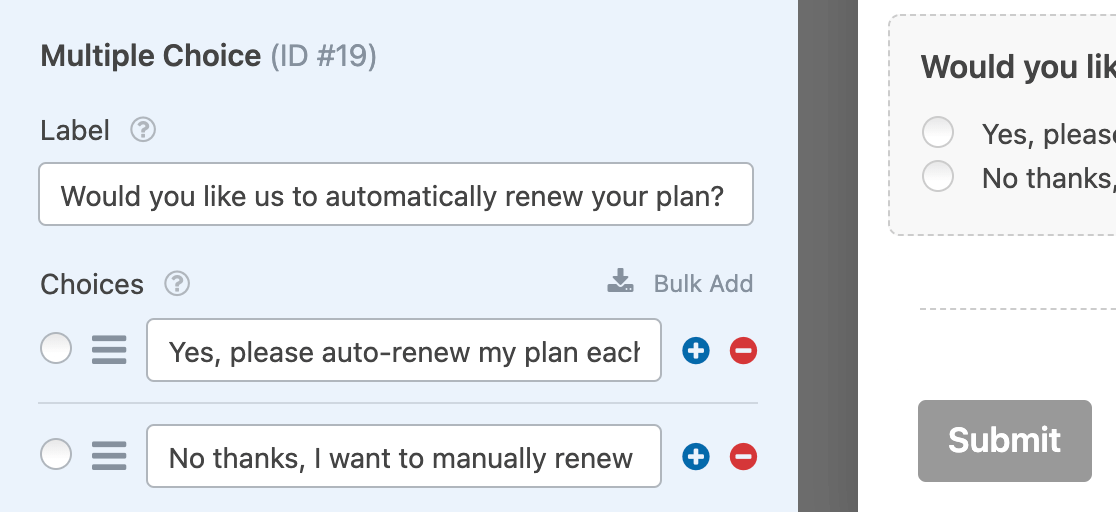
Once your form has all the conditional fields it requires, you’ll need to set up your conditional logic rule(s). Go to Payments » Authorize.Net and toggle on the Enable Conditional Logic option under the Subscriptions settings.
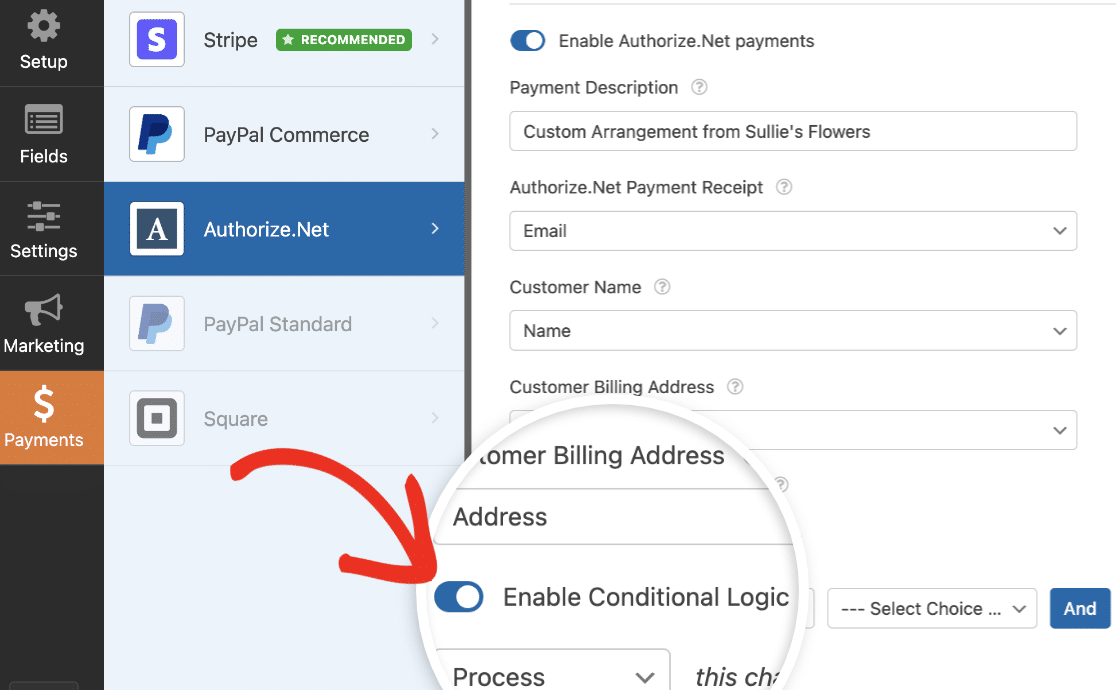
Note: You can also enable conditional logic in the general Authorize.Net settings. Make sure you toggle on the correct conditional logic option for your form.
For our example, we’ll set up our rule to read, Process payment as recurring if Would you like us to automatically renew your plan? is Yes, please auto-renew my plan each month.

Once this form is published, if users select Yes, please auto-renew my plan each month, then their payment will be processed as a subscription. If they choose No thanks, I want to manually renew, then their payment will be processed as a one-time purchase.
Note: Need help creating your conditional logic rule? See our tutorial on WPForms conditional logic for more details.
Creating Conditional Notification Emails for Completed Payments
By default, WPForms sends out all notification emails as soon as a user submits your form. However, in some cases, you may want to wait to send a notification email until the user’s payment has been successful in Authorize.Net.
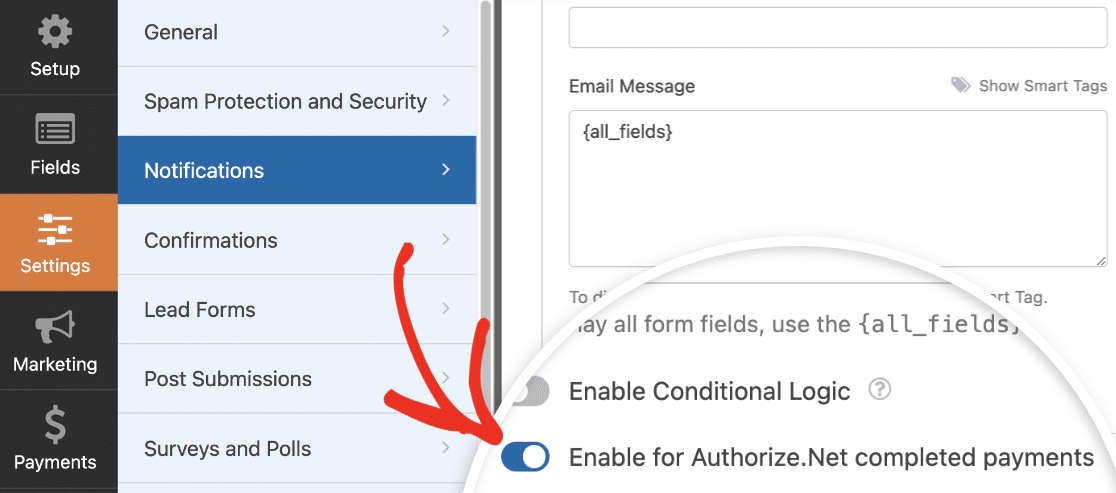
To delay a notification email until payment has been successfully completed, go to Settings » Notifications to access the form’s notification settings. After that, scroll to the notification you want to delay. Then toggle on the Enable for Authorize.Net completed payments option.
Note: Looking for more details on creating notification emails? Check out our guides on notification emails in WPForms and setting up multiple conditional notifications.
Once you’ve configured all your form’s settings, make sure to click the Save button before you exit the form builder.

Then you’ll be ready to preview and test your form to ensure it works properly before you embed it on your site.
Viewing and Managing Payments
Once you’ve received some payments through your forms, you’ll be able to view and manage them right from your site’s admin area.
To do this, go to WPForms » Payments and select the Overview tab to access the Payments page.
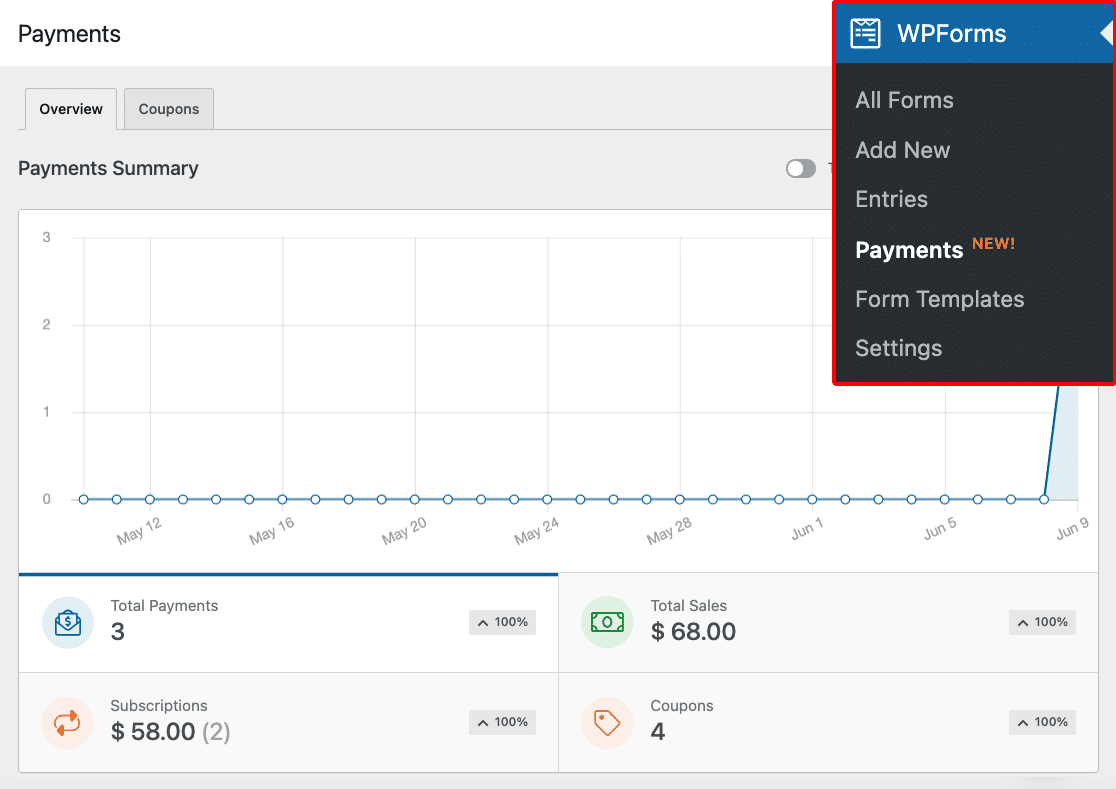
On the Payments overview page, you can view transaction details, track your sales, view revenue trends, measure the success of your payment forms, and much more.
Be sure to check out our guide to viewing and managing form payments for more information.
Note: If you’d like, you can create coupon codes and give users a discount when filling out your payment form. To learn more, check out our Coupons addon tutorial.
Frequently Asked Questions
Below, we’ve addressed some of the most common questions we receive about the Authorize.Net addon.
What currencies does Authorize.Net support?
For the most up-to-date list of currencies that Authorize.Net supports, please check out Authorize.Net’s doc on supported currencies.
Can I send an invoice number or phone number to Authorize.Net after forms are submitted?
Yes, you can send both invoice numbers and phone numbers to your Authorize.Net account from WPForms. For detailed instructions, check out our developer documentation on mapping invoice numbers.
To learn how to include phone numbers with each transaction, be sure to check out our developer documentation for more information.
Why am I seeing an error that reads, “API: (E00027) The transaction was unsuccessful”?
This problem is likely caused by required fields in your Authorize.Net account that users are not filling out in your form. This could be because there is no corresponding field in your form for this information, or because you have not marked the field as required and users are skipping over it.
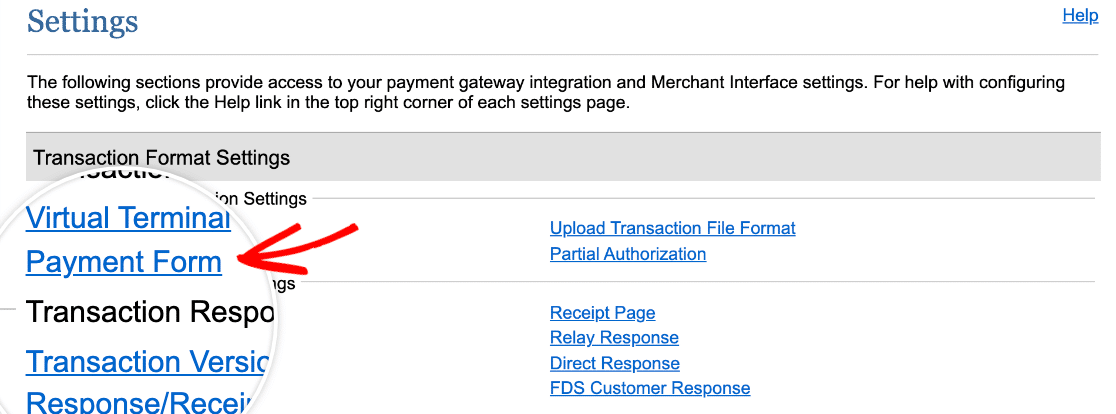
To see the required fields for your Authorize.Net account, log in to your dashboard and go to Account » Settings in the left sidebar menu. Then look for Transaction Format Settings and click on Payment Form.
On the next screen, click Form Fields.
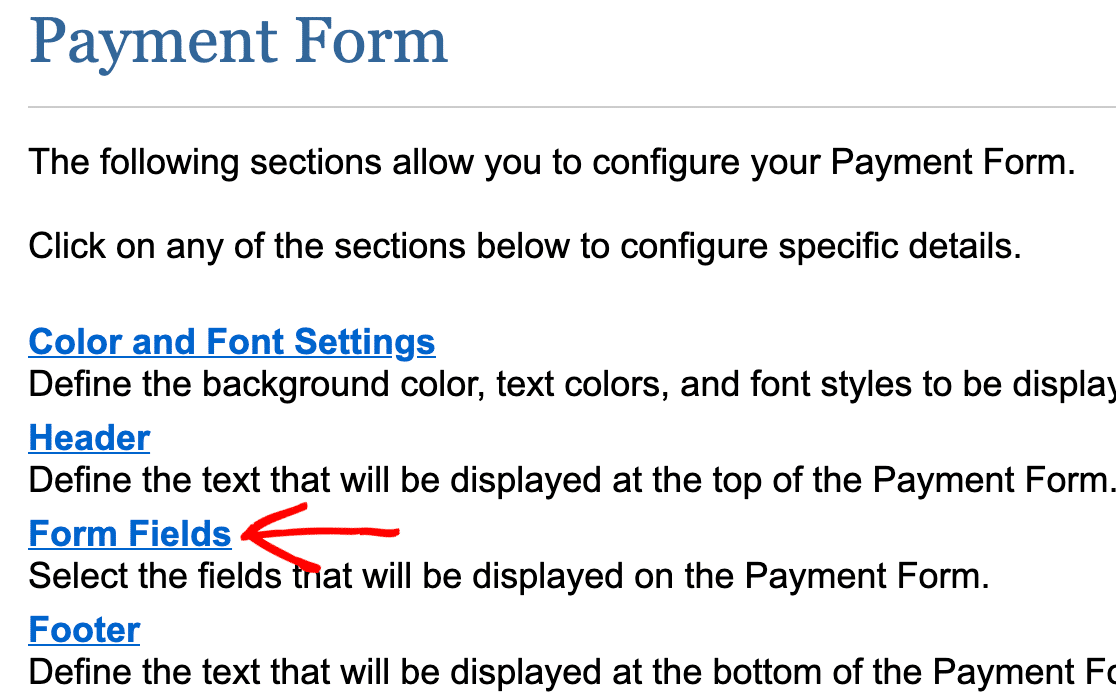
Here, you’ll see a list of all the available payment fields for Authorize.Net. Required fields will have a check in the Required column.
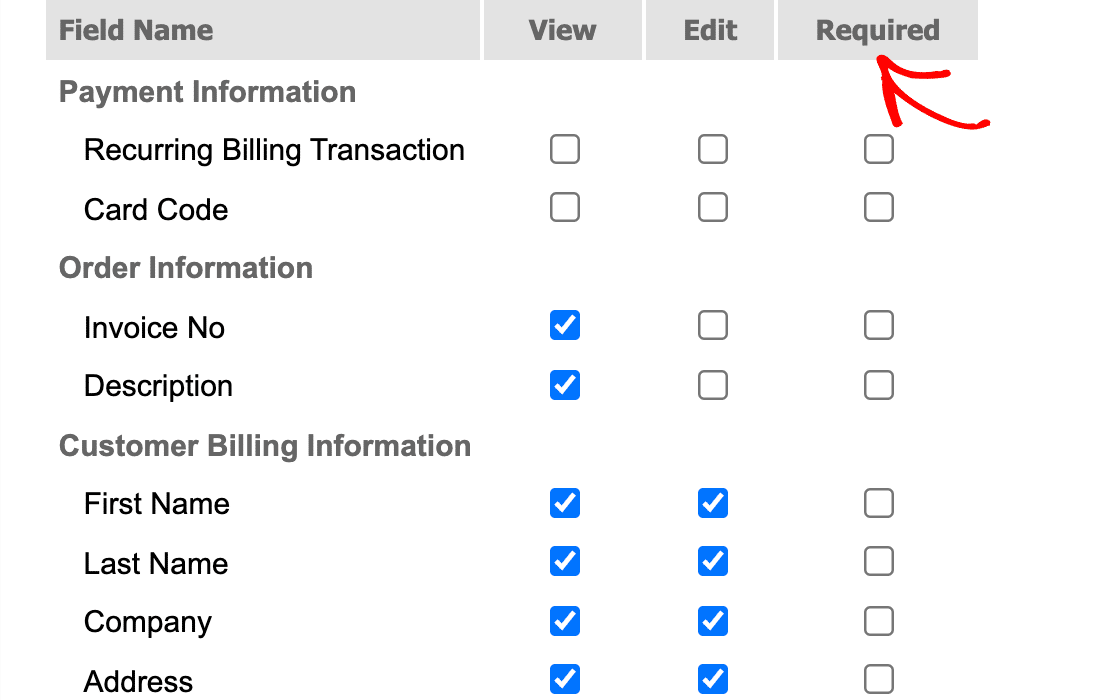
If there are any fields here that you do not want to require for customers, you can uncheck them and save your settings by clicking the Submit button at the bottom of the screen. Otherwise, make sure you have the proper corresponding fields in your form, that they’re mapped to your Authorize.Net account, and that you’ve marked them as required in the Field Options panel.
For more help with this error, please contact Authorize.Net’s support team.
That’s it! You can now set up Authorize.Net payments with WPForms.
Now that you know how to set up an order form, would you like to learn more about how your entries will look and work? Be sure to check out our complete guide to form entries for all of the details.
