Have you been performing your WordPress monthly maintenance the right way?
Good, regular maintenance will help keep your website safe and performing well. But what tasks should you focus on for WordPress monthly maintenance?
In this post, we’ve put together a checklist of WordPress monthly maintenance tasks that will make sure that your site remains in great shape.
Let’s get started!
How Do I Maintain My WordPress Site?
You can maintain your WordPress site by making sure it’s backed up, checking your forms are working properly, ensuring pages load quickly, and updating plugins.
Here’s an easy-to-use checklist of WordPress monthly maintenance tasks along with some tools and plugins that’ll help.
WordPress Monthly Maintenance Tasks (Checklist)
In This Article
1. Review Your Site’s Forms
Forms are probably the main way people will get in touch with your business. So if your forms aren’t working, or aren’t in the right places, that’s something you’ll want to catch and fix early.
Usually, this requires you to manually check every form on your website one after the other. But if you have a medium-large website, you might have quite a few forms in several locations, and you might not remember them all.
If you’re using WPForms, you can save a lot of time by using the Form Locations feature to view all the forms you’ve created and see exactly where they’re located.
Form Locations won’t be enabled by default, but it’s easy to set this up. To get started, click on WPForms » All Forms from the WordPress dashboard. This will open up the Forms Overview page where you’ll see all your forms.
From the Forms Overview page, simply click on Screen Options and tick the Locations checkbox.
Next, click Apply, and that’s it! Under each form listing, you’ll now see all the locations where each form has been installed on your website.
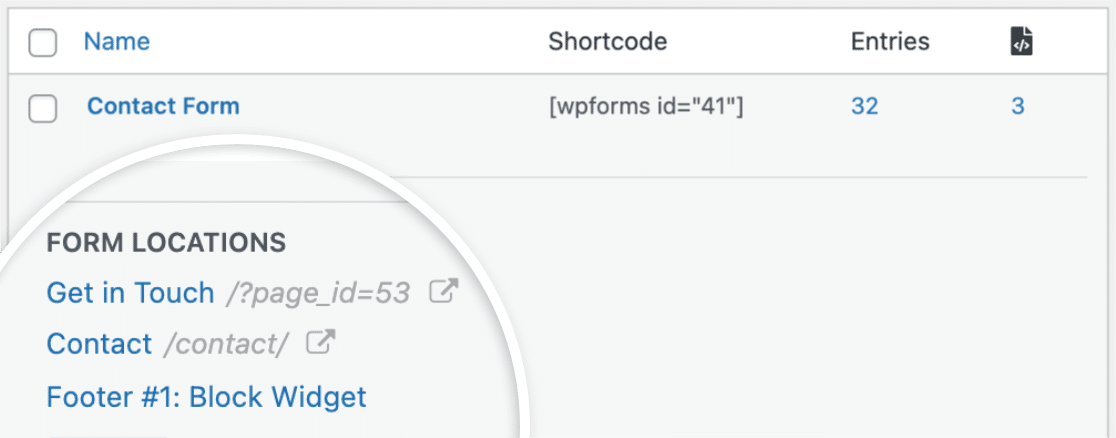
Now that you’ve found your forms, you’ll have to make sure they work properly. This is called form validation, and it’s fairly straightforward to do.
To get started, go ahead and test your forms by using them like your users would. Some things to pay attention to include required fields, conditions, CAPTCHA, payments, and so on. For a detailed guide, take a look at our complete form testing checklist.
In addition to form validation, you might also want to keep an eye on how your forms appear after any recent updates.
If any updated forms aren’t quite fit for purpose, no problem! All you have to do is use the Form Revisions feature to roll them back to a previous version.
To view a revision of any form, simply click on the Revisions icon at the bottom left of the form builder interface. This will take you to the Form Revisions panel.
![]()
Form Revisions usually come enabled by default but this won’t always be the case. This is because the form revisions feature is built off WordPress’s internal post revisions feature. If WordPress post revisions are turned off, the WPForms revision feature will be too.
Fortunately, when this happens it’s usually easy to fix. To be sure whether revisions are enabled or not, watch out for a red exclamation mark on the revisions icon. If you don’t see one, this means the revisions feature is enabled.
![]()
If you do see the red exclamation mark, though, you can resolve this by following this simple guide to working with WordPress post revisions.
2. Create Regular Backups of Your Website
Creating regular backups of your website is a smart idea. As your website grows, and as you add new plugins, and update the core files, themes and plugins, there’s no telling what might go wrong. And when they do it’s usually without warning.
Backing up your website will help you stay prepared for any unexpected events like a plugin conflict or other accidents.
You can create a backup of your website manually, but the easier way is to use a plugin like UpdraftPlus.
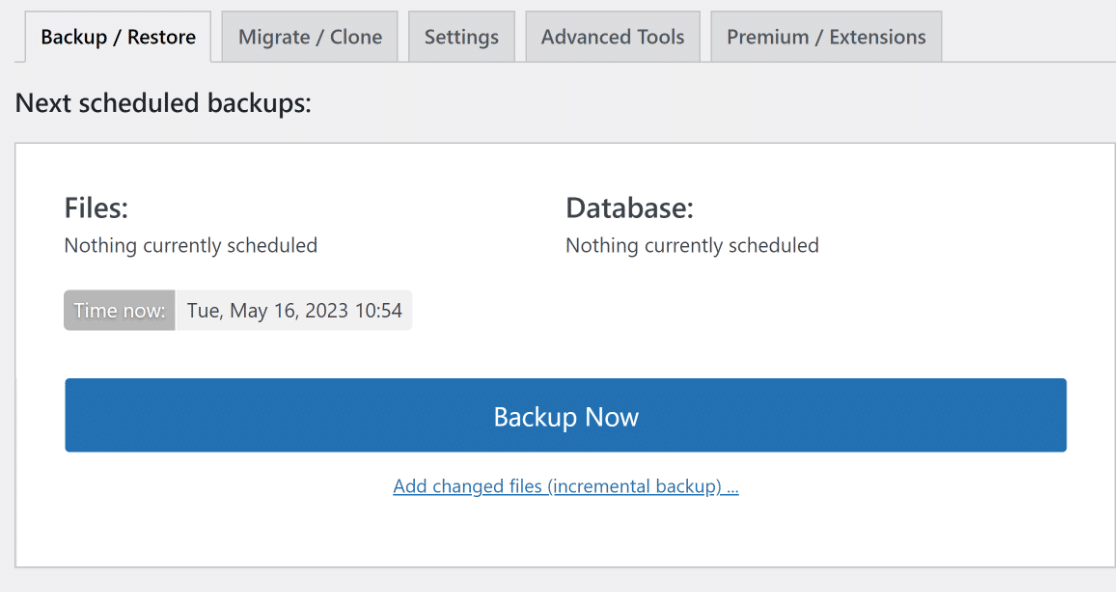
To get started, install and activate UpdraftPlus from the WordPress plugin directory. If you’re not sure how to do this, reading this guide on how to install WordPress plugins would be a great start.
Once the plugin is installed, the next thing to do is run through some basic configuration settings. The most important ones will be setting a backup frequency and backup location.
In your WordPress dashboard, click on Settings » UpdraftPlus Backups. You can click on Backup Now to create a backup immediately. But to schedule automatic backups, there’s a little more that’ll need to be done.
In the UpdraftPlus dashboard, navigate to Settings. As you’ll see, UpdraftPlus comes pre-configured to enable manual backups of your WordPress files and database.

You’ll want to automate these by setting them to some frequency, such as daily, or weekly. Next, you can choose the backup location that works best for you. These will include options like email, Google Drive, Microsoft OneDrive, DropBox, and a few others.
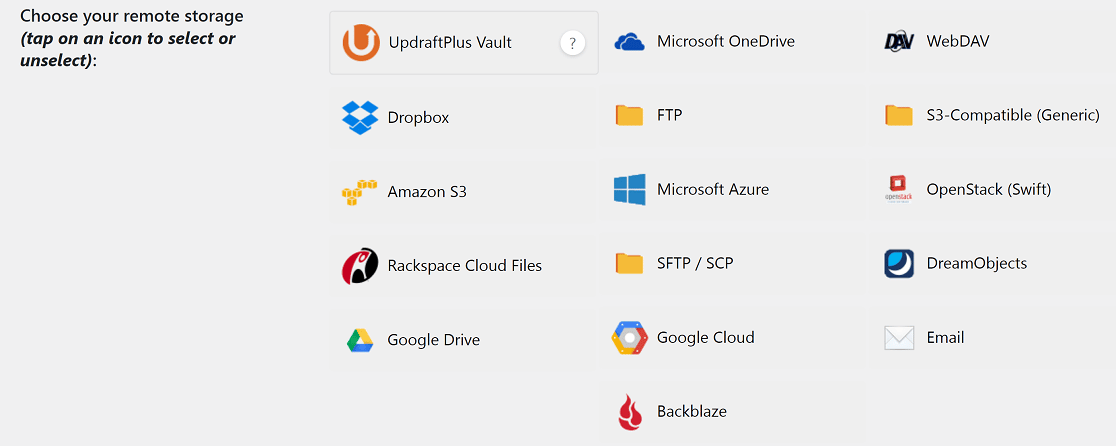
If you have a premium UpdraftPlus subscription, you’ll be able to choose multiple backup locations. If you don’t, you’ll be limited to 1.
Finally, if you would like to receive backup reports by email, scroll down and tick the Email checkbox. Click Save Changes, and you’ll be all set.
3. Update WordPress Files
The WordPress core files, themes, and plugins sometimes have security bugs. WordPress developers work non-stop to find and fix these, and then provide solutions through updates.
To keep your website safe, one of the things you’ll have to do regularly is making sure that all your website components (the core, theme, and plugins) are up to date.
Fortunately, updating these components of your website is a relatively easy task. First, from the WordPress dashboard, simply click on Updates.

From this interface, you’ll have a good overview of everything that needs an update on your website, including the WordPress core files, themes and updates. Updates can be done with a single click.
Updates to themes and plugins can sometimes cause conflicts that may affect your website. This is why you should always create a backup of your website before you commence any site maintenance.
Additionally, it may be a good idea to test updates in a staging environment before you implement them on your live website.
4. Review Security Logs
Keeping things up to date is just one piece of the security puzzle. Another step to take regularly is keeping an eye on WordPress’s internal site health monitor.
In your WordPress dashboard, click on Tools » Site Health. This interface will highlight security and performance issues that need your attention.
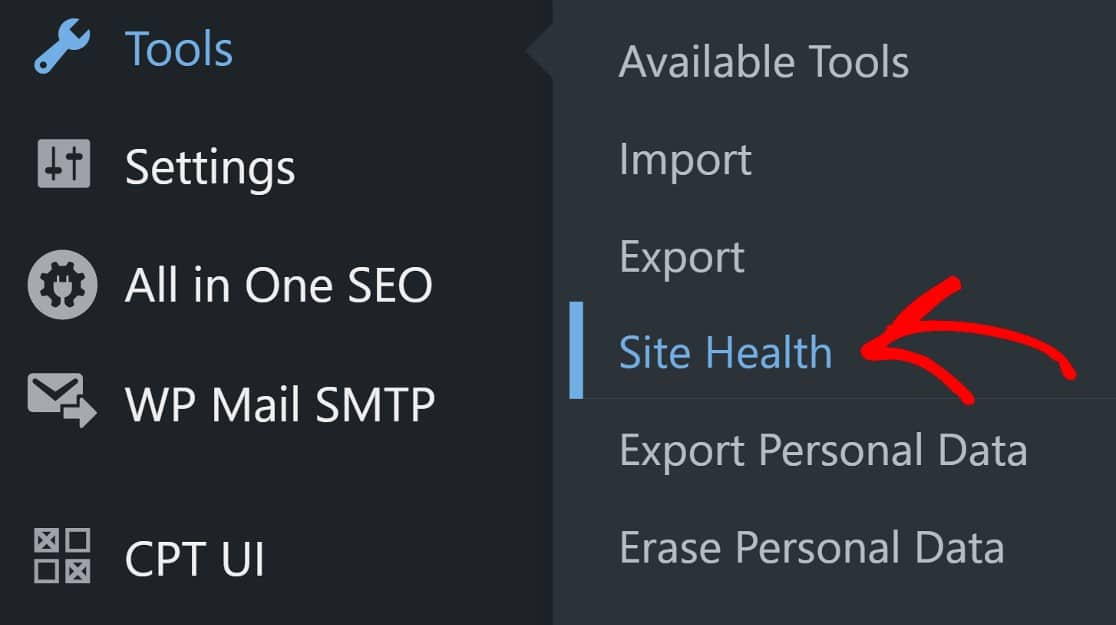
For a higher level of security, you may consider using a leading WordPress security plugin such as Sucuri. Sucuri can help protect your login pages, create firewalls (only in the premium version), scan for malware, and provide useful reports on threats to your website.
Once installed and activated, it’s advisable that you stick with Sucuri’s pre-configured settings, particularly if you’re not an advanced user.
Once you have Sucuri installed, you’ll want to keep an eye on the reports it’ll create and send to your email. One thing to note about Sucuri, though, is that it tends to send quite a few reports, and this may feel overwhelming.
One way to handle this is by creating a dedicated email for Sucuri reports so that your active email inbox doesn’t get cluttered.
5. Keep Your Database Lean
Over time, your WordPress database will accumulate lots of data. Much of it is indispensable, like your blog posts, pages, and user profiles. But a lot of it will also be things you can do without like spam.
You might know that you can delete spam from your WordPress backend. But deleting spam in this way isn’t thorough. This is because your database retains the spam entries.

To get rid of spam for good, you’ll need to do it from within the database. You can use a plugin like WP-Optimize to optimize your database, permanently deleting spam and other useless data.
Once you’ve installed and activated the plugin, navigate to your WordPress dashboard and click on WP-Optimize » Database.
Here, you can configure the database optimization or simply go ahead with the pre-configured settings. In most cases, these settings should be fine.
Click Run all Selected Optimizations, and you’ll be done with database optimization. Hopefully, you’ve already created a backup of your website. If you haven’t though, WP-Optimize has a useful integration with UpdraftPlus that’ll help.

WP-Optimize is owned by the same company that owns UpdraftPlus so these plugins integrate quite well.
One of the advantages of this is that you can set up UpdraftPlus to automatically backup your files before you optimize your database, which would be efficient.
6. Run Performance Tests
How fast does your website load? Slow loading speeds are bad for SEO so you should aim to test your site’s loading speeds regularly, and fix any issues you discover as soon as you can.
There are a few different tools you can use for this. These include apps like IsItWP Website Speed Test Tool, and Google’s PageSpeed Insights. For more tools, here’s a helpful guide to 8 tools you can use for testing your website’s speed.

In testing your website’s performance on either tool, there are 6 performance indicators to watch out for. We’ve covered these, briefly, here:
Total Blocking Time
This is a measure of the amount of time it takes before users are able to make the first meaningful interaction with elements on a web page. A good Total Blocking Time (TBT) score is 0 – 200 milliseconds.
Time to Interactive
Time to Interactive measures how long it takes for content on a page to become fully usable. A good Time to Interactive score is 0-3.8 seconds.
Speed Index
Speed Index is a measure of how fast the visible content of your web pages loads above the fold (the area that you see on your screen), compared to other live websites. A good Speed Index score is 0-3.4 seconds.
First Contentful Paint
The First Contentful Paint (FCP) measures how fast the first piece of visible content on a web page loads. A good FCP score is 0-1.8 seconds.
Cumulative Layout Shift
Cumulative Layout Shift (CLS) is a measure of how much displacement occurs due to elements loading at different speeds. A good CLS score is 0.1 or less.
Largest Contentful Paint
The Largest Contentful Paint (LCP) is a measure of how fast the largest visible element on a page loads. A good LCP score is 0-2.5 seconds.
7. Find and Fix Broken Links and 404s
When a user clicks a link on your website, do they end up where they intended? If they don’t, that could be bad for user engagement. There are two instances when this could happen.
One is when users click on an internal link or enter an internal URL into the browser but the browser cannot find the requested page. In these cases, the browser will return (or show) a 404 error.
The second instance to worry about is when your content includes links to an external page that also can’t be found. These are called broken links. Here’s a helpful guide on finding and fixing broken links.
You’ll want to pay attention to fixing broken links, in particular, because not only are they bad for user experience, they are also harmful for SEO.
Similarly, you’ll want to fix any 404 pages on your website. Fortunately, AIOSEO can help with finding and fixing 404 links.

AIOSEO is the leading WordPress SEO plugin, with tons of useful SEO features which include cutting-edge on-page analysis, social media integration, XML sitemaps, eCommerce and video SEO support, and so much more.
You can use AIOSEO for free but you won’t have access to the redirects manager addon. This feature is available only with the premium plan.
Once you’ve installed and activated AIOSEO Pro, you’ll need to enable redirects on your site. In the WordPress dashboard, click on All in One SEO > Activate Redirects > Redirects > Settings.
In the Settings interface, you’ll have to scroll down to find the Logs section. Once there, simply toggle the 404 Logs button. It’ll turn blue when its switched on.
Now you’ll be able to see all 404 links generated across your website, simply by clicking on the 404 Logs tab. Naturally, you’ll want to redirect these to live pages on your website.
Click Add Redirect and paste in the URL of the selected page. The last step will be to select a redirection type. In most cases, 301 Moved Permanently will meet your needs.
If you would like a more detailed, step-by-step guide, this guide to tracking and redirect 404 pages using AIOSEO redirects manager will have you tracking and fixing your 404 pages like a pro!
And that’s about it, for our WordPress monthly maintenance checklist. In addition to this list of monthly WordPress maintenance tasks, here’s a list of common WordPress errors to avoid.
Next, Learn How to Enable WordPress Maintenance Mode
One more thing to do, while you undertake any routine maintenance, is put your website into WordPress’s inbuilt maintenance mode. Maintenance mode simply shows visitors to your website that the website is temporarily unavailable, and restricts them from accessing any parts of the frontend.
To make maintenance tasks even easier, we recommend using these WordPress site management tools.
Ready to build your form? Get started today with the easiest WordPress form builder plugin. WPForms Pro includes lots of free templates and offers a 14-day money-back guarantee.
If this article helped you out, please follow us on Facebook and Twitter for more free WordPress tutorials and guides.

Estoy usando WordPress y quiero obtener WPForms gratis? Si deseo obtener WPForms gratis. Les agradecere mucho que cumplan este ofrecimiento.
Hey Edison – We have a free version of WPForms here.
And you can check the paid versions here. At the moment, we are offering a 50% discount on the first year!
I hope this helps. Let me know if you have any other questions. Thanks 🙂