AI Summary
Would you like to know how to use MailerLite with WPForms? With the MailerLite addon, you can easily send leads from your forms to the MailerLite dashboard.
This tutorial will show you how to install and use the MailerLite addon for WPForms.
Requirements:
- You need a Plus or higher license to use MailerLite integration
- Ensure that you’ve installed the latest version of WPForms to meet the minimum required version for the MailerLite addon
1. Installing the MailerLite Addon
First, ensure you’ve installed and activated WPForms on your WordPress site. Once you’ve verified your license, you can install and activate the MailerLite addon.
2. Setting Up MailerLite Integration
Once you’ve got MailerLite installed and activated, it’s time to connect your site. To do this, you will need an API key.
Obtaining an API Key
If you have an existing API key, you can skip this section. Otherwise, open the MailerLite dashboard and click on Integrations to obtain your key.

Under API in the MailerLite API section, click Use to open the token generation screen.

Next, click on Generate new token to bring up the Create new API token dialog.

In the Create new API token dialog, enter a name for your token and choose an option for IP restrictions based on your security needs.
After making your selection, click on Create token to generate a new API token.

MailerLite will generate an API key for you, which you can copy to your clipboard by clicking the Copy button.

You can also click on the Download button to download and save the API key.

Once you’ve copied your API key, you can close the dialog. We highly recommend downloading and saving a copy of the API key.

Note: You won’t be able to reaccess the token once you’ve closed this popup. We recommend saving a copy somewhere secure.
If you lose your API token and need to connect again, you’ll need to generate a new token. You can have multiple tokens for the same account.
Managing Connections in WPForms
Now that you’ve obtained your API key, you can continue to set up MailerLite integration on your WordPress site.
To do this, go to WPForms » Settings and click on the Integrations tab.

Click on MailerLite to reveal the account details for this integration.
Next, click Add New Account, and add your account details, including the MailerLite API Key and MailerLite Account Nickname.

You can use anything you like for your Account Nickname, but the API key must match what you have in your MailerLite account. If you don’t provide an Account Nickname, WPForms will use your MailerLite account name.
To ensure this, paste the API key you copied earlier, where it says MailerLite API Key. Now, give your connection a name and click Connect to MailerLite.

Adding Additional Connections
If you would like to add additional connections, click on Add New Account and add a new MailerLite API key and nickname.

This will allow you to have as many connections for MailerLite as you need, so long as each has a unique API key and nickname.
Note: Although you can generate multiple API keys for the same MailerLite account, WPForms counts each as a unique connection.
If you need to remove a connection, click Disconnect.

3. Using MailerLite With Your Forms
Now that you’ve connected MailerLite to your site, you can easily use it with any of your forms. For example, we will create a new form and add MailerLite integration using one of the connections we made earlier.
Note: Sending data to MailerLite occurs in the background after the form is submitted, so actions may not appear immediately in your MailerLite dashboard.
Adding MailerLite Integration to a Form
To get started, go to WPForms » Add New.

For this example, we’ll use the Simple Contact Form template.

Next, click on the Marketing tab and choose MailerLite from the list.

To choose a connection, click Add New Connection on the upper right of the interface.

This will open a dialog allowing you to name your new connection. You can choose any name you like. Once you’ve selected a name, click OK to move on to the next step.

Now you’ll be able to choose any of the API connections you created earlier.

Note: You can have as many connections as you need. Just set up each connection separately. Additional connections can use any of the accounts you’ve added under WPForms » Settings » Integrations.
Choosing an Action to Perform
Under Action To Perform, you can select from three options:

Different configurations are available under each of these options. We’ve described the three options in more detail below.
Subscribe
This action will add a new subscriber upon form submission. When selected, it’ll allow you to choose a Type and any Groups you’ve created in MailerLite.
Type

There are three subscription types you can choose from:
- Active
- Unsubscribed
- Unconfirmed
These correspond with the subscription types found in MailerLite. When users submit a form with the Subscribe action selected, their subscription details will be updated in your MailerLite subscriptions. For example, if you choose Active, the user will be marked as Active in MailerLite.
Groups

By using this setting, you can add or remove subscribers to or from any of the groups you have available in MailerLite.
Mapping WPForms Fields to MailerLite Custom Fields
When the Subscribe action is selected, you can map any of your form’s Field Values to MailerLite custom fields.

Unsubscribe
This action will remove a contact from your MailerLite subscriber groups without deleting their information altogether. If you want to remove a subscriber, you should choose the Delete action.

Delete
This action completely removes a contact from your subscriber list. No other options are required when this action is selected.

Choosing an Email Field
Regardless of which of the above actions you choose, you will need to set an Email field. The MailerLite addon will only pull emails from fields of the type Email.

Choosing Groups
When the Subscribe and Unsubscribe actions are selected, you can choose from any groups that already exist in your MailerLite subscriptions.

Enabling Conditional Logic (Optional)
You can enable conditional logic when setting up MailerLite connections. Just click on Enable Conditional Logic to activate it.

You can then set any rules that you’d like according to the WPForms conditional logic system.

Note: If you are unfamiliar with conditional logic in WPForms, we highly recommend that you check out our guide to learn more.
4. Enabling Double Opt-In Confirmation Email (Optional)
Double opt-in confirmation email is a good practice as it contributes towards legal compliance in European countries (GDPR). Mailerlite includes this option, and you can easily integrate it with WPForms.
To use this option, you’ll first need to enable it on your MailerLite account. To do so, log in to your MailerLite account and click on Account settings.
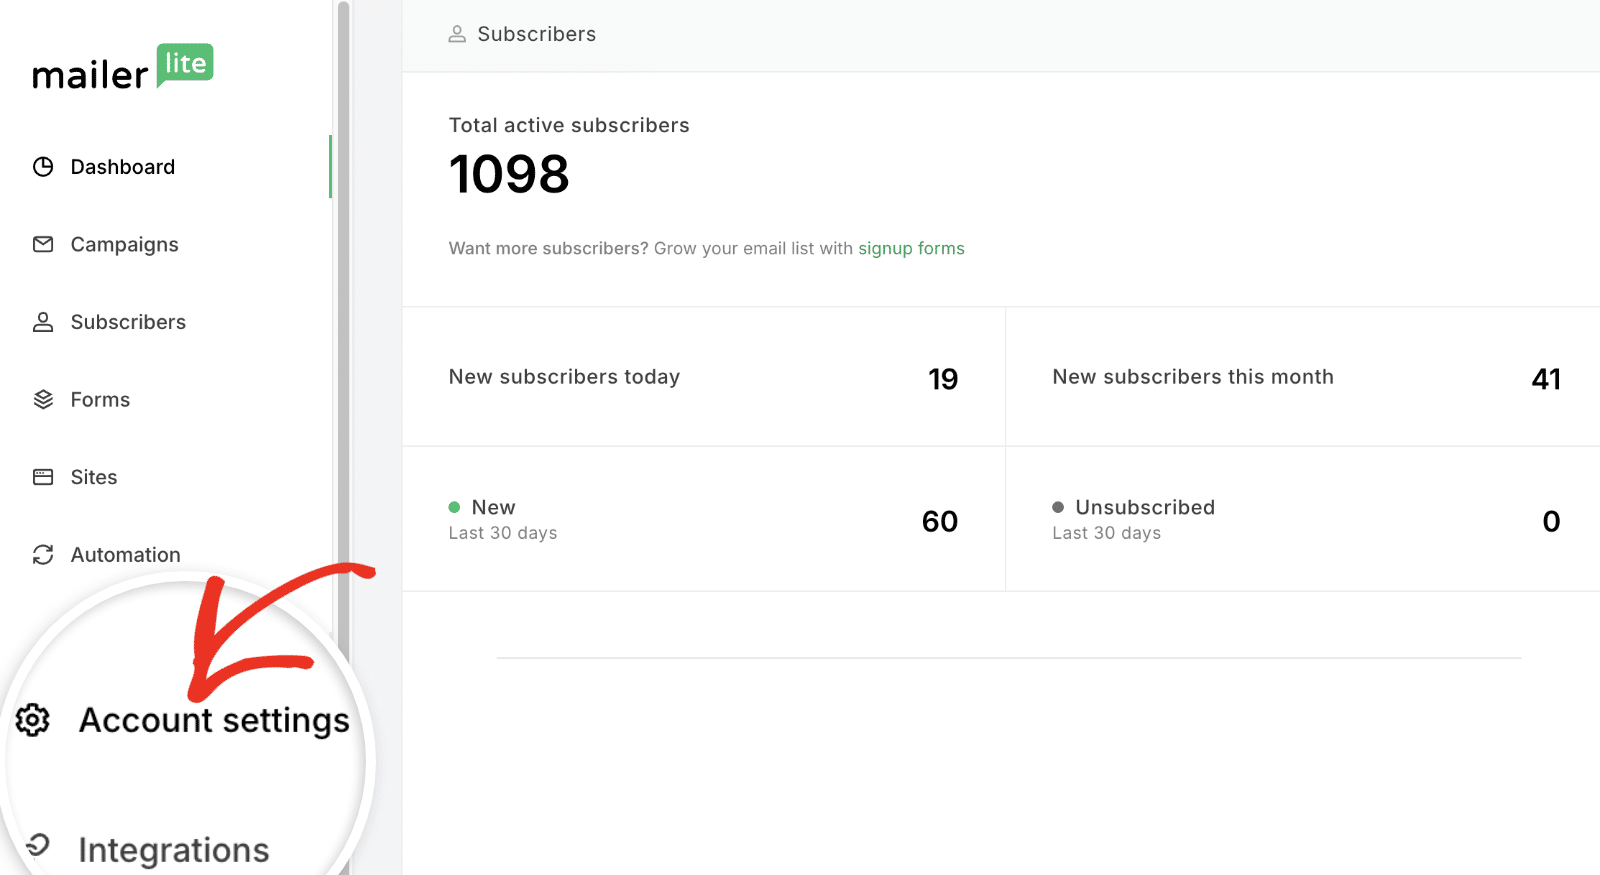
After that, select the Subscribe settings option.
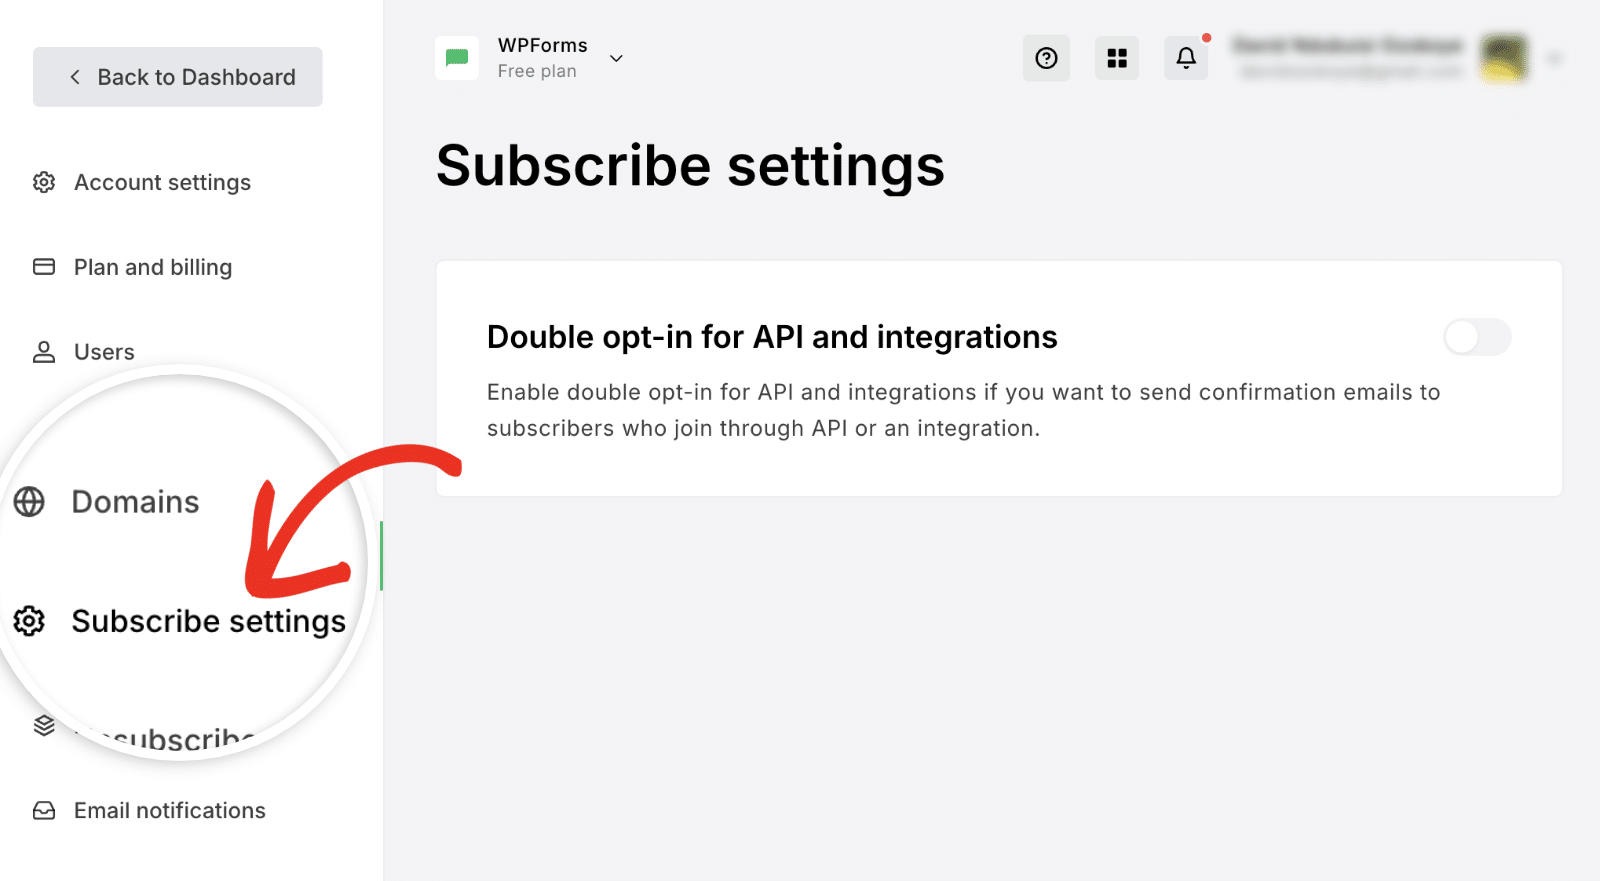
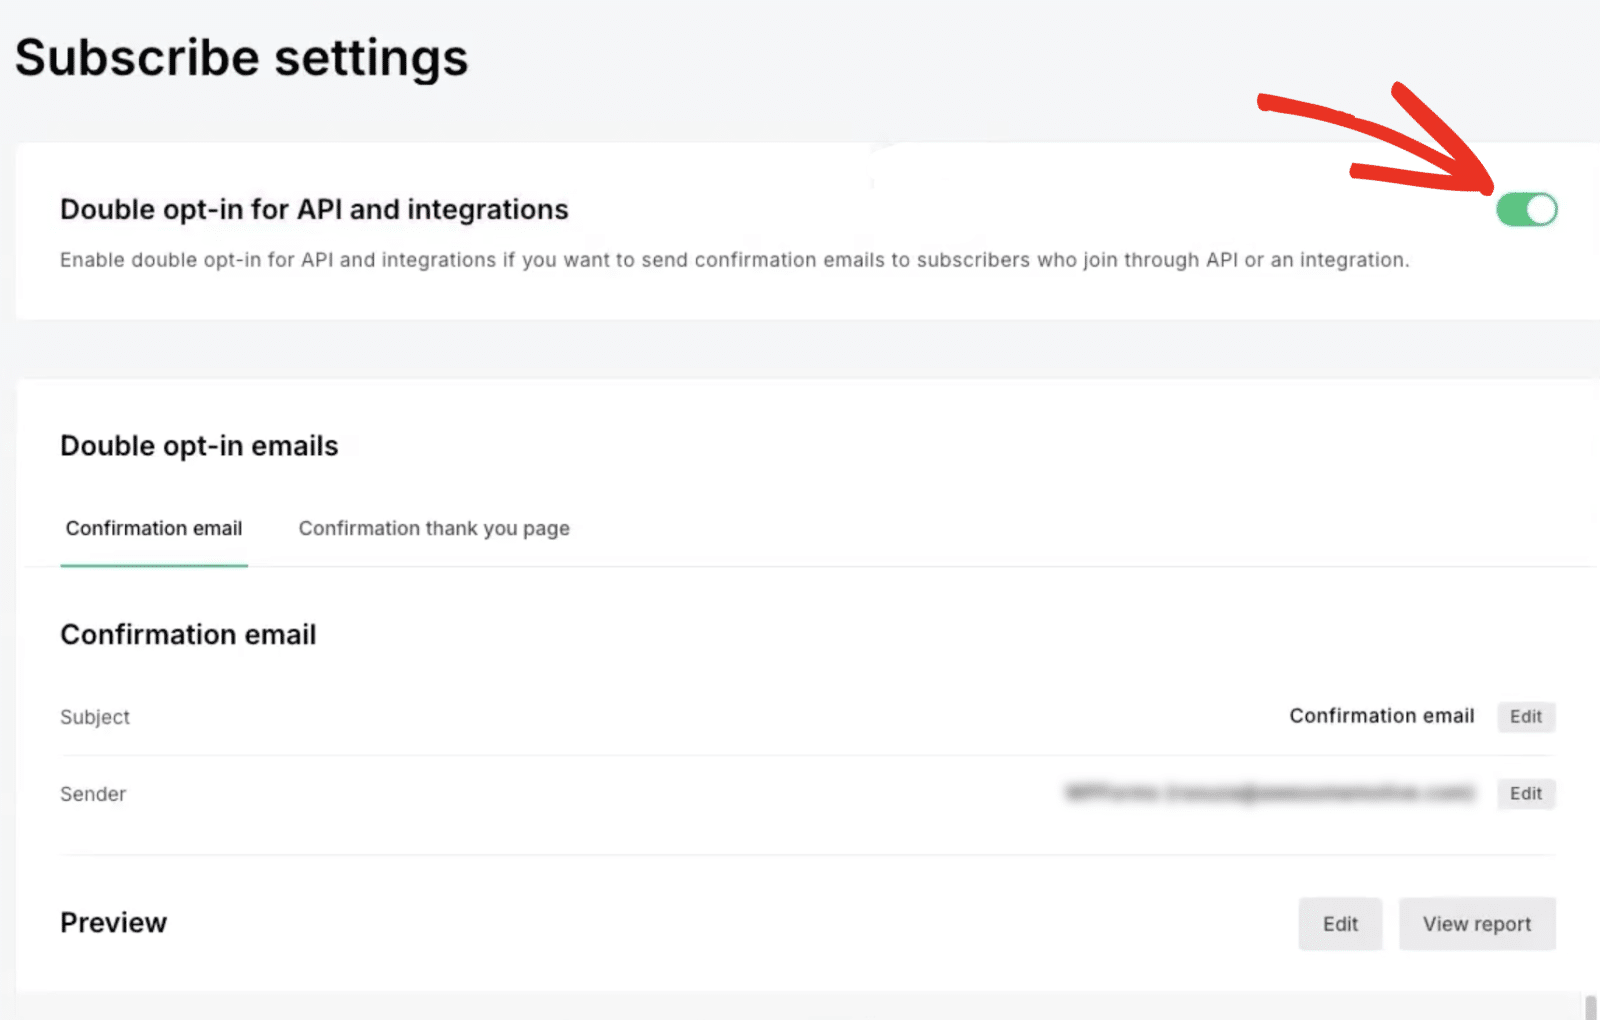
Once here, toggle on the Double opt-in for API and integrations option. Then, proceed to configure the confirmation email subject and sender details.
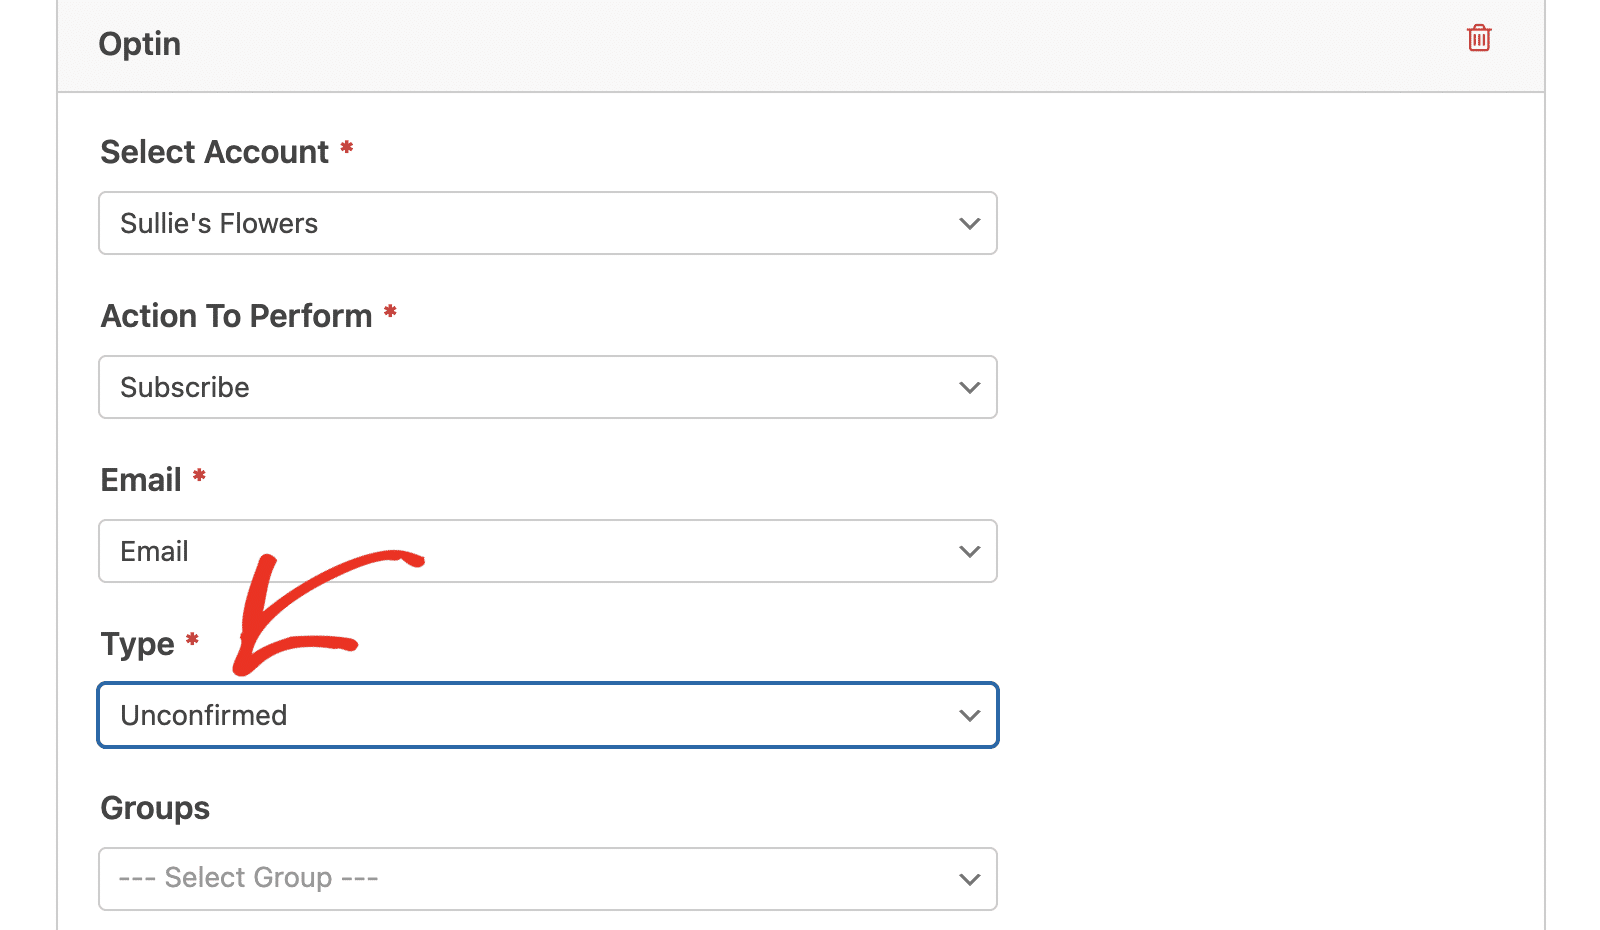
After enabling the double opt-in option, you’ll need to modify the MailerLite addon settings. To do so, open the form integrated with the MailerLite addon, then set the Type field dropdown value to Unconfirmed. Setting it to Unconfirmed is a required step for the double opt-in confirmation to work properly.
That’s it! You now know how to install and use the MailerLite addon for WPForms!
Next, would you like to know how to set up conditional logic to send email notifications for your forms? Learn more by checking out our complete tutorial.