
KI-Zusammenfassung
Wenn Sie Dateien über WordPress-Formulare sammeln, kann der Speicherplatz schnell zu einem Problem werden. Ich habe schon viele Websites gesehen, die Probleme bekamen, als sich Dateiuploads auf ihrem Hosting-Server stapelten.
Deshalb empfehle ich immer, Ihre Formulare direkt mit Google Drive zu verbinden. Anstatt diese hochgeladenen Dateien auf Ihrem WordPress-Server zu speichern, werden sie direkt in Ihr Google Drive-Konto übertragen.
Wenn Sie es also leid sind, den Dateispeicher zu verwalten und eine reibungslose Lösung benötigen, sind Sie hier genau richtig. Mit WPForms ist es einfach, Ihr WordPress und Google Drive zu verbinden!
Erstellen Sie jetzt Ihr WordPress-Dateiupload-Formular! 🙂
Ein WordPress-Formular zum Hochladen auf Google Drive erstellen
Tauchen wir ein in die Erstellung einer WordPress Google Drive-Integration, damit Sie Dateien automatisch von Ihren WordPress-Formularen sichern können.
Schritt 1: WPForms installieren und aktivieren
Wenn es um die Verarbeitung von Dateiuploads in WordPress-Formularen geht, benötigen Sie eine Lösung, die sowohl zuverlässig als auch flexibel ist. Daher ist WPForms das beste WordPress-Plugin, um Dateien nach Google Drive zu hochladen.
Sie können ein Formular in wenigen Minuten erstellen und verschiedene Dateitypen akzeptieren, bestimmte Upload-Limits festlegen und alles automatisch mit Ihren Google Drive-Ordnern synchronisieren lassen.
Wenn Sie WPForms noch nicht installiert haben, benötigen Sie die Pro-Version, um auf das Google Drive Addon zugreifen zu können. Damit können Sie Dateien automatisch an bestimmte Drive-Ordner senden und sogar benutzerdefinierte Berechtigungen festlegen.

Und wenn Sie nicht sicher sind, wie Sie ein Plugin in WordPress installieren, können Sie unsere Dokumentation zur Installation des WPForms-Plugins zurate ziehen. Es dauert nur wenige Minuten, um loszulegen!
Jetzt auf WPForms Pro upgraden! :)
Schritt 2: Erstellen Sie ein Dateiupload-Formular
Es gibt verschiedene Möglichkeiten, ein Formular einzurichten, das Dateiuploads akzeptiert, und ich zeige Ihnen meinen bevorzugten Ansatz, der jedes Mal funktioniert.
Sie können entweder von Grund auf neu beginnen oder eine der Vorlagen von WPForms verwenden. Öffnen Sie Ihren WordPress-Adminbereich und klicken Sie auf WPForms » Neu hinzufügen.

Dies öffnet den WPForms-Formularersteller. Geben Sie hier zunächst Ihrem Formular einen geeigneten Namen. Nutzen Sie dann die umfangreiche Vorlagenbibliothek von WPForms.

Um Ihnen die Arbeit zu erleichtern, empfehle ich Ihnen, die Vorlage „Dateiupload-Formular“ zu verwenden. Scrollen Sie nach unten und geben Sie im Suchfeld unter dem Abschnitt Vorlage auswählen Dateiupload-Formular ein.

Wenn sich die Vorlage öffnet, finden Sie darin einige gängige Felder, darunter ein Feld für den Dateiupload. Sie können diese Vorlage nach Belieben anpassen oder sie so belassen, wie sie ist.

Für eine detailliertere Anleitung zu Dateiupload-Formularen siehe unser Tutorial zum Thema Erstellen eines Dateiupload-Formulars in WordPress. Wenn Sie bereit sind, stellen Sie sicher, dass Sie das Formular speichern.
Schritt 3: Verbindung mit Google Drive herstellen
Bevor wir Dateien an Google Drive senden können, müssen wir das Google Drive Addon aktivieren. Gehen Sie von Ihrem WordPress-Dashboard zu WPForms » Addons.

Suchen Sie nach „Google Drive“, indem Sie den Namen in das Feld Addons durchsuchen eingeben. Klicken Sie dann auf die Schaltfläche Addon installieren und anschließend auf die Schaltfläche Aktivieren.
Gehen Sie danach in Ihrem WordPress-Dashboard zu WPForms » Einstellungen und klicken Sie auf die Registerkarte Integrationen. Sie sehen Google Drive unter den verfügbaren Integrationen aufgelistet.

Klicken Sie als Nächstes auf die Google Drive-Integration, um ihre Einstellungen zu erweitern, und klicken Sie auf die Schaltfläche Mit Google fortfahren, um WPForms mit Ihrem Google-Konto zu verbinden.

Wenn Sie auf die Schaltfläche Verbinden klicken, werden Sie von Google aufgefordert, sich anzumelden und WPForms Zugriff auf Ihr Drive zu gewähren. Anschließend werden die Berechtigungen angefordert, die zum Speichern Ihrer Formular-Uploads erforderlich sind.

Nach der Autorisierung von WPForms werden Sie zurück zu WPForms » Einstellungen » Integrationen weitergeleitet. Achten Sie auf das kleine grüne „Verbunden“-Abzeichen neben Google Drive. So wissen Sie, dass alles verbunden und einsatzbereit ist.

Schritt 4: Fügen Sie die Integration zu Ihrem Formular hinzu
Zurück in Ihrem Formular-Builder richten wir genau ein, wie Dateien in Google Drive fließen sollen. Klicken Sie auf Einstellungen » Google Drive und dann auf die Schaltfläche Neue Verbindung hinzufügen.

Sie sehen ein Popup, in dem Sie einen Spitznamen für diese Verbindung eingeben können. Machen Sie sich keine allzu großen Sorgen darüber, da dies nur zu Ihrer Information dient. Geben Sie Ihren Spitznamen ein und klicken Sie auf OK.

Wählen Sie als Nächstes Ihr verbundenes Google Drive-Konto aus dem Dropdown-Menü aus. Wenn Sie mehrere Google-Konten verbunden haben, stellen Sie sicher, dass Sie das richtige auswählen, da dort alle Ihre Formular-Uploads landen werden.

Nachdem Sie Ihr Konto ausgewählt haben, sehen Sie neue Optionen, mit denen Sie steuern können, wo Ihre hochgeladenen Dateien in Google Drive gespeichert werden. Unter der Einstellung Ordner sehen Sie zwei Optionen:
- Neu erstellen: Dies erstellt einen neuen Ordner in Ihrem Drive (das mache ich normalerweise für neue Projekte). WPForms schlägt vor, Ihren Formularnamen als Ordnernamen zu verwenden, aber Sie können ihn in etwas Sinnvolleres ändern.
- Vorhandenen auswählen: Verwenden Sie einen vorhandenen Ordner, wenn Sie bereits einen bestimmten Speicherort für diese Uploads im Sinn haben. Klicken Sie einfach auf die Schaltfläche Ordner auswählen, um Ihr Drive zu durchsuchen.

Sobald Sie Ihre Auswahl getroffen haben, müssen Sie WPForms mitteilen, welche Upload-Felder mit Drive synchronisiert werden sollen. Sie können entweder bestimmte Felder auswählen oder „Alle Dateiupload-Felder“ wählen, um alles zu übertragen.

Nachdem Sie Ihre Formulareinstellungen gespeichert haben, wird im Abschnitt „Ordner“ Ihrer Google Drive-Verbindungseinstellungen eine Schaltfläche Ordner anzeigen auf Drive angezeigt.

Wenn Sie auf diese Schaltfläche klicken, wird der ausgewählte Ordner in Ihrem Google Drive-Konto geöffnet. So können Sie hochgeladene Dateien schnell aufrufen und verwalten.
Schritt 5: Veröffentlichen Sie Ihr Google Drive-Formular
Jetzt, da Ihr Formular mit Google Drive verbunden ist, ist es an der Zeit, es auf Ihrer Website einzubinden. Sie können Ihr Upload-Formular auf jeder Seite, jedem Beitrag oder sogar in Ihrer Seitenleiste platzieren.
Fügen wir es zu einer Seite hinzu, da ich das normalerweise für Dateiupload-Formulare mache. Klicken Sie auf die Schaltfläche Einbetten oben in Ihrem Formular-Builder, um zu beginnen.

Sie sehen zwei Optionen: zu einer vorhandenen Seite hinzufügen oder eine neue erstellen. Ich erstelle normalerweise eine eigene Seite für Dateiuploads, um die Dinge organisiert zu halten. Wählen Sie, was für Ihre Website am besten geeignet ist.

Geben Sie Ihrer Seite einen Namen (etwas wie „Dokumente hochladen“ oder „Dateien einreichen“) und klicken Sie dann auf Los geht’s. Der WordPress-Editor wird geöffnet, wobei Ihr Formular bereits platziert und einsatzbereit ist.

Bevor Sie auf Veröffentlichen klicken, lassen Sie uns Ihr Formular professionell aussehen lassen. Klicken Sie auf den Formularblock, um das Styling-Optionsfeld zu öffnen. Hier können Sie Ihr Upload-Formular wirklich hervorheben.
Um Ihr Formular schnell zu gestalten, können Sie unter der Formular-Design Option ein fertiges Design auswählen. In diesem Beispiel verwende ich das Frost-Design (eines meiner Favoriten).
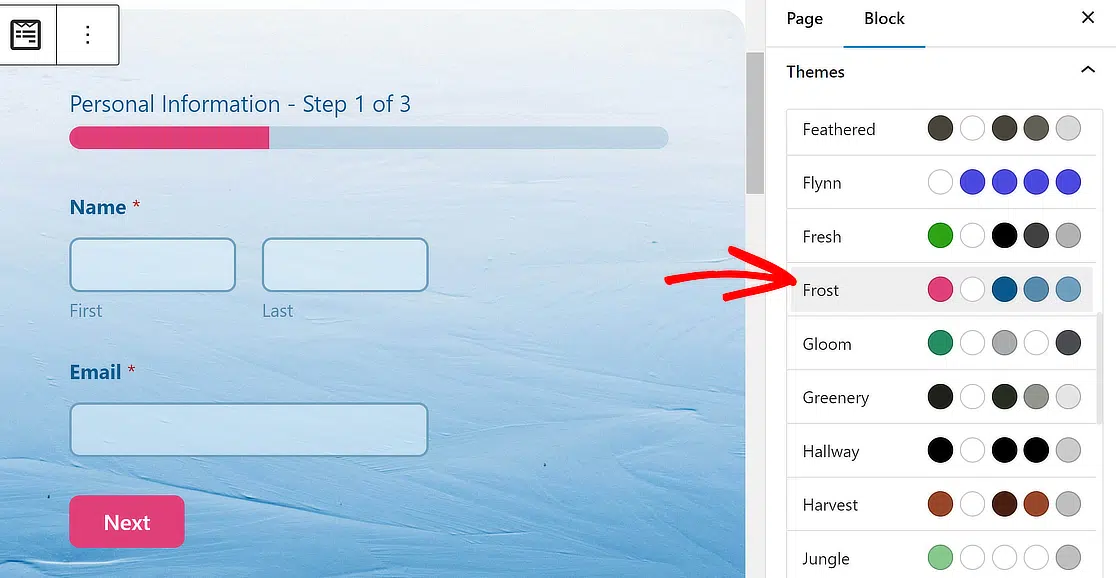
Probieren Sie gerne andere Themes aus; Sie haben viele Optionen. Wenn Sie gerne direkt experimentieren, können Sie auch manuell verschiedene Elemente des Formulars präziser anpassen.
Wenn Sie mit dem Aussehen zufrieden sind, klicken Sie auf Veröffentlichen. Ihr mit Google Drive verbundenes Upload-Formular ist jetzt live! Wenn Benutzer Dateien einreichen, werden diese direkt in Ihren angegebenen Drive-Ordner übertragen, ohne Ihren WordPress-Speicher zu belasten.
FAQs zum Erstellen eines WordPress Google Drive Upload-Formulars
Das Erstellen eines WordPress Google Drive Upload-Formulars ist ein beliebtes Thema für unsere Leser. Hier sind Antworten auf einige häufig gestellte Fragen dazu:
Warum ein Google Drive Upload-Formular erstellen?
Ein Google Drive Upload-Formular bietet Ihnen die Zuverlässigkeit, dass Ihre Uploads von Formularen jederzeit sicher gespeichert werden. Normalerweise werden Formular-Uploads auf den Servern Ihrer Website gespeichert. Ihre Website kann jedoch schnell keinen Speicherplatz mehr haben, wenn alle Ihre Uploads darin gespeichert sind.
Wenn Sie Google Drive mit Ihrem Kontaktformular verbinden, wird auch eine Kopie dieser hochgeladenen Dateien an Ihr Google Drive gesendet. So haben Sie Kopien dieser hochgeladenen Dateien sowohl auf Ihrem Server als auch auf Google Drive.
Wie erstelle ich ein Formular, das Uploads nach Google Drive ermöglicht?
Um ein Formular zu erstellen, mit dem Benutzer Dateien direkt nach Google Drive hochladen können, können Sie WPForms zusammen mit dem Google Drive Addon verwenden.
Erstellen Sie zuerst ein Dateiupload-Formular in WPForms und verbinden Sie dann WPForms mit Google Drive. Dies ermöglicht es, dass die Formularübermittlungen Dateien automatisch direkt an Ihr Google Drive gesendet werden.
Wie erstelle ich ein Upload-Formular in WordPress?
Um ein Upload-Formular in WordPress zu erstellen, installieren und aktivieren Sie das WPForms-Plugin. Verwenden Sie den Drag-and-Drop-Formularersteller, um ein Dateiupload-Feld hinzuzufügen, das Formular anzupassen und es für den Dateiupload einzurichten.
Sie können es mit Diensten wie Google Drive über das spezielle Add-on weiter integrieren. Ebenso können Sie Einträge an Google Sheets senden.
Als Nächstes: Automatisieren Sie WordPress-Aufgaben
Wenn Sie die Idee, all diese Dinge automatisch mit Ihren Formularen zu erledigen, cool finden, werden Sie diesen Beitrag über die besten WordPress-Automatisierungstools unbedingt lesen wollen.
Und wenn Sie eine gemeinnützige Organisation sind, die nach Möglichkeiten sucht, Spenden effektiv zu verfolgen, finden Sie hier unseren Leitfaden zur Erstellung eines automatisierten Spenden-Trackers mit der Google Sheets-Integration von WPForms.
Für einige andere Möglichkeiten, Google Workspace-Apps auf einer WordPress-Website zu nutzen, lesen Sie unseren Leitfaden zu den Top-Google-Workspace-Plugins für WordPress.
Sie werden vielleicht auch unseren Leitfaden zum Ändern der maximalen Dateiuploadgröße in WordPress lesen wollen. Dies kann nützlich sein, wenn Sie mit Dateiupload-Formularen arbeiten.
Erstellen Sie jetzt Ihr WordPress-Formular
Bereit, Ihr Formular zu erstellen? Beginnen Sie noch heute mit dem einfachsten WordPress-Formularersteller-Plugin. WPForms Pro enthält viele kostenlose Vorlagen und bietet eine 14-tägige Geld-zurück-Garantie.
Wenn Ihnen dieser Artikel geholfen hat, folgen Sie uns bitte auf Facebook und Twitter für weitere kostenlose WordPress-Tutorials und Anleitungen.


Ist dieser gesamte Prozess Ende-zu-Ende-verschlüsselt? Wo werden die Dateien vor der Übertragung nach Google Drive temporär gespeichert? Es scheint, dass sie auf einem Server namens i0.wp.com gespeichert werden. Was ist das für ein Server? Ist er sicher? Wem gehört er/wer kontrolliert ihn?
Hallo Ryan.
Um sicherzustellen, dass wir Ihre Frage so gründlich wie möglich beantworten, werden wir per E-Mail-Support in Ihrem aktuell aktiven Ticket dazu antworten.
Ich hoffe, das hilft!
Mein Formular sendet die Datei nicht mehr an Google Drive. Wenn ich den Zap alleine ausführe, funktioniert er einwandfrei und platziert die zuletzt von WPFORMS hochgeladene Datei in Google Drive. Wenn ich ihn jedoch über WPFORMS auslöse, erhalte ich die folgende Fehlermeldung: „Erforderliches Feld „file“ (Datei) fehlt.“ Ich habe mit dem mehrstufigen ZAP-Support gesprochen. ZAP hat angegeben, dass dies ein bekanntes Problem mit WPFORMS ist, und mich gebeten, WPFORMS zu kontaktieren. Kann mir jemand sagen, ob dies ein bekanntes Problem ist und ob jemand daran arbeitet?
Hallo Erik, es tut uns leid für die Unannehmlichkeiten. Um sicherzustellen, dass wir Ihre Frage so gründlich wie möglich beantworten und Verwirrung vermeiden.
Würden Sie uns bitte kontaktieren und uns weitere Details mitteilen, damit wir Ihnen in diesem Fall weiterhelfen können?
Danke.
Wie kann der Benutzer die Datei von der Benutzerseite aus sehen?
Hallo Arjunan, es tut uns leid für die Unannehmlichkeiten. Um sicherzustellen, dass wir Ihre Frage so gründlich wie möglich beantworten und Verwirrung vermeiden.
Würden Sie uns bitte kontaktieren und uns weitere Details mitteilen, damit wir Ihnen in diesem Fall weiterhelfen können?
Danke.
Ich mag diese Lösung, aber etwas, das ich brauche, fehlt.
Ich möchte in der Upload-Formular ein Dropdown erstellen können, das es dem Benutzer ermöglicht, auszuwählen, in welchen Ordner im Google Drive hochgeladen werden soll.
Wenn mein Benutzer beispielsweise eine PDF-Datei für eine Präsentation am Freitag hochlädt, möchte ich, dass er aus dem Dropdown den Ordner Freitag auswählen kann. Ermöglicht Zapier dies?
Hallo MJ,
Leider muss ich Ihnen mitteilen, dass wir keine integrierte Funktion haben, um spezifische Ordner wie von Ihnen erwähnt über ein Dropdown auszuwählen. Ich stimme zu, dass dies sehr hilfreich wäre! Ich habe diese Funktion als zukünftige Verbesserung hinzugefügt.
Danke,
Gibt es eine Möglichkeit, dies so einzurichten, dass die Datei nicht auf dem Server gespeichert wird (und die Upload-Größenbeschränkung umgangen wird), sondern Dateien direkt in Google Drive gespeichert werden?
Hallo Cody,
Ja, Sie können Ihr Formular so konfigurieren, dass hochgeladene Dateien direkt an Google Drive gesendet werden, wodurch die lokale Serverspeicherung und deren Größenbeschränkungen umgangen werden. Aktivieren Sie einfach die Option „Lokale Dateien nach dem Hochladen löschen“ in den Addon-Einstellungen im Formular-Builder. Dadurch wird sichergestellt, dass Dateien nur in Ihrem verbundenen Google Drive-Konto gespeichert werden. Weitere Details hierzu finden Sie in unserer Dokumentation: Google Drive Addon.