AI Summary
Are you looking to collect more information from new users than just their names and email addresses? By setting up custom user meta fields in WordPress and creating a registration form with WPForms, you can display unique data in your site’s user profiles.
This guide will show you how to set up custom user meta fields in WordPress and then collect that data with WPForms.
In This Article
Requirements: You will need a Pro license level or higher to access the User Registration addon.
Before you get started, be sure to install and activate the WPForms plugin on your WordPress site. Also, you’ll need to have the User Registration addon installed and activated.
What are Custom User Meta Fields?
Custom user meta fields are additional details you collect from your users during the registration process that WordPress doesn’t support in the user profile page natively.
For example, here are a few custom fields you can add to the user registration form on your site:
- Address
- Phone number
- Birthday
- Gender
WPForms lets you completely customize your user registration forms. Aside from text fields, you can also add dropdown menus, radio buttons, and more to your signup page.
However, in order to see that data in your user profiles, you’ll need to set up custom fields on your WordPress site using a plugin.
Installing Advanced Custom Fields
The Advanced Custom Fields plugin enables you to create your own user meta fields for your WordPress site. These may include fields that let you collect information from your registration form and display it in your users’ profiles.
You can check out this guide on how to install a plugin if you’re not sure how to do so.
Adding New Custom Fields
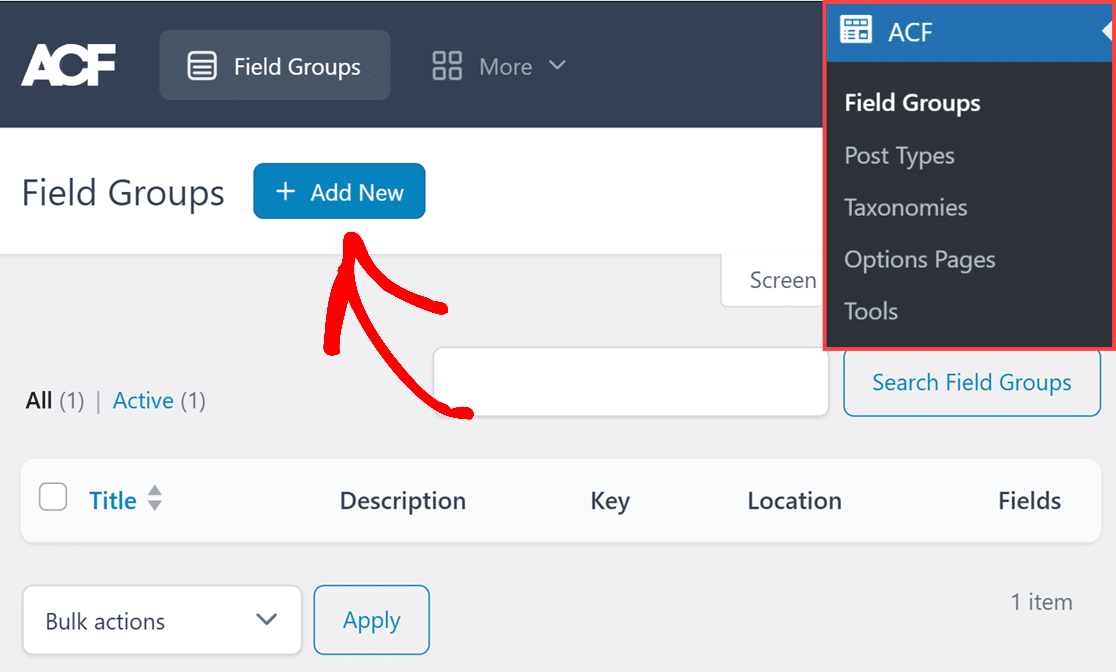
To begin, you’ll need to be logged into your WordPress admin area. Once there, click on ACF in the admin sidebar to go to the Field Groups page.
Then, to create custom fields, click on the + Add New button.
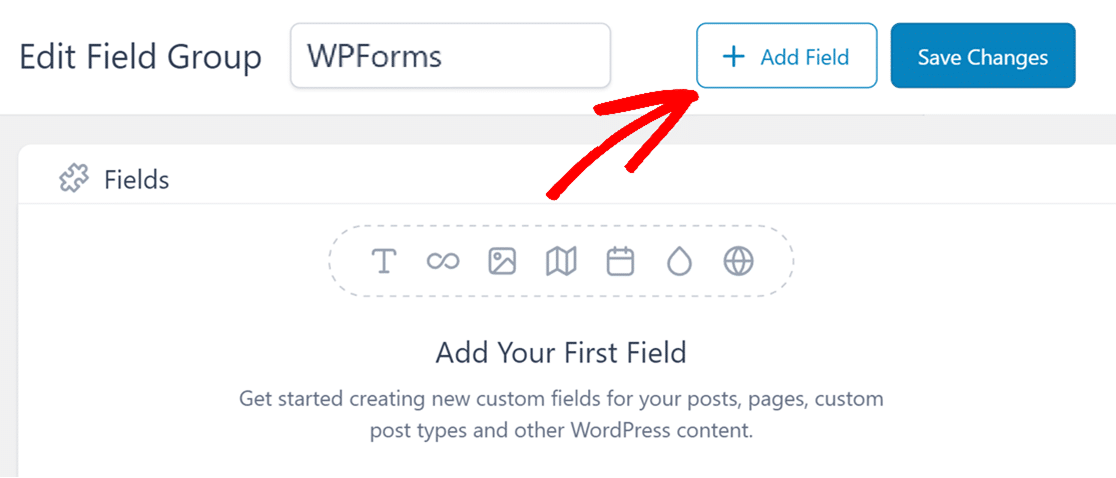
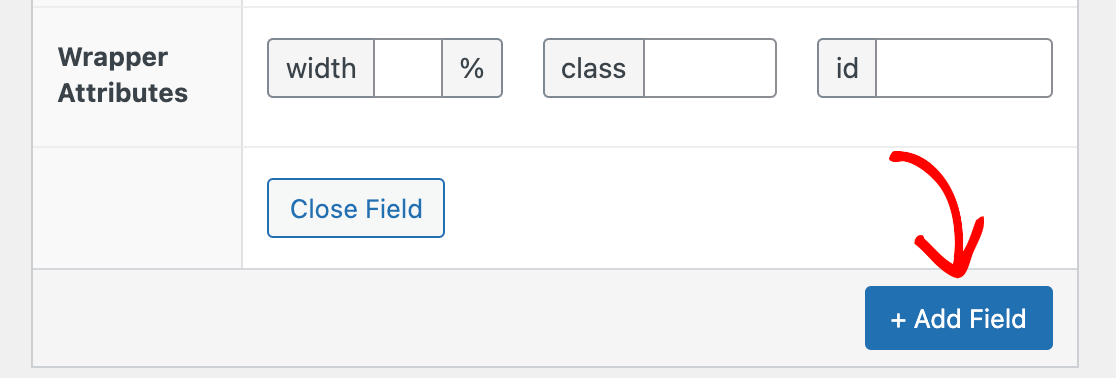
On the next page, add a title for your new field group in the Edit Field Group field. For our example, we’ll call it WPForms. Then, you’ll need to add a new field by clicking the + Add Field button.
In this example, we’ll add custom user meta fields for the user’s address, phone number, and gender.
For each custom field, you’ll be asked to specify a Field Type, Field Label, and Field Name along with other optional details.
- Field Type: You can select an appropriate field type for each field, like text, number, password, etc. For details on available field types, please see the Advanced Custom Fields overview.
- Field Label: This is the name of the field as it appears on your users’ profile pages.
- Field Name: This is the meta key you’ll use later in your user registration form. It will be created automatically once you’ve specified the Field Label.
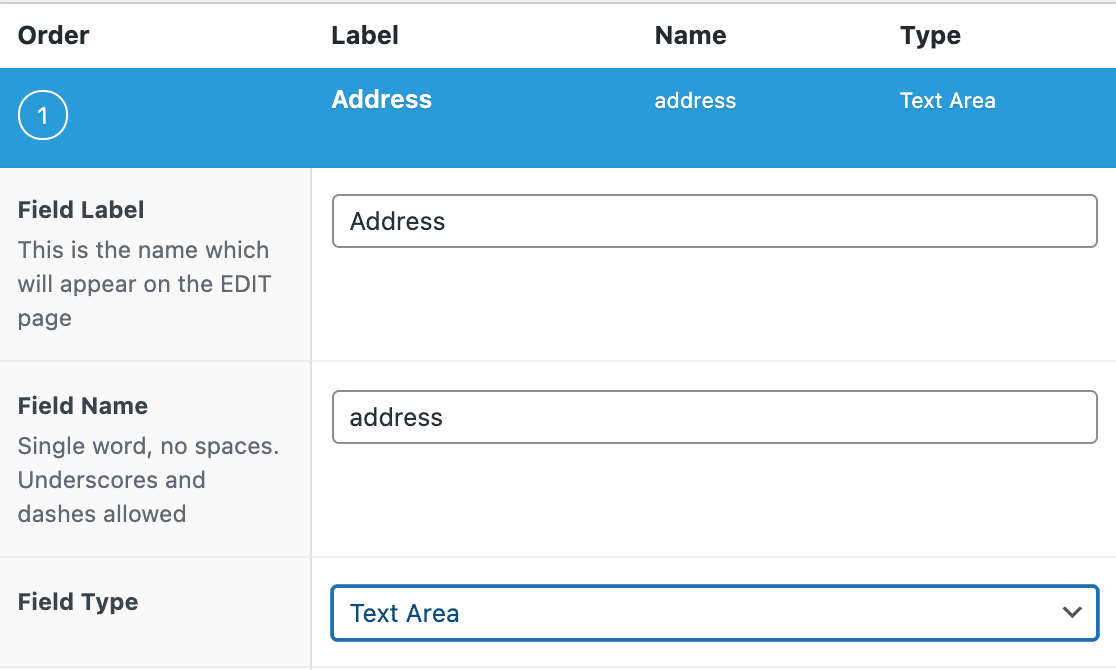
Below are a few recommendations for choosing the right field type in Advanced Custom Fields.
- Address: Choose Text Area as the field type. This option is big enough to display all the information at a glance on the user profile page.
- Phone Number: Choose Text as the field type. Phone numbers include special characters like brackets, which can’t be stored in the Number field type.
- Gender: If you’re using a Dropdown field in WPForms, choose Select as the Field Type. If you’re using a Multiple Choice field, choose Radio Button. Additionally, you’ll need to specify the options in the Choices field.
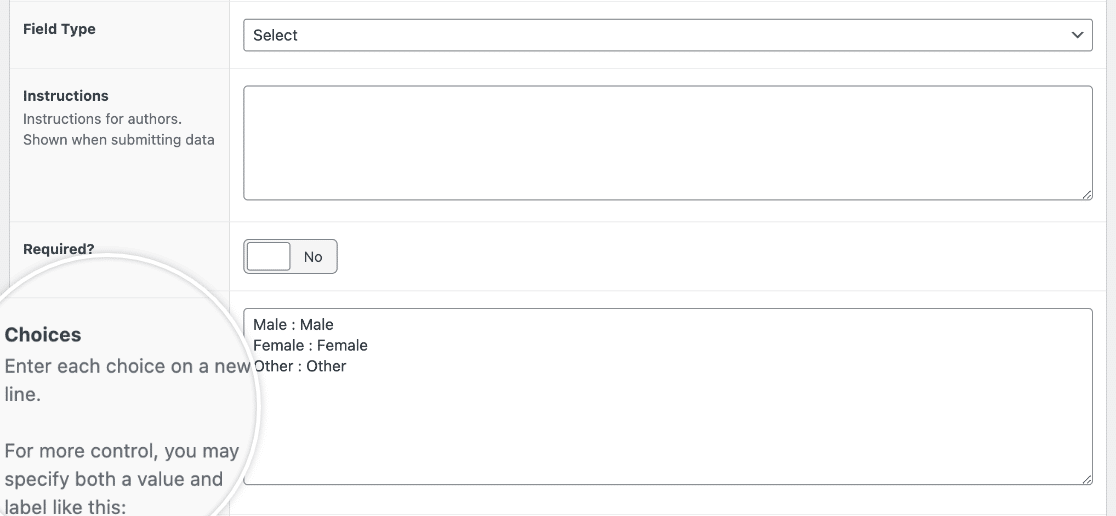
After you’ve provided all the required information for your new custom field, scroll down and click on + Add Field to configure the next one.
To display the fields in this group on the WordPress user page, scroll down to the Location section and configure the rule to read Show this field group if User Role is equal to All.

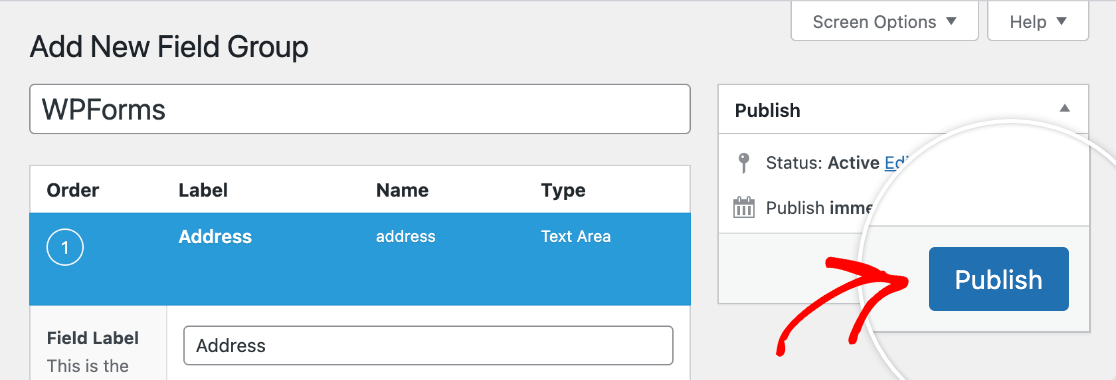
When you’re ready, click on Publish in the top right corner of the screen to save your fields.
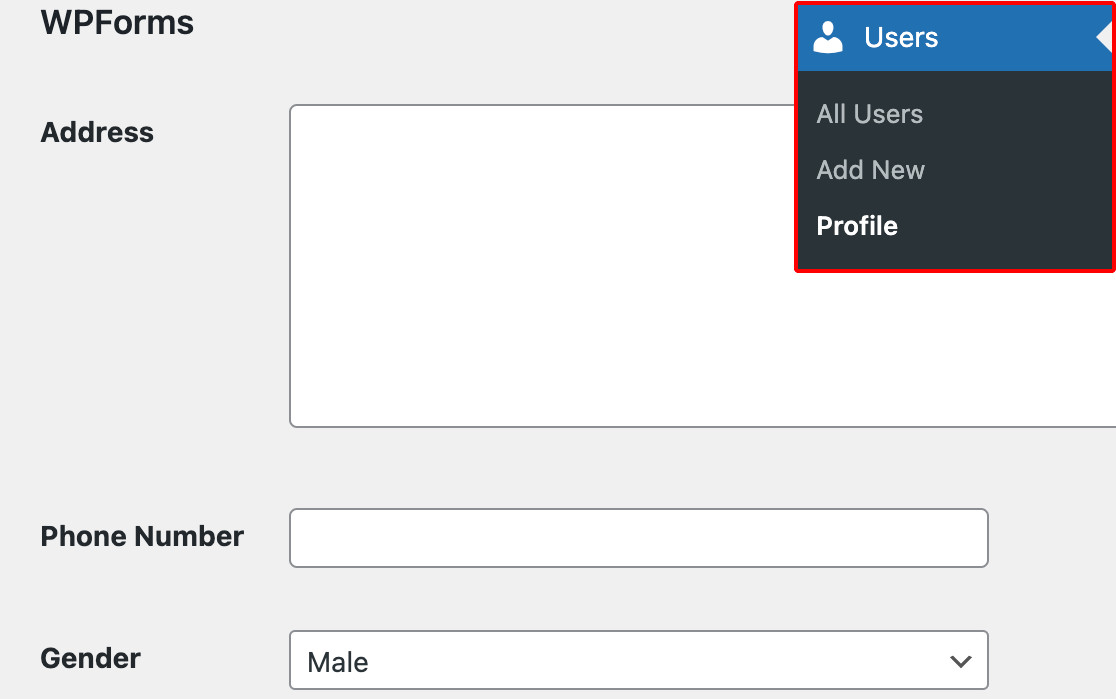
If you’d like to see the custom fields you’ve just added, you can navigate to your own profile page by clicking on User » Profile and scrolling to the section titled after your field group (in our example, WPForms).
Creating a User Registration Form
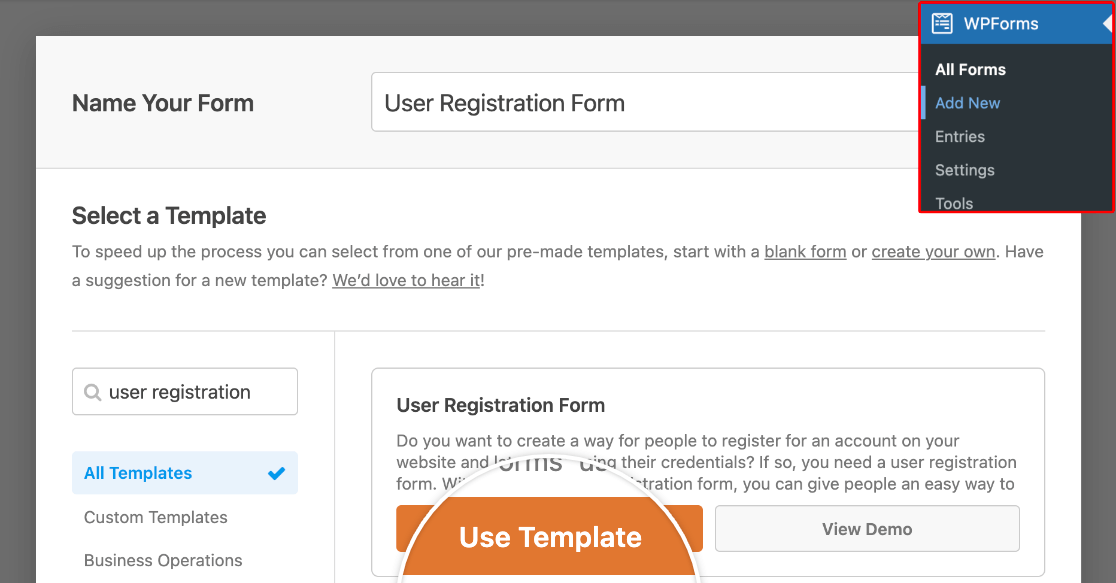
Once your custom fields are set up, you can create a user registration form if you don’t already have one. To do so, navigate to WPForms » Add New.
Add a name for your new form at the top of the screen. Then enter “User Registration” in the search bar on the left side of the template library. Click on Use Template to add it to the form builder.
By default, our User Registration Form template includes the following fields, which are mapped to the default user meta fields in WordPress:
- Name
- Username
- Password
- Short Bio
You can add new fields from the left panel and customize the order in which they appear using our drag and drop builder.
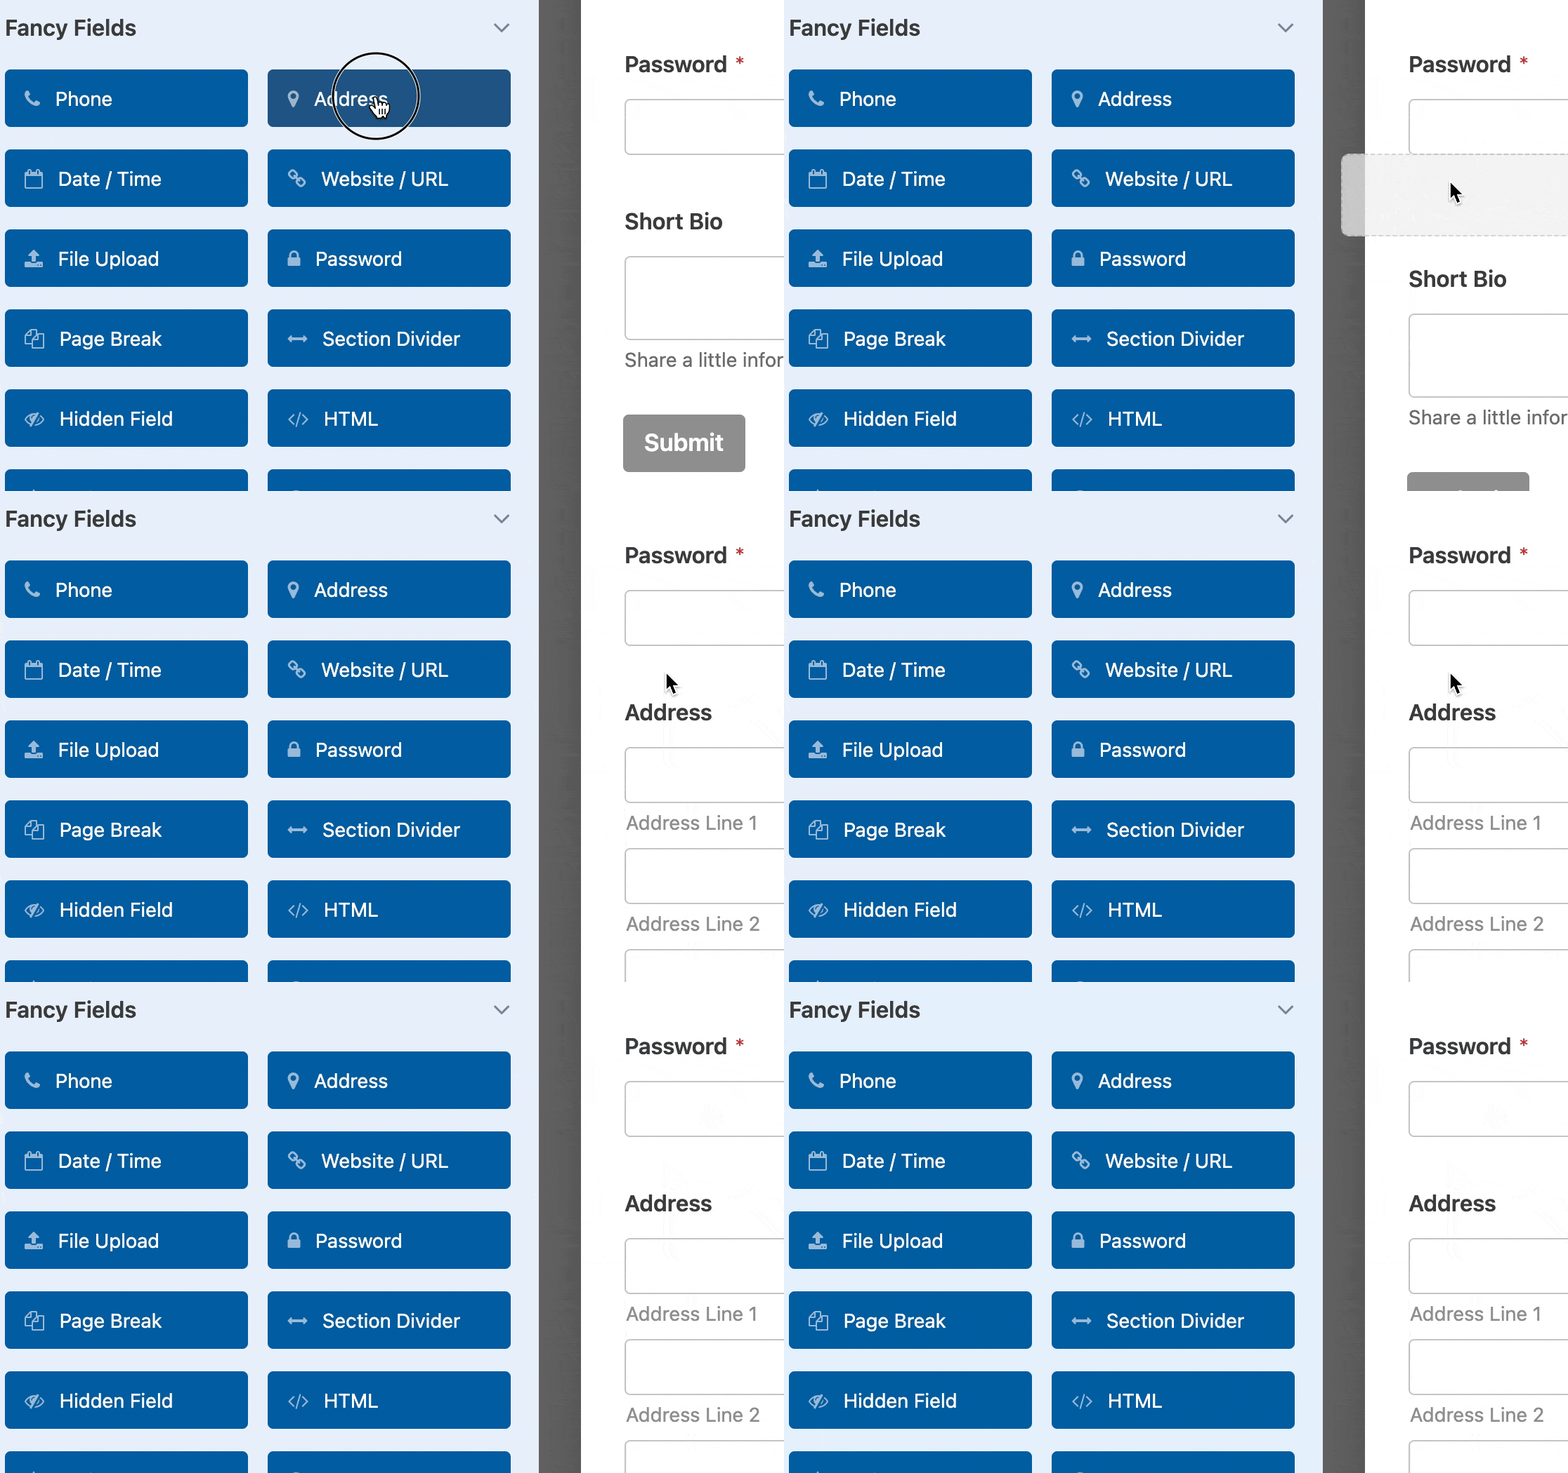
In this example, we’ll add the fields we created above: Address, Phone Number, and Gender (this could be a Dropdown or Multiple Choice field depending on what you decided earlier when setting up your custom fields).
Note: Want to learn more about setting up your form’s fields? Check out our guide on how to customize field options.
If you want to require users to fill out these fields to submit your registration form, you can do so by clicking on a field in the preview to the right to open its field options. Then toggle on the Required setting.
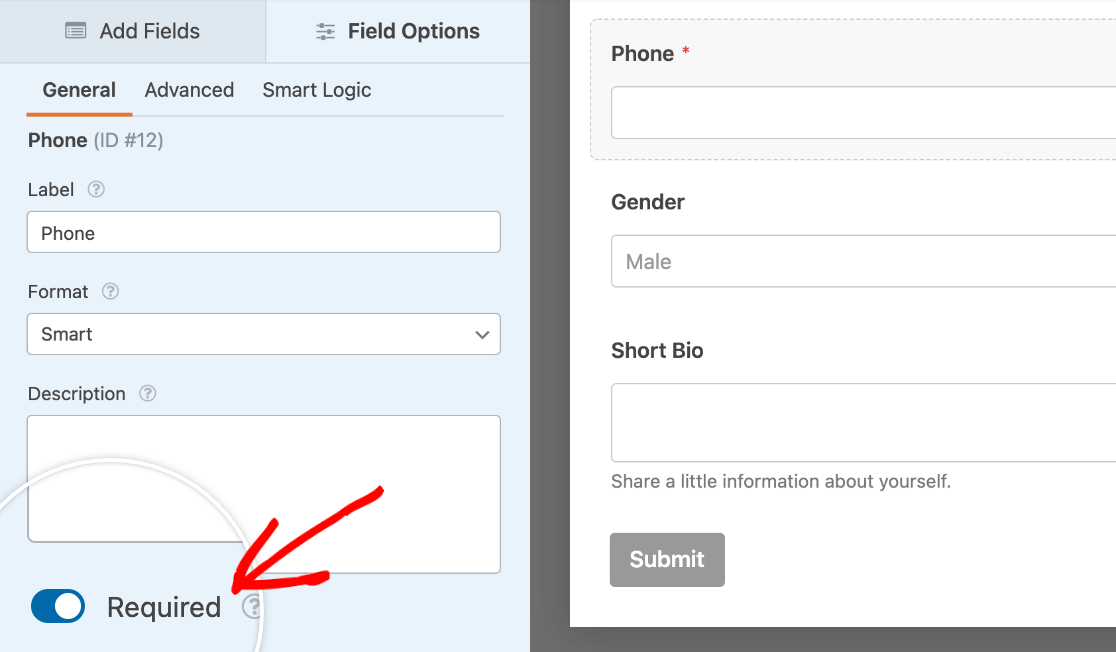
When you’ve added all your fields to your form, you’ll then need to configure your user registration settings by going to Settings » User Registration.
To map your form fields to the custom user meta fields you added earlier, scroll down to the Custom User Meta section.
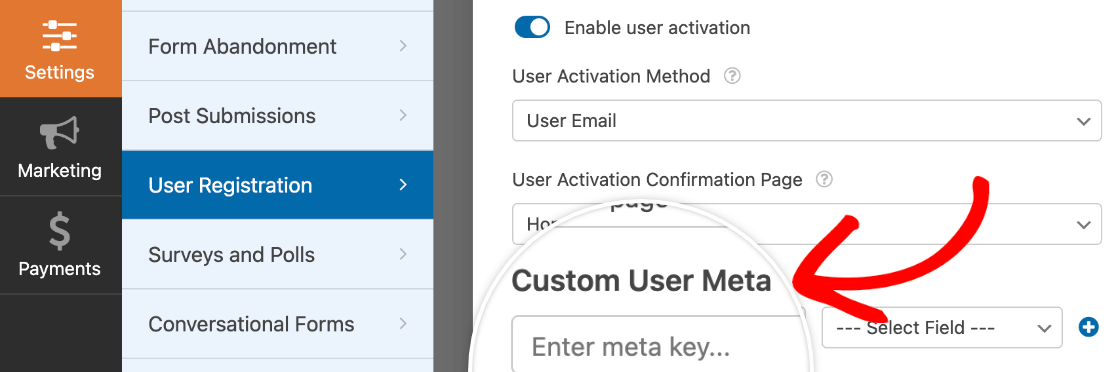
In the meta key field, you can copy the Field Name that Advanced Custom Fields generated for you. After adding each field, click the plus (+) button to create another one.

For the Select Field dropdowns, choose the fields from your form that you want to map to your custom fields. In our example, we labeled our fields Address, Phone, and Gender.
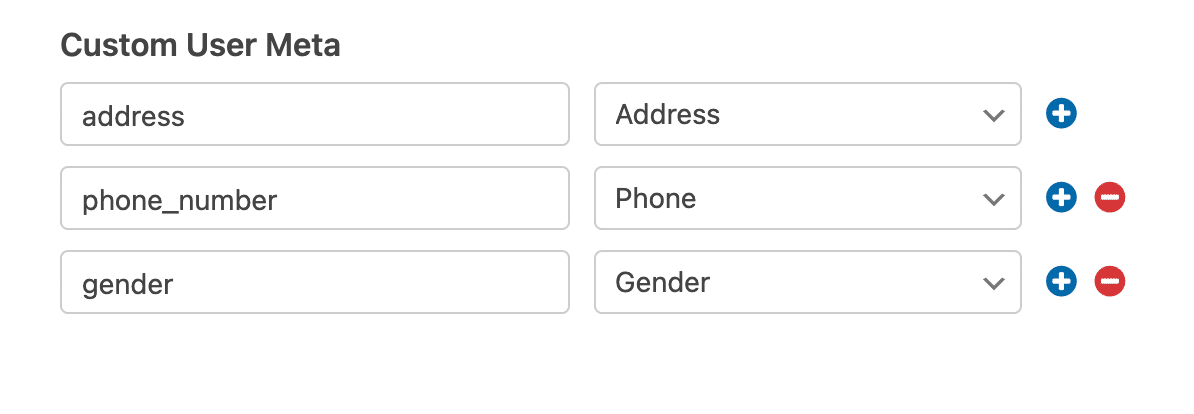
Once you’re done setting up your user registration form, be sure to click the Save button at the top of the builder.
Publishing Your Form
To publish your user registration form, you can either create a new page or edit an existing one.
In the page editor, click the plus (+) button to add a new block.

Then search for “WPForms” in the block library search bar on the left, or scroll down to the Widgets section and click on WPForms.
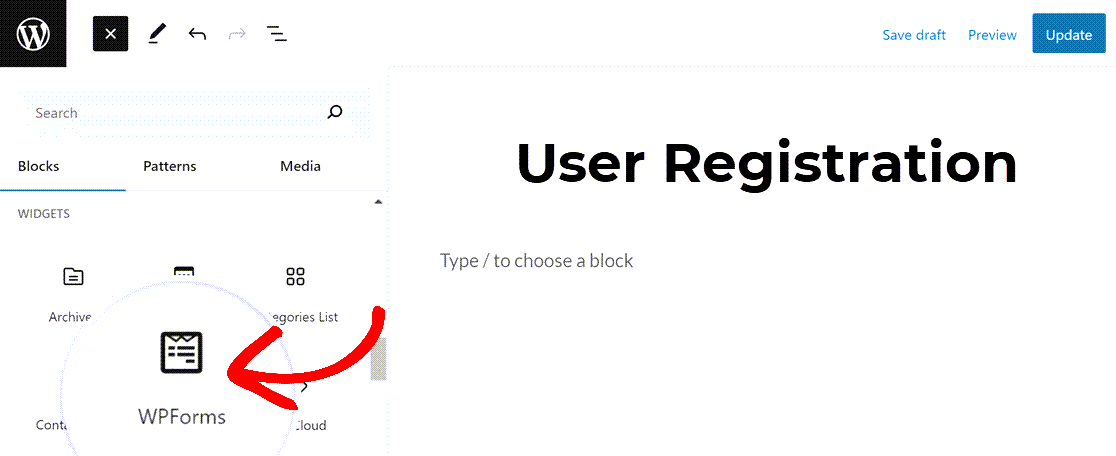
In the page editor, select your user registration form from the dropdown.
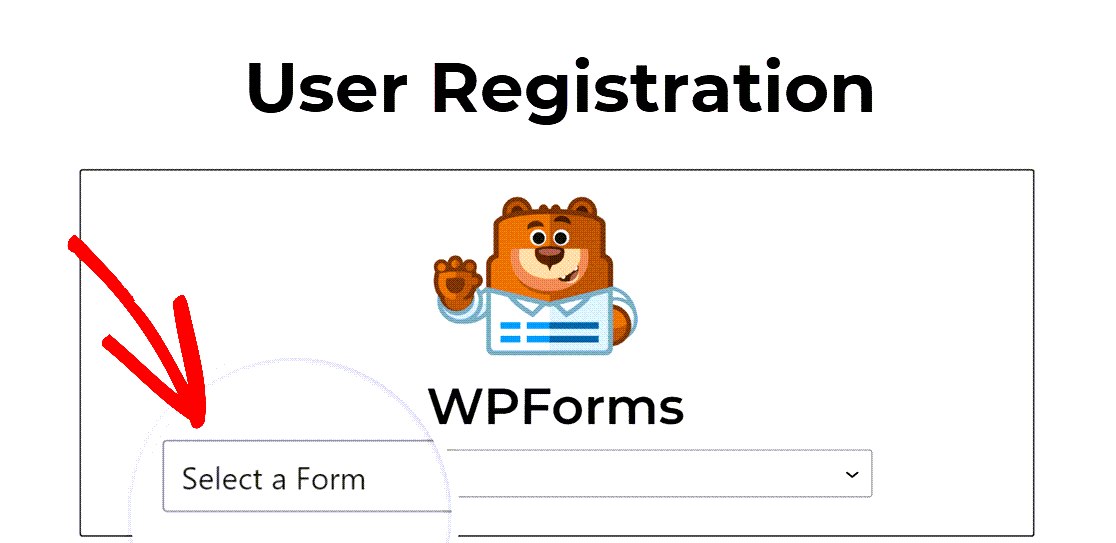
Once this page is published, users will be able to register using your new form.
Note: We always recommend testing your forms before publishing them. See our form pre-launch checklist for tips on how to preview your forms.
To access users’ submitted data, go to Users » All Users. Then, select a user and click Edit below their name.
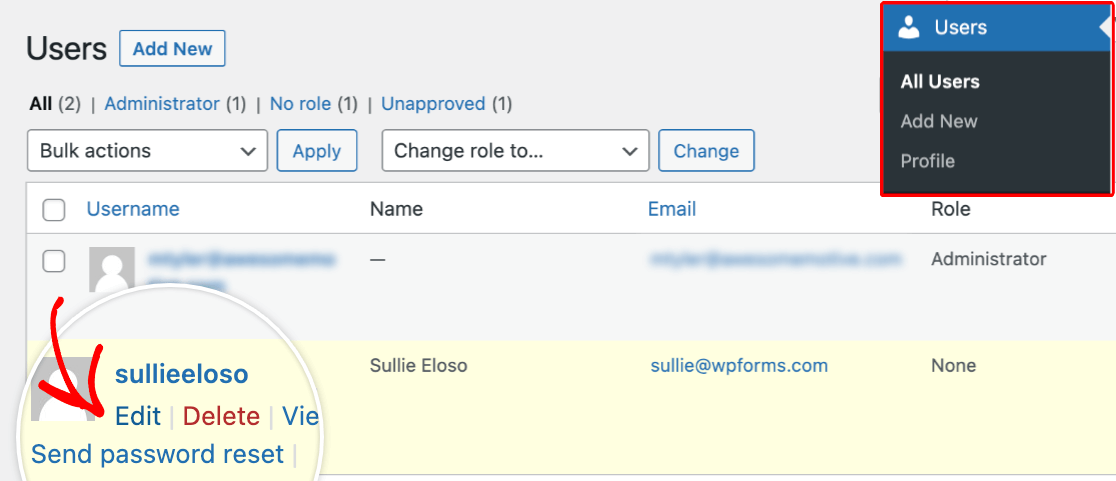
Finally, scroll down the page and look for your new fields in the selected user’s profile.
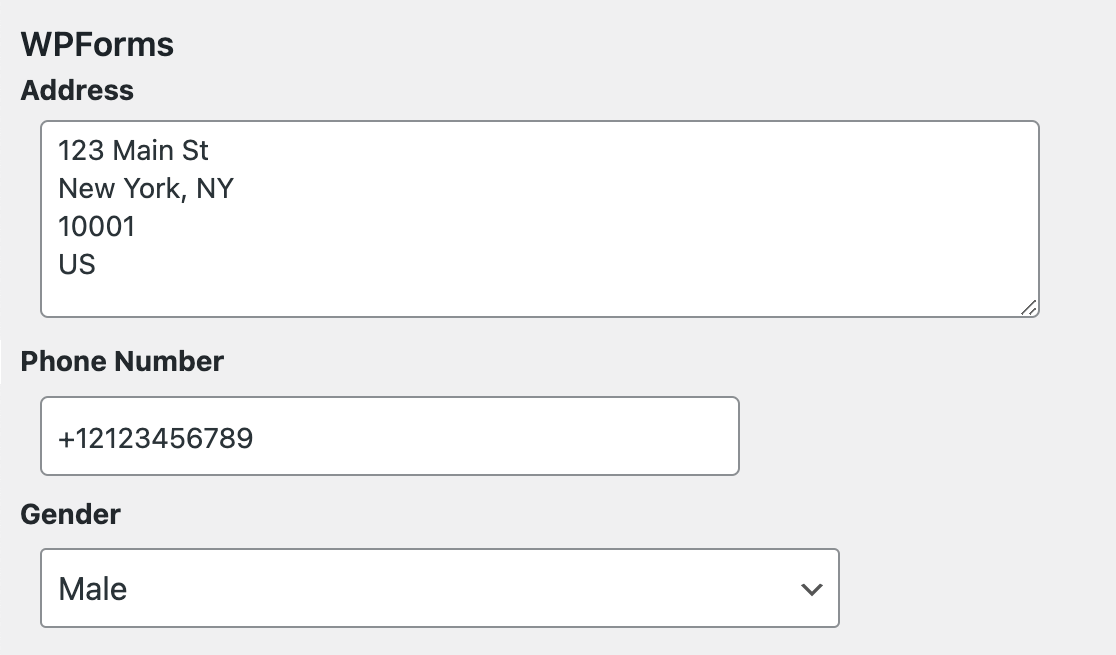
That’s it! You can now set up custom user meta fields and collect data through your WPForms user registration form.
Next, would you like your visitors to be able to contribute content to your site without accessing your WordPress dashboard? Be sure to check out our guide on how to install and use the Post Submissions addon.
