


AI Summary
Would you like to accept credit and debit card payments from customers across Latin America? Buyers in this region expect to pay in their local currency, with the option to split a purchase into installments, and they trust Mercado Pago to handle it.
The Mercado Pago addon connects your forms to Latin America’s most popular payment platform so buyers complete their payment without ever leaving your site. This tutorial will show you how to install and use the Mercado Pago addon with WPForms.
Requirements:
- You’ll need a Pro license level or higher to access the Mercado Pago addon.
- Ensure that you’ve installed WPForms version 2.0.0.3 or higher to meet the minimum required version for the Mercado Pago addon.
- Your site must have SSL (HTTPS) enabled for the payment field to load.
- You’ll need a Mercado Pago account registered in one of the 7 supported countries: Argentina, Brazil, Chile, Colombia, Mexico, Peru, or Uruguay.
Before you get started, be sure to install and activate WPForms on your WordPress site. After verifying your license, you’ll be able to quickly install and activate the Mercado Pago addon.
Connecting Mercado Pago to Your Site
Once the Mercado Pago addon is installed and activated, you’ll need to connect your Mercado Pago account to WPForms. To do this, you’ll create an application in your Mercado Pago dashboard, then copy its credentials into your WPForms payment settings. We’ll walk through each step below.
Creating a Mercado Pago Application
To get started, log in to your Mercado Pago account and go to the Integrations page in the Mercado Pago Developer Dashboard. Then click Create application.

This will open the setup wizard which will walk you through 4 steps. In the first step, enter a name for your application, such as your site’s name. Then click Continue.

Next, Mercado Pago asks which type of payment you want to integrate. Select Online payments.
Then, under How did you set up the store?, select With its own development. Once you’ve made both selections, click Continue.

In the third step, you’ll choose how you want to receive payments in your store. On the Checkouts tab, select Checkout Bricks. Then click Continue.

In the last step, review the options you selected. Then check the box to accept Mercado Pago’s privacy statement and terms, complete the reCAPTCHA, and click Confirm.

Mercado Pago will create the application and take you to its overview page.
Getting Your Mercado Pago Credentials
Next, you’ll need the application’s credentials. In the menu on the left side of your application’s page, under Production, click Production Credentials.
Note: Mercado Pago shows its developer dashboard in the language of your account’s country, so these menu labels may read differently on your screen. The credentials always sit in the menu on the left, grouped under a testing section and a production section.

Then, copy the Public Key and the Access Token.

Keep this page open. You’ll paste both values into WPForms in the next step.
Note: To try the addon before taking real payments, open Test credentials in the same menu instead. Those keys start with TEST- and pair with the Test Mode setting covered later in this guide.
Finishing the Connection in WPForms
In your WordPress admin area, go to WPForms » Settings and click on the Payments tab.

First, check the Currency setting at the top of the page and make sure it matches the currency of the country where your Mercado Pago account is registered.

Note: Mercado Pago processes payments only in the currency of your account’s country. If the WPForms currency doesn’t match it, you’ll see a warning in your payment settings and payments won’t be processed until the currencies match.
Next, scroll to the Mercado Pago section. Paste the Public Key you copied from Mercado Pago into the Production Public Key field. Then paste your Access Token into the Production Access Token field.

Note: For WPForms payment integrations, Test Mode and live mode are configured separately, each with its own pair of keys. To try your form’s Mercado Pago integration first, see the Testing Mercado Pago Payments section below.
Below the credential fields, leave Enable Webhooks turned on. Then click Save Settings.

WPForms checks your keys with Mercado Pago as it saves them, so a mistyped or mismatched key shows an error right away. When the connection succeeds, the Connection Status shows a green checkmark along with your Mercado Pago account email.

Note: Mercado Pago uses webhooks to tell WPForms when a payment is resolved, failed, or refunded. WPForms shares the webhook address with Mercado Pago automatically, so there’s nothing to set up in your Mercado Pago dashboard.
Adding Mercado Pago to Your Forms
After connecting your account, you’re ready to accept payments in your forms. To begin, create a new form or edit an existing one to open the form builder.
Your form will need at least one payment item field, such as Single Item or Multiple Items, so there’s an amount to charge. Then, from the Payment Fields section of the builder, add the Mercado Pago field to your form.

As soon as the field lands on your form, WPForms will ask you to enable Mercado Pago payments for this form. Click the Enable Mercado Pago Payments button to jump straight to the form’s payment settings.

On the Payments » Mercado Pago screen, turn on the Enable Mercado Pago payments toggle if it isn’t on already.

Then, fill out the settings for this form’s payments:
- Payment Description: A short description for the payment, such as your product or service name. It appears in your Mercado Pago dashboard activity.
- Customer Email: The field in your form that holds the customer’s email address. Mercado Pago sends its receipt to this address, and buyers who fill it in won’t be asked for their email again inside the payment field.
- Customer Name: The field in your form that holds the customer’s name. It appears in the payment details in your Mercado Pago dashboard.
APRO: The payment is approved.CONT: The payment stays pending.OTHE: The payment is declined with a general error.FUND: The payment is declined for insufficient amount.

The Mercado Pago field itself collects the card number, expiration date, security code, and cardholder name. It also asks for an email address, unless you’ve mapped Customer Email above and the buyer has already filled that field in. When a buyer enters a card that supports installments, an installments dropdown appears inside the field automatically so they select how many payments to split the charge into. There’s nothing to configure for this.
When you’re done, save your form. It’s now ready to accept payments.
Testing Mercado Pago Payments
Before you start taking real payments, it’s worth running a payment through your form yourself. WPForms includes a test mode for Mercado Pago that lets you complete the whole flow without any money moving.
Turning On Test Mode
To make sure no real payments are processed while you’re testing, go to WPForms » Settings in your WordPress dashboard and click on Payments.
Under Mercado Pago, turn on the Test Mode toggle, then click Save Settings. The page will refresh and the Test Public Key and Test Access Token fields will appear in place of the production ones.

Note: Test Mode and live mode are configured separately, so you’ll need to add your test keys here even if you’ve already connected your production keys.
Now head back to your Mercado Pago application and click Test credentials in the menu on the left.

Copy the Public Key and paste it into the Test Public Key field in your WPForms payment settings.
Then copy the Access Token, paste it into the Test Access Token field, and click Save Settings.

Making a Test Payment
Next, open a page with your Mercado Pago form on it and fill the form out the way a customer would.
For the card details, use one of the test cards Mercado Pago provides for your country.
For the cardholder name, Mercado Pago decides the outcome of a test payment from what you type here, so enter one of these status codes:
To run a successful test payment, use APRO. Then submit the form as usual.
Viewing Your Test Payments
Test payments don’t appear in your Mercado Pago dashboard. To find them, go to WPForms » Payments and turn on the Test Data toggle.
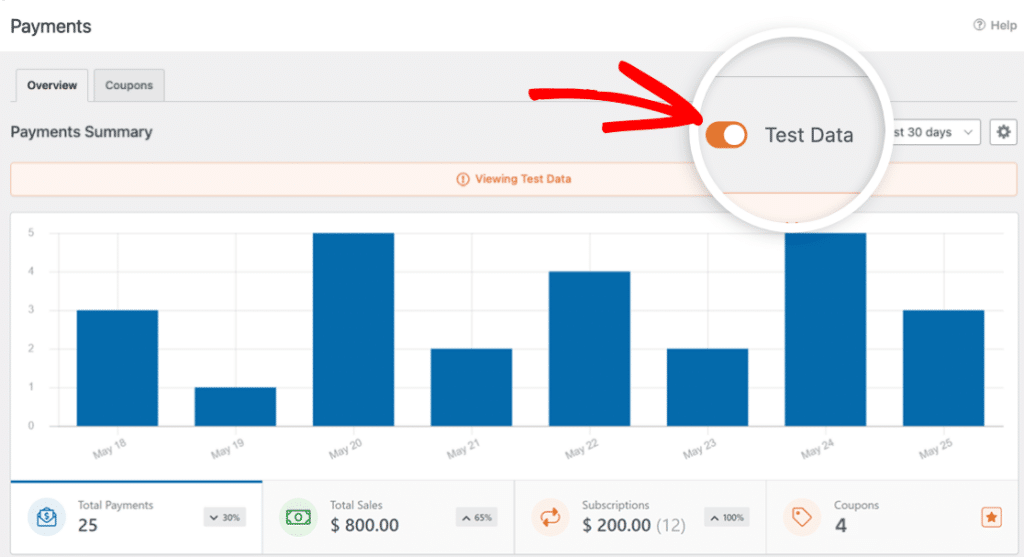
For full details on viewing test and live payment information, understanding transaction trends, adjusting for different currencies, and more, check out our guide to viewing and managing payments.
Setting Up Conditional Logic (Optional)
Conditional logic lets you decide when a Mercado Pago charge should be processed, based on what the user selects in your form. For example, you may want to skip the charge when the user picks a free option.
To set this up, go to Payments » Mercado Pago in the form builder and turn on Enable Conditional Logic. Then build the rule that decides when to process the charge.
![Form area for setting a payment rule with conditional logic enabled: Process, this charge if [field] [is] [value], with options to add a group or remove.](https://wpforms.com/wp-content/uploads/2026/08/mercado-pago-conditional-logic.png.webp)
Creating Conditional Notification Emails for Completed Payments
You may want to send a notification email only after a payment has actually gone through, such as a receipt or a fulfillment alert for your team.
To do this, go to Settings » Notifications in the form builder and open the notification you’d like to limit. Then check the box labeled Enable for Mercado Pago completed payments. This notification will now only be sent when a Mercado Pago payment completes successfully.

Frequently Asked Questions
Below, we’ve addressed some of the most common questions about using the Mercado Pago addon.
Which countries and currencies does the Mercado Pago addon support?
The addon works with Mercado Pago accounts registered in Argentina, Brazil, Chile, Colombia, Mexico, Peru, and Uruguay. Payments are processed in your account country’s currency: ARS, BRL, CLP, COP, MXN, PEN, or UYU. Set the matching currency in WPForms » Settings » Payments.
Why am I seeing a currency error in my payment settings?
This warning appears when the WPForms currency doesn’t match the currency of your Mercado Pago account’s country. Mercado Pago only processes payments in your account country’s currency, so payments stay paused until they match. To fix it, go to WPForms » Settings » Payments and update the Currency setting.
Why don’t I see installment options in the payment field?
The installments dropdown only appears after a complete, valid card number has been entered, since Mercado Pago uses the card itself to work out which plans it supports. The available plans also depend on the card type and the payment amount. Debit cards, for example, usually don’t offer installments, and smaller amounts may only qualify for a single payment.
Why doesn’t the payment field ask buyers for an email address?
If you’ve mapped Customer Email in your form’s Mercado Pago settings and the buyer fills that field in, the payment field skips its own email step and uses the address they already gave. It only collects an email when no field is mapped or the mapped field is left empty.
Why are my test payments being declined?
First, check the cardholder name. Mercado Pago decides the outcome of a test payment from what you type there, so it needs to be a status code like APRO for an approved payment. If the name is right and payments still fail, check the email address in your submission. Mercado Pago declines payments from email addresses that look auto-generated, so use a realistic address when testing.
Do I need to set up webhooks in my Mercado Pago dashboard?
No. WPForms shares its webhook address with Mercado Pago automatically, so refunds, chargebacks, and delayed payment updates sync to your site on their own. Just keep the Enable Webhooks setting turned on in WPForms » Settings » Payments.
Does WPForms store my customers’ card data?
No. The card inputs in the Mercado Pago field are hosted by Mercado Pago, so card details go directly to Mercado Pago and never touch your site. WPForms only receives a secure, single-use token to create the payment, along with the card brand and last 4 digits for your records.
That’s it! You can now accept credit and debit card payments, complete with installments, through the WPForms Mercado Pago addon.
Next, want to keep a closer eye on the payments coming through your forms? Check out our guide to viewing and managing payments to learn about payment details, statuses, and refunds.


