
Resumo de IA
Você está procurando uma maneira fácil de criar um formulário online de solicitação de viagem para o seu site WordPress?
Quando os funcionários da sua empresa precisam fazer viagens de trabalho, você precisará de uma maneira para que eles solicitem o reembolso das despesas.
Portanto, neste post, mostraremos como você pode adicionar rapidamente um formulário online de solicitação de viagem ao seu site, sem contratar um desenvolvedor.
Crie Seu Formulário Online de Solicitação de Viagem Agora
O que é um Formulário de Solicitação de Viagem?
Um formulário de solicitação de viagem é um formulário que coleta os detalhes da viagem de seus funcionários para que você possa aprovar despesas de suas viagens. É uma ótima maneira de otimizar as solicitações de viagem de seus funcionários.
O formulário pode coletar todas as informações que sua equipe de RH ou administrativa precisará sobre o viajante. Dessa forma, você pode enviar informações organizadas para a autoridade que precisa aprová-la, antes que a viagem possa ser realizada.
Se você tem muitos vendedores externos que viajam com frequência, local ou nacionalmente, você vai querer uma maneira de organizar os pedidos de reembolso e o processo de aprovação.
Um bom formulário online de solicitação de viagem coleta detalhes específicos sobre a viagem e o viajante, como:
- Nome
- Nome do Gerente
- Datas da Viagem
- Cidades de Chegada/Partida da Viagem
- Tipo de Providências Necessárias (Voo/Carro Alugado/Ambos)
- ...e mais.
Ao criar um formulário online de solicitação de viagem, você vai querer procurar um construtor de formulários que permita adicionar ou remover campos.
Dessa forma, seus funcionários podem solicitar tempo de viagem relacionado ao trabalho, bem como solicitar coisas como uma licença médica. Neste caso, você pode adicionar um campo de upload de arquivo para coletar um atestado médico ou outra documentação sobre a licença. Você pode conferir alguns modelos de saúde e bem-estar oferecidos pelo WPForms também.
Mostraremos exatamente como fazer isso e como usar um modelo de formulário online de solicitação de viagem e personalizá-lo ao seu gosto a seguir.
Como Criar um Formulário Online de Solicitação de Viagem
Então, vamos começar. Usaremos o modelo de formulário de solicitação de viagem para funcionários do WPForms para este tutorial.
- Etapa 1: Abrir o Modelo de Formulário de Solicitação de Viagem
- Etapa 2: Adicionar Campos Adicionais (Opcional)
- Etapa 3: Configurar as Definições do Seu Formulário de Solicitação de Viagem
- Etapa 4: Configurar as Notificações do Seu Formulário
- Etapa 5: Configurar as Confirmações do Seu Formulário
- Etapa 6: Publicar Seu Formulário em Seu Site
Etapa 1: Abrir o Modelo de Formulário de Solicitação de Viagem
Usar o WPForms é a maneira mais fácil de criar um formulário online de solicitação de viagem no WordPress. O WPForms vem com mais de 2.100 modelos de formulários WordPress para todos os nichos e setores, incluindo um modelo de formulário online de solicitação de viagem.
Portanto, a primeira coisa que você precisará fazer é instalar e ativar o plugin WPForms. Para mais detalhes, confira este guia passo a passo sobre como instalar um plugin no WordPress.
Em seguida, você precisará criar um novo formulário.
Para começar, vá para WPForms » Adicionar Novo e nomeie o formulário. Em seguida, role para baixo até a seção rotulada Selecionar um Modelo e digite "solicitação de viagem" na barra de pesquisa.

Assim que o modelo de formulário online de solicitação de viagem pré-construído carregar, a maior parte do trabalho já estará feita para você.

Você verá campos para o seguinte:
- Nome do Funcionário
- ID do Funcionário
- Gerente / Supervisor
- Motivo da viagem
- Necessidade de arranjos de viagem (Voo, Hotel, Aluguel de Carro e Outros)
- Cidade de Partida
- Cidade de Chegada
- Data de Partida
- Data de Retorno
- Informações Adicionais
Quer ver uma versão ao vivo do formulário de solicitação de viagem online em ação? Acesse e confira nossa demonstração do formulário de solicitação de viagem online.
Etapa 2: Adicionar Campos Adicionais (Opcional)
Você pode adicionar campos extras ao seu formulário de solicitação de viagem arrastando-os do painel esquerdo para o painel direito.
Em seguida, clique no campo para fazer quaisquer alterações. Você também pode clicar em um campo do formulário e arrastá-lo para cima ou para baixo para reorganizar a ordem no seu formulário de solicitação de viagem.
Por exemplo, se você quiser que seu formulário de solicitação de viagem peça um documento, você pode facilmente adicionar um campo de upload de arquivo.
Simplesmente vá para a seção Campos Criativos à esquerda e arraste o campo Upload de Arquivo para o seu formulário à direita, assim:

Quando seu formulário de solicitação de viagem estiver do jeito que você quer, clique em Salvar.
Etapa 3: Configurar as Definições do Seu Formulário de Solicitação de Viagem
Para começar, vá para Configurações » Geral.

Aqui você pode configurar o seguinte:
- Nome do Formulário — Altere o nome do seu formulário aqui, se desejar.
- Descrição do Formulário — Dê uma descrição ao seu formulário.
- Tags — Organize seus formulários WordPress com tags.
- Texto do Botão Enviar — Personalize o texto do botão de envio.
- Texto de Processamento do Botão de Envio — Altere o texto que aparece enquanto seu formulário está sendo enviado.
Na seção Avançado, você também pode:
- Adicionar Classes CSS — Estilize seu formulário ou botão de envio com CSS.
- Habilitar Preenchimento por URL — Preencha automaticamente alguns campos do seu formulário usando um URL personalizado.
- Ativar envio de formulário AJAX — Ative as configurações AJAX sem recarregar a página.
- Desativar o armazenamento de informações de entrada no WordPress — Você pode desativar o armazenamento de informações de entrada e detalhes do usuário, como endereços IP e agentes de usuário, em um esforço para cumprir os requisitos do GDPR. Confira nossas instruções passo a passo sobre como adicionar um campo de acordo com o GDPR ao seu formulário de contato simples.
Após terminar com as configurações gerais, siga para as configurações de Proteção contra Spam e Segurança.
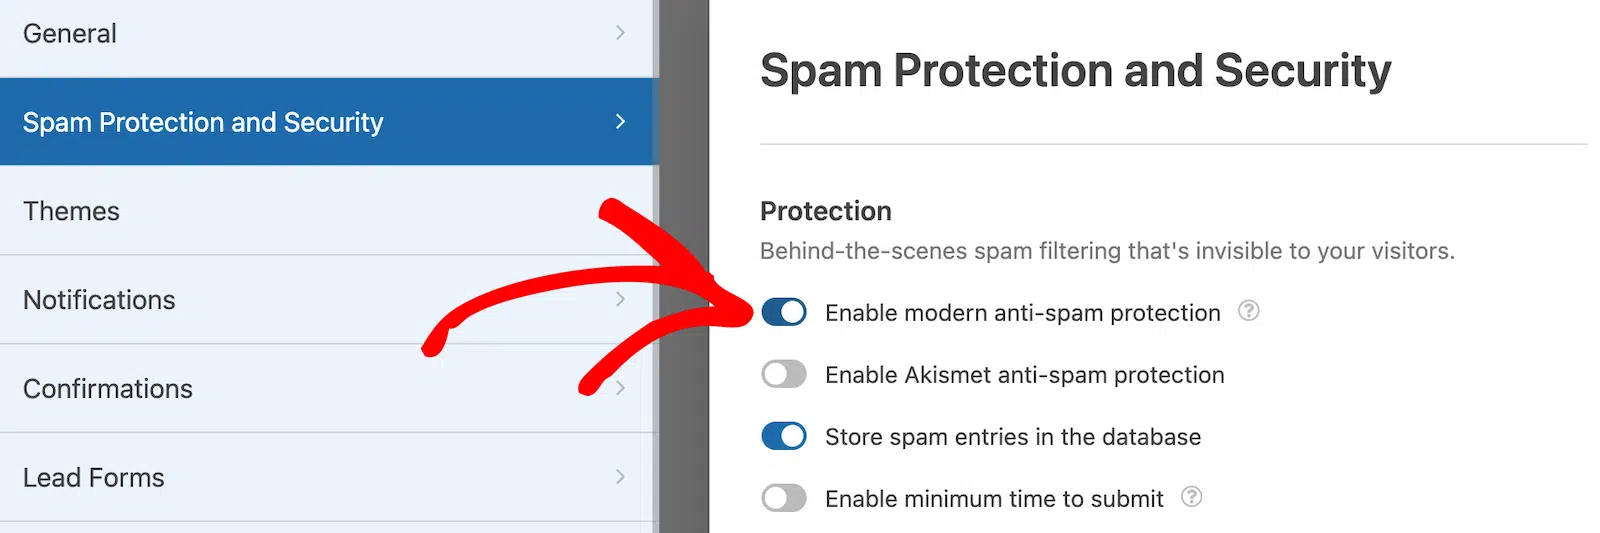
- Ativar proteção moderna contra spam — Interrompa o spam em formulários de contato com a proteção moderna contra spam do WPForms. Ela é ativada automaticamente por padrão em novos formulários, mas você pode escolher se deseja ativá-la ou desativá-la em cada formulário individualmente. Essa proteção contra spam integrada funciona perfeitamente em segundo plano para manter seus formulários seguros. Você também pode combiná-la com outra camada de segurança, como um CAPTCHA.
- Habilitar proteção anti-spam Akismet — Se você usa o plugin Akismet, pode conectá-lo ao seu formulário.
- Habilitar filtro de país — Bloqueie envios de determinados países.
- Habilitar filtro de palavras-chave — Impede entradas que incluam palavras ou frases específicas.
E você também pode configurar seu CAPTCHA preferido. Confira nosso guia completo de prevenção contra spam para mais detalhes.
Em seguida, clique em Salvar.
Etapa 4: Configurar as Notificações do Seu Formulário
Notificações são uma ótima maneira de enviar um e-mail sempre que alguém envia um formulário de solicitação de viagem online.

Na verdade, a menos que você desative este recurso, sempre que alguém enviar um formulário em seu site, você receberá uma notificação sobre isso.
Se você usar Smart Tags, também pode enviar uma notificação para as pessoas que preenchem seu formulário de solicitação de viagem, informando que você recebeu o formulário delas e entrará em contato em breve, se necessário. Isso garante que as pessoas saibam que o formulário de solicitação foi processado corretamente.
Você também pode adicionar informações importantes ao e-mail de notificação, como detalhes sobre como funciona o processo de aprovação de viagens e reembolso em sua pequena empresa.
Para obter ajuda com esta etapa, consulte nossa documentação sobre como configurar notificações de formulário no WordPress.
Algo incrivelmente útil para tentar com este tipo de formulário é enviar mais de uma notificação quando alguém o preenche. Por exemplo, você pode enviar uma notificação para si mesmo, mais uma para a pessoa que o preencheu e outra para alguém do RH, informando que há uma nova solicitação de viagem em sua caixa de entrada para revisão.
Para obter ajuda com isso, confira nosso tutorial passo a passo sobre como enviar várias notificações de formulário no WordPress.
Por último, se você quiser manter a consistência da marca em seus e-mails, pode conferir este guia sobre como adicionar um cabeçalho personalizado ao seu modelo de e-mail.

Isso dará um toque profissional ao seu formulário e fará com que as pessoas que o preenchem se sintam mais à vontade.
Etapa 5: Configurar as Confirmações do Seu Formulário
Confirmações de formulário são mensagens que são exibidas às pessoas depois que elas enviam um formulário em seu site. Elas informam às pessoas que o formulário foi enviado e oferecem a você a chance de informá-las quais são os próximos passos.
O WPForms tem 3 tipos de confirmação:
- Mensagem. Este é o tipo de confirmação padrão no WPForms. Quando alguém envia um formulário, uma confirmação de mensagem simples aparecerá, informando que o formulário foi recebido e está sendo processado.
- Mostrar Página. Este tipo de confirmação redirecionará os clientes para uma página específica em seu site agradecendo a eles. Para obter ajuda com isso, confira nosso tutorial sobre como redirecionar clientes para uma página de agradecimento.
- Ir para URL (Redirecionar). Esta opção é usada quando você deseja enviar pessoas para um site diferente.
Ok, vamos dizer que queremos usar um tipo de confirmação de Mensagem para informar às pessoas que leva 3 dias úteis para obter uma resposta sobre a aprovação de solicitações de viagem.
Então, vamos conferir como configurar uma confirmação de formulário simples no WPForms para que você possa personalizar a mensagem que as pessoas verão ao preencher um formulário de solicitação de viagem em seu site WordPress.
Para começar, clique na guia Confirmações no Editor de Formulários, em Configurações.
Em seguida, selecione o tipo de confirmação que você gostaria de criar. Para este exemplo, selecionamos Mensagem e escrevemos “Obrigado por enviar sua solicitação de viagem! Informaremos se foi aprovada ou negada em até três dias úteis.”

Depois de personalizar a mensagem de confirmação ao seu gosto, clique em Salvar.
Etapa 6: Publicar Seu Formulário em Seu Site
Agora que seu formulário online de solicitação de viagem está pronto, vamos publicá-lo na web.
Comece clicando no botão Incorporar na parte superior do construtor de formulários.

E então, quando a notificação Incorporar em uma Página aparecer, clique em Criar Nova Página.

Em seguida, o WPForms pedirá para você nomear sua página. Digite o título da página na caixa e clique em Vamos Lá!

Agora o WPForms abrirá uma nova página para o seu formulário de solicitação de viagem. Em seguida, clique em Publicar ou Atualizar no topo para publicar o formulário em seu site.

Ótimo trabalho. Agora você pode informar aos seus funcionários que eles podem enviar solicitações de viagem online usando o site da sua empresa.
E aí está! Agora você sabe como criar um formulário de solicitação de viagem no WordPress.
Crie Seu Formulário Online de Solicitação de Viagem Agora
Em seguida, Melhore a Contratação Com um Formulário de Candidatura de Emprego
Você pode começar a criar seu formulário de solicitação de viagem agora usando WPForms Pro. O WPForms Pro é a maneira mais fácil e melhor de ter formulários profissionais em seu site WordPress (sem precisar pagar um desenvolvedor web!).
Ele não só vem com um modelo gratuito de formulário de solicitação de viagem que você pode usar internamente, mas também inclui toneladas de outros recursos incríveis para começar a gerar mais leads online.
- Você pode usar recursos como formulários conversacionais para fazer seus formulários de site converterem muito e aumentar suas vendas.
- É o plugin de formulário de contato WordPress mais amigável para iniciantes.
- O campo de Upload de Arquivo para que você possa aceitar documentos através de seus formulários.
- Ferramenta incrível de Jornada do Usuário que mostra onde os usuários do seu formulário estiveram em seu site.
- Ele permite que você crie um formulário de várias páginas para dividir o formulário em várias páginas e aprimorar a experiência do usuário.
- Ele se integra aos serviços de marketing por e-mail mais populares.
- É totalmente responsivo e os formulários ficam ótimos em todos os dispositivos.
- Lógica condicional ajuda a manter seus formulários organizados para manter os visitantes focados em completar o formulário.
- Você tem acesso a suporte prioritário de uma equipe amigável e experiente.
Então, pronto para começar a criar seu formulário online de solicitação de viagem agora mesmo? Comece hoje com o melhor plugin de formulários do mundo. WPForms Pro inclui um modelo gratuito de formulário de solicitação de viagem e oferece uma garantia de devolução do dinheiro em 14 dias, então você não tem nada a perder.
Contratando mais funcionários em breve? Confira nosso tutorial sobre como criar um formulário de candidatura de emprego no WordPress para ampliar seu grupo de candidatos.
Pronto para criar seu formulário? Comece hoje mesmo com o plugin de criação de formulários WordPress mais fácil. WPForms Pro inclui muitos modelos gratuitos e oferece uma garantia de devolução do dinheiro em 14 dias.
Se este artigo ajudou você, por favor, siga-nos no Facebook e Twitter para mais tutoriais e guias gratuitos do WordPress.

