


AI Summary
Would you like to bring submission data from another form plugin or a CSV file into your WPForms forms? The Entry Importer lets you import entries directly from supported source plugins or upload a file, then map each source field to a WPForms field before importing.
This tutorial will show you how to import form entries in WPForms.
Before you dive into the tutorial below, be sure you’ve installed WPForms and have verified your license key.
Note: This tutorial covers how to use the Entry Importer to bring form submissions into WPForms. To import or export form structure rather than entry data, see our guide on importing and exporting WPForms.
Accessing the Entry Importer
To begin, go to WPForms » Tools from your WordPress dashboard, then click the Import Entries subtab.

From here, you can bring entries into WPForms in two ways:
- From a File: Upload a CSV file exported from any system and map its columns to WPForms fields.
- From an Installed Plugin: Import entries directly from another form plugin already installed on your site (WPForms, Gravity Forms, Ninja Forms, or Contact Form 7 via Flamingo).
Importing Entries From Another Form Plugin
If your entries are stored in another form plugin on the same WordPress site, select From an Installed Plugin. The Entry Importer automatically detects supported plugins on your site.
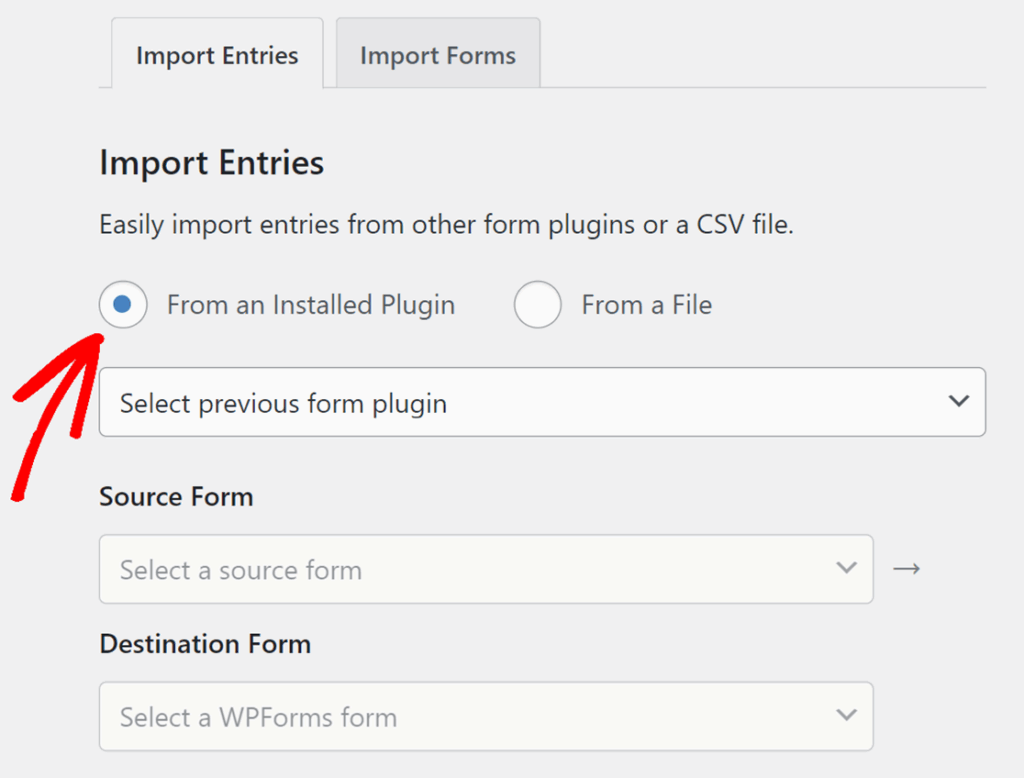
Use the plugin dropdown to pick your source plugin (WPForms, Gravity Forms, Ninja Forms, or Contact Form 7). Once selected, choose:
- Source Form: the form whose entries you want to import
- Destination Form: the WPForms form that will receive the entries
Click Continue once both are set.

Next, you’ll need to map each source field to a WPForms field. See the Mapping Source Fields to WPForms Fields section for the next step.
Note: Importing from a source plugin does not delete entries from the source plugin. The entries are copied into your WPForms form. You can keep, archive, or remove the source entries separately.
Importing Entries From a CSV File
To import entries from a CSV file exported from a CRM, spreadsheet, or another system, select From a File. The CSV must include column headers in the first row.

Click Choose a File to upload your CSV. The maximum supported file size is 300 MB. Then, use the Destination Form dropdown to pick the WPForms form that will receive the entries.
Once your file is uploaded and a destination form is selected, click the Continue button.

Note: CSV files must use comma-separated values with column headers in the first row. Each row after that represents one entry. Save your file with UTF-8 encoding for the best results with non-English characters.
Mapping Source Fields to WPForms Fields
Once you’ve selected your source and destination, the Field Mapping section appears further down the page. It pairs Source Field entries from your CSV or from another plugin with Destination Field entries from your WPForms form.
The Entry Importer auto-matches source fields to destination fields based on similar labels. For example, a source field labeled Email maps to the WPForms Email field automatically. Mapped rows display in white, and unmapped rows are highlighted yellow so you can spot which ones still need attention.

To adjust a mapping, click any Source Field dropdown and choose a different source. To skip a destination field, leave its source dropdown on the — Select a Field — placeholder. Skipped fields stay empty for every imported entry.
Note: The Entry Importer validates field values during import. Emails, URLs, phone numbers, dates, and addresses are checked against the matching WPForms field type. Invalid values are skipped.
Running the Import
Once your field mapping is complete, a confirmation message appears above the Import Entries button showing how many entries you’re about to import and where they’re going. For plugin imports, the message also names the source form and plugin.
Review it as a final check, then click Import Entries to start.

Large files are processed in chunks, so imports of thousands of entries complete reliably without timeouts. You can leave the page open while the import runs.
When the import finishes, an Import Complete modal appears summarizing the results. It shows three counts (total entries, imported entries, and entries with issues) and names the destination form, for example “14 entries were imported to Registration Form”.

From the modal, click View Imported Entries to open the destination form’s Entries page, or Start New Import to return to the Entry Importer and run another import.
Frequently Asked Questions
Below, we’ve answered some of the top questions about using the Entry Importer.
Which form plugins can I import entries from?
The Entry Importer currently supports the following source plugins:
- WPForms (move entries between WPForms forms)
- Gravity Forms
- Ninja Forms
- Contact Form 7 (via Flamingo)
For any other source, export the entries to a CSV file and use the From a File option.
How do I migrate entries between two different WordPress sites?
On the source site, export your entries to a CSV file using the Export Entries tool. Move the CSV to the destination site, then use the From a File option in the Entry Importer to upload it. Map the columns to your destination form’s fields and run the import.
What if my CSV has columns that don’t match my WPForms form fields?
The mapping works field-by-field, anchored to your destination form. Any destination field without a matching source stays empty on the imported entries, so leave its source dropdown on the — Select a Field — placeholder. Source columns that don’t have a matching destination field aren’t included in the import. To preserve unmatched source data, add the matching fields to your destination form first, then return to the Entry Importer and map the columns.
Will my source plugin’s entries be deleted after the import?
No. The Entry Importer copies entries from your source into WPForms. The original entries stay in the source plugin or file. You can remove them separately once you’ve confirmed the import succeeded.
Can I use the Entry Importer on the free version of WPForms?
No. The Entry Importer is a Pro feature. On the free version, the Import Entries subtab shows an upgrade page. To use the Entry Importer, upgrade to a Pro license or higher.
Free version users can still import and export form structure, and export form templates, from the Tools page.
That’s it! You now know how to use the Entry Importer to bring form submissions from another plugin or a CSV file into your WPForms forms.
Next, want to export entries from your WPForms forms? Check out our guide on exporting form entries to CSV.


