AI Summary
Would you like to create a unique ID for each of your form entries? Giving each form entry a unique reference number can make it easier to track any internal function you may want to reference later. Using PHP and WPForms Smart Tags, you can easily achieve this. In this tutorial, we’ll walk you through each step.
There is already a default Smart Tag in WPForms that will generate a unique value. However, the purpose of this tutorial is to control what that unique value may be, such as limiting it to numbers only, adding a prefix before the unique ID, etc. For further information on the Unique Value Smart tag, please see this helpful guide.
For this tutorial, we’ll create a support form for our visitors. Each support submission will be assigned a unique ID. This will be their support ticket number. We’ll then store that number inside the entry on a Hidden Field.
Creating the Unique ID
We usually start our tutorials by creating our form. However, since we want to use this Smart Tag inside our form builder, we’ll start by adding the code snippet to our site first this time. If you need any assistance with adding code snippets to your site, you can read this tutorial for help.
/*
 * Create a unique_id Smart Tag and assign it to each form submission.
 *
 * @link https://wpforms.com/developers/how-to-create-a-unique-id-for-each-form-entry/
 */

// Generate Unique ID Smart Tag for WPForms
function wpf_dev_register_smarttag( $tags ) {

    // Key is the tag, item is the tag name.
    $tags['unique_id'] = 'Unique ID';

    return $tags;
}

add_filter( 'wpforms_smart_tags', 'wpf_dev_register_smarttag' );

// Generate Unique ID value
function wpf_dev_process_smarttag( $content, $tag, $form_data, $fields, $entry_id ) {

    // Only run if it is our desired tag.
    if ( 'unique_id' === $tag && !$entry_id ) {

        // Replace the tag with our Unique ID that will be prefixed with wpf.
        $content = str_replace( '{unique_id}', uniqid( 'wpf', true ), $content );
    } elseif ( 'unique_id' === $tag && $entry_id ) {

        foreach ( $form_data['fields'] as $field ) {

            if ( preg_match( '/\b{unique_id}\b/', $field['default_value'] ) ) {
                $field_id = $field['id'];
                break;
            }
        }

        $content = str_replace( '{unique_id}', $fields[$field_id]['value'], $content );
    }

    return $content;
}

add_filter( 'wpforms_smart_tag_process', 'wpf_dev_process_smarttag', 10, 5 );
This snippet will not only create the code we need to build a unique ID with every form submission but also allow us to use this number as a Smart Tag so that we can attach it to our form entries.
Creating Your Form
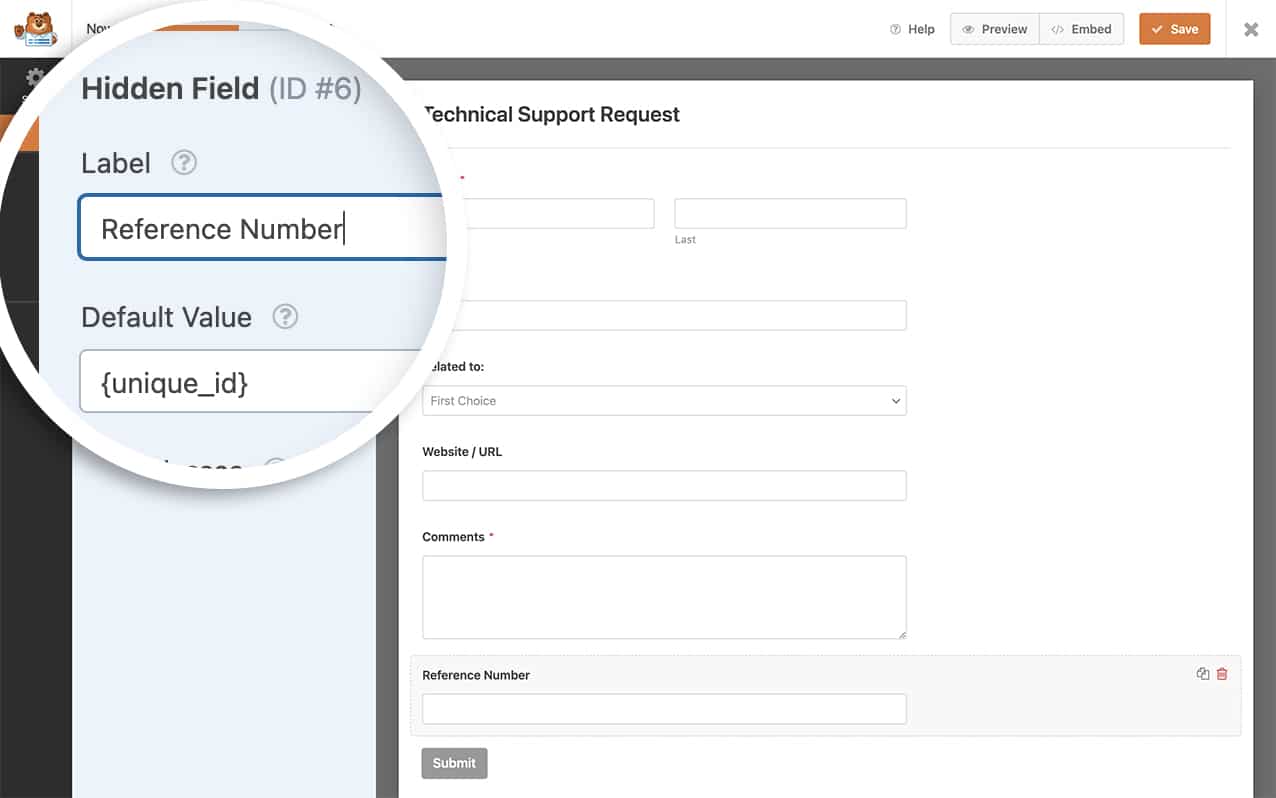
Next, we’ll create our support form. This form will contain fields for Name, Email Address, a Dropdown field to try to capture the issue, and finally, a Paragraph Text form field to allow our visitors a place to give further information about the support they are seeking. However, since we want to store this number as part of our entries, we’ll also be adding a Hidden Field to store that unique ID number as well.
After adding the Hidden Field, click on it to open the Field Options panel. Then, go to the Advanced Options section.
In the Default Value, simply add the Smart Tag {unique_id}.

Adding the Unique ID to Confirmation Messages
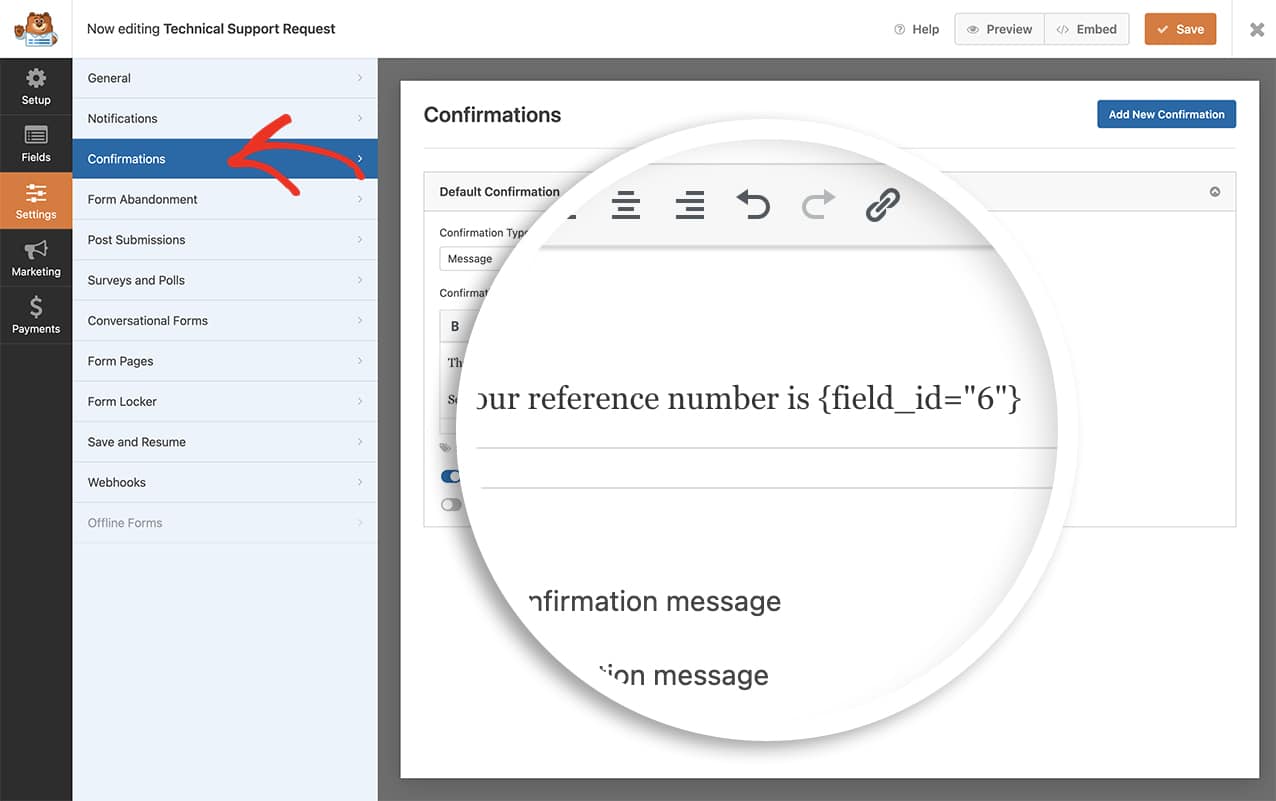
If you’d like to add your unique ID to your confirmation message, you’ll need to place the value that is stored inside the Hidden Field when the form is submitted.
In our form, the field ID was 6, as you can see in the previous image. So we’ll add this to our confirmation message so it will pull in that exact same value.
{field_id="6"}

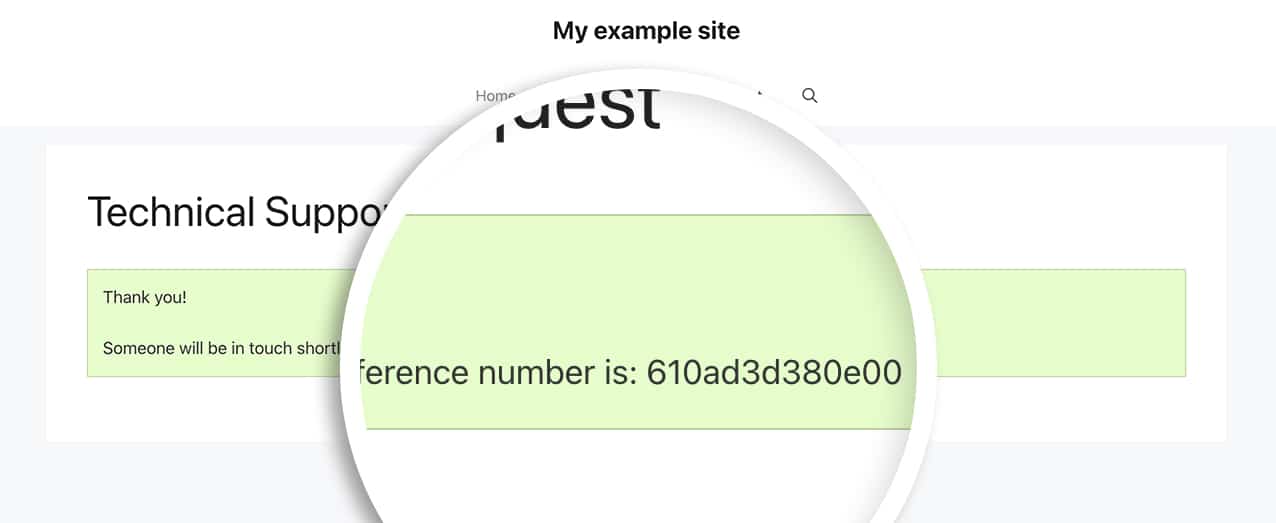
Now, when the form is submitted, your visitors will see the unique ID as well as it being recorded inside the Hidden Field of the form.

FAQ
Q: What if I wanted a specific number of characters for my unique ID?
A: You can see the following example will only provide a 6-digit (hexadecimal only) unique ID.
/*
 * Create a unique ID with a specific number of characters and assign it to each form submission.
 *
 * @link https://wpforms.com/developers/how-to-create-a-unique-id-for-each-form-entry/
 */

// Generate Unique ID Smart Tag for WPForms
function wpf_dev_register_smarttag( $tags ) {

    // Key is the tag, item is the tag name.
    $tags['unique_id'] = 'Unique ID';

    return $tags;
}

add_filter( 'wpforms_smart_tags', 'wpf_dev_register_smarttag' );

// Generate Unique ID value
function wpf_dev_process_smarttag( $content, $tag, $form_data, $fields, $entry_id ) {

    // Only run if it is our desired tag.
    if ( 'unique_id' === $tag && !$entry_id ) {

        // Generate a hexadecimal string based on the time to ensure uniqueness
        // Reduce the string to 6 characters
        $uuid = substr( md5( time() ), 0, 6 );

        // Replace the tag with our Unique ID.
        $content = str_replace( '{unique_id}', $uuid, $content );

    } elseif ( 'unique_id' === $tag && $entry_id ) {

        foreach ( $form_data['fields'] as $field ) {

            if ( preg_match( '/\b{unique_id}\b/', $field['default_value'] ) ) {
                $field_id = $field['id'];
                break;
            }
        }

        $content = str_replace( '{unique_id}', $fields[$field_id]['value'], $content );
    }

    return $content;
}

add_filter( 'wpforms_smart_tag_process', 'wpf_dev_process_smarttag', 10, 5 );
This snippet will grab the current time, then convert it into a hexadecimal string and restrict it to a 6-character number.
Q: Can I use this snippet to get a numeric-only value?
A: Of course! You can use this snippet that will return a unique numeric value between the numbers of 1 – 5,000,000,000. Using this number range will mean you’ll end up with a unique number that is between 1 and 10 digits. If you want to reduce the number of digits generated, you would reflect that in the rand(1, 5000000000).
/*
 * Create a unique_id numeric-only Smart Tag and assign it to each form submission.
 *
 * @link https://wpforms.com/developers/how-to-create-a-unique-id-for-each-form-entry/
 */

// Generate Unique ID Smart Tag for WPForms
function wpf_dev_register_smarttag( $tags ) {

    // Key is the tag, item is the tag name.
    $tags['unique_number_id'] = 'Unique Number ID';

    return $tags;
}

add_filter( 'wpforms_smart_tags', 'wpf_dev_register_smarttag' );

// Generate Unique ID value
function wpf_dev_process_smarttag( $content, $tag, $form_data, $fields, $entry_id ) {

    // Only run if it is our desired tag.
    if ( 'unique_number_id' === $tag && !$entry_id ) {

        // Generate a random numeric ID between 1 and 5,000,000,000
        $unique_id = rand(1, 5000000000);

        // Replace the tag with our Unique ID.
        $content = str_replace( '{unique_number_id}', $unique_id, $content );

    } elseif ( 'unique_number_id' === $tag && $entry_id ) {

        foreach ( $form_data['fields'] as $field ) {

            if ( preg_match( '/\b{unique_number_id}\b/', $field['default_value'] ) ) {
                $field_id = $field['id'];
                break;
            }
        }

        $content = str_replace( '{unique_number_id}', $fields[$field_id]['value'], $content );
    }

    return $content;
}

add_filter( 'wpforms_smart_tag_process', 'wpf_dev_process_smarttag', 10, 5 );
Q: Can I prefix the unique ID?
A: Absolutely. If you’d like to add a prefix, you can use this snippet.
/*
 * Create a unique ID and add a prefix.
 *
 * @link https://wpforms.com/developers/how-to-create-a-unique-id-for-each-form-entry/
 */

// Generate Unique ID Smart Tag for WPForms
function wpf_dev_register_smarttag( $tags ) {

    // Key is the tag, item is the tag name.
    $tags['my_unique_id'] = 'My Unique ID';

    return $tags;
}

add_filter( 'wpforms_smart_tags', 'wpf_dev_register_smarttag' );

// Generate Unique ID value
function wpf_dev_process_smarttag( $content, $tag, $form_data, $fields, $entry_id ) {

    // Only run if it is our desired tag.
    if ( 'my_unique_id' === $tag && !$entry_id ) {

        // Replace the tag with our Unique ID that will be prefixed with "WPF-".
        $content = str_replace( '{my_unique_id}', uniqid('WPF-', true), $content );

    } elseif ( 'my_unique_id' === $tag && $entry_id ) {

        foreach ( $form_data['fields'] as $field ) {

            if ( preg_match( '/\b{my_unique_id}\b/', $field['default_value'] ) ) {
                $field_id = $field['id'];
                break;
            }
        }

        $content = str_replace( '{my_unique_id}', $fields[$field_id]['value'], $content );
    }

    return $content;
}

add_filter( 'wpforms_smart_tag_process', 'wpf_dev_process_smarttag', 10, 5 );
Q: Can I control the number by incrementing the count?
A: Absolutely. However, if you’d like to increment the number we recommend following this useful guide instead.
Q: Can I use the form field value as the Unique ID’s prefix?
A: Yes. The snippet below will allow you to use a specific field from your form as the prefix for the unique ID.
/*
 * Create a unique ID and add a prefix based on user submitted data.
 *
 * @link https://wpforms.com/developers/how-to-create-a-unique-id-for-each-form-entry/
 */

// Generate Unique ID on form submission and add to a hidden field
function wpf_dev_generate_unique_id( $fields, $entry, $form_data ) {

    // Replace '5' with the actual field ID of your field
    $field_id = 5;
    // Replace '3' with the actual field ID of your hidden field for unique ID
    $hidden_field_id = 3;

    // Check if the field exists and has a value
    if ( isset( $fields[$field_id]['value'] ) && ! empty( $fields[$field_id]['value'] ) ) {
        // Get the field value
        $field_value = $fields[$field_id]['value'];

        // Sanitize the field value to use as a prefix
        $prefix = preg_replace( '/[^A-Za-z0-9]/', '', $field_value );

        // Generate unique ID with the dropdown value as prefix
        $unique_id = $prefix . '-' . uniqid();

        // Add the unique ID to the hidden field
        foreach ( $fields as &$field ) {
            if ( $field['id'] == $hidden_field_id ) {
                $field['value'] = $unique_id;
                break;
            }
        }
    }

    return $fields;
}
add_filter( 'wpforms_process_filter', 'wpf_dev_generate_unique_id', 10, 3 );

// Register the Unique ID Smart Tag for WPForms
function wpf_dev_register_smarttag( $tags ) {
    // Key is the tag, item is the tag name.
    $tags['my_unique_id'] = 'My Unique ID';
    return $tags;
}
add_filter( 'wpforms_smart_tags', 'wpf_dev_register_smarttag' );

// Process Unique ID Smart Tag to retrieve the value from the hidden field
function wpf_dev_process_smarttag( $content, $tag, $form_data, $fields, $entry_id ) {
    // Only run if it is our desired tag
    if ( 'my_unique_id' === $tag ) {
        // Replace '3' with the actual field ID of your hidden field for unique ID
        $hidden_field_id = 3;
        if ( isset( $fields[$hidden_field_id]['value'] ) ) {
            $content = str_replace( '{my_unique_id}', $fields[$hidden_field_id]['value'], $content );
        }
    }
    return $content;
}
add_filter( 'wpforms_smart_tag_process', 'wpf_dev_process_smarttag', 10, 5 );
You’ll need to replace the values of the $field_id variable with the ID of the specific form field you’d like to use for the prefix. Also, replace the $hidden_field_id variable with the ID of the Hidden field with the Unique ID Smart Tag on your form.
And that’s all you need to create a unique ID for each form submission. Would you like to process a Smart Tag inside Checkbox field labels? Try out our tutorial on How to Process Smart Tags in Checkbox Labels.
