
KI-Zusammenfassung
Haben Sie jemals an einem Quiz teilgenommen, bei dem sich manche Fragen wichtiger anfühlten als andere? Das ist die Idee hinter gewichteten Quizfragen, bei denen unterschiedliche Punktwerte basierend darauf zugewiesen werden, wie wichtig jede Frage ist.
Dies ermöglicht es Ihnen, Dinge wie Vorlieben, Prioritäten oder Tendenzen mit weitaus größerer Genauigkeit zu messen als ein Standard-Quiz. Die meisten Quiz-Plugins zwingen Sie jedoch in starre Formate wie Persönlichkeitstypen oder Bestehen/Nicht-Bestehen-Bewertungen.
Mit dem Quiz-Addon von WPForms müssen Sie sich darum überhaupt keine Sorgen machen. Sie legen einfach Ihre Punktwerte fest, und das Plugin erledigt den Rest automatisch. Ich zeige Ihnen genau, wie Sie eines einrichten.
Erstellen Sie jetzt Ihr gewichtetes Quiz! 🙂
So erstellen Sie ein gewichtetes Quiz in WordPress
- Schritt 1: Erstellen Sie ein neues Formular und aktivieren Sie den Quiz-Modus
- Schritt 2: Wählen Sie „Gewichtetes Quiz“ als Quiztyp
- Schritt 3: Fügen Sie Quizfragen hinzu und weisen Sie Gewichtungen zu
- Schritt 4: Richten Sie die Ergebnisse für gewichtete Quizze ein
- Schritt 5: Veröffentlichen Sie Ihr gewichtetes Quiz auf WordPress
- Schritt 6: Quiz-Ergebnisse und Analysen anzeigen
Was Sie benötigen werden
Bevor wir beginnen, stellen Sie sicher, dass Sie Folgendes haben:

Wenn Sie noch WPForms Lite verwenden, müssen Sie eine kostenpflichtige Lizenz erwerben, um auf das Quiz-Addon zugreifen zu können.
Keine Sorge, der Vorgang dauert nur wenige Minuten und Sie können direkt danach mit dem Erstellen beginnen.
Überspringen Sie alles!
Wenn Sie wenig Zeit haben (oder einfach nicht jede Frage und Gewichtung manuell einrichten möchten), können Sie den WPForms KI-Formularersteller die Arbeit für Sie erledigen lassen.
Generieren Sie Ihr Quiz mit KI
Gehen Sie in Ihrem WordPress-Dashboard zu WPForms » Neu hinzufügen. Fahren Sie dann mit der Maus über die lila Schaltfläche Mit KI generieren und klicken Sie auf Formular generieren.
Sie gelangen zum KI-Formular-Builder-Bildschirm. Hier beschreiben Sie, welche Art von Quiz Sie wünschen. Sie können Ihre eigene Eingabeaufforderung eingeben oder aus den Vorschlägen auf der linken Seite wählen.
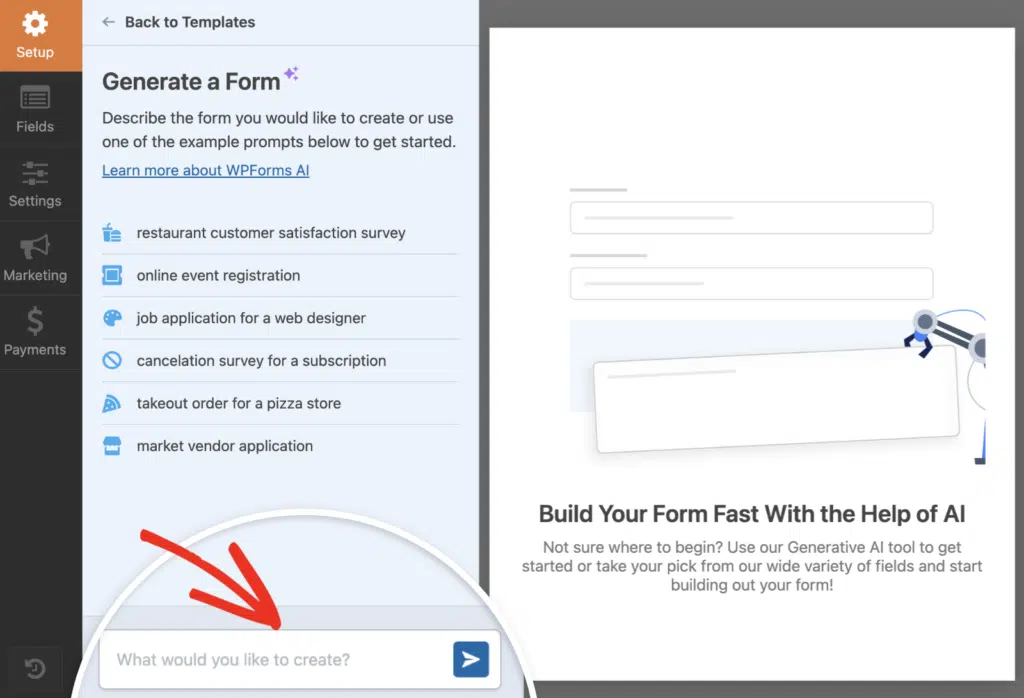
Sobald Sie auf „Generieren“ klicken, benötigt die KI einige Sekunden, um Ihr Quiz zu erstellen. Sie fügt automatisch Fragen hinzu und weist Gewichtungen basierend auf dem von Ihnen angegebenen Kontext zu, sodass Sie nicht bei Null anfangen müssen.
Von dort aus können Sie Fragen anpassen, richtige Antworten ändern oder Punktwerte ändern. Die Quiz-Einstellungen sind bereits aktiviert, sodass Sie im Grunde genommen von der Ziellinie starten.
Probieren Sie den WPForms KI-Quiz-Builder aus! 🙂
Wenn Sie lieber die volle Kontrolle über jedes Detail haben möchten, überspringen Sie diesen Schritt und folgen Sie stattdessen der manuellen Methode. Befolgen Sie die nachstehenden Schritte, um Ihr gewichtetes Quiz von Grund auf neu zu erstellen!
Schritt 1: Erstellen Sie ein neues Formular und aktivieren Sie den Quiz-Modus
Um mit Ihrem gewichteten Quiz zu beginnen, gehen Sie in Ihrem WordPress-Dashboard zu WPForms » Neu hinzufügen. Dies öffnet den Formularersteller, wo Sie Ihr Quiz von Grund auf neu erstellen können.
Sie sehen eine Reihe von Vorlagen zur Auswahl. Wenn Sie Zeit sparen möchten, wählen Sie eine der Quizvorlagen. Andernfalls können Sie mit einem Leeren Formular beginnen und alles selbst erstellen.

Sobald der Formularersteller geladen ist, schauen Sie in das linke Bedienfeld und klicken Sie auf Einstellungen, wählen Sie dann Quiz aus dem Menü. Dort sehen Sie eine große Schaltfläche Quiz aktivieren.

Sobald Sie dies tun, ändert sich der Formularersteller ein wenig. Sie werden feststellen, dass oben im Ersteller neue Registerkarten erscheinen: Fragen, Ergebnisse, Antworten und Einstellungen.
- Unter Fragen fügen Sie Ihre Quizfelder hinzu.
- Unter Ergebnisse können Sie verschiedene Ergebnis-Kategorien einrichten.
- Unter Antworten erhalten Sie eine Aufschlüsselung der Quiz-Antworten.
- Und Einstellungen kümmert sich um Dinge wie die Bewertung.
Schritt 2: Wählen Sie „Gewichtetes Quiz“ als Quiztyp
Nachdem Sie den Quizmodus aktiviert haben, werden Sie von WPForms aufgefordert, den Typ des zu erstellenden Quiz auszuwählen. Sie sehen drei Optionen: Benotetes Quiz, Persönlichkeitsquiz und Gewichtetes Quiz.
Klicken Sie auf Gewichtetes Quiz. Dies richtet ein Punktesystem ein, bei dem jede Antwort ein numerisches Gewicht erhält, anstatt als richtig oder falsch markiert zu werden (wie bei einem benoteten Quiz) oder an einen Persönlichkeitstyp gebunden zu sein.

Sobald Sie es auswählen, wird die Registerkarte Einstellungen aktualisiert und Sie sehen einen Hinweis, dass Sie Kontrollkästchen-, Multiple-Choice- oder Dropdown-Felder zu Ihrem Formular hinzufügen und für jede Auswahl ein Gewicht festlegen müssen.
Schritt 3: Fügen Sie Quizfragen hinzu und weisen Sie Gewichtungen zu
Jetzt ist es an der Zeit, das eigentliche Quiz zu erstellen. Hier fügen Sie Ihre Fragen hinzu und weisen jeder Antwort Gewichtungswerte zu. Klicken Sie im Formular-Generator auf die Registerkarte Fragen oben.

Ziehen Sie aus dem linken Bereich ein Feld vom Typ Multiple Choice, Kontrollkästchen oder Dropdown in die Formularvorschau auf der rechten Seite. Dies sind die einzigen Feldtypen, die eine gewichtete Bewertung unterstützen. Bleiben Sie also bei einem dieser drei Typen.
Sobald das Feld platziert ist, klicken Sie darauf, um den Bereich Feldoptionen auf der linken Seite zu öffnen. Geben Sie in das Feld „Feldbezeichnung“ Ihre Frage ein. Scrollen Sie nach unten zum Abschnitt Auswahlen.
Hier geben Sie Ihre Antwortmöglichkeiten ein. Jede Auswahl erhält eine eigene Zeile. Neben jeder Antwort sehen Sie ein kleines Eingabefeld. Dort weisen Sie die Gewichtung zu. Geben Sie eine Zahl von 0 bis 99 ein.

Wiederholen Sie diesen Vorgang für jede Quizfrage. Fügen Sie ein neues Feld hinzu, geben Sie die Frage ein, fügen Sie die Auswahlmöglichkeiten hinzu und weisen Sie Gewichtungen zu. Stellen Sie sicher, dass jede Antwort eine Gewichtung hat.
Wenn Sie eine überspringen, kann WPForms die Punktzahl nicht korrekt berechnen. Sobald Sie alle Ihre Fragen hinzugefügt und die Gewichtungen festgelegt haben, sind Sie mit diesem Schritt fertig. Ihr Quiz beginnt Gestalt anzunehmen.
Schritt 4: Richten Sie die Ergebnisse für gewichtete Quizze ein
Nachdem Sie Ihren Quizfragen Punkte zugewiesen haben, besteht der nächste Schritt darin, zu entscheiden, was Ihre Benutzer sehen, nachdem sie ihre Antworten eingereicht haben.
Hier kommen die Ergebnisse ins Spiel. Sie ermöglichen es Ihnen, unterschiedliche Ergebnismeldungen anzuzeigen, basierend darauf, wie gut jemand Ihr gewichtetes Quiz bestanden hat.
Klicken Sie zunächst auf die Registerkarte Ergebnisse oben in Ihrem Formular-Generator. Sie landen auf einer Seite, die wie folgt aussieht:

Standardmäßig bietet Ihnen WPForms ein Standardergebnis mit einem einfachen Nachrichten-Editor. Dies ist die Ergebnismeldung, die jeder Benutzer sieht, es sei denn, Sie richten eine bedingte Logik ein, um sie basierend auf ihrer Punktzahl zu ändern.
Ich beginne normalerweise damit, eine Standardnachricht hinzuzufügen wie „Sie haben {quiz_percentage} in diesem Quiz erreicht. Vielen Dank für Ihre Teilnahme!“ Dann baue ich von dort aus auf.

Wenn Sie unterschiedliche Nachrichten anzeigen möchten, je nachdem, wie jemand abgeschnitten hat (z. B. eine personalisierte „Tolle Arbeit!“ für hohe Punktzahlen oder „Üben Sie weiter!“ für niedrigere), müssen Sie weitere Ergebnisse hinzufügen.
Klicken Sie auf die Schaltfläche Neues Ergebnis hinzufügen oben auf der Seite. Unter Ihrem Standardergebnis wird ein neuer Ergebnisblock angezeigt. Suchen Sie nach dem Schalter Bedingte Logik aktivieren und schalten Sie ihn ein.

Fügen Sie weiterhin Ergebnisse hinzu, bis Sie alle Ergebnisbereiche abgedeckt haben, die für Sie wichtig sind. Ich strebe normalerweise drei bis fünf Ergebnisse an (niedrig, mittel, hoch und vielleicht ein „fast geschafft“ dazwischen).
Hier sehen Sie, wie das von mir eingerichtete Ergebnis auf der Frontend-Seite meiner Website aussieht. Testen Sie jedes Ergebnis, um zu sehen, wie Sie die Nachrichten verbessern können.

Schritt 5: Veröffentlichen Sie Ihr gewichtetes Quiz auf WordPress
Wenn Sie mit Ihren Ergebnissen zufrieden sind, klicken Sie im oberen rechten Bereich des Formular-Generators auf Speichern. Jetzt können Sie Ihr Quiz auf Ihrer Website live schalten!
Klicken Sie oben im Formular-Generator auf die Schaltfläche Einbetten. Sie sehen zwei Optionen: Fügen Sie Ihr Quiz zu einer vorhandenen Seite hinzu oder erstellen Sie eine neue Seite von Grund auf neu.

Wenn Sie eine neue Seite erstellen, geben Sie ihr einen Namen, der zu Ihrem Quizthema passt. Etwas wie „Produktempfehlungs-Quiz“ ist gut. Klicken Sie dann auf Los geht’s.
WordPress öffnet den Block-Editor mit Ihrem Quiz, das bereits auf der Seite eingebettet ist. Jetzt ist ein guter Zeitpunkt, um Dinge zu gestalten, wenn Sie möchten, indem Sie die nativen Styling-Optionen des WPForms-Block-Editors verwenden.
Um die Gestaltung Ihres Formulars schnell zu erledigen, können Sie ein fertiges Theme im Abschnitt Formular-Theme auswählen. In diesem Beispiel verwende ich das Dschungel-Theme (eines meiner Favoriten).

Wenn Sie mit dem Aussehen zufrieden sind, klicken Sie oben rechts im Editor auf die Schaltfläche Veröffentlichen. Ihr gewichtetes Quiz ist jetzt live und kann von Besuchern genutzt werden.
Schritt 6: Quiz-Ergebnisse und Analysen anzeigen
Jetzt, da Ihr gewichtetes Quiz live ist und Leute Antworten einreichen, möchten Sie sehen, wie sie abschneiden. Hier glänzt das Quiz-Addon wirklich!
Gehen Sie zurück zum Formular-Builder und klicken Sie oben auf den Tab Ergebnisse. Sie sehen sofort Diagramme, die die Gewichtungsverteilung, Abschlussraten und die Antworten der Teilnehmer auf jede Frage aufschlüsseln.
Ich finde diese Ansicht sehr hilfreich, wenn ich Muster auf einen Blick sehen möchte, z. B. ob die meisten Benutzer auf einer bestimmten Skala hohe oder niedrige Punktzahlen erreicht haben.

Um tiefer einzusteigen, verwenden Sie die Option Filter. Klicken Sie darauf und Sie können die Ergebnisse nach Datumsbereich, Gewichtungsskala (es gibt einen Schieberegler, den Sie anpassen können), Abschlussstatus oder sogar nach bestimmten Fragen und Antworten filtern.
Dies ist nützlich, wenn Sie die Leistung im Laufe der Zeit vergleichen oder sich auf eine bestimmte Gruppe von Befragten konzentrieren möchten. Ich habe diese Funktion bei saisonalen Quizzen verwendet, um zu sehen, wie sich die Antworten von Monat zu Monat ändern.

Sie können auch anpassen, wie jedes Diagramm aussieht. Klicken Sie auf das Zahnrad-Symbol bei einem beliebigen Diagramm, um den Diagrammstil zu ändern (Sie haben Balken-, Kreis-, Linien- und Säulendiagrammoptionen), Farben anzupassen oder die Größe des Diagramms anzupassen, damit es besser auf Ihr Dashboard passt.
Sobald Sie Ihre Diagramme nach Ihren Wünschen eingerichtet haben, haben Sie einen klaren Überblick über die Leistung Ihres Quiz. Dies erleichtert die Anpassung von Fragen, die Anpassung von Gewichtungen oder die Änderung Ihrer Bewertungslogik, wenn etwas nicht stimmt.
FAQs zum Erstellen eines gewichteten Quiz in WordPress
Ich erhalte viele Fragen zu gewichteten Quizzen, daher habe ich unten Antworten auf die häufigsten zusammengestellt.
Welche WPForms-Lizenz benötige ich, um gewichtete Quizze zu erstellen?
Sie benötigen WPForms Pro oder höher, um auf das Quiz-Addon zugreifen zu können. Wenn Sie derzeit eine Lizenz mit niedrigerer Stufe haben, können Sie Ihr Konto über Ihr WPForms-Konto-Dashboard upgraden.
Kann ich jeden Feldtyp für gewichtete Quizfragen verwenden?
Nein, nur bestimmte Feldtypen unterstützen die gewichtete Bewertung. Sie können Gewichte für Multiple-Choice-, Kontrollkästchen- und Dropdown-Felder zuweisen.
Andere Feldtypen wie Textfelder oder Datei-Uploads funktionieren nicht für gewichtete Fragen, da sie keine vordefinierten Antwortmöglichkeiten haben, denen Punkte zugewiesen werden können.
Wie weise ich Antwortmöglichkeiten unterschiedliche Gewichte zu?
Klicke auf das Feld, das du in eine gewichtete Frage umwandeln möchtest, und gehe dann im Abschnitt Antwortmöglichkeiten der Feldoptionen zu den Optionen. Du siehst einen Schalter Werte anzeigen. Schalte diesen ein, und du erhältst eine neue Spalte neben jeder Antwortmöglichkeit.
Gib den Punktwert ein, den du für jede Antwort in dieser Spalte haben möchtest. Wenn also eine Antwort 10 Punkte und eine andere 5 Punkte wert sein soll, gib einfach diese Zahlen ein.
Was ist der Gewichtungsbereich für Antworten in einem gewichteten Quiz?
Du kannst jede positive oder negative Zahl als Gewicht zuweisen. Es gibt keine harte Grenze, sodass du 1-10, 0-100 oder sogar negative Werte verwenden könntest, wenn du für bestimmte Antworten Punkte abziehen möchtest.
Dennoch bleibe ich normalerweise bei einfachen Bereichen wie 1-5 oder 1-10. Das erleichtert die Berechnung, wenn du Ergebnisnachrichten basierend auf Punktbereichen einrichtest.
Kann ich basierend auf gewichteten Punktzahlen unterschiedliche Ergebnisnachrichten anzeigen?
Ja, und das ist eine meiner Lieblingsfunktionen. Nachdem du den Quizmodus aktiviert und Gewichtet als Quiztyp ausgewählt hast, kannst du benutzerdefinierte Nachrichten im Tab Ergebnisse einrichten.
Für jedes Ergebnis definierst du einen Punktbereich mit größeren und kleineren Operatoren und erstellst eine personalisierte Nachricht.
Wie filtere ich gewichtete Quiz-Ergebnisse nach Punktbereich?
Gehe zu WPForms » Einträge und wähle dein gewichtetes Quiz-Formular aus. Oben rechts in der Liste der Einträge siehst du eine Schaltfläche Filter.
Klicke darauf und wähle den Punktbereich aus, den du anzeigen möchtest. Das ist sehr hilfreich, wenn du Personen nachverfolgen musst, die in einem bestimmten Bereich gelandet sind, z. B. niedrige Punktzahlen, die zusätzliche Aufmerksamkeit benötigen könnten.
Kann ich WPForms AI verwenden, um ein gewichtetes Quiz zu generieren?
Ja, du kannst den KI-Formularersteller bitten, ein gewichtetes Quiz für dich zu erstellen.
Wenn du dein Formular der KI beschreibst, erwähne, dass du ein gewichtetes Quiz möchtest, und füge Details zur Punktvergabe hinzu.
Zum Beispiel könntest du sagen: „Erstelle ein gewichtetes Kundenzufriedenheits-Quiz mit 5 Fragen, wobei jede Antwort 1-10 Punkte zählt.“
Die KI erstellt die Grundstruktur, obwohl du die Gewichtungen und Ergebnisse danach vielleicht noch anpassen möchtest.
Als Nächstes: Lerne, wie man ein benotetes Quiz in WordPress erstellt
Nachdem du gewichtete Quizze gemeistert hast, möchtest du vielleicht andere Quiztypen erkunden. Ein benotetes Quiz funktioniert anders, wobei du Antworten als richtig oder falsch markierst und eine Endpunktzahl berechnest.
Es ist perfekt zum Testen von Wissen, Erstellen von Zertifizierungsprüfungen oder Durchführen von Schulungsbewertungen. Wenn das nützlich klingt, schau dir unseren Leitfaden an, wie du ein benotetes Quiz für deine WordPress-Website erstellst.
Erstellen Sie jetzt Ihr WordPress-Formular
Bereit, Ihr Formular zu erstellen? Beginnen Sie noch heute mit dem einfachsten WordPress-Formularersteller-Plugin. WPForms Pro enthält viele kostenlose Vorlagen und bietet eine 14-tägige Geld-zurück-Garantie.
Wenn Ihnen dieser Artikel geholfen hat, folgen Sie uns bitte auf Facebook und Twitter für weitere kostenlose WordPress-Tutorials und Anleitungen.

