AI Summary
Have you set up WPForms on your WordPress site, only to find that email notifications aren’t reaching recipients’ inboxes? It’s common to see email delivery issues in WordPress, but you can easily fix them using WP Mail SMTP for reliable, authenticated email delivery.
This tutorial will show you how to use WP Mail SMTP to fix delivery issues for WPForms email notifications and other emails from your WordPress site.
How to Fix Contact Form Not Sending Email With WP Mail SMTP
Emails sent from WordPress, including your WPForms email notifications, often fail to reach the inboxes of the intended recipients. This is due to how WordPress sends your emails.
SMTP (Simple Mail Transfer Protocol) fixes email delivery issues by changing the way your site sends emails and properly authenticating them. SMTP is the industry standard for ensuring email deliverability.
WP Mail SMTP is the most flexible way to connect your WordPress to your preferred SMTP services (called “mailers”).
In the steps below, we’ll show you how to set up WP Mail SMTP to fix your contact form email delivery problems.
Step 1: Install WP Mail SMTP
First, you’ll need to install the WP Mail SMTP plugin. You can use the free version, WP Mail SMTP Lite, for a simple email delivery solution.

If you would like access to more advanced features, such as the option to connect your site to multiple mailers and route different types of email through different connections, you’ll need a paid license. WP Mail SMTP Pro also includes additional mailers not offered in the free version of the plugin.
We’ll use WP Mail SMTP Lite for this tutorial. To install it, go to Plugins » Add New Plugin and search for “WP Mail SMTP”. Then click Install Now and Activate.

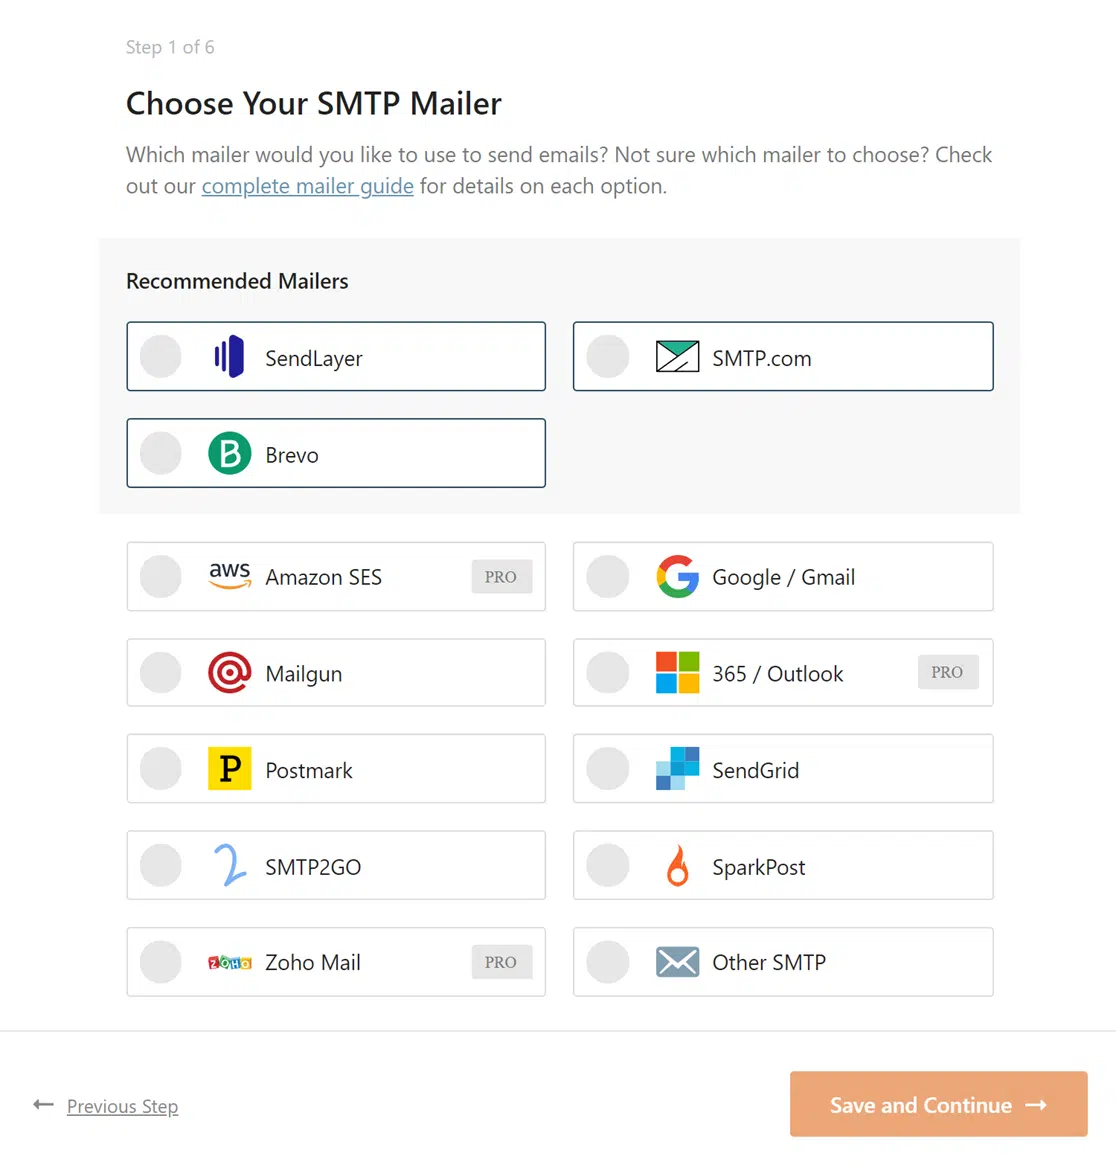
Step 2: Choose an SMTP Mailer
Next, you’ll need an account for the mailer you want to connect to your site. This platform will authenticate your website’s domain and enable you to send emails using SMTP.
There are many mailers to choose from, including some providers with free plans. See WP Mail SMTP’s complete list of mailers for more details about each to help you decide which one to use for your site.
Step 3: Configure WP Mail SMTP Settings
When your mailer account is set up, return to your WordPress admin dashboard and go to WP Mail SMTP » Settings. Here, click on the Launch Setup Wizard button.

The Setup Wizard is the simplest way to get started with WP Mail SMTP. It walks you through each step in the process. Click Let’s Get Started to begin.

First, select the mailer you’ve chosen from the list provided. For our example, we’ll use the SendLayer mailer.
Click Save and Continue. The options on the next screen will depend on which mailer you chose, as the setup process is slightly different for each one. WP Mail SMTP has complete documentation on each mailer’s setup process to walk you through the options.
The SendLayer mailer requires you to authorize your domain before connecting it to WP Mail SMTP. See SendLayer’s documentation for steps on authorizing your domain.
For most mailers, you will need to provide an API key or similar credentials to connect your site to your account.

See the SendLayer documentation on how to find your API key if you need help setting up this mailer.
You will also likely need to provide a From Name and From Email. This will be the sender name and email that are shown on your form notification emails. Most mailers require that your From Email is at the domain that you’ve authenticated in your account.
Click Save and Continue again to move to the next step.
Next, if you’ve purchased WP Mail SMTP Pro, you’ll have the option to enable advanced email delivery features such as email logs, instant alerts, and more.

Then you’ll have the option to sign up for the WP Mail SMTP mailing list to receive tips on how to use the plugin. You can also choose if you want to share data from your site with the plugin’s team to help improve testing and functionality.

You can skip this step if you prefer.
On the next screen, WP Mail SMTP Lite users have the option to upgrade to WP Mail SMTP Pro and access those advanced features we mentioned above.

You can also skip this step if you want to keep using the free version.
Step 4: Send a Test Email
At the end of the Setup Wizard, WP Mail SMTP will check to make sure everything is working as it should.

If you see a success message here, your WPForms email notifications should now deliver properly. Just click Finish Setup to exit the Setup Wizard.
If you would like to send a test email for good measure, just go to WP Mail SMTP » Tools » Email Test and click the Send Email button.

You’ll then see another success message and receive an email confirming that your connection is set up properly.

WP Mail SMTP Pro White Glove Setup
If you’ve purchased the paid version of WP Mail SMTP, you can have the plugin’s talented support team configure the settings for you at an additional cost instead of going through the process we showed up above.
This service is available for the SendLayer, SMTP.com, and Brevo (formerly Sendinblue) mailers. Please see WP Mail SMTP’s white glove setup documentation for more details regarding purchasing and account requirements.
Frequently Asked Questions and Common Issues
Below, we’ve answered some of the most common questions about improving email notification delivery for your forms with WP Mail SMTP.
Why Aren’t Form Notification Emails Getting Delivered?
There are two main reasons why WordPress emails don’t deliver successfully: server configuration and spam filtering.
WordPress and WordPress plugins send email using the PHP mail() function by default. This is a simple way of sending email, but many WordPress hosting servers are not configured to use this mail() function.
In addition, email providers check each incoming email to determine if they should allow the email to deliver, send it to spam, or block it entirely. One way email providers do this is by checking if the email originates from the same location it claims to be sent from.

As spam becomes more common (and smarter), email providers are tightening restrictions around which emails make it to your inbox. If an email fails these checks, it may be marked as spam or blocked entirely from delivery.
The problem with using the built-in WordPress mailing function is that it is less reliable and doesn’t always pass security checks from email providers. This results in your notification emails ending up in the spam folder or not getting sent altogether.
My SMTP test email delivers successfully, so why aren’t my form notification emails delivering?
If your test email is successful, this means that SMTP is working properly. Instead, you’ll need to check the form’s notification settings by opening the form builder and going to Settings » Notifications.
From here, you can check all the settings. However, specifically note the From Email, as this must meet the requirements set by your WP Mail SMTP mailer.
For more details, see our documentation on troubleshooting form email notifications.
My site’s hosting provider is GoDaddy and I can’t get SMTP to work. What can I do?
In many cases, GoDaddy will, by default, block the ports SMTP requires. To address this, you’ll need to reach out to GoDaddy’s support to ask them to open up the port you need for your site.
I’m seeing an error message. How do I fix it?
Here are solutions for the most common SMTP error messages.
Error: Could Not Open Socket
This usually happens when your web host is blocking the ports required to connect. A lot of times this is due to a firewall that is running. Contact your host and ask them to open the port you need.
Also, double-check your port and encryption settings, as accidentally using SSL over port 587 can trigger this error.
Error: smtp connect() failed
This error means the connection to the SMTP host failed. You’ll typically see this error when your SMTP settings are incorrect or the SMTP host is denying or blocking the connection for security purposes.
Some hosting providers, such as GoDaddy, may specifically be blocking the port needed for SMTP.
Be sure to double-check all of your settings, including your email and password. If the error persists, the best next step is to contact your site’s hosting provider to ask them to check for any server issues.
Error: Connection Refused
A firewall may be preventing the connection. Contact your web host and ask them to open the required port.
Error: Mod_Security
“Not Acceptable! An appropriate representation of the requested resource could not be found on this server. This error was generated by Mod_Security.”
This error most commonly occurs when the server is blocking requests needed to run SMTP. To fix this, you’ll need to contact your site’s hosting provider and ask them to disable specific rules within Mod_Security, which they can determine using server logs.
Error: 535 Incorrect authentication data
“SMTP ERROR: Password command failed: 535 Incorrect authentication data”
This error generally results from overly strict server permissions, which your hosting provider should be able to help you resolve. For WHM / cPanel server management, you can specifically ask your site’s hosting provider to switch the “Restrict outgoing SMTP to root, exim, and mailman” setting from “On” to “Off.”
Note: If you’re encountering specific SMTP error messages and need more detailed information for troubleshooting, refer to the SendLayer Error Library for comprehensive guidance on various SMTP-related errors.
I’m seeing a warning that says “The current sender address does not match your website’s domain name.” What does this mean?
This warning appears when the From Email address in your settings uses a different domain than your website. For example, if your site is mysite.com but your From Email is set to a @gmail.com address. Most mailers require the From Email to match the domain you’ve authenticated in your SMTP account. To fix this, go to WP Mail SMTP » Settings and update the From Email to an address at your website’s domain (e.g., [email protected]). For more details on configuring the From Email correctly, see our guide on setting up form notification emails.
That’s it! Now you know everything you need to know to start improving email delivery for your form notifications using WP Mail SMTP.
Next, would you like to learn how to set up conditional email notifications to send different messages depending on how users fill out your forms? Check out our full tutorial on conditional notifications.