AI Summary
Would you like to know how to add background images to your forms? It’s easy to style your form with an image or color gradient as a backdrop using CSS!
This tutorial will show you how to add a background image to your form.
In This Article

Note: The steps in this tutorial require adding a CSS class to your site. If you’d prefer a more straightforward approach that doesn’t involve adding custom CSS, see our tutorial on using form themes to learn how.
1. Choosing a Background Image
You’ll need to choose an image to use as your form’s background to get started. You may use any image from your media library, or anywhere on the internet that your site can access.
Considerations To Make
For maximum readability, ensure sufficient contrast between the background image, and any text or fields in your form.
As an example, avoid using light text on a light background. Instead, use darker text on paler backgrounds, and lighter text on dark backgrounds.
2. Choosing a Form
Next, choose the form you’d like to customize. If you still need to create a form, add a new one by clicking WPForms » Add New.

You can choose from one of the many available form templates to get started.

If none of the defaults fit your requirements, you can still choose a similar template, and customize it in the Form Builder.
3. Adding a Background Image to Your Form
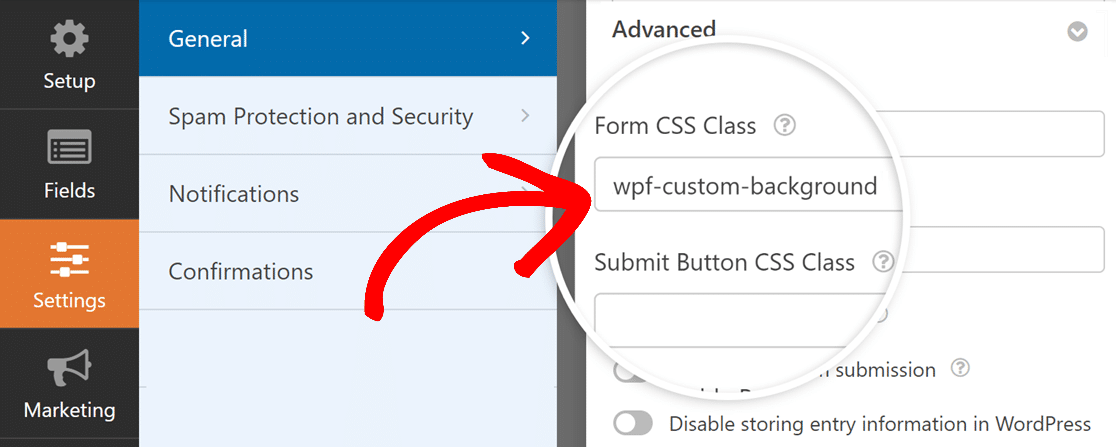
In the Form Builder, go to Settings » General » Advanced.

From here, enter a class name under Form CSS Class. Feel free to use any name for your class, but we recommend adding wpf- as a prefix. This helps avoid conflicts between your custom CSS code, and any themes or plugins on your site.
Note: To avoid any issues, be sure to start your class name with a letter. Also, remember that class names in CSS are case-sensitive. For more information, check our introductory styling guide and adding classes to WPForms tutorials.
Using an Existing Image
If you want to use an image from your media library, you’ll need the full image URL. To obtain this, first, go to Media » Library from the WordPress admin dashboard.

From here, click the image you’d like to use.

In the dialog box that opens, click on Copy URL to clipboard.

This will copy the image URL to your clipboard.
Note: For images from other sources on the internet, copy the URL by right-clicking on the image, and clicking Copy image address.
The menu text you see may be slightly different depending on your browser of choice. However, it’ll perform the same function as clicking Copy URL to clipboard in the media library.
Once you’ve done this, head back to the WordPress admin dashboard and go to Appearance » Customize, then choose Additional CSS.

Next, create a custom class with the property background-image, and paste the URL you copied earlier.
We’ve written an example of such a class below. Remember to replace /path/wpforms-backdrop.png with the actual URL of your image.
Your settings should look something like this.
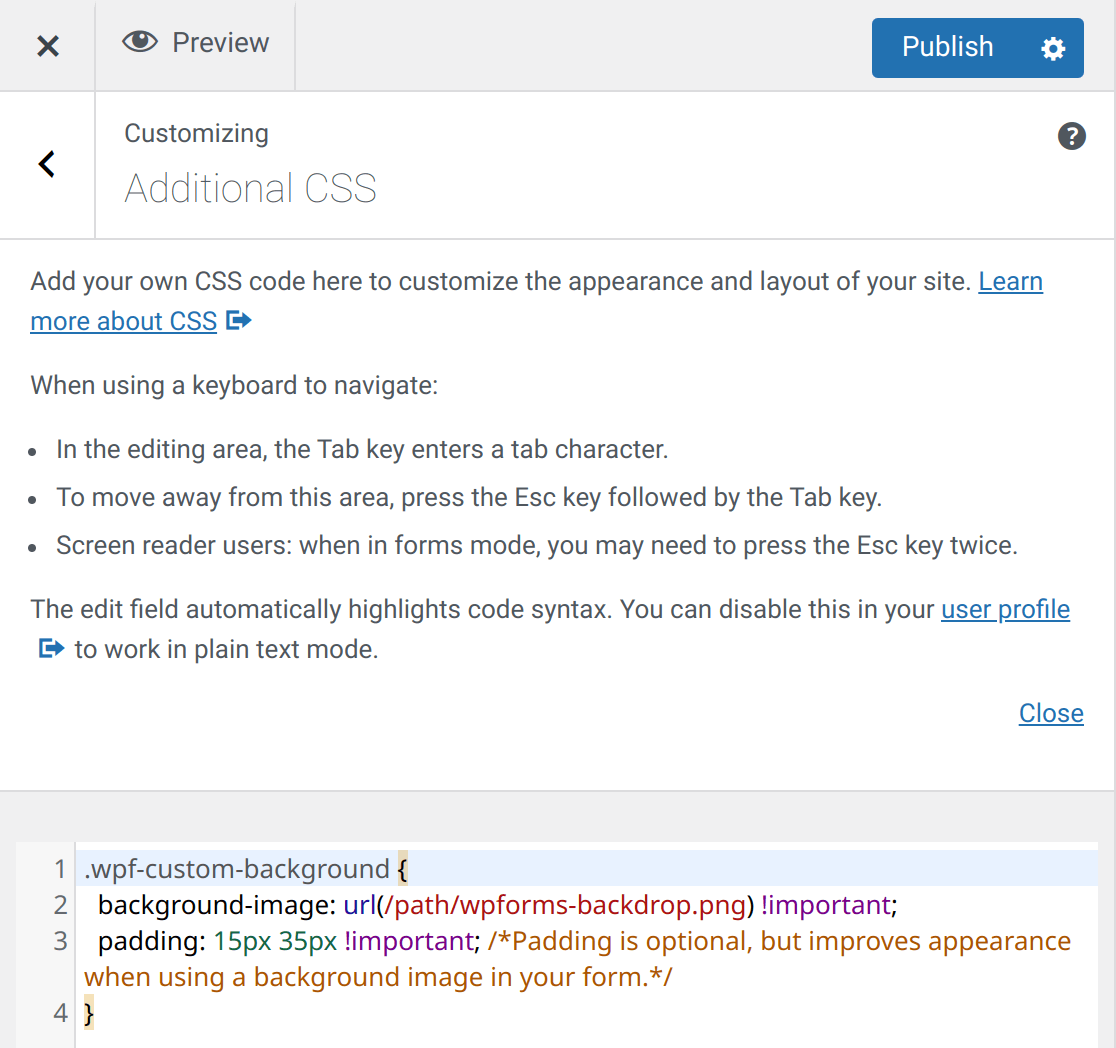
Once you’re sure that your code is correct, click on Publish to save your changes.

If there are no errors in your code, your form will now have a background image. Here is an example form using the above code:

Using a Gradient as a Background Image
With CSS, color gradients can be used as images, and this solution works with your forms as well. Gradients are extensively customizable, and can use any number of colors.
Since gradients are autogenerated, you don’t need a source image from your media library or anywhere else on the internet. This provides the advantage of increased speed and uniqueness. You also won’t have to worry about the source image going missing.
There are three kinds of gradients available in CSS:
conic-gradient()linear-gradient()radial-gradient()
Note: If you’d like to learn more about using gradients in CSS, we recommend reading this page on the Mozilla Developer Network.
In this example, we’ll show you how to use a simple, linear gradient as a backdrop for your form. Simply write your class as you did before, but instead of using a URL, we’ll use the CSS function linear-gradient().
To see how this works, check out the code example below:
.wpf-custom-background {
    background-image: linear-gradient(#0299ed, #FFFFFF) !important;
    /*Padding isn't necessary, but highly recommended*/
    padding: 15px 35px !important;
}
This will produce a soft blue to white gradient as your form’s background image:

Note: If you’d prefer to use a code-free solution to generate your gradients, you can use online resources, such as CSS Gradient (cssgradient.io).
Frequently Asked Questions
Below, we’ve answered some of the top questions about adding a background image to forms.
How do I add a background image to my forms that use the Conversational Forms addon?
If you add a background image using the method described above, it won’t apply to the form. This is because conversational forms use a different styling option.
To add a background image to a form that uses the Conversational Forms addon, you’ll need to use the #wpforms-conversational-form-page CSS selector. Here is an example code. Be sure to replace the path in the url() property with the actual image you intend to use.
#wpforms-conversational-form-page {
     background-image: url(/path/wpforms-backdrop.png) !important;
     background-position: center; /* Center the image */
     background-repeat: no-repeat; /* Do not repeat the image */
     background-size: cover;
}
That’s all! Now you know how to add a background image to your forms in WPForms.
Next, would you like to know how to style your forms without using code? Check out our guide to customizing WPForms with CSS Hero.
