Introduction
Would you like to create custom user Smart Tags to use in your WPForms that will pull information from the WordPress User Profile?
A Smart Tag is a bit of code that you can use to insert relevant information to your form notification settings or as field default values. In this tutorial, we’re going to a form for all the default WordPress user prompts that make up a profile and display them on a page for users to confirm their information.
By default, there are already some user-related Smart Tags available with WPForms such as User ID, Display Name, User Meta etc.
The User Meta Smart Tag can be used as a blank coverage for any custom fields that may have been added to the WordPress User Profiles such as social links or any custom fields added to the WordPress User Profile.
Creating the new user Smart Tags
First, we’ll need to add this code snippet to our site. The first function using the wpforms_smart_tags filter will create the Smart Tags. The second function using the wpforms_smart_tag_process filter will define the Smart Tags.
If you need help in adding code snippets to your site, please review this tutorial.
/**
 * Create User Smart Tags from the WordPress profile.
 *
 * @link   https://wpforms.com/developers/how-to-create-more-user-smart-tags/
 */

function wpf_dev_register_user_profile_smart_tags ( $tags ) {

    // Key is the tag, item is the tag name.
    $tags[ 'wp_nickname' ]     = 'WP Profile Nickname';
    $tags[ 'wp_username' ]     = 'WP Profile Username';
    $tags[ 'wp_url' ]          = 'WP Profile URL';
    $tags[ 'wp_user_role' ]    = 'WP Profile User Role';
    $tags[ 'wp_user_bio' ]     = 'WP Profile Bio';

    return $tags;
}

add_filter( 'wpforms_smart_tags', 'wpf_dev_register_user_profile_smart_tags', 10, 1 );


/**
 * Process the User Smart Tags from the WordPress profile.
 *
 * @link   https://wpforms.com/developers/how-to-create-more-user-smart-tags/
 */

function wpf_dev_process_user_profile_smart_tags( $content, $tag ) {

    $userID = get_current_user_id();

    // Nickname from WordPress profile
    if ( 'wp_nickname' === $tag ) {

        $wp_nickname = get_the_author_meta( 'nickname', $userID );

        // Replace the tag with the nickname pulled from the user's WordPress profile.
        $content = str_replace( '{wp_nickname}', $wp_nickname, $content );

    }

    // Username from WordPress profile
    if ( 'wp_username' === $tag ) {

        $wp_username = get_the_author_meta( 'user_login', $userID );

        // Replace the tag with the username pulled from the user's WordPress profile.
        $content = str_replace( '{wp_username}', $wp_username, $content );

    }

    // Website URL from WordPress profile
    if ( 'wp_url' === $tag ) {

        $wp_url = get_the_author_meta( 'user_url', $userID );

        // Replace the tag with the Website URL pulled from the user's WordPress profile.
        $content = str_replace( '{wp_url}', $wp_url, $content );

    }

    // Current role from WordPress profile
    switch ($tag) {

        case "wp_user_role":
        $user = wp_get_current_user();
        $roles = implode(', ', (array) $user->roles);
        $content = str_replace( '{' . $tag . '}', $roles, $content );
        break;

    }

    // Bio from WordPress profile
    if ( 'wp_user_bio' === $tag ) {

        $wp_user_bio = get_the_author_meta( 'description', $userID );

        // Replace the tag with the user bio pulled from the user's WordPress profile.
        $content = str_replace( '{wp_user_bio}', $wp_user_bio, $content );

    }

    return $content;
}

add_filter( 'wpforms_smart_tag_process', 'wpf_dev_process_user_profile_smart_tags', 10, 2 );
This snippet is adding WP Profile Nickname, WP Profile Username, WP Profile URL, WP Profile User Role, and WP Profile Bio. These Smart Tags we’ll use in our form to pull in the information we already have from the user’s WordPress profile so that they can confirm the information on file.
Creating the form
Now it’s time to create our form so that we can use our new Smart Tags. If you need help in creating a form, please see this article.
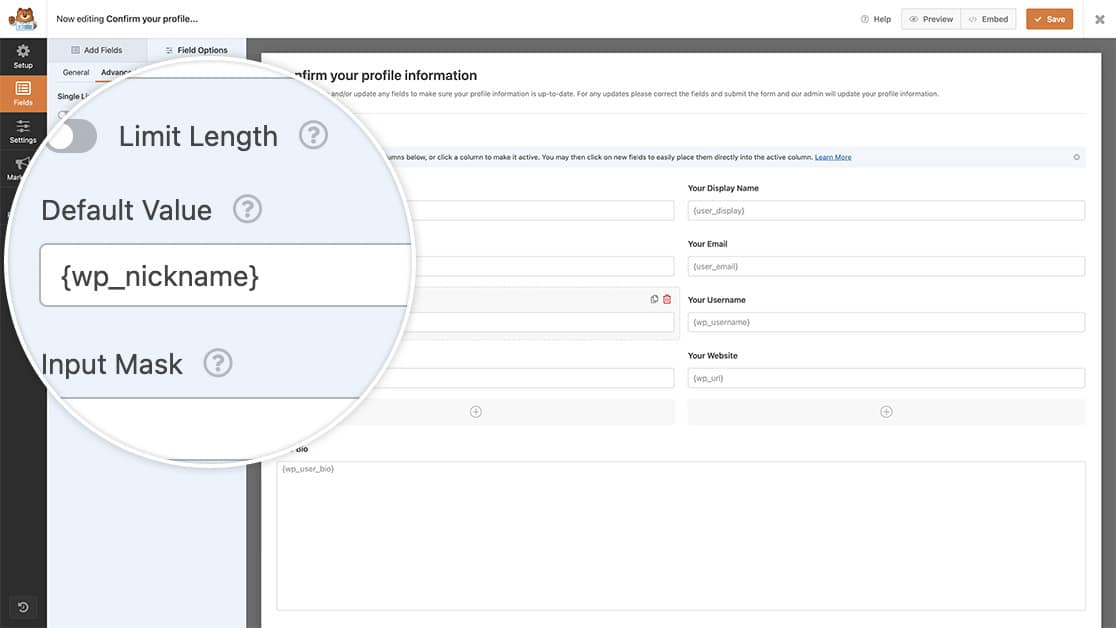
For most of our fields on this form, we’re just adding the Single Line Text form field. Once we’ve added the field and updated the label, click on the Advanced tab. You’ll see the Default Value field, just select the Show Smart Tags and scroll until you find one of the new Smart Tags we just added. Once you’ve selected the correct one, that Smart Tag will display inside the Default Value for our field.

We’ll continue to add our fields and Smart Tags in the same fashion. For the Bio field, we’re going to use the Paragraph Text form field to display the bio, but the steps to add the Smart Tag to the Default Value field are exactly the same as above.
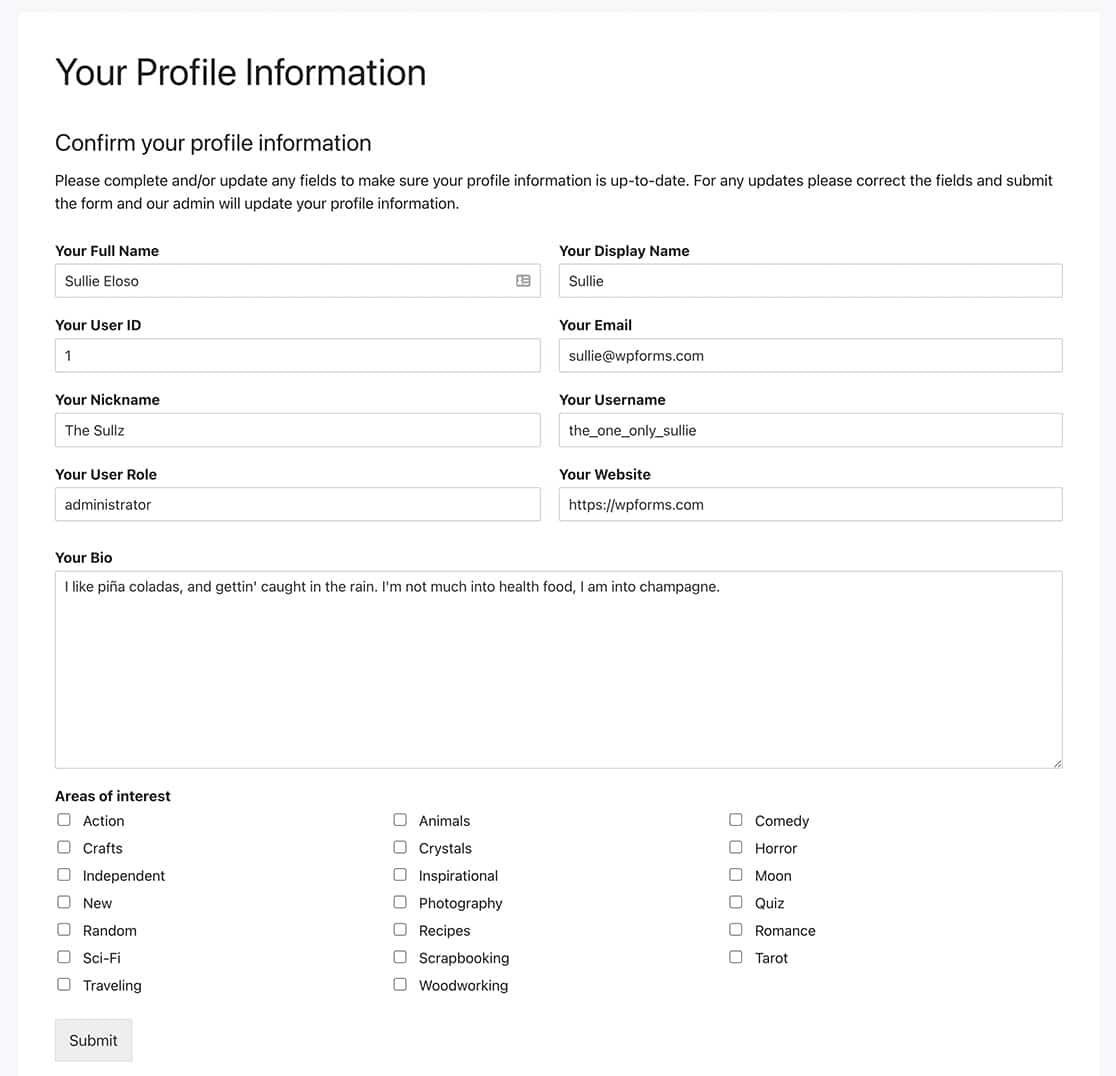
Now when the users visit this form, they’ll see the information is already pulled in for them by default.

You can find more information on creating other Smart Tags by viewing the article on How to Create A Custom Smart Tag.
And that’s all you need in order to create more user Smart Tags with WPForms. Would you like to use those Smart Tags inside an HTML / Code Block? In our tutorial How to Process Smart Tags in HTML Fields, we’ll show you how to use PHP to allow Smart Tags in this type of form field.
Related
Filter References:
