WordPressで加重クイズを作成する方法

他の質問よりも重要だと感じた質問があるクイズを受けたことはありませんか?それが加重クイズの考え方で、各質問の重要度に基づいて異なる点数を割り当てます。

これにより、標準的なクイズよりもはるかに正確に、好み、優先順位、傾向などを測定できます。しかし、ほとんどのクイズプラグインは、性格タイプや合格/不合格の採点のような厳格な形式を強制します。

WPFormsのクイズアドオンを使用すれば、この心配はまったくありません。点数を設定するだけで、プラグインが自動的に残りを処理します。設定方法を正確に説明します。

Create Your Weighted Quiz Now! 🙂

WordPressで加重クイズを作成する方法

必要なもの

開始する前に、以下があることを確認してください:

wpforms クイズアドオン

If you’re still on WPForms Lite, you’ll need to upgrade to a paid license to access the Quiz addon.

Don’t worry, the process takes just a couple of minutes, and you can start building right after.

すべてスキップ!

If you’re short on time (or just don’t want to manually set up every question and weight), you can let the WPForms AI Form Builder handle it for you.

AIでクイズを生成する

From your WordPress dashboard, go to WPForms » Add New. Then, hover over the purple Generate With AI button and click Generate Form.

AIフォームビルダー画面が表示されます。ここで、どのような種類のクイズを作成したいかを説明します。独自のプロンプトを入力するか、左側の提案から選択できます。
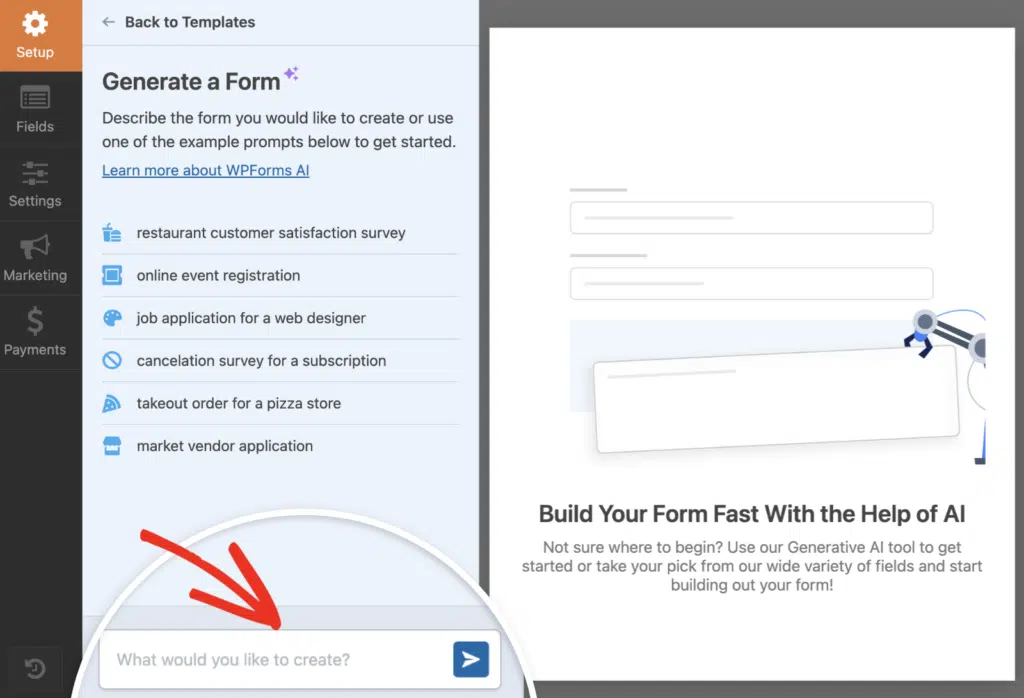
wpforms AI クイズビルダー

Once you hit generate, the AI takes a few seconds to build your quiz. It’ll automatically adds questions and assign weights based on the context you gave it, so you’re not starting from scratch.

そこから、質問を微調整したり、正解を調整したり、ポイント値を変更したりできます。クイズ設定はすでに有効になっているため、実質的にゴールラインから開始することになります。

WPForms AIクイズビルダーをお試しください! 🙂

If you’d rather have full control over every detail, skip this step and follow the manual method instead. Follow the steps below to build your weighted quiz from scratch!

ステップ1:新しいフォームを作成し、クイズモードを有効にする

To get started with your weighted quiz, head to WPForms » Add New from your WordPress dashboard. This opens the form builder where you can create your quiz from scratch.

You’ll see a bunch of templates to choose from. If you want to save time, pick one of the quiz templates. Otherwise, you can start with a Blank Form and build everything yourself.

クイズテンプレート

Once the form builder loads, look at the left panel and click on Settings, then choose Quiz from the menu. You’ll see a big Enable Quiz button right there.

クイズを有効にする

The moment you do that, the form builder changes a bit. You’ll notice new tabs show up at the top of the builder: Questions, Outcomes, Results, and Settings.

  • Questions is where you’ll add your quiz fields.
  • Outcomes lets you set up different result categories.
  • Results gives you a breakdown on quiz responses.
  • And Settings handles things like scoring.

Step 2: Select Weighted Quiz as Your Quiz Type

After you enable quiz mode, WPForms will ask you to pick the type of quiz you want to create. You’ll see three options: Graded Quiz, Personality Quiz, and Weighted Quiz.

Go ahead and click on Weighted Quiz. This sets up a scoring system where each answer gets a numeric weight instead of being marked right or wrong (like a graded quiz) or tied to a personality type.

select weighted quiz type

Once you select it, the Settings tab will update and you’ll see a note to add Checkboxes, Multiple Choice, or Dropdown fields to your form and set the weight for each choice.

プロのヒント:

Before adding fields, jot down your scoring scale (for example, 1–5 or 0–10). Using a consistent range keeps outcome logic simpler and avoids confusing score math later.

Step 3: Add Quiz Questions and Assign Weights

Now it’s time to build the actual quiz. This is where you’ll add your questions and assign weight values to each answer. In the form builder, click the Questions tab at the top.

weighted quiz questions tab

From the left panel, drag a Multiple Choice, Checkboxes, or Dropdown field into your form preview on the right. These are the only field types that support weighted scoring, so stick with one of those three.

Once the field is in place, click on it to open the Field Options panel on the left. In the Field Label box, type your question. Scroll down to the Choices section.

This is where you’ll enter your answer options. Each choice gets its own row. Next to each answer, you’ll see a small input box. That’s where you assign the weight. Enter a number from 0 to 99.

加重クイズの質問

Repeat this process for every quiz question. Add a new field, type the question, add the choices, and assign weights. Make sure every answer has a weight entered.

If you skip one, WPForms won’t be able to calculate the score correctly. Once you’ve added all your questions and set the weights, you’re done with this step. Your quiz is starting to take shape.

プロのヒント:

After adding a few questions, submit the form yourself using test data. This helps you quickly spot missing weights or uneven scoring before you build all remaining questions.

Step 4: Set Up Weighted Quiz Outcomes

Once you’ve assigned points to your quiz questions, the next step is to decide what your users see after they submit their answers.

This is where outcomes come in. They let you show different result messages based on how well someone scored on your weighted quiz.

To get started, click on the Outcomes tab at the top of your form builder. You’ll land on a page that looks like this:

結果タブ

By default, WPForms gives you a Default Outcome with a simple message editor. This is the result message every user will see unless you set up conditional logic to change it based on their score.

I usually start by adding a default message like “You scored {quiz_percentage} on this quiz. Thanks for participating!” Then I build from there.

加重クイズの結果

If you want to show different messages depending on how someone scored (like a personalized “Great job!” for high scores or “Keep practicing!” for lower ones), you’ll need to add more outcomes.

Click the Add New Outcome button near the top of the page. A new outcome block will appear below your default one. Look for the Enable Conditional Logic toggle and switch it on.

enable conditional logic outcome

Keep adding outcomes until you’ve covered all the score ranges you care about. I usually aim for three to five outcomes (low, medium, high, and maybe an “almost there” in between).

上記の結果を設定したものが、ウェブサイトのフロントエンドでどのように表示されるかを示します。メッセージングをどのように改善できるかを確認するために、各結果をテストしてください。

weighted quiz outcome frontend

Step 5: Publish Your Weighted Quiz on WordPress

Once you’re happy with your outcomes, click Save in the top right corner of the form builder. Now, you’re ready to take your quiz live on your website!

Click the Embed button at the top of the form builder. You’ll see two options: add your quiz to an existing page or create a new page from scratch.

新規ページを作成

If you’re creating a new page, go ahead and give it a name that matches your quiz topic. Something like “Product Recommendation Quiz” works well. Then click Let’s Go.

WordPress will open the block editor with your quiz already embedded on the page. Now’s a good time to style things if you want using WPForms’ native black editor styling options.

To make quick work of styling your form, you can select a ready-made theme under the Form Theme section. In this example, I’m using the Jungle theme (which is one of my favorites).

weighted quiz form styling

When you’re happy with how everything looks, click the Publish button at the top right of the editor. Your weighted quiz is now live and ready for visitors to take.

Step 6: View Quiz Results and Analytics

Now that your weighted quiz is live and people are submitting responses, you’ll want to see how they’re doing. This is where the Quiz Addon really shines!

Head back to the form builder and click the Results tab at the top. You’ll see charts right away that break down weight distribution, completion rates, and how people answered each question.

I find this view super helpful when I want to see patterns at a glance, like whether most users scored high or low on a particular scale.

weighted quiz results

To dig deeper, use the Filters option. Click on it, and you can narrow results by date range, weight scale (there’s a slider you can adjust), completion status, or even specific questions and answers.

This comes in handy when you want to compare performance over time or focus on a certain group of respondents. I’ve used this feature when running seasonal quizzes to see how answers shift month to month.

quiz results filter options

You can also customize how each chart looks. Click the gear icon on any chart to change the graph style (you’ve got bar, pie, line, and column options), adjust colors, or resize the chart to fit your dashboard better.

Once you’ve set up your charts the way you like them, you’ll have a clear view of how your quiz is performing. This makes it easy to tweak questions, adjust weights, or change your scoring logic if something doesn’t look right.

FAQs on How to Create a Weighted Quiz in WordPress

I get a lot of questions about weighted quizzes, so I’ve put together answers to the most common ones below.

Which WPForms license do I need to create weighted quizzes?

You’ll need WPForms Pro or higher to access the Quiz Addon. If you’re currently on a lower-tier license, you can upgrade from your WPForms account dashboard.

Can I use any field type for weighted quiz questions?

No, only certain field types support weighted scoring. You can assign weights to Multiple Choice, Checkboxes, and Dropdown fields.

Other field types like text fields or file uploads won’t work for weighted questions since they don’t have predefined answer choices to assign points to.

How do I assign different weights to answer choices?

Click on the field you want to turn into a weighted question, then go to the Choices section in Field Options. You’ll see a Show Values toggle. Turn that on, and you’ll get a new column next to each choice.

Enter the point value you want for each answer in that column. So if one answer should be worth 10 points and another worth 5, just type those numbers in.

What is the weight range for answers in a weighted quiz?

You can assign any positive or negative number as a weight. There’s no hard limit, so you could use 1-10, 0-100, or even negative values if you want to deduct points for certain answers.

That said, I usually stick with simple ranges like 1-5 or 1-10. It makes the math easier when you’re setting up outcome messages based on score ranges.

Can I show different outcome messages based on weighted scores?

Yes, and it’s one of my favorite features. After you enable quiz mode and select Weighted as the quiz type, you can set up custom messages in the Outcomes tab.

For each outcome, you define a score range with greater than and less than operators and create a personalized message.

How do I filter weighted quiz results by score range?

Head to WPForms » Entries and select your weighted quiz form. At the top right side of the entries list, you’ll see a Filters button.

Click it and choose the score range you want to view. This is super helpful when you need to follow up with people who scored in a specific range, like low scores that might need extra attention.

Can I use WPForms AI to generate a weighted quiz?

Yes, you can ask the AI form builder to create a weighted quiz for you.

When you’re describing your form to the AI, mention that you want a weighted quiz and include details about the scoring.

For example, you could say “Create a weighted customer satisfaction quiz with 5 questions, scoring from 1-10 points per answer.”

The AI will build the basic structure, though you might still want to tweak the weights and outcomes afterward.

Next, Learn How to Create a Graded Quiz in WordPress

Once you’ve mastered weighted quizzes, you might want to explore other quiz types. A graded quiz works differently, where you mark responses as correct or incorrect and calculate a final score.

It’s perfect for testing knowledge, creating certification exams, or running training assessments. If that sounds useful, check out our guide on how to build a graded quiz for your WordPress website.

WordPressフォームを今すぐ作成

フォームの作成準備はできましたか?最も簡単なWordPressフォームビルダープラグインで今日から始めましょう。WPForms Proには多くの無料テンプレートが含まれており、14日間の返金保証が付いています。

この記事がお役に立った場合は、FacebookTwitterでフォローして、WordPressの無料チュートリアルやガイドをさらにご覧ください。

開示:当社のコンテンツは読者によってサポートされています。これは、一部のリンクをクリックすると、手数料が発生する可能性があることを意味します。WPFormsがどのように資金調達されているか、なぜそれが重要なのか、そしてどのように私たちをサポートできるかをご覧ください

ハムザ・シャヒド

ハムザはWPFormsチームのライターであり、デジタルマーケティング、サイバーセキュリティ、WordPressプラグイン、ERPシステムに関連するトピックも専門としています。もっと詳しく知る

最高のWordPressドラッグアンドドロップフォームビルダープラグイン

簡単、高速、安全。WPFormsを信頼する600万人以上のウェブサイト所有者に加わりましょう。