
Resumo de IA
Com que frequência você lê avaliações e depoimentos antes de comprar um produto ou serviço? Provavelmente com bastante frequência. Eu também! A prova social pode ter um grande impacto, mas você sabia que é bem fácil adicioná-la ao seu próprio site? Com apenas algumas ferramentas, você pode coletar depoimentos de clientes e exibi-los em seu site.
Neste post, mostrarei como você pode criar formulários de depoimento personalizados e exibir suas avaliações em seu site em 3 etapas fáceis.
Crie Seu Formulário de Depoimento WordPress Agora
Colete Depoimentos de Clientes a Partir de Envio de Formulários do WordPress
Sei que seu tempo é valioso e você quer ir direto ao ponto, então aqui está um breve resumo do meu processo para exibir depoimentos e avaliações autênticas de clientes.
Veja como são apenas 3 etapas para configurar isso? Estou entrando em muitos detalhes sobre cada uma delas para que seja mais fácil para você acompanhar, mas assim que você pegar o jeito, verá que realmente leva apenas alguns minutos.
Vamos lá!
O Que Você Precisará Para Este Tutorial
Meu processo é super fácil, mas você precisará instalar os 2 seguintes plugins:
- WPForms: Claro, eu posso ser parcial, mas o WPForms é o plugin de criação de formulários mais fácil que já usei. Posso criar um formulário de coleta de feedback do usuário em menos de 2 minutos, e é exatamente isso que precisamos fazer aqui.
- Reviews Feed by Smash Balloon: Você não pode usar este plugin apenas para exibir avaliações que recebe das redes sociais, mas ele também se integra ao WPForms para permitir que você colete facilmente avaliações diretamente em seu site.
Depois de ter ambos os plugins baixados e instalados em seu site, volte e começaremos.
Etapa 1: Crie um Formulário de Depoimento no WPForms
A primeira coisa que precisamos fazer é criar um formulário de depoimento no WPForms. Felizmente, isso não levará muito tempo, pois existem vários modelos disponíveis para acelerar o processo.
Primeiro, com seu painel do WordPress aberto, navegue até WPForms » Adicionar Novo.
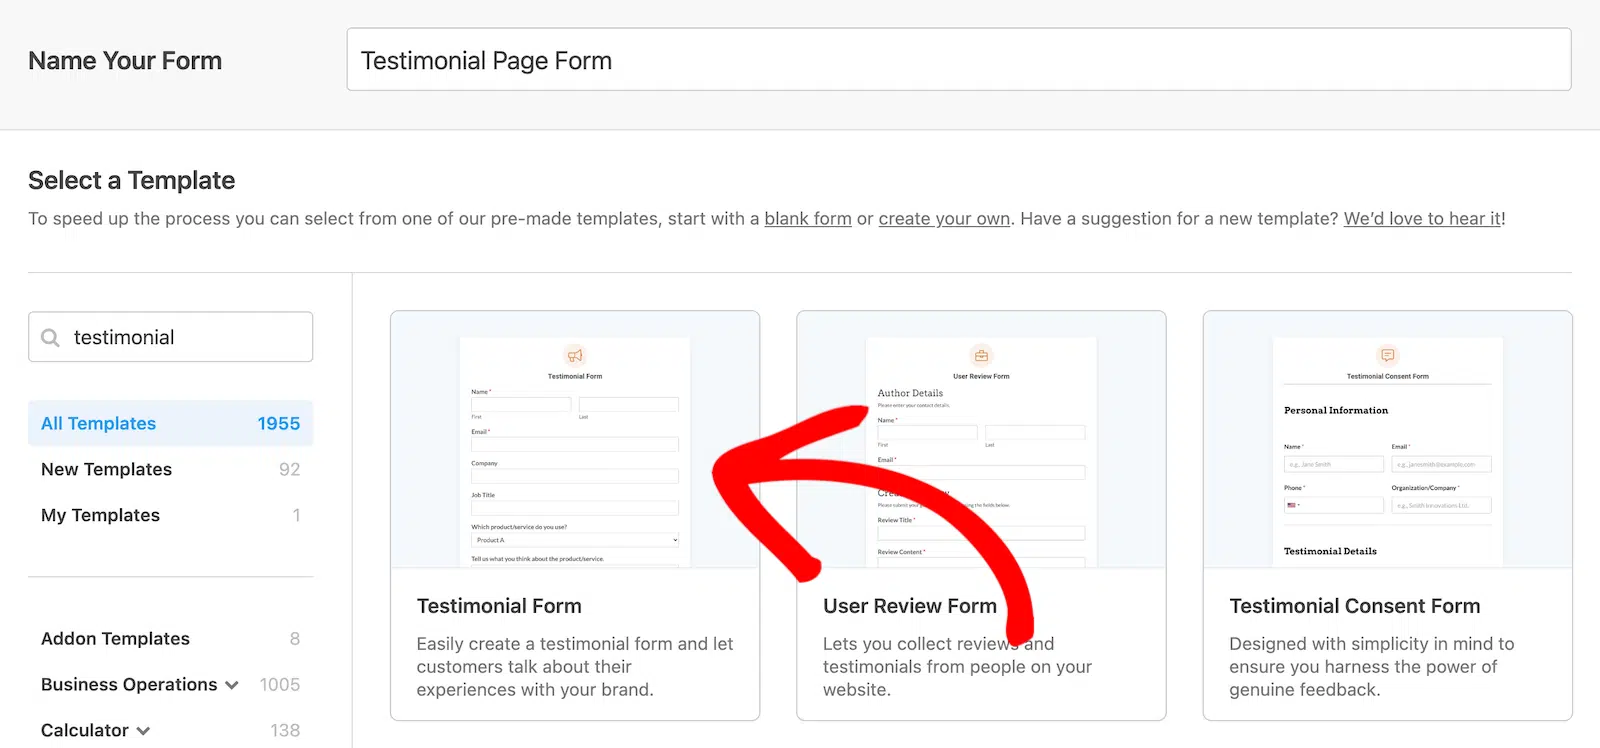
O construtor de formulários será aberto e pedirá para você nomear seu formulário e começar com um formulário em branco ou selecionar um modelo de formulário. Você pode pesquisar por formulários de depoimento e várias opções aparecerão.
Estou usando o modelo chamado Formulário de Depoimento para todos os exemplos neste guia, mas escolha o que fizer mais sentido para o seu site!
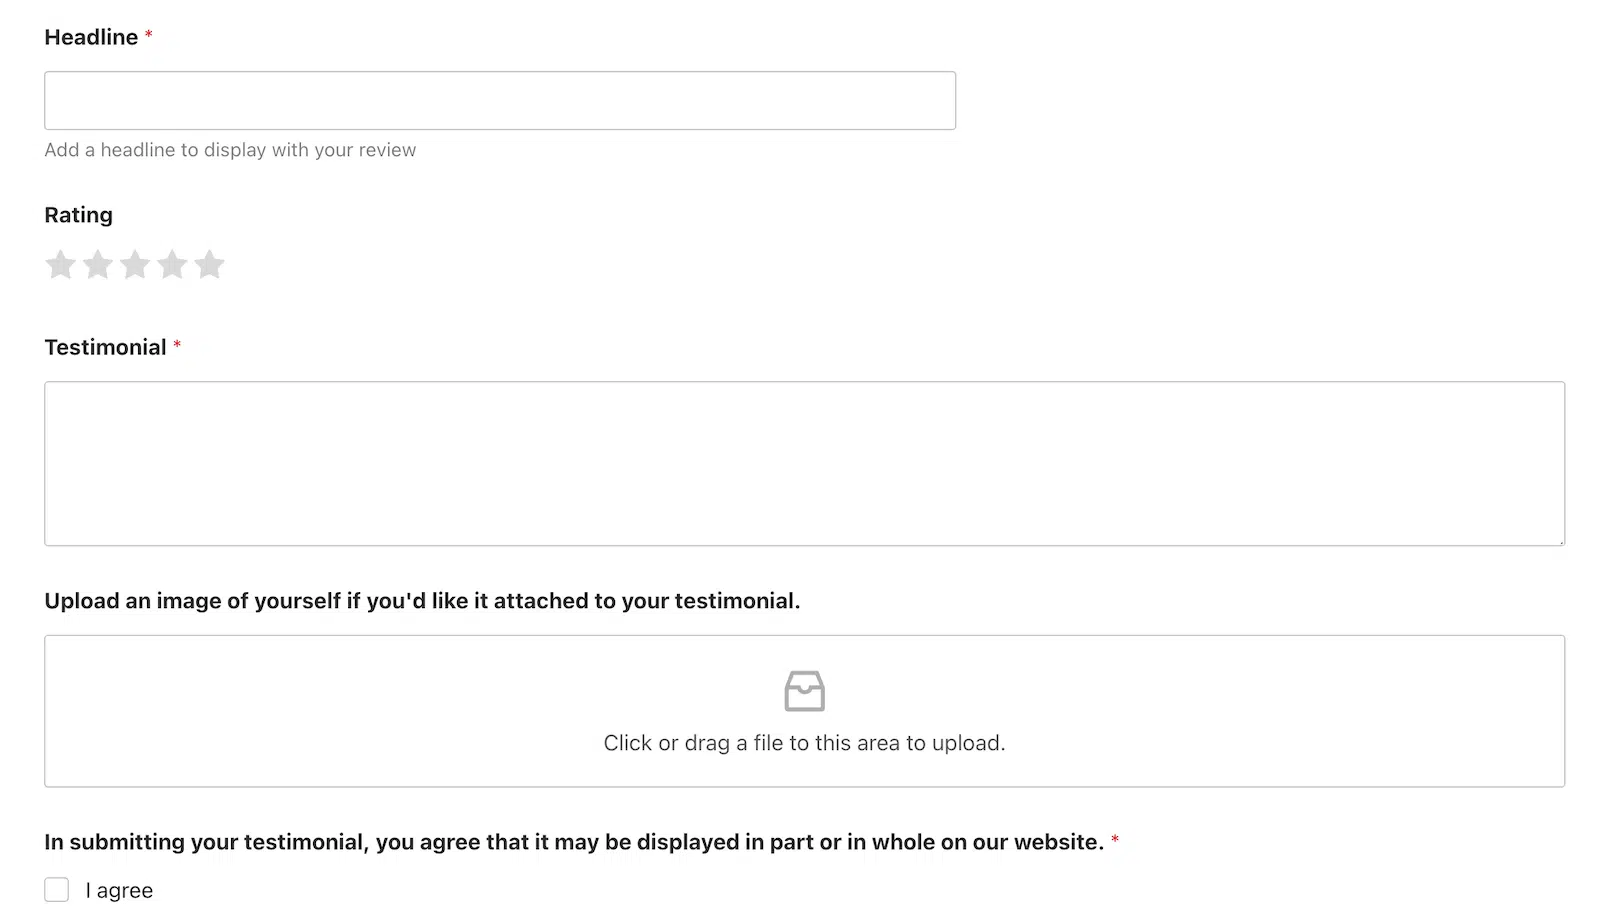
Todos os modelos do WPForms são 100% personalizáveis, então você pode usá-los como estão ou torná-los seus. Pensando no conteúdo do depoimento que quero exibir, farei algumas alterações em meu formulário da seguinte forma:
- Remova a lista suspensa para “Qual produto/serviço você usa?”
- Remova os botões de rádio para “Podemos publicar seu depoimento em nosso site?”
- Altere o título do campo de texto do parágrafo de “Conte-nos o que você pensa sobre o produto/serviço” para “Depoimento”.
- Adicione um campo de texto de linha única com o título “Manchete”.
- Adicione um campo de classificação.
- Adicione uma caixa de seleção na parte inferior que os usuários devem marcar para reconhecer que os depoimentos podem ser publicados.
Este é o aspecto da metade inferior do meu formulário agora, após fazer essas atualizações.
Fácil, né? Começar com um modelo definitivamente acelera o processo. Todo o processo levou apenas cerca de 2 minutos para mim. Se você demorou um pouco mais, não se preocupe. Assim que você estiver mais familiarizado com o construtor de formulários, você estará voando como ninguém! 🙂
Se você quiser ir um pouco mais longe, também pode clicar em Configurações no menu esquerdo e configurar quaisquer configurações que desejar.
- Geral: Atualize o nome do formulário, descrição, tags, texto do botão e CSS
- Proteção contra Spam e Segurança: Ative a proteção contra spam usando ferramentas integradas do WPForms, reCAPTCHA, hCaptcha, Captcha Personalizado ou Akismet.
- Notificações: Configure os e-mails de notificação que são enviados quando alguém envia seu formulário.
- Confirmações: Faça ajustes em como e onde os usuários veem as confirmações de envio.
Quando estiver satisfeito, vá em frente e incorpore seu formulário em seu site para que ele possa começar a coletar esses valiosos depoimentos!
Etapa 2: Conecte o WPForms ao Feed de Avaliações e Colete Depoimentos de Clientes
O plugin Reviews Feed da Smash Balloon tornará muito fácil para você publicar os depoimentos ou avaliações que coletar através do seu formulário. Há apenas um pouco de configuração a fazer primeiro. Não se preocupe. Eu vou te mostrar!
Primeiro, no seu painel do WordPress, navegue até Reviews Feed » Coleções. Clique em Adicionar Novo.

Depois de clicar no botão Adicionar Novo, você receberá um prompt para dar um nome à sua nova coleção. Isso é apenas para uso interno, então você pode nomeá-la como quiser. Idealmente, será algo que indique o que está em sua coleção. Eu nomeei a minha Depoimentos.

Após nomear sua coleção, clique no botão Criar Coleção.
A próxima tela que você verá parecerá que você deveria estar vendo avaliações lá. Você verá, mas precisamos conectá-las primeiro! Para fazer isso, clique no botão Conectar um Formulário na parte superior.
A próxima tela inclui um menu suspenso de todos os seus formulários no WPForms para que você possa selecionar aquele que deseja usar.
Há também uma opção para criar um novo formulário a partir de um modelo se você ainda não tiver um.
Como criei meu formulário na primeira etapa, vou selecionar aquele no menu suspenso e clicar em Conectar.

Após conectar o formulário, posso decidir se adiciono ou não regras para aprovação automática ou exclusão automática.
Este é um recurso útil se você quiser exibir apenas certas regras, como talvez apenas 5 estrelas ou 3 estrelas e acima. É totalmente com você! Se você não quiser usar nenhuma regra automática, não precisa. Para o meu formulário, quero adicionar depoimentos manualmente à minha coleção, então não vou fazer nada com as regras.
Agora seu formulário está pronto para começar a coletar depoimentos que você pode adicionar à sua coleção!
Quero compartilhar algo que aprendi aqui para que você esteja preparado para isso. Isso se aplicará se, como eu, você decidir selecionar o conteúdo manualmente para sua coleção em vez de usar as regras para fazer isso automaticamente.
Se você for para sua página de Coleções e não vir nenhuma avaliação ou depoimento lá, não entre em pânico! (Dá para perceber que eu definitivamente entrei em pânico?)

Aqui você pode ver que há um formulário conectado, mas nada em termos de avaliações. Lembre-se, a menos que você defina uma regra para aprovação automática, você terá que adicionar avaliações manualmente à sua coleção. Felizmente, esse processo é tão fácil que você esquecerá que já entrou em pânico. Novamente, falando por experiência própria.
Primeiro, nessa tela, clique no botão Envio de Formulário.

Agora você pode ver os depoimentos que recebeu através do formulário em seu site. Você provavelmente já adivinhou, mas se quiser adicionar o depoimento à sua coleção, basta clicar no botão Adicionar à Coleção.
Agora, se você voltar para sua página de Coleções, verá os depoimentos que adicionou.

Então, agora você provavelmente está se perguntando como realmente fazer essas avaliações serem exibidas em seu site. Vamos em frente!
Etapa 3: Exiba Coleções de Avaliações e Depoimentos em Seu Site
Coleções preenchem Feeds, e o Feed é o que você mostrará em seu site. No seu painel do WordPress, navegue até Feed de Avaliações » Todos os Feeds.
Clique no botão Adicionar Novo.

Agora vou selecionar as fontes que preencherão meu feed. No meu caso, é minha coleção de Depoimentos.

Se você conectar seu plugin Feed de Avaliações a outras fontes, como plataformas de mídia social, Google, Yelp e assim por diante, você também pode incluí-las. Você pode adicionar várias coleções ao seu feed.
Depois de selecionar as coleções que deseja incluir, clique em Avançar.
Agora você pode escolher o modelo que deseja usar para como as avaliações serão exibidas. Existem várias opções. Escolha o que funciona melhor para o seu site. Vou usar os Cartões Simples.

O Smash Balloon fará sua mágica por alguns segundos e então você verá seu feed. Pense nisso como um rascunho. Você pode personalizá-lo com todas as opções à esquerda. Quando estiver do seu agrado, procure o botão Incorporar na parte superior (não custa nada salvá-lo primeiro também).

Quando você clica em Incorporar, você obtém opções. Quem não ama opções?
Você obtém um shortcode que pode copiar e colar onde quiser para publicar seu feed.

Copiei o shortcode, abri a página onde queria publicar minhas avaliações e o adicionei a um bloco de shortcode no Editor de Blocos do WordPress. Agora tenho um belo feed de avaliações publicado em meu site.

E se alguém quiser deixar um depoimento, pode clicar no botão Escrever um Depoimento e ir direto para o formulário conectado que está coletando os testemunhos.
E é isso! Agora você sabe como coletar depoimentos de clientes com um formulário personalizado e exibi-los em seu site. Bom trabalho!
Em seguida, Saiba Como Gerenciar Suas Faturas no WordPress
Após este tutorial, você está a caminho de se tornar um usuário avançado. E se você administra um negócio onde coleta depoimentos, há uma boa chance de que também esteja gerenciando faturas. Você está procurando maneiras de fazer isso no WordPress? Se sim, confira nosso post para aprender 2 maneiras de faturar de forma mais inteligente, não mais difícil.
Você gerencia eventos para o seu negócio? Se sim, você também vai querer conferir nosso guia para usar o Campo Repetidor do WPForms e o Google Sheets para otimizar o gerenciamento de eventos.
Crie seu formulário WordPress agora
Pronto para criar seu formulário? Comece hoje mesmo com o plugin de criação de formulários WordPress mais fácil. WPForms Pro inclui muitos modelos gratuitos e oferece uma garantia de devolução do dinheiro em 14 dias.
Se este artigo ajudou você, por favor, siga-nos no Facebook e Twitter para mais tutoriais e guias gratuitos do WordPress.


Olá
Tenho o WPForms e gostaria de saber se a solução acima também funciona com o plugin Strong Testimonials?
Olá Peter,
Atualizamos este artigo para usar o plugin Strong Testimonials.
isso é grátis ou licenciado
Olá Satyendra - O Addon de Pós-Submissão está disponível com licenças Pro e Superiores.
Caso ajude, por favor, consulte a tabela comparativa completa de cada nível de licença e os recursos e addons associados a ela.
Além disso, aqui está um documento sobre comparação Lite vs Pro.
Espero que ajude 🙂
Olá! O formulário de feedback está planejado através de um questionário com emoticons. pergunta. Você poderá enviar imagens / sorrisos para a avaliação?
Olá Maksim,
Atualmente, não temos um recurso integrado para enviar imagens/emojis para a postagem. Concordo que seria super útil e adicionei seu voto para considerar este recurso como uma melhoria para o futuro.
Enquanto isso, caso ajude, aqui está um guia para configurar campos meta personalizados
Espero que ajude 🙂
O plugin Easy Testimonial não está mais disponível. Sugestões?
Olá Lawrence, obrigado por notar isso. Nossa equipe atualizará o tutorial assim que pudermos. Enquanto isso, considere conferir este artigo de revisão sobre os melhores plugins de depoimentos para WordPress para ajudá-lo a decidir.
Olá Lawrence, obrigado novamente por nos informar. Atualizamos o artigo com informações novas e o tutorial agora usa Strong Testimonials. Espero que isso ajude!
Preciso de uma maneira de permitir apenas que usuários logados / usuários com contas possam enviar uma avaliação. Isso é possível nesta configuração?